
6. Masks and Channels
Lesson overview
In this lesson, you’ll learn how to do the following:
Create a mask to remove a subject from a background.
Refine a mask to include complex edges.
Create a quick mask to make changes to a selected area.
Edit a mask using the Properties panel.
Manipulate an image using Puppet Warp.
Save a selection as an alpha channel.
View a mask using the Channels panel.
Load a channel as a selection.
Create a pattern by drawing a star-shaped vector graphic with rounded corners.

This lesson will take about an hour to complete. To get the lesson files used in this chapter, download them from the web page for this book at adobepress.com/PhotoshopCIB2023. For more information, see “Accessing the lesson files and Web Edition” in the Getting Started section at the beginning of this book.
As you work on this lesson, you’ll preserve the start files. If you need to restore the start files, download them from your Account page.

PROJECT: PODCAST EPISODE GRAPHICS
Photography © Andrew Faulkner
Use masks to isolate and manipulate specific parts of an image. The cutout portion of a mask can be altered, but the area surrounding the cutout is protected from change. You can create a temporary mask to use once, or you can save masks for repeated use.
Working with masks and channels
Out of the camera, a digital image is an opaque rectangle. To combine part of that image with others, you hide the area outside the subject. Or you might want to apply an adjustment layer or filter only to certain areas of a layer. The recommended way to do both is by using a mask, a way to mark areas of a layer as transparent.
![]() Tip
Tip
The way masks work is similar to applying masking tape to panes or wall trim before you paint a house: Masked areas are protected from being changed.
Using a mask is more useful than deleting unwanted areas of a layer, because it’s reversible: For example, if you notice that you accidentally trimmed off part of the subject, a mask lets you restore the trimmed area to correct the mistake.
In addition to color channels, an image can contain alpha channels, useful for saving and reusing selections and marking transparent areas for an entire document.
It can be challenging to paint or draw a mask or channel edge that precisely follows a nonsharp border of a subject, such as fuzzy hair. Photoshop provides automated tools to help you quickly create complicated selections and masks.
![]() Note
Note
Masks and alpha channels don’t print and aren’t visible; you see their effects only on visible layers.
Getting started
First, you’ll view the image that you’ll create using masks and channels.
Start Photoshop, and then simultaneously hold down Ctrl+Alt+Shift (Windows) or Command+Option+Shift (macOS) to restore the default preferences. (See “Restoring default preferences” on page 5.)
When prompted, click Yes to delete the Adobe Photoshop Settings file.
Choose File > Browse In Bridge to open Adobe Bridge.
 Note
NoteIf Bridge isn’t installed, the File > Browse In Bridge command in Photoshop will start the Creative Cloud desktop app, which will download and install Bridge. After installation completes, you can start Bridge.
Click the Favorites tab on the left side of the Bridge window. Select the Lessons folder, and then double-click the Lesson06 folder in the Content panel.
Study the 06End.psd file. To enlarge the thumbnail so that you can see it more clearly, move the thumbnail slider at the bottom of the Bridge window to the right.
In this lesson, you’ll create a graphic for a podcast. The model was photographed in front of a different background. You’ll use Select And Mask to quickly isolate the model over the final background. You’ll also tilt the model’s head up a little more and create a pattern for the background.
![]() Note
Note
If Photoshop displays a dialog box telling you about the difference between saving to Cloud Documents and On Your Computer, click Save On Your Computer. You can also select Don’t Show Again, but that setting will deselect after you reset Photoshop preferences.
Double-click the 06Start.psd thumbnail to open it in Photoshop. Click OK if you see an Embedded Profile Mismatch dialog box.
Choose File > Save As, rename the file to 06Working.psd, and click Save. Click OK if the Photoshop Format Options dialog box appears.
Saving a working version of the file lets you return to the original if you need it.
Using Select And Mask and Select Subject
Photoshop provides a set of tools focused on creating and refining masks, collected in a task space called Select And Mask. Inside Select And Mask, you’ll use the Select Subject tool to get a fast head start on the mask that will separate the model from the background. Then you’ll refine the mask using other Select And Mask tools, such as the Quick Selection tool.
![]() Tip
Tip
When any selection tool is active, the Select And Mask button is available in the options bar. You can choose Select > Select and Mask when the Select and Mask button is not shown.
In the Layers panel, make sure both layers are visible and the Model layer is selected.
Choose Select > Select And Mask.
Select And Mask opens with the image. A semitransparent “onion skin” overlay indicates masked areas. For now, the checkerboard pattern covers the entire image, because you haven’t yet identified the areas to unmask.
![]() Tip
Tip
The first time you use Select And Mask, a tutorial tip may pop up. You may view it before you continue with the lesson, or you can click Later or Close.
![]() Tip
Tip
For more help making selections, refer to Lesson 3, “Working with Selections.”
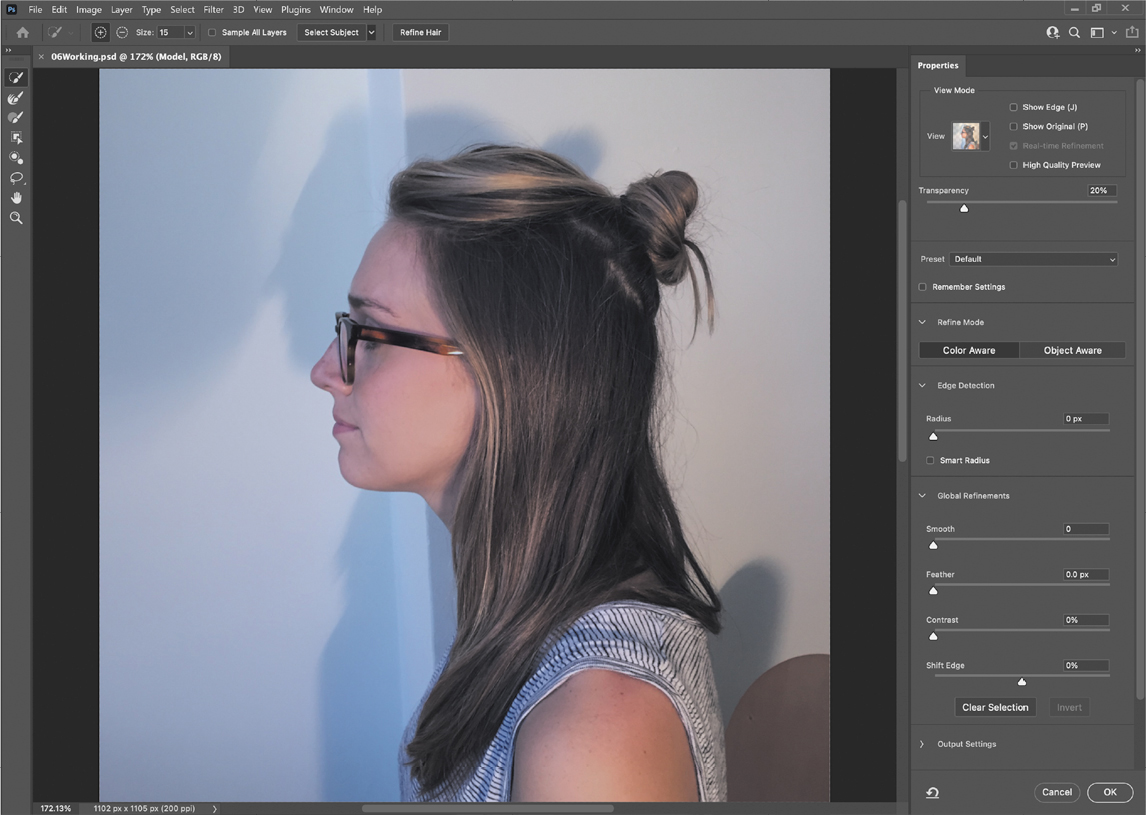
Click the View menu in the View Mode section of the Properties panel, and choose Overlay. The masked area is now shown as a semitransparent red color instead of the onion skin checkerboard. It’s solid because nothing is masked yet.
 Tip
TipWhen a selection tool is active, you can enter Select And Mask by clicking the Select And Mask button in the options bar instead of having to find the command in the menus.
 Tip
TipQuickly cycle through the View Modes by pressing the F key. Viewing different modes helps you spot selection mistakes that might not be obvious in other modes.
The different View Modes are provided so that you can see the mask more easily over various backgrounds. In this case, the red overlay will make it easier to see missed areas and edges where loose hair isn’t properly masked.
In the options bar, click the Select Subject button.
NoteIn the Select Subject button drop-down list, you can choose where to process the selection. Cloud processing may produce better results, using a larger machine learning model on a powerful remote computer. Processing on your device is usually faster. Changing this setting affects the next image only; you can set this permanently in the Image Processing panel of the Preferences dialog box.

Using advanced machine learning technology, the Select Subject feature is trained to identify typical subjects of a photo, including people, animals, and objects, and then create a selection for them. The selection may not be perfect, but it’s often close enough for you to refine easily and rapidly with other selection tools.
Click the View menu in the View Mode section of the Properties panel, and choose Black & White. This View Mode helps make the mask edge easier to see.
TipYou don’t have to be in the Select And Mask dialog box to use the Select > Subject command. It’s available even when a selection tool is not active. Also, it’s OK to use Select Subject first and then enter Select And Mask to refine the selection.
In the Properties panel, expand the Refine Mode if needed, and click Color Aware. If a message appears, click OK. The mask edge changes.
The two Refine Modes interpret potential subject edges differently. Color Aware can work well on simple backgrounds like the one in this lesson. Object Aware may work better on more complex backgrounds. If you want to compare the two results, choose Edit > Toggle Last State to switch between them.
Click the View menu in the View Mode section of the Properties panel, and choose Overlay to better compare the edge to the actual image.
Notice that there are a few areas over the chest that were missed by Select Subject. You can easily add them to the selection using the Quick Selection tool.
Make sure the Quick Selection tool (
 ) is selected. In the options bar, set up a brush with a size of 15 px.
Drag the Quick Selection tool over the missed areas (without extending into the background) to add the missed areas to the selection. Notice that the Quick Selection tool fills in the selection as it detects content edges, so you don’t have to be exact. It’s okay if you release the mouse button and drag more than once.
TipWhen editing a selection, increase the magnification if it helps you see missed areas.
Where you drag teaches the Quick Selection tool which areas should be revealed and are not part of the mask. Do not drag the Quick Selection tool over or past the model’s edge to the background, because this teaches the Quick Selection tool to include part of the background in the mask, and you don’t want that. If you accidentally add unwanted areas to the mask, either choose Edit > Undo or reverse the edit by painting over it with the Quick Selection tool in Subtract mode. To enable Subtract mode for the Quick Selection tool, click the Subtract From Selection icon (![]() ) in the options bar.
) in the options bar.
As you drag the Quick Selection tool over the model, the overlay disappears from the areas that you are marking to be revealed. Don’t worry about total perfection at this stage.
![]() Tip
Tip
You can adjust the opacity of the onion skin by dragging the Transparency slider under the View Mode options.
Click the View menu in the View Mode section again, and choose On Layers. This shows you how the current Select And Mask settings look over any layers that are behind this layer. In this case, you’re previewing how the current settings will mask the Model layer over the Episode Background layer.

Inspect the edges around the model at a high magnification, such as 400%. Some of the original light background may still show between the model’s edge and the podcast background, but overall the Select Subject and Quick Selection tools should have created clean edges for the shirt and face. Don’t be concerned about edge gaps or imperfect hair edges, because you’ll take care of those next.
Refining a mask
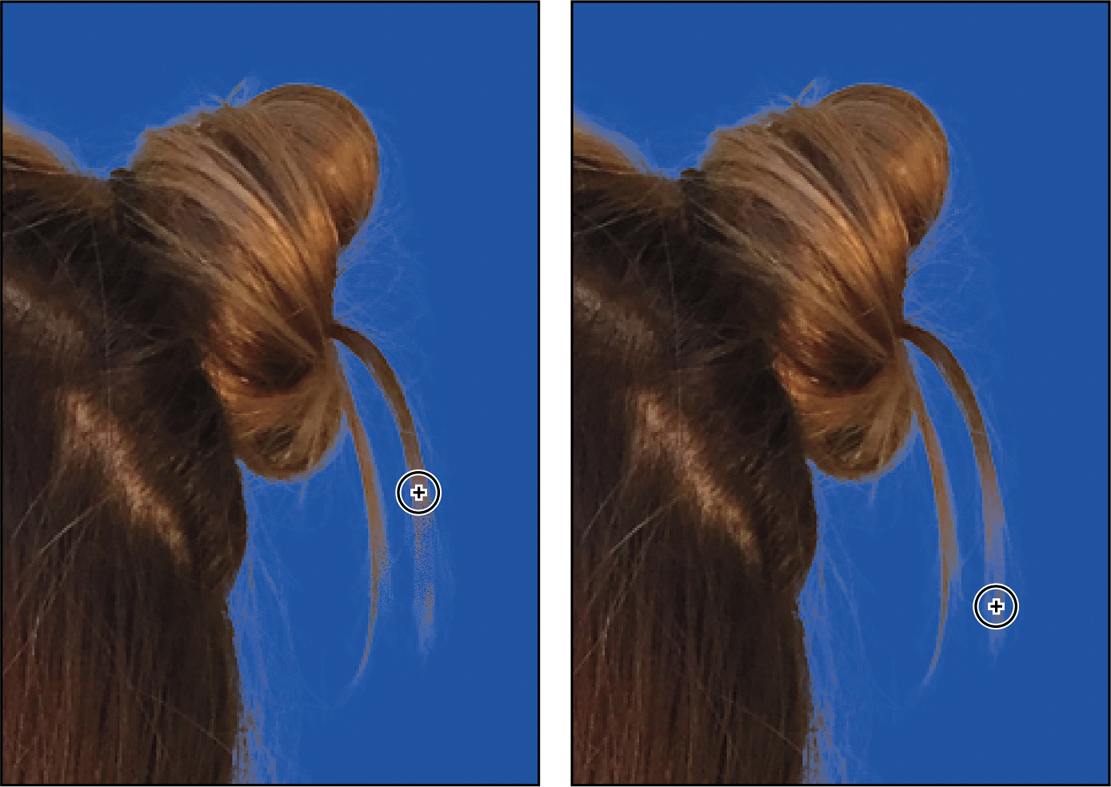
The mask is pretty good so far, but Select Subject didn’t quite capture all of the model’s hair. For example, some of the strands coming off of the bun on the back of the model’s head are discontinuous. In Select And Mask, the Refine Edge Brush tool is designed to mask edges with challenging details.
At a magnification of 300% or higher, inspect the hair edges at the back of the model’s head.

Select the Refine Edge Brush tool (
 ). In the options bar, set up a brush with a size of 20 px and Hardness of 100%. Tip
If you use a tool to make the initial selection (instead of Select Subject), click the Refine Hair button. It should result in less manual brushing with the Refine Edge Brush tool.

Drag the Refine Edge Brush tool between the hair bun and the ends of the hair, where the selection needs to be improved. As you drag the Refine Edge Brush tool over the hair edge, you should see that the missing hair strands falling from the bun are now included in the visible areas.
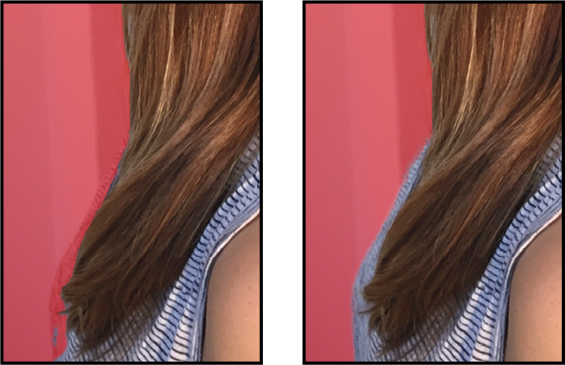
Scroll down to the loop of hair that falls over the back of the shirt.
Select Subject correctly masked the background inside the hair loop. However, a more subtle hole above still needs to reveal the podcast background, so you’ll use the Refine Edge Brush to add that hole to the mask.
In the options bar, set up a Refine Edge brush with a size of 15 px, with a Hardness of 100%.
Drag the Refine Edge Brush tool over the enclosed area that should be transparent. Gaps in the hair should become masked as transparent, and fine hairs are added to the visible edge.

Click the View option, and choose Black & White to more clearly evaluate the current mask edge. Inspect the mask at different magnifications. When you’re done, choose View > Fit On Screen. Black areas indicate transparency.

If you see hairs or other details that are masked but should be visible, drag the Refine Edge brush over them. The finer the details you want to mask, the smaller you should set the Refine Edge brush size. It’s okay if the brush size is slightly larger than the details you want to mask, and you don’t have to drag the Refine Edge Brush tool precisely.
![]() Tip
Tip
Gray pixels should appear only in transitional edges of a mask. All areas fully outside the subject should be solid black, and all areas fully inside should be solid white.
If you see Refine Edge Brush tool mistakes that need to be erased, such as inner areas incorrectly added to the mask, drag the Refine Edge Brush tool over the mistakes while holding down the Alt (Windows) or Option (macOS) key.
If you see individual spots or discrete areas that need to be fully visible or fully transparent, you can paint them out using the Brush tool, the third one down in the toolbox. To make areas visible, paint them with white; to make areas hidden, paint them with black. You can also drag the Lasso tool to enclose any areas you want to add, subtract, or intersect with the mask, depending on its mode in the options bar.
![]() Tip
Tip
A quick way to remember what color to paint in a mask is the phrase “black conceals, white reveals.”
Adjusting Global Refinements
At this point the mask is in good shape but needs to be tightened up a little. You can tune the overall appearance of the mask edge by adjusting the Global Refinements settings.
Click the View menu in the View Mode section of the Properties panel, and choose On Layers. This lets you preview adjustments over the Episode Background layer, which is behind the Model layer.
In the Global Refinements section, move the sliders to create a smooth, unfeathered edge along the face. The optimal settings depend on the selection you created, but they’ll probably be similar to ours. We moved the Smooth slider to 1 to reduce the roughness of the outline, Contrast to 20% to sharpen the transitions along the selection border, and Shift Edge to −15% to move the selection border inward and help remove unwanted background colors from selection edges. (Adjusting Shift Edge to a positive number would move the border outward.)
NotePay attention to details while using Global Refinements. For example, if you adjust Smooth and the mask edge starts to round corners or grind down important details, that means Smooth is set too high. Similarly, setting Feather too high can create unsightly halos along the edge.

Take one more look at this preview of the current mask over the background layer, and make any remaining corrections as needed.
Completing the mask
When you’re satisfied with the mask preview, you can create its final output as a selection, a layer with transparency, a layer mask, or a new document. For this project, we want to use this as a layer mask on the Model layer, which was selected when you entered Select And Mask.
![]() Tip
Tip
If you mask many images that need similar settings, click the Preset menu and choose Save Preset to create a named preset of Select and Mask properties that you can apply at any time.
If the Output Settings are hidden, click the disclosure icon (
 ) to reveal them.
Zoom in to 200% or more so that you can more easily see the light fringing around the face edge that’s due to the Model layer’s original background color seeping in behind the mask.
Select Decontaminate Colors to suppress those color fringes. If Decontaminate Colors creates unwanted artifacts, reduce the Amount until the effect looks the way you want. We set Amount to 25%.
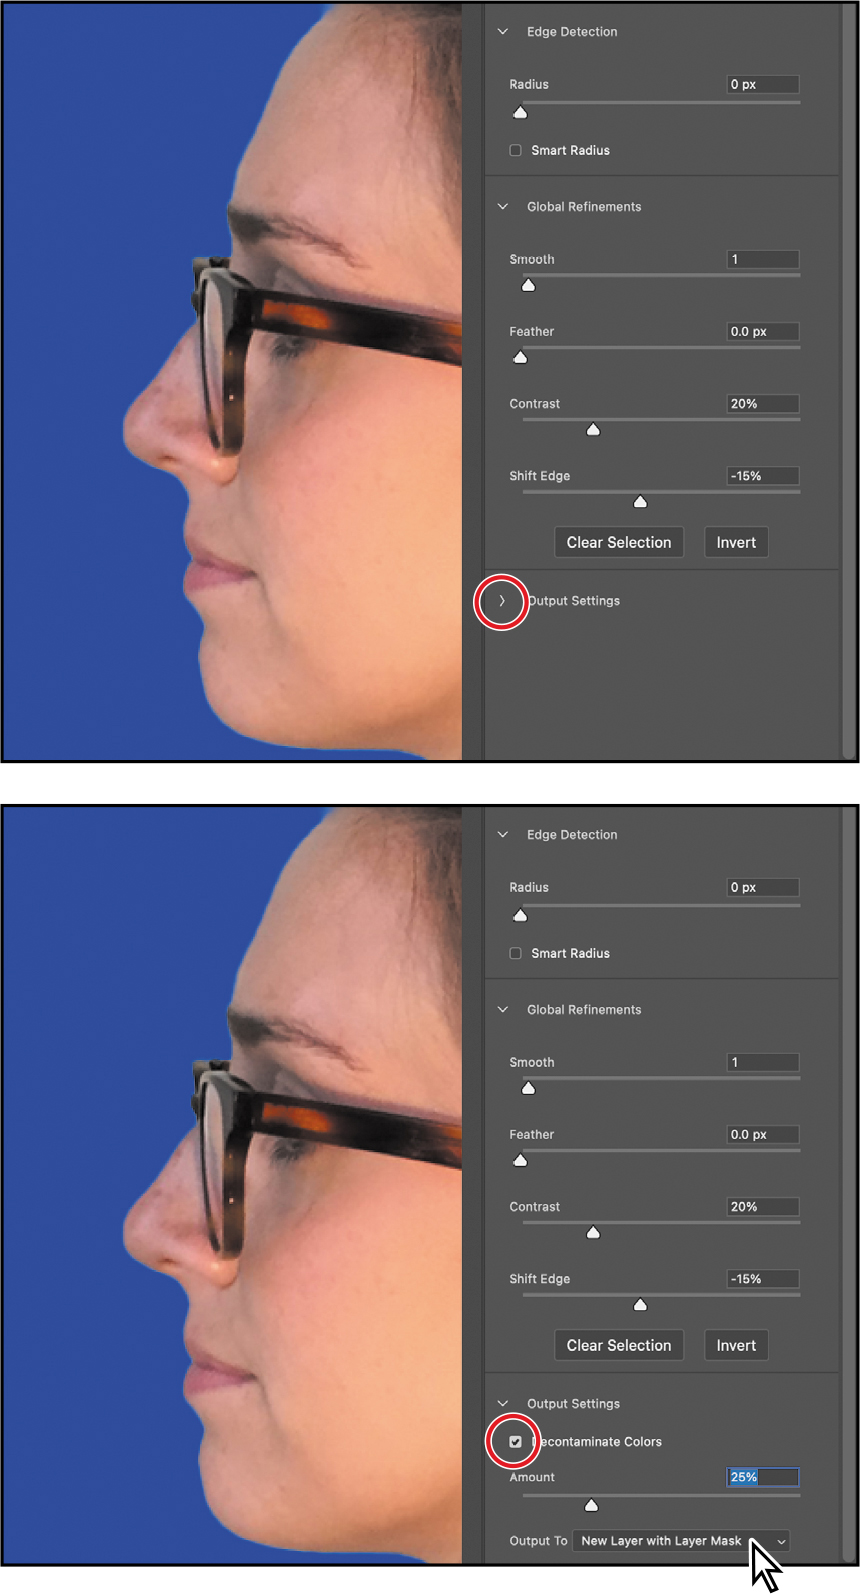
Choose New Layer With Layer Mask from the Output To menu. Then click OK.

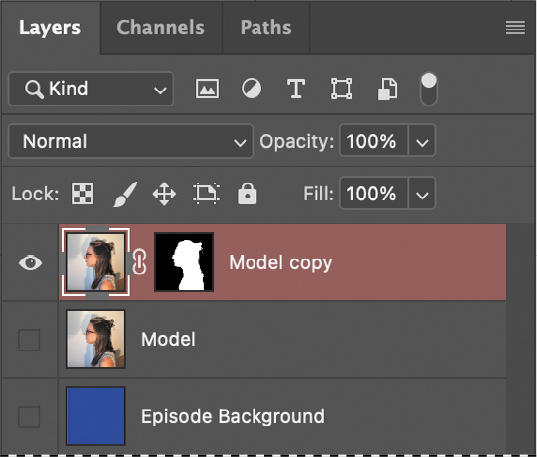
In the Layers panel, the Model Copy layer now has a layer mask (pixel mask) that was generated by Select And Mask.
The layer was copied because using the Decontaminate Colors option requires generating new pixels. The original Model layer is preserved and automatically hidden. If you wanted to start over, you could delete the Model Copy layer, make the original Model layer visible again and selected, and open Select And Mask again.
![]() Note
Note
If you had not selected Decontaminate Colors, it would have been possible to choose a Layer Mask output option that would have added a layer mask to the Model layer without copying it.
If the mask isn’t perfect, you can continue to edit it at any time. When a layer mask thumbnail is selected in the Layers panel, you can click the Select And Mask button in the Properties panel, click it in the options bar (if a selection tool is active), or choose Select > Select And Mask.
Save your work.
Creating a quick mask
To change the color of the glasses frames, you’ll use a quick mask, because you won’t need the mask after you’re done with this one task and so that you can create the mask by painting. First, you’ll clean up the Layers panel.
-
Hide the Episode Background layer so you can concentrate on the model. Make sure the Model copy layer is selected.

-
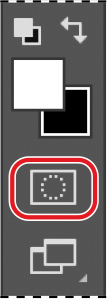
Click the Edit In Quick Mask Mode button near the bottom of the Tools panel. (Until now, you have been working in the default Standard mode.)
 Note
NoteIf you are using a small display and the Tools panel is in single-column mode, the Quick Mask Mode button may be past the bottom of the screen. If the Tools panel is in two-column mode, the Quick Mask Mode button is at the bottom-left corner of the panel.
In Quick Mask mode, a red overlay appears as you make a selection, masking the area outside the selection the way a rubylith, or red acetate, was used to mask images in traditional print shops. (This idea is similar to the Overlay view mode you saw in Select And Mask.) You can apply changes only to the unprotected area that is visible and selected. Notice that the highlight color for the selected layer in the Layers panel is red, indicating you’re in Quick Mask mode.
-
In the Tools panel, select the Brush tool (
 ).
). -
In the options bar, make sure that the mode is Normal. Open the Brush pop-up panel, and select a small brush with a diameter of 13 px and a Hardness of 100%. Click outside the panel to close it.
-
Paint the earpiece of the glasses frames. (Magnify the view if it helps you paint more precisely.) The area you paint will appear red, creating a mask.
-
Continue painting with the Brush tool to mask the earpiece of the frames and the frame around the lenses. Reduce the brush size to paint around the lenses. You can stop where the earpiece goes under the hair.
TipHere, you’re making a selection by painting the area you want to select. Compare this to Chapter 3, where you made selections using tools that create a selection marquee.

In Quick Mask mode, Photoshop treats the red overlay as a grayscale mask, where shades of gray correspond to degrees of mask transparency. When using a painting or editing tool in Quick Mask mode, keep these principles in mind:
-
Painting with black adds to the mask (the red overlay), subtracting from the selected area.
-
Painting with white erases the mask, adding to the selected area.
-
Painting with gray or reduced opacity adds semitransparent areas to the mask, where darker shades are more transparent (more masked).
-
Click the Edit In Standard Mode button (
 ), which is the same as the Enter Quick Mask Mode button.
Exiting Quick Mask mode converts the Quick Mask into a selection.
-
Choose Select > Inverse to select the area you originally masked.
TipIf you want to keep the selection for future use, save it as an alpha channel (Select > Save Selection); otherwise, it will be lost as soon as the area is deselected.
-
Choose Image > Adjustments > Hue/Saturation. The commands on the Adjustments menu affect pixels directly, without creating an adjustment layer.
-
In the Hue/Saturation dialog box, change the Hue to +70. The new green color fills the glasses frame. Click OK.

-
Choose Select > Deselect.
Manipulating an image with Puppet Warp
The Puppet Warp feature gives you flexibility in manipulating an image. You can reposition areas, such as hair or an arm, just as you might pull the strings on a puppet. Place pins wherever you want to control movement. You’ll use Puppet Warp to tilt the model’s head back so she appears to be looking up.
![]() Note
Note
Photoshop provides several different ways to warp a layer. You’ll use Puppet Warp because it’s the easiest way to pivot part of an image, such as tilting the head back in this example.
-
Zoom out so you can see the entire model.
-
With the Model Copy layer selected in the Layers panel, choose Edit > Puppet Warp.
A mesh appears over the visible areas in the layer—in this case, the mesh appears over the model. You’ll use the mesh to place pins where you want to control movement (or to ensure there is no movement).
-
Click to add pins around the body and along the base of the head, as shown below. Each time you click, Puppet Warp adds a pin. About 10 to 12 pins should work.

The pins you’ve added around the shirt will keep it in place as you tilt the head.
-
Select the pin at the nape of the neck. A blue dot appears in the center of the pin to indicate that it’s selected.

-
Press Alt (Windows) or Option (macOS). A larger circle appears around the pin, and a curved double arrow appears next to it. Continue pressing Alt or Option as you drag the pointer to rotate the head backwards. You can see the angle of rotation in the options bar; you can enter 170 there to rotate the head back.
NoteBe careful not to Alt-click or Option-click the dot itself, or you’ll delete the pin.

-
When you’re satisfied with the rotation, click the Commit Puppet Warp button (
 ) in the options bar, or press Enter or Return.
-
Save your work so far.
Using an alpha channel to create a shadow
Just as different information in an image is stored on different layers, channels also let you access specific kinds of information. Alpha channels store selections as grayscale images. Color information channels store information about each color in an image; for example, an RGB image automatically has red, green, blue, and composite channels.
To avoid confusing channels and layers, think of channels as containing an image’s color and selection information, and think of layers as containing painting, shapes, text, and other content.
You’ll first convert the transparent areas of the Model copy layer to a selection and then fill it with black on another layer to create a shadow. Because the selection will be altered to make the shadow, you’ll now save the current form of the selection as an alpha channel so that you can load it again later if needed.
In the Layers panel, Ctrl-click (Windows) or Command-click (macOS) the layer thumbnail icon for the Model Copy layer. The masked area is selected.
Choose Select > Save Selection. In the Save Selection dialog box, make sure New is chosen in the Channel menu. Then name the channel Model Outline, and click OK.

Nothing changes in the Layers panel or in the document window. However, a new channel named Model Outline has been added to the Channels panel. The selection is still active.
![]() Tip
Tip
Now that the original selection outline of the model is saved as an alpha channel, you can reuse that selection at any time, even from another Photoshop document, by choosing the Select > Load Selection command.
Click the Create A New Layer icon (
 ) at the bottom of the Layers panel. Drag the new layer below the Model Copy layer so that the shadow will be below the image of the model. Double-click the new layer’s name, and rename it Shadow. Note
Some image file formats offer the option to save an alpha channel with the image document. If you use this option, Photoshop creates an alpha channel that includes all areas of the composite image that are not occupied by an opaque pixel.
With the Shadow layer selected, choose Select > Select And Mask. This loads the current selection into the Select And Mask task space.
Click the View menu in the View Mode section of the Properties panel, and choose On Black.
In the Global Refinements section, move the Shift Edge slider to +36%.
In the Output Settings section, make sure Selection is selected in the Output To menu, and then click OK.

Choose Edit > Fill. In the Fill dialog box, choose Black from the Contents menu, and then click OK.

The Shadow layer displays a filled-in black outline of the model. Shadows aren’t usually as dark as the person who casts them, so you’ll reduce the layer opacity.
In the Layers panel, change the layer opacity to 30%.

The shadow is in exactly the same position as the model, where it can’t be seen. You’ll shift it.
Choose Select > Deselect to remove the selection.
Choose Edit > Transform > Rotate. Rotate the shadow by hand, or enter −15° in the Rotate field in the options bar. Then drag the shadow to the left, or enter 545 in the X field in the options bar. Click the Commit Transform button (
) in the options bar, or press Enter or Return, to accept the transformation.
Click the eye icon for the Episode Background layer to make it visible, and delete the Model layer (the one without the mask).

Choose File > Save to save your work so far.
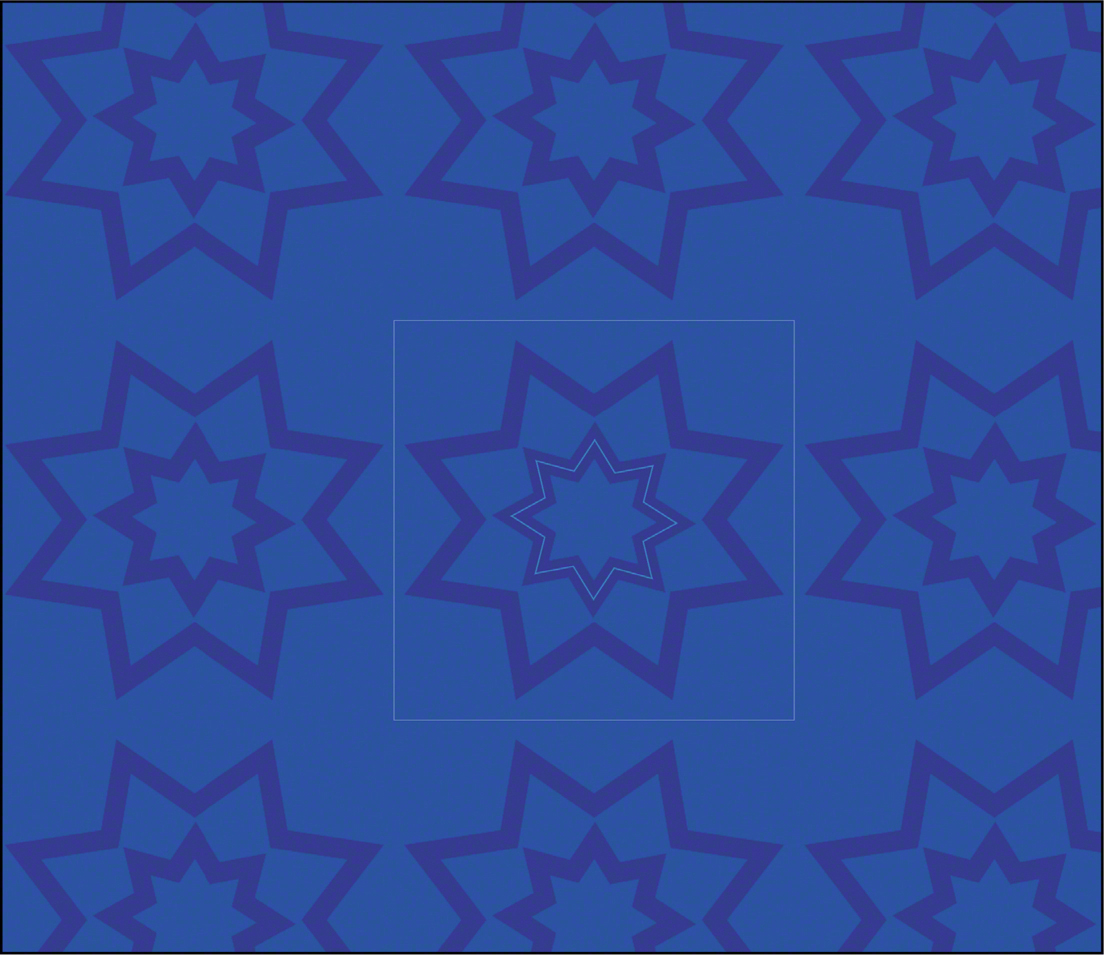
Creating a pattern for the background
The design for the episode graphic incorporates a pattern into the background. You’ll quickly create the pattern by customizing a vector graphic shape.
Customizing a polygon shape
The background is based on star shapes. There is no star tool in Photoshop, but you can easily create one by customizing a shape drawn with the Polygon tool.
-
In the Lesson06 folder, open the document 06Pattern.psd. It opens in its own document tab.
-
Select the Polygon tool (
 ), which is grouped with the Rectangle tool. In the options bar, make sure the tool is set to Shape.
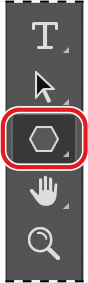

-
Hold down Shift and draw a polygon shape about 340 pixels wide. If it isn’t centered on the canvas, after drawing you can reposition it with the Move tool.
-
With the shape layer still selected, in the Appearance section of the Properties panel set the Fill to None, set the Stroke to 20px, and apply a blue Stroke color slightly darker than the background; we used R=27, G=58, B=185.
-
Set the polygon Number Of Sides to 8, and set the Star Ratio to 70%. When the Star Ratio is less than 100%, the number of sides becomes the number of points.

-
In the Layers panel, duplicate the star shape layer by dragging and dropping it on the Create A New Layer button.
-
In the Properties panel, change the Rotate angle to 24.
-
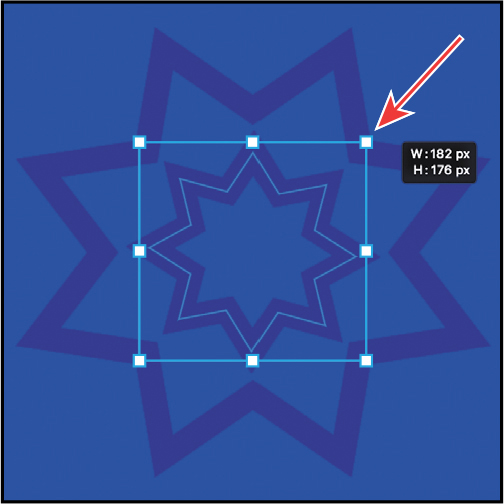
Choose Edit > Free Transform Path, and hold down the Alt (Windows) or Option (macOS) key as you drag a corner handle to shrink the duplicate star layer to fit inside the larger star. Press Enter or Return to apply the transformation.
TipThe Edit > Free Transform Path command may appear as Free Transform if you switched to the Move tool in step 3. The command is Free Transform Path when the current tool can edit paths or shapes.
-
Choose View > Pattern Preview to see how the design looks as a pattern. If a message appears, click OK. Only the original shape on the canvas is editable, but Pattern Preview updates to account for any changes you make.
-
Select the Move tool, select Polygon 1 (the large star) in the Layers panel, and look for a small circular handle inside the top-right star point. If you don’t see the handle, make sure Show Transform Controls is selected in the options bar, and increase the view magnification.
-
Drag the handle to change the sharp star points to rounded points. We used a radius of 20 pixels. The pattern preview updates.

-
In the Layers panel, select Polygon 1 copy (the small star). In the Properties panel, set the Number Of Points to 15 and reduce the Stroke Width to 15 px.

-
Choose Edit > Define Pattern, name it Podcast Pattern, and click OK. This creates a pattern preset that you can use in any Photoshop document.

-
Choose File > Save As, rename the file to 06Pattern_Working.psd, and click Save. Click OK if the Photoshop Format Options dialog box appears.
-
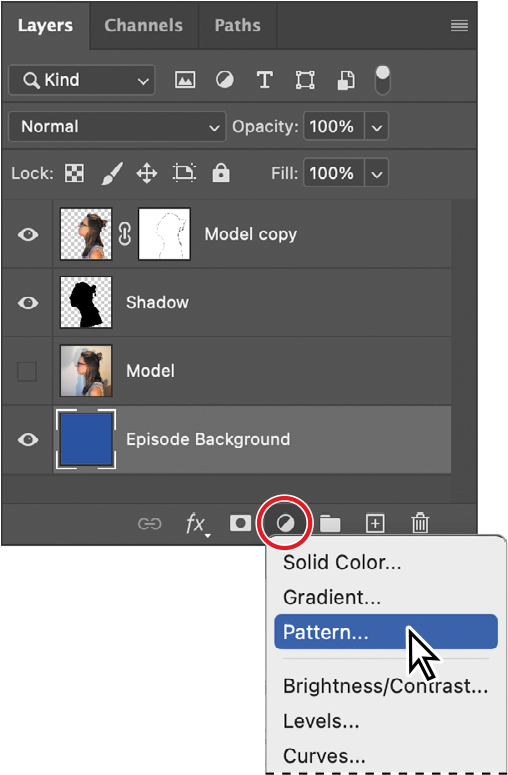
Switch to 06Working.psd, and select the Episode Background layer.
-
In the Layers panel, click the Create New Fill Or Adjustment Layer button, and choose Pattern.
-
In the Pattern Fill dialog box, click the pattern picker, and at the bottom of the list, select the blue pattern you created. Set Angle to 45 degrees, set Scale to 35%, and click OK.

-
Save your work. Your podcast background is ready for the next step!
Review questions
1 What is the benefit of using a quick mask?
2 When you have a selection created by a quick mask, what happens when you deselect?
3 When you save a selection as an alpha channel, where is the alpha channel stored?
4 How can you edit a mask in a channel once you’ve saved it?
5 How do channels differ from layers?
Review answers
1 Quick masks are helpful for creating one-time selections. In addition, using a quick mask is an easy way to edit a selection using the painting tools.
2 As with any other selection, a quick mask selection disappears when you deselect it.
3 Alpha channels are stored in the Channels panel, along with the visible color channels.
4 You can paint in an alpha channel using black, white, and shades of gray.
5 Alpha channels are storage areas for saved selections. All layers set to be visible will be present in printed or exported output. But only the color channels are visible in printed or exported output; alpha channels are not. Layers contain information about image content, while alpha channels contain information about selections and masks.