
4. Layer Basics
Lesson overview
In this lesson, you’ll learn how to do the following:
Organize artwork on layers.
Create, view, hide, and select layers.
Rearrange layers to change the stacking order of artwork.
Apply blending modes to layers.
Resize and rotate layers.
Apply a gradient to a layer.
Apply a filter to a layer.
Add text and layer effects to a layer.
Add an adjustment layer.
Save a copy of the file with the layers flattened.

This lesson will take less than an hour to complete. To get the lesson files used in this chapter, download them from the web page for this book at adobepress.com/PhotoshopCIB2023. For more information, see “Accessing the lesson files and Web Edition” in the Getting Started section at the beginning of this book.
As you work on this lesson, you’ll preserve the start files. If you need to restore the start files, download them from your Account page.
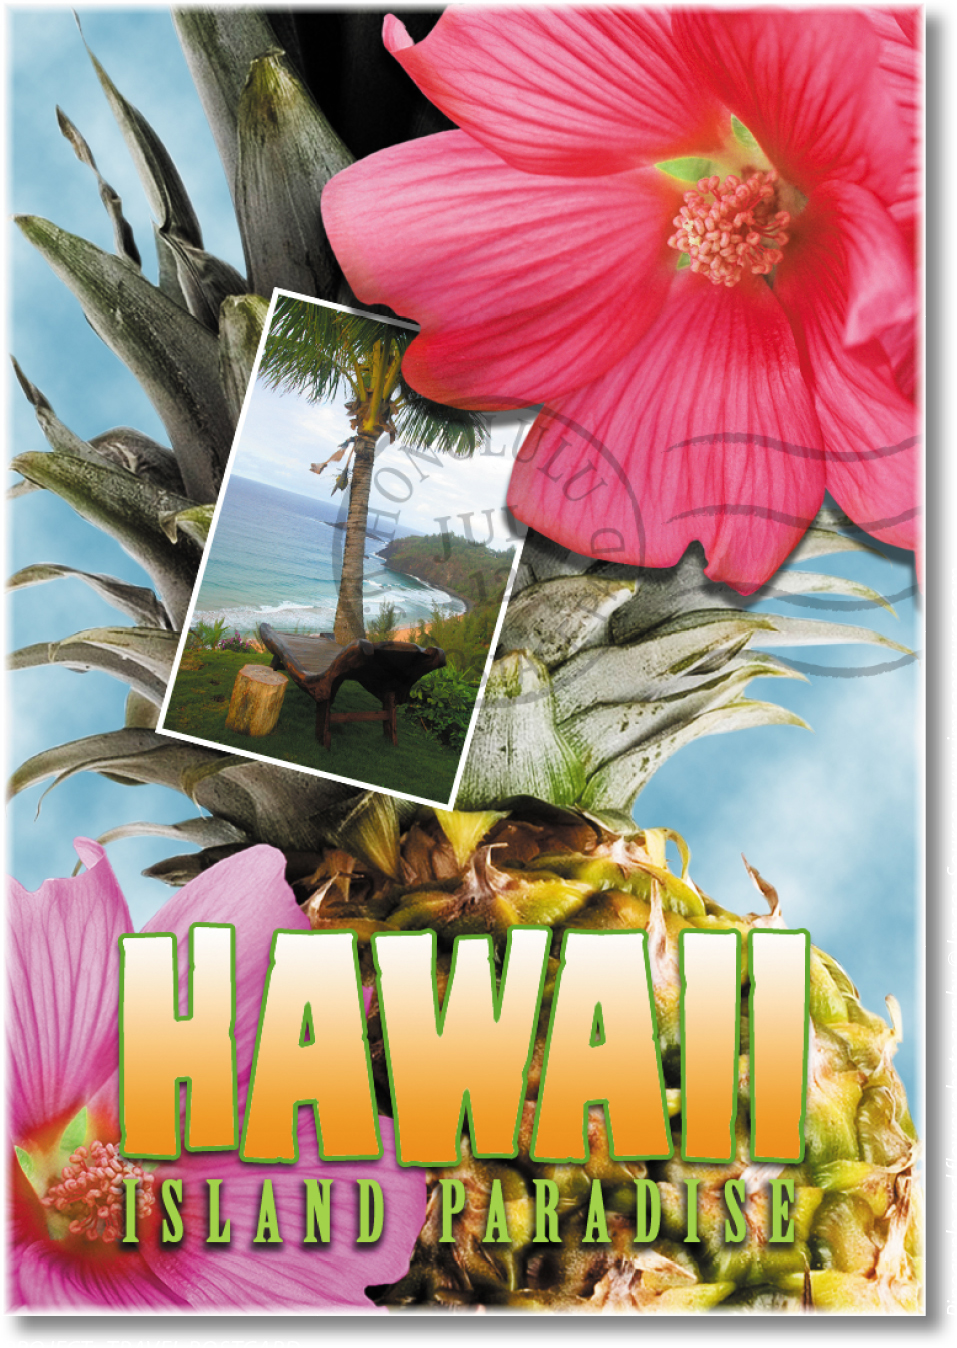
PROJECT: TRAVEL POSTCARD
Pineapple and flower photography © Image Source, www.imagesource.com
In Photoshop, you can organize different parts of an image using layers. Each layer can then be edited as discrete artwork, giving you tremendous flexibility as you compose and revise an image.
About layers
Every Photoshop file contains one or more layers. All new layers in an image are transparent until you add text or artwork. Working with layers is analogous to placing portions of a drawing on clear sheets of film, such as those viewed with an overhead projector: Individual sheets may be edited, repositioned, and deleted without affecting the other sheets. When the sheets are stacked, the entire composition is visible.
![]() Note
Note
Some file formats, such as JPEG and GIF, don’t support layers. To save those images with layers, you must save them in Photoshop or TIFF format. Also, some color modes (on the Image > Mode submenu), such as Bitmap and Indexed Color, don’t support layers. The lesson files in this chapter are Photoshop documents in RGB color mode.
Many of the lesson files for this book have a background layer, a layer behind all others that is always completely opaque. Photoshop documents intended for print, digital camera images, and scanned images typically have a background layer. Photoshop documents created for mobile devices and websites might not have a background layer; for example, website graphics may need transparent areas that won’t block a web page’s background or other elements. To learn more about the background layer, see “About the background layer” on page 78.
Getting started
You’ll start the lesson by viewing an image of the final composition.
-
Start Photoshop, and then simultaneously hold down Ctrl+Alt+Shift (Windows) or Command+Option+Shift (macOS) to restore the default preferences. (See “Restoring default preferences” on page 5.)
-
When prompted, click Yes to delete the Adobe Photoshop Settings file.
-
Choose File > Browse In Bridge to open Adobe Bridge.
 Note
NoteIf Bridge isn’t installed, you’ll be prompted to install it. For more information, see page 3.
-
In the Favorites panel, click the Lessons folder. Then double-click the Lesson04 folder in the Content panel to see its contents.
-
Study the 04End.psd file. Move the thumbnail slider to the right if you want to see the image in more detail.
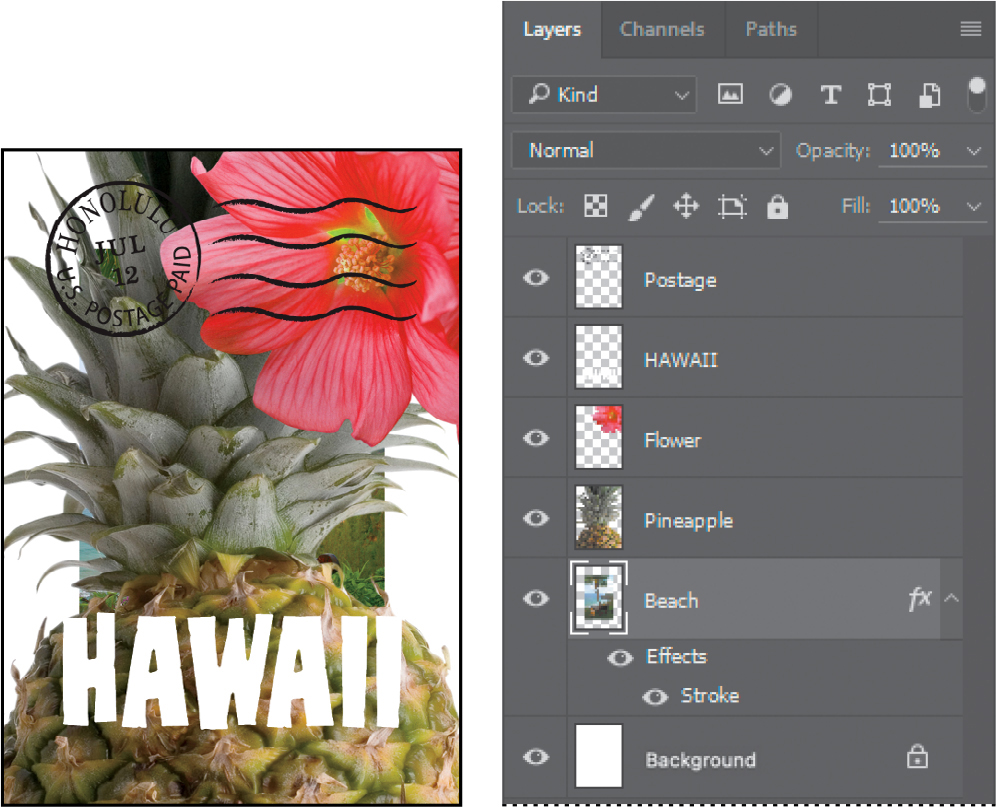
This layered composite represents a postcard. You will assemble it in this lesson as you learn how to create, edit, and manage layers.
![]() Note
Note
If Photoshop displays a dialog box telling you about the difference between saving to Cloud Documents and On Your Computer, click Save On Your Computer. You can also select Don’t Show Again, but that setting will deselect after you reset Photoshop preferences.
-
Double-click the 04Start.psd file to open it in Photoshop.
-
Choose File > Save As, rename the file 04Working.psd, and click Save. Click OK if you see the Photoshop Format Options dialog box.
Saving another version of the start file frees you to make changes without worrying about overwriting the original.
Using the Layers panel
The Layers panel lists all the layers in an image, displaying the layer names and thumbnails of the content on each layer. You can use the Layers panel to hide, view, reposition, delete, rename, and merge layers. The layer thumbnails are automatically updated as you edit the layers.
-
If the Layers panel is not visible in the work area, choose Window > Layers.
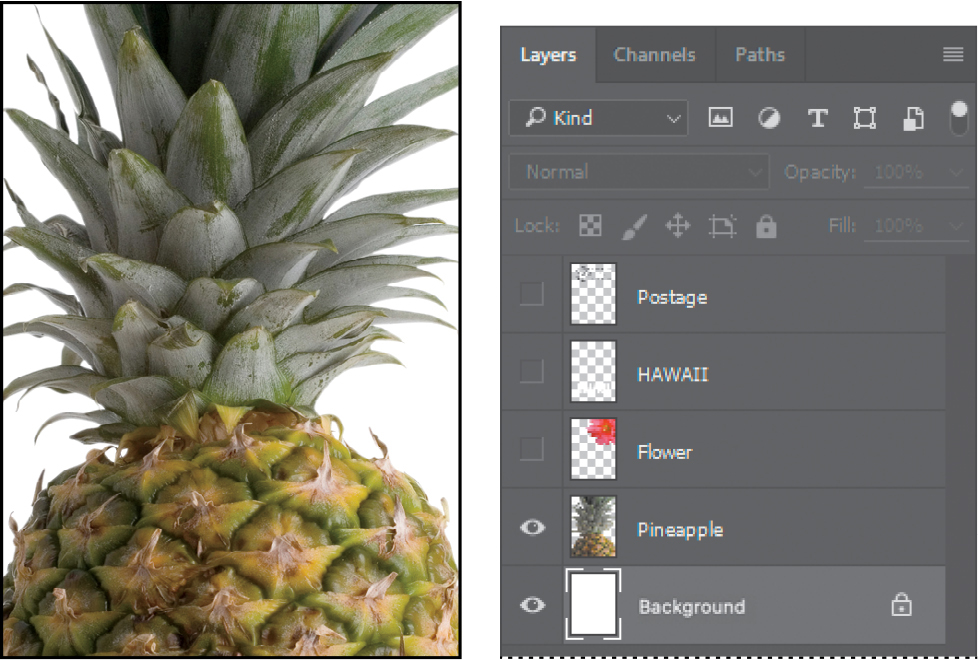
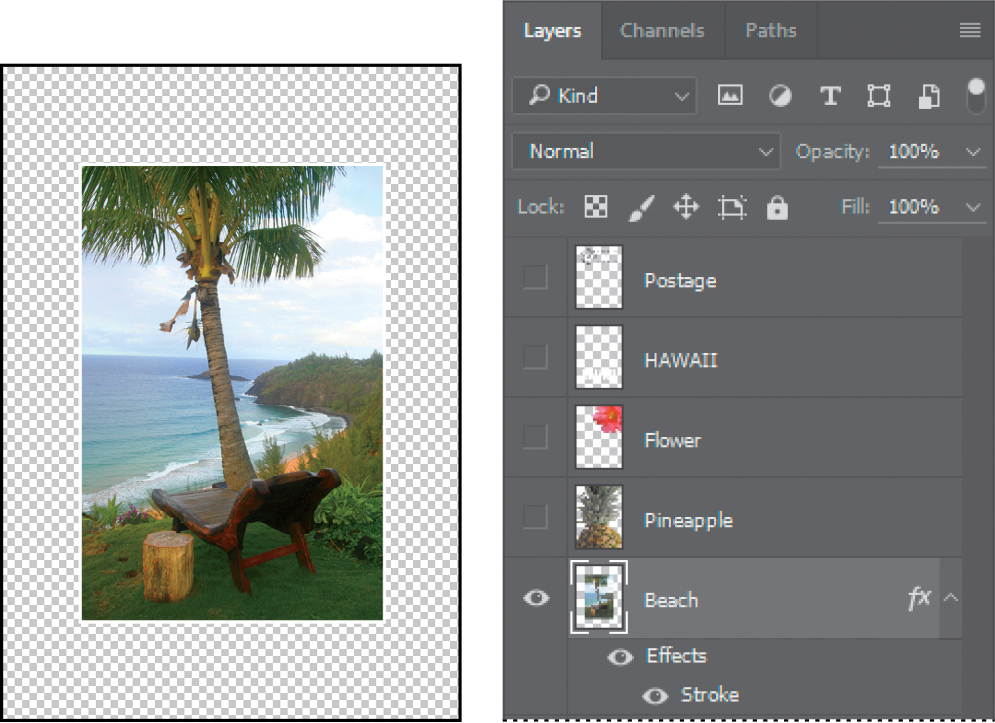
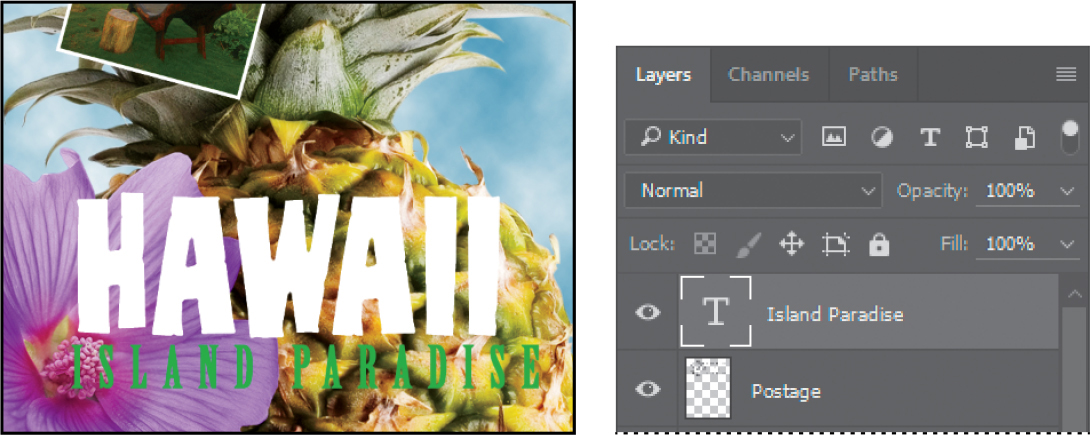
The Layers panel lists five layers for the 04Working.psd file (from top to bottom): Postage, HAWAII, Flower, Pineapple, and Background.
-
Select the Background layer to make it active (if it’s not already selected). Notice the layer thumbnail and the icons shown for the Background layer:
 Tip
TipUse the context menu to hide or resize the layer thumbnail (the small preview picture next to the layer name). Right-click (Windows) or Control-click (macOS) a thumbnail in the Layers panel to open the context menu, and then choose a thumbnail size.
-
The lock icon (
 ) indicates that the layer is protected from layer changes. That’s why the options above the layer list are unavailable. However, it’s still possible to edit the layer content itself, such as painting on it.
 -
The eye icon (
 ) indicates that the layer is visible in the document window. If you click the eye, the document window no longer displays that layer.
-
The first task for this project is to add a photo of the beach to the postcard. First, you’ll open the beach image in Photoshop.
-
In Photoshop, choose File > Open, navigate to the Lesson04 folder, and then double-click the Beach.psd file to open it.
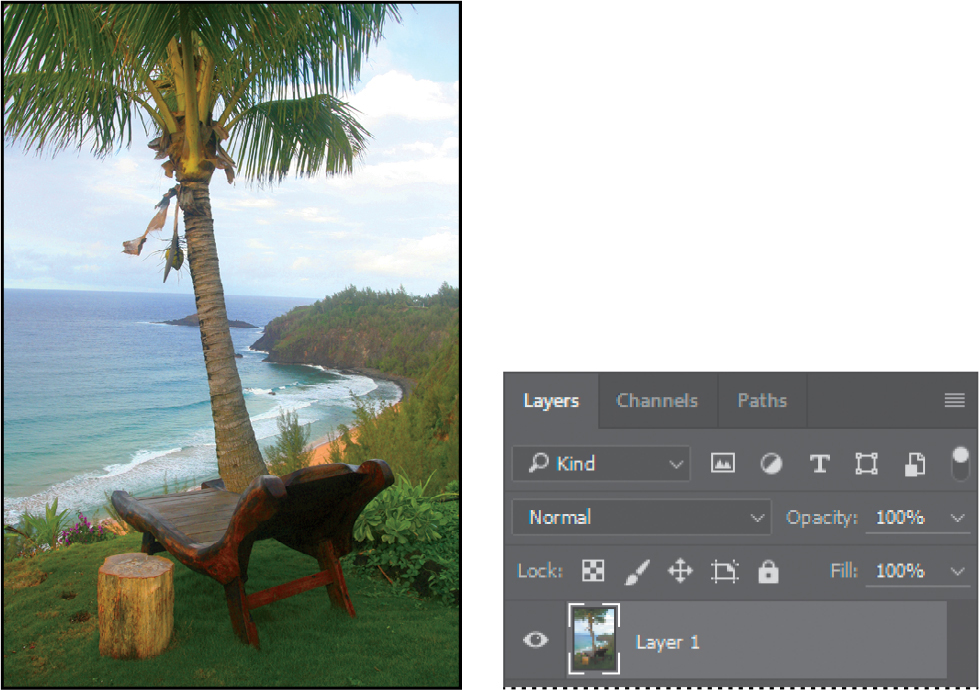
The Layers panel changes to display the layer information for the active Beach.psd file. Notice that only one layer appears in the Beach.psd image: Layer 1. It’s not a Background layer, so it can use layer features such as transparency.
Renaming and copying a layer
To add content, drag and drop one or more files or Photoshop layers into a Photoshop document window. You can drag layers from a source document window, drag them from the Layers panel, or drag a compatible file from the desktop. Each item you drop into a Photoshop document is added as a separate layer.
![]() Tip
Tip
Dragging many layers to another document can be easier if you combine them into a layer group first. Select them in the Layers panel, and then choose Layer > Group Layers. Now you have only one thing to drag: the layer group (which uses a folder icon).
You’ll drag the Beach.psd image onto the 04Working.psd file. Before you begin, make sure that both the 04Working.psd and Beach.psd files are open and that the Beach.psd file is selected.
First, you’ll give Layer 1 a more descriptive name.
-
In the Layers panel, double-click the name Layer 1, type Beach, and then press Enter or Return. Keep the layer selected.
NoteWhen you rename a layer, make sure you double-click the layer name text. If you double-click outside the name, other layer options may appear instead.

-
Choose Window > Arrange > 2-Up Vertical. Photoshop displays both of the open image files. Select the Beach.psd image so that it is the active file.
-
Select the Move tool (
 ), and use it to drag the Beach.psd image onto the 04Working.psd document window. Tip
If you hold down Shift as you drag an image from one file into another, the dragged image automatically centers itself in the target image window.

![]() Tip
Tip
You can also transfer layers between documents by copying and pasting: Select layers in the Layers panel, choose Edit > Copy, switch to another document, and choose Edit > Paste.
The Beach layer now appears in the 04Working.psd file document window and its Layers panel, between the Background and Pineapple layers. Photoshop always adds new layers directly above the selected layer; you selected the Background layer earlier.
![]() Tip
Tip
Need images for a project like this one? In Photoshop, choose File > Search Adobe Stock to download low-resolution placeholder images from the Adobe Stock online photo library. If you license the images, Photoshop replaces the placeholders with high-resolution images.

-
Close the Beach.psd file without saving changes to it.
Viewing individual layers
The 04Working.psd file now contains six layers. Some of the layers are visible, and some are hidden. The eye icon (![]() ) next to a layer thumbnail in the Layers panel indicates that the layer is visible.
) next to a layer thumbnail in the Layers panel indicates that the layer is visible.
![]() Tip
Tip
If you need to center the Beach layer, select the Beach layer in the Layers panel, choose Select > All, and then choose Layer > Align Layers To Selection > Horizontal Centers (or Vertical Centers, as needed). Then choose Select > Deselect.
-
Click the eye icon (
) next to the Pineapple layer to hide the image of the pineapple.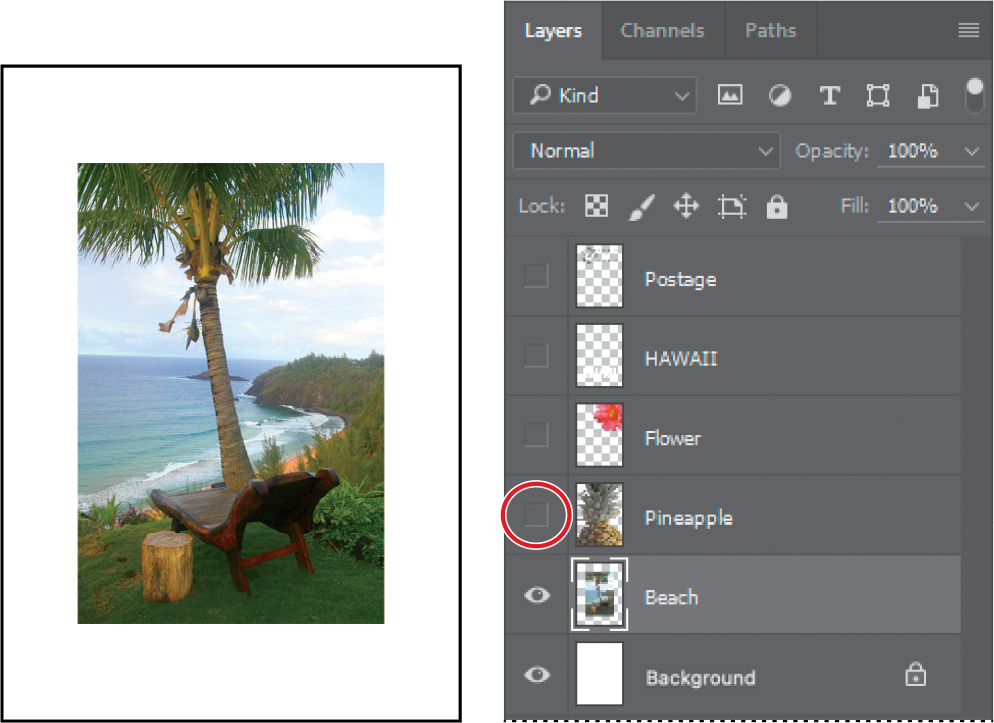
You can hide or show a layer by clicking this icon or clicking in its column, also called the Show/Hide Visibility column.
-
Click again in the Show/Hide Visibility column to display the pineapple.
Adding a border using the Stroke layer style
Now you’ll add a white border around the Beach layer to create the impression that it’s an old photograph.
-
Select the Beach layer. (To select the layer, click the layer name in the Layers panel.)
The layer is highlighted, indicating that it is active. Changes you make in the document window affect the active layer.
-
To make the opaque areas on this layer more obvious, hide all layers except the Beach layer: Press Alt (Windows) or Option (macOS) as you click the eye icon (
) next to the Beach layer.
The white background and other objects in the image disappear, leaving only the beach image against a checkerboard background. The checkerboard indicates transparent areas of the active layer.
-
Choose Layer > Layer Style > Stroke.
The Layer Style dialog box opens. Now you’ll select the options for the white stroke around the beach image.
-
Specify the following settings:
TipWhen the Preview option is enabled in a dialog box such as Layer Style, you can watch the selected layer change as you adjust the options.
-
Size: 5 px
-
Position: Inside
-
Blend Mode: Normal
-
Opacity: 100%
-
Color: White (Click the Color box, and select white in the Color Picker.)

-
-
Click OK to commit the effect to the layer.
NoteLayer styles apply to the opaque pixels of a layer only. For example, the Stroke layer style draws its line around the opaque pixels of the Beach layer and doesn’t change the transparent pixels.
Rearranging layers
The order in which the layers of an image are organized is called the stacking order. Stacking order determines how the image is viewed—you can change the order to make certain parts of the image appear in front of or behind other layers.
You’ll rearrange the layers so that the beach image is in front of another image that is currently hidden in the file.
-
Make the Postage, HAWAII, Flower, Pineapple, and Background layers visible by clicking the Show/Hide Visibility column next to their layer names.
TipWhen you want to hide or show a continuous series of layers, you can also drag through their eye icons in the Show/Hide Visibility column, instead of clicking each eye icon separately.
The beach image is almost entirely blocked by images on other layers.
-
In the Layers panel, drag the Beach layer up so that it is positioned between the Pineapple and Flower layers—as you drag, a blue line indicates where it will be dropped—and then release the mouse button.

![]() Tip
Tip
You can also control the stacking order of layered images by selecting them in the Layers panel, choosing Layer > Arrange, and then choosing Bring To Front, Bring Forward, Send Backward, or Send To Back.
The Beach layer moves up one level in the stacking order, and the beach image appears on top of the pineapple and background images but under the postmark, flower, and the word “HAWAII.”
Changing the opacity of a layer
You can reduce the opacity of any layer to reveal the layers below it. In this case, the postmark is too dark on the flower. You’ll edit the opacity of the Postage layer to let the flower and other images show through.
-
Select the Postage layer, and then click the arrow next to the Opacity field to display the Opacity slider. Drag the slider to 25%. You can also type 25 in the Opacity box or scrub the Opacity label.

The Postage layer becomes partially transparent so you can better see the layers underneath. Notice that the change in opacity affects only the content of the Postage layer. The Pineapple, Beach, Flower, and HAWAII layers remain opaque.
-
Choose File > Save to save your work.
Duplicating a layer and changing the blending mode
You can apply different blending modes to a layer. Blending modes affect how the color pixels on one layer blend with pixels on the layers behind it (see the “Blending Modes” sidebar on page 86). First you’ll use blending modes to increase the intensity of the image on the Pineapple layer so that it doesn’t look so dull. Then you’ll change the blending mode on the Postage layer. (Currently, the blending mode for both layers is Normal.)
Click the eye icons next to the HAWAII, Flower, and Beach layers to hide them.
Right-click or Control-click the Pineapple layer name, and choose Duplicate Layer from the context menu. (Make sure you click the layer name; other areas may display a different context menu.) Click OK in the Duplicate Layer dialog box.
TipIf you prefer using the menu bar, Duplicate Layer is also available by choosing Layer > Duplicate Layer.
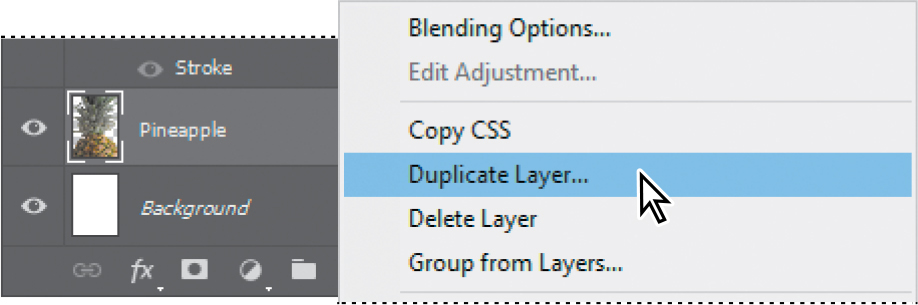
A layer called “Pineapple copy” appears above the Pineapple layer in the Layers panel.
With the Pineapple copy layer selected, choose Overlay from the Blending Modes menu in the Layers panel.
TipNotice that the image changes as you move the mouse over the options in the Blending Modes menu. This is a quick way to preview which one will do what you want.
 Tip
TipIf the effect of a blending mode is too strong, reduce the Opacity of that layer.
The Overlay blending mode blends the Pineapple copy layer with the Pineapple layer beneath it to create a vibrant, more colorful pineapple with deeper shadows and brighter highlights.
Select the Postage layer, and choose Multiply from the Blending Modes menu.
TipAs the list of layers becomes longer, it can be difficult to locate the layer you want. You can use the filter field at the top of the Layers panel to limit the layer list by attributes such as layer kind, layer name, effect, and more.
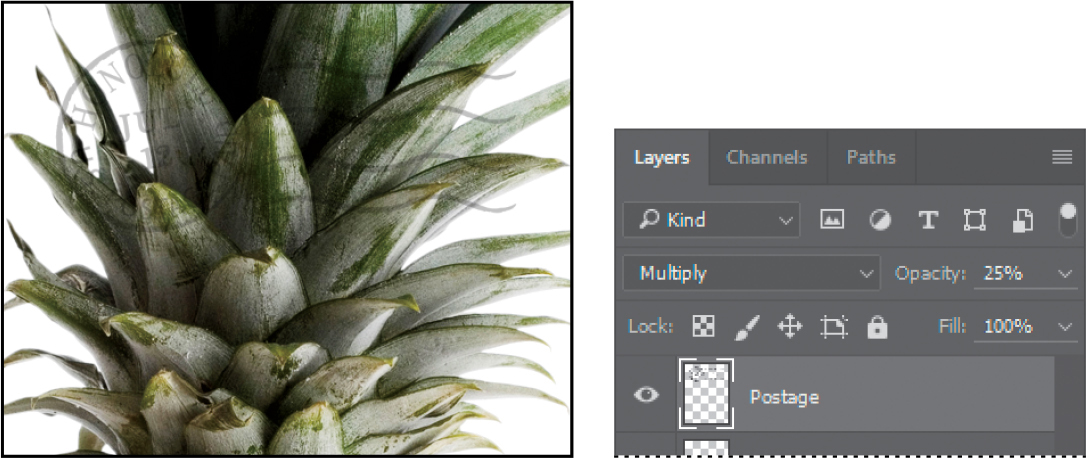
The Multiply blending mode multiplies the color values of its layer with those of the underlying layers. In this example, areas of the postmark that are over the pineapple are darkened using the tonal values of the pineapple.
![]() Tip
Tip
In the Layers panel list, you can display the selected layers only and hide the rest: Choose Select > Isolate Layers. When you do this, the filter switch in the Layers panel turns red to let you know that some layers are hidden in the list.
Each blending mode uses different math to combine a layer with the layers behind it. Overlay tends to increase contrast; Multiply tends to darken its layer.
Choose File > Save to save your work.
Resizing and rotating layers
Changing the position, size, and angle of layers gives you many creative possibilities. In Photoshop, these kinds of edits are called transformations. You performed transformations in Chapter 3 with selections, and they also apply to layers.
-
Click the Visibility column on the Beach layer to make the layer visible.
-
Select the Beach layer in the Layers panel, and choose Edit > Free Transform.
TipThe Edit > Free Transform command is so useful that you may want to memorize its keyboard shortcut: Ctrl-T (Windows) or Command-T (macOS).
A Transform bounding box appears around the beach image. The bounding box has square handles on each corner and each side.
First, you’ll resize and angle the layer.
-
Drag a corner handle inward to scale the beach photo down by about 50%. (Watch the Width and Height percentages in the options bar.)
-
With the bounding box still active, position the pointer just outside the bounding box until the pointer becomes a curved double arrow. Drag clockwise to rotate the beach image approximately 15 degrees. You can also enter 15 in the Set Rotation box in the options bar.
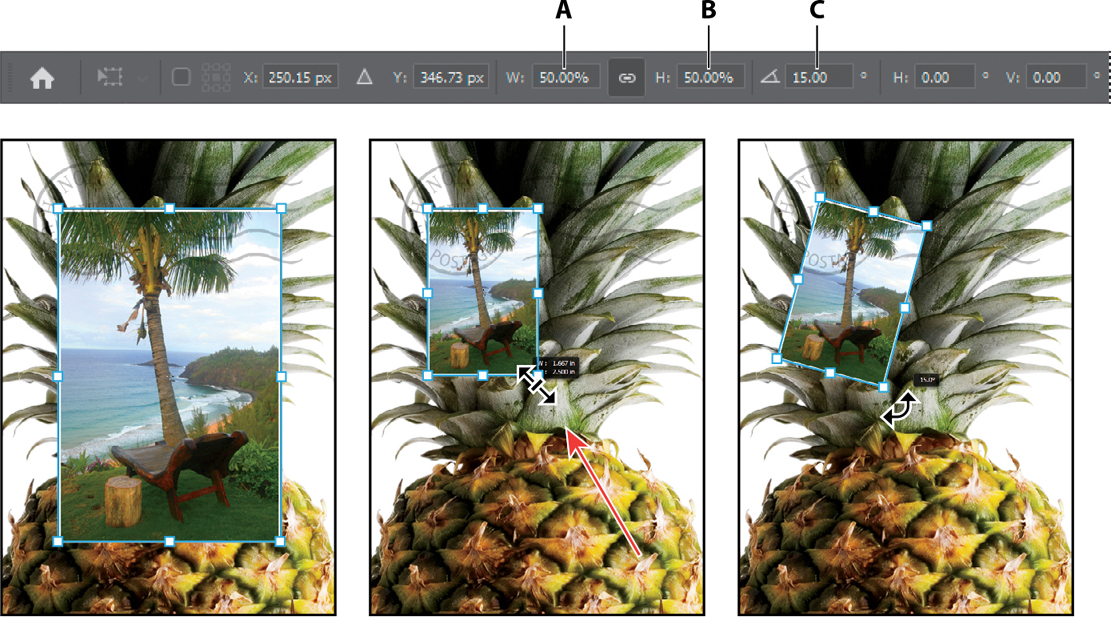
A. Width value
B. Height value
C. Set Rotation box
TipYou can also commit a transformation by clicking far outside the transform bounding box. Just make sure you aren’t clicking somewhere that will alter a setting or layer accidentally.
-
Click the Commit Transform button (
 ) in the options bar.
 -
Make the Flower layer visible. Then select the Move tool (
), and drag the beach photo so that its corner is tucked neatly beneath the flower, as in the illustration after step 7. -
Choose File > Save.

Using a filter to create artwork
Next, you’ll create a new layer with no artwork on it. (Adding empty layers to a file is comparable to adding blank sheets of clear film to a stack of images.) You’ll use this layer to add realistic-looking clouds to the sky with a Photoshop filter.
-
In the Layers panel, select the Background layer to make it active, and then click the Create A New Layer button (
 ) at the bottom of the Layers panel.
A new layer, named Layer 1, appears between the Background and Pineapple layers. The layer has no content, so it has no effect on the image.
![]() Note
Note
You can also create a new layer by choosing Layer > New > Layer or by choosing New Layer from the Layers panel menu.
-
Double-click the name Layer 1, type Clouds, and press Enter or Return to rename the layer.
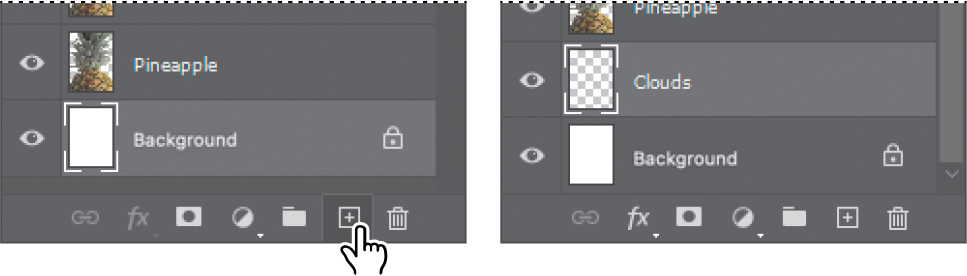
-
In the Tools panel, click the foreground color swatch, select a sky blue color from the Color Picker, and click OK. We selected a color with the following values: R=48, G=138, B=174. The Background Color remains white.
 Tip
TipIf you expect to use a certain color frequently in multiple documents, add it to your Creative Cloud Libraries. Create a swatch of the color in the Swatches panel, and then drag the swatch to a library in the Libraries panel. Now that color is available to any Photoshop document that you open.
-
With the Clouds layer still active, choose Filter > Render > Clouds.
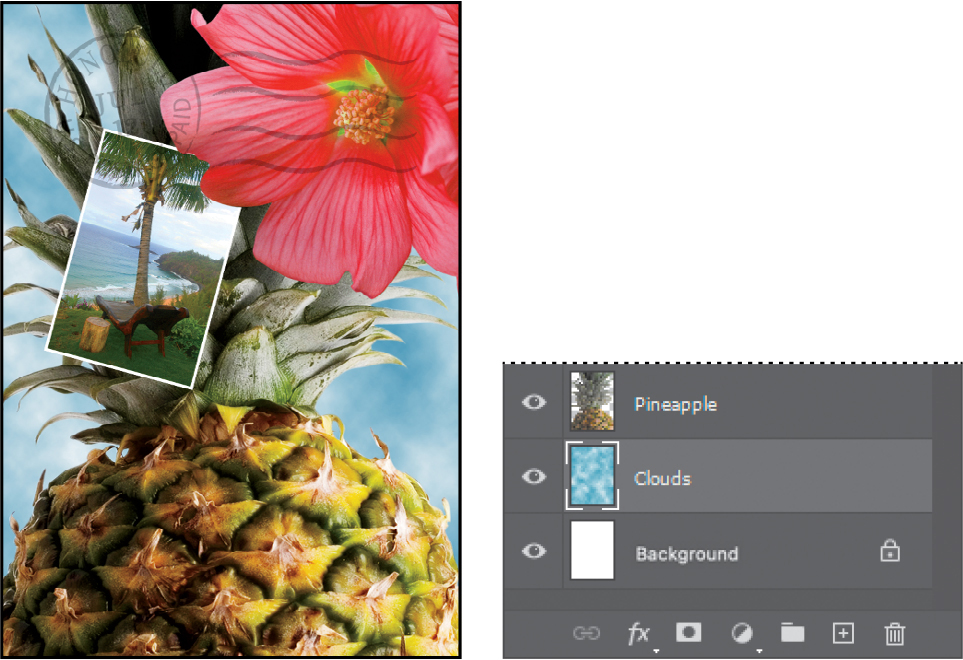
Realistic-looking clouds appear behind the image.
-
Choose File > Save.
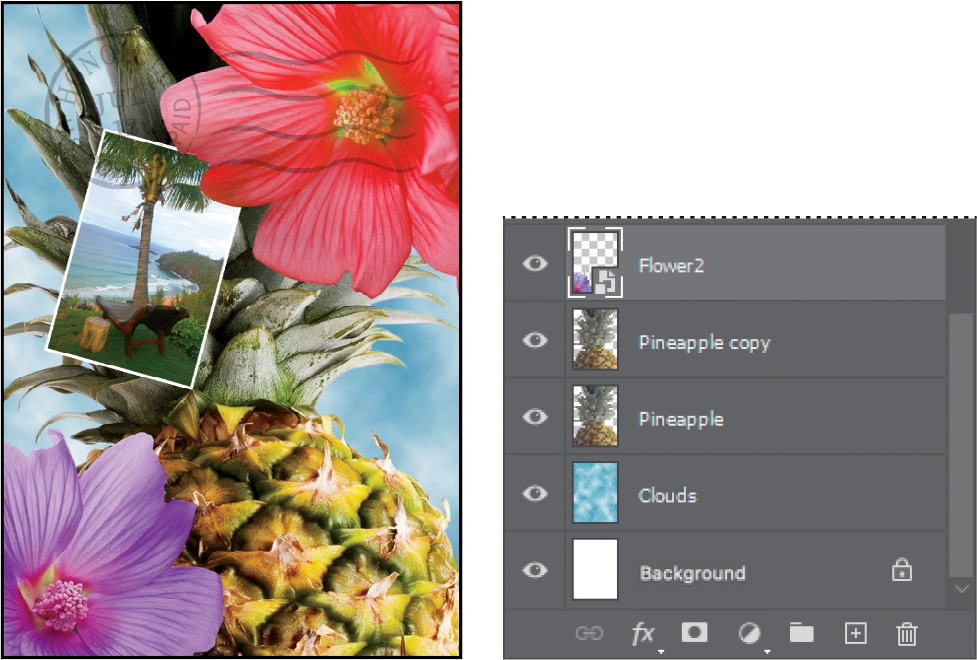
Dragging to add a new layer
You can add a layer to an image by dragging an image file from Bridge or from the desktop in Explorer (Windows) or the Finder (macOS). You’ll add another flower to the postcard now.
![]() Tip
Tip
If you’re adding artwork from a Creative Cloud library, you can simply drag and drop it from the Libraries panel into a Photoshop document. You can also do this with Adobe Stock images stored in your Creative Cloud Libraries.
-
If Photoshop fills your monitor, reduce the size of the Photoshop window:
-
On Windows, click the Restore button (
 ) in the upper-right corner, and then drag any corner of the Photoshop window to make it smaller.
 -
On a Mac, click the green Maximize/Restore button (
 ) in the upper-left corner of the document window, or drag any corner of the Photoshop window to make it smaller.
-
-
In Photoshop, select the Pineapple copy layer in the Layers panel to make it the active layer.
-
In Explorer (Windows) or the Finder (macOS), navigate to the Lessons folder you downloaded from the peachpit.com website. Then navigate to the Lesson04 folder, and position that window so you can see its contents next to the Photoshop window.
-
Select Flower2.psd, and drag it from Explorer or the Finder onto your image.

The Flower2 layer appears in the Layers panel, above the Pineapple copy layer.
![]() Tip
Tip
You can drag images from a Bridge window to Photoshop as easily as you can drag from the Windows or Mac desktop.
-
Now that you are done importing, you can make the Photoshop application window larger again if it will give you more room to work comfortably.
-
Position the Flower2 layer in the lower-left corner of the postcard so that about half of the top flower is visible.
-
Click the Commit Transform button (
) in the options bar to accept the layer. Its layer icon indicates that Photoshop placed the image as a Smart Object, which is a layer you can edit without making permanent changes. You’ll work more extensively with Smart Objects in Lesson 5, “Quick Fixes.” NoteIf you don’t see the Commit Transform button in the options bar, the Photoshop application window may be too narrow. Either resize the window to be wider, or press the Enter or Return keyboard shortcut for committing an edit.
Adding text
Now you’re ready to create some type using the Horizontal Type tool, which places the text on its own type layer. You’ll then edit the text and apply a special effect.
-
Make the HAWAII layer visible. You’ll add text just below this layer and apply special effects to both layers.
-
Choose Select > Deselect Layers to ensure that no layers are selected.
-
In the Tools panel, select the Horizontal Type tool (
 ). Then choose Window > Character to open the Character panel. Do the following in the Character panel:
-
Select a condensed font (we used Birch Std, which you can add from Adobe Fonts; if you use a different font, adjust other settings accordingly).
-
Select a font style (we used Regular).
-
Select a large font size (we used 36 points).
-
Select a large tracking value (
 ) (we used 250).
 -
Click the color swatch, select a shade of grassy green in the Color Picker, and click OK to close the Color Picker.
-
If the font does not have a bold variant, click the Faux Bold button (
 ). Tip
If a font has a bold variant, always choose that instead of applying the Faux Bold option. True bold fonts are precisely crafted to be typographically consistent and well designed; Faux Bold is computer generated.
-
Click the All Caps button (
 ).
). -
Select Crisp from the Anti-aliasing menu (
 ).
).
-
-
In the options bar or Paragraph panel, click the Center Text icon (
 ).
). -
Click just below the “W” in the word “HAWAII,” and type Island Paradise, replacing the selected placeholder text that appears. Then click the Commit Any Current Edits button (
) in the options bar.
As you type, the text expands out from the center because you selected centered text alignment. The Layers panel now includes a layer named Island Paradise with a “T” thumbnail, indicating that it is a type layer. This layer is at the top of the layer stack because no layers were selected when it was created.
-
If the text is slightly off center relative to the “HAWAII” text, select the Move tool (
), and drag to reposition the “Island Paradise” text layer as needed.
Applying a gradient to a layer
You can apply a color gradient to all or part of a layer. In this example, you’ll apply a gradient to the word “HAWAII” to make it more colorful. First you’ll select the letters, and then you’ll apply the gradient.
-
Select the HAWAII layer in the Layers panel to make it active.
-
Right-click or Control-click the thumbnail in the HAWAII layer, and choose Select Pixels.
NoteMake sure you click the thumbnail, rather than the layer name, or you’ll see a different context menu.

All non-transparent pixels on the HAWAII layer (the white lettering) are selected. Now that you’ve selected the area to fill, you’ll apply a gradient.
![]() Note
Note
Though the layer contains the word “HAWAII,” it is no longer an editable type layer. The text was rasterized (converted to pixels).
-
In the Tools panel, select the Gradient tool (
 ).
). -
Click the Foreground Color swatch in the Tools panel, select a bright shade of orange in the Color Picker, and click OK. The Background Color should still be white.
-
In the options bar, make sure that Linear Gradient (
 ) is selected.
 -
In the options bar, click the arrow next to the Gradient Editor box to open the Gradient Picker. Select the Foreground To Background swatch (it’s the first one in the Basics group), and then click anywhere outside the Gradient Picker to close it.
TipTo list the gradient options by name rather than by sample, click the menu button in the Gradient Picker, and choose either Small List or Large List. Or, hover the pointer over a thumbnail until a tool tip appears, showing the gradient name.

-
With the selection still active, drag the Gradient tool from the bottom to the top of the letters. If you want to be sure you drag straight up, hold down the Shift key and then drag. When the pointer reaches the top of the letters, release the mouse button.
TipYou can also apply a gradient that’s already saved as a preset in the Gradients panel. See the sidebar “Using the Gradients panel” later in this chapter.
The gradient extends across the type, starting with orange at the bottom and gradually blending to white at the top.
-
Save the work you’ve done so far.
Applying a layer style
You can enhance a layer by adding a shadow, stroke, satin sheen, or other special effect from a collection of automated and editable layer styles. These styles are easy to apply, and they link directly to the layer you specify.
Like layers, layer styles can be hidden by clicking their eye icons (![]() ) in the Layers panel. Layer styles are nondestructive, so you can edit or remove them at any time.
) in the Layers panel. Layer styles are nondestructive, so you can edit or remove them at any time.
Earlier, you used a layer style to add a stroke to the beach photo. Now, you’ll add drop shadows to the text to make it stand out.
Select the Island Paradise layer, and then choose Layer > Layer Style > Drop Shadow.
TipYou can also open the Layer Style dialog box by clicking the Add A Layer Style button at the bottom of the Layers panel and then choosing Drop Shadow or another layer style from the pop-up menu.
In the Layer Style dialog box, make sure that the Preview option is selected, and then, if necessary, move the dialog box so that you can see the “Island Paradise” text in the image window. A drop shadow is now applied.
In the Structure area, select Use Global Light, and then specify the following settings:
Blend Mode: Multiply
Opacity: 75%
Angle: 78 degrees
Distance: 5 px
Spread: 30%
Size: 10 px
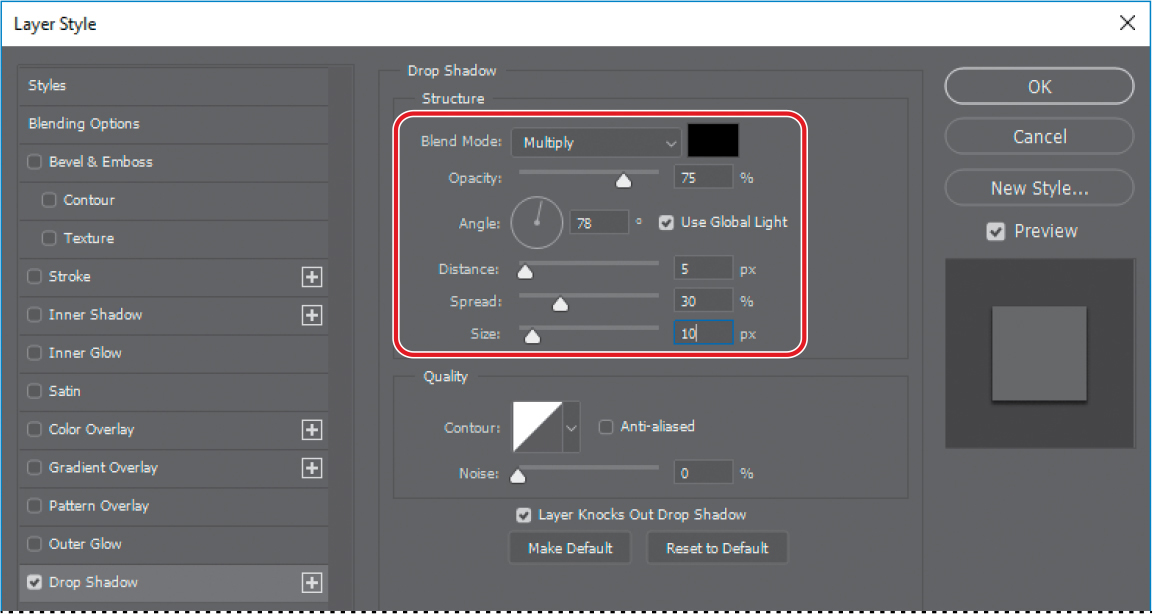
When Use Global Light is selected, a global (shared) lighting angle is available in many layer effects that use shading. If you set a lighting angle in one of these effects, every other effect with Use Global Light selected inherits the same angle setting.
![]() Tip
Tip
You can also change Global Light settings by choosing Layer > Layer Style > Global Light.
Angle determines the lighting angle at which the effect is applied to the layer. Distance determines the offset distance for a shadow or satin effect. Spread determines how gradually the shadow fades toward the edges. Size determines how far the shadow extends.
Because the Preview option is selected, as you make changes Photoshop updates the drop shadow preview in the document window.
Click OK to accept the settings and close the Layer Style dialog box.

In the Layers panel, the layer style appears nested in the Island Paradise layer. An Effects heading is listed first, and under that, the layer styles applied to the layer appear. An eye icon (![]() ) appears next to the effect category and next to each effect. To turn off an effect, click its eye icon. Click the visibility column again to restore the effect. To hide all layer styles for that layer, click the eye icon next to Effects. To collapse the list of effects, click the arrow to the right of the layer name.
) appears next to the effect category and next to each effect. To turn off an effect, click its eye icon. Click the visibility column again to restore the effect. To hide all layer styles for that layer, click the eye icon next to Effects. To collapse the list of effects, click the arrow to the right of the layer name.
![]() Tip
Tip
If you expect to use a layer style frequently in multiple documents, add it to your Creative Cloud Libraries. First create or open a library. In the document, select a layer that uses the style, click the Add Content button (![]() ) at the bottom of the Libraries panel, and then click Layer Style. Now you can apply that style to any open Photoshop document.
) at the bottom of the Libraries panel, and then click Layer Style. Now you can apply that style to any open Photoshop document.
Make sure that eye icons appear for both items nested in the Island Paradise layer.
Press Alt (Windows) or Option (macOS), and in the Layers panel, drag the Effects listing or the fx symbol (
 ) for the Island Paradise layer onto the HAWAII layer.
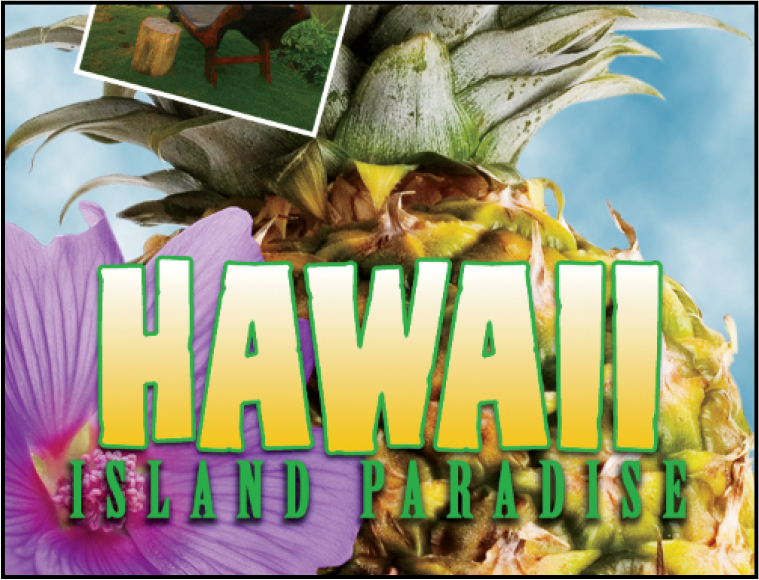
The Drop Shadow layer style is applied to the HAWAII layer, copying the settings you applied to the Island Paradise layer. Now you’ll add a green stroke around the word “HAWAII.”
Select the HAWAII layer in the Layers panel, click the Add A Layer Style button (
) at the bottom of the panel, and then choose Stroke from the pop-up menu.In the Structure area of the Layer Style dialog box, specify the following settings:
Size: 4 px
Position: Outside
Blend Mode: Normal
Opacity: 100%
Color: Green (Select a shade that goes well with the one you used for the “Island Paradise” text.)
TipHere’s a quick way to match the color of the “Island Paradise” text. When the Color Picker is open for the Stroke Color, position the pointer outside the Color Picker dialog box so that it changes into an eyedropper icon. Click the Island Paradise to sample its green color, loading it into the Color Picker.

Click OK to apply the stroke.
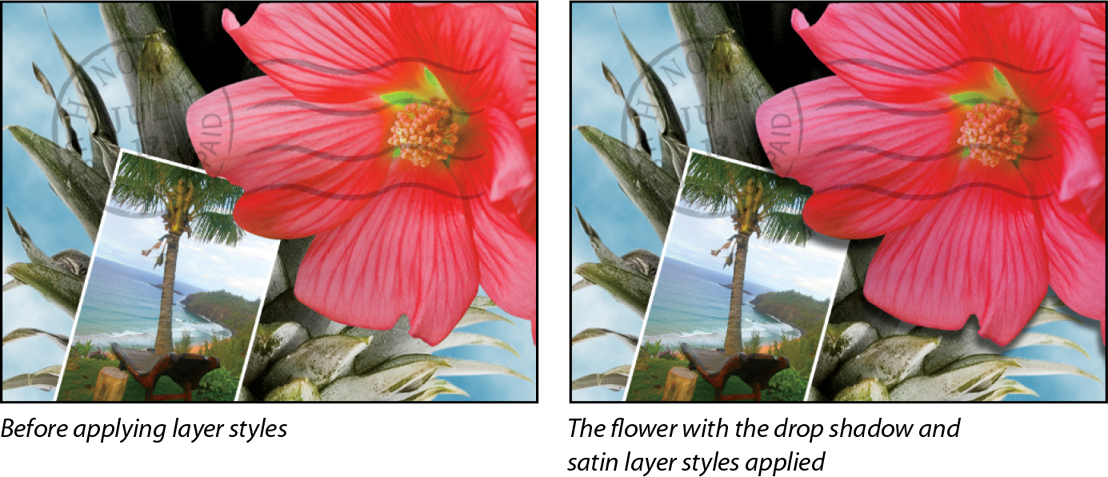
Now you’ll add a drop shadow and a satin sheen to the flower.
Select the Flower layer, and choose Layer > Layer Style > Drop Shadow. Then change the following settings in the Structure area:
Opacity: 60%
Distance: 13 px
Spread: 9%
Make sure Use Global Light is selected and that the Blend Mode is Multiply. Do not click OK.

With the Layer Style dialog box still open, click the word “Satin” on the left to select it and display its options. Then make sure Invert is selected, and apply the following settings:
NoteBe sure to click the word “Satin.” If you click only the check box, Photoshop applies the layer style with its default settings, but you won’t see the options.
Color (next to Blend Mode): Choose a color that enhances the flower color, such as a fuchsia hue
Opacity: 20%
Distance: 22 px
The Satin layer effect applies interior shading to create a satiny finish. The contour controls the shape of the effect; Invert flips the contour curve.

Click OK to apply both layer styles. In the Layers panel you can see the two layer styles applied to the Flower layer, and you can use the eye icons to see what the Flower layer looks like with and without the layer styles applied.
Adding an adjustment layer
You can add adjustment layers to apply color and tonal adjustments without permanently changing the pixel values in the image. For example, if you add a Color Balance adjustment layer to an image, you can experiment with different colors repeatedly, because the change occurs only on the adjustment layer. If you decide to return to the original pixel values, you can hide or delete the adjustment layer.
You’ve used adjustment layers in other lessons. Here, you’ll add a Hue/Saturation adjustment layer to change the color of the purple flower. An adjustment layer affects all layers below it in the image’s stacking order unless a selection is active when you create it or you create a clipping mask.
Select the Flower2 layer in the Layers panel.
Click the Hue/Saturation icon in the Adjustments panel to add a Hue/Saturation adjustment layer.

In the Properties panel, apply the following settings:
Hue: 43
Saturation: 19
Lightness: 0
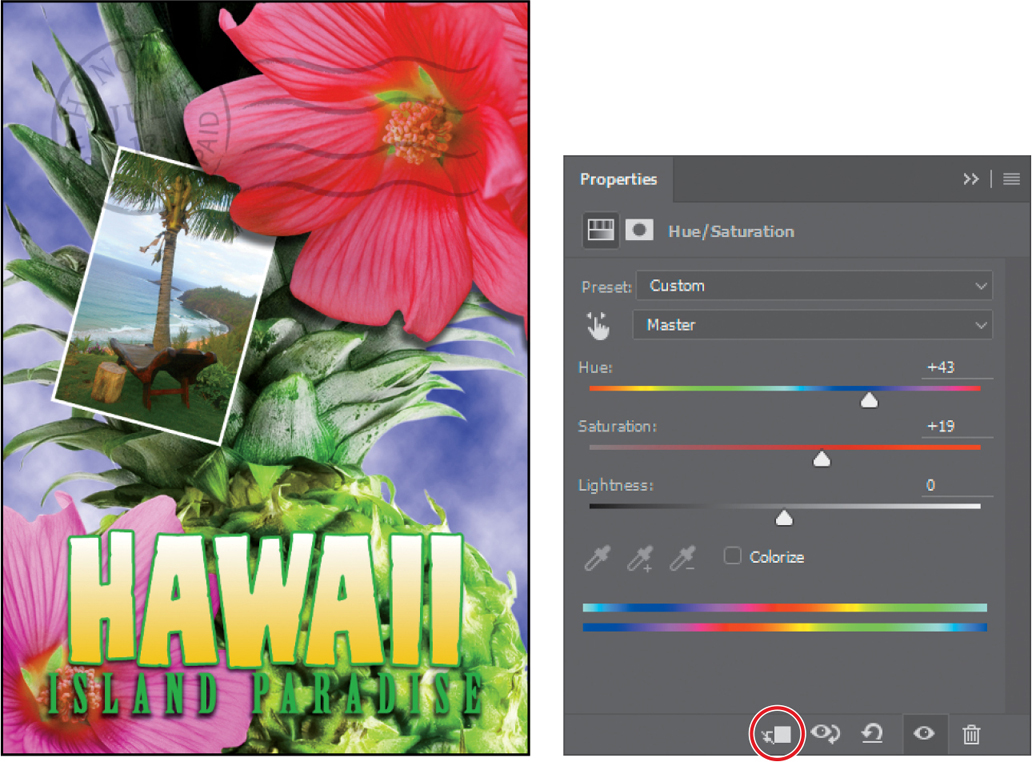
The changes affect the Flower2, Pineapple Copy, Pineapple, Clouds, and Background layers. The effect is interesting, but you want to change only the Flower2 layer.
In the Properties panel, click the Create Clipping Mask button (
 ). It’s the first button along the bottom of the panel, and you see it when the Properties panel displays options for a layer that can become a clipping mask, such as an adjustment layer. Tip
You can also find the Create Clipping Mask and Release Clipping Mask commands (and their keyboard shortcut) on the Layer menu, on the Layers panel menu, and by right-clicking the layer name. You can also create a clipping mask for a layer by Alt-clicking (Windows) or Option-clicking (macOS) the line under that layer in the Layers panel.
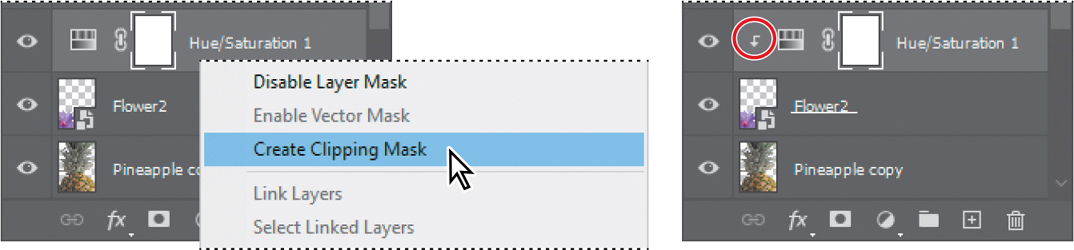
An arrow appears in the Layers panel, indicating that the adjustment layer applies only to the Flower2 layer. You’ll learn more about clipping masks in Lesson 6, “Masks and Channels,” and Lesson 7, “Typographic Design.”
Updating layer effects
Layer effects are automatically updated when you make changes to a layer. You can edit the text and watch how the layer effect updates to match.
-
Select the Island Paradise layer in the Layers panel.
-
In the Tools panel, select the Horizontal Type tool (
). -
In the options bar, change the Size by a few points, and press Enter or Return.
You changed the settings for the entire type layer, even though you didn’t select the text by highlighting the characters (as you would have to do in a word processing program). This worked because in Photoshop, you can change settings for an entire type layer by selecting it in the Layers panel, as long as a type tool is selected.
If you add more text to a layer that has a layer effect applied to it, the new text takes on the same layer effect. Changing the type size may leave too little space above the “Island Paradise” and “HAWAII” type layers, so if you need to, you can adjust that.
-
Select the Move tool (
), and drag the “Island Paradise” type layer as needed.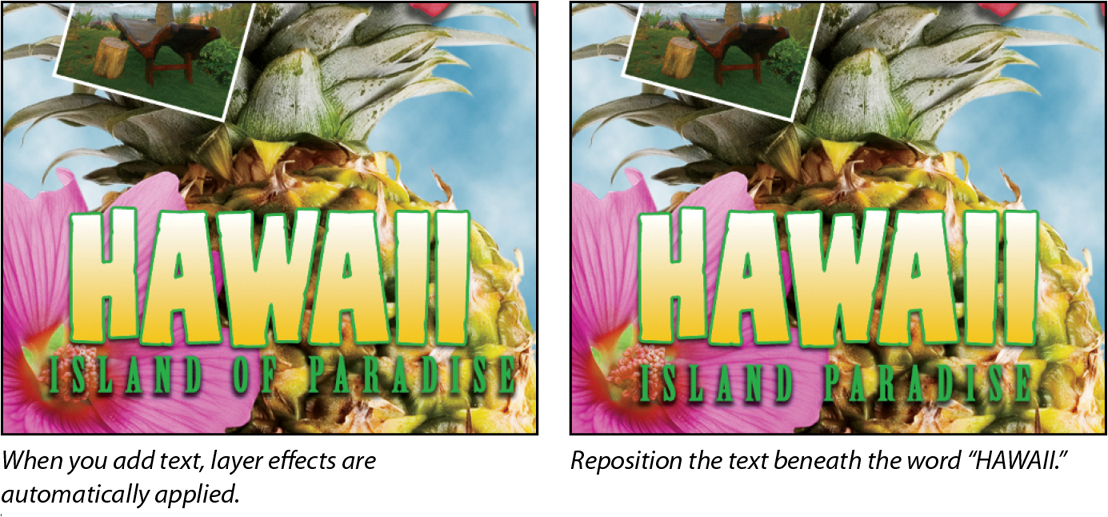
-
Choose File > Save.
Creating a border from a selection
The Hawaii postcard is nearly done. The elements are almost all arranged correctly in the composition. You’ll finish up by positioning the postmark and then adding a white postcard border.
![]() Note
Note
The Auto-Select option can save time by letting you select a layer by clicking it with the Move tool, instead of having to select it in the Layers panel. But in documents where many layers overlap, if clicking keeps selecting the wrong layer, try turning off Auto-Select.
-
Select the Move tool, and in the options bar, make sure Auto-Select is disabled.
-
Select the Postage layer, and then use the Move tool (
) to drag it to the middle right of the image, as in the illustration.
-
Select the Island Paradise layer in the Layers panel, and then click the Create A New Layer button (
) at the bottom of the panel. -
Choose Select > All.
-
Choose Select > Modify > Border. In the Border Selection dialog box, type 10 pixels for the Width, and click OK.
A 10-pixel border is selected around the entire image. Now, you’ll fill it with white.
-
Select white for the Foreground Color, and then choose Edit > Fill.
-
In the Fill dialog box, choose Foreground Color from the Contents menu, and click OK.
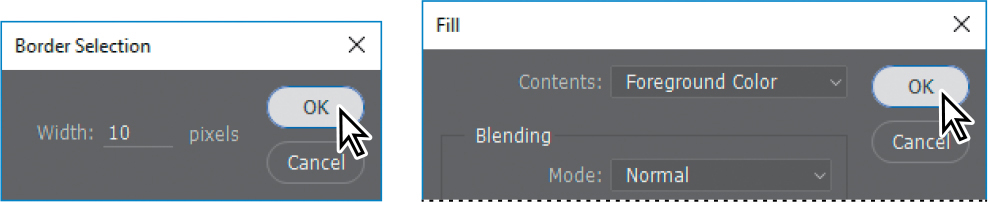
-
Choose Select > Deselect.
-
Double-click the Layer 1 name in the Layers panel, and rename the layer Border.

Flattening and saving files
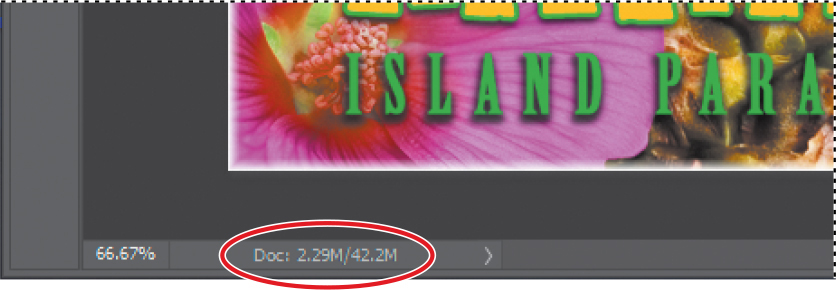
When you finish editing all the layers in your image, you can merge or flatten layers to reduce the file size. Flattening combines all the layers into a single background layer. However, you cannot edit layers once you’ve flattened them, so you shouldn’t flatten an image until you are certain that you’re satisfied with all your design decisions. Rather than flattening your original PSD files, it’s a good idea to save a copy of the file with its layers intact, in case you need to edit a layer later.
To appreciate what flattening does, notice the two numbers for the file size in the status bar at the bottom of the document window. The first number represents what the file size would be if you flattened the image. The second number represents the file size without flattening. This lesson file, if flattened, would be 2–3MB, but the current file is much larger. So flattening is well worth it in this case.
![]() Note
Note
If the sizes do not appear in the status bar, click the status bar pop-up menu arrow, and choose Document Sizes.
Select any tool except the Type tool (
), to be sure that you’re not in text-editing mode. Then choose File > Save (if it is available) to be sure that all your changes have been saved in the file.Choose Image > Duplicate.
In the Duplicate Image dialog box, name the file 04Flat.psd, and click OK.
Leave the 04Flat.psd file open, but close the 04Working.psd file.
Choose Flatten Image from the Layers panel menu.
TipThe Flatten Image command is also on the Layer menu and on the context menu when you right-click/Control-click a layer name.

Only one layer, named Background, remains in the Layers panel.

Choose File > Save. Even though you chose Save rather than Save As, the Save As dialog box appears, because this document has not yet been saved to storage.
Make sure the location is on your computer in the Lessons/Lesson04 folder, and then click Save to accept the default settings and save the flattened file.
You have saved two versions of the file: a one-layer, flattened copy as well as the original file, in which all the layers remain intact.
![]() Tip
Tip
Flattening always means merging all layers into one. If you want to merge only some of the layers in a file, click the eye icons to hide the layers you don’t want to merge, and then choose Merge Visible from the Layers panel menu.
You’ve created a colorful, attractive postcard. This lesson only begins to explore the vast possibilities and the flexibility you gain when you master the art of using Photoshop layers. You’ll get more experience and try out different techniques for layers in almost every chapter as you move forward in this book.
Review questions
1 What is the advantage of using layers?
2 When you create a new layer, where does it appear in the Layers panel stack?
3 How can you make artwork on one layer appear in front of artwork on another layer?
4 How can you apply a layer style?
5 When you’ve completed your artwork, what can you do with layers to minimize the file size without changing the quality, dimensions, or compression?
Review answers
1 Layers let you move and edit different parts of an image as discrete objects. You can also hide individual layers as you work on other layers.
2 In the Layers panel, a new layer always appears immediately above the selected layer. If no layer is selected, a new layer appears at the top of the layer list.
3 You can make artwork on one layer appear in front of artwork on another layer by dragging layers up or down the stacking order in the Layers panel or by using the Layer > Arrange commands—Bring To Front, Bring Forward, Send Backward, and Send To Back. However, you can’t change the layer position of a background layer unless you convert it to a regular layer (unlock it or double-click to rename it).
4 To apply a layer style, select the layer, and then click the Add A Layer Style button in the Layers panel, or choose Layer > Layer Style > [style].
5 To minimize file size, you can flatten the image, which merges all the layers onto a single background. It’s a good idea to keep a duplicate with layers intact before you flatten the document, in case you have to make changes to a layer later.