
12. Working with Camera Raw
Lesson overview
In this lesson, you’ll learn how to do the following:
Open a camera raw image in Adobe Camera Raw.
Adjust tone and color in a raw image.
Sharpen an image in Camera Raw.
Synchronize settings across multiple images.
Retouch a portrait in Camera Raw using masked adjustments.

This lesson will take about an hour to complete. To get the lesson files used in this chapter, download them from the web page for this book at adobepress.com/PhotoshopCIB2023. For more information, see “Accessing the lesson files and Web Edition” in the Getting Started section at the beginning of this book.
As you work on this lesson, you’ll preserve the start files. If you need to restore the start files, download them from your Account page.

PROJECT: ADVANCED PHOTO RETOUCHING
Camera raw files give you greater flexibility, especially for adjusting color and tone, when compared to editing JPEG format files from a camera. You can tap into that potential by using Adobe Camera Raw, an application integrated with Photoshop and Bridge.
Getting started
In this lesson, you’ll edit several digital images using Adobe Camera Raw, a plug-in application you can use from within Photoshop or Bridge. You’ll use a variety of techniques to touch up and improve the appearance of digital photographs. You’ll start by viewing the before and after images in Adobe Bridge.
-
Start Photoshop, and then simultaneously hold down Ctrl+Alt+Shift (Windows) or Command+Option+Shift (macOS) to restore the default preferences. (See “Restoring default preferences” on page 5.)
-
When prompted, click Yes to delete the Adobe Photoshop Settings file.
-
Choose File > Browse In Bridge to open Adobe Bridge.
 Note
NoteIf Bridge isn’t installed, the File > Browse In Bridge command in Photoshop will start the Creative Cloud desktop app, which will download and install Bridge. After installation completes, you can start Bridge.
-
In the Favorites panel in Bridge, click the Lessons folder. Then, in the Content panel, double-click the Lesson12 folder to open it.
-
Adjust the thumbnail slider, if necessary, so that you can see the thumbnail previews clearly. Then look at the 12A_Start.crw and 12A_End.psd files.

The original photograph of a Spanish-style church is a camera raw file, so it doesn’t have the usual .psd or .jpg file extension you’ve worked with so far in this book. It was shot with a Canon SLR camera, and its document uses the Canon proprietary .crw file extension. You’ll process this camera raw image to make it brighter, sharper, and clearer, and then save it both as a JPEG file for the web and as a PSD file so that you could work on it further in Photoshop.
![]() Note
Note
We used Adobe Camera Raw 15, which was the current version at the time of publication. Adobe updates Camera Raw frequently; if you’re using a later version, some of the steps in this lesson may not match what you see. Also, if you have used an earlier version of Camera Raw, note that the user interface was significantly redesigned in version 12.3.
-
Compare the 12B_Start.nef and 12B_End.psd thumbnail previews.
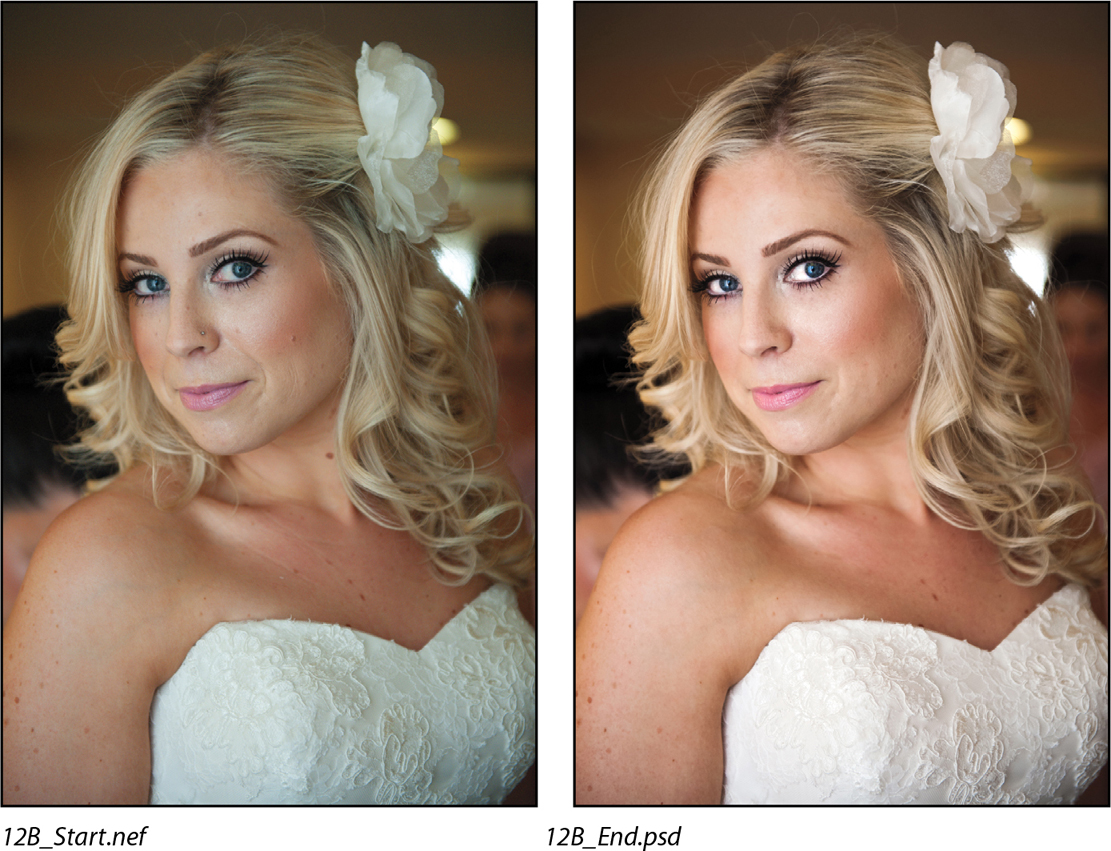
This time, the start file was taken with a Nikon camera, and the raw image has an .nef extension. You’ll perform color corrections and image enhancements in Camera Raw and Photoshop to achieve the end result.
About camera raw files
Many digital cameras can save images in camera raw format. A camera raw file contains unprocessed picture data from a digital camera’s image sensor, somewhat like undeveloped film. Raw sensor data is not yet converted to a standard multiple-channel color image file. It’s still one unprocessed channel of sensor data, and in that form, it is not yet viewable as an image. You might then wonder: How can you view raw files, such as those included with this lesson, on the back of the camera and on your computer before you open them? The answer is that a camera typically saves a raw file with an embedded preview image that represents the camera’s interpretation of the raw data.
Raw processing software such as Adobe Camera Raw interprets the unprocessed raw data into the multiple color channels (such as three RGB channels) that photo editing software such as Photoshop can edit. Camera raw files let you interpret the original image data, giving you more editing flexibility than when you edit a JPEG file saved using the camera’s interpretation of the data. You can use Adobe Camera Raw to make wider and deeper changes to white balance, tonal range, contrast, color saturation, noise reduction, and sharpening than you could if the raw data was already converted to RGB. You can reprocess a raw file at any time, without degrading the original image data.
![]() Note
Note
Camera raw files are typically unique to each camera model’s sensor. If you have CRW files from three different Canon camera models and NEF files from three Nikon models, chances are those represent six different types of sensor data. If you buy a new camera, you might need an Adobe Camera Raw update that adds support for its specific raw data.
To create camera raw files, set your digital camera to save files in raw format instead of JPEG format. A raw file has a manufacturer-specific filename extension such as .nef (from Nikon) or .crw (from Canon). In Bridge or Photoshop, you can process camera raw files from a myriad of supported digital cameras from Canon, Fuji, Leica, Nikon, and other makers. You can then export the proprietary camera raw files to DNG, JPEG, TIFF, or PSD file format.
Should you always capture camera raw images instead of JPEG images? If you want maximum editing flexibility, then yes. However, camera raw images require more space to store and more processing power to edit. If your images need little to no editing after the shot, you could decide to capture and edit JPEG images instead.
Processing files in Camera Raw
When you make adjustments to an image in Camera Raw, such as straightening or cropping the image, Photoshop and Bridge store your edits separately from the original file. You can edit the image as you desire, export an edited version, and keep the original intact for different or improved adjustments in the future.
Opening images in Camera Raw
You can open Camera Raw from either Bridge or Photoshop, and you can edit multiple images in Camera Raw. You can also apply the same edits to multiple files simultaneously. That’s useful if you’re working with images that were all shot in the same environment and that therefore need similar adjustments.
![]() Tip
Tip
You can open and edit TIFF and JPEG images in Camera Raw, if those formats are enabled in the File Handling preferences for Camera Raw. But those formats don’t provide the same range of adjustments as a camera raw file.
Camera Raw provides extensive controls for adjusting white balance, exposure, contrast, sharpness, tone curves, and much more. In this exercise, you’ll edit one image and then apply the settings to similar images.
-
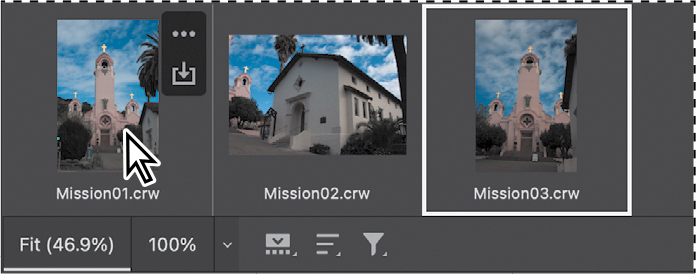
In Bridge, open the Lessons/Lesson12/Mission folder, which contains three shots of the Spanish church you previewed earlier.
-
Shift-click to select all of the images—Mission01.crw, Mission02.crw, and Mission03.crw—and then choose File > Open In Camera Raw.
-
If a Welcome to Camera Raw 15.0 screen appears, click Get Started.
Both the Set Up Camera Raw and Welcome to Camera Raw 15.0 screens appear only the first time you start Camera Raw 15 or the first time after you reset Camera Raw preferences (which are separate from Photoshop preferences).
![]() Note
Note
If a Set Up Camera Raw screen appears, make sure New ACR Default is selected, and click OK.
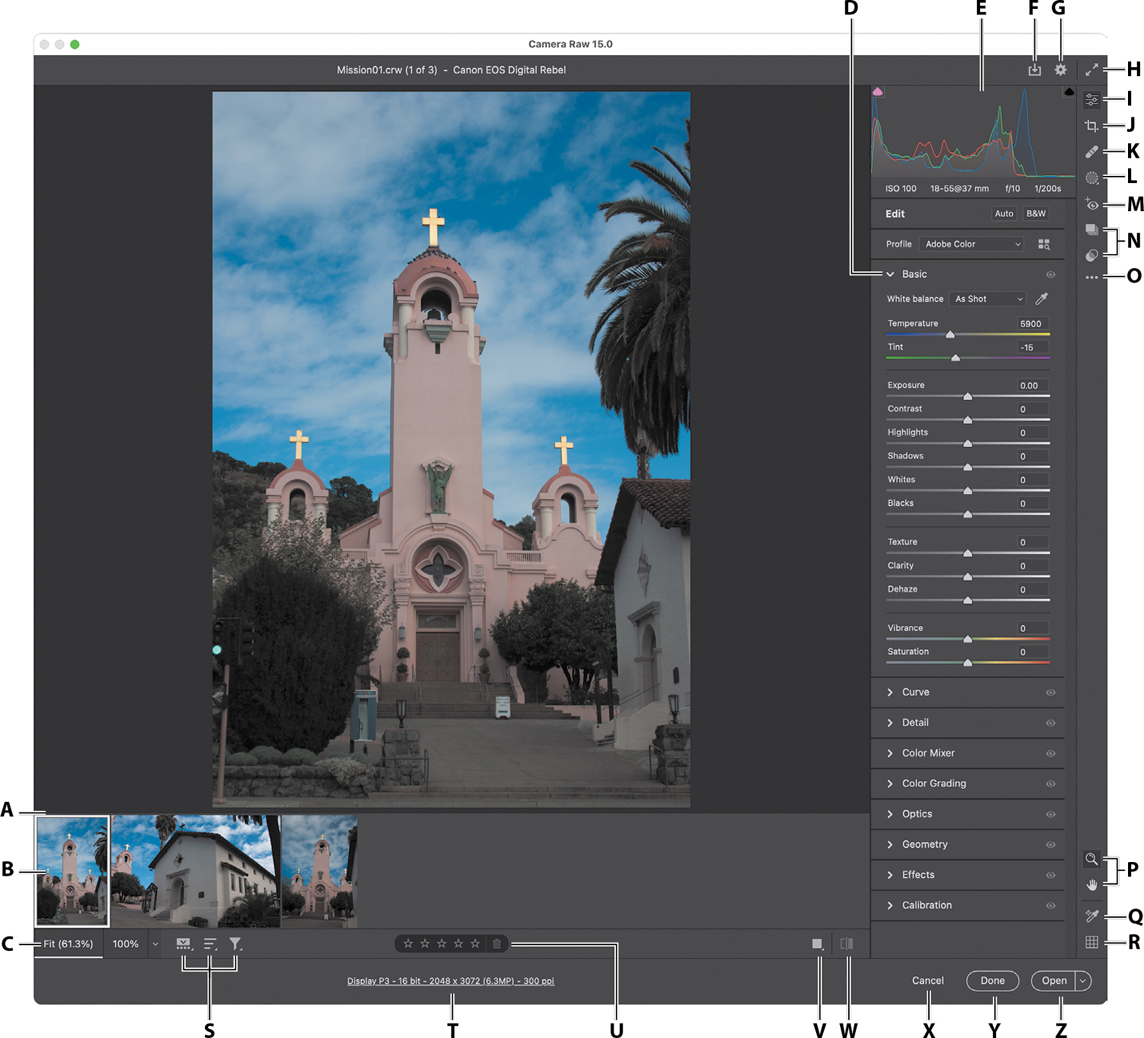
A. Filmstrip divider (drag to adjust)
B. Filmstrip
C. Zoom levels menu
D. Collapsible adjustments panels (in Edit mode; other modes display other options)
E. Histogram
F. Save a copy, with edits, of selected images
G. Camera Raw preference settings
H. Toggle Full Screen mode
I. Edit (image adjustments)
J. Crop & Rotate
K. Healing
L. Masking (local) adjustments
M. Red Eye Removal
N. Snapshots and Presets
O. More Image Settings menu
P. Zoom and Hand tools
Q. Toggle Sampler Overlay
R. Toggle Grid Overlay
S. Filmstrip, Sort, and Filter menus
T. W orkflow preference settings
U. Rate, and mark for deletion
V. Before/After Views (click to cycle through options, click and hold for options)
W. Toggle between default and current settings
X. Exit and don’t save changes
Y. Exit and save changes
Z. Exit, save changes, and open in Photoshop
-
If the photos appear in a vertical strip along the left side of the Adobe Camera Raw window, click and hold the filmstrip menu button (
 ) and choose Horizontal from the menu that appears. This is so that the layout matches the figures in this lesson. If you prefer the vertical filmstrip, you may use it for your own work.
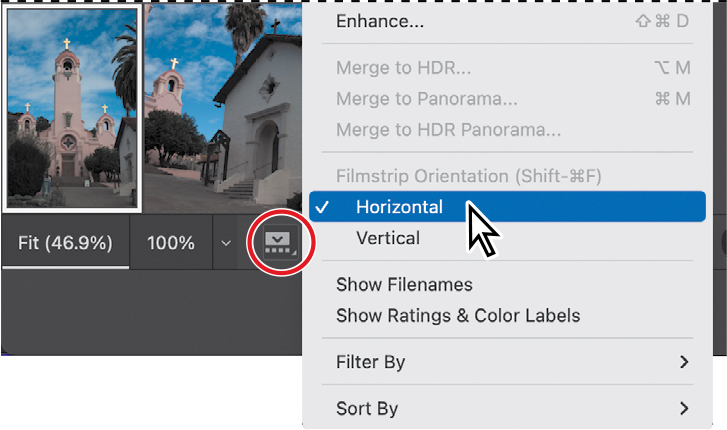
The Camera Raw dialog box displays a large preview of the selected image, and a filmstrip displays all open images. The histogram in the upper-right corner shows the tonal range of the selected image. The workflow options below the preview window control the selected image’s color space, bit depth, size, and resolution, which you can click to change. Tools along the right side of the dialog box let you zoom, pan, crop, straighten, and make other adjustments to the image.
![]() Note
Note
If more than one image is selected in Camera Raw, in the filmstrip the thumbnails for the selected images display a gray border, and the currently previewed image displays a white border.
In the default mode (Edit), Camera Raw displays a stack of collapsible panels under the histogram. You can expand individual panels to edit the selected image’s color, tone, detail (sharpening and noise reduction); correct lens distortions; and more. You can also save settings as a preset so that you can apply them to other images.
![]() Note
Note
When you open a raw format image in Camera Raw, its appearance may seem to change. This is because the preview image created by the camera is replaced by a rendering of the current settings in Camera Raw.
The Camera Raw options within the Edit mode are intentionally organized so that you can get good results by using the tabbed panels from top to bottom. But it’s okay to adjust the options in any order, and you don’t have to adjust every option.
You will explore these controls now as you edit the first image file.
-
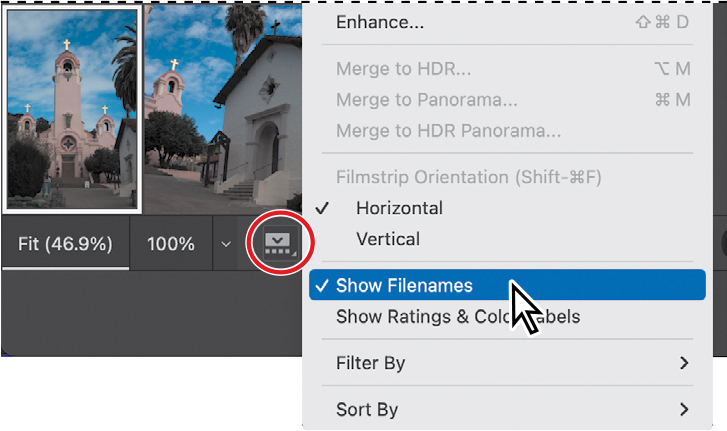
For this lesson it will be useful to see the filenames for each image. Click and hold the filmstrip menu button (
), and choose Show Filenames. NoteIf the filmstrip disappears, it’s because you clicked the filmstrip menu button instead of clicking and holding. Click it again to display the filmstrip.
-
Click each thumbnail in the filmstrip to preview each image before you begin. When you’ve seen all three, select the Mission01.crw image.
 Tip
TipYou can also move among filmstrip images by pressing the Left Arrow or Right Arrow key. But if you clicked an option’s field to edit its value, arrow keys move within the text, so add the Ctrl (Windows) or Command (macOS) key to view other images (for example, press Ctrl/Command-Right Arrow).
Choosing an Adobe Raw profile
An Adobe Raw profile controls the overall color rendering of an image, a separate step combined with the adjustments that you make. You can change the raw profile at any time.
![]() Tip
Tip
If you want the image to look more like the preview generated by the camera, click the Browse Profiles icon to the right of the Profile menu, scroll down to see the list of profile categories, and try a profile from the Camera Matching category.
-
If the Profile panel isn’t already displayed under the histogram, click the Edit button (
 ). The Profile panel is above the controls, so if it isn’t visible, it might be scrolled out of view; scroll the panel stack until you can see the top.
 -
Choose Adobe Landscape from the Profile menu.
NoteAdobe Raw profiles are different than the ICC color profiles used by your display or printer. Raw profiles affect only the conversion and processing of a camera raw file into a conventional image.

The default profile, Adobe Color, is a general-purpose profile. Adobe Landscape emphasizes colors in nature, like trees and skies, and works well for this image. The goal of Adobe Portrait is natural representation of skin tones, and Adobe Vivid adds punchy color contrast. Adobe Monochrome provides a high-quality conversion to black and white.
The profile sets the ranges for the Edit controls, laying the foundation for the more precise edits you’ll make in Camera Raw. If the current profile produces a look that’s far from what you want, it may be difficult to get there using Edit controls alone. It’s better to choose another profile as a better starting point.
![]() Tip
Tip
You can use Creative profiles to apply a visual style to an image. Click the Browse Profiles icon (![]() ) to the right of the Profile menu, scroll down to see the list of profile categories (such as Artistic, B&W, Modern, and Vintage), select one, then click Back.
) to the right of the Profile menu, scroll down to see the list of profile categories (such as Artistic, B&W, Modern, and Vintage), select one, then click Back.
Adjusting white balance
An image’s white balance represents the color conditions under which it was captured. A digital camera records the white balance at the time of exposure; this is the value that initially appears in the Camera Raw dialog box image preview.
White balance comprises two components. The first is temperature, which is measured in kelvins and determines the level of “coolness” or “warmth” of the image—that is, its cool blue-green tones or warm yellow-red tones. The second component is tint, which compensates for magenta or green color casts.
Depending on the settings you’re using on your camera and the environment in which you’re shooting (for example, with artificial light or mixed light sources), you may want to adjust the white balance for the image.
By default, As Shot is selected in the White Balance menu, applying the white balance settings that were in your camera at the time of exposure. If you think you could improve on the current white balance setting, Camera Raw includes several other White Balance presets that you can try.
-
If you can’t see White Balance options under the Profile menu, click the Basic panel heading to expand it.
-
Choose Cloudy from the White Balance menu.
 Tip
TipAdjusting white balance is easiest when there is only one light source. When a scene is lit by multiple light sources with different color characteristics, you may have to manually choose a white balance setting and also make masked color corrections over specific areas.
Camera Raw adjusts the temperature and tint for a cloudy day. Sometimes a preset is an instant fix. In this case, though, there’s still a blue cast to the image. You’ll adjust the white balance manually.
-
Select the White Balance tool (
 ) to the right of the White Balance menu.
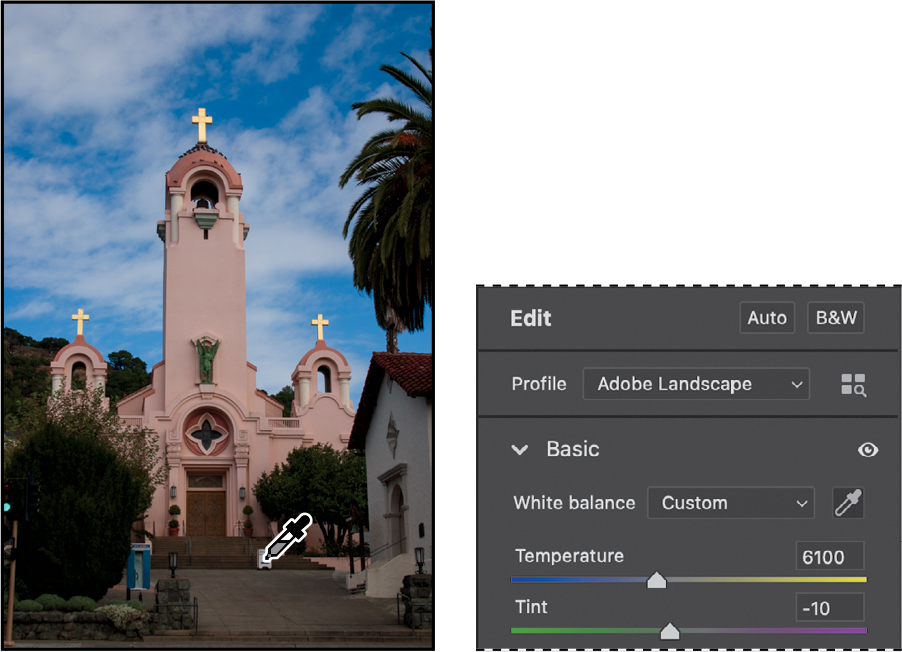
To set an accurate white balance, select an object that should be white or gray. The spot where you click becomes a reference for neutral white balance; Camera Raw shifts the image colors accordingly.
-
Click the white clouds in the image. The color balance of the image changes.
-
Click a different area of the clouds. The color balance shifts again, because that area of the clouds has slightly different color values.
To find the best color balance quickly and easily, click the White Balance tool on an area that should be neutral. Clouds are not always a neutral color, depending on the time of day. In Camera Raw, clicking different areas changes color balance without altering the original image file, so you can experiment freely.
-
Click the white area of the small sign in front of the church. This removes most of the color casts.
TipClicking a known neutral area, such as the sign in step 6, applies White Balance values that result in a neutral image, with unwanted color casts removed. You are then free to use options such as White Balance expressively. For example, apply a higher Temperature value to make a scene appear shot closer to sunset, or simply to evoke a warmer mood.
-
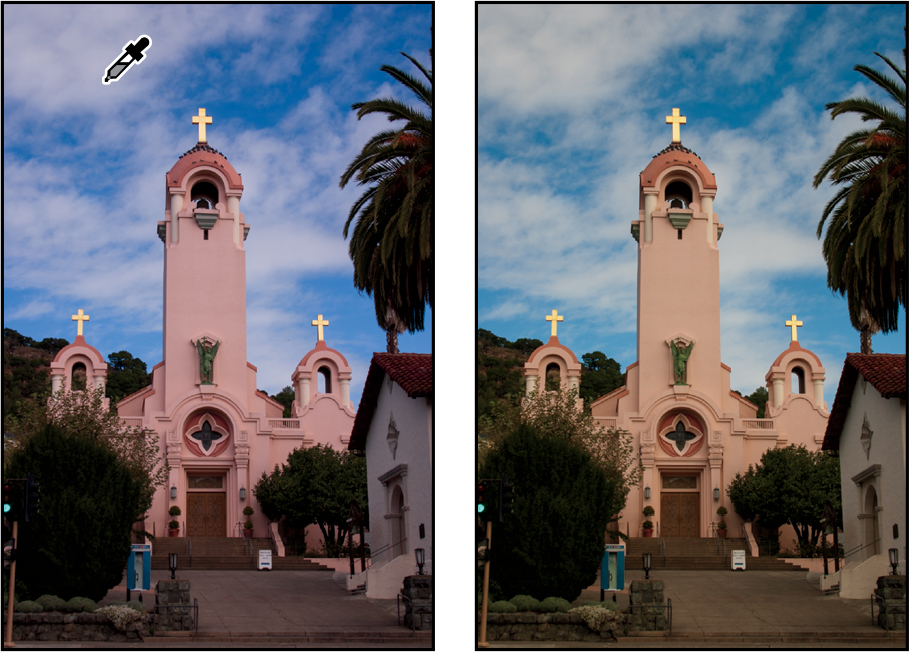
To see the changes you’ve made, click and hold the Before/After Views button (
 ) at the bottom of the window, and choose Before/After Left/Right from the pop-up menu. (If you only click without holding, it cycles to the next option.) Tip
To toggle between current and default settings with the keyboard, press the backslash () key. To cycle through the Before/After Views menu, press Q.

Camera Raw displays the Before image on the left and the After image on the right so you can compare them.
![]() Tip
Tip
To expand Camera Raw to fill the screen, click the Toggle Full Screen Mode button (![]() ) near the top-right corner of the window, or press F.
) near the top-right corner of the window, or press F.

-
To see only the After image again, click and hold the Before/After Views menu and choose Single View. Or, if you prefer, you can leave both views visible so you can see how the image changes as you continue to alter it.
Making tonal adjustments in Camera Raw
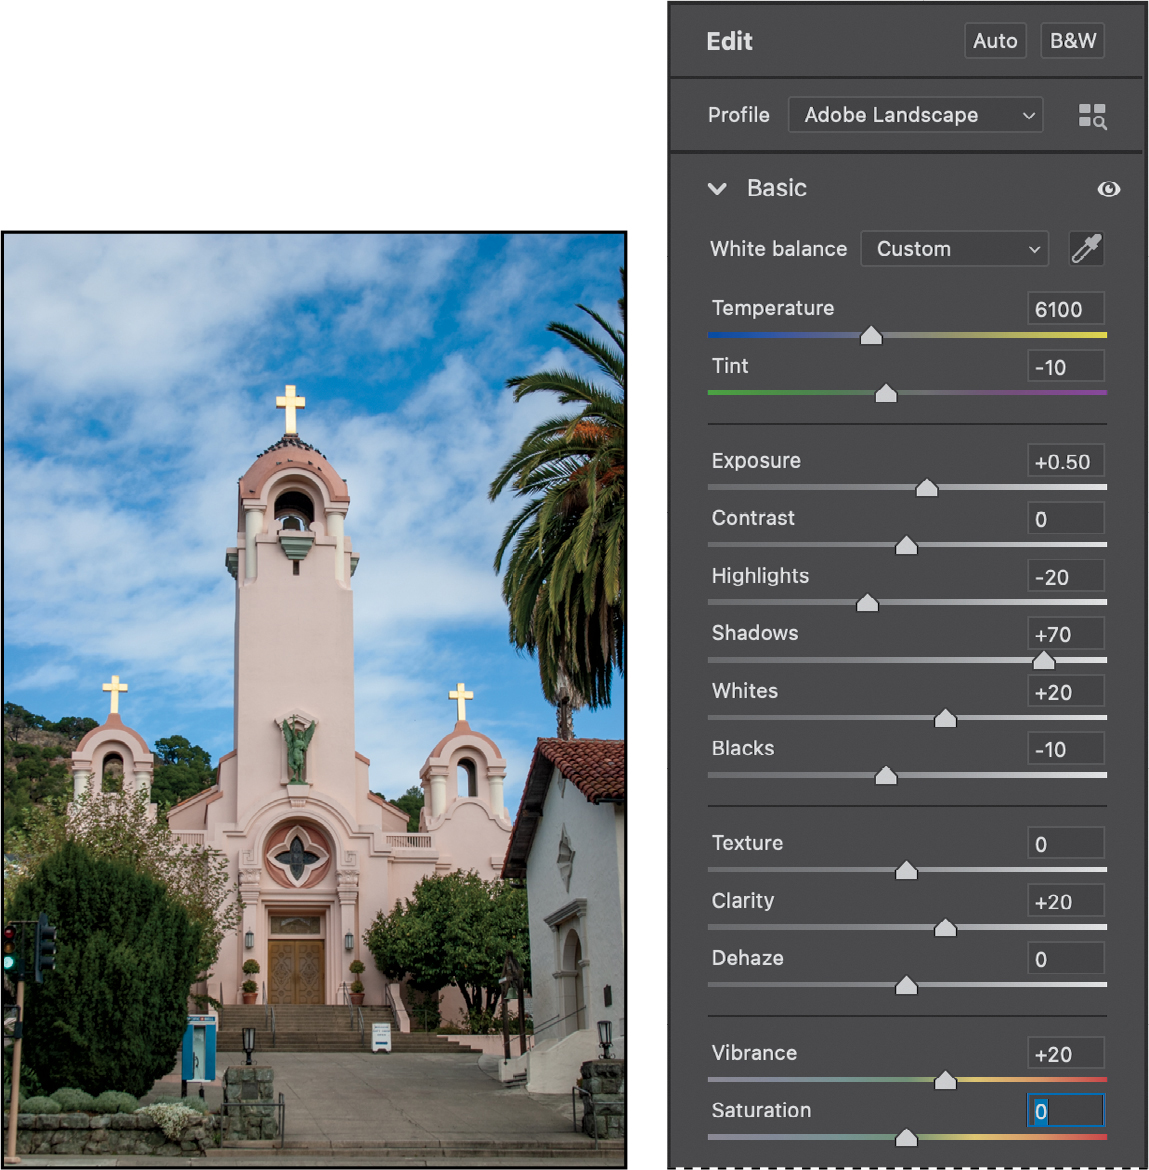
The group of options in the middle of the Basic panel (starting with Exposure) affects how tones are distributed from dark to light in the image. Except for Contrast, moving a slider to the right in that group lightens the areas of the image that it affects, and moving it to the left darkens those areas. Exposure sets the overall brightness of the image. The Highlights and Shadows options control detail in near-white and near-black tones, respectively. The Whites option defines the white point, or the lightest tone of the image; tones above its value are made white. Conversely, the Blacks option sets the black point, or the darkest tone in the image; tones above its value are made black.
Dragging the Contrast slider to the right moves darker and lighter midtones away from the midtone; dragging left moves those tones toward the midtone. For more nuanced contrast adjustments, you can use the Clarity option, which adds depth to an image by increasing local contrast, especially around the midtones.
![]() Tip
Tip
To apply Clarity properly, increase the Clarity slider until you see halos near the edge details, and then reduce the setting until the halos are not distracting.
The Saturation option adjusts the intensity of all colors in the image equally. The Vibrance option is often more useful because it has a greater effect on undersaturated colors. For example, you can use Vibrance to bring life to an image without oversaturating any skin tones in it.
Click Auto at the top of the Edit mode panel stack.
TipClicking Auto again toggles between default settings and Auto settings.
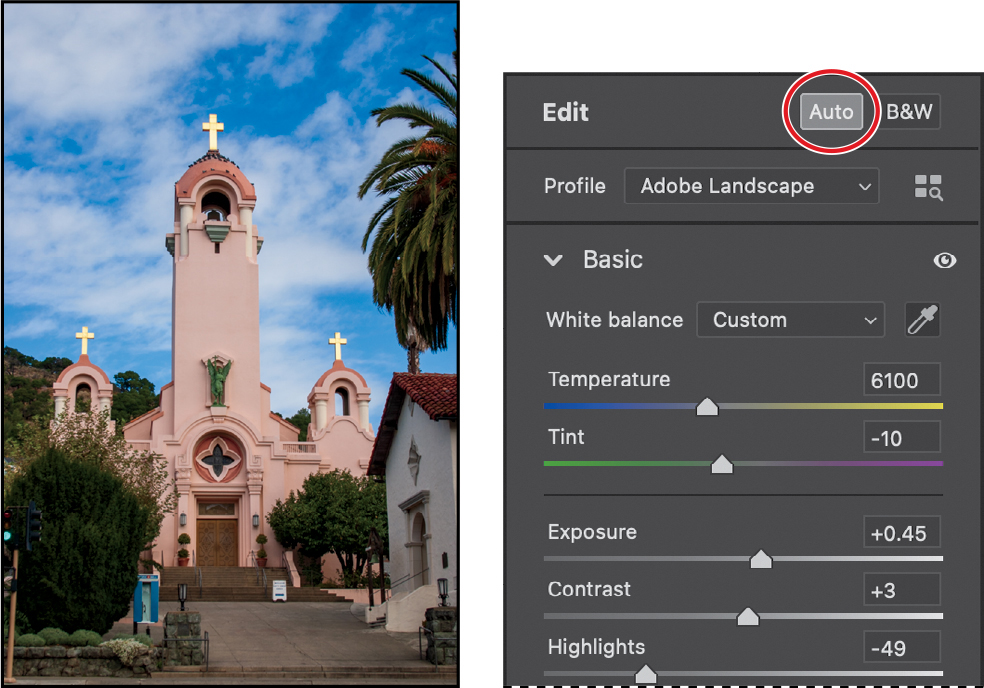
The Auto button changes several settings in the Basic panel, and the image is greatly improved. Auto correction may produce a useful image right away, because it’s based on advanced Adobe Sensei machine learning technology, which is trained using a wide variety of professionally corrected sample images. This makes Auto a quick way to reach a good starting point for your own edits. If you like the results, you can study and learn from the adjustments made by Auto. You can also choose to keep some Auto adjustments and change others. Or you can enter your own adjustments, as you are about to do.
Set the options as follows:
TipWhen adjusting tones, watch out for highlight or shadow clipping (loss of detail from over-adjustment). One way to preview clipping is to hold down the Alt (Windows) or Option (macOS) key while dragging a slider for Exposure, Highlights, Shadows, Whites, or Blacks. When Alt/Option-dragging those sliders, pixels are OK if they appear black (for Exposure, Highlights, and Whites) or white (for Shadows and Blacks); otherwise, they are clipped.
Exposure: +0.50
Contrast: +0
Highlights: -20
Shadows: +70
Whites: +20
Blacks: −10
Clarity: +20
Vibrance: +20
These settings brighten the image, especially the dark shadow areas, and boost color without oversaturating it.
Applying sharpening
Photoshop offers several ways to sharpen, but when an image is in raw format, it’s good to apply basic sharpening in the Detail panel in Camera Raw. To see the best preview of sharpening, view the image at 100% or greater magnification.
![]() Tip
Tip
Sharpening enhances the finest details of an image. The Clarity option in the Basic panel can help emphasize relatively large details. The Texture slider can bring out details that are between the size ranges handled by Sharpening and Clarity. Texture is typically best applied to specific areas using a masked adjustment tool, to avoid emphasizing noise in broad areas.
Click the Zoom Levels menu (
 ) near the bottom-left corner of the window to zoom in to 100%. Then select the Hand tool (
 ), and drag the image preview to pan (slide) it down until you see the cross at the top of the mission tower.
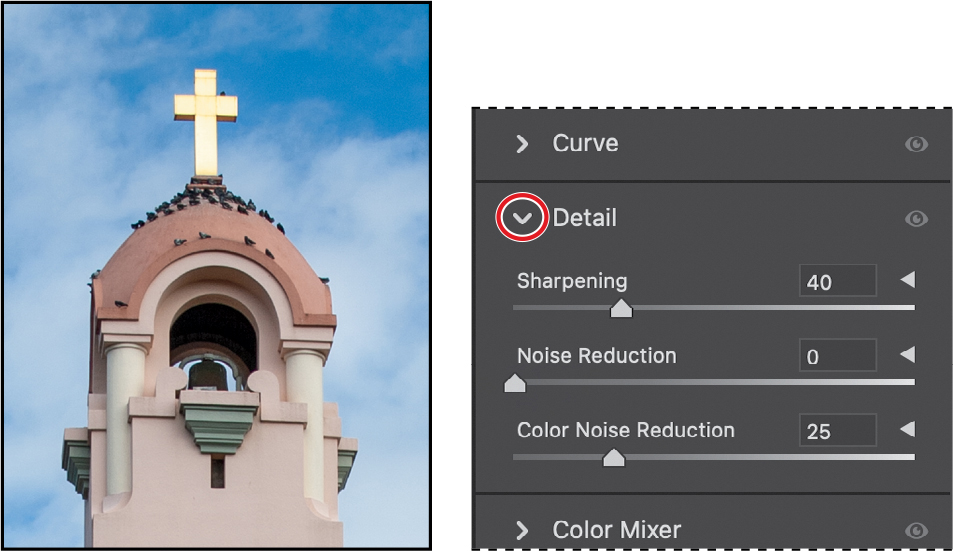
In the Edit mode panel stack under the histogram, scroll down until you see the Detail panel, and click its heading to expand it.
 Tip
TipYou can use keyboard shortcuts to go to each Edit panel directly to avoid scrolling. Press the Ctrl (Windows) or Command (macOS) key along with a number key; the panels are numbered from the Basic panel down. For example, the Detail panel is the third one, so to open it press Ctrl-3 (Windows) or Command-3 (macOS).
The Sharpening option determines how much Camera Raw emphasizes fine details. One approach is to exaggerate the Sharpening value at first to more easily see the effect of other sharpening options, and after those settings are tuned, reduce the Sharpening value back down to a more realistic level.
Change the Sharpening value to 100.

Click the disclosure triangle above the right end of the Sharpening slider to reveal more options.
Many Camera Raw features have advanced options that are hidden to save space. If you see a disclosure triangle along the right side, you know there are more options available there if you need them.
Change the Radius value to 0.9.
The Radius option determines how far out from a pixel that sharpening is applied. For properly focused images without motion blur, a Radius value of 1 pixel works well to start. You might decrease the Radius value for images with fine details that are precisely focused or increase Radius to help sharpen blurred details.
Change the Detail value to 25, unless it’s already set that way.
The Detail option controls the balance between sharpening edges and textures for images with fine details. Lower values draw sharpening toward edges leaving broad areas smoother; higher values can bring out textures in broad areas.
Change the Masking value to 61.
TipWant to see what Masking is actually doing? Press Alt (Windows) or Option (macOS) as you drag the Masking slider. White indicates areas Camera Raw will sharpen; black areas will be left alone.
The Masking slider is similar to the Detail slider in that it helps keep sharpening constrained along content edges, but Masking is more generally useful because it isn’t just for fine details. A higher Masking value makes it easier to increase the Sharpening value without oversharpening noise and textures in broad areas of the image that should look smooth, such as a face or the sky. Lower the Masking value when you want Sharpening to emphasize details in broad areas, such as the weave of threads in fabric.
After you’ve adjusted the Radius, Detail, and Masking sliders, you can lower the Sharpening slider to a more reasonable final value.
Decrease the Sharpening slider to 70.

Your Camera Raw edits are saved in XMP format “sidecar” files that are stored in the same folder as the original file and have the same base filename with an .xmp filename extension. If you also added masked (local) adjustments, you may also see an .acr sidecar file with the same base filename. When you move a raw image edited in Adobe Camera Raw to another computer or storage medium, be sure to move its XMP file (and ACR file, if present) with it. Camera Raw doesn’t save changes into an original raw file, because raw files are intended to be read-only. Adobe Camera Raw can include edits in the same file as the raw image when exporting to the open Adobe DNG raw format.
Synchronizing settings across images
All three of the church images were shot at the same time under the same lighting conditions. Now that you’ve made the first one look great, you can automatically apply the same settings to the other two images using the Synchronize command.
-
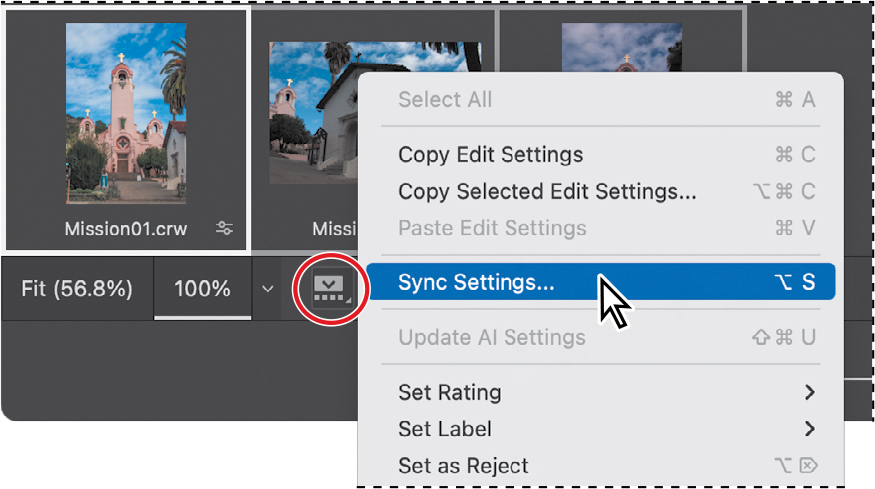
Click and hold the filmstrip menu button (
), and choose Select All to select all of the images in the filmstrip.
-
Click and hold the filmstrip menu button again, and choose Sync Settings.
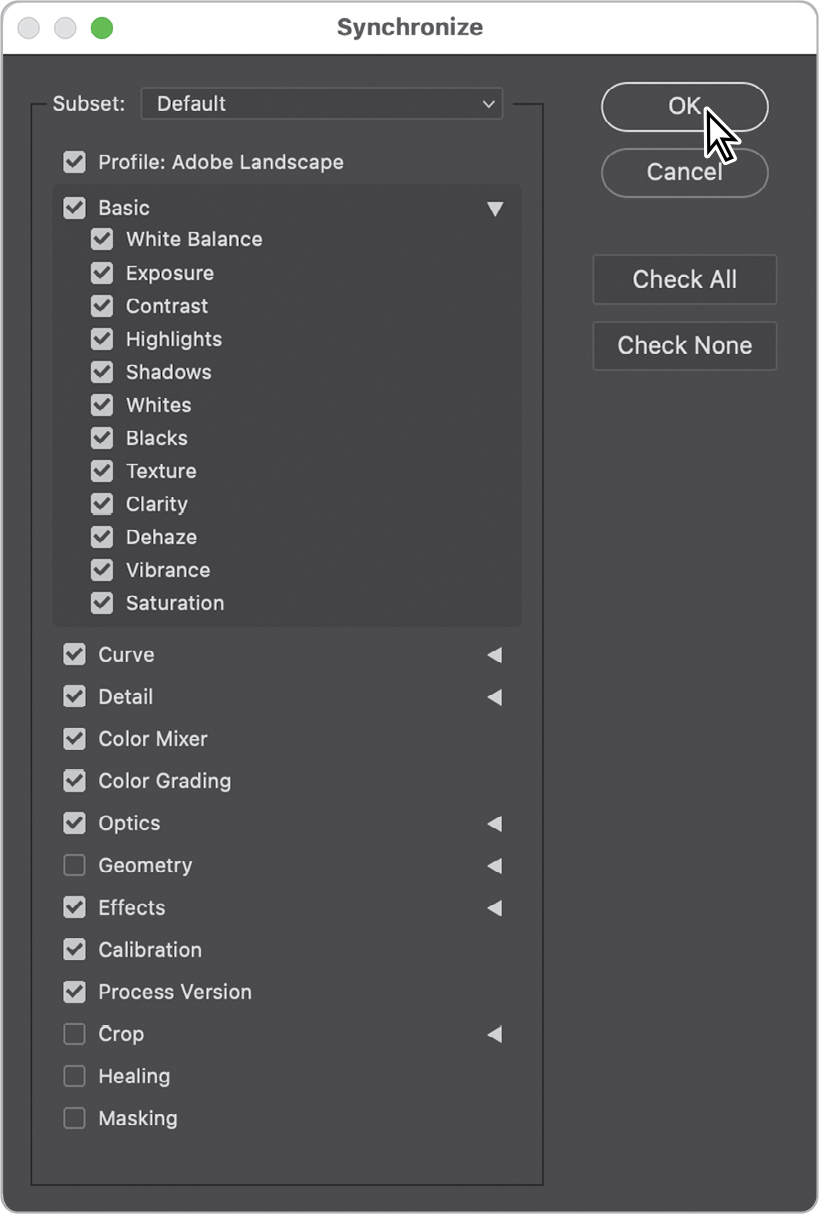
The Synchronize dialog box appears, listing all the settings you can apply to the images. By default, all options except Geometry, Crop, Healing, and Masking are selected. For this project, you can accept the default selections, even though you didn’t change all the settings.
-
Click OK in the Synchronize dialog box.
NoteA yellow alert triangle may temporarily appear over a preview or thumbnail image while Camera Raw is synchronizing settings to that image. When the triangle goes away, the preview or thumbnail is up to date.
When you synchronize the settings across all of the selected images, the thumbnails update to reflect the changes you made. To review the changed images, click each thumbnail in the filmstrip.
![]() Note
Note
It’s always a good idea to review images altered by synchronizing settings. Some images may have slight variations in tone and color that may require a few more minor adjustments.
Saving Camera Raw changes as new files
Many applications don’t read raw files, so before sharing them, it’s typically necessary to save them in a more common image file format. First, you’ll save the images with adjustments as low-resolution JPEG files that you can share on the web. Then, you’ll save one image, Mission01, as a Photoshop file that you can open as a Smart Object in Photoshop. When you open an image as a Smart Object in Photoshop, you can return to Camera Raw at any time to make further adjustments.
In the Camera Raw dialog box, click the filmstrip menu button, and choose Select All to make sure all three images are selected.
Click the Convert And Save Selected Images button (
 ) near the top-right corner of the Camera Raw window.
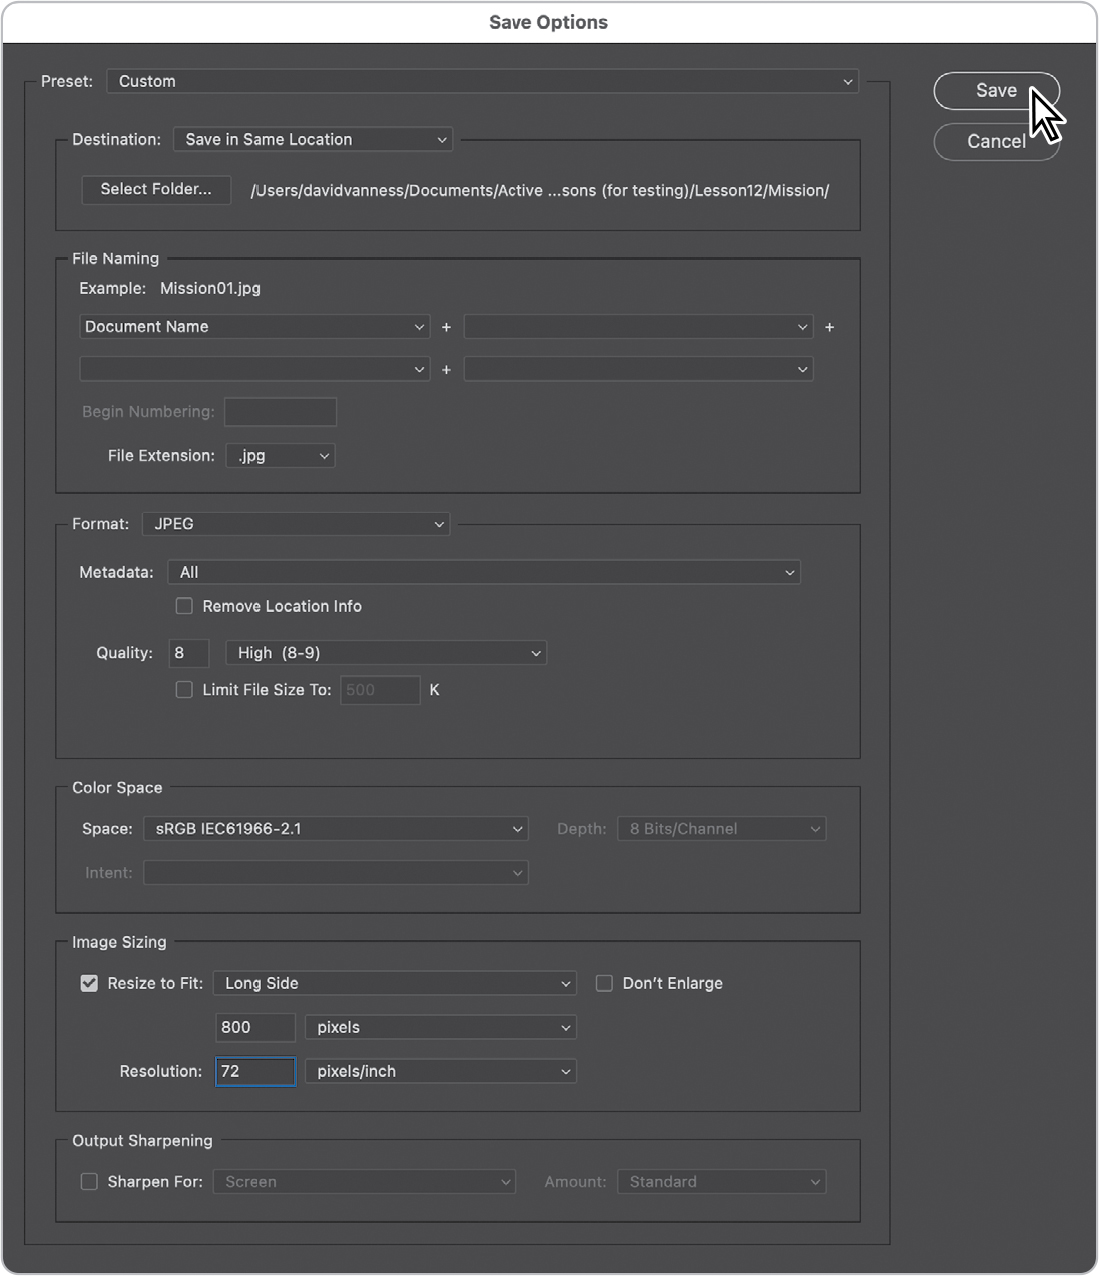
In the Save Options dialog box, do the following:
Choose Save In Same Location from the Destination menu.
In the File Naming area, leave “Document Name” in the first box.
Choose JPEG from the Format menu, and set the Quality level to High (8–9).
In the Color Space area, choose sRGB IEC61966-2.1 from the Space menu.
In the Image Sizing area, select Resize To Fit, and then choose Long Side from the Resize To Fit menu.
Enter 800 pixels. This will set the long side of an image to 800 pixels whether it’s a portrait (tall) or landscape (wide) image. When you choose Long Side, the dimension of the short side will automatically be adjusted proportionally.
Type 72 pixels/inch for the Resolution value.
These settings will save your corrected images as smaller, downsampled JPEG files, which you can share with colleagues on the web. They’ll be resized so that most viewers won’t need to scroll to see the entire image when it opens. Your files will be named Mission01.jpg, Mission02.jpg, and Mission03.jpg.
Click Save.
TipIf your images contain metadata that you consider private, you can restrict what metadata is included when you save copies from Camera Raw. For example, if your images contain camera information, keywords such as names of people, a copyright notice, and other metadata you entered in Bridge, choose Copyright Only from the Metadata menu to include only the copyright notice.
In the Camera Raw dialog box, a readout in the bottom-left corner indicates how many images have been processed until all the images have been saved. The CRW thumbnails still appear in the Camera Raw dialog box. However, in the Mission folder, you now also have JPEG versions as well as the original raw image files, which you can continue to edit or leave for another time.
Now you’ll open a copy of the Mission01 image in Photoshop.
Select the Mission01.crw image thumbnail in the filmstrip in the Camera Raw dialog box. Then click the menu of options to the right of the Open button, and choose Open as Object.
NoteIf you see a message that says “Skip loading optional and third-party plug-ins?” click No. The message appears if the Shift key is held down when Photoshop starts up.
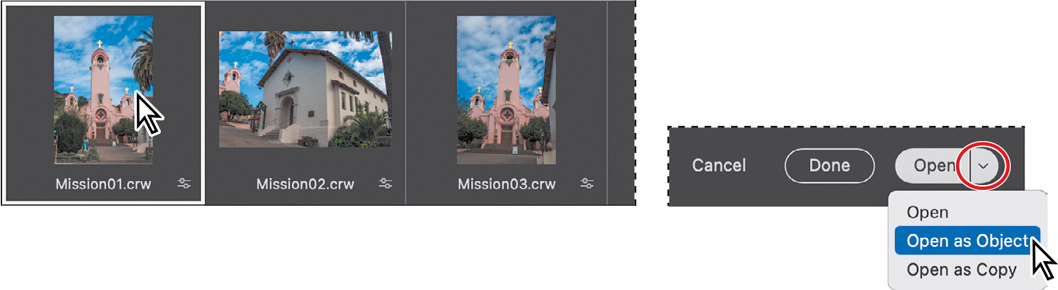
The Open as Object button opens the image as a Smart Object layer in Photoshop: Instead of converting the camera raw file to Photoshop format, it’s preserved in camera raw format inside the Photoshop document. This lets you continue making raw-based adjustments at any time, by double-clicking the Smart Object thumbnail in the Layers panel to open Camera Raw. If, instead, you had clicked Open, the image would be permanently converted into a normal Photoshop layer, and no more raw format edits would be possible.
![]() Tip
Tip
To change the Open button so that it’s always an Open Object button, click the underlined workflow options link at the bottom of the Camera Raw dialog box, select Open In Photoshop As Smart Object, and click OK.

In Photoshop, choose File > Save As. In the Save As dialog box, choose Photoshop for the format, rename the file Mission_Final.psd, navigate to the Lesson12 folder, and click Save. Click OK if the Photoshop Format Options dialog box appears. Then close the file.
NoteIf Photoshop displays a dialog box telling you about the difference between saving to Cloud Documents and On Your Computer, click Save On Your Computer. You can also select Don’t Show Again, but that setting will deselect after you reset Photoshop preferences.
Retouching a portrait in Camera Raw
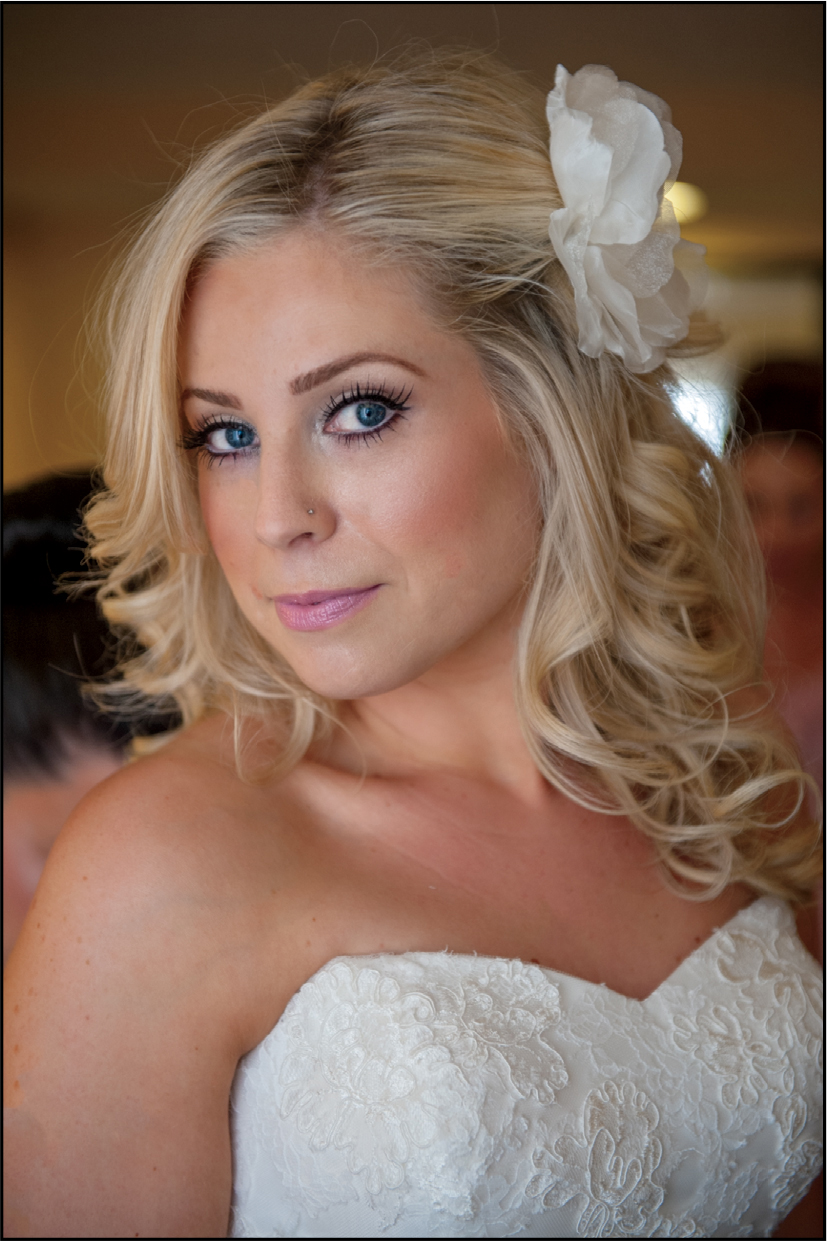
The image editing features in Camera Raw are deep enough that it’s possible to perform most correction tasks at the raw level, using Photoshop only when you need to do more advanced retouching or masking. When you don’t need to continue on to Photoshop, you can simply save finished images directly from Camera Raw. You’ll use a range of Camera Raw tools to improve a raw image of a bride.
Making initial corrections
The default rendering of the raw image uses the Adobe Color profile and has a slight color cast. You’ll get started by correcting both.
-
In Bridge, navigate to the Lesson12 folder. Select the 12B_Start.nef file, and choose File > Open In Camera Raw.
-
In the Edit options, choose Adobe Portrait from the Profile menu, to apply a more portrait-friendly initial rendering.
TipYou can try other profiles to see if they work better. For this image, Adobe Color produces a similar result to Adobe Portrait, but other profiles may be too garish or contrasty for skin tones.
-
In the Basic panel in Camera Raw, select the White Balance tool (
), and then click a white area in the model’s dress to remove a green color cast. Tip
TipIt may work better to click a white area of the dress that is directly lit rather than in shade. The white balance of a neutral area facing the light source is more likely to be consistent with the white balance of the light source. A neutral area in shadow might be shifted by the color of light reflected by nearby surfaces.
-
Click the filmstrip menu button (
 ) to hide it. With only one file open, you don’t need to use the filmstrip. Hiding it frees up more screen space for viewing the image.
 -
In the Edit options, click Auto.
The Auto corrections improve the image; the automatic Highlights adjustment reveals more detail in the white dress and lace hair piece. However, some of the changes go too far, so you’ll edit certain settings.
-
Adjust specific Basic panel options:
TipBe careful when applying Clarity or Texture to a portrait. Higher values may emphasize skin texture and surface characteristics such as freckles and wrinkles. Apply higher Clarity and Texture values only to specific areas, by using the masked adjustment tools covered later.
-
Double-click the slider control for Exposure to reset its value to 0. Double-clicking is a shortcut for resetting an option to its default value.
-
Set Contrast to –20.
-
Set Clarity to +8.

-
Using the Content-Aware Remove tool to correct blemishes
Now you’re ready to give the model’s face some focused attention. You’ll use the Content-Aware Remove tool to hide blemishes and smooth the skin.
![]() Tip
Tip
In Lesson 2, you used the Spot Healing Brush and Patch tool in Photoshop. Camera Raw offers similar Healing tools when you want to make similar edits at the raw editing stage.
-
In the toolbar along the right edge of the Camera Raw window, click the Healing icon (
 ). Under the Histogram, Healing tools replace the Edit tools.
 -
In the Healing options, select the Content-Aware Remove tool (
 ).
).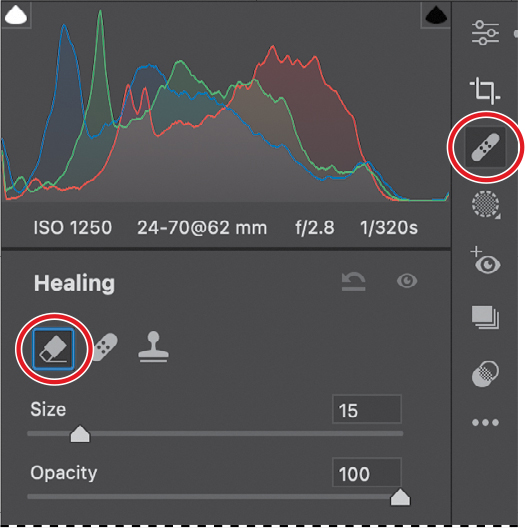
The Content-Aware Remove tool can delete content such as skin blemishes and seamlessly fill them in with surrounding content. It’s similar to the Spot Healing Brush tool you used in Photoshop in Lesson 2.
-
Set the view magnification to 100%.
-
In the Healing options, set Size to 15, and Opacity to 100.
-
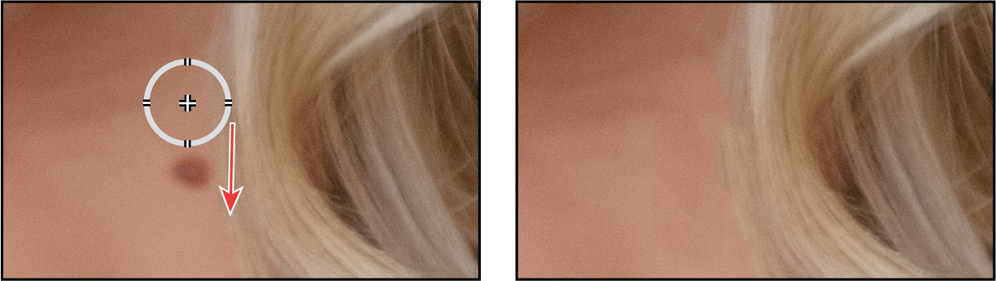
Click one of the spots on the face. The Content-Aware Remove tool fills in the spot you clicked using the content around it.
TipIf the area filled by the Content-Aware Remove tool is not seamless because it used nearby content that’s visually inconsistent, as long as that edit is selected you can Ctrl-drag (Windows) or Command-drag (macOS) somewhere else in the image to define a different source for that edit.
-
Drag the Content-Aware Remove tool over the dark blemish on the neck. Dragging is useful here because the current Size setting may not be able to remove the entire blemish in one click.
-
If Show Controls is enabled in the Healing tools, click to disable it so that you can better see the results of your corrections.
When Show Controls is enabled, you can see the locations of that tool’s edits on the image, represented by icons. This lets you select and then change or delete your edits. When an edit draws from source content elsewhere in the image (more common when using the Heal or Clone tool), Show Controls shows you where the source is and lets you drag the source to change its location.
![]() Tip
Tip
You can toggle Show Controls with the keyboard by pressing the V key.

-
Brush over fine lines around the eyes and mouth. You can also brush away freckles and minor blemishes on her face, neck, arms, and chest. Experiment with simply clicking, using very short strokes, and creating longer brush strokes.
Remove distracting lines and blemishes, but leave enough that the face retains its character. You can practice by removing the jewelry on the nose, but on a real job, it may be preferable to leave the jewelry visible if it’s meaningful to the subject and part of their character. The safe thing to do is to ask the subject before removing personal decoration such as jewelry.

You can also experiment with removing blemishes with the Heal tool instead of the Content-Aware Remove tool. In general, the Heal tool may do a better job of preserving existing textures.
Enhancing the face with masked adjustments
You’ll use masked adjustments to brighten the eyes and lips. A mask constrains the adjustment to a specific area. Applying a Camera Raw masked adjustment is similar to painting white in an adjustment layer mask in Photoshop.
-
Use the Hand tool to change the view so that you can see the eyes.
-
Click the Masking icon (
 ), and then click Brush. The Masking panel appears, listing a New Mask and New Brush in italic because they have not yet been created. They will be created as soon as you use the brush.
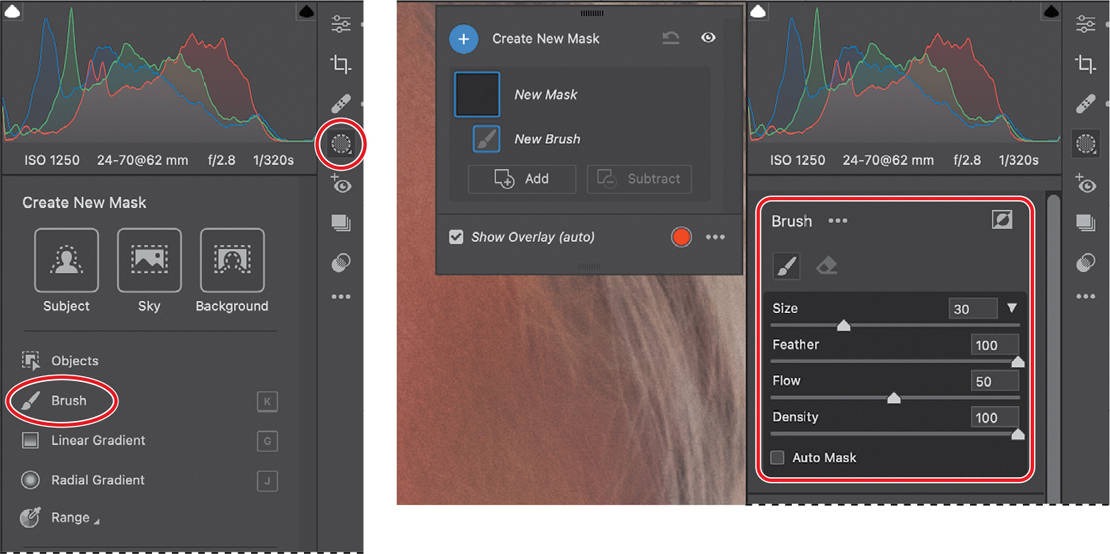
Notice that the Edit settings that were under the histogram are now under a Brush heading. When a masked adjustment is selected in the masks panel, the settings shown are for that selected adjustment—not for the entire image. You’ll change Brush settings to set up what this Brush adjustment will do. You want it to increase the saturation of whatever you brush, in this case the irises of the eyes.
-
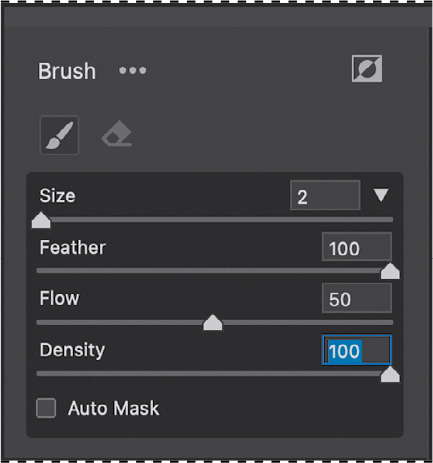
In the Brush options, change settings as follows:
-
Size: 2
-
Feather: 100
-
Flow: 50
-
Density: 100
-
Auto Mask: Off
-
-
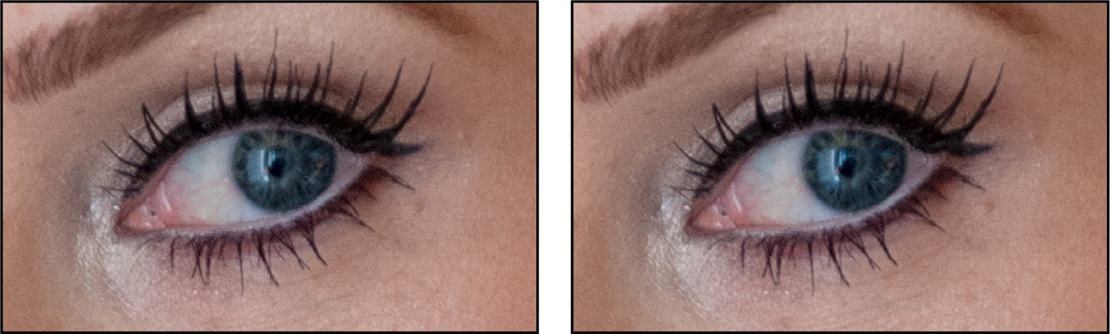
Scroll the Brush settings until you see the Color panel, and set Saturation to +70.

-
Drag the Brush tool over the irises in the eyes to increase their saturation.
-
If you think the irises are oversaturated, make sure Brush 1 is still selected in the masks panel, and then reduce the Saturation value until it looks reasonable.
Mask 1 no longer appears in italics because the mask was created after you brushed. If you make many masks, naming them helps you identify them later.
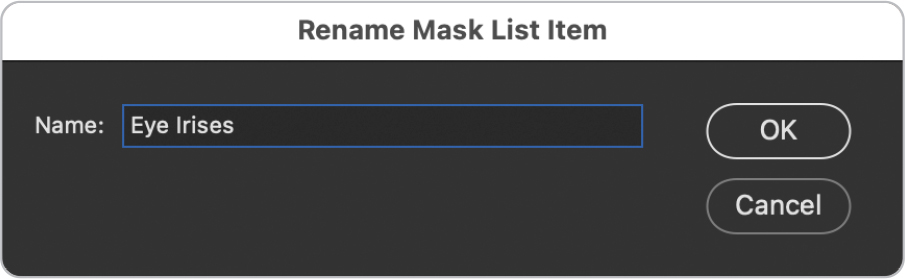
-
In the masks panel, double-click Mask 1, rename it Eye Irises, and click OK.
-
In the masks panel, select the Show Overlay option to enable it.
A red overlay appears, showing you where you brushed. If you see areas you did not intend to brush with the current adjustment, as long as the brush mask is selected in the masks panel you can subtract areas from the mask by holding down the Alt (Windows) or Option (macOS) key as you brush.
![]() Tip
Tip
When you hold down the Alt or Option key to use the Brush adjustment in Erase mode, the Brush settings may change. That’s because Erase mode can have different Brush settings.
Now you’ll create another brush mask to desaturate the red corners of the eye.
-
In the masks panel, click the blue Create New Mask button, and choose Brush.
NoteYou may notice the Add button within the Eye Irises mask. The reason you do not click Add in step 8 is that Add creates another submask within Eye Irises. Eye Irises adds Saturation, and all submasks within Eye Irises would do the same. But now you want to desaturate, so you need to create a different mask, not a sub-mask of Eye Irises. Add is useful when you want to control multiple submasks using the same settings.
-
In the Color panel, set Saturation to –50, and brush the red corners of the eyes.

-
In the masks panel, double-click Mask 1, rename it Eye Corners, and click OK.

Now you’ll use another brush adjustment to brighten other areas around the eyes.
-
In the masks panel, click the blue Create New Mask button, and choose Brush.
-
Scroll the Brush settings until you see the Light panel, and set Exposure to +.50.
-
Brush over the white areas of the eyes, the irises, and the shadows above the eye.

-
In the masks panel, double-click Mask 1, rename it Eye Brighten, and click OK.
Now step back and review your work.
-
In the masks panel, click the eye icon for the Eye Brighten mask to hide it; then click it again to show it. Evaluate whether you need to adjust anything, and make any needed adjustments to that mask while it is selected.
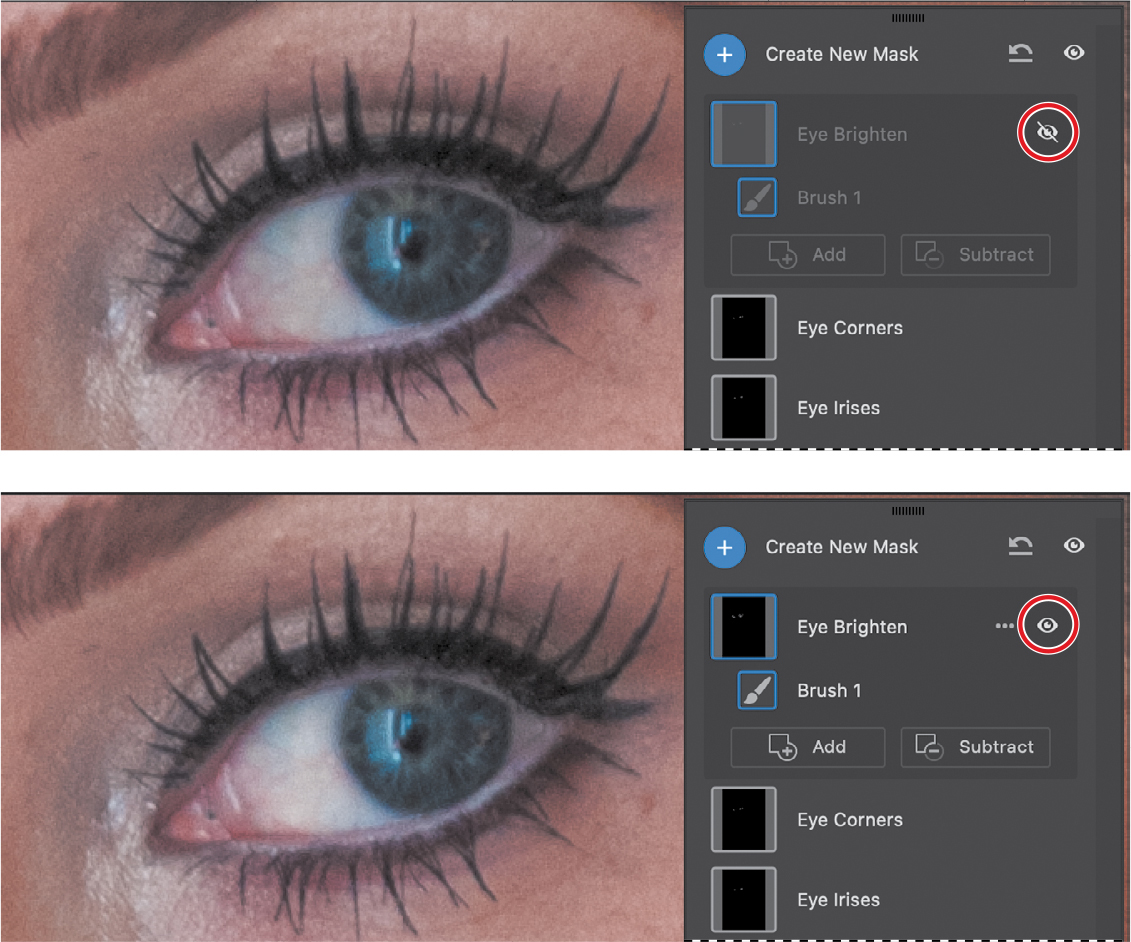
For example, if Exposure is too strong, make sure the Eye Brighten mask is selected in the masks panel and reduce the Exposure value. You can experiment with how other Light settings affect this mask, such as Shadows and Whites, to find the right combination. Or create more brush masks with different settings for each area.
Smoothing skin texture
In Camera Raw you can use a masked adjustment that automatically recognizes skin on people so that it’s easier to retouch skin without affecting the entire raw image.
![]() Tip
Tip
You can also select a color range and skin tones when an image is open in Photoshop. Choose Select > Color Range, and in the Color Range dialog box, choose Skin Tones from the Select pop-up menu.
Set the view magnification to Fit.
In the masks panel, click the Create New Mask button, and choose Select People.
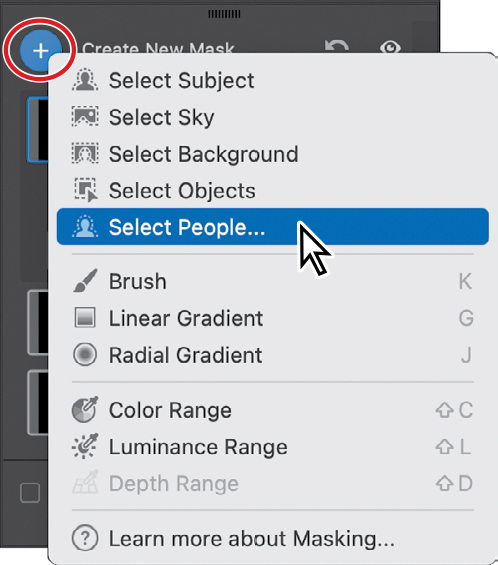
Camera Raw searches for people in the image, which may take a few moments. Then, under Person Mask Options, a list of identified people appears. In this image, there is only one person. Mask 1 appears in the masks panel; this is the current mask. A red overlay for Mask 1 appears over the image.
In Person Mask Options, if options are not active, click the circular Person thumbnail to select it.
Make sure that Face Skin and Body Skin are selected and that all the other options are deselected, and click Create.
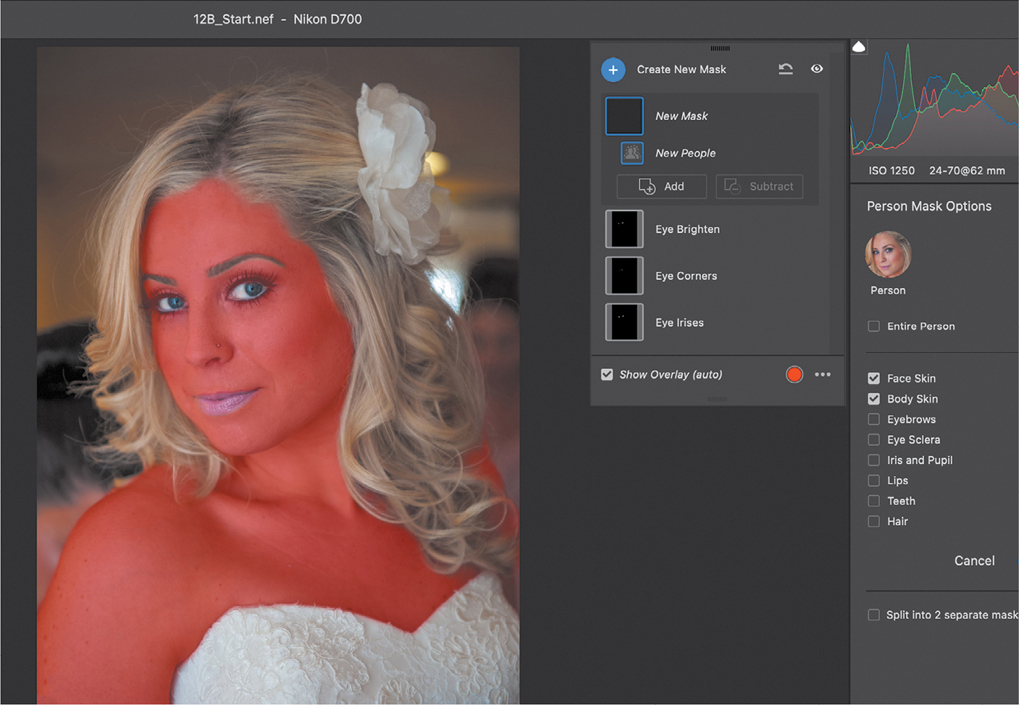
Camera Raw automatically isolates face and body skin areas and creates masks for those areas—you didn’t have to do any manual masking. It creates a new Mask 1 with separate Body Skin and Face Skin submasks for the person (named Person 1).
Make sure Mask 1 is selected.
You’ll need to see skin details, so set the view magnification to 100%.
In the options for Mask 1, scroll until you see the Effects panel, and set the Texture value to –30.
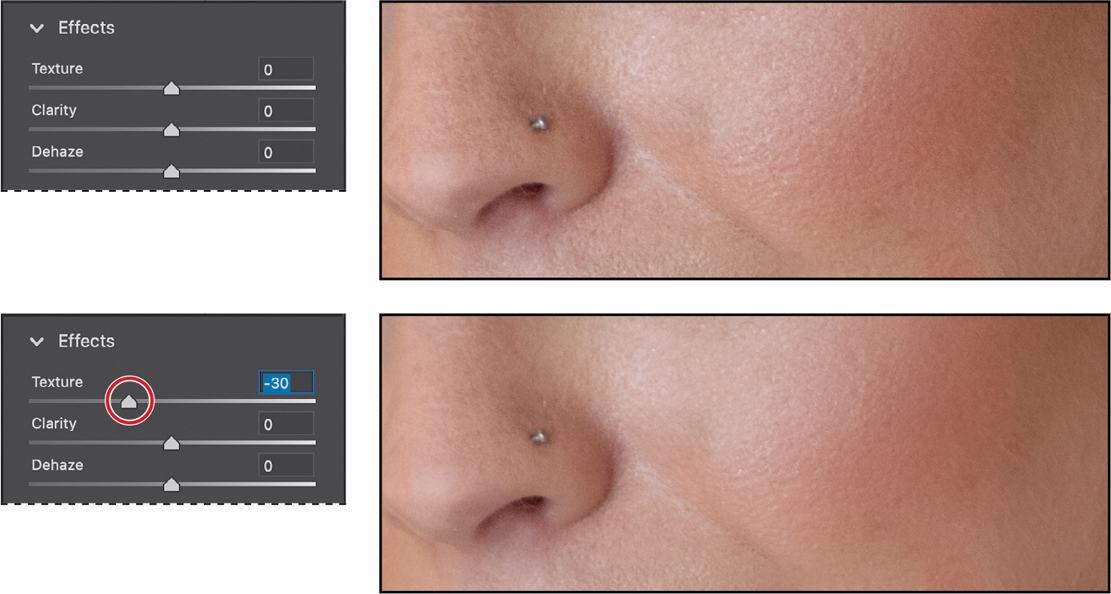
You should see the skin texture become smoother, because a negative Texture value de-emphasizes detail. (If you didn’t notice the change, toggle the eye icon for Mask 1 in the masks panel.) Again, if you think the adjustment is too much or too little, go ahead and adjust the Texture value while Mask 1 is selected in the masks panel.
While the skin mask is selected, it’s a good time to also make any other skin tone or color adjustments you think are needed. For example, if there is a color cast to remove from the skin, try adjusting options in Mask 1 panels such as Color and Curve. (If you want to correct a color cast across the entire image, after step 8 click the Edit button to exit masking; then adjust options in the general Edit panels.)
In the masks panel, double-click Mask 1, rename it Skin, and click OK.

Click the Edit button (
 ) to close the masks panel, and set the view magnification to Fit so that you can review the entire image.
You opened an image from Bridge into Camera Raw and performed portrait retouching, without opening Photoshop. If you need a finished copy to distribute, you can click the Save icon as you did with the mission buildings earlier in this lesson. If you want to apply more advanced retouching techniques that Camera Raw can’t do, you can click Open to convert the image into a Photoshop document and continue editing in Photoshop. But for now, let’s make sure all of the work you did in Camera Raw is saved.
Click Done. Great work! The Done button saves your changes and closes Camera Raw, returning you to Bridge.
Review questions
1 How is editing a camera raw image different than editing a photo in a format such as JPEG or Photoshop file format?
2 What is the advantage of the Adobe Digital Negative (DNG) file format?
3 How can you apply the same settings to multiple images in Camera Raw?
4 How do you apply a Camera Raw edit to specific areas of an image?
Review answers
1 A camera raw file contains unprocessed picture data from a digital camera’s image sensor. Camera raw files give photographers control over interpreting the image data, rather than letting the camera make the adjustments and conversions. When you edit the image in Camera Raw, it stores the edits separately while leaving the original raw file untouched. This way, you can edit the image the way you want, export it, and keep the original intact for future use or other adjustments.
2 The Adobe Digital Negative (DNG) file format contains the raw image data from a digital camera as well as metadata that defines what the image data means. DNG is an industry-wide standard for camera raw image data. DNG can help photographers manage proprietary camera raw file formats using an openly available standard, and it provides a compatible archival format that includes edits.
3 To apply the same settings to multiple images in Camera Raw, select the images in the filmstrip, click the filmstrip menu button, and choose Sync Settings. Then select the settings you want to apply, and click OK.
4 To apply a Camera Raw edit to specific areas of an image, click the Masking icon, and create a new mask that isolates the areas you want to edit.