1. Getting to Know the Work Area
Lesson overview
In this lesson, you’ll learn how to do the following:
Open image files in Adobe Photoshop.
Select and use tools in the Tools panel.
Set options for a selected tool using the options bar.
Use various methods to zoom in to and out from an image.
Select, rearrange, and use panels.
Choose commands in panel and context menus.
Open and use a panel in the panel dock.
Undo actions to correct mistakes or to make different choices.

This lesson will take about an hour to complete. To get the lesson files used in this chapter, download them from the web page for this book at adobepress.com/PhotoshopCIB2023. For more information, see “Accessing the lesson files and Web Edition” in the Getting Started section at the beginning of this book.
As you work on this lesson, you’ll preserve the start files. If you need to restore the start files, download them from your Account page.
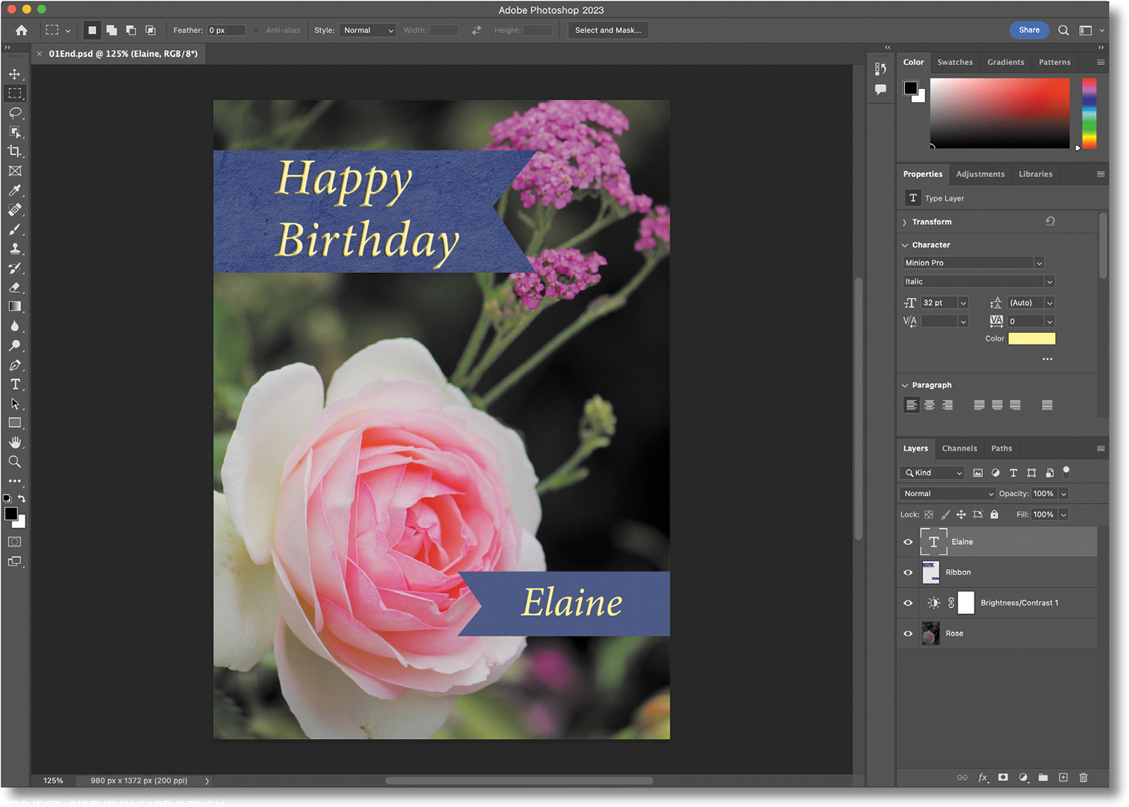
PROJECT: BIRTHDAY CARD DESIGN
As you work with Adobe Photoshop, you’ll discover that you can often accomplish the same task in several ways. To make the best use of the extensive editing capabilities in Photoshop, you must first learn to navigate the work area.
Starting to work in Adobe Photoshop
The Adobe Photoshop work area includes menus, toolbars, and panels that give you quick access to tools and options for editing and adding elements to your image. You can also add features by installing third-party software known as plug-ins.
In Photoshop, you primarily work with bitmapped digital images: continuous-tone images that have been converted into a series of small squares, or picture elements, called pixels. You can also work with vector graphics, which are drawings made of smooth lines that retain their crispness when scaled. You can create original artwork in Photoshop, or you can import images from many sources, such as:
-
Photographs from a digital camera or mobile phone
-
Stock photography, such as images from the Adobe Stock service
-
Scans of photographs, transparencies, negatives, graphics, or other documents
-
Captured video clips
-
Artwork created in drawing or painting programs
Starting Photoshop
To begin, you’ll start Adobe Photoshop and reset the default preferences.
-
Click the Adobe Photoshop 2023 icon in your Start menu (Windows) or the Launchpad or Dock (macOS), and then simultaneously hold down Ctrl+Alt+Shift (Windows) or Command+Option+Shift (macOS) to reset the default settings.
 Note
NoteTypically, you won’t need to reset defaults when you’re working on your own projects. However, you’ll reset the preferences before working on most lessons in this book to ensure that what you see onscreen matches the descriptions in the lessons. For more information, see “Restoring default preferences” on page 5.
If you don’t see Adobe Photoshop 2023, type Photoshop into the search box in the taskbar (Windows) or in Spotlight (macOS), and when the Adobe Photoshop 2023 application icon appears, select it, and press Enter or Return.
-
When prompted, click Yes to confirm that you want to delete the Adobe Photoshop Settings file.

Using the Home screen
After starting Photoshop, the first thing you see is the Home screen, which gives you a number of ways to get started, as shown in the following illustration.

A. Switch to Photoshop workspace
B. Create new document
C. Open document
D. Home screen content and recently opened local documents
E. Learn with tutorials
F. Cloud Documents you created on Windows, Mac, or iPad
G. Cloud Documents shared with you
H. Your photos in the Lightroom cloud
I. Deleted Cloud Documents
J. Cloud storage sync status
K. Search, Help, and Learn
L. What’s New in Photoshop
M. Visit your Creative Cloud account in a web browser
On the left you see a list of view options:
-
Home helps you use and learn about the current version and includes a tour. After you’ve opened at least one locally stored document, a Recent section of previously opened documents will appear at the bottom of the Home screen.
-
Learn presents links to tutorials that open in Photoshop, where the Learn panel leads you through a lesson’s steps that you follow using Photoshop itself.
-
Your Files lists Photoshop Cloud Documents, including those you created on devices such as an iPad. You’ll learn more about Cloud Documents in Lesson 3, “Working with Selections.”
 Tip
TipTo skip past the Home screen and go straight to the Photoshop application workspace, click the Photoshop icon in the upper-left corner.
-
Shared with You lists Cloud Documents that others have invited you to see by using the File > Invite command.
-
Lightroom Photos lists images synced to your Creative Cloud account’s Lightroom online photo storage (not Lightroom Classic local storage).
-
Deleted lists Cloud Documents you’ve deleted, in case you change your mind and want to recover them (similar to the Recycle Bin or Trash on your computer desktop). This list includes Cloud Documents only, not files you deleted from Lightroom Photos or from your computer’s local storage.
 Tip
TipTo manage files in the Deleted list, click the ellipsis (…) button next to a file, and choose Restore or Permanently Delete.
When you click the Search icon in the upper-right corner and enter text, Photoshop looks for matching content in the Learn tutorials about Photoshop and in Adobe Stock images. When a document is open, the Search icon can also find specific commands and tools in Photoshop and can find content in your cloud-synced Lightroom images. For example, enter “bird” to find your Lightroom cloud photos that contain birds.
The Home screen automatically hides when you open a document, which is what you’re going to do next. You can return to the Home screen by clicking the Home icon in the upper-left corner of the application window.
Open a document
Photoshop provides a number of ways to open documents. For this lesson, you’ll use the traditional Open command, which works like the Open command you’ve probably used in other applications.
-
Choose File > Open. If a dialog box appears that says Cloud Documents at the top, click On Your Computer at the bottom of the dialog box.
 Tip
TipIf you drag and drop a compatible file anywhere on the Home screen, Photoshop will open it.
-
Navigate to the Lessons/Lesson01 folder that you copied to your hard drive from the peachpit.com website. (If you haven’t downloaded the files, see “Accessing the lesson files and Web Edition” on page 4.)
-
Select the 01End.psd file, and click Open. Click OK if the Embedded Profile Mismatch dialog box appears, and click No if a message about updating text layers appears.
The 01End.psd file opens in its own window, in the default Photoshop workspace. The end files in this book show you what you are creating in each project. In this project, you’ll create a birthday card.
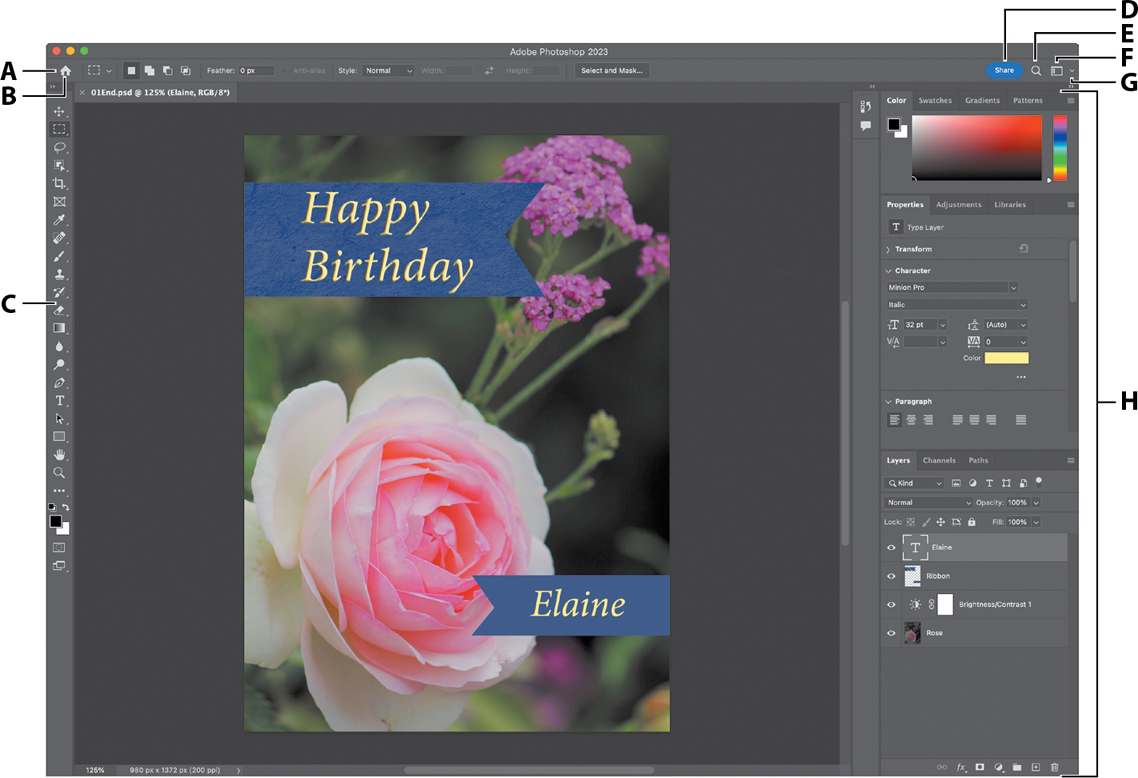
A. Options bar
B. Switch to Home screen
C. Tools panel
D. Share button
E. Search, Help, and Learn
F. Workspaces menu
G. Panels
![]() Note
Note
This illustration shows the Mac version of Photoshop. The arrangement is similar on Windows, but operating system styles may vary.
The default workspace in Photoshop consists of the menu bar and options bar at the top of the screen, the Tools panel on the left, and several open panels in the panel dock on the right. When you have documents open, one or more document windows also appear, and you can display them at the same time using the tabbed interface. The Photoshop user interface is similar to the one in Adobe Illustrator® and Adobe InDesign®, so learning how to use the tools and panels in one application makes it easier to learn and use the other applications.
There is one main difference between the Photoshop work area on Windows and that on the Mac: Windows always presents Photoshop in a contained window. On macOS, you can choose whether to work with an application frame, which contains the Photoshop document windows and panels within a frame that is distinct from other applications you may have open; only the menu bar is outside the application frame. The application frame is enabled by default; to disable the application frame, choose Window > Application Frame, but note that the illustrations in this book are created with the application frame enabled.
![]() Tip
Tip
When you open multiple documents in Photoshop, each is identified by a tab at the top of its document windows, similar to the tabbed windows in a web browser.
-
Choose File > Close, or click the close button (the x next to the filename) on the tab of the document window. Do not close Photoshop, and don’t save changes to the document. The filename is added to the Recent list on the Home screen.
Using the tools
Photoshop provides an integrated set of tools for producing sophisticated graphics for print, web, and mobile viewing. We could easily fill the entire book with details about the wealth of Photoshop tools and tool configurations, but that’s not the goal of this book. Instead, you’ll gain experience by using a few important tools on a sample project. Every lesson will introduce you to more tools and ways to use them. By the time you finish all the lessons in this book, you’ll have a solid foundation for exploring other parts of Photoshop.
Selecting and using a tool from the Tools panel
The Tools panel is the tall, narrow panel on the left side of the work area. It contains selection tools, painting and editing tools, foreground- and background-color selection boxes, and viewing tools.
![]() Note
Note
For a complete list of the tools in the Tools panel, see the appendix, “Tools panel overview.”
You’ll start by using the Zoom tool, which also appears in many other Adobe applications, including Illustrator, InDesign, and Acrobat.
-
Choose File > Open, navigate to the Lessons/Lesson01 folder, and double-click the 01Start.psd file to open it.
The 01Start.psd file contains the background image and a ribbon graphic that you’ll use to create the birthday card that you viewed in the end file.
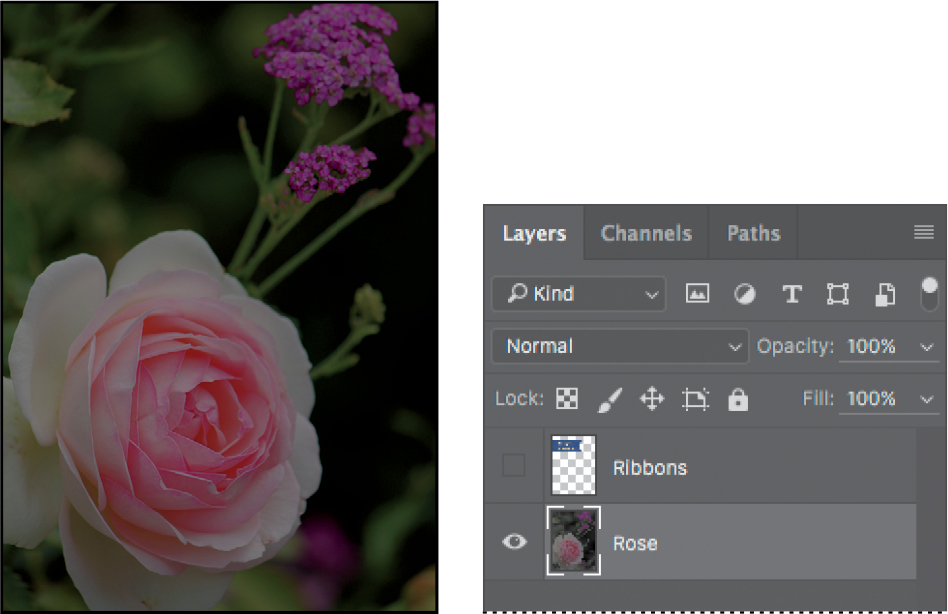
-
Click the double arrows just above the Tools panel to toggle to a double-column view, which may be better for smaller displays such as those on laptops. Click the double arrows again to return to a single-column Tools panel, which might use space more efficiently on a large desktop display.
 Tip
TipYou can customize the Tools panel by arranging, removing, and adding tools. To do this, hold down the Edit Toolbar icon (
 ) that appears after the Zoom tool, and choose Edit Toolbar.
 -
Examine the status bar at the bottom of the work area (Windows) or document window (macOS), and notice the percentage that appears on the far left. This represents the current enlargement view of the image, or zoom level.

-
Move the pointer over the Tools panel, and hover it over the magnifying-glass icon until a tool tip appears. The tool tip displays the tool’s name (Zoom tool) and keyboard shortcut (Z).

-
Click the Zoom tool icon (
 ) in the Tools panel to select it.
 Tip
TipTo select the Zoom tool using a keyboard shortcut, press the Z key. Tool shortcuts are single keys (do not press modifier keys such as Ctrl or Command). If a tool has a keyboard shortcut, you’ll see it in the pop-up tool tip.
-
Move the pointer over the document window. The pointer now looks like a tiny magnifying glass with a plus sign in the center of the glass (
 ).
). -
Click anywhere in the document window.
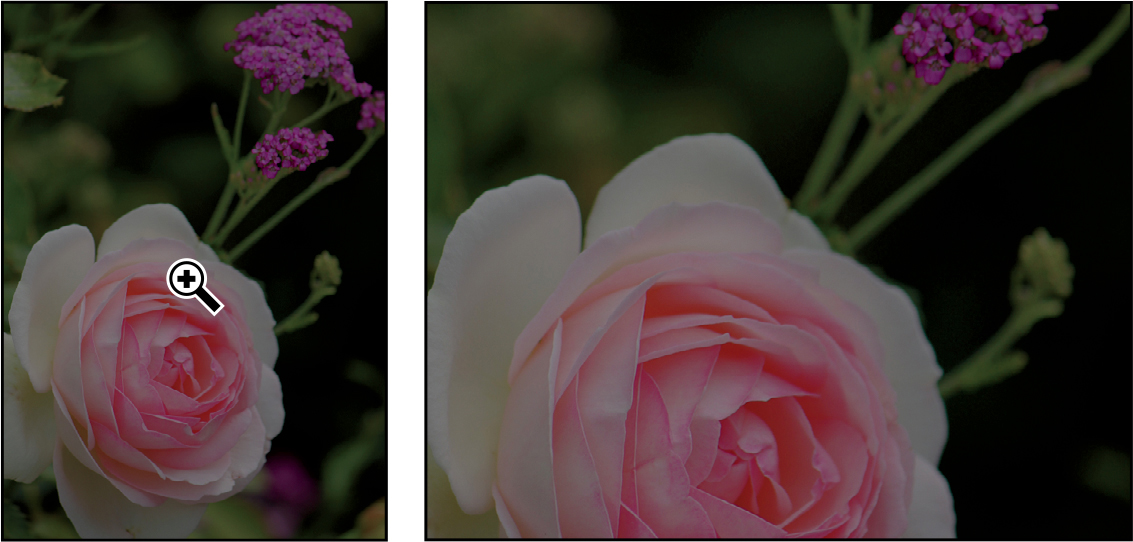
 Tip
TipThe zoom percentage also appears in the document tab.
The image enlarges to a preset percentage level, which replaces the previous value in the status bar. If you click again, the zoom advances to the next preset level, up to a maximum of 12800%.
-
Hold down the Alt key (Windows) or Option key (macOS) so that the Zoom tool pointer appears with a minus sign in the center of the magnifying glass (
 ), and then click anywhere in the image. Then release the Alt or Option key.
Now the view zooms out to a lower preset magnification, so you can see more of the image, but in less detail.
![]() Note
Note
You can use other methods to zoom in and out. For example, when the Zoom tool is selected, you can select the Zoom In or Zoom Out mode on the options bar. You can choose View > Zoom In or View > Zoom Out. Or, you can type a new percentage in the status bar and press Enter or Return.
-
If Scrubby Zoom is selected in the options bar, click anywhere on the image and drag the Zoom tool to the right. The image enlarges. Drag the Zoom tool to the left to zoom out.

-
Deselect Scrubby Zoom in the options bar if it’s selected. Then, using the Zoom tool, drag a rectangle to enclose part of the rose blossom.

The image enlarges so that the area you enclosed in your rectangle now fills the entire document window.
-
Click Fit Screen in the options bar to see the entire image again.

You have used the Zoom tool in different ways to change the document window magnification: clicking, holding down a keyboard modifier while clicking, dragging to zoom in and out, dragging to define a magnification area, and clicking a button in the options bar. You can customize tools by using options, keyboard combinations, and gestures (for example, clicking versus dragging). You’ll have opportunities to use these techniques as you work through the lessons in this book.
Brightening an image
One of the most common edits you’re likely to make is to brighten an image taken with a digital camera or phone. You’ll brighten this image by changing its brightness and contrast values.
-
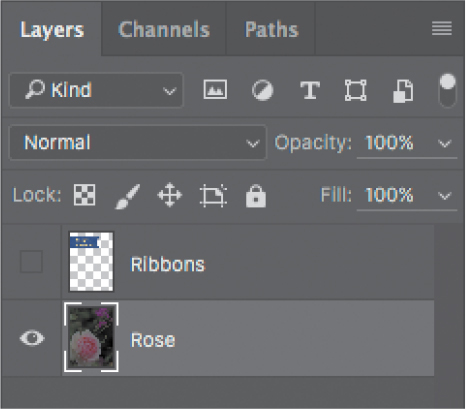
In the Layers panel, on the right side of the workspace, make sure the Rose layer is selected.
-
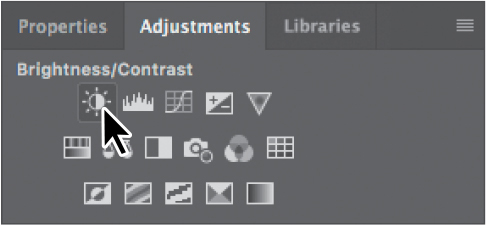
In the Adjustments panel (above the Layers panel in the panel dock), click the Brightness/Contrast icon (
 ) to add a Brightness/Contrast adjustment layer. The Properties panel opens, displaying the Brightness/Contrast settings.
 -
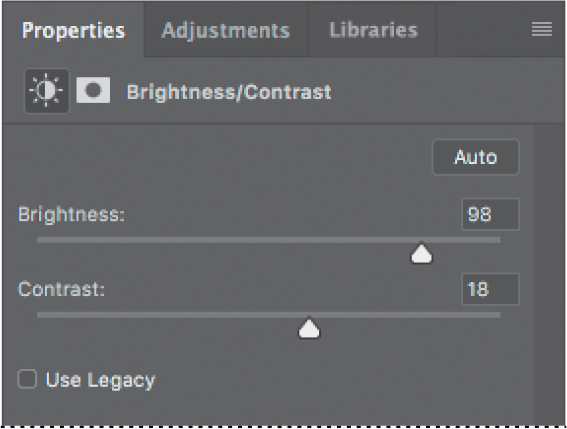
In the Properties panel, move the Brightness slider to 98 and the Contrast slider to 18.
The image of the rose brightens.
In these lessons, we’ll often instruct you to enter specific numbers in panels and dialog boxes to achieve particular effects. When you’re working on your own projects, experiment with different values to see how they affect your image. There is no right or wrong setting; the values you should use depend on the results you want.
-
In the Layers panel, click the eye icon for the Brightness/Contrast adjustment layer to hide its effect, and then click the eye icon again to show the effect.
Adjustment layers let you make changes to your image, such as adjusting the brightness of the rose, without permanently altering the actual pixels. Because you’ve used an adjustment layer, you can always disable the edit by hiding or deleting the adjustment layer—and you can edit the adjustment layer at any time. You’ll use adjustment layers in several lessons in this book.
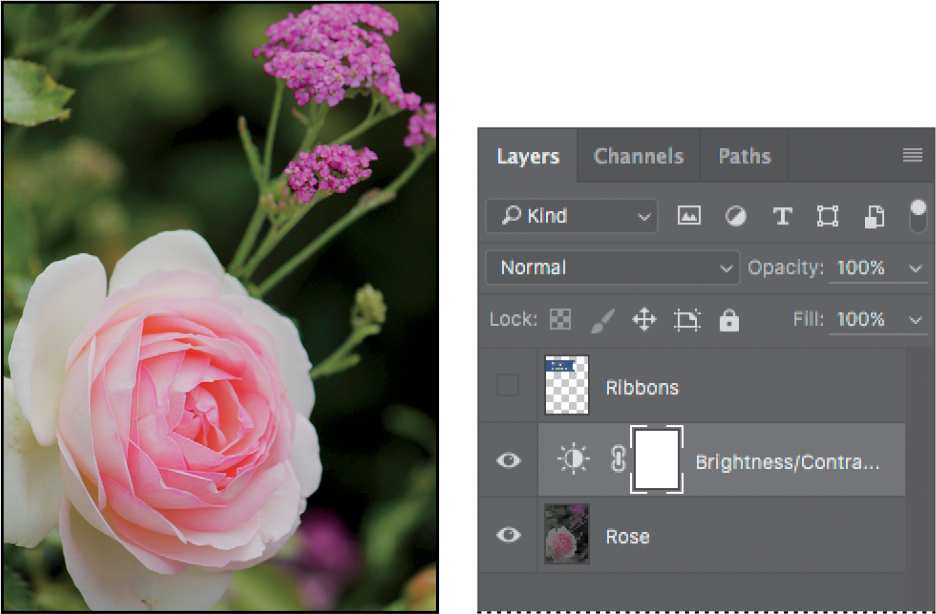
Layering is a fundamental and powerful feature in Photoshop. Photoshop includes many kinds of layers, some of which contain images, text, or solid colors, and others that simply interact with layers below them. You’ll learn more about layers in Lesson 4, “Layer Basics,” and throughout the book.
-
Double-click the Properties panel tab to collapse it.
-
Choose File > Save As, name the file 01Working.psd, and click OK or Save.
-
Click OK in the Photoshop Format Options dialog box.
![]() Note
Note
If Photoshop displays a dialog box telling you about the difference between saving to Cloud Documents and On Your Computer, click Save On Your Computer. You can also select Don’t Show Again, but that setting will deselect after you reset Photoshop preferences.
Saving the file with a different name ensures that the original file (01Start.psd) remains unchanged. That way, you can return to it if you want to start over.
You’ve just completed your first task in Photoshop. Your image is bright and punchy and ready for a birthday card.
Sampling a color
Photoshop uses a foreground color and background color when you paint on a layer. Most of the time you’ll pay attention to the foreground color, such as the color loaded for a brush. By default, the foreground color is black, and the background color is white. You can change the foreground and background colors in several ways. One way is to use the Eyedropper tool to sample a color from the image. You’ll use the Eyedropper tool to sample the blue of one ribbon so that you can match that color when you create another ribbon.
![]() Note
Note
When a layer mask is selected, the default foreground color is white, and the default background color is black. You’ll learn more about layer masks in Lesson 6, “Masks and Channels.”
First you’ll display the Ribbons layer so you can see the color you want to sample.
-
In the Layers panel, click the Visibility column for the Ribbons layer to make the layer visible. When a layer is visible, an eye icon (
 ) appears in that column.
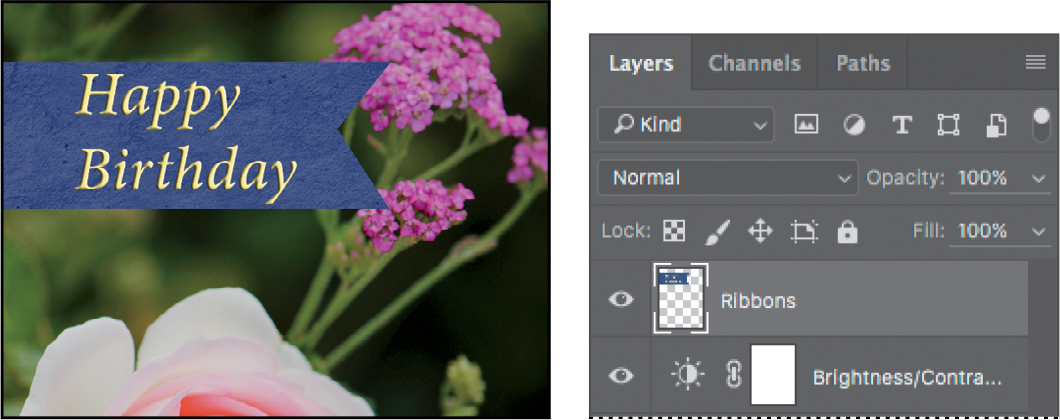
A ribbon with “Happy Birthday” written on it appears in the document window.
-
Select the Ribbons layer in the Layers panel so that it’s the active layer.
-
Select the Eyedropper tool (
 ) in the Tools panel.
 -
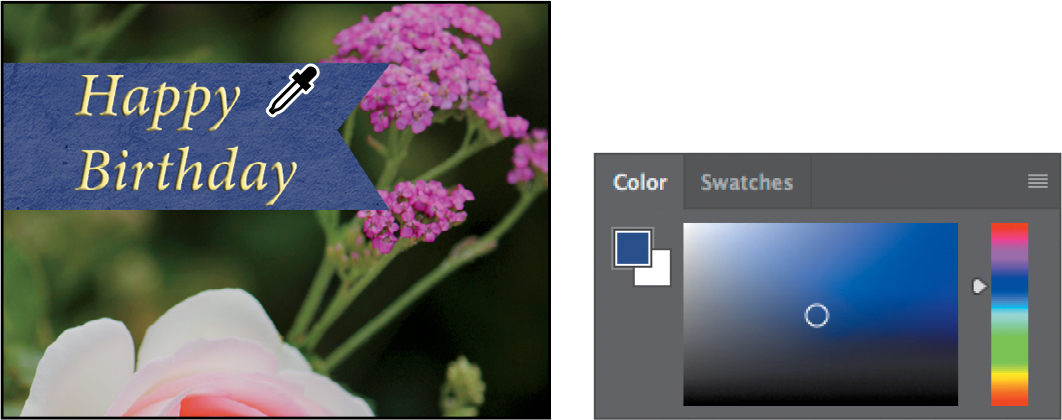
Click the blue area in the Happy Birthday ribbon to sample a blue color.
 Note
NoteIf you have trouble finding the Eyedropper tool, click the Search icon near the top-right corner of the workspace, and type eyedropper. Click Eyedropper Tool in the search results; the tool will be selected in the Tools panel for you.
The foreground color changes in the Tools panel and the Color panel. Anything you paint will be this color until you change the foreground color again.
Working with tools and tool properties
When you selected the Zoom tool in the previous exercise, you saw that the options bar provided ways for you to change the view of the current document window. Now you’ll learn more about setting tool properties using context menus, the options bar, panels, and panel menus. You’ll use all of these methods as you work with tools to add the second ribbon to your birthday card.
Setting the unit of measure
You can change the unit of measure you use to work in Photoshop. This greeting card will be printed, so you’ll work in inches.
![]() Tip
Tip
When rulers are displayed (View > Rulers), you can change the unit of measure by right-clicking (Windows) or Control-clicking (macOS) a ruler.
-
Choose Edit > Preferences > Units & Rulers (Windows) or Photoshop > Preferences > Units & Rulers (macOS).
-
In the Units section, choose Inches from the Rulers menu, and click OK.

 Tip
TipIf you can’t remember where to find a preference setting, look for it using the Search Preferences field in the upper-right corner of the Preferences dialog box, in the title bar.
Using context menus
Unlike the menus that drop down from a menu bar, a context menu pops up under the pointer. It contains commands and options that may apply to the object under the pointer or to the current selection or state of the document. Usually, the commands on a context menu are also available in the menu bar or panel menus, but a context menu can save time because it can display relevant commands where the pointer is so you don’t have to look through the menu bar. Context menus are sometimes called “right-click” or “shortcut” menus.
![]() Tip
Tip
A context menu is a type of shortcut, similar to a keyboard shortcut. Some prefer one or the other; others use both or neither. Over time, you’ll learn which context menus and keyboard shortcuts save you the most time in your own work.
-
Change the view as needed (zoom or scroll) so that you can clearly see the lower third of the card.
-
Select the Rectangular Marquee tool (
 ) in the Tools panel.
The Rectangular Marquee tool selects rectangular areas. You’ll learn more about selection tools in Lesson 3, “Working with Selections.”
-
Drag the Rectangular Marquee tool to create a selection about 0.75 inches tall and 2.5 inches wide, ending at the right edge of the card. (See the illustration.) As you drag the tool, Photoshop displays the width and height of the selected area. It’s okay if the size of your selection is a little different from ours.

A selection border is indicated by a dashed line called a selection marquee (also called marching ants), which is animated so that you can see it more easily.
-
Select the Brush tool (
 ) in the Tools panel.
 -
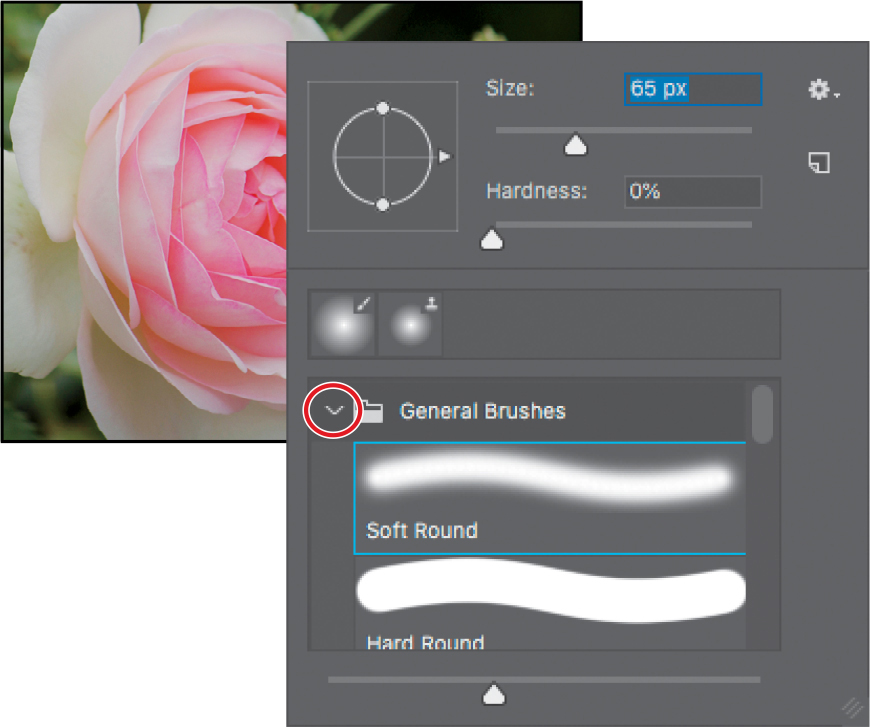
In the document window, right-click (Windows) or Control-click (macOS) anywhere in the image to open the Brush tool context menu.
Context menus usually show a list of commands, but in this case, it’s a pop-up panel with options for the Brush tool.
-
Click the arrow next to the General Brushes preset group (folder) to expand it, select the first brush (Soft Round), and change the size to 65 pixels.
-
Press Enter or Return to close the context menu.
 Tip
TipYou can also close a context menu by clicking outside it. Be careful when you click so that you don’t paint an unwanted stroke or accidentally change a setting or selection.
-
Make sure the Ribbons layer is still selected in the Layers panel; then drag the Brush tool across the selected area until it’s fully painted blue. Don’t worry about staying within the selection; you can’t paint outside the selection.
 Note
NoteThe Brush tool paints using the Foreground color, which you set earlier when you sampled a blue color using the Eyedropper tool.
-
When the bar is colored in, choose Select > Deselect so that nothing is selected.

The selection is gone, but the blue bar remains on the Ribbons layer.
Selecting and using a hidden tool
To save space on your screen, the Tools panel arranges some of the tools in groups, with only one tool shown for each group. The other tools in the group are hidden behind that tool. A small triangle in the lower-right corner of a button is your clue that other tools are available but hidden under that tool.
You’ll use the Polygonal Lasso tool to remove a triangular notch from the color bar so that it matches the ribbon at the top of the card.
-
Position the pointer over the third tool from the top in the Tools panel until the tool tip appears. The tool tip identifies the Lasso tool (
 ), with the keyboard shortcut L.
 -
Select the Polygonal Lasso tool (
 ), which is hidden behind the Lasso tool, using one of the following methods:
-
Press and hold the mouse button over the Lasso tool to open the pop-up list of hidden tools, and select the Polygonal Lasso tool.
-
Alt-click (Windows) or Option-click (macOS) the tool button in the Tools panel to cycle through the hidden tools until the Polygonal Lasso tool is selected.
-
Press Shift+L, which cycles between the tools in the group (the Lasso, Polygonal Lasso, and Magnetic Lasso tools).
-
With the Lasso tool, you can draw free-form selections; the Polygonal Lasso tool makes it easier to draw straight-edged sections of a selection border. You’ll learn more about selection tools, making selections, and adjusting the selection contents in Lesson 3, “Working with Selections.”
-
Move the pointer over the left edge of the blue color bar that you just painted. Click just to the left of the upper-left corner of the bar to start your selection. You should begin your selection just outside the colored area.
-
Move the cursor to the right a little more than 1/4 inch, and click about halfway between the top and bottom of the bar. You’re creating the first side of the triangle. It doesn’t need to be perfect.
-
Click just to the left of the bottom-left corner of the bar to create the second side of the triangle.
-
Click the point where you started to finish the triangle.

-
Press the Delete key on your keyboard to delete the selected area from the colored bar, creating a notch for your ribbon.
 Note
NoteIf the selected area is not deleted when you press the Delete key, make sure the Ribbons layer is selected in the Layers panel, and try again.
-
Choose Select > Deselect to deselect the area you deleted.

 Note
NoteThe Select menu contains Deselect and Deselect Layers commands; be mindful of which one you need to choose.
The ribbon is ready. Now you can add a name to your birthday card.
Setting tool properties in the options bar
Next, you’ll use the options bar to select the text properties and then type the name.
-
In the Tools panel, select the Horizontal Type tool (
 ).
).
The buttons and menus in the options bar now relate to the Type tool.
-
In the options bar, select a font you like from the first pop-up menu. (We used Minion Pro Italic, but you can use another font if you prefer.)
-
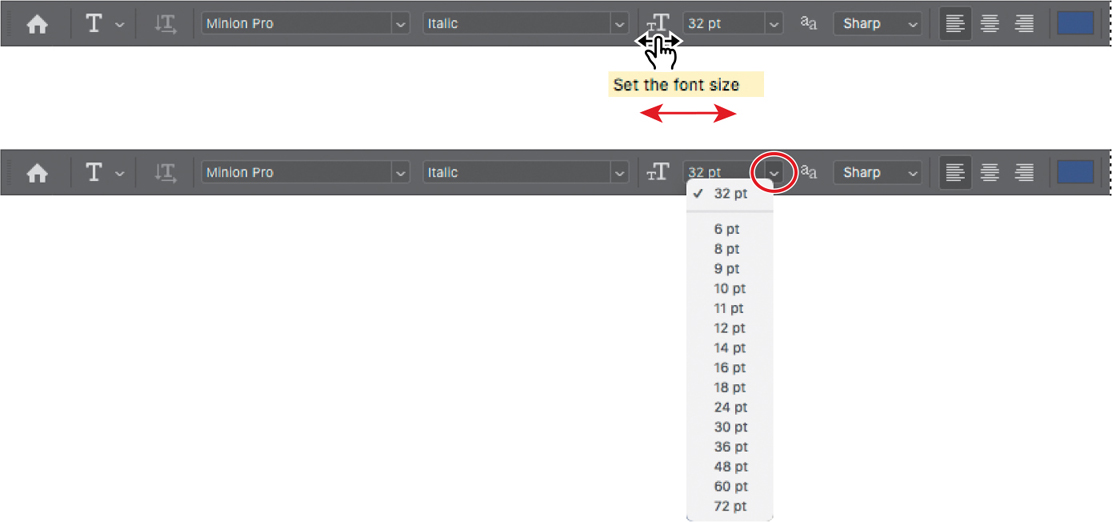
Specify 32 pt for the font size.
 Tip
TipYou can position the pointer over the labels of most numeric settings in the tool options bar, in panels, and in dialog boxes in Photoshop to display a “scrubby slider.” Dragging the pointing-finger slider to the right increases the value; dragging to the left decreases the value. Shift-dragging changes it by 10 points.
You can specify 32 points by typing directly in the font-size text box and pressing Enter or Return or by scrubbing the font-size menu label (see the tip in the margin). You can also choose a standard font size from the font-size pop-up menu.
-
Click the Swatches tab to bring that panel forward, if it’s not already visible; then click the triangle next to the Pastel preset group to expand it; and select any light-colored swatch. (We chose Pastel Yellow.)
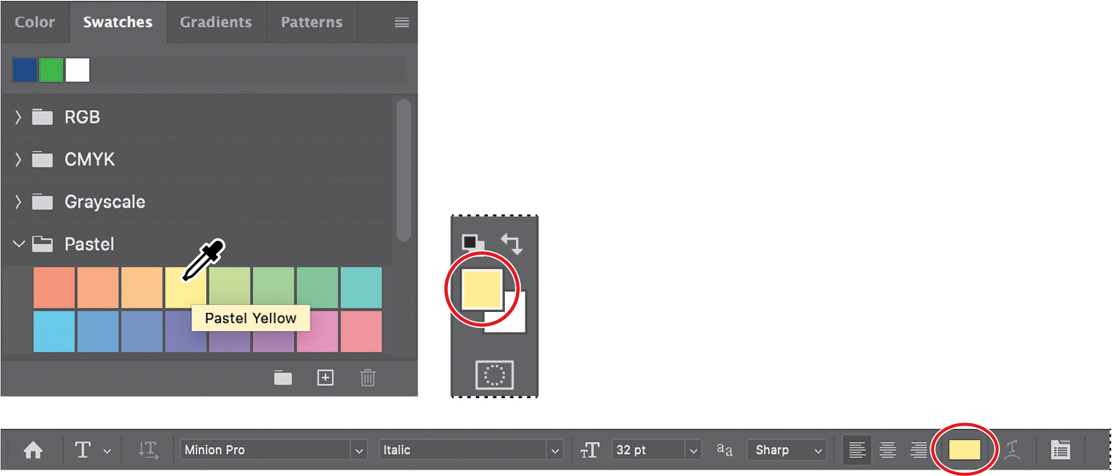
 Tip
TipWhen you move the pointer over the swatches, it temporarily changes into an eyedropper. Position the tip of the eyedropper over the swatch you want, and click to select it.
The color you select appears in two places: as the Foreground Color in the Tools panel and in the text color swatch in the options bar. The Swatches panel is one easy way to select a color; later you’ll learn other ways to select a color in Photoshop.
-
Click the Horizontal Type tool once anywhere on the left side of the colored bar. “Lorem Ipsum” placeholder text appears as a sample of the current type specifications. It’s selected by default so that you can immediately type over it.
-
Type a name; we typed Elaine. It replaces the placeholder text. Don’t worry if the text isn’t positioned well; you’ll correct that later.

-
Click the check mark icon in the options bar (
 ) to commit the text.
While pastel yellow looks OK, try a specific color that sets the name apart from the other ribbon’s text. It’s easier to find it if you change the Swatches panel display.
-
Click the menu button (
 ) on the Swatches panel to open the panel menu, and choose Small List.
 Tip
TipIf you want to select just some of the text in a layer, drag the Horizontal Type tool over a range of characters instead of double-clicking.
-
With the Horizontal Type tool, double-click the text. The text becomes selected.
-
In the Swatches panel, click the triangle next to the Light group of swatch presets to expand it, and then select the Light Yellow Orange swatch.

 Tip
TipAfter you select a different color swatch, you can see the change in the foreground color swatch in the Tools panel, and in the color swatch in the options bar for the Horizontal Type tool.
-
Click the check mark button (
 ) to commit and deselect the text.
 Tip
TipYou can also commit a text edit by clicking outside the text layer.
Now the text appears in the orange color.
Undoing actions in Photoshop
In a perfect world, you’d never make a mistake. You’d never click the wrong object. You’d always correctly anticipate how specific actions would bring your design ideas to life exactly as you imagined them. You’d never have to backtrack.
For the real world, Photoshop gives you the power to step back and undo actions so that you can try other options. You can experiment freely, knowing that you can reverse the process.
Even beginning computer users quickly come to appreciate the familiar Undo command. You’ll use it to move back one step and then step further backward. In this case, you’ll go back to the light color that you originally chose for the name.
-
Choose Edit > Undo Edit Type Layer, or press Ctrl+Z (Windows) or Command+Z (macOS) to undo your last action.
The name returns to its previous color.
-
Choose Edit > Redo Edit Type Layer, or press Ctrl+Shift+Z (Windows) or Command+Shift+Z (macOS) to reapply the orange color to the name.
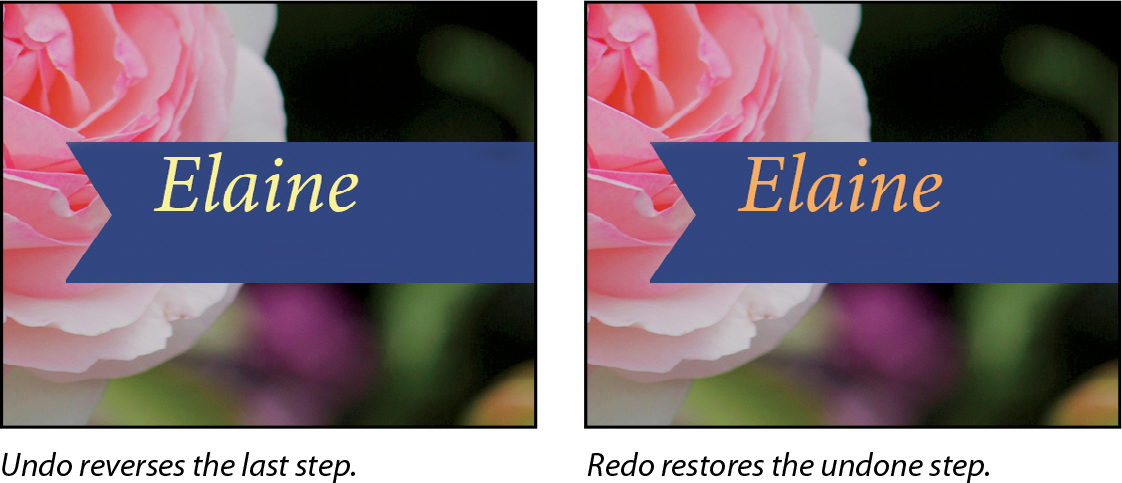
Each time you use the Undo command it reverses one more step, so if you want to undo five steps, you can apply the Undo command (or its keyboard shortcut) five times. The Redo command works the same way.
![]() Tip
Tip
To see the steps you can undo and redo, look at the History panel (Window > History).
If you want to switch back and forth between the current and previous steps you did, choose Edit > Toggle Last State or press Ctrl+Alt+Z (Windows) or Command+Option+Z (macOS) to go back, and then choose the same command again to go forward. Applying Toggle Last State multiple times is a great way to see a before/after comparison of your last edit.
-
Once the name is back to the color you’d like it to be, use the Move tool (
 ) to drag the name so it’s centered in the blue bar.
 Tip
TipAs you drag, magenta lines called Smart Guides may appear. They help align the edges and centers of dragged content to other objects and guides. If they are getting in your way, you can disable them by deselecting the View > Show > Smart Guides command or by holding down the Control key as you drag.
-
Save the file. Your birthday card is done!
More about panels and panel locations
Photoshop panels are powerful and varied. Rarely would you need to see all panels simultaneously. That’s why they’re in panel groups and why the default configurations leave many panels unopened.
The complete list of panels appears in the Window menu. Check marks appear next to the names of the panels that are open and active in their panel groups. You can open a closed panel or close an open one by selecting the panel name in the Window menu.
You can hide all panels at once—including the options bar and Tools panel—by pressing the Tab key. To reopen them, press Tab again.
![]() Note
Note
When panels are hidden, a thin vertical strip appears along the left or right edge of the application frame. Hover the pointer over the strip to temporarily reveal the panels docked along that edge.
You already used panels in the panel dock when you used the Layers and Swatches panels. You can drag panels to or from the panel dock. This is convenient for bulky panels or ones that you use only occasionally but want to keep handy.
You can arrange panels in other ways as well:
-
To move an entire panel group, drag that group’s title bar to another location in the work area.
-
To move a panel to another group, drag the panel tab into that panel group so that a blue highlight appears inside the group, and then release the mouse button.

-
To dock a panel or panel group, drag the title bar or panel tab onto the top of the dock.

-
To undock a panel or panel group so that it becomes a floating panel or panel group, drag its title bar or panel tab away from the dock.
Expanding and collapsing panels
You can resize panels to use screen space more efficiently and to see fewer or more panel options, either by dragging or by clicking to toggle between preset sizes:
-
To collapse open panels to icons, click the double arrow in the title bar of the dock or panel group. To expand a panel, click its icon or the double arrow.
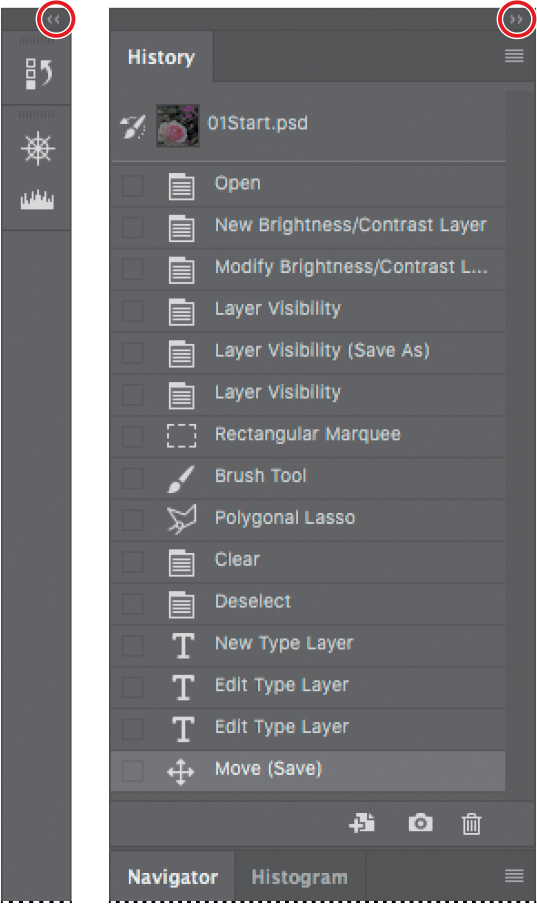
-
To change the height of a panel, drag its bottom edge.
-
To change the width of a dock, position the pointer on the left edge of the dock until it becomes a double-headed arrow, and then drag to the left to widen the dock or to the right to narrow it.
-
To resize a floating panel, move the pointer over the right, left, or bottom edge of the panel until it becomes a double-headed arrow, and then drag the edge in or out. You can also pull the lower-right corner in or out.
-
To collapse a panel group so that only the dock header bar and tabs are visible, double-click a panel tab or panel title bar. Double-click again to restore it to the expanded view. You can open the panel menu even when the panel is collapsed.

 Note
NoteSome panels cannot be resized, such as the Character and Paragraph panels, but you can still collapse them.
Notice that the tabs for the panels in the panel group and the button for the panel menu remain visible after you collapse a panel.
Special notes about the Tools panel and options bar
The Tools panel and the options bar share some characteristics with other panels:
![]() Tip
Tip
To restore the default Essentials workspace, click the workspace icon at the top-right corner of the application window, and choose Reset Essentials.
You can drag the Tools panel by its title bar to a different location in the work area. You can move the options bar to another location by dragging the grab bar at the far-left end of the panel.
You can hide the Tools panel and options bar using Windows menu commands.
However, some panel features are not available or don’t apply to the Tools panel or options bar:
You cannot group the Tools panel or options bar with other panels.
You cannot resize the Tools panel or options bar.
You cannot stack the Tools panel or options bar in the panel dock.
The Tools panel and options bar do not have panel menus.
Review answers
1 You can open a photograph from a digital camera. You can also open a scanned image of a photographic print, a transparency or negative film frame, or a graphic. You can open images downloaded from the internet such as photography from Adobe Stock, or images uploaded to your Cloud Documents or your Lightroom photos.
2 To select a tool in Photoshop, click its icon in the Tools panel, or press the tool’s keyboard shortcut. A selected tool remains active until you select a different tool. To select a hidden tool, either use a keyboard shortcut to toggle through the tools or click and hold the tool in the Tools panel to open a pop-up menu of the hidden tools.
3 Choose commands from the View menu to zoom in on or out from an image or to fit it onscreen, or use the zoom tools and click or drag over an image to enlarge or reduce the view. You can also use keyboard shortcuts or the Navigator panel to control the display of an image.
4 Choose Edit > Undo or Edit > Toggle Last State, or press its keyboard shortcut. (Another correct answer is to choose an earlier document state in the History panel, although that was not shown in this lesson.)
