
15. Exploring Neural Filters
Lesson overview
In this lesson, you’ll learn how to do the following:
Understand how Neural Filters are different than other filters and effects in Photoshop.
Explore the Neural Filters workspace.
Apply a Neural Filter to an image.
Combine multiple Neural Filters in a single layer or document.

This lesson will take about 30 minutes to complete. To get the lesson files used in this chapter, download them from the web page for this book at adobepress.com/PhotoshopCIB2023. For more information, see “Accessing the lesson files and Web Edition” in the Getting Started section at the beginning of this book.
As you work on this lesson, you’ll preserve the start files. If you need to restore the start files, download them from your Account page.
PROJECT: COMPOSITING WITH NEURAL FILTERS
Landscape: © Jurik Peter, Shutterstock; superhero: © sunlight19, Shutterstock
Neural Filters are advanced filters trained using machine learning. You can explore ideas that would be more labor-intensive, or sometimes impossible, with conventional digital photo filters and effects.
Understanding Neural Filters
If you worked through the earlier lessons in this book, you’ve used Photoshop filters such as Surface Blur, Smart Sharpen, Clouds, and Liquify. Those are conventional filters that produce their results with algorithms—procedural programs where the code itself determines the result.
The newer Neural Filters produce results in a different way, combining traditional algorithms with machine learning and other advanced techniques. Machine learning means that a filter in Neural Filters can be trained using many examples of desirable and undesirable results, potentially creating better images than what could be achieved with procedural computer code alone.
Neural Filters are different from other Photoshop effects in the following ways:
-
Neural Filters are trained by machine learning and neural networks.
-
Some filters need to be downloaded before the first time you use them. This is partly to save space on your computer, because some Neural Filters and their machine-learning models can be large. If you need to download a Neural Filter, you can do it with one click in the Neural Filters workspace.
 Note
NoteYou can use Neural Filters if your computer meets the system requirements for Photoshop, but performance is better with a more powerful CPU, more powerful graphics hardware, and in some cases a faster Internet connection.
-
Some filters display a message saying that they process image data in the cloud (on Adobe Creative Cloud servers). They may need more power than a desktop computer has, or a machine-learning model may be too large to download.
It’s possible to use some Neural Filters without an Internet connection, but you get the most options when your computer is connected to the Internet.
Getting started
Exploring the possibilities of Neural Filters might turn out to be the most fun you have with this book. Let’s first take a look at the files you’ll work with.
![]() Note
Note
If Bridge isn’t installed, the File > Browse In Bridge command in Photoshop will start the Creative Cloud desktop app, which will download and install Bridge. After installation completes, you can start Bridge. For more information, see page 3.
-
Start Photoshop, and then simultaneously hold down Ctrl+Alt+Shift (Windows) or Command+Option+Shift (macOS) to restore the default preferences. (See “Restoring default preferences” on page 5.)
-
When prompted, click Yes to delete the Adobe Photoshop Settings file.
-
Choose File > Browse In Bridge to open Adobe Bridge.
-
In Bridge, click Lessons in the Favorites panel. Double-click the Lesson15 folder in the Content panel.
-
Compare the files 15Restore.psd and 15Restore_End.psd, 15Colorize.psd and 15Colorize_End.psd, and 15Composite.psd and 15Composite_End.psd. Using Neural Filters, you’ll create the finished files in just a few clicks.
Exploring the Neural Filters workspace
-
In Bridge, double-click the 15Restore.psd file to open it in Photoshop. If the Embedded Profile Mismatch dialog box appears, click OK.
NoteIf Photoshop displays a dialog box telling you about the difference between saving to Cloud Documents and On Your Computer, click Save On Your Computer. You can also select Don’t Show Again, but that setting will deselect after you reset Photoshop preferences.
-
Save the document as 15Restore_Working.psd in the Lesson15 folder.
-
Choose Filter > Neural Filters.
In the Neural Filters workspace, the image appears in a large preview area on the left, and the Neural Filters panel is on the right:
-
When you select a filter, its options appear in the Neural Filters panel.
-
To use a filter, it must be enabled. A filter is enabled when its toggle switch is moved to the right position and in color. You can enable multiple filters.
-
If the selected filter recognizes faces in the image, they’re listed in the thumbnail preview menu at the top of the options. In the document, a blue rectangle indicates the selected face; gray rectangles indicate other detected faces. Select a face in the face menu or in the document.
NoteIf the Neural Filters command is not available, make sure a visible layer is selected.
-
To compare the current filter results with the original image, click the Show Original icon at the bottom of the workspace to select it and display the original layer. Click again to deselect it and preview the filter results again.
-
When a document has multiple layers, the Layer Preview button controls whether the preview displays one layer or the entire document.
-
Along the left side, the top two tools let you paint a mask to hide filter effects from some areas, similar to the layer masks you edited in Chapters 6 and 8.

A. Add To Selection and Subtract From Selection tools
B. Hand tool
C. Zoom tool
D. Selected face
E. Filter lists
F. Filter toggle, enabled
G. Use Graphics Processor (GPU) option
H. Thumbnail menu for selecting a detected subject, such as a face
I. Reset filter options to default settings
J. Options for the selected Neural Filter
K. Show Original/Preview Changes button
L. Show current layer or all layers (Layer Preview)
M. Output options
Restoring an antique portrait photo
To learn more about Neural Filters, let’s see how they can help restore old photos.
![]() Note
Note
Adobe may update Neural Filters after this book is published, so the list of categories and filters you see may depend on the version of Photoshop you are using. Also, if Adobe updates how Neural Filters effects are trained, you may see different results than those in this chapter.
-
In the filters list, scroll down to the Restoration category, and click the toggle switch next to the Photo Restoration filter to enable and apply it. (If options are not available and a Download button appears instead, click the Download button because it means the filter is not yet installed. When the download completes, the filter will install itself and be ready for you to use.)

A. Photo Enhancement
B. Enhance Face
C. Scratch Reduction
-
To compare the changes with the original, click the Show Original button at the bottom of the workspace. Click once to hide the changes and see the original, and click again to preview the changes again. If you don’t notice a change, zoom in to 100% or higher magnification.
NoteSome Neural Filters may be labeled Beta, which means they function but are still under development. You can use them, but when the finished version is released, those filters may produce different results or some options may be different.

-
As needed, adjust the first two Photo Restoration options, and then repeat step 2 to check your work:
-
We left Photo Enhancement at its default value of 50.
-
We reduced Enhance Face to 15 to preserve more of the original film texture.
-
-
Scroll up or zoom out as needed until you can see the top of the image. That part of the photo print is scratched and torn.
-
Adjust Scratch Reduction to about 20. A progress bar at the bottom of the image may indicate that it will take a little while. When it’s done, the scratch is intelligently removed, which you can verify using the Show Original button.
 Tip
TipIf you increase the value of a Neural Filter option, watch out for negative side effects on some parts of the image. it’s typically better to leave minor spots and wrinkles, cleaning them up quickly using the retouching techniques you learned in Lesson 2.

-
You greatly improved this image using the Restoration Neural Filter. For Output, choose Smart Filter, and then click OK to exit Neural Filters. Close the document, saving your changes.
Adding color and depth blur
You can use Neural Filters to colorize black-and-white images and add depth blur.
In Bridge, double-click the 15Colorize.psd file to open it in Photoshop. If the Embedded Profile Mismatch dialog box appears, click OK.
Save the document as 15Colorize_Working.psd in the Lesson15 folder.
Choose Filter > Neural Filters.
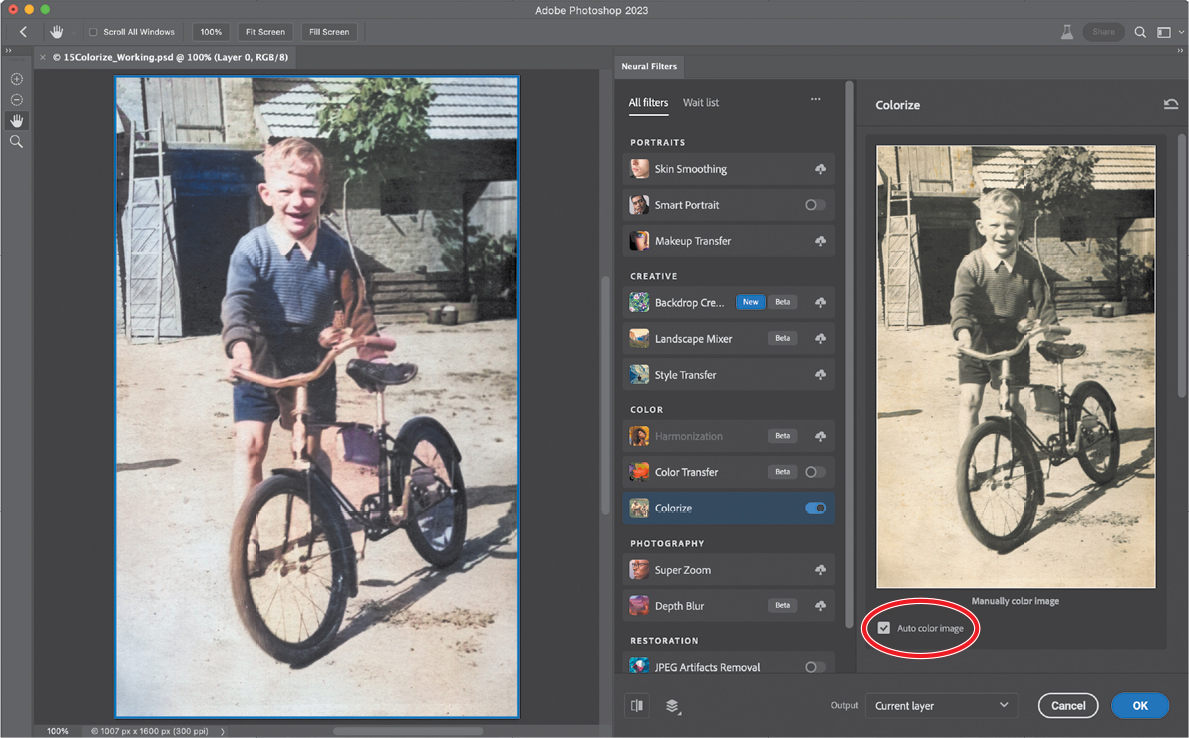
In the filters list, scroll down to the Color category, and click the toggle switch next to the Colorize filter to enable it. Make sure Auto Color Image is selected.
NoteIf the Colorize options aren’t available because the filter needs to be downloaded, download it.
 Tip
TipFor a different look, select a Profile. If the result is too strong, reduce the Profile Strength, and make any other changes you like using the other Adjustments options.
The Colorize filter applies assumed colors to objects and regions it recognizes, such as the leaves on the tree and the boy’s skin and clothing. If you disagree with a color choice Colorize made (for example, if the shirt is not all the same color), you can apply custom colors to specific areas.
In the preview image on the right, click to add a new color focal point over an area you want to change, and set its color using the color picker below the image. Repeat for other areas where you want to change the color.
TipIf the results of the Colorize filter aren’t perfect, you can combine it with manual Photoshop techniques. For example, after closing Neural Filters, add a new layer that uses the Color blending mode, and paint on that layer to colorize the image under it.

In the Photography category in the filters list, click the toggle switch next to the Depth Blur filter to enable it (download it if needed).
Adjust filter options as needed until you like the result. We disabled the Focus Subject option because it included part of the tree, and we set our Focal Range to 40 so that more of the bicycle remains in focus.

You’ve brought this image back to life! For Output, choose Smart Filter, and then click OK to exit Neural Filters. Close the document, saving your changes.
Creating a more convincing composite
When compositing multiple images, the images may not be consistent in tone and color. Some Neural Filters can help resolve this.
In Bridge, double-click the 15Composite.psd to open it in Photoshop. If the Embedded Profile Mismatch dialog box appears, click OK.
Save the document as 15Composite_Working.psd in the Lesson15 folder. Click OK in the Photoshop Format Options dialog. This image will become a thumbnail image for a video, but the color palette and subject need to be closer to the look of the art director’s concept.
In the Layers panel, make sure the Planet layer is selected, and then choose Filter > Neural Filters.
In the filters list, scroll down to the Creative category, and click to enable the toggle switch next to the Landscape Mixer filter (if needed, download it first). The Landscape Mixer filter can apply the look of one landscape image to another. Depending on the landscape images you mix, you can even change a scene from summer to winter or fill a desert image with green foliage.
In the Landscape Mixer options, click different Presets to experiment with how each of them alters the landscape attributes of the layer.
TipYou can use your own image to drive the style applied by Landscape Mixer. Click Custom, click Select An Image, and open an image from your computer. Also, Landscape Mixer options let you adjust attributes such as the amount of Day or Night and the time of year. For example, you can add snow by increasing the Winter value.
Click the third preset. That’s the one to use for this project.

For Output, choose Smart Filter, and then click OK to apply the changes.

In the Layers panel, click the eye icon for the Heroine layer to make it visible. Its tone and color doesn’t quite match up with the landscape, so let’s improve that.
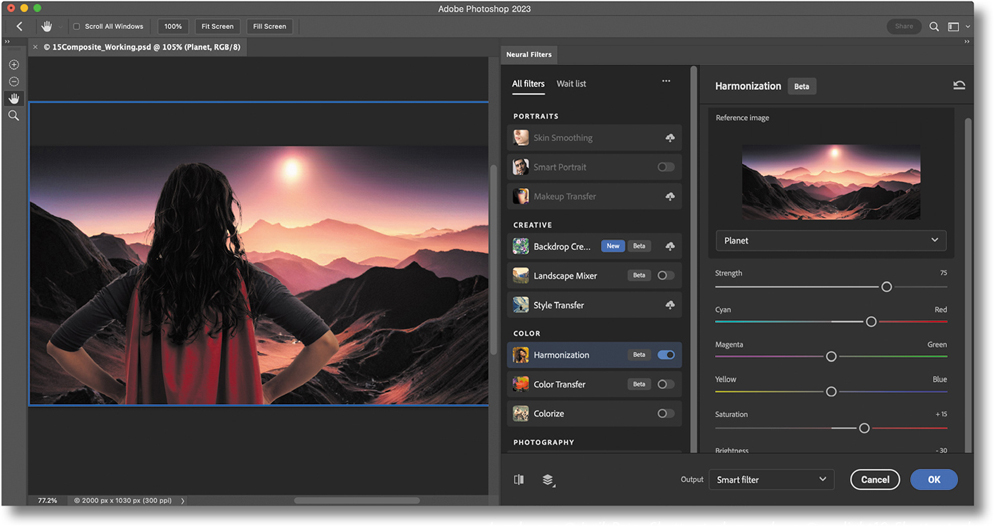
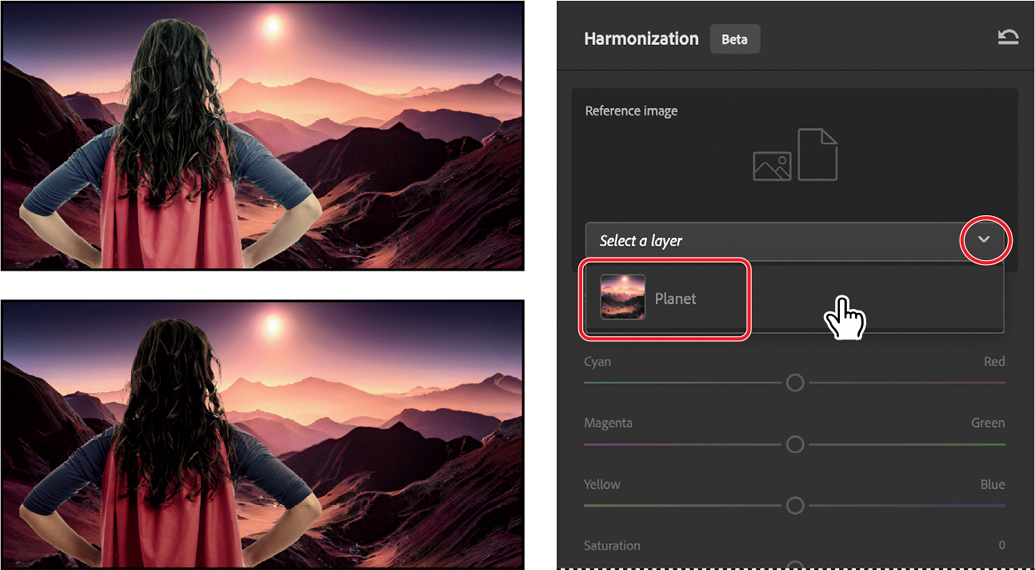
With the Heroine layer selected, choose Filter > Neural Filters, and in the Color category in the filters list, click to enable the toggle switch next to the Harmonization filter (if needed, download it first). The Harmonization filter helps match the color and tone of a layer to another layer in the document.
In the Reference Image section, click Select A Layer, and select Planet.
The color and tone of the Heroine layer change to better match the color and light of the Planet layer, but it could be improved.
In the Harmonization options, drag the Cyan/Red slider about one-third of the way toward Red, drag Saturation to about +15, and reduce Brightness to about –30. Make any other adjustments that make the composite more convincing. Remember to use the Show Original button to check your work.
TipThe best thing you can do to make your composite images the most convincing is to make sure all of your original images are consistent in as many ways as possible—not only color and tone, but other visual details such as the quality of lighting (including sources, angles, and shadows), lens focal length, and camera distance from the ground.

For Output, choose Smart Filter, and then click OK to apply the changes.
In the Layers panel, click the eye icon for the Guardian type layer to make it visible.
TipNeural Filters results might not always produce perfect results right away. But remember that you can output the results to a separate masked layer, so you can blend them with the original layer to achieve a more convincing result, still saving many steps compared to more labor-intensive methods.
You’ve completed the video thumbnail … nice work! You used Neural Filters to transform the look of both images in just a few steps, making them work together to match the mood and the look of the production.

Save your work, and close the document.
You’ve learned the basics of using Neural Filters. The results created in this lesson required only a few steps each; for example, retouching the old images was almost no work compared to the steps you learned in Lesson 2 and Lesson 5.
You’re ready to explore the possibilities of the Neural Filters with your own images!

Review questions
1 How does a filter in Neural Filters differ from other filters in Photoshop?
2 How does an Internet connection affect how you use Neural Filters?
3 Why is it typically best to choose any Neural Filters output option except Current Layer?
4 How can Neural Filters help restore digitized images of old prints and slides?
5 How can Neural Filters help with compositing multiple images?
Review answers
1 Neural Filters are trained using machine learning, so they are capable of results that are not attainable using conventional algorithmic filters.
2 If you are connected to the Internet, you can download Neural Filters and use Neural Filters that process image data in the cloud. If you choose to participate in the Photoshop Improvement Program, an Internet connection allows your usage data and images to be sent to Adobe for use by researchers.
3 The Current Layer option applies the results of Neural Filters to the selected layer, permanently changing it (destructive editing). The other Output options apply the results of Neural Filters to a separate layer or as a Smart Filter, maintaining a layer’s original state, so that you can start over at any time (nondestructive editing).
4 The Photo Restoration Neural Filters (and possibly Super Zoom) can help improve the quality of digitized images of old prints and slides. The Colorize Neural Filter can re-create colors for a black-and-white photo. JPEG Artifacts Removal can improve images that were saved at a low-squality JPEG compression setting. Depth Blur can help focus attention on the subject of a photo.
5 Neural Filters such as Landscape Mixer, Harmonization, and Color Transfer can help unify a composite by making its layers more visually consistent with each other.