All users in all Acrobat viewers constantly work with PDF navigation. How you move around PDF documents quickly is an important consideration in all Adobe Reader sessions.
Reader offers you many tools, commands, and keyboard shortcuts to help you navigate documents. This chapter explains how to move around pages, open related documents, and use the navigation tools contained in Reader as well as the navigational elements supplied in files from PDF authors.
You can access navigation tools from the Adobe Reader window, from toolbars, and from menu commands. As with many operations in Reader, you can navigate by using any one of several methods that produce the same result. Becoming familiar with all the tools and menu commands at your disposal helps you choose your preferred methods for moving around documents.
The Status Bar at the bottom of the Reader window provides several navigation tools for viewing and navigating PDF documents (Figure 5.1):
First Page tool. Click this tool to go to the first page in a document.
Previous Page tool. Click this tool to go to the previous page.
Current Page. The text box displays both the current page and the total number of pages in a document. You can type a page number in the text box and press Enter/Return to jump to that page.
Next Page tool. Click this tool to go to the next page in a document.
Last Page tool. Click this tool to go to the last page in a document.
Previous View tool. Clicking this tool takes you to the last view displayed in the Document pane. The previous view can be another page in the same document or the last viewed page in another document.
Next View tool. This tool is active only after you click the Previous View tool. Once you open the previous view, you can click the Next View tool to return to the view you were in previously. This tool and the Previous View tool retrace your page views.
To easily navigate pages using the Status Bar navigation tools:
Open two documents in Adobe Reader (use files that have more than one page). You don't need both documents open in the Document pane to use the Previous View and Next View tools. If the previous view was a document that's currently closed, Reader opens the file and places the last viewed page of that file in the Document pane.
Click the Next and Previous Page tools in the Status Bar to move back and forth between pages.
Choose Window and select the second document you opened in Reader.
Click the Previous View tool shown in Figure 5.2. The first-opened document is brought forward in the Document pane with the page last viewed visible in the Document pane.
Click the Next View tool. You return to the second document listed in the Window menu.
The same navigation tools found in the Status Bar also appear in a separate toolbar. By default, this Navigation toolbar is not loaded when you open Reader. To open the toolbar, open a context menu from the Toolbar Well and select Navigation. The Navigation toolbar opens as a floating toolbar (Figure 5.3).
You can navigate PDF documents using menu commands, context menus, the Status Bar, and keyboard shortcuts. The key is to find the option that works for you and helps you move quickly through documents and document pages. Here's a rundown of all options you have so you can find the tools or commands that work best for you.
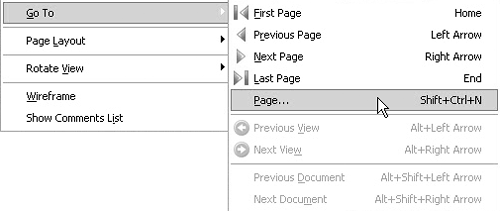
The Go To submenu (Figure 5.4) contains many of the same commands for page navigation as the Status Bar and the Navigation toolbar. Click View > Go To, to access the menu options.
In addition to the tools available in the Navigation bar, the Go To submenu includes the following tools:
Page. Select View > Go To > Page, and the Go To Page dialog opens (Figure 5.5). Type a page number in the text box and click OK to jump to the respective page.
Previous Document. If you have several documents open and are scrolling pages in one document, the Previous and Next View commands take you to the last viewed page in the same document. But if you select Previous Document, the last viewed document opens regardless of the pages viewed in the current document.
Next Document. This tool works the opposite of Previous Document—it moves forward to the Next Document after you've viewed the Previous Document.
To the right of each command in the Go To submenu are the keyboard shortcuts. Figure 5.4 shows the keyboard shortcuts for Windows users. Figure 5.6 shows the keyboard shortcuts for Macintosh users.
You can also move forward and backward in a PDF document using context menu commands. Typically, you will select the Hand tool when reviewing documents, but you can use some of the other tools from the toolbars when opening a context menu and selecting commands for navigating pages. Changing tools and opening context menus often changes the menu commands. However, the common menu commands to move forward and backward in a document remain in each context menu.
To navigate pages using a context menu:
Open a multipage document in Adobe Reader.
Press the H key on your keyboard. If you have another tool selected, pressing the H key selects the Hand tool. Note that you need to check the check box in the General preferences for Use single-key accelerators to access tools as discussed in Chapter 3, “Getting Familiar with Adobe Reader.”
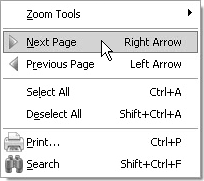
Open a context menu in the Document pane. The menu commands appear (Figure 5.7).
Select Next Page. The next page appears in the Document pane.
Open a context menu and select Previous Page. The previous page opens in the Document pane.
Obviously, using keyboard shortcuts offers you more page-navigation choices than the two commands available in the context menus. Memorize as many keyboard shortcuts as you can, so that you'll be able to move swiftly through document pages.
PDF authors often add links and buttons to documents to help you easily navigate through pages and between documents. A link or button can have one of many types of actions associated with it. In Reader you're limited to using the links and buttons to travel to the target destinations or to invoke other actions such as opening Web links, submitting forms, executing a menu command, and so on—as designed by the PDF author. To actually create these navigational elements, you must use Acrobat Standard or Acrobat Professional.
Note
To view PDFs that contain links, use the culinaryMaster.pdf and recipeRequest.pdf files from www.peachpit.com/adobereader7. Be certain to copy both files to the same folder on your hard drive. The files need to reside in the same folder for the links to work properly.
To invoke actions associated with links and buttons:
Open a file containing links or buttons. Use the culinaryMaster.pdf file you downloaded from the Peachpit Web site.
Press the H key to select the Hand tool if it's not currently selected. Links and button actions are accessible only with the Hand tool.
Click the Last Page tool in the Status Bar to open the last page in the document. The last page in the culinaryMaster.pdf file contains a link that opens the recipeRequest.pdf file.
Move the cursor over a portion of text, an icon, or an image where a link or button is used. In many cases, the link or button is clearly indicated by an icon or by a text description of what clicking the link will do. In other cases, links and buttons contained in a PDF file might not be so obvious. The only way to know if links and/or buttons exist when using Reader is to move the cursor around the page. When the cursor changes to a Hand icon with the index finger pointing upward (Figure 5.8), the cursor is resting over a link or button.
Click the mouse button when the cursor indicates a link or button. The associated action is invoked when you click the mouse button. In this example, the recipeRequest.pdf file opens.
Click the link in the bottom-right corner of the page in the recipeRequest.pdf file (Figure 5.9). Clicking the link opens the first file (culinaryMaster.pdf) and closes the current document.
Layers are supported in programs like Adobe Illustrator, Adobe InDesign, Autodesk AutoCAD, Microsoft Visio, Microsoft Project, and a number of other graphic design and engineering drawing programs. If a designer or engineer creates a document in one of these programs, that person can add different layers to a single page, to create graphics, text, and drawing elements. Once the file is converted to PDF, the layers can remain intact and appear as Adobe PDF Layers in all Acrobat viewers.
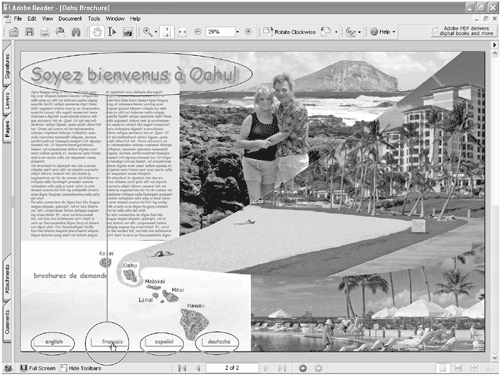
A good example for a document containing layers is a file designed for multilanguage use. A graphic designer may want to use the same layout and design for a multilingual brochure. The text in different languages can be placed on different layers. When you view the file in Adobe Reader, you can use the Layers palette and make one language visible while hiding the others. All images remain the same regardless of the language viewed. The showing and hiding of layers in Adobe Reader terms is referred to as layer visibility.
In some PDF documents containing layers, you may find links and buttons used to open different layer views. Rather than relying on the end user to become familiar with using the Layers pane and its viewing options in order to turn layer visibility on and off, some PDF authors may add links or buttons to change the layer view.
Note
To view a document with links to different layer visibility, use the oahuBrochure.pdf file at www.peachpit/adobereader7.
To change layer visibility using assigned links and/or buttons:
Open a document (open oahuBrochure.pdf and go to page 2) that contains links or buttons designed to change layer visibility.
Move the cursor to a link or button. The oahuBrochure.pdf file is a multilayered brochure.
Click the link or button. Figure 5.10 shows that the text links indicating different languages at the bottom of the page point to different layer views. Clicking a link hides the current view and opens another layer specific to the language selected.
Bookmarks designed to open pages and files are links to destination views. The structure and properties of a bookmark are the same as with links and buttons. All the actions a PDF author can apply to links and buttons can also be applied to bookmarks. Because bookmarks are obvious in Adobe Reader, you can easily find and use them.
To navigate pages using bookmarks:
Open a file containing bookmarks.
Open the Bookmarks tab in the Navigation pane. Some files may open with the Bookmarks tab displayed.
Click a bookmark in the Bookmarks tab (Figure 5.11). The action associated with the bookmark is invoked. Most often you'll find the bookmark action set to open a page in the current document.
Page thumbnails are mini images of the pages in a PDF document. When you open the Pages tab in the Navigation pane, the page thumbnails are generated on-the-fly. These page thumbnails link to the pages in the Document pane.
To navigate a PDF document using page thumbnails:
Open a multipage PDF document. Click the Pages tab in the Navigation pane.
Click a page thumbnail other than the opening page (Figure 5.12). The respective page opens in the Document pane.
Drag the separator bar dividing the Navigation pane and the Document pane to the right to expand the Pages tab.
Open a context menu on a page in the Pages tab and select Enlarge Page Thumbnails (Figure 5.13).
Repeat step 4 to make the page thumbnail larger still, if you like. By using the context menu commands, you can size page thumbnails to suit your viewing preferences.
When you click on a link or button and a second file opens, then the link is a cross-document link. When designing documents with cross-document links, PDF authors can save open preferences—options that control the opening and closing of documents. PDF authors have three choices:
Window set by user preference. When the author saves the PDF document with this option, each user's individual preferences determine the window view.
New window. When the author saves the PDF document with this option, a link or button that opens a second file opens the target file in the Document pane and the original file remains open in the background.
Existing window. When the author saves the PDF file with this option, the original document closes as the new file opens.
You can control viewing preferences only when a PDF author has saved a document with a cross-document link and the open preference options were set to Window set by user preference. If either of the other two options is saved with the PDF file, the saved open preferences override any preference settings you decide to use with Adobe Reader.
Note
To view PDFs with cross-document links, use the culinaryMaster.pdf and recipeRequest.pdf files from the Peachpit Web site at www.peachpit.com/adobereader7.
To set preference options for viewing cross-document links:
Press Ctrl/Command+K to open the Preferences dialog. Click General in the left pane.
Remove the checkmark for Open cross-document links in same window (Figure 5.15).
This preference choice is a personal decision you make according to how you want to view documents when opened with cross-document links. If you want destination documents to open while the documents containing the links remain open, remove the checkmark in the General preferences. If you want documents to close as new documents are opened via cross-document links, check the box in the preference settings. However, be aware that your preferences apply only to documents that have been saved enabling the end user to set the preferences for opening files with cross-document links.
When PDF authors create collections of documents that use navigational links in the form of bookmarks, links, buttons, and page actions, the link to the secondary files captures the directory path as well as the link to the open file. If you copy files from the Web, a CD-ROM, or those sent to you via email, you need to be certain the documents are contained in the same folder or nested folders as when the links were created. Copying files to different folders may produce inoperable links, called dead links, because Reader won't know where to look for the target file. If you click a bookmark, link, or button, or open/close a document and Reader can't find the target file, a dialog will appear (Figure 5.16).

Figure 5.16. Dead cross-document links are reported in a dialog when the target file can't be found.
To fix problems with dead cross-document links:
Create and name a new folder on your hard drive. Its name can be any name you want to use because it won't affect document links for files copied to the folder.
Copy all PDF documents and subfolders to the newly created folder. Keep in mind that files saved to a root of a CD-ROM or those at the same level on a Web site network server can all be contained within a single folder. However, if you copy files from a CD-ROM or a network server where some files are saved to the root level and other files are contained within subfolders, you need to copy folders or re-create them with the same folder name and be certain all PDF documents within the subfolders remain within the same directory path. In Figure 5.17 a folder named Pamphlets and two files are copied to the newly created folder.
Launch Adobe Reader and test the links. If the links are operable on a CD-ROM, they should be equally operable after copying the files and folders to your hard drive. If some links don't work, recheck your folder names and the directory paths.
Link properties can be assigned to handle many different action types. A PDF author may use actions for executing menu commands, opening Web links, playing sounds and media, reading articles, resetting a form, setting layer visibility, submitting forms, running JavaScripts, and more. Some action types may be operable only in Acrobat Standard or Acrobat Professional. For example, a PDF author might create a link or button to generate a new page in a document. New pages can be created in Acrobat Standard and Acrobat Professional, but not in Adobe Reader.
The informed PDF author is likely to create warning dialogs for Adobe Reader users indicating that a certain feature requires one of the commercial Acrobat products and is not available in Adobe Reader. Figure 5.18 shows a custom dialog designed by a PDF author. However, in some cases, PDF authors may design documents without such warnings.
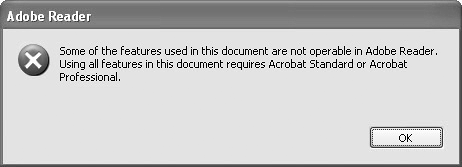
Figure 5.18. PDF authors can design documents with dialogs informing you that some features may not be operable in Adobe Reader.
If no warning dialog opens and you click on a link that produces no action, you can assume the link action is either broken or doesn't work in Adobe Reader. Reader does not display a dialog when you click a link with an action type not supported by Adobe Reader.
You may acquire PDF documents that contain article threads. An article thread is another type of link designed to help you read forward or backward in a passage of text. You may navigate from the top of one column, down to the bottom of the column, then to the top on another column on the same page or through multiple pages. In some documents you'll find article threads on every page so you can continue clicking to read through a document.
Article threads are most helpful when an article begins on one page and continues on a separate page. Much like you might see in a newspaper or magazine where a footnote indicates continued on page 4, the article thread prevents you from having to navigate to page 4 using navigation tools. You simply click the link to navigate the thread and easily follow the continuation of the article.
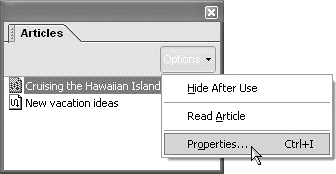
If a PDF document contains articles, the Articles tab lists all articles in the file. Unlike other navigation tabs, the Articles tab does not automatically open if a PDF contains articles.
To use the Articles tab:
Select View > Navigation Tabs > Articles. The Articles tab opens in the Reader window (Figure 5.19).
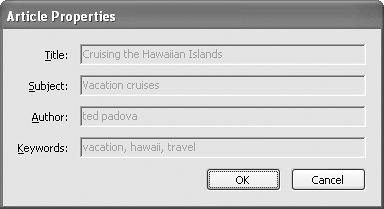
To review any comments or information provided by a PDF author, you can open the Article Properties dialog. Select an article in the Articles tab and click the down arrow to open the Options pull-down menu. Select Properties from the menu options. The Article Properties dialog opens (Figure 5.20).
Notice that the text boxes are not editable. Changes can be made only in Acrobat Standard and Acrobat Professional. In Adobe Reader you can only view the properties. Click OK to close the dialog.
To start reading articles, move the cursor to the top of an article thread. The cursor Hand icon changes to show a down arrow (Figure 5.21). Click the cursor, and the page zooms to the beginning of the article. Sometimes, the default zoom level will show text that is too large for normal reading. The page zoom used when reading articles is controlled in a preferences setting.

Figure 5.21. Click in an article when the cursor changes, and the page zooms to the beginning of the article.
To change the zoom level when reading articles:
Open the Preferences dialog by pressing Ctrl/Command+K to change the default zoom level.
Click Page Display in the left pane.
Click the pull-down menu for Max Fit Visible Zoom and select a zoom level for comfortable reading. The default zoom level is set to 800%. You can choose a new zoom level from the fixed zoom levels in the menu options (Figure 5.22) or type a value in the Max Fit Visible Zoom text box.
Click OK. The next time you read an article, the page will zoom to the new value you selected in the Page Display preferences.
To begin reading articles, you can click in an article thread or select Read article from a context menu opened in the Articles tab. As you move the cursor within an article, the cursor shows you the direction the article moves in when you click the mouse button. As you read articles, you'll want to move forward through an article, move backward to reread text, and jump to the beginning of an article. The mouse and keyboard keys help you navigate through articles and change direction.
To read articles:
Open a document containing articles.
Set your zoom level in the Page Display preferences.
Click the cursor within an article thread.
Click the cursor again to move forward through the article. When you reach the end of an article, the cursor changes (Figure 5.23), indicating that the article stops at the cursor position.
Press Shift+click or Shift+Enter/Return. The cursor changes (Figure 5.24) to indicate that you're moving backward in the article.
Press Ctrl/Option+click or Control/Option+Enter/Return to move to the beginning of an article. The cursor changes (Figure 5.25) again indicating you are moving to the beginning of the article.
