Adobe Reader Picture Tasks is a fun and handy feature for working with images in PDF files. Picture Tasks helps you create a slide show, export and edit pictures, print pictures, and use online services.
Picture Tasks features are available to you when source files of certain formats were created as PDFs. Image file formats such as JPEG and TIFF, as well as files created with Adobe Photoshop Album, Adobe Photoshop Elements, and Adobe Photoshop CS that were converted to or saved in PDF format support Picture Tasks in Adobe Reader. The Picture Tasks tool by default is not loaded in the Reader Toolbar Well and is not accessible from menu commands. The Picture Tasks tool loads in the Tasks toolbar only when the open PDF document supports the use of Picture Tasks.
Once you open a file that supports Picture Tasks, you can access options for extracting images from the file, such as printing images in a variety of sizes, and sharing images via online services (the online services features are available only to Windows users).
The Picture Tasks tool offers pull-down menus containing options for working with images in the open PDF document.
Note
Use the hawaiianLuau.pdf file, which you can download from www.peachpit.com/adobereader7, to follow steps in this chapter. Note that when you open the file it opens in Full Screen mode. Press the Esc key to change the view to editing mode.
To load the Picture Tasks tool:
Open a file that supports Picture Tasks, or use the hawaiianLuau.pdf file. A dialog opens (Figure 9.1) informing you that several features are supported in the open document.
Click OK in the dialog. The Picture Tasks tool is loaded in the Adobe Reader Toolbar Well.
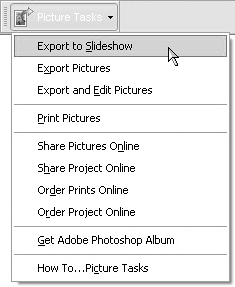
Click the down arrow on the Picture Tasks tool to open a pull-down menu (Figure 9.2) containing Picture Tasks commands.
If you use a Macintosh computer, the same tool opens when you open files that support Picture Tasks; however, fewer menu commands appear because the Macintosh version of Adobe Reader does not support online services (Figure 9.3).
The Export to Slideshow feature offers you the option of extracting selected images in an existing PDF document and converting them to a PDF slide show. You can set slide durations, add transition effects, add background music, and view your slide show in Adobe Reader or any other Acrobat viewer.
You might have a file supporting Picture Tasks where you want to use a selected number of images to create a new slide show—say, to create a slide show from a file that was intended to be a larger slide-show presentation. Additionally, you might want to add sound to a slide show for a self-running kiosk or slide presentation.
To export images to a slide show:
Open a PDF document that supports Picture Tasks.
Open the Picture Tasks pull-down menu and select Export to Slideshow. The Export to Slideshow dialog opens (Figure 9.5).
Select the images you want to export to a slide show. Click on individual images or press the Shift key to select a contiguous range of images. As each image is selected, a checkmark appears in the box below the selected image.
Add a title for your slide show in the text box in the Title field. Titles can be up to 32 characters.
Set the slide duration. Enter the time in seconds you want each slide to appear in Adobe Reader. You can select fixed intervals from the pull-down menu or type a value in the text box. Values range from 1 to 32767 seconds.
Apply a transition. A number of transition effects appear on the pull-down menu. Among others, you can choose from Fade, Dissolve, and different wipe effects. If you don't want any transitions, select None.
Add music. If you want your slide show to play background music, choose Select from the pull-down menu. The Choose Audio File dialog opens, where you can browse your hard drive for a sound file and add it as a background sound. If you don't want music to play during the slide show, select None. Adobe Reader supports MP3 and WAV files.
Open your slide show. If you want to preview the slide show immediately after creating it, check Open slideshow after export.
Export the slide show. Click the Export button, and the Save As dialog opens. Find a target folder where you want to save your PDF slide show, and click Save. Note that the filename is derived from the name you added to the Title text box in the Export to Slideshow dialog. If you want to change the filename, you can do so in the Save As dialog. The Title text appears on the first slide, but the filename can be any name you want to use.
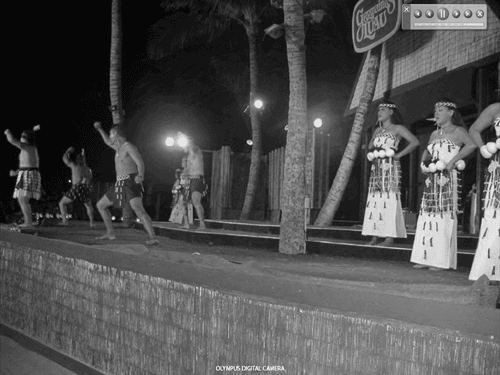
Preview the slide show. If you checked Open slideshow after export, the slide show opens in Adobe Reader. If the slide show doesn't open in Reader immediately, click the Open tool and open the file. The slide show opens in Full Screen mode and automatically changes slides at the interval you selected in the Export to Slideshow dialog. A controller appears in the upper-right corner (Figure 9.6), enabling you to pause, move back, and move forward among the slides.
The Picture Tasks feature enables you to export pictures from PDF files as individual JPEG image files. Using photo editors installed with your operating system you can edit the exported images without having to purchase an image editor. You might have images that need contrast adjustments or color changes, or you may want to composite several images together in a collage. If you do use a commercial image editor such as Adobe Photoshop CS or Adobe Photoshop Elements, you can edit the exported images in those products.
To export images using Picture Tasks:
Open a PDF document that supports Picture Tasks in Adobe Reader.
Select Export Pictures from the Picture Tasks pull-down menu. The Export Pictures dialog opens.
Select the pictures you want to export. Using the same method for selecting pictures as you do when exporting pictures for a slide show, select the pictures you want to export. If all images are to be exported, click Select All in the bottom-left corner (Figure 9.7).
Select a target folder. Click the Change button to open the Browse For Folder dialog (Figure 9.8). Click the Make New Folder button to create a new folder. Type a name for the folder in the Folder text box.
Add a common base name for the files. Type a descriptive name for easy recognition when you view files in a Desktop view. Adding a name like Hawaiian Luau exports the files as Hawaiian Luau1.jpg, Hawaiian Luau2.jpg, Hawaiian Luau3.jpg, and so on. Otherwise, if you use the default of Original Names the files will have the name of the open PDF file from which you extracted the images.
Export the pictures. Click the Export button, and all selected images are exported to the target folder as JPEG images. The exported files retain the original image resolution of the PDF file.
Verify the folder location of the exported files and that they all were exported successfully so you know where the files are saved. Return to your Desktop view and open the folder where you saved the files. Each image should appear with the common base filename (Figure 9.9).
Tip
Photo-finishing centers can use Adobe Reader for commercial photo printing without having to purchase Adobe Acrobat Standard or Professional or a PDF creator that converts image file formats to PDF. Clients need to submit PDF documents directly to the vendor. Using Picture Tasks, you export the pictures; the files are all saved as JPEG images. Service centers using professional photo-imaging equipment can directly download the JPEG images to the imaging device. When the pictures are exported using the Picture Tasks menu command, the files retain their original resolution.
You may have a PDF document supporting Picture Tasks and want to print some or all of the images to a desktop printer. Prior to printing you may also want to edit the pictures for contrast adjustment, cropping, compositing, adding text, or a host of other reasons.
The Picture Tasks pull-down menu offers a quick and efficient way of exporting pictures and opening them in a program you use to edit photos.
To export and edit photos from a PDF document supporting Picture Tasks:
Open a PDF document that supports Picture Tasks or the hawaiianLuau.pdf file in Adobe Reader.
Select the Export and Edit Pictures command from the Picture Tasks pull-down menu. The Export and Edit Pictures dialog opens.
Select the images you want to export and edit using the same selection procedures you use when creating slide shows and exporting pictures (Figure 9.10).
Create a target folder where the images are to be exported. Using the same procedure you used when exporting pictures, click the Change button and create a new folder. Note: If you want to use a common base name, follow the same procedure as when exporting pictures.
Identify your image-editing application. Click the Change button in the Editing Application area and the Choose Image Editor dialog opens (Figure 9.11).
If you want to apply effects, correct brightness and contrast, or make other edits, you can use a commercial image editor or the image editor installed with your operating system. In Windows use the Microsoft Photo Editor (Figure 9.12); on the Macintosh use iPhoto. Navigate your hard drive to locate the image editor you want to use. Select the application and click Open.
You return to the Export and Edit Pictures dialog. Click Edit, and the files open in the selected image editor.
Edit the images as desired using the editing tools and menu commands in your image-editing program.
On the Macintosh, open the exported images in iPhoto (Figure 9.13). iPhoto supports tools for adjusting brightness and contrast, retouching photos, removing red-eye, and changing color modes such as the Sepia toning applied in Figure 9.13.
The Picture Tasks feature enables you to print your images using more options than are available in the Print dialog. Among these additional options are the ability to print picture packages, contact sheets, and custom photo sizes. The Picture Tasks Print Picture command offers options for printing pictures similar to those at a custom photo-finishing center.
To print pictures using Picture Tasks:
Open a PDF file that supports Picture Tasks.
Select Print Pictures from the Picture Tasks pull-down menu. The Print dialog opens. Note that the Picture Tasks Print dialog is different from the Print dialog that opens when you choose File > Print.
Select the pictures you want to print from the Print dialog shown in Figure 9.14. Click each picture you want to print, or click Select All to select all pictures in the file.
Select your printer. Click Change Settings to open the Print Setup dialog. In the Print Setup dialog, select a printer from the Name (Windows) or Format for (Macintosh) pull-down menu. Click OK and return to the Print dialog shown in Figure 9.15.
Select a Print Size. In the Print Size section, click the size you want to print the pictures. When you click a size, a preview of the printed page displays in the Preview section.
If you choose Contact Sheet, as in this example, you can access the Contact Sheet Options. The three options include adding a caption for each index print, a filename, and the date the file is printed.
Click Print. The Adobe Reader Print dialog opens (Figure 9.16).
Double-check the print options and the target printer in the Print dialog box. Click Print to print the file.
Online services enable you to share pictures and projects, order projects, and print pictures at professional photo-finishing labs. These services, offered by various service providers, are available for Adobe Reader Windows users. As of Adobe Reader 7, the services are not available to Macintosh users.
To use the online services for Picture Tasks:
Open a file supporting Picture Tasks in Adobe Reader.
From the Picture Tasks pull-down menu, select one of the four options for online services: Share Prints Online, Share Project Online, Order Prints Online, and Order Project Online.
If you select either Share Pictures Online or Order Pictures Online, a dialog opens—the Order Prints Online dialog in Figure 9.19—where you can select the pictures in the current open document that you want to either share or print online.
Select the pictures you want to share or print, and either click Next or choose the other option either for ordering prints or projects online. The Online Services Wizard dialog opens (Figure 9.20).
You will first need to set up an account with an online service provider. If you have ordered services from a provider, the provider is listed in the dialog. To find more information for setting up accounts and ordering services, click the Help button.
The Adobe Reader Help document opens, and the page related to online services opens in the Adobe Reader Help window. Browse the Help document (Figure 9.21) to learn how to log on to a service and how to order services.
If you open the Online Services Wizard and a service provider you want to use appears in the dialog, click the Next button. You are then prompted to review the license agreement and set up an account. Follow the directions in the Online Services Wizard dialog to place an order.
Help is available for all Picture Tasks features. If you want to use a Picture Task command and you're still unclear about how to produce the results you want, the Adobe Reader Help document is a mouse click away.
To open the Picture Tasks help information in the Help document:
Open a file supporting Picture Tasks. Note that you can't access the Picture Tasks command if you don't have a file open that supports Picture Tasks.
From the Picture Tasks pull-down menu, select How To…Picture Tasks.
The How To pane opens (Figure 9.22) listing the same commands found in the Picture Tasks pull-down menu. Click one of the items, and the result is the same as using the pull-down menu commands from the Picture Tasks tool. Scroll to the bottom of the How To window to access the link to the Help document.
Click Picture Tasks Help, and the Adobe Reader Help document opens to the Picture Tasks help page.


