The goal behind creating and exchanging PDF files is to move toward a paperless workflow. Eliminating hard copy and storing files electronically reduces clutter, keeps documents well organized, and makes searching content easy—advantages that argue in favor of electronic file archival. However, there are times when you need to produce printed documents for convenience and for other reasons.
You may need to acquire PDF forms from a Web site and fax them back to a commercial vendor once completed, for instance, or share hard copy documents for meetings, or provide clients with a hard copy print preview for a commercial printing job.
Adobe Reader provides you with many options for printing PDF files to local desktop printers. Becoming familiar with the Print Setup and Print commands helps you understand these options.
The Print Setup dialog offers options for choosing a printer, setting up page sizes, and choosing the document orientation. The same print attribute choices in Print Setup also appear in the Print dialog. Whether you use Print Setup or set print attributes in the Print dialog is a matter of personal choice.
To use Print Setup:
Open a document in Adobe Reader and select File > Print Setup.
Select a printer from the Name (Windows shown in Figure 6.1) or Format (Macintosh) pull-down menu. All local and network printers appear in the pull-down menu.
Select a paper size from the Size pull-down menu. All acceptable paper sizes appear according to the selected printer.
Select the page orientation by clicking Portrait or Landscape.
Click OK. The Print Setup attributes apply to all documents in a current Adobe Reader session. If you quit Reader and open a new session, you may need to revisit the Print Setup dialog and reset the print attributes.
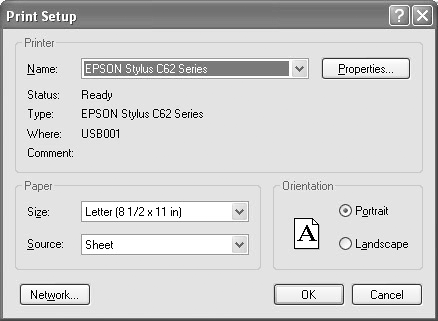
For Windows users, the Print Setup dialog contains a Properties button. Click Properties, and options specific to the selected printer appear in another dialog. Figure 6.2 shows the properties associated with an Epson Stylus C62 printer. Choices for print quality, paper type, and other print options derive from the printer driver for the selected printer and will vary according to the printer being used. Note that a Properties button also appears in Windows in the Print dialog. Clicking the Properties button in that dialog offers the same choices as opening properties in the Print Setup dialog.

Figure 6.2. Click Properties in the Print Setup dialog to open another dialog where you make specific print choices unique to the selected printer.
On the Macintosh you select the same options in the Print dialog. Below the Presets pull-down menu you find another pull-down menu with the default choice for Copies and Pages. Open the pull-down menu and select Print Settings. The Print dialog expands to show you options unique to the selected printer.
You can bypass the Print Setup dialog and make the same choices in the Print dialog or use the settings you made in the Print Setup dialog box to print your file. Either way, you need to select File > Print to print a file.
To print a PDF document from Adobe Reader:
Open a file in Reader and select File > Print. The Print dialog opens.
At the top of the dialog (Figure 6.3) is the option for choosing a printer. If the target printer is not the one you want to use, click the Name (Windows) or Printer (Macintosh) pull-down menu and select your printer.
From the Comments and Forms pull-down menu, make a selection for what to print. You can choose to print a Document, Document and Markups, or Document and Stamps. If you have a document with comment markups and/or stamps, you can choose to print the document with or without the associated markups and stamps. For normal PDF printing without comments and stamps, select Document from the pull-down menu. For more information on comments, see Chapter 11, “Using the Comment Tools.” For more information on stamps, see Chapter 12, “Working with Stamp Comments.”
Select the Print Range. Click the All button to print all pages in the PDF. If you want to print the current page in view, select Current page. If you want to print a range of pages, click the Pages from button and enter the page range in the from and to text boxes.
Set the scaling. From the Page Scaling pull-down menu select None to print the file at actual size; Fit to Printer Margins to expand the entire page within the margins allowed by your printer; Reduce to Printer Margins to reduce the page size to fit within the printable area; or Multiple pages per sheet to print several pages on one sheet of paper.
Preview the print. A thumbnail image appears in the Preview area of the Print dialog. The preview shows you if any clipping of the page will occur before printing the file.
Click OK to print the document.

How can I preview several pages?
PDF documents can comprise pages of different sizes. For example, you can have a letter page, a tabloid page, and an envelope size page in the same PDF document. If you want to preview the pages in the Print dialog's Preview section (Figure 6.4), drag the slider below the preview area to the right or click to the right of the slider bar. Each time you move the slider or click, the next page appears in the Preview.

You can use the Print dialog to select a range of pages to print. The range specified in the Print dialog needs to be a contiguous range, such as pages 27 through 33. If you want to print several pages in a noncontiguous order such as page 12, 18, 22, 45, 57, and so on, you must first select the pages using the Pages tab before opening the Print dialog.
To print a group of selected pages:
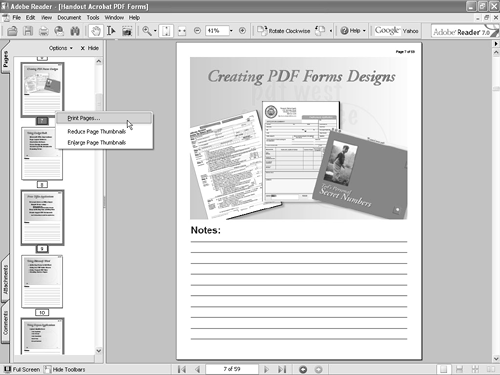
Open a document in Adobe Reader. Click the Pages tab to open the Pages pane.
Select the first page to print by clicking its page thumbnail. Press the Ctrl/Command key and select the next page to print. Continue clicking on pages while pressing the Ctrl/Command key. Scroll the Pages pane as needed to select more pages.
Open a context menu from one of the selected pages (Figure 6.5). Select Print Pages. The Print dialog opens.
Set the print attributes in the Print dialog as described earlier in the “Printing a Document” section.
In the Print Range section of the Print dialog, Selected pages should be enabled (Figure 6.6). All selected pages are printed.

At times, you'll find some PDF documents either difficult or impossible to print. There are a number of reasons why a PDF document can't be printed—the most common being problems with type fonts. A corrupt font, a font not embedded in a PDF, too many fonts in the document that overload a printer's memory, and similar types of font problems can prevent you from printing the file to your desktop printer. To help overcome printing problems you can choose to print the file as an image, which converts all the illustrated vector artwork and type fonts to raster images, which are less-complex files to print.
When you print a file as an image, however, the document integrity suffers and may result in a bitmapped appearance with visible jagged edges on the type. Use this option only as a last alternative when the file fails to print using the other print options.
What is a raster image?
Type fonts are created as vector art drawings similar to what occurs in an illustration program such as Adobe Illustrator CS. When you scale a type font up or down, the font prints at the resolution of the printing device, ensuring a smooth appearance.
When you convert a vector object such as a type font to a raster image, the object is converted to a bitmap with a fixed resolution. The conversion process is known as rasterizing objects. Through the rasterizing process, the resolution of objects yields a resolution lower than your printer resolution (shown on the right side of Figure 6.7). As a result, the printed bitmap appears degraded and often with jagged edges that are clearly visible on type.
To print PDF files as image files:
Open a document in Adobe Reader. Open the Print Setup dialog and set the print attributes.
Select File > Print and set all the remaining print attributes.
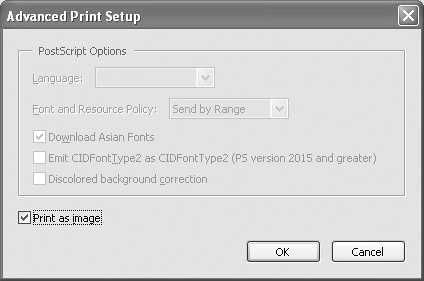
Click the Advanced button at the bottom of the Print dialog. The Advanced Print Setup dialog opens.
Check the Print as image box (Figure 6.8).
Click OK in the Advanced Print Setup dialog and then click OK in the Print dialog. The document prints as an image file.
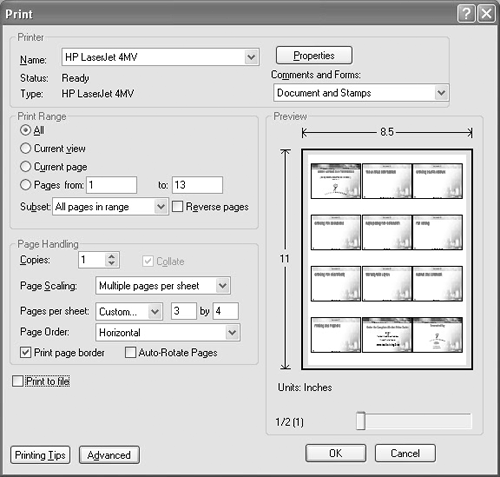
A handy feature in Adobe Reader is the option for printing multiple pages on a single sheet of paper. You may have files you're using for a slide presentation and want to print handouts with multiple slides on a page for your audience. You might also want to print thumbnail images on a sheet of paper for a CD jewel case or some other use where you want to print multiple pages on a single sheet—or you might want to just save on paper.
To print multiple pages on a single sheet of paper:
Open a document in Adobe Reader. Open the Print Setup dialog and set the print attributes. Click OK.
Select File > Print to open the Print dialog.
In the Page Handling pane select Multiple pages per sheet from the Page Scaling pull-down menu (Figure 6.9).
Open the Pages per sheet pull-down menu. You have some default values for choosing the number of pages you want to print in rows and columns—for example, four pages across and six pages down. If you want to add a number not found in the pull-down menu, select Custom. Type the number of images appearing horizontally and vertically in the two text boxes. For example you may want three pages across and seven pages down.
Open the Page Order pull-down menu. Select the order of the pages as you want them to appear from the menu choices. As you make a choice from the menu, the order is displayed in the Preview box to the right.
Check the Preview pane to be certain the number and order appear as you want the pages printed.
Check the box for Print page border if you want a keyline border to appear around each page image.
Click OK and the file prints as shown in the Preview pane.
Certain PDF files, such as PDF forms, include a Print button. This helps a user who has filled out a form and wants to print the filled out form with the data. (For more information on PDF forms enabled with usage rights, see Chapter 19, “Working with PDF Forms”.) When you open a PDF form, a Print Form button appears in the Document Message Bar.
To print a PDF form using the Print Form button:
Open a PDF form in Adobe Reader.
Fill out the form. Be certain the Hand tool is selected and click in text boxes to type your responses. If you see pull-down menus, radio buttons, or check boxes, click to enable the desired items.
Click the Print Form button (Figure 6.10) to open the Print dialog.
At this point you can print the form with the filled-in data. As an alternative, click Cancel in the Print dialog to return to the form. You might want to return to a form to edit the data before printing the final copy.
If you fill in a form and attempt to close a file, a warning dialog opens. The Form Data Not Saved warning dialog offers you three options (Figure 6.11). You can click Continue Filling In Form to return to the Document pane and fill in the form; you can click Print Form to open the Print dialog; or you can choose Discard Data and Close Form, which closes the document and causes all data you typed on the form to be lost.


The appearance of the Document Message Bar is controlled by a preferences setting. By default, the Document Message Bar appears when you open files such as PDF forms or documents enabled with usage rights. If the Document Message Bar does not appear, open the Preferences dialog by pressing Ctrl/Command+K.
Click Forms in the left pane of the Preferences dialog. Under the General category, remove the checkmark for Always hide forms document message bar (Figure 6.12). The next time you open a PDF form, the Document Message Bar will appear over the Document pane and the Print button will appear inside the bar.
Figure 6.12. Remove the checkmark for Always hide forms document message bar to make the bar visible in the Adobe Reader window.
If you prefer to keep the Document Message Bar hidden by default, you can open it manually when you want to examine any document message information. To show the Document Message Bar, move the pointer over the horizontal bar that separates the toolbar from the Document pane and then drag the bar down when the pointer icon changes to a double-arrow icon. Conversely, you can hide the Document Message Bar by moving the pointer over the horizontal bar that separates the Document Message Bar from the Document pane and dragging the bar up to the Toolbar Well when the pointer icon changes to the double-arrow icon.
To quickly access the Message Bar or to quickly hide it, move the cursor to the bar separating the Toolbar Well and the Document pane and double-click the mouse button. You can show and hide the Document Message Bar using mouse clicks.
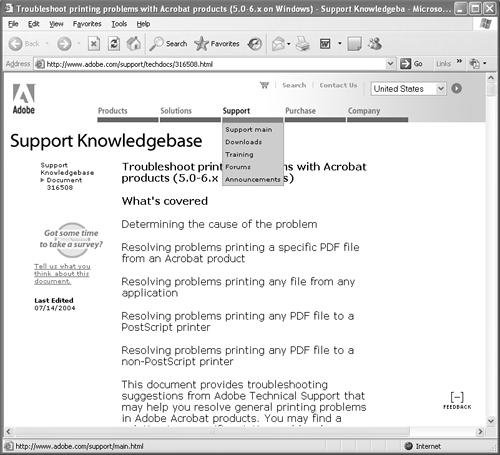
Printing a file as an image may not resolve printing problems with some PDF documents. If you encounter problems, you can easily access help for printing PDF documents. Adobe's Web site contains Web pages and documents to help you resolve your printing problems.
To access the printing solutions on the Adobe Web site:
Open a PDF document in Adobe Reader.
Select File > Print.
Click the Printing Tips button in the Print dialog. Your default Web browser launches and takes you to the Adobe Support Knowledgebase (Figure 6.13).
Scroll the Web page to review solutions for printing problems. From this page you can get more information on Acrobat products, log on to forums, review training information, download files, and more.
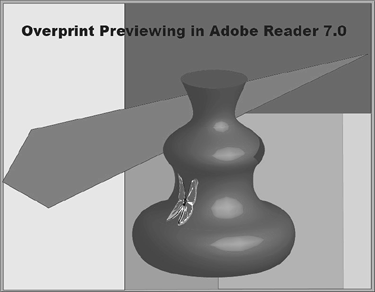
You use overprints when printing files to commercial printing equipment and an offset press. When you assign an overprint in an authoring application such as Adobe Illustrator or Adobe InDesign, one color prints on top of another where the two colors overlap. Overprinting is desirable when, for example, you print black type over another color so the type prints without any visible gaps between the type color and the underlying color. However, assigning overprints to colors can also create printing problems by rendering illustrations and designs with different colors due to the blending of the overlapping colors.
Adobe Reader provides you with a means for checking overprints to ensure that files designed for commercial printing output correctly for overprints.
To check a document for appearances with overprints:
Open a document that was designed with overprints assigned to image and/or object elements. Note that overprint previews only display overprint assignments in files where overprints are used.
Examine the document in Adobe Reader. The view shown in the Document pane appears as the file is intended to print—like the document shown in Figure 6.15.
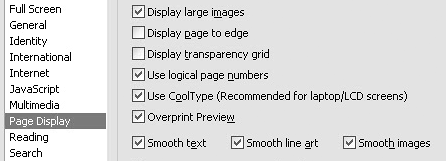
Press Ctrl/Command+K to open the Preferences dialog. Then click Page Display in the left pane and check the box for Overprint Preview (Figure 6.14).
Examine the file with Overprint Preview enabled (Figure 6.16). Compare the view between the document appearances when Overprint Preview is turned off (Figure 6.15) and when it's turned on. If overprints change the appearance of the document, as they do in Figure 6.16, then that indicates potential printing problems.

PrintMe is a Web-hosted service designed to offer you printing services from a computer, a laptop, or a handheld device. The service prints your files and sends the printed copies anywhere you want them distributed.
You can access PrintMe in Adobe Reader by selecting File > PrintMe Internet Printing. Your default Web browser launches and takes you to the PrintMe Web site (Figure 6.17).

Figure 6.17. Select File > PrintMe Internet Printing, and the PrintMe Web site appears in your default Web browser.
The PrintMe Web site contains easy-to-follow directions for connecting to a PrintMe Station and using the service. If remote printing is something you may want to use, you can read all about it on the PrintMe Web site.