What is PDF accessibility, and why should it matter to you?
Accessible PDFs are PDF files that can be read by screen readers—programs designed to assist people who are vision and motion challenged. These special programs read aloud documents via controls a user activates with keystroke commands. Such controls may include character by character reading, pausing, stopping, and various audible controls. Accessible files are structured in such a way that the contents can be read by a screen reader in a logical reading order such as column by column reading as opposed to reading horizontally across pages.
You can't create accessible PDF files using Adobe Reader, but you can interpret and read them using various software programs designed for screen reading. So why do you need to know about accessibility if you're not using a screen reader?
Certain commands in Adobe Reader are designed for accessibility, but you may find them useful even if you're not physically challenged. For instance, you might want to give your eyes a break and listen to a document, rather than read it onscreen. These accessibility features offer you several ways to view and read PDFs: You can have documents read out loud; have them autoscroll; and reflow documents to fit the Document pane width, enlarging the text for better readability.
Note
Use the draftLayout_accessible.pdf document, which you can download from www.peachpit.com/adobereader7, for all steps in this chapter.
If you help configure Adobe Reader for a person who uses an assistive device or a screen reader, you should first adjust preferences options for viewing PDF documents. If you aren't using such a device or a screen reader, be certain to leave all the viewing options at the default settings and ignore the following steps that describe accessibility setups.
To prepare the Adobe Reader environment for a screen reader:
Open Adobe Reader and select Help > Accessibility Setup Assistant. You don't need a document open when adjusting settings in the Accessibility Setup Assistant.
The Accessibility Setup Assistant window contains several panes that you advance through by clicking Next at the bottom of the window. The first pane (Figure 18.1) offers you the choice of letting the Assistant set up options according to recommended settings.
If you want to try the recommended settings, click Use recommended settings and skip setup. The settings are made, and the Accessibility Setup Assistant window closes. If you want to choose an option other than the recommended settings, click one of the three other options for the type of assistive technology you want to use and click Next. Additional panes offer you choices for text appearance, reading attributes, number of pages delivered to the assistive device, and document viewing options.
Many of the settings in the Accessibility Setup Assistant are also available in the Preferences dialog. You can select various options using different category panes in the Preferences dialog. Additionally, an Accessibility category is available to set accessibility options. Press Ctrl/Command+K to open the Preferences dialog.
Click Accessibility in the left pane, and the accessibility options appear in the right pane (Figure 18.2).
If you're using an assistive device, you can choose the color scheme. The remaining choices are made for you by the Accessibility Setup Assistant. If you want to override an option, check the boxes for choices you want to change. If you're not using an assistive device, leave all the settings at the defaults.


Accessible documents are created in authoring applications that support accessibility and export to PDF files. As an Adobe Reader user you can't make a document accessible. Only a PDF author can create an accessible document. However, Adobe Reader does provide you with an option for checking files to see that they meet accessibility standards (for example, a file whose figures are missing the alt text that describes each figure would be noncompliant).
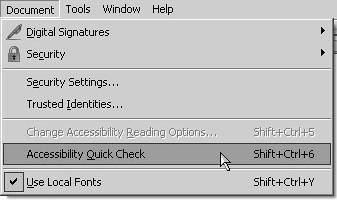
To check a file for accessibility standards:
Open the draftLayout_accessible.pdf file.
Select Document > Accessibility Quick Check (Figure 18.3).
The Accessibility Quick Check dialog opens. If a file doesn't meet accessibility standards, the dialog informs you. If the file meets accessibility, the dialog reports no problems were detected (Figure 18.4).
For further information about accessibility select Help > Accessibility Information Online.
Your default Web browser opens and takes you to the Accessibility Web page on Adobe's Web site. The Web page (Figure 18.5) offers help information and solutions for working with accessible files.


The Read Out Loud and Automatically Scroll commands are designed to be used for document accessibility. However, you can use either command with any document, whether it meets accessibility requirements or not. And you don't need a screen reader. So whether you use a screen reader or an assistive device—or you just want some flexibility in how you view documents—you'll want to try these tools.
Read Out Loud is a command intended more for checking documents for reading by screen readers than it is a substitute for a screen reader. When you select the command, your operating system's internal Text to Speech engine reads a document and outputs the audio through your computer's speakers. Although this feature is intended for working with accessible documents, sighted users can employ the command for a variety of purposes such as casual reading, multitasking, and operating self-running kiosks.
To read a document out loud:
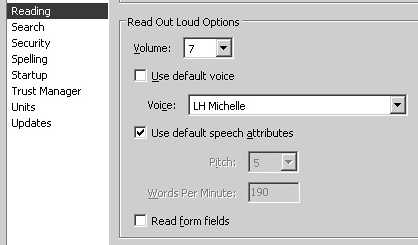
Press Ctrl/Command+K to open the Preferences dialog.
Click Reading in the left pane. The Read Out Loud options are shown in the right pane (Figure 18.6).
You can change the volume by selecting options from the Volume pull-down menu.
If you want to select a voice other than the default voice, remove the checkmark from the Use default voice check box and select an option from the Voice pull-down menu.
Choose an audio pitch and specify the words per minute.
If you want form fields read, check the Read form fields box. Click OK in the Preferences dialog after making your choices.
Open the draftLayout_accessible.pdf document.
Select View > Read Out Loud > Read This Page Only. The submenu (Figure 18.7) contains commands for reading a single page, reading to the end of the document, and pausing and stopping the reading.
The reading begins according to the settings made in the Reading preferences. To stop the reading, return to the submenu and select Stop, or press Shift+Ctrl/Command+E.

Automatic scrolling is designed for users with motion challenges. Anyone who has difficulty using a mouse can use an extended set of keyboard shortcuts in Adobe Reader and view pages with automatic scrolling. As a leisure tool, those without motion challenges can use the auto-scrolling feature for reading documents, publications, and Digital Editions.
To use the autoscroll feature in Adobe Reader:
Open the draftLayout_accessible.pdf document in Adobe Reader.
Select View > Automatically Scroll (Figure 18.8).
The Page Layout view changes to Continuous.
Press the 1 key on your keyboard. The page scrolling slows down. Press each of the number keys on your keyboard to change the scrolling speed. The zero (0) key is the slowest motion and 9 is the fastest.
Reflowing documents is helpful when you're using assistive devices and when transporting PDF documents to handheld devices. Document reflow wraps paragraphs to the width of the Document pane. As you zoom in and out of a document page, the reflow moves the paragraphs in and out to fit the Document pane width.
To reflow PDF documents:
Open the draftLayout_accessible.pdf document in Adobe Reader.
Zoom in on a page to a 100% view (Figure 18.9).
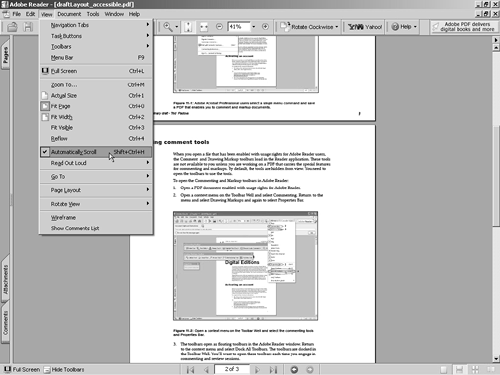
Select View > Reflow.
Select the Zoom tool and click on the page to zoom to a 200% view.
Scroll the page to a column of text.
The text wraps to the width of the Adobe Reader Document pane Figure 18.10).


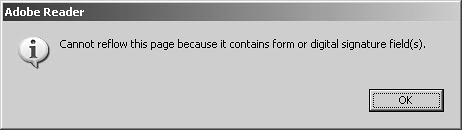
Why do I get an error dialog when I try to reflow text?
If you try to reflow text on PDF forms containing form fields and/or digital signature fields, Adobe Reader opens a dialog as shown in Figure 18.11. Reflow is not permitted when a document contains form fields or digital signatures.