
You know about the free Adobe Reader program you download from Adobe's Web site, but did you know about the other applications you can use to view the same documents you view in Adobe Reader? If you're longing for tools and commands that will let you do more editing on PDF files, you may need to buy one of the commercial Adobe Acrobat products.
This chapter explains the distinctions between the Acrobat viewers and describes some of the features of each, to help you decide which product best meets your needs when working with PDF documents.
Adobe Acrobat Professional is the premiere Acrobat end-user product. You can purchase Acrobat Professional directly from Adobe Systems or from a software reseller. The full-featured program enables you to convert a variety of different file types to PDF, edit PDF documents, and save your edits.
With Acrobat Professional you can create PDF forms and use a variety of print tools to print documents to commercial devices such as offset printers and prepress systems. In addition to using its many editing tools, you can also use Acrobat Professional to enable a PDF document with usage rights, allowing Adobe Reader users to comment on and mark up documents. Figure 2.1 shows the number of tools available in Acrobat Professional when all the toolbars are in view.

If you work in a company where PDFs are widely used, you need to have one or more copies of Adobe Acrobat Professional installed for users who author documents and enable usage rights. Depending on your needs and the number of PDF authors, you may find that only a handful of users actually need the Acrobat Professional software, while the remaining users in your company can comfortably use the Adobe Reader software.
Acrobat Standard is a lighter version of Acrobat Professional. The primary differences between the two versions are that the Standard version includes no support for authoring PDF forms, no support for professional printing tools, and no support for adding usage rights for Adobe Reader users. In addition, some tools, menu commands, and features that are included in Acrobat Professional are not available in Acrobat Standard.
One of the many distinctions between both Acrobat Professional and Acrobat Standard compared with Adobe Reader is that the Pro and Standard applications enable you to create PDF documents. In addition to the many kinds of edits you can make with the commercial viewers, you can save your edits. These options are not available to Adobe Reader users.
Adobe Reader is not an authoring program. You can't create PDFs. You can't use the program to edit and save PDF documents. And if you fill in a form, you can't save the added field data. However, with the introduction of Acrobat 7 and Adobe Reader 7, an Acrobat Professional user can issue certain usage rights to a PDF document that permit an Adobe Reader user to make edits and save an edited file. Usage rights are restricted to comments and markups, and they are permitted only on a document that was saved in Acrobat Professional with usage rights enabled.
While working in Adobe Reader, be aware that not all tools and editing capabilities appear for every file you open in Adobe Reader. Usage rights for additional features are enabled on a document-by-document basis.
PDF documents can be created for specific purposes such as for prepress and printing, document archival, engineering drawings, and documents suited for many different industries. Although you can't create PDFs in Reader, you can view all PDFs created for any purpose. Some PDF documents are created using subsets of the PDF format. They remain PDFs but they are specially designed documents meeting certain standards for particular purposes. As an example, the PDF/X format is designed for professional printing. The PDF/A format is designed to preserve documents in an archived file. Fortunately, Adobe Reader can view and print PDF files meeting these standards.
To get the most out of Adobe Reader, start by familiarizing yourself with some common terms in the Reader environment. The Reader environment itself is referred to as the workplace. Figure 2.2 shows you all the toolbars in view in PDF documents that are opened in Adobe Reader and that have no special features added. Figure 2.3 shows a PDF document in Adobe Reader with usage rights enabled for Reader users to comment on and mark up the document. If you don't see many tools and tabs available to you when you view a document in Reader, your PDF was probably not enabled with usage rights. All the tools pictured in Figure 2.3 are available only with PDFs that are saved with these usage rights enabled.

Figure 2.2. The Adobe Reader workplace shows all toolbars when you're viewing a PDF with no special features enabled.

Figure 2.3. The Adobe Reader workplace shows all toolbars when you're viewing a PDF with usage rights enabled.
The Adobe Reader workplace includes the following tools, panes, and tabs:
Title bar. The Title bar, located at the top of the Adobe Reader window, lists the Reader application icon and the program name. Adjacent to the Adobe Reader name is the filename contained within brackets. In some cases the name that appears within the Title bar is different than the filename. PDF authors can choose to use a filename or a document title to appear in the Title bar. (See Chapter 4, “Viewing PDF Documents” for more information related to initial views where document titles are explained).
Menu bar. Everyone working on a computer today is familiar with menu bars. Click the menu name, and a drop-down menu opens. Click on a menu item to execute an action.
Toolbar Well. Individual toolbars reside in the Toolbar Well. When you open a toolbar, it appears as a floating toolbar in the Reader window. You can place a toolbar within the Toolbar Well by dragging and dropping. Toolbars are said to be docked when they reside within the Toolbar Well.
Document Message Bar. The Document Message Bar reports information about PDFs saved with special features, forms fill-in options, document security, review status, and other options related to your ability to edit and view files. The document in Figure 2.3 was enabled with Adobe Reader usage rights, and the message in the Document Message Bar reports that you can add comments and markups to the open document.
Navigation tabs. Click on any tab that appears in a document, and the tab expands in the Navigation pane. In Figure 2.3, the Comments tab is opened horizontally. All navigation tabs except the Comments and Attachments tabs open vertically in the Navigation pane. For more on using Navigation tabs, see Chapter 5 “Navigating PDF Documents.”
Status Bar. Use the Status Bar for page navigation and viewing options by clicking on the tools along the bottom of the Reader window. For more information on navigating documents, see Chapter 5.
Document pane. The Document pane is where you view PDF pages.
How To window. The How To window is where to find online help information and to search PDF files.
Message box. In the top-right corner of the Toolbar Well is a message box that looks like a mini-banner. The banner icon changes periodically, displaying information related to additional Adobe products, such as ones for creating PDFs online, using Adobe Photoshop Album, and working with commenting and reviews. When you click the message box, your default Web browser launches, opening a page on Adobe's Web site where you can find more information about the topic in the message.
When you first launch Adobe Reader, several toolbars are hidden. You open and close toolbars using a menu command, or by opening a context menu in the Toolbar Well by right-clicking the mouse button (when using a two-button mouse in Windows and on the Macintosh) or by pressing Ctrl+click (when using a one-button mouse on the Mac).
When you open a context menu in the Toolbar Well, the menu commands for viewing and managing toolbars appear (Figure 2.4).

Figure 2.4. Open a context menu in the Toolbar Well to display menu commands that show and hide toolbars.
Toolbars with a checkmark adjacent to the toolbar name are visible; toolbars without a checkmark are hidden. To display a toolbar, select it from the menu. To hide a toolbar, remove the checkmark next to that toolbar.
Other commands in the context menu include:
Reset Toolbars. Select this menu command to return the toolbars to the default position. By default, the Basic, File, Help, Rotate View, Tasks, and Zoom toolbars appear docked in the Toolbar Well.
Dock All Toolbars. This menu command is visible in the context menu only when you open a toolbar and it appears floating in the Reader window. When you first open toolbars, they appear as floating toolbars. Select this menu command to dock the toolbars in the Toolbar Well.
Hide Toolbars. Select this command or press the F8 function key on your keyboard, and all toolbars are hidden from view. To bring the toolbars back into view, press F8 again or select View > Toolbars > Show Toolbars.
Lock Toolbars. When you Lock Toolbars, the vertical separator bar on the left side of each toolbar disappears. The separator bar is used to drag a toolbar out of the Toolbar Well, move it around the Reader window, and dock a floating toolbar in the Toolbar Well. Since the vertical separator bar disappears from locked toolbars, there's no way to move them in or out of the Toolbar Well. To unlock them, open a context menu and select Lock Toolbars again.
Show Button Labels. On the Show Button Labels submenu, you have three options: Default Labels, All Labels, or No Labels. When you first start using Adobe Reader, select All Labels, and the toolbar icon and toolbar name appear within the toolbars. Use the No Labels option once you're familiar with the tools and no longer need the toolbar names. The Default Labels option shows some toolbars by icon and name, and other toolbars by icon only. The more you choose to display the less room you have in the Toolbar Well. Therefore, showing No Labels enables you to fit more toolbars on fewer rows than when showing All Labels. Note that when you move a toolbar into a space too small to display the button labels, Adobe Reader collapses the toolbar and hides the labels to allow the toolbar to fit within a given row.
Toolbars contain individual tools represented by icons and labels, and pull-down menus represented by down arrows. In several cases you can select a menu command to show a mini-toolbar containing all tools within a particular group. For example, note that the Zoom In tool represented by a magnifying glass is contained in the Basic toolbar. When you open the pull-down menu next to the Zoom In tool by clicking on the down arrow, the last menu command is Show Zoom Toolbar. Selecting this menu command opens a separate toolbar containing only the Zoom tools.
To help you understand the toolbars and the tools contained within each toolbar group, review the following list and mark this page for reference.
Basic toolbar. The Basic toolbar contains the Hand tool used to move a PDF page around the Document pane. This tool is the default tool and should be selected when you perform tasks such as filling in form fields. The Select tool is used to select both text and graphics. The Snapshot tool is used to copy a selection created with the tool to the system clipboard, where you can paste data as an image in other programs. Click on the separator bar and drag away from the Toolbar Well to undock the toolbar.

Edit toolbar. The Edit toolbar contains tools to check spelling in form fields and comment notes, and commands for rotating pages and copying data.

File toolbar. The file tools handle document management such as opening and saving files, printing files, adding file attachments (when PDFs are enabled with usage rights), emailing PDFs, and searching PDF content.

Find toolbar. Use the Find toolbar to search the text in an open document. Type your search text in the text field box and press the Enter/Return key. Press Ctrl/Command+F to open this toolbar.

Help toolbar. Click the Help tool to open the How To window, where you'll find help information on selected topics. From the pull-down menu, you can choose other help options.

Navigation toolbar. Contains tools for page and document navigation. For more information on navigating documents, see Chapter 5.

Object Data toolbar. Contains a single tool to view object metadata. This tool can display data added in programs that support object-level data such as Microsoft Visio and Autodesk AutoCAD. For more information on using the Object Data tool, see Chapter 4, “Viewing PDF Documents.”

Rotate View toolbar. Contains tools for rotating pages. The tool is particularly helpful when viewing eBooks on laptop computers.

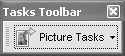
Tasks toolbar. Contains tools for managing eBooks and for working with Picture Tasks such as exporting, printing, and sharing images. The Picture Tasks tool is not accessible from menu commands and does not appear in the Tasks toolbar until you open a file where Picture Tasks are supported. By default, the tool is hidden from the Tasks toolbar. For more information on working with eBooks, see Chapter 20, “Working with Digital Editions.” For more information on using Picture Tasks, see Chapter 9, “Working with Picture Tasks.”
Zoom toolbar. The Zoom toolbar contains tools for zooming in and out of document pages. For more information on using the Zoom tools, see Chapter 4.

Properties Bar. When working in comment and review sessions, use the Properties Bar to change comment properties. In addition, the Properties Bar is used to format text when filling out PDF forms.

When usage rights for Adobe Reader are enabled on PDF documents, two additional toolbars appear listed in a context menu opened from the Toolbar Well:
Commenting toolbar. The Commenting toolbar contains a variety of comment tools. A number of different tools and menu commands are available from pull-down menus within all groups except the Note tool. For more information on using the comment and drawing markups tools, see Chapter 11, “Using the Comment Tools.”

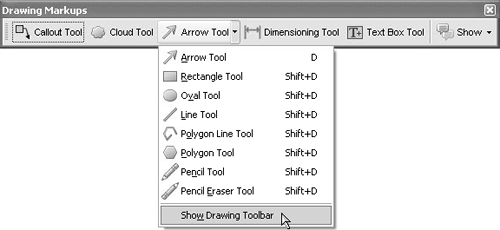
Drawing Markups toolbar. Drawing markups are commonly used with engineering and scientific drawings. You can use these tools with any kind of PDF document. All the marks have associated pop-up note windows.

Note
If you need a file enabled with Adobe Reader usage rights, download the file hawaiiNewsletter.pdf from the Peachpit Web site at www.peachpit.com/adobereader7.
Whenever you see a down arrow, click the arrow to open a pull-down menu. From the menu selections, choose among different tools within a group or choose a menu command. Most pull-down menus also provide you with the option of showing the particular toolbar group. Figure 2.5 shows the Drawing Markup Arrow tool, which has a pull-down menu where you can choose other drawing tools, and a menu item at the bottom to Show Drawing Toolbar. When you select Show Drawing Toolbar, the tools accessible from this menu open in a separate, expanded toolbar.
The Navigation pane is a placeholder window for navigation tabs. Some navigation tabs are docked in the Navigation pane and others are accessible from menu commands. To view all the navigation tabs available in Adobe Reader select View > Navigation Tabs. When tabs are docked in the Navigation pane, click on a tab to open it. Figure 2.6 shows the open Bookmarks tab in the Navigation pane. To collapse the bookmarks and close the Navigation pane, click the tab. Likewise you can open and close all other tabs by clicking them.

The Navigation tabs available to you in Adobe Reader include:
Signatures. The Signatures tab lists all digital signatures contained in the document. You can validate signatures using menu commands in the tab. For more information on using and validating digital signatures, see Chapter 17, “Using Digital Signatures and Security.”
Pages. The Pages tab shows you thumbnail views of the pages in a PDF document. You can change thumbnail sizes and print selected pages using menu commands in the Pages tab. For more information on using the Pages pane, see Chapter 4.
Attachments. All file attachments are listed in the Attachments tab. You can search, open, and save attachments via menu commands in the tab. This tab opens horizontally at the bottom of the Reader window. For more information, see Chapter 13, “Working with File Attachments.”
Comments. This tab lists all comments contained in the document. A number of tools appear at the top of the Comments tab for managing and editing comments. The tab opens horizontally like the Attachments tab. For more information on working with the Comments pane, see Chapter 14 “Managing Comments.”
Articles. Documents containing Article threads list the article properties in this tab. For more information on viewing articles and article properties, see Chapter 4.
Bookmarks. You can expand, collapse, wrap, hide, and navigate bookmarks, as well as change text sizes, all from menu commands in the Bookmarks tab. No changes to bookmark views can be made in Adobe Reader. For more information on using bookmarks, see Chapter 4.
Layers. PDF documents with Adobe PDF Layers can have layers visible or hidden. Use the Layers tab to show/hide different layers. Although you can access the Layer Properties dialog, you can't change layer properties in Adobe Reader. For more information on viewing layers, see Chapter 4.
Context menus are commonly available in all Adobe software programs, and Adobe Reader is no exception. You learned earlier in this chapter how you can access context menus in the Toolbar Well by right-clicking the mouse button (Windows) or pressing Ctrl+click (Macintosh). Each time you change a tool in the Toolbar Well and open a context menu on a document page, the menu options change.
You can also open context menus in all of the navigation tabs. In some cases, when you select an item in a particular navigation tab and then open a context menu, you get different menu options than when you don't first select an item. Figure 2.7, for example, shows a context menu that was opened in the Pages tab without first selecting a page thumbnail. In Figure 2.8, a page thumbnail was selected before a context menu opened.


All navigation tabs contain an Options menu. Click the down arrow, and menu choices similar to those shown in Figure 2.9 appear.

The Options menu in many cases offers you the same choices as the context menus. In other cases, like the example shown for the Bookmarks tab, the Options menu offers additional menu selections.
In addition to the menu commands, toolbars, and tools already discussed, Adobe Reader also provides you with other tools and windows that help you view and work with PDF documents.
The How To window has two purposes: It shows help information when you open a document from the Help > How To pull-down menu. It's also home to the search tools. For more information on using search tools, see Chapter 7, “Searching PDFs.”
If you open both the Navigation pane and the How To window, your Document pane significantly shrinks in size, limiting the viewing area for the PDF pages. When accessing help or performing a search, be certain to click the Hide button to hide the How To pane when you finish the task and you'll open up the Document pane, permitting you to see pages in larger sizes.
For quick access to the How To window press Shift+F4. Press Shift+F4 again to close the How To window. Because you will frequently want to use the How To window, the keyboard shortcut allows for faster access.
The Status Bar at the bottom of the Reader window handles viewing options. You can use tools in the Status Bar to navigate pages, display different page views, hide toolbars, change from Edit view to Full Screen mode, and for certain file types, view document status information.
If you haven't yet memorized the keyboard shortcuts for navigating documents, you'll find the Status Bar much handier than using menu commands or loading toolbars. Once you become familiar with all the options available in the Status Bar, you'll be able to quickly navigate your PDF documents.
Along the right side and bottom of the Document pane, you'll find familiar scroll bars. Click the up/down arrows to jump short distances for viewing documents in zoomed views. Drag the scroll bars up/down or left/right to rapidly scroll pages, and click the mouse button between an arrow and the scroll bar to jump full pages. For more information on zooming views, see Chapter 4.
Once you become familiar with keyboard shortcuts, the scroll bars should be of little significance to you. Using page down/up keys and the arrow keys on your keyboard along with the Hand tool should eliminate the need for poking around the scroll bars.