Preferences dialogs in many software programs look like a messy garage that requires cleaning up on another day. Adobe Reader's Preferences dialog presents an array of choices no less overwhelming than those offered by many other programs.
Happily, this chapter dispenses with an exhaustive list of preferences options that you'll probably forget as soon as you turn to the next chapter. Instead, it gives you information on only the more essential preferences you might want to set up before you engage in any serious Adobe Reader sessions.
Preferences enable you to customize your work sessions in Adobe Reader. The work environment you set up, as explained in Chapter 2, “Understanding Acrobat Viewers,” handles the toolbars and Reader window. You use preferences settings for specifying views and operations, and for choosing alternative ways to invoke actions with tools and menu commands.
To open the Preferences dialog (Figure 3.1) in Windows, select Edit > Preferences. On the Macintosh select Adobe Reader > Preferences. Alternatively, you can use the keyboard shortcut Ctrl/Command+K.

Figure 3.1. By default the General preferences are visible in the right pane when you first open the Preferences dialog.
The Preferences dialog has two panes. The list in the left pane is a categorical list of preferences options that change in the right pane when you select a given category.
Almost all the preferences you change in the Preferences dialog are dynamic, which means you don't need to quit Reader and relaunch the program for a preferences choice to take effect. Preferences remain in effect until you change them again. If you quit Adobe Reader and relaunch the program, the last preferences settings made remain in effect. However, if for some reason the program crashes or you don't shut it down properly, any new preferences changes are not recognized when you relaunch.
Your first stop in the Preferences dialog should be selecting options in the General preferences. Open the dialog (Ctrl/Command+K) and click General in the left pane if the General preferences are not in view. The settings in General preferences list various options for viewing and handling PDF documents. For now, leave all the check boxes at their defaults, and check the box for Use single-key accelerators to access tools. Checking this box permits you to access tools in the toolbars using their keystroke shortcuts. For example, if you want to select the Hand tool, press the H key on your keyboard. To select the Zoom In tool, press Z, and so on. The keyboard shortcuts will not work unless this check box is selected.
As specific tasks are covered in subsequent chapters, some of the choices of options are discussed in more detail.
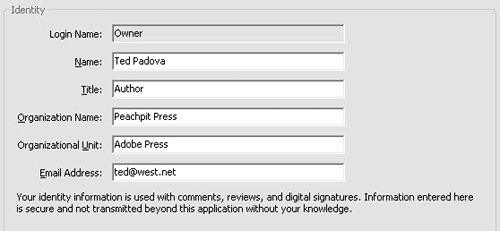
To set the Identity preferences, click Identity in the Preferences Categories pane and supply your identifying information in the text fields that appear in the right pane. The information shown in Figure 3.3 is used when you add comments to PDF documents and when you participate in email-based review sessions. (For more information on participating in reviews, see Chapter 15, “Working with Reviews and Markups.”)
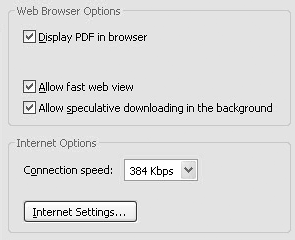
Click Internet in the left pane in the Preferences dialog, and the right pane displays options for Internet settings (Figure 3.4).

Figure 3.4. Click Internet in the left pane to display options for Internet preferences settings in the right pane.
Leave the default check boxes as they appear, and select a connection speed from the Connection speed pull-down menu. The connection speed setting pertains to multimedia used with PDFs. At the top of the options list you can choose to display PDFs downloaded from the Internet either within your Web browser or within Adobe Reader. Check the box for Display PDF in browser. When you view PDFs in a Web browser, you don't need to toggle back and forth between the Web browser and Adobe Reader if you're Web surfing.
When PDF authors create documents for viewing in Acrobat viewers, they have the option to set viewing parameters at fixed views. If an author doesn't set a fixed view, then they've left the view set to a default setting, in which case you can choose how you want PDFs displayed when you open the files in Adobe Reader. For example, you can view PDF documents in single-page views, where page scrolling automatically jumps to the next or previous page, and you can zoom in and out of documents.
To set the views to your personal preference, click Page Display in the left pane in the Preferences dialog and change the Default Page Layout. From the pull-down menu, you can choose among five viewing options. I recommend using the Single Page option as the default view. When you use Single Page, each time you press a Page Down key or a down arrow key, the next page snaps into view in the Document pane. Single-page views are ideal when scrolling through document pages.
Next, change the Default Zoom level. If you want PDF pages to appear in the Document pane so that you can view the entire page, select Fit Page from the pull-down menu. On the other hand, if you want to see the page content at a higher zoom level to make it easier to read, select Fit Width from the menu choices. You have many other options, so you can change the zoom level to your liking.
Another item you may want to adjust in Adobe Reader when you first start to use the program is the unit of measure. Click Units in the left pane in the Preferences dialog to show a pull-down menu where you can select different units of measure. If you prefer to view documents in centimeters, select Centimeters from the menu options. You can also choose from Inches, Millimeters, Picas, and Points.
After adjusting all your preferences settings, click OK and your new choices will immediately take effect. This preliminary look at the Preferences dialog is intended to get you started with Adobe Reader for viewing and navigating PDF files. Later chapters will discuss additional options.
At times, you can find it handy to get some immediate help while working in Adobe Reader. Reader offers several ways to get help information. You can open a comprehensive Help document and search for what you need, you can get help on specific topics while working on a task, you can go to Adobe's Web site for more help information, and you can click Help buttons in various dialogs.
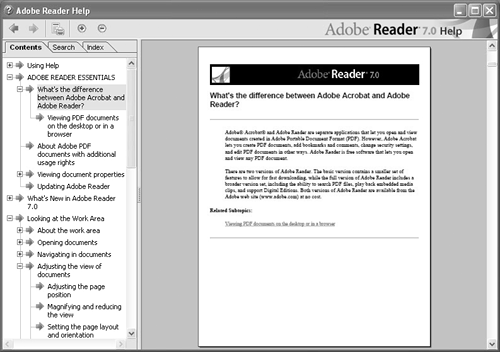
The top-level menu bar contains a Help menu. Click Help and select Adobe Reader Help, or press the F1 function key on your keyboard. The complete Adobe Reader Help document opens (Figure 3.5).
At the top of the left pane are three tabs. The Contents tab lists bookmarked sections in the Help document. Click the plus (+) symbol (Windows) or right arrow (Macintosh) to open a nested category. Click on any name listed in the Contents pane, and the page associated with the bookmark opens in the right pane.
If you want to search for a specific topic, click the Search tab. Type the text you want to search on in the text field box and press the Enter/Return key. A search returns a list of links reported in the Search tab. Click on any item listed in the tab, and a page associated with the link opens in the right pane.
An alphabetical list appears in the Index tab. Click Index and scroll the tab to find topics listed in alphabetical order. When you find a topic you want to view, click the name in the list, and the respective page opens in the right pane.
You can also access the same Help document from the Help Task Button pull-down menu. Click the down arrow adjacent to the Help task button in the toolbar, and select Adobe Reader Help. The Help file opens.
At the top of the Help document, above the Tabs pane, are tools for printing topics and controlling the zoom level. Select a topic from the Contents tab, after searching a topic, or from an indexed topic, and then click the Print tool. The Print dialog opens, enabling you to you select your printer and print the pages related to that topic. The plus (+) and minus (-) tools enable you to zoom in and out of the right pane while viewing the help information.
The Help Task Button pull-down menu offers two other menu selections in addition to letting you access the complete Adobe Reader Help document. Open the menu and select Adobe Reader Essentials. The How To window opens, providing you with a list of general topics for finding quick help information (Figure 3.6).
Click on a topic listed in the How To window, and related help information appears in the window. At the top of the How To window, you can access the navigation tools. Click the left and right arrows to move back and forth between pages in the How To window.
The other menu command, Secure, relates specifically to document security. Select Secure from the Help Task Button pull-down menu, and information related to document security appears in the How To window. For more information on document security, see Chapter 17, “Using Digital Signatures and Security.”
In addition to accessing the Help document, you can also choose to open Adobe Expert Help, Online Support, and Accessibility Information Online. Selecting any of these menu commands opens your default Web browser and takes you to respective information and help Web pages on Adobe's Web site.
You can find Help buttons in many dialogs. Figure 3.7 shows a dialog opened for Picture Tasks. Notice the Help button in the lower-left corner. Click the button to open the Adobe Reader Help document in the foreground. When you click Help in a dialog, the page in the Help document related to the task at hand opens. In this example, the page associated with Picture Tasks would open in the right pane of the Help document. For more information on using Picture Tasks, see Chapter 9, “Working with Picture Tasks.”
Adobe Reader offers several menu commands at the top of the Adobe Reader window. You can use these menu commands in addition to tools and Navigation panes to invoke actions.
For page navigation, it's faster to use the Status Bar, keyboard shortcuts, and tools in the Toolbar Well. The real value in the View menu is opening/closing navigation tabs and displaying the Wireframe view, which has no keyboard shortcut. In the Navigation Tabs submenu, you find the tabs that do not load by default in the Navigation pane. Use the submenu commands to show hidden tabs. The Wireframe mode shows you lines on drawings displayed at 1-point size regardless of the zoom level. Use this feature when you want to examine oversized engineering drawings and need to see lines when zooming out of the document pages.
All the tools in the menu and submenus have equal counterparts in the View submenu and in the context menu opened from the Toolbar Well.
As you open documents in Adobe Reader, the most recent document opens in the foreground in the Document pane and hides all other open documents. If you view several files at one time, use the Window menu to select among open files at the bottom of the menu. When you select a filename listed in the menu, the file moves to the foreground in the Document pane. You'll use the Window menu often if you open more than one document without closing previously viewed documents.
Of the important items listed in this menu, you should plan to make periodic visits to Adobe's Web site for Online Support and Adobe Expert Support. Use the Detect and Repair command when Adobe Reader appears to malfunction with one feature or another. And use the Check for Updates command routinely to see if maintenance upgrades have been posted on Adobe's Web site.
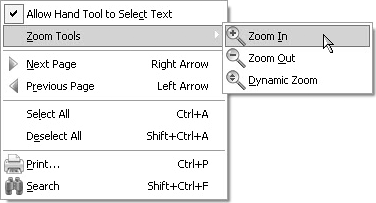
All Adobe products make use of context menus. To open a context menu, right-click the mouse (for Windows and Macintosh users who have a two-button mouse) or press Ctrl+click (Macintosh). When you change tools by clicking a tool in the Toolbar Well and then open a context menu, the menu options relate to the selected tool and may differ from context menu commands that appear when you use the default Hand tool. Figure 3.8 shows a context menu opened in the Document pane when the Select tool is the currently active tool.
Context menus opened from different areas in the Adobe Reader window contain different menu commands. Context menus opened in the Navigation pane, the Document pane, and the Toolbar Well, respectively, each have different commands in their menus. In addition, context menus opened on selected items, or without an item selected at all, often display different menu choices. When in doubt about how to select a tool or perform an action in Adobe Reader, always open a context menu. In many cases, the context menu offers a command to achieve your desired results.


