"Security groups" allow for fine-grain permission checking, on a user-by-user basis, across an entire OFBiz web application ("webapp"). If you have webapps needing protection based on a user's permissions—that is, a user's authorization to perform various business processing tasks—and not just login authentication, then using security groups may be the answer.
To protect an OFBiz webapp using security groups, proceed as described here:
- In the
ofbiz-component.xmlfile for the component containing the webapp to be secured, add one or more security groups using thebase-permissionattribute. To add multiple security groups, separate each group name with a comma (","). In the following example, we configure theOFBTOOLSsecurity group association for themyappwebapp:<webapp name="myapp" server="default-server" location="webapp/myapp" mount-point="/" base-permission="OFBTOOLS" app-bar-display="false"/>
- In the
controller.xmlfile within themyappwebapp (or whichever webapp you are securing using security groups), set the correspondingrequest-mapentrysecurityelement'sauthattribute totrueas shown here. This will force user login when requests for the web page are made.<request-map uri= "mywebpage"> <security https="false" auth="true" /> <response name="success" type="view" value="somewebpage" /> </request-map>
- Restart OFBiz and test coverage by trying to access a protected web page. Observe that you may be able to log in, but that you will be denied access to the webapp if the user login used is not a member of the appropriate security group(s).
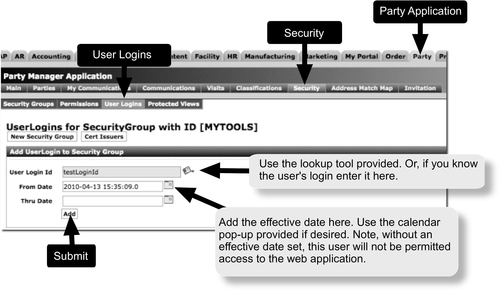
- Associate one or more users with the configured security group. A security group must also be associated with each user that you wish to authorize access to your protected web application. To associate one or more security groups with a user, you may use the security group's Add UserLogin to Security Group form by selecting the User Logins tab as shown here:
Security groups may be used to apply fine-grain authorization or permission enforcement checks to individual web pages and portions of a web page within a protected web application.
Using the following diagram, security group processing may be described as follows:
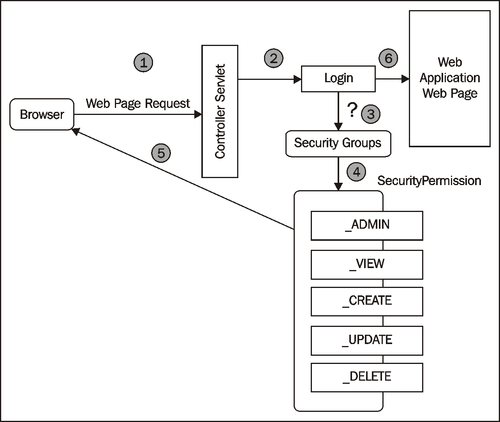
When a visitor makes a request for an OFBiz web page, the Controller Servlet (1) checks to see if the request-map security element's auth attribute is set to true for the web page. If it is, the visitor is presented a Login form(2). After successful login, OFBiz checks to see if the webapp is configured to require further access mediation based on Security Groups (3). If there are no security groups configured for a webapp, the visitor—now an OFBiz user—is allowed access to the web page.
If the webapp has one or more security group(s) configured, OFBiz checks to see if the user is a member of all configured groups. If not, the user is allowed to log in but is denied access to the web page and any protected web page(s) within the protected webapp.
Note
Note: if the user successfully logs in, but is not a member of all the configured security group(s), they are still logged in to the OFBiz instance. This means they may access any other OFBiz webapp(s)/web page(s) requiring authentication as long as they are a member of all configured security group(s) for that web page(s)/webapp(s). They may always access any web page(s)/webapp(s) that require authentication but are not protected by security groups.
If the user is a member of all the configured security group(s), the user is assigned the appropriate Security Permissions (4) and allowed to continue (5) to the protected web page as shown in the previous diagram:
Once a user gains access to a webapp protected by security groups, they are permitted or denied use of OFBiz resources accessed through the web page, based on Security Permissions. Out-of-the-box, there are five security permissions that may be applied to mediate access to OFBiz resources. They are shown here:
|
Security permission |
Usage (rights are cumulative. For example, a user must have both DELETE and UPDATE permissions to perform update and delete operations using provided forms). |
|---|---|
|
|
View only access rights. Minimum permission necessary to access a protected webapp. |
|
|
Allows the user to create new entities. |
|
|
Allows the user to delete entities. |
|
|
Allows the user to update entities. |
|
|
Includes all other permissions. |
Security groups and security permissions are an extremely flexible tool that may be used as needed to protect any OFBiz web application. In the following example, we apply two new security groups to the myapp web application:
<webapp name="myapp" server="default-server" location="webapp/myapp"
mount-point="/" base-permission="MYTOOLS,MYPLACE"
app-bar-display="false"/>
The MYTOOLS and MYPLACE security groups are not part of the OFBiz distribution, and must be created. To create a new security group, use the Party Manager application as shown here:
- Log in to the Party Manager application.
- Select the Security tab.
- Select the New Security Group tab.
- Enter the name of the new security group and any description, and submit the HTML form. That is all you need do to create a new security group.
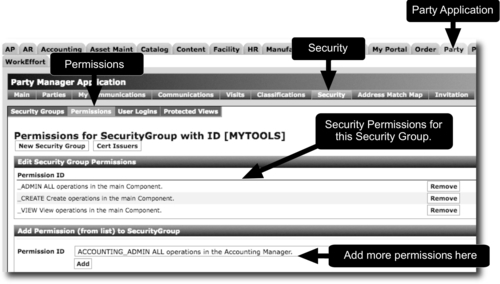
Security groups are like containers that hold one or more security permission(s). To associate one or more security permissions to a security group, for example, the MYTOOLS security group created earlier, use the Party Manager application as shown here:
- Edit the
MYTOOLSsecurity group by selecting it from the list of security groups displayed on the Party Manager application's SecurityGroups List as shown here: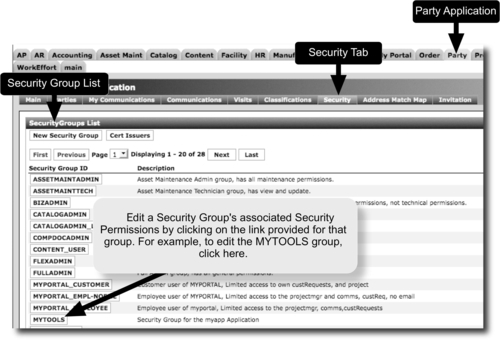
- Selection of the security group on the SecurityGroups List web page will bring up the Edit Security Group form for this security group. Select the Permissions tab to bring up the Edit Security Group Permissions form.
- From the Add Permissions (from list) to SecurityGroup form select an existing security permission from the drop-down select box provided and hit the Add button. Continue adding as many security permissions as desired.