Lesson 4. Safe Working Procedures and General Maintenance
Time
This lesson takes approximately 1 hour to complete.
Goals
Practice ESD damage prevention
List the basic equipment needed to reduce the risk of damage from ESD and explain how this equipment works
Set up a conductive workbench mat
Identify the risks of working with CRTs
Locate CRT safety, discharge, and disposal procedures
State the eight CRT safety rules
Discharge a CRT using Apple-recommended procedures
Explain safety and first-aid procedures related to the leaking of liquid coolant
Describe the hazards of working with an iMac power supply
Describe the risks of booting into EFI
Care for the translucent plastics on Apple products
Clean and maintain a monitor screen
Back up files
Check for viruses
Dispose of batteries safely
Optimize a hard disk
Whether the computers you’re taking care of belong to you, a customer, or a large group, this lesson provides the information you need to approach any situation safely and with the proper tools.
In this lesson, you will learn about the risks to you and the computer when you service computers, as well as general maintenance tasks you might perform during the “verify repair” step in the Apple General Troubleshooting Flowchart. While these may seem like unrelated topics, safe workstations and conscientious work practices are all part of keeping computers, customers, and yourself happy.
ESD Prevention
Whenever you open a Macintosh or other electrical device, you are exposing its internal components to potential damage from the static electricity that builds up in your body through normal activity. Electrostatic discharge (ESD) occurs when static electricity is discharged from one conductor (such as your finger) to another conductor (such as a memory chip) of a different potential. Exposing an integrated circuit (IC) to as little as 10 volts of static electricity can damage the IC irreparably—and you wouldn’t even know it happened, because humans can’t perceive static electricity less than 1500 volts. When you do feel an electrical shock, you are feeling a minimum of 3000 volts.
Since imperceptible ESD can damage ICs found in computer and communications equipment, you must be particularly careful when working on Macintosh hardware. Plastics, utensils, polystyrene products, polyester clothing, and even the ungrounded touch of your hand carry sufficient electrostatic charges to damage electronic components, even if you don’t feel a spark. This section provides guidelines for preventing ESD damage and describes how to set up an ESD-compliant workstation.
ESD Safety Guidelines
Follow these guidelines to reduce the risk of ESD damage:
• Before working on any device containing a printed circuit, ground yourself and the equipment you are working on to an earth or building ground. Use a grounded conductive workbench mat and a grounding wrist strap or heel strap, and ground the equipment to the mat.
Warning
Make sure you are not grounded when you:
• Work on plugged-in equipment
• Discharge a cathode-ray tube (CRT)
• Work on an unplugged CRT that has not been discharged
• Perform live adjustments on a CRT
See “CRT Safety Procedures,” later in this lesson, for more information.
• Handle all ICs by the body, not by the pins. Do not touch the edge connectors, exposed circuitry, or printed circuits on boards or cards. Handle ICs, boards, and cards by the edges, or extract them using an ESD-compliant pair of pliers or other appropriate tool.
• Never place components on any metal surface. Metal surfaces can hold a static charge that will damage sensitive electronic parts. Use antistatic, conductive, or foam rubber mats.
• Do not touch anyone who is working on ICs. If you touch someone who is properly grounded, your “zap,” or body charge, might cause damage. Always keep your own body charge away from other technicians.
• Use static-shielding storage bags for boards and ICs. Before you leave your bench to take a board to a storage place, put the board in a static-shielding bag. Leave all Apple replacement modules in their ESD-compliant packaging until you need them.
• Don’t wear polyester clothing or bring plastic, vinyl, or Styrofoam into the work environment. The electrostatic field that surrounds these nonconductors cannot be totally removed without the use of an ionized air generator.
• If possible, keep the humidity in the service area between 70 and 90 percent, and use an ionized air generator if available. Charge levels are reduced (but not eliminated) in high-humidity environments. Using an ionized air generator helps neutralize the charge surrounding nonconductors. However, this type of device can’t provide total protection: the static charges often cause ESD damage before the neutralizing process eliminates the charge.
Workstation Setup
Before you start to work on any task involving circuit boards, you must verify that your workstation is ESD-compliant—that is, that it has equipment and materials designed to prevent ESD damage.
You need the following equipment to set up an ESD-compliant workstation:
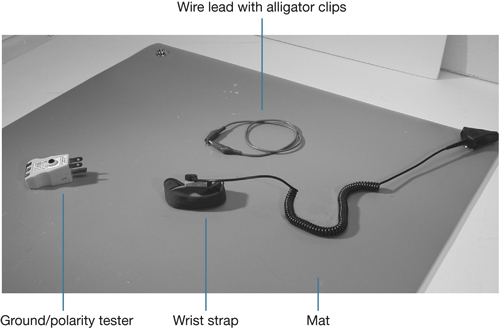
• A conductive workbench mat and wire lead—When properly grounded, the workbench mat provides a safe place on which to set sensitive components and equipment.
More Info
Refer to Knowledge Base document 50077, “ESD Prevention Rules” for more information on setting up a conductive workbench mat.
• A wrist strap with a built-in 1-megohm resistor and wire lead—The wrist strap grounds you so that you can touch sensitive components without zapping them.
• An equipment wire lead with alligator clips—This wire lead grounds the equipment so that an electrostatic charge cannot build up. It is especially important when you are working on CRTs, which can build up an electrostatic charge even when they are not plugged in.
• A ground/polarity tester—This tester verifies proper grounding of power outlets.
A Note on Working Off-Site
When you work at a customer site, you must take the same precautions to avoid ESD damage. Take time to make the work area ESD-compliant. Take a workbench mat and a wrist strap with you. (For travel convenience, you may want to use a mat that folds up.) Be sure everything is properly grounded and never set parts on the floor.
Warning
Do not wear a wrist strap when discharging a CRT. See “CRT Safety Procedures,” later in this lesson, for more information.
ESD-Compliant Workstation Quiz
Read Knowledge Base document 50077, “ESD Prevention Rules”, and answer the following questions:
1. When there is a risk of contacting high voltage, such as when you discharge a CRT or work with a powered-on CRT, do you wear a grounding wrist strap?
2. When there is a risk of contacting high voltage, do you work on a grounded pad?
3. What items do you need to set up an ESD-compliant workstation?
4. For what do you use a ground/polarity tester?
Answer Key
3. A conductive workbench mat, a wrist strap with 1-megohm resistor and ground cord, a wire lead with alligator clips, and a ground/polarity tester
4. To verify proper grounding of the power outlet.
CRT Safety Procedures
Over the last few years, cathode-ray tube (CRT) displays have been used in fewer and fewer computers. In the Macintosh systems, only one model, the eMac, has been available. From June 2002 until mid-2006, the eMac was sold to schools and some private parties. While CRT-based Macintosh systems are no longer sold, they will be a part of the supported product line for years to come. At some point, you may have to service a CRT system.
Between the changing and improving technology and the lowering of prices, attempting to fix a CRT unit should rarely be your first option. If you are not an Apple Authorized Service Provider (AASP) or in a certified training course, you should not attempt to do so at all.
Risks
The CRT is one of the most dangerous pieces of equipment you’ll repair. Happily, there are very few occasions when you should have to open a display and expose a CRT. Yet because of the risks inherent in working with CRTs, it is extremely important that you know what to do and what not to do when troubleshooting and servicing Macintosh computers that contain them.
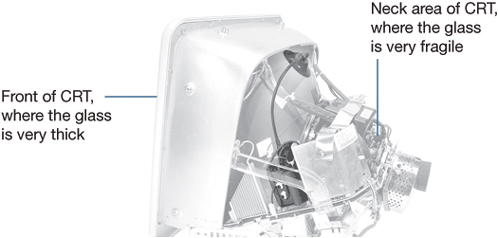
CRTs are glass vessels that have the air pumped out of them. They have very thick glass in the screen area and thinner glass in the narrow neck area. This makes a CRT fairly fragile when it is not encased in a computer or bezel. The neck area is particularly easy to break or crack.
The vacuum tube in a CRT can implode if it is broken or punctured. The surrounding air will rush violently into the unsealed vacuum in the CRT, spraying broken glass in every direction.
Color CRTs may contain mercury or other potentially toxic materials. If the CRT is broken or cracked, these materials may be released and pose a risk of toxic exposure.
A charged CRT carries high voltage—about 27,000 volts in a color unit. You could electrocute yourself unless you handle the display using the appropriate safety procedures.
Safety
If you handle a CRT properly, neither you nor the display will come to any harm. There are several CRT safety procedures that can keep you safe.
Handling CRTs correctly consists of not placing stress on the neck portion of the CRT assembly. Since the neck has thinner glass, you should never lift a CRT by the neck. It is also important to handle CRT modules carefully when lifting them or putting them down.
If you must transport a CRT module, always make sure that it is in a shipping package or installed in the computer.
Warning
A CRT can carry a charge even when the display or system is turned off, and can build up a secondary charge after the power is removed.
These areas of a CRT can present a shock hazard:
• Anode cap and connector
• High-voltage cable
• Yoke assembly
• Flyback transformer
• Any exposed soldered connections

Dangerously high voltages flow through these parts until the display is disconnected from its power source and properly discharged. Do not touch any of these parts inside the product housing until after the display is disconnected from its power source and properly discharged.
In typical repair situations, you should always follow ESD precautions while working inside a Macintosh. This means setting up an ESD-compliant workstation and consistently following all ESD rules.
However, working around a CRT inside a Macintosh, or working around the inside of any Macintosh while it is powered on, can bring parts of your body dangerously close to hazardous voltages. Thus doing so requires an exception to the ESD rules.
Being grounded in these situations is extremely dangerous because your grounded ESD wrist or heel strap and grounded ESD workbench mat create a path through your body to ground. If you accidentally contact high voltage, the current has a clear path through your body and can electrocute you.
To work safely on a CRT inside a Macintosh, follow these safety rules every time:
- Never work alone. Having someone nearby in case of an accident could save your life.
- Turn off the power and disconnect the AC power cord before you remove the CRT cover.
- Remove any metal jewelry.
- Remove the grounding wrist or heel strap until the CRT has been discharged.
- Disconnect the snap fastener on the grounded workbench mat until the CRT has been discharged.
- Wear safety goggles.

- Discharge the CRT immediately after removing the case and before touching anything inside the system or display. (The CRT-discharge procedure is discussed next.)
- After discharging the CRT and turning off the CRT power, reconnect and wear a grounding wrist or heel strap.

Discharge
By now you shouldn’t have to be reminded that CRTs carry a high voltage and can be dangerous. But you still have to work on them sometimes. So how do you do that without electrocuting yourself?
Newer Apple CRT displays are equipped with a bleeder resistor (contained in the flyback transformer) that automatically drains the charge from the CRT when the power is shut off. However, if the resistor fails, the anode may retain a charge. For that reason, Apple requires all service technicians to discharge all CRTs before performing repairs.
The Apple discharge procedure is a precautionary measure to confirm that the CRT has been discharged prior to working on it.
After completing this section, you will be able to safely discharge the high voltage from a CRT.
Warning
The CRT discharge component of this lesson is intended for service technicians working under the direct supervision of an AASP. Do not attempt the CRT discharge part of this lesson if you are studying AppleCare Technician Training.
When discharging a CRT, you need the following equipment:
• Safety glasses
• Ungrounded foam pad
• Needlenose pliers
• Wire lead with alligator clips at both ends
• CRT discharge tool
To ensure your safety, follow Apple-recommended CRT discharge procedures. Search the Knowledge Base and Service Source for the display or Macintosh you are servicing.
Before you do anything, including discharging a CRT, turn off and unplug the display or Macintosh. Then follow these steps:
- Follow the first six CRT safety rules, listed in the preceding section, to prepare to discharge the CRT.
- Remove the housing.
If you have access to them, refer to the Take Apart instructions in the appropriate service manual for your Macintosh or display.
- Put one hand behind your back.

Note
Putting one hand in your pocket or behind your back helps to prevent current from passing through your heart if you touch a high-voltage area.
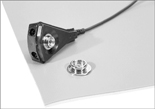
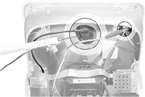
- Using the Apple CRT discharge tool shown below, connect the alligator clip from the lead to the ground lug on all-in-one systems.

Note
If you do not have a discharge tool, you can use an insulated screwdriver attached to a wire lead with alligator clips on both ends.
- Slide the discharge tool probe under the anode cap and into the anode aperture. As soon as you can feel the metal of the probe touching the metal of the aperture, the CRT is discharged.
If a discharged CRT must remain exposed for any length of time, establish an ongoing lead between the anode and ground.
More Info
Refer to Knowledge Base document 50078, “About CRT Safety,” for instructions on establishing an ongoing lead.
When discharging a CRT, use only the ground lug to make your ground connection on a Macintosh to prevent damage to the logic board. Any high voltage that may be present is safely discharged to ground circuits (on the power/sweep assembly), which are designed to handle such voltage.
Disposal
Use the following instructions for returning color CRTs, whether in-warranty or out-of-warranty.
Some dead CRT assemblies, specifically color CRT assemblies, cannot be thrown away with regular trash because they have the potential of becoming hazardous waste.
As with dead lithium, lead-acid, nickel-hydride, and nickel-cadmium batteries, AASPs should return dead Apple color CRT assemblies directly to Apple if the original packaging is available.
When returning dead color CRT assemblies:
• Do not release the vacuum.
• Enclose them in the packaging in which they were originally shipped.
If you no longer have the original packaging, do not return color CRTs to Apple. Instead, dispose of CRT assemblies according to your local hazardous waste ordinances.
Similarly, broken CRTs (for example, monitors with cracked glass) must not be returned to Apple. Dispose of any broken color monitor CRT assemblies according to your local hazardous waste ordinances.
Remember that CRT displays present these basic dangers:
• CRT displays may implode if mishandled.
• CRT displays may contain hazardous materials.
CRT Safety Quiz
1. Name the major risks of working on CRTs.
2. Is carrying CRTs by the neck recommended?
3. Name one toxic material that can be found inside CRTs.
4. You are troubleshooting an eMac for a no-video issue. You want to open the system to check internal cabling. What is the first recommended step you take?
5. What are the eight CRT safety rules?
6. You have an Apple CRT that is cracked and you do not have the original packing for the part. How do you dispose of it?
Answer Key
1. Implosion (flying glass), hazardous materials if CRT is cracked or broken, lethal shock hazard
4. Make sure someone is in the room with you
5. a) Never work alone; b) Turn off the power and disconnect the AC power cord before you remove the CRT cover; c) Remove any metal jewelry; d) Remove the grounding wrist or heel strap until the CRT has been discharged; e) Disconnect the snap fastener on the grounded workbench mat until the CRT has been discharged; f) Wear safety goggles; g) Discharge the CRT immediately after the case has been removed and before touching anything inside the system or display; h) After you have discharged the CRT and turned off the CRT power, reconnect and wear a grounding wrist or heel strap
6. According to your local hazardous waste ordinances
Liquid Coolants
Traditionally Macintosh computers have been air-cooled by attaching large aluminum or copper heatsinks over the processor. These heatsinks have fins that are fan-cooled.
The Power Mac G5 (June 2004) Dual 2.5 GHz model was the first Power Mac to include a liquid cooling system, which is considered a “closed-loop system.” This means the cooling fluid is completely sealed within the tubing and you don’t have access to the fluid to refill or change it.
The liquid cooling system fluid is predominantly water (80 percent or greater) with a mixture of corrosion inhibitors, antifreeze, and bacterial growth preventatives.
Although having a closed-loop liquid cooling system provides a higher degree of safety when using liquid cooling, there still can be some circumstances in which the liquid cooling system is defective and causes a leak.
You might visually identify a coolant leak if you happen to be near the computer when it is on. Since the liquid is under pressure, you may see or hear squirting. Once the processor reaches a certain temperature (due to a lack of cooling), the computer will power itself off to prevent further damage.
If you ever suspect that a liquid cooling system fault is present or involved, you should pull the power cord from the computer or wall socket immediately. Don’t just turn off a power strip. Once the computer is powered off, you can open the case to determine if there is an overt leak.
Evidence of leaks includes corrosions around fittings in the liquid coolant system, the presence of a light green or red liquid, or a slick or slimy feel when handling the part. If you perceive any indication of a leak, service the computer immediately (if you’re an AASP technician).
Wear nitrile or rubber gloves when handling a liquid cooling module that is leaking or suspected to be leaking.
Place the failed liquid cooling module (leaking or not) in the bag the replacement came in, seal it, and return it to Apple.

For coolant leaks or spills, absorb the material using rags, paper towels, or other suitable materials. Contain and dispose of all cleaning materials according to local antifreeze-disposal laws and regulations. Do not combine used coolant with any other chemical.
For complete instructions on working with liquid coolants, refer to the Material Safety Data Sheet (MSDS) for the liquid:
- Open www.apple.com/environment/resources/msds.html.
- Click the MSDS link for the Power Mac G5 Dual 2.7GHz, red liquid.
- Skim the document.
Liquid Coolant Safety Quiz
Read the MSDS for liquid coolants and answer the following questions.
1. What should you do if you get some liquid coolant from a Power Mac G5 in your eyes?
2. What happens if you get some liquid coolant on your hands?
Answer Key
1. Rinse the eyes with water, get immediate medical attention
2. The skin on your hands could get slightly irritated
iMac Power Supply
A number of iMac computer models contain a power supply board that requires extra caution. These models include:
• iMac (iSight)
• iMac (Early 2006)
• iMac (Mid 2006 17-inch)
• iMac (Late 2006)

The AC/DC power supply board is a high-voltage source when the unit is under power, and remains powered up whenever the system is plugged in, whether or not the system is turned on. The voltages pose a potential hazard to your personal safety.
Observe these precautions:
• Make sure the unit is unplugged when working on it with the front bezel removed. Never work on or near the power supply with the unit powered on.
• Never work alone. In the event of an electrical shock, it is important to have someone present who can provide assistance.
• Keep one hand in your pocket or behind your back when working on any computer that is plugged in. This will help ensure that your body does not provide a path to ground in the event that you accidentally make contact with the line voltage.
• Don’t wear jewelry, watches, necklaces, or other metallic articles that could present a risk if they accidentally make contact with the power supply circuitry.
Booting to EFI
While you might think booting to EFI on an Intel-based Macintosh is the same as booting to Open Firmware on a Power PC–based Macintosh, there are some critical differences.
On a Power PC–based Macintosh, booting into Open Firmware yielded a shell command prompt where a savvy troubleshooter could do many useful things, such as reset the nonvolatile memory (NVRAM), eject a CD, set up Open Firmware password protection, and even disable one of the processors in a multiple-processor Macintosh for testing purposes.
The firmware in an Intel-based computer uses EFI technology. When Apple introduced the earliest Intel Macintosh models, they did not have a shell. All the diagnostics and key commands at startup functioned as they did for Open Firmware, but without a shell. Enterprising, if uninformed, users could irreparably damage the logic board.
Since those earliest Intel-based Macintosh models were introduced, Apple has made available a few key tools:
• Boot Camp, so you can boot Macintosh computers into Windows
• A firmware restoration utility, available through the Downloads section of the Apple Support page (www.apple.com/support/downloads)
Depending on what you’re trying to achieve, use one of these two tools, or the diagnostic and key commands; do not boot into EFI.
Note
Attempts to use firmware in a manner that Apple does not explicitly endorse may damage your computer’s logic board. Any repairs that are necessary because of this damage will not be covered under the terms of the Apple One-Year Limited Warranty, AppleCare Protection Plan, or other AppleCare agreement.
General Maintenance
A lot of general maintenance falls to end users. It’s always a good idea to remind them to give their computers the “spa treatment” to help ensure reliability and good performance. This section presents guidelines and hints to help maintain computer equipment in good working order.
Caring for Translucent Plastics
Many Apple products are made with translucent or transparent polycarbonate plastic. This plastic is designed to be both aesthetically pleasing and tough; it should wear quite well.
Yet while translucent plastics are as durable as those used in other computer equipment, scratches and other kinds of minor cosmetic damage may be more visible than in opaque plastics.
When servicing products that use translucent plastics, follow these general guidelines:
• Do not scratch the plastic with sharp items or rub it with abrasive materials.
• Do not drop anything heavy on the product or drop the product on the floor.
Cleaning Computer Equipment
There are specific instructions for cleaning the plastics of Apple computers and displays. Search the Knowledge Base for cleaning plastics. You’ll find articles like the following:
• Knowledge Base document 30889, “How to clean the plastics on your Mac”
• Knowledge Base document 58036, “iMac: Servicing and Take Apart Issues”
• Knowledge Base document 86399, “Apple Cinema HD Display: How to Remove Adhesive Residue”
• Knowledge Base document 304058, “About white MacBooks’ palmrest area”
• Knowledge Base document 93270, “iSight: About the Mount Adhesive”
• Knowledge Base document 60446, “How To Clean an LCD Panel”
Warning
Do not clean any part of the display with a cleaner that contains alcohol or acetone. Never spray cleaner directly onto the screen. Liquid could drip inside the display and cause electrical shock.
Maintaining the Display
Since glass is a main component of Apple displays, and since they are designed to minimize weight, it is easy to crack or break an LCD display panel.
Some sources maintain that defective LCD pixels can be restored by rubbing the screen around the defective pixel. This procedure does not work and is very likely to create further problems. In fact, given the great complexity of LCD displays, such a procedure will likely make more pixels defective. For example, rubbing too hard can crush some of the tiny spacers that keep several of the LCD layers apart, causing even more pixel anomalies to appear. Simply put, don’t rub LCD screens. If you have to clean an LCD screen surface, be sure to do so carefully and only with gentle pressure.
To maintain a display, follow these basic procedures:
• Turn off the display or turn down the brightness whenever the display is turned on but not being used; otherwise, the image on the screen could “burn in” and damage the screen.
• Use the Energy Saver pane of System Preferences to set the display to go to sleep after a specified period of inactivity. Screen Effects (in System Preferences) or a third-party screen saver program is another option. However screen savers aren’t as effective at maintaining the LCD. (Refer to Knowledge Base document 10639, “Screen Savers: Using With Liquid Crystal Displays.” Also, search the Knowledge Base for screen saver for more information.)
• Make sure the vents on the computer and display are clear and unobstructed.
• Don’t let liquid get on or into the display.
If you are trying to eliminate a persistent image from an LCD screen, refer to Knowledge Base document 88343, “Avoiding image persistence on Apple LCD displays.”
Backing Up Files
Of course no one ever expects to lose data, whether for technical or other reasons. This is precisely why you should make backing up a standard part of any workflow. Backing up files helps you prevent the loss of important documents, applications, and other software.
You can back up your files using a dedicated application, such as Retrospect (www.dantz.com), that automatically archives the contents of your hard disk (or any portion you specify). Alternatively you can back up important documents every day by copying the files to another disk, a volume on a network, an external hard disk, or a writeable optical disc.
More Info
For detailed information on backup methods, refer to Knowledge Base document 106941, “Mac OS X: How to back up and restore your files,” and Knowledge Base document 301239, “How to back up and restore your important Mac OS X 10.4 files.”
There are some special things you should consider when backing up an iPod, or more accurately, an iTunes library.
With iTunes 7 you can easily back up the entire iTunes library, including ratings and play count. You can also restore the entire library using the disc(s) you created.
To perform a library backup, follow these steps:
- Open iTunes.
- Choose File > Back up to disc.
You are presented with a window with three options:

Select “Back up entire iTunes library and playlists” or “Back up only iTunes Store purchases.” With either option, you can choose to back up only those items added or changed since the last backup.
iTunes begins processing the library and determines which items to back up. The size of the iTunes library determines the length of time this step takes. The larger the library, the longer it will take.
The processing step completes, and iTunes begins burning the backup to disc. If your backup is too large for a single disc, a dialog appears letting you know the backup will or will not fit on one disc:

- Insert a blank CD or DVD into your computer’s optical drive.
Note
When a disc is finished burning, iTunes closes the disc and verifies the information. This step may take up to an hour. When a disc is full, iTunes prompts you to insert another disc.
A dialog notifies you when your library backup is complete.
Tip
When working with iTunes and iPod customers, it’s important to remind them of the benefits of using this backup feature to help preserve their entire iTunes library. This is especially helpful in the event that there is a need to reinstall the computer’s operating system or move a library to a new computer.
Proper Battery Disposal
Whenever you replace a battery—whether from inside a Macintosh computer or a common flashlight—it is important that you dispose of the old batteries appropriately, according to local hazardous waste ordinances. For current instructions, search for battery disposal in the Knowledge Base. Also refer to Knowledge Base document 50079, “Battery Handling.”
Checking for Viruses
A computer virus is a program, usually hidden within another (seemingly innocuous) program, that produces copies of itself to insert into other programs and often performs malicious actions such as destroying data.
Use an antivirus program regularly to check for and delete viruses on the hard disk, especially if you download files from the Internet or share files with others. Choose an antivirus program that alerts you when an email attachment, shared file, or Internet download is infected.
Check periodically for updates to your antivirus program to ensure that the program scans for the latest known viruses. Also search the Knowledge Base for antivirus. You’ll find documents such as these:
• Knowledge Base document 4454, “Mac OS: Antivirus Utilities”
• Knowledge Base document 11907, “Macintosh: Lists of viruses”
Optimizing the Hard Disk
As you may know, smaller hard disks have a habit of becoming full, and the operating system deals with this by writing bits and pieces of files wherever it can find free space. Although they are fully written, the files are logically fragmented over the surface of the disk. Because the drive’s magnetic head has to move all over the place to read or write fragmented files, performance suffers.
Disk optimization is a process in which the physical locations of files on a volume are streamlined. Files and metadata are rearranged to improve data access times and minimize time moving a hard drive’s head.
Fortunately all of this has changed in recent years. Multigigabyte drives are common and inexpensive, so the lack of storage space that led to fragmentation rarely occurs. Furthermore, Mac OS X contains intelligent routines that, in essence, optimize the hard disk during normal use.
More Info
To find out more about disk optimization, refer to Knowledge Base document 25668, “About disk optimization with Mac OS X.”
General Best Practices
Even if you have plenty of experience taking apart computers, it can’t hurt to take a moment to review some common-sense suggestions to keep in mind while working on Macintosh hardware:
• Consider making a full backup before attempting any significant hardware change.
• Always properly shut down the Macintosh computer before opening its case.
• As you remove screws, take care not to lose them. Place them in a small ESD-safe container or stick them on a strip of duct tape in the order they’re removed as an aid for reassembly. Some Macintosh computers have “captive” screws that can’t be removed; take care not to strip these.
• If you don’t have a printed reference to guide you, take your own pictures with a digital camera to remind you of the proper placement and orientation of components.
• Wearing eye protection and a nose and mouth filter, use a can of compressed air to clean dust from the interior of the Macintosh computer. Every Macintosh with a fan inside draws air through it to keep the components cool, but this can also suck in a lot of dust. That dust coats the components like a thin blanket and clogs air vents, causing the interior to operate at higher-than-ideal temperatures.
Tip
Blowing out accumulated dust can extend the useful lifespan of your Macintosh, but be sure not to blow dust into sensitive components like magnetic or optical drives.
• Be gentle. If a part to be removed is stuck, wiggle it back and forth. If you’re trying to install a part and it appears not to fit, don’t force it. Double-check the orientation, look for alignment tabs, and make sure you have the right part.
Lesson Review
a. Electronic surveillance device
b. Electric shock damage
c. Electrostatic discharge
2. ESD can damage a computer by:
a. Decalibrating the CRT
b. Damaging sensitive chips
c. Starting a fire in the enclosure
3. Which three of the following should you keep away from an ESD-compliant workbench? (Choose all that apply.)
a. Plastics
b. Magnets
c. Polyester clothing
d. Styrofoam
4. Which of the following tasks requires that you not wear a grounded wrist strap or heel strap?
a. Discharging a CRT
b. Handling a logic board
c. Opening a computer case
5. How should you handle integrated circuits to reduce the risk of ESD damage?
a. By the pins
b. By the edge connectors
c. By the body
6. How should you reduce the risk of ESD damage?
a. Ground yourself.
b. Make sure the equipment is on.
c. Keep the equipment on a metal surface.
7. Which one of the following is not one of the four basic pieces of equipment needed to reduce the risk of damage from ESD?
a. Grounded mat
b. Wrist strap
c. Plastic storage bags
8. Which general step(s) do you take to clean a monitor screen safely? (Choose all that apply.)
a. Disconnect the power cord.
b. Turn off the monitor.
c. Use a mild, nonabrasive cleaner.
9. Which of the following is most likely a symptom of a fragmented hard disk?
a. Download errors
b. Insufficient memory errors
c. Slow disk access
10. True or false: Always wear a grounding wrist or heel strap when discharging a CRT or performing live adjustments.
11. True or false: Whenever you work around a live CRT, keep one hand behind your back or in your pocket.
12. True or false: The CRT carries a charge even when the display or system is turned off, so you must discharge a CRT before you can work safely.