Lesson 24. Troubleshooting a MacBook
Reference Files
MacBook (13-inch) service manual (macbook_13in.pdf)
Time
This lesson takes approximately 1 hour to complete.
Goals
Given a MacBook, use all technical resources to locate service procedures, symptom charts, and service issues
Given a problem scenario or malfunctioning MacBook, use the Apple General Troubleshooting Flowchart and the corresponding Apple Service Source manual for this unit, and return the computer to normal operation
In this lesson, we focus on the Try Quick Fixes and Research Trouble shooting steps of the Apple General Troubleshooting Flowchart, by using symptom charts to effectively troubleshoot and repair MacBook computers. Your familiarity with Apple technical resources coupled with a good understanding of the operation of the MacBook will help you restore a MacBook to normal operation.
Note
For more detailed information, refer to the Service Source manual for this unit, which can be found on this book’s companion website, www.peachpit.com/ats.deskport3.
Before we begin, proceed to the General Information section of the Service Source manual for MacBook (13-inch). On page 314, review both of the kinds of problems that you might see when troubleshooting this unit, and review the Apple General Troubleshooting Flowchart steps.
In the previous lesson, the lead technician assigned you to replace a logic board. In that scenario, the MacBook in question played no sound from its speakers. As you read this lesson, keep this scenario in mind to better understand what procedures the lead technician performed before assigning you to perform this specific part replacement.
Note
At the time of publication, there is one service manual that covers both the preproduction and productions models of the MacBook (13-inch). In some of the diagrams, you may notice preproduction model photographs have been used. The operation and troubleshooting of the units is the same, but certain aspects of their construction may be slightly different.
Symptom Charts
The symptom charts included in this lesson will help you diagnose specific symptoms by following the guidelines set forth in the Apple General Trouble shooting Flowchart. Ensure that you have gathered information, verified the problem, and tried quick fixes as part of your troubleshooting before proceeding. Because cures are listed on the charts in the order of most likely solution to least likely, try the cures in the order presented. Verify whether or not the product continues to exhibit the symptom. If the symptom persists, try the next cure. If a cure instructs you to replace a module, and the symptom persists with the new module, reinstall the original module before you proceed to the next cure.
Note
Apple continuously updates the technical resources required to troubleshoot and service their products. It is always recommended that before performing service on any Apple product, that Apple Authorized Service Providers (AASPs) obtain the most current service manual or user guide, appropriate to the model being serviced.
AirPort Extreme Card
AirPort Extreme Card Not Recognized
- Use Software Update in Mac OS X System Preferences, or see the Apple Software Updates webpage to make sure the latest version of AirPort software is installed.
- In System Preferences, check the Network pane to verify that the AirPort port is selected.
- Reseat the AirPort Extreme Card and make sure the AirPort antenna cables are fully connected.
- Remove and reinstall the AirPort software.
- Replace with a known-good AirPort Extreme Card.
- Replace the logic board.
Poor AirPort Reception
- Refer to Knowledge Base document 88258, “Optimizing AirPort reception in portable computers,” which also provides links to useful articles regarding potential sources of interference and how to optimize performance in the AirPort Base Station.
- Reseat the AirPort Extreme and Bluetooth antenna cables on cards.
- Check the AirPort Extreme and Bluetooth antenna cables for damage.
- Replace with known-good AirPort Extreme Card or Bluetooth card.
- Replace the AirPort Extreme or Bluetooth antenna cables.
Note
Remember that devices that operate in the 2.4 GHz band may interfere with wireless connectivity.
Cooling
Unit Unusually Hot
Although this computer runs hotter than previous models, the normal operating temperature is well within safety standards. Your customers may be concerned about the heat generated by the unit. To prevent an unneeded repair, you can compare a customer’s computer to a known-good display unit, if available.
Note
The bottom surface and some areas between the keyboard and liquid crystal display (LCD) hinge of an Apple notebook computer can become hot after extended periods of use. This is normal operating behavior.
- Verify that the customer uses the computer while it is placed on a flat, hard surface.
- Verify that the computer is hotter than expected for normal operation. If possible, compare how hot the computer case feels with how hot the case of a running display model feels.
- Is the computer running hotter than normal?
Yes: Proceed to the next step.
No: The unit is operating normally. Proceed to the Inform Customer step on the flowchart. When speaking with the customer, direct them to Knowledge Base document 30612, “Apple Notebooks: Operating Temperature.”
- Check the processor speed.
- Is the processor speed running at the setting the customer set?
Yes: Continue with the next step.
No: The computer could be overheating. The operating system will automatically reduce the processor speed if the computer starts to get too hot. Continue with the next step.
- Check for a failed fan.
- Can you hear the fan running?
Yes: Continue with the next step.
No: This computer has only one fan. If the unit feels too hot and you do not hear a fan running or cannot feel the air venting over the top of the keyboard, the fan may have failed. Proceed to the Take Apart procedure for replacing the fan.
- Check for misplaced thermal grease. Each processor chip should have .01 to .12 cc (one-third of a single syringe) of grease on it. It should look completely covered. See the Heatsink section of the service manual on page 73 for complete details.
- Is the thermal grease applied in the right places and in the right amount, according to the service manual?
Yes: You have eliminated all the immediately known potential causes of an unusually hot unit. Proceed to the Systematic Fault Isolation step of the flowchart.
No: Apply the thermal grease correctly, according to the instructions in the service manual, and then proceed to the Verify Repair step of the flowchart.
Fan fails
- Check the fan cable connection and check cable for damage.
- Check the fan for loose parts stuck in fan blades.
Note
If you have recently replaced the fan, reinspect the fan unit to ensure that no debris is impeding the fan’s normal operation.
- Replace the fan.
- Replace the logic board.
Memory
Memory Not Recognized; Beeping Tones
You may need to use increased firm pressure when installing memory. If you or the customer does not fully seat the memory, the computer will not start up or System Profiler may not recognize the memory.
Note
For further information, refer to Knowledge Base document 303721, “MacBook: How to install memory.”
Computer Will Not Start; LED Blinks or Remains On
- You may need to use increased firm pressure when reseating the memory. Try ejecting the memory and reseating it.
- Try a known-good memory module.
Note
If you or the customer do not fully seat the memory, the computer will not start up. See Knowledge Base documents 303083, “Intel-based Mac Power On Self Test RAM error codes,” and 303721, “MacBook: How to install memory.”
Battery
Battery Will Not Charge
- Remove any connected peripherals.
- Try a known-good power outlet.
- Try a known-good power adapter and power cord.
Note
Verify that the power adapter connector glows amber or green. If the power adapter light is green, turn over the computer and press the battery button. If the power adapter is operating correctly, the battery lights should glow green and stay on. Also note that when a lithium polymer battery reaches its end of life, the battery simply ceases to function; there is no downward ramp in performance. This means that any battery issue should prompt questions as to how long the battery has been used. To check the voltage and amperage of the battery, as well as the number of charge cycles the battery has undergone, open System Profiler to the Hardware section, and select Power.
- Try a known-good battery.
- Reset the Power Manager by pressing Control-Option-Shift-power.
Warning
Make sure you do not hold down the Fn (function) key when resetting the Power Manager. Resetting the Power Manager means you will also need to reset the date and time in Date & Time preferences.
- Try a known-good DC-in board and cable assembly.
- Replace the battery connector with a sleep switch.
- Replace the logic board.
Note
For information on how to better diagnose short battery life, visit www.apple.com/batteries. Battery calibration is highly recommended to ensure the best possible battery life for the lithium polymer batteries used in the MacBook. Repeat the calibration process occasionally to keep a MacBook battery fully functioning. If the customer uses the MacBook infrequently, it’s best to recalibrate the battery at least once a month. Refer to Knowledge Base document 86284, “Calibrating your computer’s battery for best performance.”
Drives
Optical Drive Does Not Work
There are four clips at the optical drive bezel that can come loose during disassembly or reassembly. If any come loose, they could cause the optical drive to stop functioning.
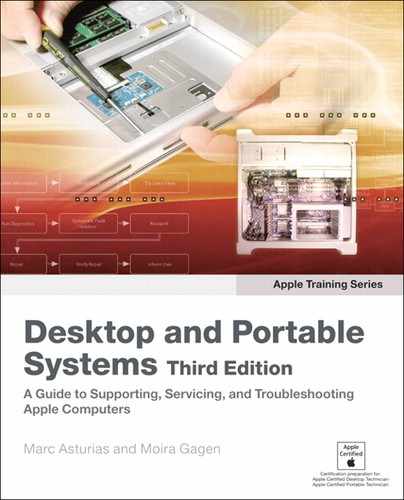
If, after trying other less-invasive quick fixes, the optical drive still does not function, remove the top case and check that the four clips at the optical drive bezel (shown below) are in place. Refer to the top case Take Apart procedures in the service manual for additional information.
Bezel clips (circled above)
Optical Drive Does Not Accept CD or DVD Disc (Mechanical Failure)
- Verify that the disc is not warped.
- Verify that the drive slot has no foreign object in the channel.
- Verify that the disc is properly seated in the carrier.
- Replace the optical drive.
Note
See Knowledge Base document 88288 “Apple Portables: Tips for inserting discs into the disc drive.”
Disc Icon Does Not Show Up on Desktop, or a Dialog Box Appears to Initialize Disc
- Verify that the correct type of disc is being used.
- Try cleaning the disc. It may not mount if it is dirty or scratched.
- Verify that the media is positioned correctly (data side down).
- Try a different disc.
- Listen to verify that the disc spins.
- Reseat the optical drive cable.
- Verify the logic board connection by trying a known-good optical drive and disc.
- Replace the optical drive cable.
- Replace the optical drive.
Disc Will Not Eject
The MacBook optical drive has narrow tolerances for the recommended optical media. If the drive does not accept a disc, it might be the wrong kind of disc. Advise the customer to use discs no thicker than 1.5 mm.
Note
For further information, refer to Knowledge Base document 88275, “MacBook Pro, MacBook, PowerBook G4, iBook G4: Trouble shooting the slot load disc drive.”
- Verify that the disc is not in use by quitting any applications that may be using it.
- Press and hold the Media Eject key at the top-right corner of the keyboard. If that does not work, hold down the Fn and Media Eject keys.
- Drag the disc icon to the Trash or select it and press Command-E.
- Choose Restart from the Apple menu while holding down the trackpad button.
Tip
Foreign objects—coins, staples, paper clips, and other small objects—can be inadvertently inserted into the drive. The limited warranty may not cover the repair under warranty if the cause is foreign object damage.
- Replace the optical drive.
Target Disk Mode
If you attempt to mount an Intel-based MacBook in Target Disk mode on a Macintosh running Mac OS X 10.3.9 or earlier, you’ll see this alert message: “You have inserted a disk containing no volumes that Mac OS X can read.” The system you are mounting to must be running Mac OS X 10.4 or later for target disk mode to work.
Power
Power Issues, Power Adapter Dead, No Power
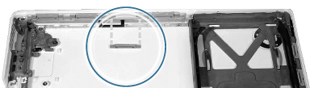
- Check for damaged pins or magnetic debris on the MagSafe power adapter. If the pins are okay, reseat the power adapter connector and make sure it is fully inserted.
Note
Refer to Knowledge Base documents 303566, “MacBook Pro: Troubleshooting MagSafe power adapters with stuck pins,” and 302461, “Troubleshooting iBook, PowerBook G4, and MacBook Pro power adapters.”
- Remove any connected peripherals.
- Try a known-good power outlet.
- Remove the battery and AC power.
- Press the Caps Lock key to see if the light on the key comes on. If it does, hold the power button down for 6 seconds to shut down the computer and restart.
- Reset parameter random-access memory (PRAM) by pressing the power button, then holding down the Option-Command-P-R keys until you hear the startup chime at least one additional time after the initial startup chime.
- Reset the Power Manager.
Note
Refer to Knowledge Base document 303319, “Resetting MacBook and MacBook Pro System Management Controller (SMC).”
Warning
Make sure you do not hold down the Fn key when resetting the Power Manager. Resetting the Power Manager means you will also need to reset the date and time in Date & Time preferences.
- Test each RAM slot individually with known-good RAM. The computer should still start with only one known-good dual inline memory module (DIMM).
- Remove the AirPort Extreme Card.
- If the computer starts on battery power only, try replacing the MagSafe board with a known-good MagSafe DC-in board.
- Verify cable connections and check cables for damage.
- Verify that the power button is connected properly to the logic board. If the power button is not functioning correctly or damaged, replace the top case.
- Replace the logic board.
Computer Shuts Down Intermittently
Apple has released SMC version 1.1 for the MacBook, which improves the computer’s internal monitoring system and addresses issues with unexpected shutdowns. This update is recommended for all MacBook systems, including those that received warranty repair. Effective immediately, when repairing MacBook computers with an intermittent shutdown failure, follow these procedures:
- Make sure the operating system has been updated to Mac OS X 10.4.8 or later and that SMC version 1.1 (or later) has been installed.
Note
To verify which SMC firmware version is installed, open System Profiler and select the Hardware section. The Hardware Overview contains useful information that about the computer being repaired. Should you need to update the SMC firmware, consult Knowledge Base document 303880, “Mac OS X: Firmware Updates for Inel-based Macs.”
- Remove all third-party internal and external devices from the computer and test again. If the issue still occurs, go to the next step.
- Reseat the computer’s system memory and test again. If the issue still occurs, go to the next step.
- Make sure you are testing from a known-good power adapter and a known-good battery that is fully charged.
- If the intermittent shutdown symptom persists, refer to the final step on pages 324–325 of the service manual.
Note
For more details on the MacBook intermittent shutdown issue, refer to Knowledge Base document 304308, “MacBook: Shuts down intermittently.”
Input Devices
Trackpad Works Intermittently
The trackpad operation can be affected by hand lotion, humidity, dangling jewelry, and the use of more than one finger on the trackpad.
- Check for environmental factors such as humidity, hand lotion, or jewelry.
- Clean the trackpad with a clean, dry lint-free cloth.
Note
For more information, refer to Knowledge Base document 17228, “Portables: Jumpy or Erratic Trackpad Operation.”
Keycap Damaged or Sticking
If a keycap is damaged, you may be able to replace just a keycap rather than the entire top case. Refer to the Additional Procedures section beginning on page 282 of the service manual, to identify the keyboard on the top case and verify whether or not to replace a keycap.
USB Port Is Not Recognizing Known Devices
- Completely shut down the computer and then press the power button to start it.
- Use Software Update in Mac OS X System Preferences to verify that the latest software is installed.
- Use System Profiler to verify that the computer is recognizing the bus.
- Test the USB port with an Apple keyboard or mouse.
- Verify that the USB port provides power to the USB device.
- Verify that the drivers are installed properly for third party, if needed.
- Try another port, if available.
- Try a different cable.
- Try a known-good device.
- Check that the device’s LED indicates that it is getting power.
- Replace the logic board.
Display
Display Issue: When Displaying a Single Color Over the Screen Area, the LCD Panel Shows One or More Pixels That Are Not Properly Lit
When speaking with customers, please use the following explanation for this issue:
Active-matrix LCD technology uses rows and columns of addressable locations (pixels) that render text and images on screen. Each pixel location has three separate subpixels (red, green, and blue) that allow the image to be rendered in full color. Each subpixel has a corresponding transistor responsible for turning the subpixel on or off. There are typically millions of these subpixels on an LCD display. For example, the LCD panel used in the Apple Cinema HD display is made up of 2.3 million pixels and 6.9 million red, green, and blue subpixels. Occasionally, a transistor does not work perfectly, which may result in the affected subpixel being turned on (bright) or turned off (dark). With the millions of subpixels on a display, it is quite possible to have a low number of faulty transistors on an LCD. Therefore, a certain number of subpixel anomalies are considered acceptable. Rejecting all but perfect LCD panels would significantly increase the retail price for products using LCD displays. These factors apply to all manufacturers using LCD technology—not just Apple products.
To determine whether or not the display has an acceptable number of pixel anomalies, follow these steps:
- Set the display image to one of the following colors: all-white display, all-red display, all-green display, or all-blue display.
Note
AASPs may refer to Knowledge Base document 112125, “Service Diagnostics Matrix,” which has the LCD Tester Diagnostic Utility that generates these patterns on the screen.
- Using a jeweler’s loupe, pocket microscope, or other magnifying device, identify and count each pixel anomaly:
• Bright subpixel anomaly = subpixel that is always on
• Dark subpixel anomaly = subpixel that is always off
- The criteria for the number of acceptable pixel anomalies for this computer are available in this unit’s service manual on page 325.
Note
When customers express concern about pixel anomalies on their product, AASPs should call Apple technical support for assistance. Do not disclose pixel anomaly procedures or tolerances to the customer.
No Display, or Dim Display, but Computer Appears to Operate Correctly (If Dim, Display Shows Startup Icon and/or Desktop)
- Remove any connected peripherals.
- Try a known-good power outlet, power adapter, and power cord.
- Press F2 (with the Fn key pressed and not pressed) to increase the screen brightness setting.
- Reboot the computer: Either hold down the Control and Command keys and press the power button; or press and hold the power button for 5 to 10 seconds to shut down the computer, and then press the power button to restart.
- Reset the Power Manager by pressing Control-Option-Shift-power. Make sure you do not hold down the Fn key when resetting the Power Manager. Resetting the Power Manager means you will also need to reset the date and time in the Date & Time preferences.
- Reset PRAM by pressing the power button, then holding down the Option-Command-P-R keys until you hear the startup chime at least one additional time after the initial startup chime.
- Connect an external display and check it for video.
- If video is fine on the external display, troubleshoot the LCD panel and verify the cable connections to the inverter and the LCD.
- If the video symptom is the same on the external display, replace the logic board.
- Verify that the LCD panel cable and LVDS cable connections are seated properly and that the cables are not damaged.
- Replace the LCD panel.
- Verify the cable connections and check the cables around the hinges for damage.
- Replace the logic board.
Sound
Distorted Sound from Speaker(s)
- Verify that the sound is correct with external speakers/headphones. If sound is correct, replace the top case.
- Verify that the speaker cables are inserted correctly and check the cables for damage.
- Open Sound preferences, select Output, and check the balance.
- Compare the same sound with two different units to make sure that the sound is actually distorted.
- Open Sound preferences, select Output, and set the slider bar to either the left or right speaker. Play a sound to tell which speaker is not responding and may need replacement. Based on the results, replace either the left or right speaker.
- Replace the logic board.
No Sound from Speaker(s)
- Reset PRAM by pressing the power button, then holding down the Option-Command-P-R keys until you hear the startup chime at least one additional time after the initial startup chime.
- Verify that the speaker cables are connected properly to the logic board, and check cables for damage.
- Use Software Update to verify that the latest audio update has been installed.
- Press the F3 key (with the Fn key pressed and not pressed) to verify that mute mode is not enabled.
- Press the F4 or F5 key (with the Fn key pressed and not pressed) to check the volume setting.
- Verify that no external speakers or headphones are plugged in.
- Restart the computer.
- Open Sound preferences, select Output, and set the slider bar to either the left or right speaker. Play a sound to tell which speaker is not responding and may need replacement. Based on the results, replace either the left or right speaker.
- Replace the logic board. This is the procedure you performed in the previous lesson. The lead technician had performed this series of troubleshooting steps, prior to assigning the replacement of the logic board to you.
Microsoft
Microsoft Office Applications Will Not Open
Under certain circumstances, if a user installs Final Cut Studio 5.1, Microsoft Office applications may no longer launch.
- Verify that both Final Cut Studio 5.1 and Microsoft Office are installed, if you have not already done so.
- Update prebinding. Refer to Knowledge Base document 303677, “Intel-based Mac: Microsoft Office doesn’t launch,” for instructions.
Windows XP Will Not Install Correctly
Boot Camp Beta lets you install Windows XP on an Intel-based Macintosh. However, Windows XP may not install correctly on this computer when an Apple Mighty Mouse is plugged in. Use the computer’s built-in trackpad until after Windows XP is installed and Windows recognizes the mouse.
Note
For further information, refer to Knowledge Base document 303575, “Boot Camp Beta: MacBook and MacBook Pro frequently asked questions (FAQ).”
Lesson Review
1. You are troubleshooting a MacBook (13-inch) that is not receiving a response from the trackpad. What does Apple suggest as the first procedure?
a. Check for environmental factors.
b. Reset PRAM.
c. Restart the computer.
d. Replace the keyboard.
2. True or false: For the MacBook (13-inch), you can test the USB port with an Apple or non-Apple mouse.
3. If the MacBook shuts down intermittently, what does Apple suggest as the first procedure?
a. Update the computer to Mac OS X 10.4.8.
b. Install SMC version 1.1 or later.
c. Both a and b.
d. None of the above.
4. True or false: The MacBook battery does not require calibration.
5. True or false: The MacBook optical drive will not accept all sizes of optical media.
6. True or false: If you have a MacBook battery that will not charge, you should reset the Power Manager before taking any other troubleshooting steps.
7. The display on a MacBook is dim, but the computer appears to be operating correctly otherwise. Which one of the following troubleshooting steps is not recommended by Apple?
a. Remove any connected peripherals.
b. Reboot the computer.
c. Replace memory.
d. Verify that the LCD panel cable and LVDS cable are seated properly.
Answer Key
2. False, test with an Apple mouse or keyboard only
4. False, the MacBook battery requires occasional calibration, more often if the computer is used infrequently
6. False, resetting the Power Manager is the last troubleshooting step