Lesson 3. General Troubleshooting Theory
Reference Files
Apple General Troubleshooting Flowchart (AGTFwithNotes.pdf)
Time
This lesson takes approximately 45 minutes to complete.
Goals
Describe three things you should do throughout the troubleshooting process
State the general steps of the Apple-recommended troubleshooting process
Use recommended Apple tools and strategies to determine whether a problem is hardware- or software-related
Describe what components are necessary for a minimum system
Describe possible outcomes of module failures in the minimum system
Describe how certain key components interact during startup
If you are experienced in troubleshooting and supporting computers, you probably have your own approaches and procedures, and don’t feel that the Apple troubleshooting process has anything new to offer. Experienced technicians are adept at recognizing symptoms that match what they have seen before and checking to confirm that the issue is the same. They use their experience and intuition to determine the steps necessary to address a particular situation and resolve it very quickly.
But when a situation is outside of their experience, even the best technician can get stuck. That’s when the need for a systematic approach becomes evident. So read on: The troubleshooting steps in this lesson give you a proven method to use when more random approaches fail. When you finish this lesson, you will have a proven process to back up your ever-increasing experience.
Goals and Processes
Let’s get into the practice of being systematic by making sure we all agree on the basic goals of the process and by reminding you of some important ideas and tasks to keep in mind as you work.
Success and Speed: Two Troubleshooting Goals
We believe that how you go about a process is as important as its outcome—in this case, that an efficient and logical approach to troubleshooting will help you find and resolve an issue. To that end, bear in mind these two equally important goals:
• Fix a product properly.
• Fix a product quickly.
Fixing a product properly results from many elements working together. These elements include:
• Following systematic troubleshooting procedures
• Following proper procedures for taking apart and reassembling a product
• Using up-to-date references and tools
• Not creating new issues
This process helps you reach the goal of giving your customer a product that works completely and correctly.
The second major goal of the efficient troubleshooter is to fix the product quickly. This does not mean taking shortcuts or doing sloppy work. It means making sure that you are not wasting time. Customers want their products back as soon as possible, so the faster you can troubleshoot a situation, the more satisfied your customers will be.
Winging It
Suppose that you are attempting to determine why an iMac is not displaying any video. The last time you saw this situation, the computer had a bad main logic board, so your experience suggests that this iMac has a similar issue. If you have had experience with a number of iMac computers that had no video, you may also be aware that resetting the power management unit (PMU) chip can address this issue. And you may know that resetting parameter random-access memory (PRAM) is a recommended step.
If you try resetting PRAM and that does not work, you might then open up the system and reset the PMU. If that has no effect either, perhaps you’ll swap out the main logic board and find that the system is working now. You have resolved the issue...or have you? Later, you could find that the main logic board was perfectly okay and that you conducted an expensive repair that may have been unnecessary.
What happened here? You got the system working, but the main logic board you replaced is a good part. Your approach fixed the computer, but now you have a new mystery. The explanation: The video issue was due to the logic board not being seated correctly. Replacing the logic board automatically resulted in seating it properly, but it did not need to be replaced.
So the lesson here is that experience and intuition aren’t always a substitute for a systematic method. It is not easy or practical to automatically know all the possible resolutions to a specific troubleshooting issue, and that’s when it’s time to address the issue in a careful, systematic way.
Troubleshooting To-Do List
Be sure to use the following suggestions throughout the troubleshooting process. One or more of these might provide inspiration for an otherwise difficult issue:
• Keep notes: What starts out as a simple troubleshooting session can sometimes develop into a major task. Start taking notes from the very beginning of the troubleshooting process, even if it seems like a simple issue to fix. Write down each piece of information you gather, the results of each test you perform, and your proposed solution.
• Consult resources: In addition to experience and techniques, a good troubleshooter possesses product knowledge. Consulting available resources is a vital part of obtaining knowledge about the product and about the specific issue you are troubleshooting. Browsing through references such as Apple Service Source or the Apple Knowledge Base can be particularly helpful when you find yourself stuck without an idea of what to try next in your troubleshooting research. It can stimulate new thoughts and ideas about the source of the issue.
• Consider the human factor: When you have been working long and hard on a situation that has you stumped, take a break (coffee is optional). Frustration can impair your ability to think logically and rationally. But after a short rest, you may be surprised at the solutions that come to mind.
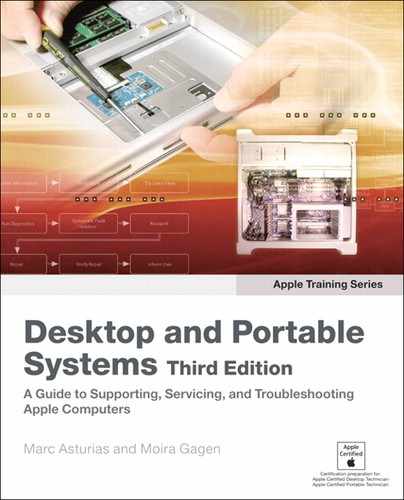
Troubleshooting Process
Now that you are well equipped with troubleshooting goals and processes, you are ready to embark on the systematic journey. There are two major stages in Apple’s recommended troubleshooting process:
• Identify the issue.
• Perform the actual repair (or take other steps that identifying the issue has made clear).
To identify the issue, you must:
- Gather information.
- Verify the issue.
- Try quick fixes.
- Use appropriate diagnostics.
- Follow systematic fault isolation.
- Use additional resources to research the issue.
- Escalate the issue (if necessary).
After you have identified the issue, you must:
- Repair or replace the faulty item.
- Verify the repair by testing the product thoroughly.
- Inform the user of what you have done and complete administrative tasks (yes, really).
We review these processes in detail in the following sections of this lesson. Keeping the steps of the troubleshooting process straight is sometimes difficult for new technicians. Apple has produced a General Troubleshooting Flowchart as a reference.
Note
This flowchart (AGTFwithNotes.pdf) is also available on this book’s companion website (www.peachpit.com/ats/deskport3).
Gather Information
It is important to know as much as you can about the situation before you jump headlong into trying to fix it. Gathering information is the first step in successful troubleshooting.
If the computer is functional, run System Profiler (discussed in Lesson 2, “Software Tools”) to compile useful technical information on the Macintosh and its components. In some cases, the customer is available to explain the nature of the situation. In those cases, the following tips will assist you in getting accurate and useful information from your customer.
When you question customers who are having trouble with their computers, you have to understand that they are probably not happy with their situation. Your courtesy and professionalism will make the circumstances better and enable you to gather information to repair the product. Be patient. Be polite. Be conscious that you are there to help the customer. Furthermore, be aware that customers may not share your level of technical expertise or understand the terminology, so try to talk to customers at their level.
Follow these tips when gathering information from customers:
• Start with open-ended questions such as “What is the issue?” Open-ended questions generally start with words like how, why, when, who, what, and where. They cannot be answered with “yes” or “no.”
• Let customers explain in their own words what they have experienced. Do not interrupt the customer—interrupting generally prompts someone to start over.
• As you begin to understand the basics of the issue, start using close-ended questions that require more limited, specific answers and can often be answered with “yes” or “no,” such as “What operating system are you using?” The customer will either tell you what the Mac OS version is or tell you that he does not know.
• Verify your understanding of what the customer has told you. Restate what you have been told and get the customer’s agreement that you understand the issue, such as “So what’s happening is that when you try X, Y happens. Is that correct?”
• If the customer agrees that you understand, continue to gather information. If the customer does not agree that you understand, clarify what you misstated and again verify your understanding. Do not continue until the customer agrees that you understand the issue.
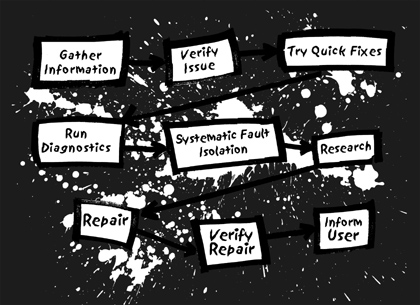
When troubleshooting an issue, you need to know how the computer is supposed to start up so you can compare that against what’s being described, and ask the appropriate questions. Here’s a visual description of the startup process.
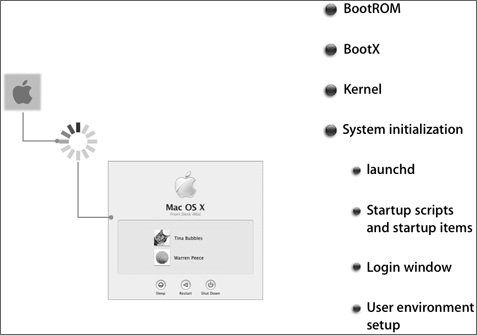
The following table lists the startup sequence for Intel-based Macintosh systems.

There are two abnormal behaviors around startup that you should be aware of so you can probe effectively:
• No power
• No video
Follow these steps to learn about troubleshooting these two behaviors in an iMac (24-inch):
- Open the service manual for the iMac (24-inch).
- Click the Troubleshooting disclosure triangle.
- Click the Symptom Charts disclosure triangle.
- Click Power Issues.
- Skim the descriptions of symptoms and solutions.
- Click No Video.
- Skim the descriptions of symptoms and solutions.
Common Symptoms Quiz
1. You are troubleshooting an iMac (24-inch) with a customer over the phone. The customer says the computer won’t turn on. What power-related probing questions should you ask?
2. You’re working on an iMac (24-inch) a customer brought in because the display isn’t working. What video-related questions should you ask to gather information and verify the issue?
Answer Key
1. “Can you see any light, even from the back, in the display? Can you hear any fans or hard drives spinning?”
2. “Does the computer turn on? Can you hear the boot chime? Does a white LED appear on the front bezel? Can you hear sounds from the fan or drive activity? Does the display show any picture or color?”

- Quick fixes: These troubleshooting steps are inexpensive, fast (shorter than 20 minutes), and non-destructive (to user data).
- Diagnostic software/tools: These are Apple or third-party software or tools that can diagnose and/or correct faults. Usually they take longer than quick fixes.
- Systematic fault isolation: This is a potentially painstaking search procedure that successively eliminates half the system as a possible trouble source. It is used in only less than 1 percent of cases.
User Errors
Software-Related Issues
• Display and video settings such as refresh rate, screen resolution, and number of colors
• Time zone
• Startup disk
• Speaker volume
• DVD region setting
• Kernel panic information (only on first reboot after a panic)
Hardware Issues
Verify the Issue
Verifying the issue is extremely important in successful troubleshooting. It gives you a chance to objectively confirm the extent and the nature of the situation. In the long run, it saves you from wasting time working on the wrong issue.
Using the information you have gathered, set up the system and try to re-create the issue. Here is an example: “When I am using my spreadsheet program and try to print in landscape mode to my inkjet printer, the Mac OS 9 system stops responding halfway through the first page. It doesn’t matter what else the system is doing or what spreadsheet I try to print—the same thing happens every time. It first occurred yesterday. I used to be able to print this way without any trouble.”
Start up the system, open the spreadsheet program, and try to print. Does the system truly stop responding or could it be something else? For example, maybe you’ll discover:
• A long delay that the user perceives as the system not responding
• The system waiting for a response to a dialog on the screen (such as clicking an OK button)
For every issue, there can be other explanations for the system’s behavior. Make sure you aren’t trying to troubleshoot a nonexistent issue or an issue that has not been well defined.
If you are helping someone troubleshoot, the act of verifying the issue is crucial. Sometimes the issue can be solved merely by watching a person go through the process of re-creating it and observing that she is operating the system incorrectly.
In other cases, watching a person re-create the issue yields additional information about the circumstances under which the issue occurs (that is, the person forgot to tell you some things about when and how the issue occurs). Or, your observation of the issue may be quite different from the description you are given.
The customer’s actions give you insight into the customer’s technical expertise and may answer some of the other questions.
Try Quick Fixes
A quick fix is not necessarily the most likely solution to the issue, but because it is easy to perform and involves little time or expense, it is worth trying. There is nothing more frustrating than spending hours isolating an issue only to find out later that a quick fix solves it.
A quick fix is defined here as a repair action that can be performed quickly, involves little or no risk of harm to the system, and has little or no cost. An experienced, efficient troubleshooter will try one or more quick fixes before taking on the more time-consuming tasks involved with isolating the issue.
Note
“Quick fix” does not imply a temporary, substandard, or sloppy repair.
Let’s take another look at the printing issue we just considered. Possible quick fixes in this situation include:
• Turn the printer off and back on again, then try to print.
• Restart the system and try again.
• Disconnect and securely reconnect the printer cable (being careful to follow safety precautions).
• Take the paper out of the paper cassette and reinsert it to be sure that it is inserted properly.
Here are some more examples of quick fixes:
• Disconnect and reconnect power cables, printer cables, monitor cables, and so forth. (Make sure that the Macintosh and its devices are turned off when you do this, except when dealing with USB and FireWire devices, which are hot-pluggable.)
• Rebuild the desktop by holding down Command-Option as the Finder loads in pre–Mac OS X.
• Completely shut down the computer (in as proper a manner as possible), wait at least 10 seconds, and then turn it back on. Better yet, turn off the computer and all of its connected peripherals, wait a bit, then turn everything back on.
• Adjust physical user controls (such as brightness and contrast knobs on a display) as well as software controls (such as the output volume setting in Sound preferences).
This is only a partial list of quick fixes. The situation and your experience will determine which quick fixes make sense for troubleshooting the issue you are working on.
A good source of quick fixes is the troubleshooting symptom charts in the Troubleshooting lesson of the product’s service manual. You should consider any steps that fit the criteria for quick fixes. Then, as you gain experience, you will develop your own collection of quick fixes.
Quick Fixes for Mac OS X
Mac OS X has a lot of settings and toggles that you can work with to help quickly determine and isolate issues. There are so many, in fact, that you might not have discovered them all. This section lists other quick fixes that might be appropriate for systems running Mac OS X. Some of them can affect data on the customer’s system, so you must consult with the customer to determine whether he has a current backup and weigh the advantages of the quick fix against the possible inconvenience or time required.
To help you keep your tests as low-impact as possible, we’ve broken the Mac OS X quick-fix tests into three categories, which you should try in order.
Innocuous/No-impact Tests
• Restart or shut down.
• Run System Profiler.
Tip
If you have access to Service Source, you can check to see whether any of the Top Support Questions look similar to the situation you’re seeing. (You’ll find these from the Service Source main page, by opening the product menu and then choosing the product’s support page.)
• Start up in Safe Mode (Mac OS X 10.2 and later), which loads only the minimum necessary files and performs an elaborate directory check of the hard disk (which is why it can take a long time to start up). After you hear the startup sound, press Shift and hold it until the progress indicator displays “Safe Boot.” To end the Safe Boot and get back to typical operation, just restart as normal.
• Suppress Auto-Login (in Login or Accounts preferences) if you suspect that the issue lies within the default user’s system configuration, and then restart and log in as a different user.
• Suppress Login items by holding down the Shift key as soon as the Finder appears in Mac OS X.
• Start up from a known-good disc such as Install Mac OS or Restoration CD.
• Click Repair Disk Permissions in the First Aid tab of Disk Utility.
• Start up in single-user mode by pressing Command-S during startup. After displaying a bunch of technical text, the Macintosh should show a UNIX command-line prompt (#). Enter any UNIX commands you want, or type exit and press Return.
• Start up in verbose mode by pressing Command-V during startup. This forces the Macintosh to display text that explains what UNIX is doing before the customary graphical user interface (GUI) appears. You’ll need to understand at least basic UNIX for this to be of any use.
• Start up in another Mac OS by selecting a different volume in Startup Disk preferences.
• Relaunch Finder by Option-clicking the Finder icon in the Dock and choosing Relaunch from the menu that appears.
• Disconnect all external devices.
• Turn off Screen Saver and Energy Saver (if troubleshooting an installation issue) in System Preferences.
• Verify with other users (if troubleshooting a network issue).
• Connect to another device or volume (if troubleshooting a network issue).
• Connect to PPP test server (if troubleshooting a modem issue).
Moderate Impact Tests
• Adjust user settings.
• If troubleshooting a network issue, check the settings in the Firewall tab in Sharing preferences.
• In Network preferences, choose Show > Network Port Configurations. Make sure necessary ports (such as Ethernet or AirPort) are activated.
• In System Preferences, check the Startup Disk selection (if troubleshooting a startup issue).
• Force-quit a troublesome application by choosing Force Quit from the Apple menu.
• In Accounts preferences, log in as a (new) test user. Since most user settings are tied to the user account, you can create a new account with which you can test a more standardized user environment, presumably with no conflicting or corrupted system resources.
• Launch the Disk Utility, select the startup disk, click the First Aid tab, then click Repair Disk Permissions. If any repairs were necessary, repeat the process.
• Move, rename, or delete potentially problematic preferences files. The applications that use the preference files will automatically re-create clean copies as necessary.
• Update the printer driver (if troubleshooting a printing issue).
• Update the firmware for peripherals (such as AirPort Base Station or an internal optical drive) if possible.
• Move a troublesome device from one port to another to determine whether the port or the peripheral is at fault.
• Use known-good peripherals (for example, monitor, disk drive, printer).
Invasive/High-impact Procedures
• Reinstall the suspect application.
• Reset the PRAM.
• Reset the PMU or system management unit (SMU) chip (see the service manual). Always reset the main logic board before resetting the PMU or SMU a second time.
• Replace current RAM with known-good RAM.
Run Diagnostics
If trying quick fixes doesn’t resolve the problem, your next step is to run appropriate diagnostics. (This step is on the flowchart.)
As you learned in Lesson 2, diagnostic tools are software packages that allow you to check the performance of a system. In that lesson you reviewed and used Apple’s primary diagnostic software.
These, and other diagnostic packages, enable you to determine if the system components are functioning correctly.
Systematic Fault Isolation
Systematic fault isolation is a technique for systematically isolating the source of an issue. You start by eliminating roughly half of the items you are checking, then trying to re-create the issue. Continue halving your search group until you find the source of the issue. To do this, you must apply your knowledge of the product, its common issues, and the symptoms as you check one possible cause after another, in a logical order.
This part of the troubleshooting process can be the most difficult and the most time-consuming, so don’t take the time to try systematic fault isolation unless all the following conditions apply:
• You’ve tried all the appropriate quick fixes and diagnostic tools and still don’t know what’s causing the issue.
• You’ve checked the service manual, Knowledge Base, and other references, and still don’t know what’s causing the issue.
• There is data on the boot hard drive that you can’t get off and can’t erase.
Here are some ways to “halve” the problem:
• Find the functional area—sometimes called a “problem space”—that the issue affects. For instance, the general functional areas for a typical Macintosh could be considered software, logic and control, memory, video, input/output (I/O), and power.
If you can narrow down the issue to, for example, the video area, you can narrow your search to the parts that relate to video: the monitor, cables and connectors, video random-access memory (VRAM), video card (if present), and logic board.
• Work from largest to smallest components of the system. For example, if you suspect there is an issue with a component of the OS, you would want to first check the complete Mac OS by starting the system from a known-good CD with the same version of the Mac OS. Only when you know that the rest of the computer system is working correctly would you want to start investigating the components of the Mac OS.
• It is ultimately more efficient to methodically test one thing at a time than it is to try two or three things at once. This means reinstalling the original part if a replacement part does not correct the issue.
Component Isolation
Component isolation is a systematic fault isolation technique with which you can accurately and decisively determine the source of hardware issues. That is, after you’ve eliminated user error, software, and the OS as potential sources of the issue, and you’ve applied the appropriate hardware quick fixes and diagnostics, you can turn to component isolation.
Here’s how it works: Using a minimal system, you start up a computer and observe its behavior. Armed with an understanding of the normal power flow sequence (discussed later in this lesson), the symptoms you observe may direct you to add or replace components in a specific sequence until you can determine the hardware component that is causing the issue.
Don’t confuse this procedure with randomly swapping modules until a system finally works; component isolation works in a much more systematic manner. You should use component isolation when you are attempting to isolate intermittent, hard-to-find hardware issues or when other approaches have not worked, and you need to make sure that the system hardware is working correctly.
Note
Component isolation requires an electrostatic discharge–compliant work area, appropriate tools for taking apart the product you are testing, and job aids identifying components of the system and the steps of the procedure for that system.
Understanding the Power Flow Process
When a computer starts up successfully, a large number of different activities occur. Let’s look at a desktop Macintosh as it starts to boot. The following steps are a very simplified description of a complex process, but they will help you understand:
- When you press the power button on your desktop computer, power flows through the power cord to the power supply. When you press the power button on a PowerBook G4 (15-inch FW800) while plugged into a power adapter, power flows through the power cord to the power adapter and then to the sound/DC-in board. If the power cord or power button is defective, the system will not boot.
- On a desktop, the power supply feeds power to the logic board. If the power supply or the connection from the power supply to the logic board is defective, the system will not boot.
On a portable, the sound/DC-in board feeds power to the logic board and the removable battery. If the sound/DC-in board or the connection from the sound/DC-in board to the logic board is defective, the system will not boot.
- In both Macintosh models, the logic boards feed power to a processor. If the logic board or the processor is defective, the computer will not boot.
- The logic board feeds power to the RAM as well. If the RAM is defective, the computer will not boot. Instead, you will hear an error chime for defective RAM.
- The logic board sends a boot chime or signal to the speaker assembly in the Front Panel board if the POST is successful. If this boot chime occurs, you know that the components in this power chain are working correctly.
Starting with a Minimal System
In the power flow description earlier in this lesson, we made no mention of hard disk drives. This was intentional, because when setting up a minimal system for the component-isolation technique, you start with only the components necessary to hear a startup sound or see a flashing question mark on the monitor.
You do not need a hard disk drive when testing power flow in a minimal system. The POST does not rely on any components of the Mac OS residing on the hard disk. Likewise, if you have a working power button on the Macintosh itself, you do not even need a keyboard.
Removable components include the hard drive, optical drive, modem, Bluetooth module, AirPort Extreme card, display, inverter board, additional RAM, power adapter (if running from battery), and battery (if running from AC adapter).
Note
For some Macintosh models, RAM is not a required component because a minimal amount of RAM may already be part of the main logic board on those models.
Here are some common portable components:
• The logic board in most portables contains what in desktop systems would be entirely separate cards. This can include the processor, video chipset, and, in some cases, RAM. All currently shipping portable systems have processors soldered onto the logic board. Some older systems had processor cards that could be separated from the logic board. Since so many components are built onto the logic board, it has many potential ways to fail. When isolating a video issue to the on-board video chipset, make sure to test using external displays. If the issue persists on both built-in and external displays, then most likely the video chipset on the main logic board is faulty. If external video is good then the issue is likely isolated to the built-in display.
• The hard drive is a permanent data storage mechanism. It’s one of the major power draws in a portable computer and one of the few moving parts in most portable systems. Common issues with the hard drive can include loss of data, crashing, freezing, excessive noise, and slow performance.
• The optical drive is used to read optical media. It’s one of the few moving parts in most portable systems. When in use, it can be fairly loud and can use a large amount of power. Common issues include not reading media, not ejecting media, failure to burn media, or damaging media when read.
• RAM is temporary data storage. It’s faster than a hard drive and is used to cache information, so as soon as power is gone the data is gone. Portables generally use small outline dual inline memory modules (SO-DIMMS). Common issues include kernel panics, crashing, and freezing.
• The DC-in board is where the alternating current (AC) adapter plugs into the computer. This is required to start the computer even if there is a battery present. Common issues are not charging the battery, not lighting up the ring on the power adapter, and not supplying any power to the system. If used improperly, AC adapters or other items end up stuck in the DC socket.
• The inverter board converts and supplies power to the fluorescent lamps that provide backlighting inside the display module. Common issues include noise when adjusting brightness, or no backlight on displays.
• The display is the main output device on portable systems, so this is where you will see what is going on. Common display failures are pixels stuck on or off, tinting, lines on the display, or physical damage.
• The low voltage differential signaling (LVDS) or time division multiplexed signaling (TDMS) cable transfers video information from the on-board video chipset to the display. Sometimes you can identify cable failures easily by moving the display back and forth. If the issue changes, the LVDS or TDMS cable is most likely the issue. Common failures include lines in the display, tinting, and loss of video.
• The battery allows a portable to be portable. Some portables allow you to hot-swap batteries. Common issues include not allowing the computer to power on, short battery life, and incorrectly reporting battery life.
• The AC adapter converts the AC voltage coming from the wall to DC voltage that the components can use. It acts as the power supply would in a desktop system. Common issues include no power, the charge ring not lighting, the tip getting broken off in the DC port, and getting tripped over and causing physical damage to the computer.
How Do I Isolate Components?
In general, component isolation consists of the following steps:
- Set up a minimal system by removing all system components that are not needed for the system to boot and produce a boot chime and/or a flashing question mark.
- Boot the system and observe/listen for what occurs.
- If you get a boot chime and/or a flashing question mark, the system is operating correctly.
This tells you that one (or more) of the components you just removed may be the root cause of the original issue.
- If you do not get a boot chime and/or a flashing question mark, check the components of the minimal system by replacing them with known-good parts in a specified order.
The advantage here is that now you have only a small number of components left to replace, instead of having to guess which component to replace from among perhaps over a dozen components in a fully configured unit.
- Whenever you replace a part, reset the PMU before rebooting.
Doing this ensures that the PMU will not have any issues that may mimic and therefore mask your original problem.
Component Isolation Quiz
1. What are the five components of a minimal system for a PowerBook G4 (15-inch FW800)?
2. When you first start up a minimal system, you do not get any sound. What component should you check first?
3. If a minimal system is starting up correctly, what component do you add first?
4. You get no startup sound from a system after swapping the main logic board. What components are likely at fault?
5. Why is it important to check cables?
Answer Key
1. AC power adapter or main battery, DC-input board, logic board, speaker assembly, and CPU with heat sink
5. A bad connection due to a defective cable acts just like a bad component.
Research in Additional Resources
At the start of this lesson you learned that, along with good troubleshooting technique, product knowledge and experience are the basis for efficient, professional troubleshooting. If you have completed the steps described so far and still can’t determine the source of the issue, it is time to research additional resources.
In situations in which you may not have in-depth experience or product knowledge, you can use such references as Service Source and the Knowledge Base. These resources are collections of the best information assembled by Apple. There is a good chance that solutions to your issues are documented in one or both of these references.
Escalate the Issue
If you still cannot troubleshoot an issue despite your best efforts, you may need to escalate your problem to Apple. How you do this depends on where you are located, and the practices and policies of your business or agency.
Repair or Replace the Faulty Item
After determining the source of a service issue, it is time to repair or replace the faulty item. There are several steps that you must take before starting to replace software or hardware:
• Make a full backup of the customer’s hard disk before updating, reinstalling, or otherwise modifying the software on a system. This ensures that you can restore the system to its original state if you need to do so.
• Use known-good software when modifying a system. Avoid introducing new issues while trying to solve the original one.
• Look for the latest versions of software when updating or reinstalling software. This is particularly important for System folder components such as extensions, control panels, and peripheral drivers. At the same time, you should be careful not to add new software components that can adversely affect applications and other software that the customer has placed on the system.
• Follow all safety guidelines for working on computer systems. This includes powering down systems before connecting or disconnecting peripherals.
• Observe all appropriate ESD precautions before working on hardware. (You will learn about ESD in Lesson 4, “Safe Working Procedures and General Maintenance.”)
Verify the Repair
To ensure a positive customer experience, thoroughly test every product you repair and ensure that the computer is functioning correctly before returning it to the customer. Sometimes you may resolve one issue only to find another, or you may have repaired the right module but left a cable unplugged when reassembling the product. You need to make sure that the entire issue has been resolved, no new issues have been introduced during troubleshooting and repair, and the computer will continue to function after the repair.
Tip
When verifying repairs for central processing units (CPUs), use Apple Service Diagnostic (ASD) or Apple Hardware Test (AHT) to test the entire system, even if you repaired only one part of the system. If possible, run looping tests for several hours, to catch any intermittent issues.
When verifying repairs for peripherals, if there is a diagnostic available for the product, use it! For example, many printers have built-in self tests; read the product’s manual to determine how to initiate this useful feature.
Repair Verification Quiz
1. You replaced the main logic board of a computer that was having intermittent issues. The situation seems to be resolved. How should you verify that the intermittent issues no longer occur?
2. A customer’s iMac was not printing to a third-party color inkjet printer. You have reinstalled the printer driver and generated a black-and-white test page on this printer. Do you need to verify further? If so, what should you do?
Answer Key
1. Conduct looping tests of the system over an extended period using ASD or a similar diagnostic
2. Print a color test page. You have checked only part of the system’s performance so far.
Inform the User and Complete Administrative Tasks
Once you have returned the computer to normal operation or escalated the issue, inform the user of the work that you completed. Also, give customers information to improve their computing experience. Taking time to teach customers how to avoid future issues adds value and improves their experience.
Keep in mind the following suggestions for giving your customer the best possible information:
• Print out diagnostics that you have completed and show them to the customer.
• Explain any steps the customer can take to avoid having situations recur. For example:
• If the customer has shut off the system incorrectly, explain the hazards of not shutting down properly.
• If the customer’s system was made unusable by a virus, teach the customer how to avoid viruses in the future.
• If the customer has lost data, describe some backup methods.
Your final step is to complete any administrative tasks. Each Apple Authorized Service Provider (AASP) has different administrative procedures for documenting service and handling parts. How you complete the administrative tasks for servicing an Apple product depends on where you are located and the internal policies of your business or agency.
Lesson Review
1. A customer tells you that her iMac has stopped working. The first thing to do is:
a. Run ASD.
b. Try quick fixes.
c. Reduce the computer to a minimum system.
d. Gather more information.
2. A MacBook is not recognizing the additional RAM that a customer just installed. You cannot resolve the issue over the phone, so the customer brings the system to you for repair. What items would be useful for resolving the issue? (Choose all that apply.)
a. Replacement keyboard and mouse
b. ASD
c. System software CDs
d. Replacement RAM SO-DIMM
e. Tools
3. Which of the following is not an example of systematic fault isolation?
a. Check for software issues before replacing any hardware.
b. Remove external devices and internal cards, and test the computer by itself.
c. If a module is easy to replace, swap it right away.
d. Inspect components visually.
4. A customer’s Power Mac G4 running Mac OS X 10.2.6 does not turn on. What is the first step to take after gathering information from the customer?
a. Run ASD.
b. Refer to Service Source.
c. Check the power source and cable connections.
d. Reset the PRAM.
5. What is the first step to consider when a computer with a cathode-ray tube (CRT) display starts up to a black screen?
a. Run AHT.
b. Adjust the brightness and contrast controls.
c. Rebuild the desktop.
d. Reset the PRAM.
6. You cannot solve an issue after trying quick fixes, running diagnostics, and consulting the troubleshooting charts in Service Source. What is the next step to take?
a. Call Apple.
b. Look up the issue in the Knowledge Base.
c. Check the cable connections.
7. Which of the following steps should you take before escalating an issue? (Choose all that apply.)
a. Verify the issue.
b. Systematic fault isolation.
c. Verify the repair.
d. Try quick fixes.
8. A customer brought you an iMac that is not working. Which of the following questions would be the most helpful to start with?
a. What is the serial number?
b. What seems to be the issue?
c. Have you had this issue before?
d. Where do you use this computer?
9. What are the three characteristics of a quick fix?
a. Can be performed quickly
b. Involves little or no risk of harm to the system
c. Has little or no cost
d. Uses Apple-approved third-party diagnostics
10. You cannot start up an iMac. What two things do you need to check first?
a. Power supply and power board
b. Internal cabling and board seating
c. Power outlet and power cord
d. Keyboard and mouse
11. Which of the following items qualifies as a quick fix?
a. Format the hard drive.
b. Power cycle a cable modem.
c. Carry the computer into a service provider.
d. Upgrade the OS from 10.1 to 10.4.
12. You have just replaced the logic board in a PowerMac G4 (Mirrored Drive Doors 2003) due to it not recognizing the hard drive. The replacement drive has been tested as working. What is your next step?
a. Inform the user the repair is complete.
b. Return the bad part and close the repair.
c. Check that no new issues have been introduced.
d. Mail the computer into the repair center to confirm the issue is resolved.
13. Which item is not an element of resolving an issue properly?
a. Isolating an issue to hardware or software
b. Following proper procedures for take apart and assembly
c. Using up-to-date references and tools
d. Using the minimum number of tools
14. A previous technician was researching an issue with an iMac G5. He was unable to find the answer, and you are unable to find one as well. Using the Apple General Troubleshooting Flowchart, what is the next step in your troubleshooting?
a. Repair or Replace
b. Escalate
d. Run Diagnostics
15. Can you remove the video card from a system to test a minimal configuration?
16. Where does power flow on a PowerBook G4 (15-inch FW800) after it reaches the processor?
a. Logic board
b. RAM
c. Hard drive
d. Display
17. Is component isolation a type of systematic fault isolation?
18. What qualifies as passing a minimal configuration test? (Choose all that apply.)
a. A RAM tone
b. Booting to an OS
c. Powering on
d. A flashing question mark
e. A normal startup chime
19. Why is a video card not required for a minimal configuration?
a. Video cards in some systems draw power and can confuse the test.
b. A startup chime can also indicate a good boot in a minimal system.
c. All you need is fans kicking on to tell you the minimal system has passed.
d. Video cards complicate the issue by giving you a display to look at.