
Lesson 4. Integrating Mac OS X With Third-Party Directory Services
|
Time |
This lesson takes approximately 2 hours to complete. |
|
Goals |
Integrate Mac OS X with a variety of third-party directory services Use Directory Access to map required Open Directory attributes to unused attributes on an LDAP server Use variables to supplement required attributes missing from an LDAP server Provide mount records for a client computer retrieving records from an LDAP server Enable a Mac OS X computer to automatically mount a file-server volume Use NFS or file-sharing protocols to provide home folders |
If your network uses a directory service other than the one provided with Mac OS X Server, don’t worry—your Mac OS X computers can still integrate with that system. This lesson introduces several third-party directory services and explains how to integrate Mac OS X clients with them.
Since each directory service is different, Open Directory includes plug-ins to interact with them. To integrate Mac OS X with these services, you just need to configure the appropriate plug-in and address the attribute differences between Open Directory and the third-party directory service.
Binding a Mac OS X computer to an Open Directory server is a straightforward task requiring very little configuration. Connecting a Mac OS X computer to other directory servers requires a bit more work, but by following a simple, methodical approach, you can bind a Mac OS X computer to almost any LDAP server. You can also use third-party directory services to provide network home folders and client management policies.
Choosing a Third-Party Network Directory Service
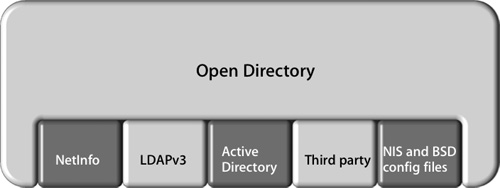
Some organizations may prefer to use a directory service developed by manufacturers other than Apple, or they may already have a well-established infrastructure in place. When choosing an alternative to Apple’s directory service, keep in mind that Open Directory is plug-in based. Apple has supplied plug-ins for various directory service protocols, such as Lightweight Directory Access Protocol (LDAP), Network Information Service (NIS), Active Directory, and NetInfo. In addition, manufacturers other than Apple can develop their own plug-ins to add features not available with the Apple plug-ins, such as ADmitMac, sold by Thursby Software.
It is important to choose the plug-in that best fits the needs of your organization. In some cases, a plug-in may provide only a limited set of features that hinder the overall usability of Mac OS X. This lesson will look into the specifics of the NIS and LDAP plug-ins that Apple supplies.
Note
The Active Directory plug-in will be covered in Lesson 5, “Integrating Mac OS X With Active Directory.”
Network Information Service
Administrators have long sought to have a centrally managed network directory service on their networks. In 1985 Sun Microsystems developed one of the earliest implementations to help support administrators deploying network file system (NFS) servers. Originally called Yellow Pages, the service eventually became known as Network Information Service, or NIS. However, the utilities were never updated to reflect the name change, so most NIS utilities start with the prefix yp.
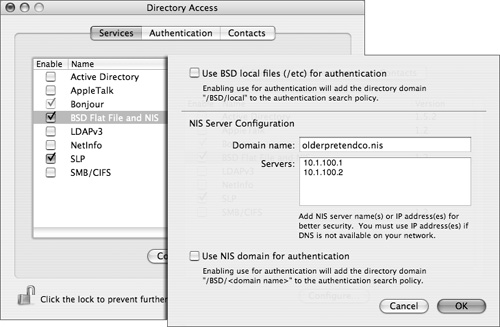
With Mac OS X v10.2.5 and later, Apple has provided an NIS plug-in for Open Directory. As with other Open Directory plug-ins, it is configured with Directory Access. Although the NIS plug-in is disabled by default, it is simple to enable and configure. If you want to use the NIS plug-in to authenticate users, be sure to add the /BSD/domain name to the Authentication pane of Directory Access after configuring the plug-in. The figure below shows where to enable the BSD/NIS plug-in and the options available within the plug-in.
Note
The NIS plug-in primarily supports legacy deployments and currently does not support NIS+ or the use of shadow files.
LDAP Integration Methodology and Workflow
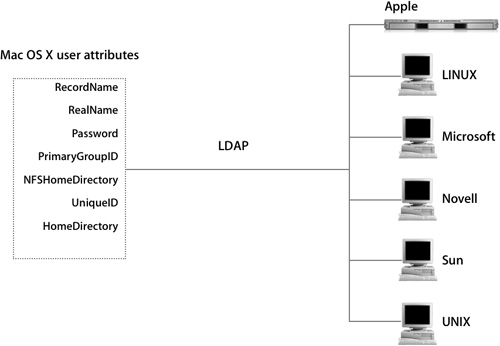
You have learned how Mac OS X stores a set of attributes for every Mac OS X user, such as user name, password, home folder, and user ID. Mac OS X needs the specific data found in these attributes, regardless of the directory-service connection. Integrating Mac OS X with a directory service to provide these attributes is a multistep process.
Open Directory’s directory service shares a common communication protocol with directory services from other vendors. Each vendor has the freedom to choose the directory data store of their choice and to build native tools to manage that directory data store. Through LDAP, a standards-based directory-service protocol, different vendors can operate together peacefully.
The rest of this lesson will focus on using Open Directory’s LDAP directory-service protocol plug-in and the dynamics of getting the best Mac OS X experience possible from a non-Apple directory service.
By following a five-part LDAP workflow, you will greatly increase your chances of successfully integrating Mac OS X with a third-party directory service. This process helps to break down the mechanics of connecting and should expose common issues administrators face while reducing the guesswork in troubleshooting a directory.
1. Connect.
2. Understand.
3. Supplement.
4. Configure.
5. Test.
Step 1: Establish a Valid Connection
To integrate Mac OS X into any directory service, you should first establish a valid connection. There are several utilities available to assist administrators in connecting to a directory service over LDAP, such as LDAP Browser, LDapper, LDAPManager, and command-line utilities. They are all excellent methods of getting immediate feedback from your directory service.
When connecting to a directory service, administrators will have to determine the following:
• Does this directory service allow anonymous browsing or is user authentication required?
• Does this directory service require a secure connection with SSL?
• Is the LDAP server using a custom port?
If user authentication is required for a particular directory service, the user name will be a user’s full distinguished name (dn). For example:
cn=John Smith,cn=Users,dc=mainserver,dc=pretendco,dc=com
Once connected, your browser will display output similar to that in the following figure:
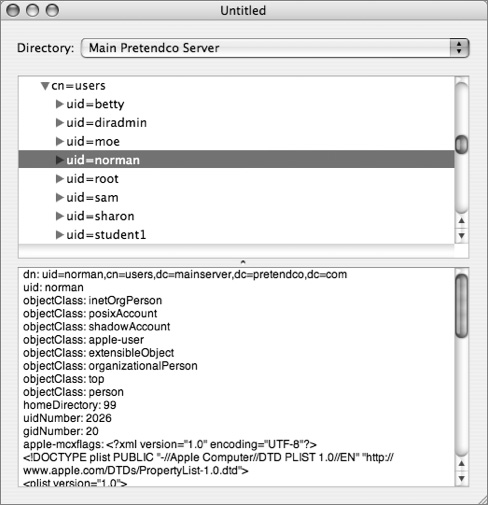
If you cannot make a connection to the directory server, then there is no need to proceed further. You must prove a valid connection and be able to view all necessary attributes and their associated values, so check typing, DNS issues, and firewall settings as the first culprits in thwarting your initial attempts at a valid connection.
Step 2: Understand Your Directory
Once a connection has been established, take a look at the data that exists in the directory service. Start by determining where user records exist in the directory service. They may be distributed throughout the entire directory or be completely contained in one part of the directory. This, of course, is at the discretion of the LDAP administrator; therefore, when planning to deploy Mac OS X with third-party directory services, you should meet with the LDAP administrator and understand exactly how the LDAP structure is laid out for that particular directory service.
When configuring Mac OS X, Directory Access will prompt you to specify a search base. This search base is the dn of where the user records can be found in a particular directory service. For example:
cn=users,dc=mainserver,dc=pretendco,dc=com
Inspect the individual user records and see what attributes have been associated with the record. Also inspect the data associated with each attribute.
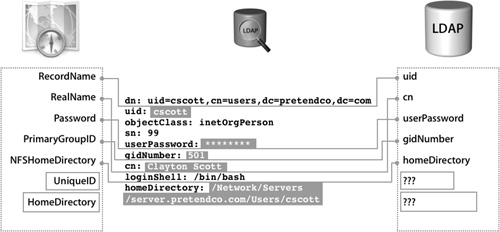
Remember, for Mac OS X to integrate with this directory service, the attributes listed in the figure must be mapped to user attributes in the directory service. The names of the attributes in the directory service do not have to match. The important thing is that the value for a user’s primary group ID is 20 and the attribute gidNumber in the directory has the value 20 associated with it. In Directory Access, the attribute PrimaryGroupID is mapped (in one method or another) to gidNumber.
Upon further review of the user records in the directory, you will discover that certain required attributes for Mac OS X either do not exist or have incompatible data populated. Take note of these deficiencies and incompatibilities as you determine the correct schema for the directory service.
Step 3: Supplement Missing Data
Supplementing directory data is by far the most challenging part of integrating Mac OS X with a third-party directory. Knowing where the deficiencies are with your existing user records will be the key to your success. The missing data must be supplemented in one or more of these three methods:
• Repurposing existing fields
• Employing local mappings with static and variable attributes
• Modifying the schema of the directory
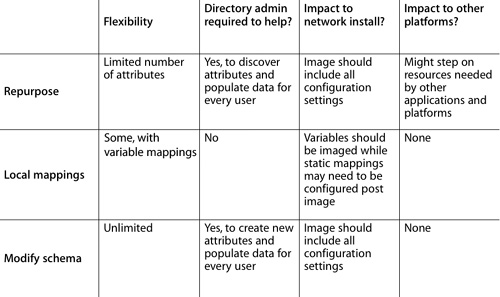
Regardless of the method administrators choose, they must plan their strategy and adequately test it prior to rolling out the solution. The major pros and cons of the three methods, which are detailed in the following sections, are summarized in this table.
Repurpose Existing Unused Attributes
This method involves taking unused attributes that are already part of the current directory schema and putting Mac OS X–specific data in those attributes.
Repurposing requires cooperation with the LDAP administrator. The primary reason to repurpose is because it does not require any modification to the schema of the directory service. Different directory services and their administrators have different appetites for making schema modifications. In addition, it usually requires less setup time, which is valuable for smaller organizations.
This method is often the most attractive at the beginning and quickly becomes the least viable solution. In the long run, attribute reuse is more difficult to maintain: Not only must system administrators track what attributes were commandeered, but there is the risk of overwriting critical data required by other clients if those attributes are suddenly needed by the LDAP administrator.
In addition, attributes have certain requirements, and one attribute may be unable to store the data that you want to populate. For example, the attribute employeeID may be allowed to store only integers. Any attempt to store a text string such as /Users/myhome would result in an error, as it does not comply with the attribute limitations. Your LDAP browser will not display unused attributes. Each user record consists solely of attributes that contain specific data for that user. To discover all the available unused attributes, administrators usually consult the directory’s schema with vendor-supplied tools for that directory service.
In the example in the following figure, two attributes that were not being used, secondaryFax and ipPhone, were mapped to the user attributes UniqueID and HomeDirectory in Directory Access. These steps are still not enough for the Mac OS X login to be successful.
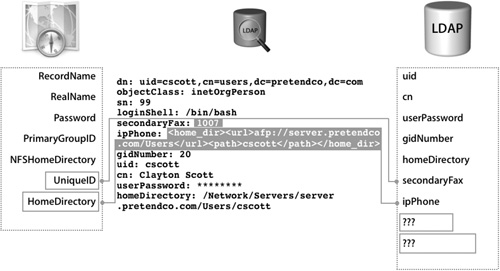
In this case, secondaryFax was populated with 1007 and ipPhone was populated with a value required for a user to have a network home folder:
<home_dir><url>afp://server.pretendco.com/Users</url><path>cscott</path></home_dir>
Notice that these values are unique to each user, and every Mac OS X user record will have to be populated prior to deploying Mac OS X.
Overall, repurposing is not flexible due to the limited number of attributes available, and can impact others with other applications and platforms.
Employ Local Static and Variable Mappings
When limitations with repurposing attributes are too restrictive for organizations, another option is to use local mappings, which are a convenient way, within Directory Access, to hard-code in directory data that would normally exist as an attribute in a user record. This is an attractive option for Mac OS X administrators who may not be able to make changes to the directory service, but still want to integrate into the existing infrastructure as best as possible. Plus, local mappings are quite flexible with variables and don’t require any attention from the directory administrator.
Static mappings are effective when each user has an individual computer and when addressing universal mappings that may be the same for all users. Local mappings always begin with a number sign (#) as the first character of the mapping within Directory Access. Note that static mappings may require extra configuration after deploying with Network Install.
The first directory-service example in the following figure does not have an existing attribute populated with data suitable for mapping UniqueID. The solution maps UniqueID #1007 in Directory Access. So everyone who logs in to this computer will have a UID of 1007 with exactly the same access to local files and any files hosted by an NFS server.
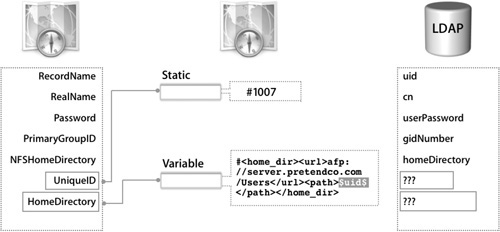
The second example in the figure addresses the missing attribute for HomeDirectory. In this case, the goal is for users to have separate home folders. A static value of
#<home_dir><url>afp://server.pretendco.com/Users</url><path>generic</path></home_dir>
will not work. Every user on this computer would have the same home folder called generic on mainserver.pretendco.com. To achieve separate home folders, a variable must be included in the static mapping.
In Mac OS X v10.3.3 and later, variables are included in the mapping by enclosing, or “wrapping,” a valid LDAP attribute in dollar signs ($). For example:
#<home_dir><url>afp://server.pretendco.com/Users</url><path>$uid$</path></home_dir>
Note
Though we can’t show it properly on the printed page, be sure to type each of these commands as a single line with no paragraph returns.
When a user logs in with this mapping in Directory Access, the home folder path will be dynamically constructed with the data stored in the attribute, uid, for that user. In this example, the user’s short name was the data associated with the uid attribute in the directory. When each user logs in, Mac OS X looks for that user’s home folder in a folder named with their short name on the server at mainserver.pretendco.com in a share point called Users, thus achieving the desired goal.
Local mappings are also used as a safety net to ensure that user logins are always successful by listing more than one attribute in a particular mapping and leaving the last entry as a local mapping. Mac OS X will search the directory for all of the listed attributes; if no matches are found, the local mapping will be applied. That’s good news if your Mac OS X computers could be used by people outside of your immediate department.
Departmental users may have network home-folder information in their user records where nondepartmental users may not have specific Mac OS X home-folder information in their respective user records. They may still need access to your Macintosh lab with a valid LDAP login. To alleviate these two different needs, you could map HomeDirectory to both the valid attribute in the directory and a local mapping of #/tmp/$uid$.
The result is that nondepartmental employees have a functional home when they visit the lab and their data will be erased the next time the computer is restarted, while your departmental employees will still have functional network home folders.
Modify the Schema and Create New Attributes
The most significant step an administrator can take to integrate Mac OS X into an existing directory service infrastructure is to modify the schema on the LDAP server. Only the directory service administrator, who uses tools from the vendors of each directory service to add additional objects and attributes that accommodate the specific needs of Mac OS X user records, can modify the schema.
This is not a trivial task—it requires extensive knowledge of the existing LDAP schema and may be very difficult to undo. Changes should be scripted and tested thoroughly before rolling these changes into a production server. Keep in mind that user attributes are not the only attributes that can be added to the schema. Group account attributes, computer account attributes, managed account settings, and network view settings can also be added.
Note
Do not attempt schema modification without consulting your LDAP server administrator!
In the following figure, the directory administrator has created two new attributes dedicated to host the missing Mac OS X user attributes. Specifically, the attribute unixid will host the value for UniqueID and macuserhome will host the value for the Network home folder.
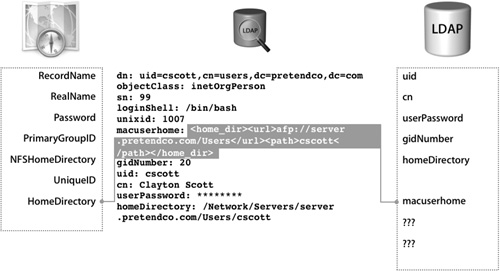
The newly created attributes still need to be populated with valid data for everyone using Mac OS X in your directory service environment. Verify this step has been completed with an LDAP browser prior to configuring Mac OS X to integrate.
More Info
Apple has a set of Active Directory schema modifications that support most of the Apple attributes. More information can be found at www.apple.com/services/consulting.
Step 4: Integrating Mac OS X With LDAP Directory
Now that you have accounted for each user attribute required by Mac OS X, you can use Directory Access to configure Mac OS X to integrate with the LDAP directory. The process is similar to configuring Mac OS X to connect to an Open Directory server.
Note
While configuring an LDAP configuration may be simple, beware that a single typing mistake can render your configuration inoperable.
Directory Access has three presets for configuring the LDAP plug-in:
• Active Directory
• Open Directory Server
• RFC 2307 (UNIX)
When connecting to a third-party directory:
1 Use the LDAP plug-in in Directory Access to create a new LDAP connection.
2 Start with the RFC 2307 (UNIX) preset and then customize the mappings to your specific settings.
First provide the default search base for your directory to find all records including users, groups, mounts, and other record types. If need be, you can edit the search base for each record type beyond this general setting.
3 Edit the configuration for your organization’s specific needs.
If your LDAP browser required any connection configuration (such as a custom port, SSL encryption, or required user authentication), make sure to duplicate the working settings from the LDAP browser utility to Directory Access.
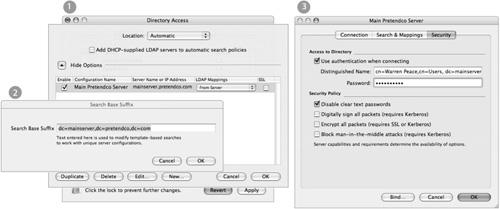
4 Now begin to assign your specific attribute mappings to match up with what you discovered with the LDAP browser utility
5 Make sure to incorporate mappings that will supplement the directory service
6 If multiple entries are entered for a particular mapping, Mac OS X will look for the data in the first mapping and work its way through the list of possible attributes until it has found a match.
The RFC 2307 preset for Directory Access does not include the user attribute HomeDirectory. If your configuration is going to employ network-based home folders, you will need to add the HomeDirectory attribute for the user record mapping. Do not forget to configure the attribute once you have added it.
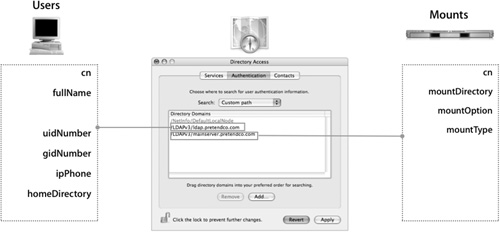
Step 5: Add Directories to the Authentication Path and Test
Now you need to add directories to the authentication path, as shown in the following figure:
1. Any directories that you want to use for authentication will be added to the search path within Directory Access.
2. You can sort the priority of different directories and Mac OS X will search each directory as they are listed within Directory Access.

Once the LDAP configuration has been inserted into the authentication search path, you can begin to test the configuration. From the command line, you may use either lookupd -d or dscl to see if the configuration is working properly. If it is, you should get output that looks very similar to the output of the LDAP browser.
The final test is to see if your users can log in using the login window. If your users are going to have network home folders, expect an error message regarding the location of the home folder—a reboot may be required to initialize the supporting automount.
After you have tested the configuration, you can use the “Write to Server” button in the Search and Mappings pane of the LDAP plug-in to store the mappings in the LDAP directory so that it can supply them automatically to other Mac OS X computers.
Use a dn of an administrator or other user with write permission for the search base (for example, uid=diradmin,cn=users,dc=mainserver,dc=pretendco,dc=com) and the account’s password. Also provide a search base to store the mappings. If you are writing mappings to an Open Directory server, the correct search base is
cn=config, suffix
where suffix is the server’s search base suffix, such as
dc=mainserver,dc=pretendco,dc=com
So the full line would be
cn=config,dc=mainserver,dc=pretendco,dc=com
Integrating Specific Records With Third-Party LDAP Directories
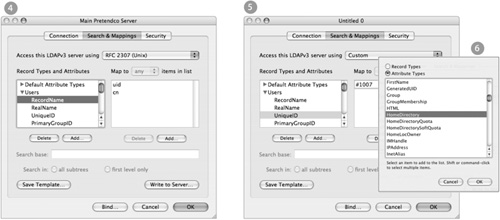
There are certain characteristics of third-party directory services that require additional configurations when working with Mac OS X. The following figure compares how different directories can integrate Mac OS X by default. Attributes with “???” are deficiencies in the directory that must be addressed to successfully integrate.
Mac OS X Server integrates well because it provides all of the attributes required by Mac OS X. It takes some additional configuration to integrate Mac OS X with other servers as they are usually missing at least some key attributes.
A common deficiency amongst third-party directories is the HomeDirectory mapping. This mapping is an addition Apple applied to the RFC 2307 standard schema. It is a required attribute for users who will have a network home folder, and administrators should always plan to address this need when integrating into any directory not manufactured by Apple.
Integrating With eDirectory
eDirectory is a directory service offering from Novell that provides support for LDAP and can be configured to provide support for Mac OS X.
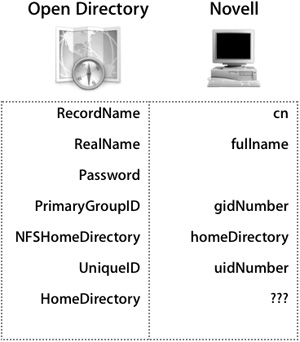
When configuring, be sure to leave the Password field blank so that authentication will occur over the LDAP Bind. Novell has provided the homeDirectory attribute as a UNIXonly attribute; using it will not conflict with native Novell clients. This was done to ensure compliance with RFC 2307.
By default the only missing user attribute is HomeDirectory; this will need to be addressed prior to integrating. Administrators interested in modifying the schema to better support Mac OS X can get functional unsupported LDIF files to automate modifying eDirectory’s schema from www.macosxlabs.org.
Integrating With SunOne
SunOne directory service is an LDAP directory service provided by Sun Microsystems. Originally called iPlanet, it has a schema that is designed to ensure full compliance with RFC 2307. This leaves the schema ready for use with exception of the HomeDirectory mapping, which is not part of the RFC 2307 schema. Schema modification should be automated through the use of LDIF files.
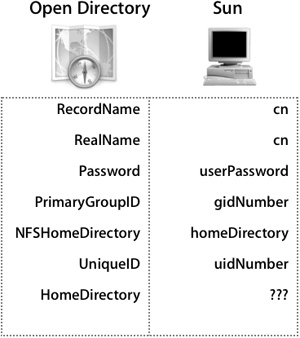
Although Sun has implemented a model RFC 2307 schema, administrators often make changes to meet the needs of an individual organization. A common change would be to not store the password in the directory as a user record attribute and use Kerberos instead. Be sure to follow the LDAP workflow and to use the above figure as a reference for your own integration.
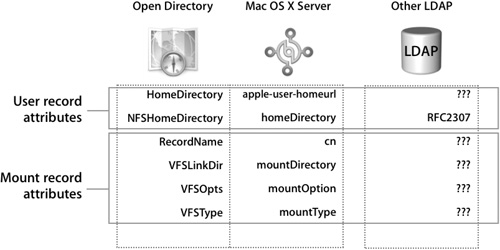
Working With Home Folders and LDAP
Administrators need to decide where their Mac OS X users will store their home folders. Network authenticated users can have a home folder stored either locally on the workstation they are currently using or on a server over the network. Network home folders are an extension of simple automounts, and the data is spread out between user-specific data and generic mount data. Open Directory has built-in support for Mac OS X home folders and makes providing network home folders easy.
A quick survey of any third-party directory server will reveal that the Apple implementation of network home folders is not part of the standard RFC 2307 LDAP schema and will need special attention to accommodate these specific requirements.
To get network home folders to function properly, you need to address the data for each user record and provide mount records with the associated mount attributes. If your directory does not have mount records as a part of your existing schema or the attributes necessary for mount records, administrators must provide valid mount records and their associated attributes in addition to the Mac OS X–specific user attributes covered previously.
Supplementing Mount Records
Supplementing your directory’s lack of mount records and attributes is similar to the procedure for user records. You can mount records in the local NetInfo database, modify the schema to create new record types and attributes, or use secondary directory to supplement primary directory.
Here’s a disadvantage to creating a mount record in the local NetInfo database, though: If the mount address changes, the administrator will have to change that information on each Mac OS X computer with local mount records.
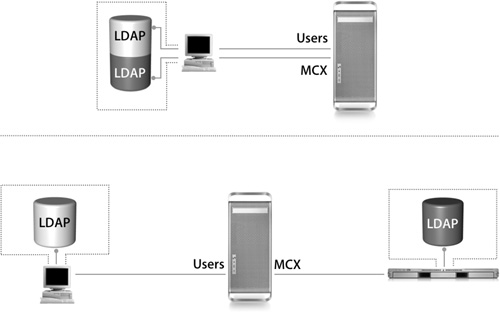
An attractive third alternative may be to supplement one directory with another. This is done by configuring an Open Directory server to host mount records in its own directory. This server will not host any user records and will also be bound to the primary directory server. To configure Mac OS X to use both directories, add the Open Directory server to the custom authentication list in Directory Access. The resulting combination will allow Mac OS X to search both directories for user and mount records. It will find user records only in the primary directory and find mount records only in the Open Directory server.
Additional Concerns for Network Homes
Administrators who are planning to provide network home folders will also need to pick which protocol they prefer to use. The protocol you choose will depend on what features you need most.
Note
Keep in mind how resource forks are handled by each protocol.
If you choose to use Apple Filing Protocol (AFP), you must be aware that to get full functionality out of Mac OS X you must use an AFP 3.x server. Version 3.x of AFP provides two critical features to Mac OS X:
• The ability to automatically reconnect; if a connection is lost or disconnected, the Mac OS X computer will attempt a reconnect when the network connection is resumed.
• The ability to write files with names over 31 characters in length, since many pieces of Mac OS X rely on being able to write files with long names
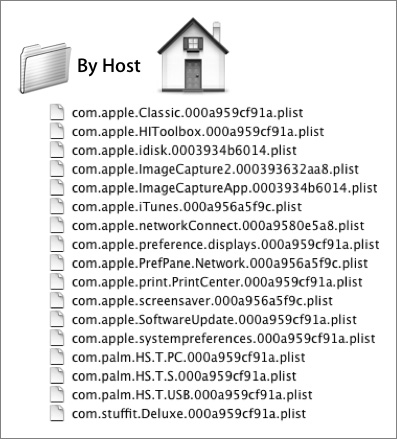
ByHost files are the most common type of file to have long names, as shown in the above figure. One of the most notable ByHost files is the com.apple.Classic. XXXXXXXXXXXX.plist file. If Mac OS X cannot access this file, the Classic environment will not be able to run. Administrators wanting to use their existing investment in Microsoft file servers will either need to give up these features or upgrade their AFP 2.x servers to 3.x with a product called Extreme Z-IP. This replaces Microsoft’s Services for Macintosh with an AFP 3.x server. Currently there is no Microsoft Windows software that will share files over AFP 3.x.
An alternative to AFP would be to use NFS. NFS home folders are fully supported in Mac OS X, and most vendors support NFS. There are security concerns with NFS, as it does not rely on user authentication. In addition, NFS homes will exclude users still migrating from Mac OS 9.x.
Two Methods for Managed Mac OS X Clients
Most organizations would like to provide at least some basic amount of management, such as providing a default set of printers. Others prefer to fully lock down the box to ensure the highest level of computer uptime at the risk of hindering the user from being productive. An optimum solution would be to get these abilities while still integrating with a third-party directory.
To get these features, Apple chose to extend the standard RFC 2307 LDAP schema with over 50 new additions. All of these changes are listed in /etc/openldap/schema/apple. schema and can be applied to any directory service. For most directory administrators, this may be too daunting a task.
A simpler solution may be to supplement the primary directory with an Open Directory server. In the same way that you can use an Open Directory server to provide mounts for network home folders, the same server can provide Managed Client for X (MCX) settings for group and computer records. With this solution you can enjoy the ease of use of the Apple tools and their directory with built-in support for client management. When configured correctly, the Open Directory server is able to create and manage groups of users or groups of groups (new to Mac OS X Server v10.4) that exist only on the primary directory server.
User Authentication With the LDAPv3 Plug-In
Having the additional directory servers bound to the Mac OS X computer to provide the array of services previously described raises some authentication questions. Depending on plug-in configuration, Mac OS X will attempt to authenticate the identity of the user using the following methods:
• Authentication authority: If the plug-in is configured to map the user attribute AuthenticationAuthority to a valid attribute in the user record, then Mac OS X will attempt to authenticate the identity with the associated value.
• Kerberos: Mac OS X will use this method if Kerberos is configured correctly with a valid edu.mit.Kerberos file (located in /Library/Preferences) and the login window is configured to use a modified right in the /etc/authorization file. A more flexible authentication authority permits the use of Kerberos for sshd, sudo, and chkpasswd, to name a few.
• Password User Attribute mapping: If mapped, Mac OS X will attempt to authenticate with the crypt user password in the directory stored in the mapped attribute.
• LDAP Bind: If the password mapping is left blank (as should be done with Microsoft and Novell), Mac OS X will use LDAP Bind to authenticate the identity. By default, this technique transmits the password in the clear. To avoid this security risk, LDAP plug-in should be configured to use SSL. LDAP binding will first try Generic Security Services Application Programming Interface (GSSAPI) and CRAM-MD5 before reverting to clear text.
• SSL: Permits all transactions to be encrypted using a certificate. The server and all client computers must have a copy of the certificate in order to communicate over SSL.
Tip
Take time to coordinate with your directory administrator and other members of your IT/IS group to determine the risk and the appropriate steps you should take to authenticate your users securely. Administrators should be aware how and whether Mac OS X users will see administratively defined password policies. The LDAPv3 password policy support varies by vendor and currently does not work with either Novell or Microsoft directory servers.
Administrators may prefer a solution that does not provide supported server-based password policies so that they can enforce their own policies through mail and Web clients. This compromise gets the most features, such as AFP network home folders, allowing users to change their passwords in the Accounts pane of System Preferences.
Although this may be OK for some administrators, Kerberos would give password policy support while maintaining the functionality of the LDAPv3 plug-in. This combination of LDAP and Kerberos can give Mac OS X users a first-class experience with password policy support plus single sign-on (SSO) to all kerberized services. It must be understood that password policies will not work without a Kerberos authentication authority.
Troubleshooting Integration
When troubleshooting your directory integration, take a step back and observe the chain of events in a successful integration. Walking through this will help you troubleshoot issues that may crop up along the way.
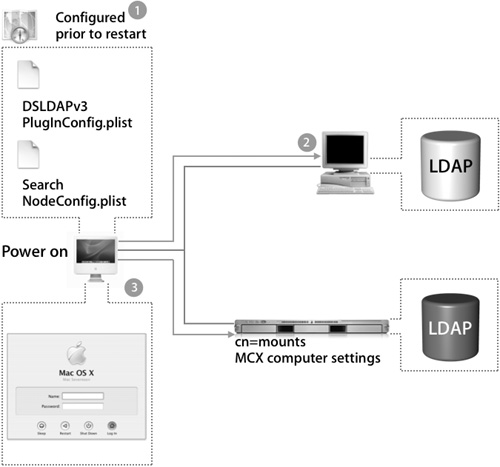
Prior to rebooting, the Mac OS X computer was configured with Directory Access to use two different LDAP directory services for authentication. The primary directory is the third-party directory, where all user records exist. The second is an Apple Open Directory (Mac OS X Server) server that will supplement the third-party directory service by hosting Mac OS X–specific information outside of the user records, such as mounts and computer MCX records. This configuration is stored in two files:
• SearchNodeConfig.plist stores what order directories should be searched.
• DSLDAPv3PlugInConfig.plist has the specific mappings for each LDAP configuration.
1. On boot, these files are read and any available directories are searched for mount record information and computer-level MCX settings.
2. In the example in the following figure, the Open Directory Server has mount record information and computer MCX settings.
3. After those settings have been applied, the Login Window appears.
User Authentication
Once the Login Window appears, a user types in his or her user name and password, and the following occurs:
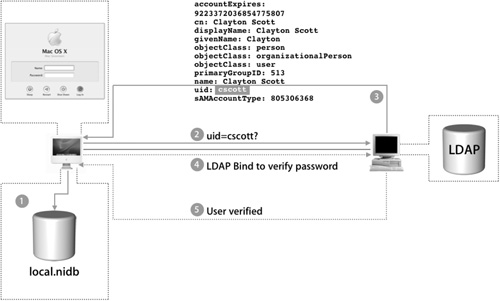
1. The Login Window process checks the local NetInfo database for the user record.
2. If no match is found, the Login Window process will query the first configured directory from Directory Access according to the Authentication list.
3. The listed directory server, bound correctly, will respond with the contents of the user’s record.
4. Now that the Login Window process has found a matching user record, it will attempt to validate if the password entered was correct through LDAP bind.
5. If the password is correct, the user will be logged into the system with all the user attributes, such as User ID and home folder, applied to that user for this session.
MCX Settings
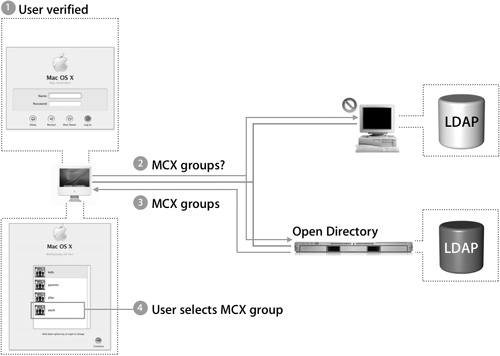
After the user is verified, Mac OS X retrieves any available MCX records via the following process:
1. The user is verified.
2. Next, Mac OS X queries all available directories for MCX group records.
3. The Open Directory server, which is hosting MCX group records, responds with a list of groups and all of their MCX settings that are available to that user record, and the Login Window process presents the user with a list of groups from which to choose.
4. Once the user chooses a MCX group, the Login Window process resumes a traditional user login process and attempts to find the user’s home folder.
Home Directory
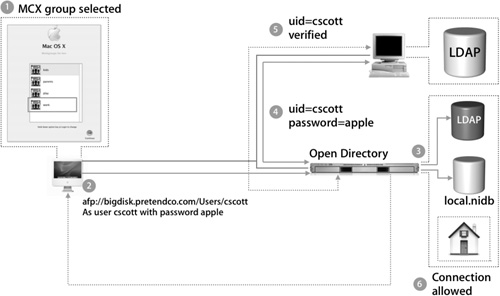
The Login Window process is designed to handle the listing of several groups; if more groups are found than can be shown, a scroll bar will appear on the right of the Login Window, allowing the user to scroll up and down to find the selected group. The following steps take place after the Login Window shows all available groups:
1. The user selects a managed group, and the process for mounting the home folder begins.
2. The home folder is automatically mounted by the automount binary located in /usr/sbin, which mounts remote file systems when they are first accessed.
In the example in the figure below, the user’s record in the directory had attributes that stated the home folder was on the Open Directory server.
3. Once the home folder is actually mounted on the remote server, the connection must be authenticated. The Open Directory server has no user names and does not directly know about the user who is attempting to connect. The local NetInfo database is searched first for valid criteria.
4. If no match is found, the server progresses through its own custom authentication path, configured in Directory Access on the server. In this case, the authentication moves up to the Open Directory directory service and then to the primary directory domain where the user actually exists. Now the user and password can be authenticated for the second time.
5. The home folder is successfully mounted.
6. The connection is allowed.
This complete process is essentially invisible to the user, which is the ultimate goal of spreading user data, home folders, and managed client settings on different servers.
What You’ve Learned
• Apple provides plug-ins for LDAPv3 and Active Directory and the option to integrate third-party custom plug-ins.
• When using the LDAPv3 plug-in, the requirements are the same as if Mac OS X were connecting to Open Directory.
• The key to integration is planning your approach to supplementing the existing directory. For the best results, start by connecting to the third-party directory service with an LDAP browser, and then follow the LDAP workflow outlined in this lesson.
• At login, Mac OS X needs to find user identification and to authenticate the identity.
• If using LDAP Bind, administrators need to use SSL to avoid exposing user passwords to the network.
• Kerberos can be used to securely authenticate identities, allow for password policies, or enable SSO to services.
References
Administration Guides
“Mac OS X Server Open Directory Administration”: http://images.apple.com/server/pdfs/Open_Directory_v10.4.pdf
“Mac OS X Server Command-Line Administration”: http://images.apple.com/server/pdfs/Command_Line_v10.4.pdf
Apple Knowledge Base Documents
The following Knowledge Base document (located at http://www.apple.com/support) provides further information about troubleshooting login problems with third-party LDAP directories.
Document 107523, “Mac OS X 10.2.5: Unable to Log In After Deleting NIS Server Entry”
Books
Carter, Gerald. LDAP System Administration (O’Reilly, 2003).
URLs
MacEnterprise.org: www.macosxlabs.org
Integrating Mac OS X in an NIS network: www.bresink.de/osx/nis.html
Novell eDirectory: www.novell.com/products/edirectory
Lesson Review
1. How can Open Directory be extended to communicate with alternate directory- service protocols?
4. What is a common deficiency when mapping Mac OS X to popular third-party directory services?
Answers
1. A custom plug-in can be developed or purchased for use in an organization’s network. One example of this is the ADmitMac plug-in available from Thursby.
2. An LDAP browser can confirm you have the correct settings and can establish a connection to the LDAP server. Once data can successfully be accessed, you can proceed with configuring Directory Access with the established settings.
3. Repurpose existing fields, modify the schema of the directory, use local mappings with static or variable attributes
4. Many directory servers do not provide a default attribute for HomeDirectory, which is required for a Mac OS X network home folder.
6. When a directory server is unable to provide mount records, the mount records could be created and stored in the NetInfo databases on the client computers.
7. Instead of modifying the schema on the main directory server, you could set up a Mac OS X Server computer to provide the additional records. The client computers would then be configured to retrieve data from both servers.