
Lesson 18. Secure Network Configuration
|
Time |
This lesson takes approximately 2 hours to complete. |
|
Goals |
Understand network security design principles Learn methods for implementing a secure network design, including NAT, VPNs, and firewalls Use the Mac OS X Gateway Setup Assistant to enable and configure routing, NAT, and VPN services Use the Mac OS X Server Admin application to configure the firewall service Create firewall rules to lock down traffic to and through a Mac OS X server, including remote administration traffic, Web and e-mail traffic, DNS zone transfers, pings, and ping replies Configure Mac OS X firewall service for stealth mode Analyze firewall rules with the UNIX ipfw show command Monitor network security with logging |
Mac OS X Server can handle advanced network security tasks that were once the specialized job of expensive, hard-to-use hardware devices. With the Mac OS X Gateway Setup Assistant and Server Admin applications, you can easily configure a Mac OS X server to act as a router, a Network Address Translation (NAT) gateway, a virtual private network (VPN) server, and a firewall.
Configuring a server to act as a router enables you to connect multiple networks to the server and route Internet Protocol (IP) traffic between the networks. Once you have multiple networks set up, NAT lets you use private addresses on the internal networks. VPNs allow remote users to connect securely to a private network and appear as if they are connected directly to the private network. The Mac OS X Server firewall helps you secure the server and implement policies regarding services that your internal and external users can reach.
Designing a Secure Network
A basic explanation of design principles is always a good start in any security discussion. Design starts with requirements analysis, so the first step for getting security right on Mac OS X Server is to understand requirements. You should talk to users, managers, and technical staff to find out what security concerns must be addressed. Before implementing security mechanisms, you need to know if you are securing services that run on the server, protecting internal servers on a private network connected to the server, controlling which outside services your internal users can reach, or all of these.
One basic aspect of requirements analysis is to find out who the users are, where they are located, and what resources they use. Designers sometimes use the concept of a user community to help them recognize requirements. A user community is a set of users with similar application and security requirements. This can be a corporate department, a set of outside users, a set of business partners, or a single user who has unique requirements. You should document user-community names, sizes, locations, and applications. Also document the names and addresses of servers, their locations and applications, and which user communities depend on them. With that documentation in hand, you can begin to understand what needs to be secured.
Next, to ensure system and data availability, you must understand the direction of network traffic flow to and from services. Talk to your users, examine network diagrams, study network traffic with a protocol analyzer, and review network logs to help you understand the direction of network traffic flow and how your security measures can filter this flow to implement user requirements.
Analyzing Network Security Threats
An important step in network security design is analyzing threats, their likelihood and severity, and the dangers associated with not taking action to prevent and mitigate these threats. Network devices—such as servers, routers, and firewalls—are attractive targets for attackers.
If an attacker undermines the security of a network device, the following problems arise:
• Data flowing through the device and the networks it connects can be intercepted, analyzed, altered, or deleted, compromising confidentiality and integrity.
• The device’s configuration can be changed to block legitimate access and allow future attacks.
• User passwords can be compromised.
• Configuration and management data can be monitored, showing the attacker other devices that are reachable from the device.
Tools for intercepting and analyzing data on a network are readily available. Ethereal, for example, is a free and easy-to-use protocol analysis tool that runs on almost every platform. Ethereal captures network traffic and displays each packet in human-readable format, which makes it a useful network management tool as well as a powerful tool for network attackers. The following output from Ethereal shows a Telnet packet. Notice that the output is helpful for analyzing packet headers while troubleshooting a problem, but it’s also helpful for attackers, who can easily see in the Telnet data section at the end of the output that the user typed co followed by a carriage return ( ).
Frame 27 (58 bytes on wire, 58 bytes captured)
Ethernet II
Destination: 00:00:0c:00:2e:75 (Cisco_00:2e:75)
Source: 00:0d:93:28:c9:f6 (AppleCom_28:c9:f6)
Type: IP (0x0800)
Internet Protocol
Version: 4
Header length: 20 bytes
Differentiated Services Field: 0x10
Total Length: 44
Identification: 0x22fe (8958)
Flags: 0x04
.1.. = Don't fragment: Set
..0. = More fragments: Not set
Fragment offset: 0
Time to live: 64
Protocol: TCP (0x06)
Header checksum: 0x02d8 (correct)
Source: 10.10.0.209 (10.10.0.209)
Destination: 10.10.0.2 (10.10.0.2)
Transmission Control Protocol
Source port: 51854 (51854)
Destination port: telnet (23)
Sequence number: 2722440935
Acknowledgement number: 3672130357
Header length: 20 bytes
Flags
0... .... = Congestion Window Reduced (CWR): Not set
.0.. .... = ECN-Echo: Not set
..0. .... = Urgent: Not set
...1 .... = Acknowledgment: Set
.... 1... = Push: Set
.... .0.. = Reset: Not set
.... ..0. = Syn: Not set
.... ...0 = Fin: Not set
Window size: 65535
Checksum: 0x788a (correct)
Telnet
Data: co
From output such as this, an attacker can gain information about Ethernet addresses (in the Ethernet II section of the example, see Destination: 00:00:0c:00:2e:75 (Cisco_00:2e:75) and Source: 00:0d:93:28:c9:f6 (AppleCom_28:c9:f6)) and IP addresses (in the Internet Protocol section, see Source: 10.10.0.209 (10.10.0.209) and Destination: 10.10.0.2 (10.10.0.2)). This knowledge of addresses helps an attacker find targets.
An attacker can also gain information about the identifiers used for IP datagrams and the sequence numbers used for Transport Control Protocol (TCP) segments. (In the Internet Protocol section, see Identification: 0x22fe (8958); in the Transmission Control Protocol section, see Sequence number: 2722440935.) This type of information could be used to craft an attack packet.
Finally, as mentioned, the attacker can see that the user typed co followed by a carriage return. These were the last two characters in the Telnet password, which was Cisco.
Reconnaissance Attacks
An attacker launches a reconnaissance attack to learn about potential targets and their weaknesses in preparation for a more focused attack. Reconnaissance attackers use tools to discover the reachability of computers, networks, services, and applications. While on a reconnaissance mission, an attacker might try to gather the following information:
• The existence of and names of servers configured in a domain name system (DNS) server
• Configuration information listed in a Simple Network Management Protocol (SNMP) server
• The reachability of servers and end-user systems via ping and port scans
• Operating system and application versions
One tool that attackers use to test the reachability and vulnerabilities of a network server is the UNIX nmap utility. nmap sends traffic to the target for numerous TCP and User Datagram Protocol (UDP) ports and examines the results to discover open ports, application and operating system versions, and vulnerabilities.
By default, Mac OS X Server has very few ports open. In this example using nmap on the Mac OS X Server with the IP address of 192.168.3.1, some default ports have been closed while others have been opened:
Pretendcos-Computer:~ Pretendco$ nmap 192.168.3.1
Starting nmap V. 3.00 ( www.insecure.org/nmap/ )
Interesting ports on (192.168.3.1):
(The 1592 ports scanned but not shown below are in state: closed)
Port State Service
25/tcp open smtp
53/tcp open domain
80/tcp open http
110/tcp open pop-3
311/tcp open asip-webadmin
407/tcp open timbuktu
427/tcp open svrloc
548/tcp open afpovertcp
625/tcp open unknown
Nmap run completed -- 1 IP address (1 host up) scanned in 10 seconds
The nmap utility has nefarious as well as reputable qualities. You can use it to test the security of your own network devices, for example. This testing method should be used sparingly and with caution, however. nmap sends a huge number of packets to the target in a short period of time.
Denial of Service Attacks
Denial of Service (DoS) attacks target networks, servers, or applications, making it impossible for legitimate users to gain access. DoS attacks usually result from the inability of a network, computer, or application to handle a huge load, which crashes the system or halts the system’s services. These attacks pose a significant risk because they can interrupt business processes and are reasonably easy to conduct, even by an unskilled attacker.
DoS attacks include:
• Flooding servers with huge numbers of connection requests
• Sending so many pings that a device gets so busy replying that it can’t handle legitimate traffic
• Flooding network paths with so much traffic that all bandwidth is consumed
Preventing DoS attacks is best handled by dedicated hardware firewalls and intrusion detection systems (IDSs) that have built-in software that recognizes and mitigates attacks. For example, some dedicated firewalls have advanced software that can recognize and deflect a flood of TCP connection requests, also known as a TCP SYN flood attack.
Dealing with DoS attacks may also require help from network administrators of upstream networks. For example, if the Internet pipe into your company is being flooded with huge amounts of traffic, consuming all available bandwidth, this must be stopped at your Internet service provider (ISP).
In the case of Mac OS X Server, simple DoS attacks are stoppable by disallowing Internet Control Message Protocol (ICMP) echoes (pings) and echo replies, and by disallowing all traffic from a known attacker—both of which are relatively easy to do with Mac OS X Server firewall service.
Using Network Security Mechanisms
Network security mechanisms protect servers, facilitate packet filtering with firewalls, and enable the use of private addresses with NAT. VPN is another security mechanism that provides secure, encrypted remote access to an internal network from computers on the Internet. This section discusses these mechanisms.
Network servers are valuable assets that should be protected with physical security and hardened (strengthened) against intrusions. To harden a server, you should enable only the services that you absolutely need. If the server has network interfaces that you aren’t using, you should disable those interfaces. You should also carefully maintain software and apply security patches when necessary.
Avoid using nonsecure protocols such as Telnet to administer a network server. Firewall rules can establish which computers can connect to servers using safer remote administration methods such as Secure Shell Protocol (SSH), SNMP, Apple Server Admin, or Netopia’s Timbuktu.
When a server is compromised, attackers may try to use that server to attack other servers. Although network security usually focuses on what traffic is allowed into servers, you may also want to develop firewall rules that restrict applications that a server can go to, in case the server gets compromised.
Finally, one last general point is that you must read logs. Firewall logs are especially important for recognizing impending (or possibly already successful) attacks.
Setting Up Firewalls
A firewall is software or hardware that guards the entrance to a network or computer and keeps out unwanted network traffic. It creates a protected environment “behind” or “inside” the firewall that is distinct from the risky world that lies “beyond” or “outside” it. A firewall can run on a router, a server (such as a Mac OS X server), a dedicated hardware box, or an individual Macintosh or PC.
Security experts often make a distinction between a host firewall and a network firewall:
• A host firewall protects the computer on which it runs. Personal host firewall software is essential for protecting individual computers, especially mobile computers. Server host firewall software is essential for protecting a server.
• A network firewall enforces security policies at the boundary between two or more networks. The Mac OS X Server firewall can be both a server host firewall and a network firewall.
A firewall has a set of rules that specify whether network traffic should be accepted, denied, or handled in some other way. As part of your network security design, you must decide if you want to configure firewall rules that protect the server or rules that protect the networks connected by the server, or both.
Firewall rules specify criteria that are applied to a packet to determine if the packet should be accepted or denied. Typical criteria are the packet source address, the packet destination address, the protocol type in the IP header, or the source or destination port numbers in the TCP or UDP header.
Some firewalls, including Mac OS X Server, have more advanced capabilities. For example, to allow all TCP traffic back in for a connection that an inside user initiated, you can allow all packets with the TCP ACK or RST (reset) bits set. This avoids traffic with only the SYN bit set, which would indicate traffic initiated by an outsider rather than an inside user. Allowing traffic with the ACK or RST bit set is called “allowing established traffic.”
For each packet, a firewall reads the list of rules in order. If a rule applies to the packet, the action specified in the rule is taken (for example, accept or deny) and the reading of further entries in the list usually ends.
Because firewall software tests a packet against each criterion in the list of rules until a match is found, you should design rules with care to avoid problems and to provide good performance. It won’t work, for example, to deny all TCP packets from a network before you allow TCP from one host on that network. You would have to do it the other way around.
On the other hand, to optimize performance, when possible you should design the list so that most packets match the earliest conditions. Fewer conditions to check per packet means better throughput. To optimize security, the last statement should be a general deny-all statement.
A stateless firewall looks at packets as individual events. A stateful firewall, on the other hand, can track multipacket communication sessions and more intelligently accept or deny traffic. For example, a stateful firewall can remember that a protected client initiated a request to download data from an Internet server and allow data back in for that connection.
Mac OS X Server can do both stateless and stateful processing. To use stateful processing, Mac OS X Server adds the keep-state keyword to rules.
Set Up Mac OS X Server Firewall Service
The Mac OS X Server firewall is built on the standard, open-source ipfw software from FreeBSD UNIX. Like most firewalls, the Mac OS X Server firewall scans incoming packets and accepts or denies them based on the packet-filtering rules that you configure. You can restrict access to any service running on the server, and you can customize filters for all internal clients or for a range of internal IP addresses. You can also allow or disallow traffic from the server to implement advanced security policies.
Although you can add and delete rules with the UNIX ipfw tool using Terminal, usually you don’t need to do this; Server Admin provides a sophisticated and easy-to-use interface to ipfw. The one ipfw command that you will use regularly, however, is sudo ipfw show, which displays the rules that ipfw is using. It shows you exactly what the underlying ipfw service is doing and helps you verify that the configuration you set up with Server Admin is correct.
Create Firewall Address Groups
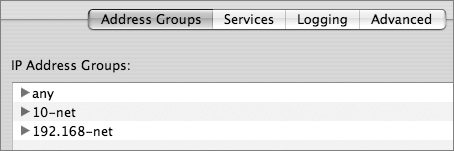
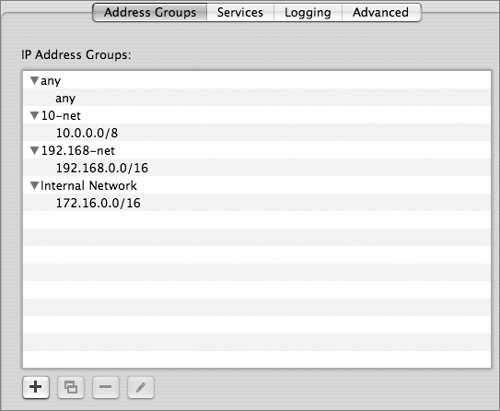
To simplify configuring firewall rules, Server Admin enables you to set up address groups. An address group can be a single address, such as 192.168.3.1, or a range of addresses, such as 192.168.3.0–192.168.3.255. You can set up a range of addresses using subnet mask notation (192.168.3.0: 255.255.255.0) or Classless Interdomain Routing (CIDR) notation (192.168.3.0/24). Mac OS X Server has three preset firewall groups:
• any
• 10-net (10.0.0.0/8)
• 192.168-net (192.168.0.0/16).
As part of your network security design process, you should have identified the user communities in your environment that need security. These user communities can become address groups. Because you will probably have many rules that apply to addresses, configuring address groups as your first step will save you much typing when configuring rules. By default, the Mac OS X Server firewall includes an address group for “any” (meaning any IP address) and may include other defaults, depending on your configuration.
1 Launch Server Admin and choose Firewall from the Computers & Services list.
2 Click Settings.
3 Click Address Groups.
4 Click the Add (+) button to add a group.
5 Enter a group name.
6 Click the Add (+) button to configure addresses for this group.
7 Enter the addresses you want rules to affect.
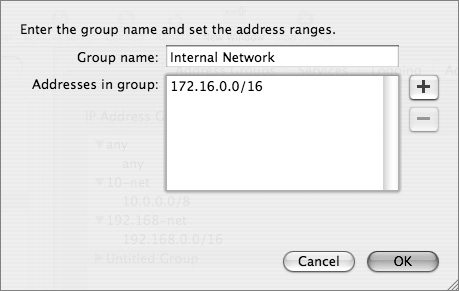
8 Remove the default “any” if it doesn’t apply by clicking the Delete (-) button.
9 Click OK.
10 Click Save.
As an example, you could configure an address group for the network manager. Later, you could use this address group when setting up rules to specify what the network manager can do (remote server administration, SSH, and so on.)
Use the Services and Advanced Panes
Once you have some address groups configured, you can configure rules using the Services and Advanced panes in Server Admin. The Services pane is quite user-friendly, whereas the Advanced pane is optimized for a finer degree of control.
In the Services pane, you can configure rules that will apply to traffic into the server. For example, one of your first configuration steps should be to specify which services the any group can reach on the server. To do this, you enable (select) or disable (deselect) services for any.
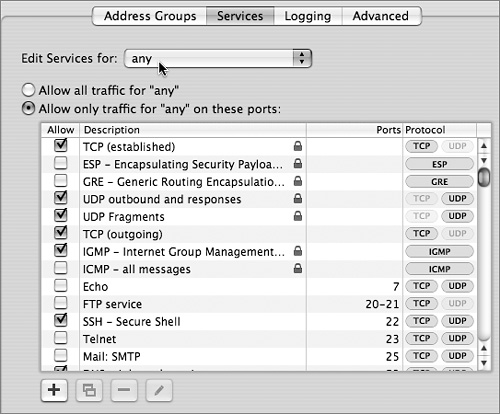
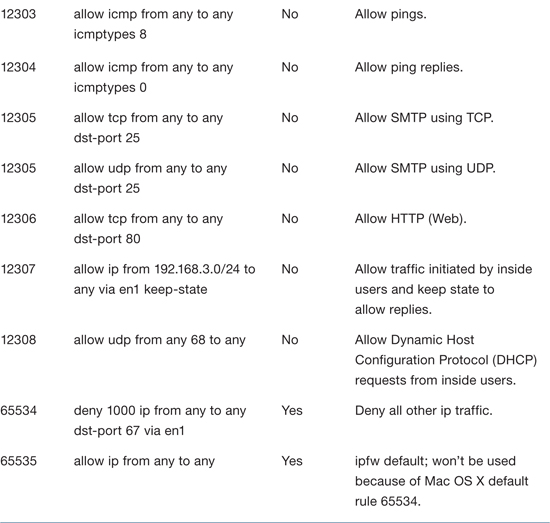
The wording in the Services pane can be confusing. When the pane says “edit services for any,” for example, it actually configures rules to allow traffic from any address to the services checked. For example, by checking Mail: SMTP, the following rules are added to ipfw:
• 12305 allow tcp from any to any dst-port 25
• 12305 allow udp from any to any dst-port 25
The 12305 is a rule number. (The firewall can have more than one rule with the same number. It reads and obeys the rules in the order that they appear in the list.) The first “any” in the rule means any source IP address. The second “any” means any destination IP address. Port 25 is the well-known port for Simple Mail Transfer Protocol (SMTP). When using the Services pane to add rules, the firewall automatically allows traffic destined to both UDP and TCP ports 25, even though SMTP doesn’t use UDP.
To configure more advanced rules, use the Advanced pane. The Advanced pane is also useful for displaying default rules. The firewall adds low-numbered rules (1000-1030) to cover well-known vulnerabilities and high-numbered rules (63200-65534) to cover typical default policies. The most important default policy is covered by rule 65534, which denies all IP traffic not covered by lower-numbered rules.
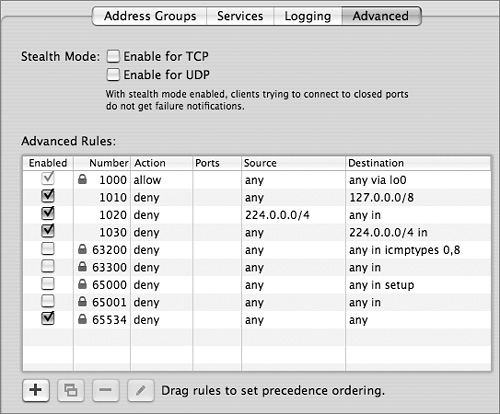
Generate and Review ipfw show Output
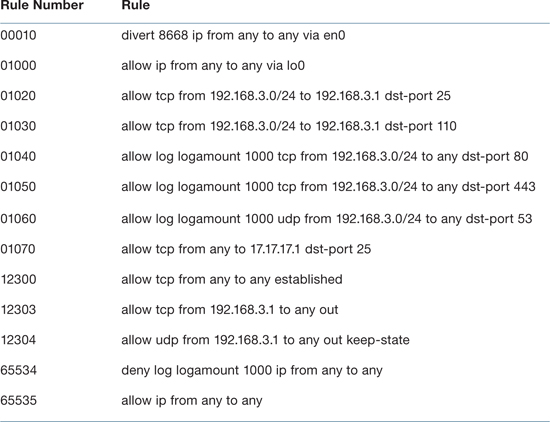
You can see the rules that your firewall has enabled by clicking Active Rules in the Server Admin application or by opening Terminal (Applications/Utilities) and entering sudo ipfw show. The following table explains the rules in use on a typical server that connects an “outside” Ethernet network that goes to the wide area network (WAN) and the Internet, and an “inside” Ethernet interface that connects a private local area network (LAN). The outside interface is en0 and the inside interface is en1. The inside network is 192.168.3.0/24. The server is providing NAT for this private address range.

Understanding Network Address Translation
NAT converts addresses that are used on an inside network to addresses that are appropriate for an outside network, and vice versa. NAT is useful when computers that need access to the Internet have private addresses.
Private IP addresses are addresses that a network administrator assigns to internal networks without any coordination from an ISP or one of the regional registries for IP addressing, such as the American Registry for Internet Numbers (ARIN). An ISP or registry provides public addresses for Web servers or other servers that external users access, but public addresses aren’t required for internal computers.
The Internet Engineering Task Force (IETF) reserves the following numbers for private networks:
• 10.0.0.0 through 10.255.255.255
• 172.16.0.0 through 172.31.255.255
• 192.168.0.0 through 192.168.255.255
With NAT, when an internal computer sends a packet, a NAT gateway (such as Mac OS X Server) dynamically translates the private source address in the packet to a public address. The gateway keeps track of this translation and converts the destination address on return packets to the correct private address.
Private addressing offers some security, although it could be considered merely security by obscurity. Private network numbers are never advertised to the Internet because they aren’t globally unique. Not advertising internal network numbers provides some privacy.
Of course, additional security—including firewalls, IDSs, and antivirus software—should also be deployed. NAT sometimes gives people a false sense of security, but keep in mind that a privately addressed computer is actually still reachable from the Internet if the NAT gateway is functioning correctly, but a firewall is not in place and configured correctly to protect the computer.
Mac OS X Server NAT Services
Mac OS X Server makes an excellent NAT gateway, especially when used with Gateway Setup Assistant (added in Mac OS X version 10.4), which makes setting up NAT even easier than it was in previous versions of Mac OS X. When Mac OS X Server provides NAT services, it translates internal addresses to the address assigned to the external address. It also keeps state information so that traffic coming back in can be translated and sent to the right internal address.
When you enable NAT, the natd process is started and a rule is added to the firewall to divert packets that come in via the outside interface to the natd process. For example, the previous table showed the following rule, where 8668 is the process ID for natd and en0 is the outside interface:
00010 divert 8668 ip from any to any via en0
Enabling NAT also adds a rule to allow traffic initiated by inside users and to keep state so that return traffic is allowed. For example, the following rule is added to support internal users on the 192.168.3.0/24 network, reachable via the server’s inside interface en1:
12307 allow ip from 192.168.3.0/24 to any via en1 keep-state
Note that if you enable the NAT service, you are also required to enable the firewall service. Otherwise packets won’t be diverted to the natd process and NAT service will not take effect.
Mac OS X Server Gateway Setup Assistant
The Gateway Setup Assistant helps you quickly and easily set up Mac OS X Server for routing and NAT. It also enables the firewall and adds some default firewall rules. Depending on your configuration choices, the assistant will do the following when it is finished:
• Assign the server a static IP address for each internal network interface. The address assigned is 192.168.x.1. The number used for x is determined by the network interface’s order in System Preferences > Network. For example, for the first interface, x is 0, and for the second interface, x is 1.
• Enable DHCP to allocate addresses on the internal networks.
• Set aside internal (192.168.x.x) addresses for DHCP to use. Without VPN enabled, each interface can allocate 192.168.x.2 through 192.168.x.254.
• Optionally enable VPN to allow authorized external clients to connect to the local network.
• Set aside addresses for VPN to use. If VPN is selected, half of the allotted IP addresses in the DHCP range are reserved for VPN connections. The addresses 192.168.x.128 through 192.168.x.254 are allotted to VPN connections.
• Enable the firewall to help secure the internal networks. Address groups are added for each internal network interface, with all traffic allowed from the newly created DHCP address ranges to any destination address.
• Enable NAT on the internal network and add a NAT divert rule to the firewall to direct network traffic to the appropriate computer.
• Enable DNS on the server.
To use the Gateway Setup Assistant, you can open the Gateway Setup Assistant application from the Applications/Server directory on the server, or you can select View > Gateway Setup while in Server Admin. Follow the directions in the assistant and click Continue after each page. Read the final output carefully, and make sure you approve of the configuration before finalizing the settings.
Before running Gateway Setup Assistant, you should have planned which interface will connect the outside network, which interfaces will connect the inside networks, and whether you want to enable VPN. The first interface that Gateway Setup Assistant asks about is the outside interface that connects to the Internet. The assistant calls this the WAN interface, even though the interface probably uses a classic LAN technology such as Ethernet.
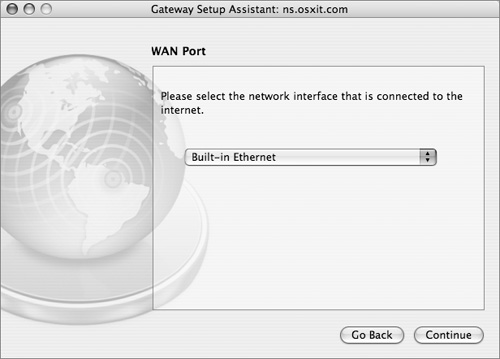
Note
Gateway Setup Assistant assumes that the outside “WAN port” gets its address via DHCP. A DHCP address for an outside interface is typical in home networks but not in enterprise networks. On an enterprise network, it’s more common for the outside interface to have a public address or an address assigned by a corporate network manager. You may need to use System Preferences > Network to reenter the correct address for your outside WAN interface after running Gateway Setup Assistant.
Understanding Virtual Private Networking
VPN supports mobile users, telecommuters, and business partners who may not physically be on a private network but want to virtually appear as if they are. Users run VPN client software that lets them connect to the private network in a secure fashion. Because the users might be on a public, insecure network, such as the Internet, all their traffic to the private network is sent in an encrypted tunnel. This allows users to travel outside the physical boundaries of the private network, but still have access to the network.
LAN-to-LAN VPNs are also possible. In this case, two private networks are connected via a public network, such as the Internet. Security is maintained because all traffic between the LANs is sent in an encrypted tunnel.
Mac OS X Server VPN Services
The built-in VPN server on Mac OS X Server supports Mac, Windows, and Linux systems running standards-based VPN client software. Both the Layer Two Tunneling Protocol (L2TP) and the Point-to-Point Tunneling Protocol (PPTP) are supported.
L2TP runs on top of IPSec, which is an IETF set of standards for Network-layer encryption and authentication. You can also use MS-CHAPv2 or Kerberos for authentication. IPSec uses security certificates (either self-signed or from a certificate authority such as VeriSign) or a predefined shared secret. The shared secret must be entered on the server as well as on the clients.
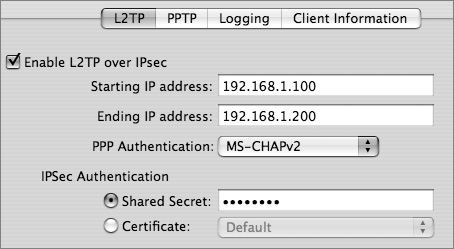
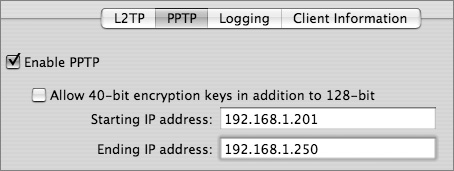
L2TP is a better choice than PPTP because it uses strong IPSec encryption and supports both IPSec and Kerberos for authentication. PPTP is still commonly used, however, to support older Windows computers and Mac OS X v10.2 clients. PPTP offers good encryption (provided strong passwords are used) and supports a number of authentication schemes. With PPTP, you can allow 40-bit encryption in addition to the default 128-bit encryption if needed by your VPN clients, but note that 40-bit encryption is weaker.
VPN requires firewall configuration. The firewall must be able to pass network traffic from external IP addresses through the firewall to the private network. This can be as open or restricted as you deem necessary. For example, if the VPN clients travel a lot and may come in via a large range of IP addresses, you may need to open the “any” firewall address group to VPN connections. If you know where your users will be coming in from, you can narrow access to a small range of IP addresses. You can create an address group that reflects that smaller range and only enable VPN traffic originating from that list.
Configuring Network Security
So far in this lesson, you learned about security concepts and basic configuration. In this section, you will learn configuration guidelines for using the firewall to lock down traffic to the server and through the server, and for setting up VPN services.
When locking down traffic to the server, it’s important to consider remote administration. For example, which computers should be allowed to access the server via various remote management ports?
It’s also important to consider which computers should be allowed access to the services running on the server, which can include Web, e-mail, file, print, and other services.
When locking down traffic through the server, the goal is to control the traffic that your inside users are allowed to send.
Locking Down Remote Administration
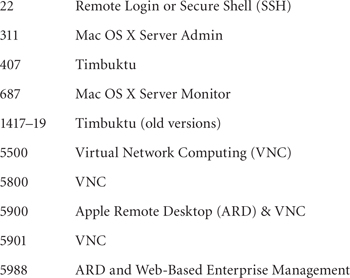
Before locking down remote administration of the server, determine which computers should be allowed to remotely administer the server and which applications they use. Once you have identified the applications in use, you should also determine whether the applications run on TCP or UDP and which port numbers they access. In general, you probably will be working with the following TCP port numbers when configuring remote administration:
Note
You may also work with UDP ports 161 and 162 for SNMP.
The TCP port for Telnet (23) isn’t in this list because you shouldn’t use it. It sends the user’s password and all other data in clear text (unencrypted). A sniffer user could snoop the commands being sent to the server and gather useful information. The Telnet service is not enabled by default on the server, but for extra precaution, if no other rule is already covering Telnet, then you should add the following rule:
deny tcp from any to any dst-port 23
To configure rules that allow legitimate computers to remotely administer the server, use the Advanced pane in Server Admin. The Advanced pane lets you add specific, low-numbered rules to your list that override higher-numbered general-purpose rules.
Carefully plan the order of your rules to avoid logic mistakes. For example, it’s easy to end up with a low-numbered rule allowing all traffic from 192.168.3.0/24 that precedes a higher-numbered rule that allows Server Admin (port 311) traffic from the network manager at address 192.168.3.2. The first rule allows other users on the private network access to 311 also, which is probably not what you intended.
Another possible logic mistake is to deny all users on network 192.168.3.0/24 access to port 311 before allowing the network manager at address 192.168.3.2 access to port 311. The first rule overrides the second rule. Your network manager never gets to port 311 because the first rule blocks the network traffic.
So, how would you allow only the network manager at 192.168.3.2 access to port 311? The first step is to set up an address group for the 192.168.3.2 address and call it something like “Network manager.”
To create the address group:
1 Launch Server Admin and choose Firewall from the Computers & Services list.
2 Click Settings.
3 Click Address Groups.
4 Click the Add (+) button to add a group.
5 Enter network manager for the group name.
6 Click the Add (+) button to configure the network manager’s IP address.
7 Enter 192.168.3.2.
8 Remove the default “any” by clicking the Delete (-) button.
9 Click OK.
10 Click Save.
Next, follow these steps to create a rule for the network manager that allows the manager access to port 311 (Server Admin):
1 Launch Server Admin and choose Firewall from the Computers & Services list.
2 Click Settings.
4 Click the Add (+) button to add a rule.
5 Click the Action pop-up menu and choose Allow.
6 Click the Protocol pop-up menu and choose TCP.
7 Click the Service menu and choose “Server Admin SSL, also Web-ASIP.”
8 Click the Address menu and choose “Network manager.”
9 Click the Destination menu and choose the address of the server (or “any” to allow management of all servers).
10 Click OK.
11 Click Save.
The following output from sudo ipfw show displays the firewall rule list after rules were successfully added to allow only a local manager (192.168.3.2) and a remote manager (17.17.17.17) access to port 311. Similar rules could be configured to allow other types of remote management, such as Timbuktu or ARD.
pretendco:~ mgr$ sudo ipfw show
00010 312175 225883045 divert 8668 ip from any to any via en0
01000 1385552 757262930 allow ip from any to any via lo0
01040 0 0 allow tcp from 192.168.3.2 to any dst-port 311
01050 0 0 deny log logamount 1000 tcp from 192.168.3.0/24 to any dst-port 311
01060 103104 28060328 allow tcp from 17.17.17.17 to 17.17.17.1 dst-port 311
12300 152335 187847220 allow tcp from any to any established
12301 0 0 allow tcp from any to any out
12302 13771 1663284 allow udp from any to any out keep-state
12307 0 0 allow ip from 192.168.3.0/24 to any via en1 keep-state
12308 0 0 allow udp from any 68 to any dst-port 67 via en1
65534 16641 6223176 deny log logamount 1000 ip from any to any
65535 3038 475990 allow ip from any to any
Notice from the sudo ipfw show output that logging has been enabled. For example, rule 01050 denies users on network 192.168.3.0/24 (other than 192.168.3.2, which is permitted by rule 01040) access to port 311 and logs their attempts up to 1000 packets. Note also that this output has two columns past the rule number column that weren’t shown before. The first of these columns is a count of the number of packets that have matched the rule. The second is the number of bytes for those packets. For example, notice that 16,641 packets and about 6.2 MB bytes have been denied by rule 65534.
Note
It may surprise you to see that any packets have been allowed by the default rule 65535, since rule 65534 should override it. Packets allowed by rule 65535 were allowed before rule 65534 was configured.
Locking Down Access to Public Servers
Before locking down any services on a server, you must complete a network security design that will help you know which services to lock down and for whom to lock them. You need to know if the server is a public server that outsiders can reach or a private server only for internal users.
You also must find out which specific services are public. Typically Web and e-mail services are public, whereas file and print services are not. On the other hand, you may have outside business partners who need to reach files on the server. In that case, you need to know if they use Apple Filing Protocol (AFP), network file system (NFS), or the Windows standard Server Message Block (SMB) and Common Internet File System (CIFS) protocols. Locking down Windows file protocols is especially important because they are vulnerable to viruses, worms, and Trojan horses.
A public server usually allows incoming Web traffic that uses the Hypertext Transfer Protocol (HTTP), port 80. If the public server is an e-mail server, it should also allow SMTP, port 25. A mail server should accept mail from its internal users as well as any public servers.
SMTP is used between Internet mail servers as well as between mail clients and servers. You can’t predict which Internet e-mail servers will need to send SMTP traffic, so you should allow traffic from any server. (You can configure mail services for protection from junk mail with tools such as SpamAssassin. Usually this isn’t done with a firewall rule, although if necessary you could configure rules to deny SMTP from known spammer IP addresses. Spammers can move to a different address, however, and thwart that measure.)
To support a public Web and mail server, configure rules to allow all traffic from any to ports 80 and 25, as follows:
1 Launch Server Admin and choose Firewall from the Computers & Services list.
2 Click Settings.
3 Click Services.
4 Choose the “any” address group.
5 Choose “Mail: SMTP.”
This adds two rules to your firewall:
• 12305 allow tcp from any to any dst-port 25
• 12305 allow udp from any to any dst-port 25
6 Choose “HTTP – Web service.”
This adds one rule to your firewall:
• 12306 allow tcp from any to any dst-port 80
7 Click Save.
All other ports are locked down because of the default rule 65534, which says to deny IP from any to any.
To support users reading e-mail, you should allow Post Office Protocol version 3 (POP3, port 110). Usually, you don’t need to allow access from any address. POP users are generally local. However, if you want to allow mobile users to read e-mail from anywhere, than you might want to open up POP3 to any address.
Note
Mail protocols other than SMTP and POP are possible, such as the Internet Message Access Protocol (IMAP, port 143). Follow the directions mentioned for SMTP, except choose a different protocol from the Services menu or enter the appropriate port number.
Locking Down Access to Services From a Private Network
If you use the Gateway Assistant Setup, your private, internal network will be allowed to send traffic to all addresses and services. Traffic will also be allowed back in because the assistant adds a firewall rule with the keep-state keyword. For example, if the private network is 192.168.30.0/24 and it’s reachable via en1, the assistant adds the following rule:
allow ip from 192.168.3.0/24 to any via en1 keep-state
If you want better control of which services your internal users can reach, you can add an address group for the internal network and then enable only the services you really want in the Services pane.
The following rules run on a typical server that allows access to only specific, commonly-used services from the private 192.168.3.0/24 network. SMTP, DNS, HTTP, POP, and DHCP are allowed.
00010 divert 8668 ip from any to any via en0
01000 allow ip from any to any via lo0
12307 allow tcp from 192.168.3.0/24 to any established
12308 allow udp from 192.168.3.0/24 to any out keep-state
12310 allow tcp from 192.168.3.0/24 to any dst-port 25
12310 allow udp from 192.168.3.0/24 to any dst-port 25
12311 allow tcp from 192.168.3.0/24 to any dst-port 53 out keep-state
12311 allow udp from 192.168.3.0/24 to any dst-port 53 out keep-state
12312 allow tcp from 192.168.3.0/24 to any dst-port 80
12313 allow tcp from 192.168.3.0/24 to any dst-port 53
12313 allow udp from 192.168.3.0/24 to any dst-port 53
12314 allow udp from 192.168.3.0/24 to any dst-port 67
12315 allow tcp from 192.168.3.0/24 to any dst-port 110
12315 allow udp from 192.168.3.0/24 to any dst-port 110
65534 deny log logamount 1000 ip from any to any
65535 allow ip from any to any
Locking Down and Logging Traffic Through the Server From a Private Network
Notice from the rules displayed in the previous section that locking down services for an internal network controls access to servers at any address. (See the “any” in this rule; for example, 12310 allow tcp from 192.168.3.0/24 to any dst-port 25). In other words, the rules allow access to services on the Mac OS X server as well as services running on other servers.
Since the Mac OS X server is also acting as a router and forwarding traffic, if you allow traffic from the internal network to a service (TCP or UDP port number), the server can either accept the traffic for itself or forward it out its external interface to an external server. The choice depends on the destination IP address in the packets. If you want to be more precise, you must use the Advanced pane in the Server Admin firewall configuration.
First make sure you aren’t allowing all traffic in the Services pane. Instead you should allow only established TCP traffic (traffic with the ACK or RST bits set—in other words, return packets for traffic initiated locally). While still in the Services pane, also be sure to allow outgoing TCP and UDP traffic from the server so it can send replies.
In the Advanced pane, configure precise rules to allow traffic to the server. Follow this with rules that allow traffic to any for the services you want to allow users to reach on any server. To log traffic, be sure to click the log button. For example, you might want to log all traffic to HTTP so you can record the IP addresses for websites that your users go to.
The following rules resulted from a typical policy that allows only SMTP and POP3 traffic into the server from the internal network, and allows and logs only DNS, HTTP, and HTTP over Secure Socket Layer (HTTPS, port 443) traffic to external sites:
SMTP and POP3 are allowed from the internal 192.168.30.0/24 network into the server’s internal 192.168.3.1 address. SMTP is also allowed into the external address of the server, 17.17.17.1, so that Internet mail servers can send messages to the server. These rules were configured in the Services and Advanced panes, using the steps mentioned in this section and in “Locking Down Access to Services From a Private Network,” above.
Locking Down DNS Zone Transfers
A DNS zone is a database of all name-to-address and address-to-name mappings that a DNS server controls. DNS supports both a primary and a secondary server. All changes to the database records for a zone are made in the primary server. The secondary server can acquire the zone data by setting up a TCP connection and transferring the data using TCP packets destined to TCP port 53.
In the DNS server configuration (in Server Admin), you can enable or disable zone transfers. Disabling zone transfers breaks the ability of DNS to have a secondary (backup) server: It makes the secondary server unable to acquire the zone data. So, if you have a legitimate secondary server but you don’t want to transfer zones to just anyone, you can set up firewall rules rather than selecting the Server Admin box to completely disable zone transfers. For example, to allow only the secondary server at address 192.168.3.5 to acquire zone data from your server whose address is 192.168.3.1, use the following rules:
allow tcp from 192.168.3.5 to 192.168.3.1 dst-port 53
deny tcp from any to 192.168.3.1 dst-port 53
Normal client/server DNS transactions use UDP, so these rules don’t break typical DNS usage. These rules do, however, give you some protection from server mining, which is a type of reconnaissance attack in which an attacker pretends to be a secondary server and requests a copy of the primary server’s records. With a copy of the primary zone data, the attacker can learn the IP addresses of named devices. The attacker can then try specific attacks on those devices.
Locking Down Pings and Ping Replies
One type of DoS attack involves an attacker sending a flood of ICMP echo messages, commonly known as pings. Another, less common type involves a server receiving a flood of echo replies (ping replies). This can happen if an attacker is spoofing the server’s address and sending a flood of pings. The replies are routed to the legitimate owner of the address: the server. (IP address spoofing is rare these days, because most firewalls are set up to allow out only traffic that uses a legitimate address, which hampers an attacker’s ability to use a spoofed address.)
To mitigate the effects of a ping DoS attack, you can configure the firewall to deny echo requests or echo replies:
1 Launch Server Admin and choose Firewall from the Computers & Services list.
2 Click Settings.
3 Click Services.
4 Choose the “any” address group.
5 Deselect “ICMP – echo request messages.”
6 Deselect “ICMP – echo reply messages.”
7 Click Save.
If you prefer, you can use the Advanced pane to enable the default rule:
63200 deny log logamount 1000 icmp from any to any in icmptypes 0,8
Ping-based DoS attacks are somewhat rare, so you should deny ICMP echoes and echo replies only if you think your server may be vulnerable to an attack. If you deny ICMP echo messages, network managers can’t ping the server to tests its reachability, which is a problem. Also, services that use ping to locate network services will be unable to detect the server.
Enabling Stealth Mode
Stealth mode makes a server less visible to attacks, especially reconnaissance attacks. You can configure stealth mode for both UDP and TCP. In the case of UDP, stealth mode causes a server not to send back an ICMP Destination Unreachable, Port Unreachable message (ICMP message type 3, code 3) when a sender tries to reach a closed UDP port on the server.
Although a determined attacker can still learn a lot about a server in other ways, stealth mode offers some deterrence. For example, if the attacker uses nmap, the nmap software takes a long time to time out and declare that UDP ports are filtered. An impatient attacker might give up.
Note from the following output that nmap took 163 seconds when stealth mode was configured (whereas usually it takes only a few seconds):
Pretendcos-Computer:~ Pretendco$ sudo nmap -sU 192.168.3.1
Starting nmap V. 3.00 ( www.insecure.org/nmap/ )
All 1468 scanned ports on (192.168.3.1) are: filtered
Nmap run completed -- 1 IP address (1 host up) scanned in 163 seconds
In the case of TCP, stealth mode causes the server not to send back an RST message when a sender tries to reach a closed port. Note that Mac OS X Server doesn’t send back an RST message anyway if you have a deny rule to deny traffic to the port. The underlying ipfw software prevents the sender’s SYN packet from ever getting to the protocol stack, which is responsible for sending back a RST. The ipfw deny rule is designed to avoid RST messages, whereas the ipfw reset rule sends back resets. Normally reset rules aren’t used, and Mac OS X Server doesn’t use them when you configure rules with Server Admin.
TCP traffic that ipfw allows, on the other hand, is passed to the protocol stack, which sends back a RST if the port is closed, unless you enable stealth mode.
1 Launch Server Admin and choose Firewall from the Computers & Services list.
2 Click Settings.
3 Click Advanced.
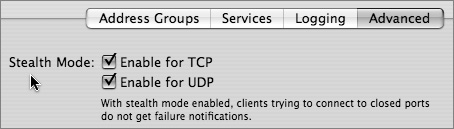
4 Select “Enable for TCP” and/or “Enable for UDP” as desired.
5 Click Save.
Logging Firewall Activity
Logging firewall activity is an essential component of network security. You should establish policies and procedures that specify how much data is logged and how it is stored and analyzed. For enterprise networks, you should err on the side of logging too much data rather than too little. This will ensure that network managers and security analysts have sufficient data to catch attacks as they occur, analyze trends, and conduct forensics analysis for use in criminal or civil court cases. For small and home offices, it’s not as imperative to log lots of data, but it’s still important.
During the network security design process, decisions should be made about the tradeoffs associated with logging a huge volume of data. Is there disk space available to save the data? (Huge hard drives are inexpensive these days, though, so that’s generally not a good reason to limit the amount of log data.) Is it possible an attacker could conduct a DoS attack by causing a server to fail because it has filled a hard drive with log data? Good server software helps avoid such a problem. With the exception of a busy Web server, where allowing all traffic to port 80 would result in an unmanageable volume of data, logging all allowed and denied packets is recommended.
Save firewall logs in a protected place that attackers can’t reach. Attackers can gather useful data from firewall logs and use that data in future attacks.
With Mac OS X Server Admin, you can enable logging for individual rules in the Advanced pane. You can also control logging in a more general sense in the Logging pane. You can log only the packets that are allowed by the rules you set, only the packets that are denied, or both.
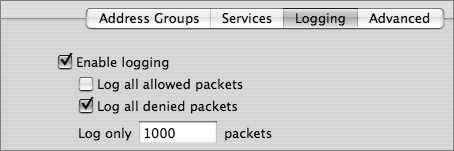
By default, Mac OS X Server logs only 1000 packets for each rule. This isn’t sufficient if you plan to use the data for trend analysis or forensics. A server can easily receive 1000 packets in just a few minutes. Because it’s difficult to predict the exact number of packets that a server will handle (and because hard drive capacity is inexpensive these days), you should log all packets by entering 0 in the “Log only N packets” field in the Logging pane. Doing so removes the logamount 1000 words from the ipfw rules that you create.
Mac OS X Server saves the log in the /var/log/ipfw.log file. Every 7 days, the server archives the log and starts a new log. The server saves only four archives and deletes older ones. To ensure that data doesn’t disappear, use scripts or third-party software to save older log data to a different directory than /var/log.
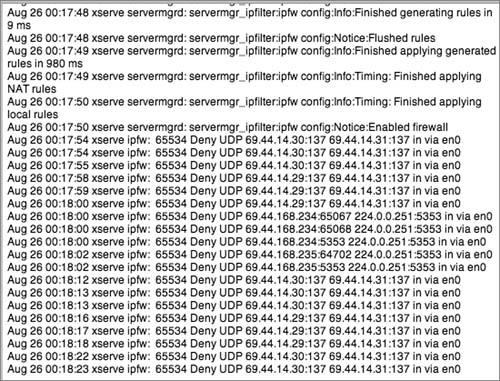
Studying the firewall log is as important as setting it up. You should check the log regularly. You can view the current log within Server Admin. You also can view the log and the log archives using UNIX commands or third-party software.
If the number of entries is overwhelming, you can filter which entries are displayed using the Server Admin text filter box. For example, to view denied packets to help you identify attack attempts and troubleshoot your firewall rules:
1 Launch Server Admin and choose Firewall from the Computers & Services list.
2 Click Log.
3 Enter deny in the text filter box.
4 Press Return.
Enabling and Configuring the VPN Server
The easiest way to get VPN going is to use the Gateway Setup Assistant. The assistant asks if you want to allow VPN and, if you say yes, configures VPN to use L2TP with IPSec. The assistant also asks you to enter a shared secret. The assistant automatically divides internal IP addresses so that half are used for users who physically reside on the internal network and the other half are used for the virtual users connecting in from external networks, including the Internet. These virtual users can now appear as if they are on the internal network, and use the resources of that network and any networks it connects to, assuming no firewall rules deny them access.
If you don’t use the Gateway Setup Assistant, you can still configure VPN services from Server Admin. In that case, you have the option of using L2TP or PPTP. PPTP is appropriate for older Windows clients and Mac OS X v10.2 clients.
1 Launch Server Admin and choose VPN from the Computers & Services list.
2 Click Settings.
3 Click L2TP or PPTP and configure the IP addresses that the server can give out to the VPN clients.
When configuring VPN with Server Admin, be sure to first release some addresses from the DHCP pool for VPN to use. If you don’t, Server Admin displays an error message stating the address ranges are not valid.
In the Client Information tab, you should also configure a DNS server that the VPN clients can use. The Client Information tab is also useful for specifying that users can reach some networks using the routing that’s available where they are currently, rather than the routing they would use as virtual clients of the internal network.
For example, perhaps a traveling salesperson needs to access nonsensitive data on the Internet while visiting customers. Assuming the customer can provide the salesperson with Internet access, there’s no need for the salesperson to use the VPN tunnel to reach public websites. You can improve performance for the salesperson if nonsensitive network traffic relies on the customer’s network, and only traffic back to the headquarters (HQ) private network is encrypted over the VPN tunnel. This makes more sense than requiring nonsensitive traffic to travel from the customer site, over the Internet in an encrypted tunnel to the VPN server at HQ, back out the server across any networks to the HQ Internet connection, and out to the Internet.
To configure which traffic uses the tunnel and which doesn’t, you can set up VPN network routing definitions using the Client Information tab. Any routes you specify as private go over the VPN connection; any routes you specify as public do not go over the VPN connection, nor do all others not specified.

What You’ve Learned
• Network security configuration should be preceded by network security design in which you analyze requirements, identify user communities and traffic flow, and analyze typical threats.
• Security threats include reconnaissance attacks and DoS attacks.
• Methods for implementing your secure network design include NAT, VPN, and firewalls—all of which you can implement on Mac OS X Server.
• The easiest way to configure NAT on Mac OS X Server is to use the Gateway Setup Assistant, which starts the NAT process, enables DHCP, sets aside addresses for DHCP to use, enables the firewall, and adds a divert firewall rule to direct traffic to the correct, privately addressed computer.
• The easiest way to configure VPN is to use the Gateway Setup Assistant, which starts the VPN process, assigns addresses for use by VPN clients, and configures VPN to use L2TP with IPSec.
• The Mac OS X firewall is configured using Server Admin. You can also directly manipulate the firewall with the ipfw UNIX feature (although usually that’s not necessary, with the exception of the ipfw show command).
• You should configure firewall rules to lock down traffic to the server, including remote administration and Web, mail, file, and DNS traffic. You should also configure firewall rules to lock down traffic through the server to control what traffic is allowed in and out of the connected networks.
• Logging firewall data is advisable so that you can confirm that your rules are working and keeping out unwanted network traffic.
References
Apple Knowledge Base Documents
The following Knowledge Base documents (located at www.apple.com/support) provide further information about firewalls:
Document 107846, “Mac OS X Server 10.3, 10.4: About firewall settings and logging”
Document 106439, “Well Known TCP and UDP Ports Used By Apple Software Products”
Books
Greenberg, Eric. Mission-Critical Security Planner (Wiley & Sons, 2003).
Hines, Annlee A. Planning for Survivable Networks (Wiley & Sons, 2003).
Kaeo, Merike. Designing Network Security, 2nd ed. (Cisco Press, 2003).
Oppenheimer, Alan B., and Whitaker, Charles H. Internet Security for Your Macintosh (Peachpit Press, 2001).
Oppenheimer, Priscilla. Top-Down Network Design, 2nd ed. (Cisco Press, 2004).
Oppenheimer, Priscilla, et al. Troubleshooting Campus Networks (Wiley & Sons, 2002).
URLs
Apple “Mac OS X Network Services Administration”: http://manuals.info.apple.com/en/MacOSXSrvr10.3_NetworkServicesAdmin.pdf
Peter Hickman, “Exploring the Mac OS X Firewall”: www.macdevcenter.com/pub/a/mac/2005/03/15/firewall.html
National Institute of Standards and Technology, Computer Security Resource Center: http://csrc.nist.gov/index.html
Lesson Review
2. What are the best applications to configure network security on Mac OS X Server?
Answers
1. A reconnaissance attack is used to learn about potential targets and their weaknesses in preparation for a more major attack. A DoS attack, on the other hand, is a major attack. With a reconnaissance attack, an attacker sends packets (using nmap, ping, and other utilities) and captures packets (using a protocol analyzer such as Ethereal) to learn about target systems. With a DoS attack, an attacker sends a huge volume of packets or sends specially crafted packets to crash or halt services on a target system. Although reconnaissance attacks can generate a lot of traffic, they aren’t nearly as serious as DoS attacks, which can render network devices inoperable.
2. The easiest way to configure NAT and VPN is to use Gateway Setup Assistant. You can also use Server Admin. Gateway Setup Assistant enables the firewall, but most configuration of the firewall is best accomplished with the Server Admin application. The Unix ipfw utility can also be used to configure the firewall, but usually that isn’t necessary.
3. The Mac OS X Server firewall is both a host firewall and a network firewall. You can configure rules to accept and deny traffic to the server itself, which matches the behavior of a host firewall. When you have routing enabled on the server, you can configure rules to accept or deny traffic forwarded by the server. This behavior matches the behavior of a network firewall.