
Lesson 13. Securing the Local System
|
Time |
This lesson takes approximately 2 hours to complete. |
|
Goals |
Understand the four layers of Mac OS X local security Set Open Firmware restrictions Create secure Mac OS X installations Use Disk Utility effectively Understand Mac OS 9 (Classic) and security Use the firewall in Mac OS X Use FileVault |
The Mac OS X local security model has four layers. The layers are not independent; an attacker can use a weakness in one layer to bypass the protections provided by some or all of the other layers. So setting up a secure Mac OS X computer requires that all four be locked down properly. The four layers in the Mac OS X security model are:
• Physical security: An attacker who has physical access to the computer can bypass any firmware- or OS-based protection in any of the other layers.
• Open Firmware security: Open Firmware controls the boot process; unless this is secured (with an Open Firmware password), an attacker can use alternate boot modes to bypass normal access controls.
• Password-based user authentication: If attackers can steal or guess passwords, they can gain access by impersonating other users. (Some third-party solutions can augment this with pass-card or biometric authentication.)
• User account–based access controls: Access controls such as file permissions and administrative access regulate what a user can do. If these are set inappropriately, users may not only be able to access files they should be locked out of, but they may also reset other users’ passwords or modify Open Firmware security settings.
If all four layers are secured, then the local system can be considered secure. The only exception to this rule is data security via encryption, such as that provided by the Mac OS X Keychain, FileVault, and encrypted disk image features. When securing all four layers is not practical (as with a PowerBook, where physical security is difficult), encryption may be the only option to reliably protect user data.
Ensuring Physical Security
If an attacker gains physical control of a computer, he can bypass any firmware- or OS-based security (such as an Open Firmware password, a login password, file permissions, and so on). With the actual hardware in hand, an attacker can remove the hard drive and attach it to another computer, then read or change any file on the drive. Less drastic attacks include changing the computer’s RAM configuration and then resetting parameter RAM (PRAM), which removes the Open Firmware password.
To prevent this, Macintosh towers and minis have lock attachment points that control access to the hard drive and memory slots as well as prevent theft of the entire computer:
• In the Power Mac G5, the attachment point consists of a foldout padlock loop on the back panel. When a padlock or cable is connected to this loop, it prevents the access latch from being opened.
• In the Power Mac G4, a pullout padlock point on the back panel physically secures the hardware. When held out by a padlock or cable, the point locks the computer’s side panel in a closed position.
• In the Macintosh mini and the iMac G5, installing a latch in the security slot in the back panel locks the computer’s top and bottom cases together.
Physically locking the internals of many other Mac models is not possible. In many cases, you can gain some measure of protection by modifying the enclosure, or replacing the case screws with “security” screws.
Disconnecting or removing alternate boot devices (FireWire devices and CD drives, for example) will also limit an attacker’s opportunities to take control of an incompletely secured computer. However, these measures should not be considered sufficient to protect critical computers and information.
If real data security is required when good physical security is not possible—particularly with PowerBook and iBook models, which have a high risk of theft or other loss—using data encryption (such as FileVault) in addition to the normal OS-based security is strongly recommended.
Implementing Open Firmware Security
The Open Firmware built into Macintosh computers supports a variety of startup options, many of which allow bypassing Mac OS X:
• Using FireWire Target Disk Mode: By pressing the T key as the computer starts up, an attacker can turn a computer into the equivalent of a FireWire hard drive. By plugging it into a computer under her control, the attacker can read or modify any file on the hard drive. The computer will display a moving icon (shown below) when it is in FireWire Target Disk Mode.

• Booting from other disks or partitions: By pressing the Option key at startup, an attacker can use Open Firmware’s Startup Manager to select an alternate boot device such as a FireWire drive. If the attacker knows an administrator user name and password for that alternate boot device, she can take control of a computer booted from that device. If Mac OS 9 is installed on a separate partition, then booting from the Mac OS 9 partition allows total access to the Mac OS X partition.
• Booting from an installer CD: By pressing the C key at startup, an attacker can boot a computer from an installer CD and use its Reset Password option to change the passwords of accounts on any Mac OS X disk or partition.
• Booting from a NetBoot server: By pressing the N key at startup, an attacker can boot a computer from a NetBoot server. This may not be problem if you control the NetBoot server, but if the attacker provides his or her own NetBoot server, or if the default NetBoot image is actually a NetInstall or NetRestore image (which automatically log in to the root account), the attacker can gain control of the computer.
• Using Open Firmware command mode: By pressing Command-Option-O-F at startup, an attacker can enter Open Firmware mode and change boot parameters—enabling, for example, a startup from an alternate device.
• Booting in single-user mode: By pressing Command-S at startup, the attacker can halt the Mac OS X boot process before starting the minimum pieces of the operating system and gain access to a command-line interface with root access to the computer.
• Booting off any other device than the internal disk: By pressing Command-Option-Shift-Delete at startup, the attacker can force a bypass of the selected startup disk and boot off of another device.
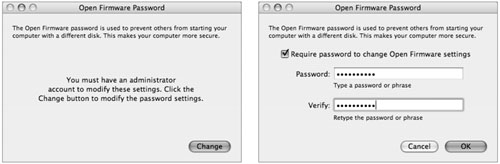
Using an Open Firmware Password
To prevent attackers from selecting any of these alternate boot modes, you should enable an Open Firmware password. The easiest way to do this is with the Apple Open Firmware Password utility, provided on the Mac OS X version 10.4 (v10.4) installer DVD in the /Applications/Utilities folder.
The Open Firmware password feature is supported only by Open Firmware version 4.1.7 and later. You may need to update some older Macintosh models’ firmware to use this feature. To determine which version of Open Firmware is installed on a computer, open the System Profiler located in /Applications/Utilities and click the Hardware option under the Contents pane. The BootROM version, which is also the computer’s Open Firmware version, is displayed in the Hardware Overview window.
A list of the latest firmware updates for various models is available at http://docs.info.apple.com/article.html?artnum=86117. For some older Mac models, you may need to perform updates under Mac OS 9.
The following Apple computers can use the Open Firmware Password application:
• iBook: all models
• iMac G3: Slot Loading and later models
• iMac G4: all models
• iMac G5: all models
• eMac: all models
• PowerBook G3: FireWire model only
• PowerBook G4: all models
• Power Mac G4: AGP Graphics and later models
• Power Mac G4 Cube
• Power Mac G5: all models
When an Open Firmware password is enabled, it blocks the following boot modes by displaying a lock with an entry box for the Open Firmware password:
• CD-ROM (C key)
• NetBoot (N key)
• Target disk (T key)
• Verbose boot (Command-V)
• Single-user boot (Command-S)
• PRAM reset (Command-Option-P-R)
• Boot from any other device except the selected internal disk (Command-Option-Shift-Delete)
![]()
Target Disk Mode, NetBoot, and CD-ROMs may still be selected in the Startup Disk preferences pane; the Open Firmware password prevents them from being selected only at boot time.
Open Firmware mode also restricts the following modes, by requiring that the password be provided to use them:
• Startup Manager (Option key)
• Open Firmware (Command-Option-O-F)
Choosing an Open Firmware Password
Open Firmware does not support international or accented characters in passwords, so you must choose a password consisting only of the printing ASCII characters (character values 32 through 126). Also, to avoid a known-password issue, do not use the capital letter U in an Open Firmware password. Following are the allowed characters:
!"#$%&'()*+,-./0123456789:;<=>?
@ABCDEFGHIJKLMNOPQRSTVWXYZ[]^_
'abcdefghijklmnopqrstuvwxyz{|}~
Be aware that Open Firmware stores its password in recoverable form. This means that if an attacker gains root access to a computer by other means, he can find out what the Open Firmware password is. For example, there are certain applications that will routinely collect the Open Firmware password from any computer on which they are installed. If multiple computers share the same Open Firmware password, the attacker can use that password to gain control of other computers with the same password.
Ideally, each computer should be given a unique password to prevent such cross-computer attacks. If completely individual passwords are impractical, at least split your computers into groups to limit the exposure. In particular, low-security computers (such as laptops and lab/general-access computers) should never be assigned the same Open Firmware password as high-security computers. Also, you should not use the Open Firmware password in any other context, such as a login password.
You can use the command-line utility nvram to control firmware settings. Just type man nvram at the command line to see the arguments. To see a better set of options, type nvram -p.
Disabling an Open Firmware Password
You may find that you need to disable an Open Firmware password, either temporarily or permanently, to perform operations like installing a new version of Mac OS X from DVD. There are a number of ways to accomplish this:
• Run the Open Firmware Password utility again and deselect the “Require password” checkbox.
This method requires that you authenticate as an administrator on the computer.
• Enter Open Firmware command mode (by pressing Command-Option-O-F during the boot process) and enter the following commands:
setenv security-mode none
setenv security-password
reset-all
This method requires that you know the current Open Firmware password. (You’ll be prompted for it after you enter the first command.)
• Reset the computer’s nonvolatile RAM (NVRAM, or PRAM) by changing its physical memory size (by adding or removing a DIMM) and then starting the system while pressing Command-Option-P-R until the system speaker has chimed four times. All PRAM settings (including the Open Firmware password) will be returned to factory defaults.
This method requires that you have access to the computer’s internals to change its RAM configuration.
Creating a Secure Mac OS X Installation
Securing Mac OS X begins with the initial setup of the computer, including the drive format and operating-system installation. Trying to go back and correct problems with the initial configuration can be difficult or even impossible, so it’s important to plan out what you’re going to do.
Considering Preinstallation Issues
Before installing Mac OS X, you should consider how the computer’s hard drives will be formatted and partitioned. Several formatting and partitioning options have potential security implications.
Booting With Mac OS 9 Drivers
Each hard drive can optionally be formatted with Mac OS 9 drivers. Since the possibility of booting into Mac OS 9 is generally a security risk in a Mac OS X environment, you should omit this option whenever possible.
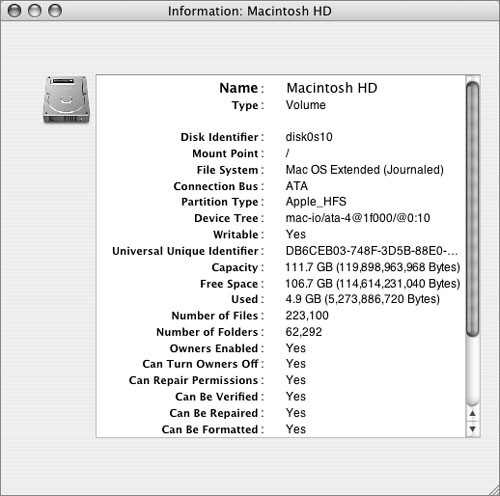
Macintoshes can ship with or without preinstalled Mac OS 9 drivers. If you have any doubt about the presence of Mac OS 9 drivers, open Disk Utility and click the Info button to check.
If the Mac OS 9 drivers are present, the only way to fully remove them is to erase or repartition the entire hard drive.

Note that the checkbox for installing Mac OS 9 drivers is available only when erasing an entire disk, not when erasing just a partition (even if it’s the only partition on the disk). The presence or absence of a driver will not change per partition.
Disabling File Permissions
File permissions can be disabled on Mac OS Extended format (HFS Plus) volumes other than the boot volume.
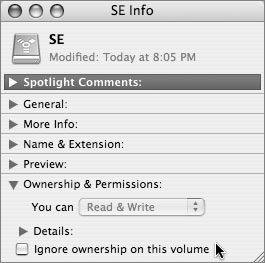
Disabling (or enabling) permissions requires administrator user access, but once permissions are disabled, all users will have the equivalent of owner access to all files on the volume. If you can’t count on your administrators to avoid this, you can format additional volumes in Mac OS Standard format (hierarchical file system, or HFS) rather than Mac OS Extended format (which could lead to compatibility problems, especially with older Mac OS programs). Or you can periodically run the following CLI commands to audit the volume database:
sh
for V in /Volumes/*; do vsdbutil -c "$V"; done
exit
Note
If you use sh or bash as your shell, the sh and exit commands can be skipped. If you don’t know which shell you use, leave them in; they will not hurt anything.
If you see any local volumes listed as “disabled,” you may have a problem.
Retaining Mac OS 9 Files
If the hard drive previously has been used with Mac OS 9 and contains files that need to be retained, consider copying the files temporarily to another disk, erasing the drive, and then copying the files back after installation. Files that Mac OS 9 created do not have ownership and permissions associated with them, and are readable by any user on the system. When the files are copied back under Mac OS X, they have ownership and permissions assigned based on the user who copied them.
Erasing Disks
When erasing a disk that has had important data stored on it, use one of the secure erasure features available in Disk Utility and the diskutil command-line tool, discussed in the next section.
By default, erasing a disk or volume does not actually erase the data that had been stored in files on the disk—it simply removes the catalog information that specified which files existed and which blocks of data belonged to those files. Even though the disk will appear blank after such an erasure, a disk editor or data recovery program may still be able to recover files from the disk.
If a disk or volume cannot be erased, it is a good idea to erase the free blocks on it (those not currently containing live files), as the free blocks will usually contain data from previously deleted files. You can do this with either Disk Utility or the diskutil command-line tool.
Choosing Secure Installation Options
There are two significant sets of choices in the process of installing Mac OS X v10.4: installation type and optional installation packages. Both sets of choices have security implications.
Selecting Installation Type
When the installer reaches the Select a Destination screen (which enables you to choose which volume to install on), there is an innocent-looking button labeled Options near the bottom of the screen. Depending on which (if any) operating system is already installed on the volume you select, you will be allowed to choose from the applicable installation types:
• Install: Available if there is no previous operating system to upgrade or replace. This option performs a from-scratch installation of Mac OS X v10.4. If you’ve already performed a secure erase of the volume (as recommended above), or if the volume contains documents that should be preserved, this is the preferred option.
• Upgrade: Available if there is an older operating system on the volume. This option merges the Mac OS X v10.4 into the older system. Since it is possible that some vestiges of the old version of Mac OS X may remain, as may older configuration settings that may no longer be optimal, you should avoid this option whenever possible. For example, user accounts created under Mac OS X v10.2 and earlier have their hashed passwords stored in the local NetInfo database, which is publicly readable. Accounts inherited from Mac OS X v10.2 will retain this password mode until the next time the password is changed.
Note
This warning does not apply to upgrading Mac OS 9 to Mac OS X. Because the two operating systems work very differently, Mac OS X will not reuse components from Mac OS 9. It will, however, use Mac OS 9 for the Classic compatibility environment. This has its own set of security implications, discussed later in this chapter.
• Archive and Install: Available if there is an operating system on the volume. This option moves parts of the old operating system to inactive locations, and replaces them with a relatively clean installation of the new operating system. This option is less likely to cause trouble than the upgrade option, but still has the potential to leave obsolete components and settings active (especially if the Preserve Users and Network Settings option is enabled).
• Erase and Install: Always available. This option is almost always the best way to ensure a clean installation of Mac OS X with no inherited glitches. The only exception is if a secure erasure has already been performed on the volume, in which case erasing it again is redundant.
Choosing Package Customization
The next screen will, by default, offer to perform an Easy Install on the selected volume. Normally you will want to click the Customize button so you can customize which optional system components will be installed. For Mac OS X v10.4.0, the only customizable components are print-driver collections, additional fonts, a variety of language localizations, and the X11 windowing system. The first three do not have significant security implications (although trimming them down to only the needed components is a good idea). X11, on the other hand, allows remote network access of some POSIX-layer programs. While you can configure X11 for a good level of security, doing so is beyond the scope of this book. Unless you know how to secure X11, you should not install the X11 component.
Note
The default Easy Install includes all printers, fonts, and languages, but not the X11 component. As far as security is concerned, this is an acceptable combination, so customization is not necessary.
Using the Setup Assistant
After the installation completes, the computer will reboot and the Setup Assistant will run to perform basic setup of the computer. For the most part you can simply follow the prompts here, but there are a few security pitfalls that should be avoided:
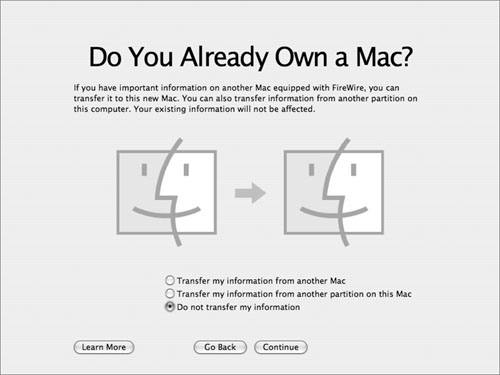
• At the Do You Already Own a Mac? screen, you can opt to transfer information (documents, programs, user accounts, and system settings) from another volume or computer. This is a possible security risk, as you may not know exactly what is being transferred. As with performing an Archive and Install, it’s possible to inherit a problem from the old configuration without realizing it.
• At the Registration Information screen, you are asked to enter personal information for the computer’s owner/user. This information will be submitted to Apple and possibly other companies.
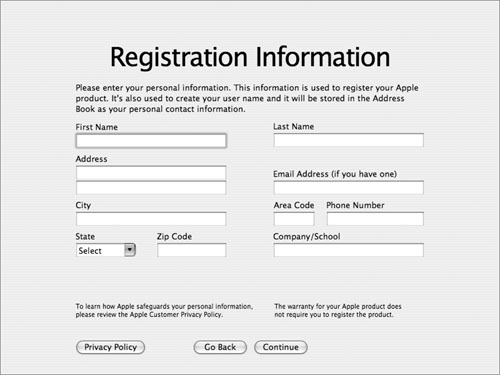
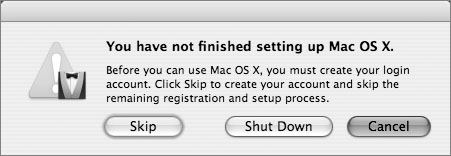
If you don’t want to give away unnecessary information about your users, press Command-Q and you will be given the option to skip the registration and marketing screens.
• At the Create Your Account screen, you’re asked to set up the initial local administrator account. Changing the account’s short name later is not easy, so it’s important to choose it right the first time. Since it is best to use a nonadministrator user account for day-to-day operation, this account should not be used as the primary user account on the computer, nor should it be named for the computer’s primary user. Instead, create a separate (nonadministrator user) account for the primary user later.
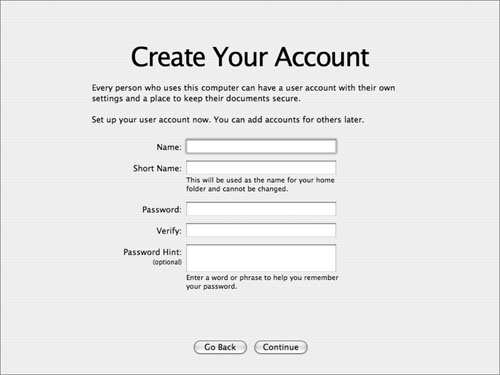
• When naming the initial account, avoid using a generic name like “admin” or “administrator,” as these may conflict with other system or network names (such as the built-in “admin” group). If one particular administrator will use the account, combining the administrator’s name with “admin” (for example, georgeadmin) is a good choice. If it will be a generic account, something like localadmin is okay.
• The initial account setup screen does not give you access to the Password Assistant to help you choose a strong password. If you want to use the Password Assistant, you can use the System Preferences Accounts pane (which does give access to the Password Assistant) to change the password later.
• Leave the Password Hint field blank.
• After the Setup Assistant finishes, it will place an alias to the Send Registration Assistant in the home folder of the initial administrator user account. If you don’t want to submit registration information, simply delete this alias.
Securing Local Accounts
There are four basic categories of accounts available on a Mac OS X computer:
• Normal users: In the Mac OS X security model, normal (nonadministrator) users are more or less restricted to their own worlds within their accounts. They have full Finder access to the contents of their own home directories, and are permitted only read-only access to other users’ Public folders and write-only access to others’ Drop Boxes. They are also permitted read/write access only to items they own that are placed in the /Users/Shared directory and the /tmp directory. In general, normal users are fully subject to the limitations that the operating system and administrators choose to place on them.
• Administrator users: Administrator users have the power to control and configure the operating system. Administrator users are still subject to things like file permissions, but they have a variety of override mechanisms that allow them to get around these limitations. Directly or indirectly, administrators have complete control over the computer; as a result, administrative access should be given only to highly trusted users.
• Root (also known as System Administrator, System, or the superuser): Quite simply, the root user (there is only one) is not constrained by many of the normal limitations of the Mac OS X security model. For example, root ignores normal file permissions. Because of this, root is extremely dangerous to the computer’s integrity. An administrator user can go beyond the normal system constraints, but must go through overrides that help make it clear that something unusual and potentially dangerous is being done. With the root account there are very few warnings (especially on the command line), and deleting something critical takes no more than one typo.
Because it is so dangerous, the root account is disabled by default on Mac OS X. It exists but does not have a password, and thus cannot be logged into directly.
• System accounts: These are identities used to keep track of and control various parts of the operating system (like www, used as the identity of the Apache Web server, and sshd, used for the remote login server). They are not full accounts in the sense that they do not have home folders or login passwords. They are used by programs, not by human users.
These system accounts are automatically configured as needed for the software included with Mac OS X. For most purposes, you can safely ignore them.
Many traditional UNIX administrators are used to logging into the root account to perform administrative duties; in Mac OS X this is strongly discouraged. The vast majority of administrative tasks can be performed from a standard administrator user account (or even a nonadministrator account) by using the padlock icon and its analogs to authenticate as an administrator for just the specific actions that require administrator access. If you have enabled the root account and decide later that you want to disable it, open NetInfo Manager and choose Security > Disable root.
Never log in as an Admin user for routine tasks such as checking mail and creating documents. Not only is there potential that you may forget to log out when you leave your desk or allow an intruder easy access to your computer, but viruses run as an administrative user are potentially much more destructive than those run as a normal user. If administrators have two accounts—one with administrator rights and one without—they can perform all necessary administrative functions but not accidentally invoke or give away that access when they’re logged into their nonadministrator account.
For example, an administrator without special authentication can write to some parts of the file structure (like the Applications directory). If an administrator is tricked into running a malicious program (or one is launched through a security hole in a Web browser), that program will run as the administrative user and can modify or delete those administrator-accessible files. If the user were logged into a normal account instead, the damage would be limited to that one account.
Installing Updates and Security Patches
After initial installation, it is important that the operating system be brought up-to-date with all current system version and security updates. If the computer is connected to the Internet, it will automatically connect to Apple and check for available updates.
Software Update also provides a convenient way to check for applicable updates and the order in which they should be applied. Software Update runs through an SSL-secured connection, which is generally sufficient to ensure that the updates have not been tampered with. One thing to be aware of is that some of the required updates may be prerequisites for others (security updates often require that the operating system first be updated to the latest version first). As a result, Software Update may not be able to perform all updates in a single pass. So run Software Update, install the relevant updates it recommends, and then run it again. Keep running it until no updates appear.
In very high-security environments Software Update’s security measures may not be considered sufficient, or it may be unacceptable to have configuration information sent to Apple. In these cases, manually downloading, verifying, and installing updates is the preferred method. You can download updates from https://www.apple.com/support/downloads.
Note
This page is available over either HTTP or HTTPS. You are recommended to use the HTTPS URL to protect against spoofing and/or tampering.
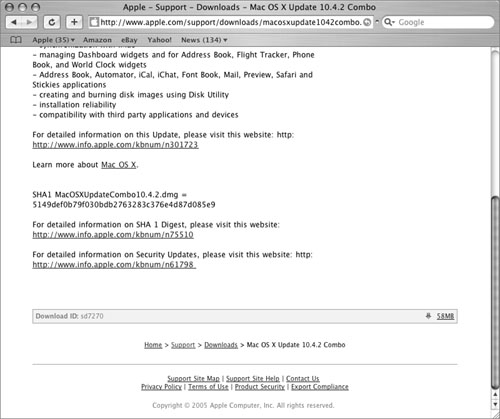
Each available item will have a download link to the right and a description link to the left. Click the description link for detailed information on the update. This information will include system requirements to help you evaluate which updates are relevant to which configurations. For security-related updates, the information will also include an SHA1 hash that can be used to verify the integrity of the update after it is downloaded.
Download all relevant updates (usually in the form of disk images), and then verify each one by opening the Terminal utility and entering the command
/usr/bin/openssl sha1 /path/to/file.dmg
Tip
To save entering the path to the file, you can enter the part of the command before the path, then drag the file from the finder into the Terminal window. The full path will be filled in automatically.
The openssl sha1 command will calculate the SHA1 hash of the file and should return something like this:
SHA1(/Users/localadmin/MacOSXUpdateCombo10.4.2.dmg)=
5149defob79f030bdb2763283c376e4d87do85e9
Compare this SHA1 hash to the one listed on the update’s webpage. If they match, the update is intact and can be used safely. If it does not match, something is wrong with the downloaded update and you should not use it.
The main difficulty of using the manual method is that it is hard to figure out which updates need to be applied, and in which order. One way around this is with a hybrid method. Consult Software Update to check for relevant updates and their order of installation, and then download, verify, and install them manually. This provides the additional security of the verification step, but it does expose configuration information to the update server.
Even this can be solved by setting up a private update server on Mac OS X Server and downloading updates from that server instead of the Apple update server. This requires setting up an Open Directory server and binding the client to that server. Setting this up is nontrivial and beyond the scope of this book. If you haven’t set up an Open Directory server for other reasons, the manual method is probably simpler; but if you’re using Open Directory’s client management anyway, adding the update server capability is an easy step.
Choosing Mac OS 9 (Classic) Security Options
Mac OS 9 can run in two different modes, both with undesirable security implications:
• In Native mode, the computer boots directly into Mac OS 9. In this mode, Mac OS 9 ignores all Mac OS X file permissions and most other security measures. Mac OS 9 has some user authentication capability of its own (using the Multiple Users Control Panel), but it is far more limited than the Mac OS X capabilities. As a result, Native-mode Mac OS 9 should be disabled in a secure environment.
• In Classic compatibility mode, Mac OS 9 runs as a process under Mac OS X control. In this mode, Mac OS 9 is constrained by the Mac OS X file permissions and other security features, but if multiple users share the same Mac OS 9 System Folder they may leak information that should be kept private. As a result, Classic mode should be disabled wherever possible. If it is required to run programs that cannot run natively under Mac OS X, special measures must be taken to prevent information leakage.
The simplest and most complete way to disable Mac OS 9 is to delete the operating system—or not install it in the first place. If access to the Classic compatibility environment is needed, there are several options available to retain Mac OS 9 but limit it to Classic mode:
• Mac OS 9 can be installed in (or copied into) a disk image. The Classic compatibility environment can run from an image, but Mac OS 9 cannot boot natively from an image, so this provides a robust way to limit Mac OS 9 availability. The Classic environment will automatically mount the image when it is needed, making this solution convenient for the user. Also, giving each user his or her own private image will avoid information leakage.
• The computer’s hard drive can be formatted without Mac OS 9 drivers. Native-mode Mac OS 9 cannot read or boot from an ATA or SCSI hard drive that does not have appropriate drivers installed. This is not an absolute lockout, as the system can still read and boot from driverless disks over FireWire—thus, putting a Macintosh into FireWire Target Disk Mode will allow its hard drive to be read or even booted to Mac OS 9.
Note
Enabling and disabling Mac OS 9 drivers can be done only when the hard drive is erased or partitioned—that is, when all data on the hard drive is being discarded. If this security measure is to be used, it must be configured before any other installation or setup of the computer is performed.
• The computer’s hard drive can be formatted in UNIX File System (UFS) or Case-Sensitive HFS Plus. Mac OS 9 cannot read or boot from these volume formats natively, but it can read them in Classic mode (via the Mac OS X file manager). Note, however, that running Mac OS 9 on one of these volume formats may be subject to compatibility issues.
Finding Mac OS 9 Installations
The Mac OS 9 system files normally reside in the aptly named “System Folder” at the top level of the hard drive, but a bootable Mac OS 9 System Folder can actually have any name and reside anywhere on the hard drive. The first step in removing (or even just controlling) Mac OS 9 is to get a complete inventory of installed systems. You can use the System Preferences Classic pane to generate a list of Mac OS 9 systems, but it’s not always complete. To make sure you find them all, use the command line.
1 Log in to a local administrator account and open Terminal.
2 Enter the command
sudo find -x / -iname System -exec mdls –name
kMDItemFSTypeCode '{}' ';' | grep -B 1 ' 2054388083'
Note
This is a single command split across two lines for the purposes of fitting on a book page. The backslash at the end of the first line tells the shell to treat the next line as a continuation.
3 Examine the command’s output: It should list each system installation—both Mac OS 9 and Mac OS X—on the hard drive.
For example:

This shows the Mac OS X system file (in /System/Library/CoreServices/System) and the Mac OS 9 system file (in /System Folder/System). The live Mac OS X system will always be in /System/Library/CoreServices/System; any other system files listed are either Mac OS 9 (or older) systems or previous Mac OS X systems that were archived by performing an Archive and Install of Mac OS X. Generally, all but the live Mac OS X system should generally be deleted.
4 If the computer has more than one volume mounted, search additional volumes with the command
sudo find /Volumes -iname System -exec mdls -name
kMDItemFSTypeCode '{}' ';' | grep -B 1 ' 2054388083'
Note
As with the command in step 2, this is a single command split between two lines.
Removing Mac OS 9
Deleting a Mac OS 9 system is easy enough. Discard the entire System Folder (or whatever it’s named—in the example above, the two folders are /System Folder and /Previous Systems/System Folder 1) into the Trash and perform a Secure Empty Trash. (Secure Empty Trash is recommended to make sure security-related information, such as passwords in the Users & Groups Data File, is not recoverable.)
However, if Mac OS 9 has ever been used on the computer, it is likely to have created additional files that should either be moved to secure locations or deleted. Many of these files and folders are invisible, so the easiest way to deal with them is from the command line.
1 Log in to a local administrator account and launch the Terminal utility.
2 Open the Mac OS 9 Desktop Folder and Documents folder with the following command:
open '/Desktop Folder'; open '/Documents'
If this returns “no such file” errors, ignore them.
The single quotes shown in the command are very important. Omitting them could cause the accidental deletion of the Mac OS X Applications folder, which would require reinstallation to repair.
3 The Mac OS 9 Desktop Folder and Documents folder should be displayed in the Finder, if they exist. Any files or folders stored in them need to be deleted or moved to more secure locations, depending on local policy and the files’ contents. If the determination cannot be made at this time, move the files and folders to a secure temporary location, as anything left in the folder will be deleted in the next step.
4 Purge leftover applications and data from Mac OS 9 with the following commands:
sudo rm -rf '/Applications (Mac OS 9)'
sudo srm -rf '/Documents'
sudo srm -rf '/Desktop Folder'
sudo srm -rf '/Trash'
sudo srm -rf '/Network Trash Folder'
sudo srm -rf '/Temporary Items'
sudo srm -rf '/Cleanup At Startup'
sudo srm -rf '/TheFindByContentFolder'
sudo srm -rf '/TheVolumeSettingsFolder'
sudo srm -rf '/VM Storage'
sudo srm -rf '/AppleShare PDS'
sudo rm -rf '/Shutdown Check'
If any of these commands give “no such file” errors, ignore them.
Warning
The single quotes shown in the command are very important; omitting them could cause the accidental deletion of the Mac OS X Applications folder, which would require reinstallation to repair.
Note
The National Security Agency (NSA) has guidelines for installing and configuring Mac OS X. You may want to mirror some of their steps to secure your systems. You can find the NSA guidelines at www.nsa.gov/snac/downloads_macX.cfm?MenuID=scg10.3.1.1.
Deleting the Classic Environment
Even with all copies of Mac OS 9 purged from the computer, it is still possible for a user to copy in a Mac OS 9 System Folder and launch it in the Classic compatibility environment. Hopefully your users have more sense than that. If you don’t want to count on that, it’s possible to remove the components of Mac OS X that allow Mac OS 9 to run in Classic mode:
1 Log in to a local administrator user account and open Terminal.
2 Delete the Classic compatibility environment by entering the following commands:
cd '/System/Library'
sudo rm –rf 'CoreServices/Classic Startup.app'
sudo rm –rf 'PreferencePanes/Classic.prefPane'
sudo rm –rf 'UserTemplate/English.lproj/Desktop/Desktop (Mac OS 9)'
3 Restart the system.
Establishing Local Operating-System Security
Settings in Mac OS X fall into two general categories:
• System-wide settings apply to the computer as a whole and all users on it. Only administrators can change these settings.
• Personal settings are set separately for each user account. All users can change their own personal settings.
A preferences pane that includes system-wide settings will have a padlock icon in the lower-left corner; if the lock is unlocked, the user has been authenticated as an administrator.
Making system-wide changes does not require logging in as an administrator; it is sufficient to click the locked padlock and give the user name and password for an account with administrator rights. After making your changes, you can click the padlock again to cancel authentication and prevent further changes.
Some preferences panes contain a mix of system-wide and personal settings. These will have the padlock icon, but some settings (the personal ones) can be changed without authentication.
There are also a few idiosyncratic settings, such as parental controls. These are set by one user (an administrator user) but apply to specific other (nonadministrator) users.
Securing Unattended Computers
Users leaving themselves logged into their computers is a common source of operational insecurity. Teaching users to always log out can help, but logging out can be inconvenient enough that users will almost inevitably cheat sometimes. Mac OS X has three main options to help with this problem.
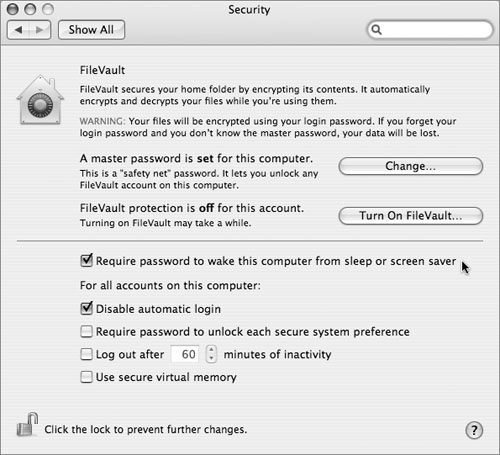
Require a Sleep/Screen Saver Password
The computer can be configured to require a password to wake from sleep or a screen saver. If the computer is configured to sleep and/or activate a screen saver after a certain amount of time, this will keep passersby from taking over a user’s login session. The password requirement (enabled in the System Preferences Security pane) is a personal setting, meaning that it must be enabled separately for each user account; also, a user can disable it if desired.
The activation settings for the screen saver are also personal settings, configured in the Desktop & Screen Saver pane. Configuring a Hot Corner to start the screen saver is recommended; this way the user can trigger the screen saver manually, eliminating the window of vulnerability between when the user leaves and when the screen saver activates.
Sleep timing is a system-wide setting, configured in the Energy Saver pane. Note that a password is required to wake the computer only from a full sleep, not screen sleep.
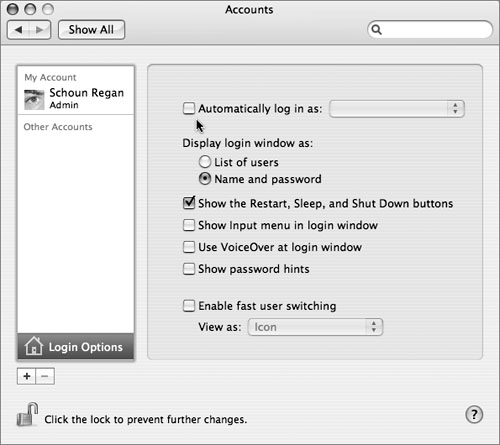
Enable Fast User Switching
Enabling Fast User Switching allows a user to quickly switch from a session to the login window (using the user menu near the right of the menu bar). Like the sleep/screen saver password, this prevents passersby from getting access to a user’s session without supplying the correct password. Unlike the sleep/screen saver password, this protection can be activated only manually, not automatically after a period of inactivity. Enable this setting in the System Preferences Accounts pane, under Login Options.
Note
Temporarily mounted volumes (such as FireWire drives or disk images) are (usually) fully accessible by all logged-in users, not just the user who mounted them. Using Fast User Switching may weaken FileVault protection on the user’s home directory. As long as the FileVault user’s session is running (even in the background), her home directory disk image will remain mounted. If another user logs in, the only thing keeping him out of the FileVault user’s home directory will be the folder permissions on that directory. For maximum FileVault security, leave Fast User Switching disabled.
One security benefit of Fast User Switching is that it allows switching from a normal (nonadministrator) user account to an administrator user account when administrator access is needed, then immediately switching back to normal. This is actually safer than temporarily enabling administrator access from the nonadministrator account (by clicking a padlock and authenticating, for example). You can disable administrator access temporarily (by relocking a padlock icon), but it’s easy to forget and leave it disabled (especially if multiple enables are needed). Switching to administrator and then logging out automatically disables all administrator access in a single step.
If both Fast User Switching and the sleep/screen saver are enabled, the option to switch users will be available from the sleep/screen saver password dialog box.
Log Out Users
You can configure the computer to log out users automatically after a period of inactivity. This is a system-wide setting, enabled in the System Preferences Security pane. This option does not provide much security protection, because any running application can (and often will) cancel the logout process. For example, if the user has any unsaved documents open, the Save dialog will cause the logout process to time out. Using this setting is not generally recommended.
Configuring the Login Process
The default settings for the login process are chosen more for the convenience of home users than for security. As a result, you should make a couple of changes to ensure a secure environment:
• Disable automatic login. By default, the computer will automatically log in to the initial administrator account every time the computer boots without requiring a password. You can disable this either in the System Preferences Security pane (by selecting Disable Automatic Login) or in the Accounts preferences pane’s Login Options section (by deselecting “Automatically log in as”).
• Turn off display of user names. By default, a list of users (names and pictures or icons) is displayed at the login window; this gives an attacker important hints about what logins are available on the computer. (The has to guess only passwords, not user names.) In the Accounts preferences pane’s Login Options section, you can select the “Name and password” option, which causes the login window to display name and password fields; one must correctly enter both to log in.
• Keep “Show password hints” deselected. This check box is deselected by default and should not be selected. This login option makes the login window display a user-provided password hint after three unsuccessful login attempts. Users should not enter password hints in the first place, but if they do, the hints should not be displayed.
In some situations you may want the login window to display a warning message against unauthorized use of the computer. You can configure this by launching the Terminal utility and entering the following command (replace the example warning with whatever message you want displayed):
sudo defaults write /Library/Preferences/com.apple.loginwindow LoginwindowText "Example
Warning Message"
Note
Although this command is reproduced here (and will display on screen) as several lines, it should be typed in as a single long command; do not press Return until you enter the entire command. If the message is particularly long, it may be easier to correct typos by entering the whole thing into a text editor and then pasting it into the Terminal window.
Using Other Security-Related Settings
There are other security-related settings that you can use. Here are some examples:
• Require a password to unlock each secure system preference (found in the Security preferences pane). By default, preference settings that affect all users (such as this setting) cannot be changed without first clicking the padlock in the bottom-left corner of the preferences pane and authenticating as an administrator user. If this option is deselected, anyone logged in as an administrator may change system-wide settings without specifically authenticating first. Keep this option enabled for higher security.
• Use secure virtual memory (in the Security preferences pane). This option enables encryption of the virtual memory swap files. Since virtual memory can contain important data (even including passwords), encrypting it is highly recommended. See Lesson 14, “Optimizing Data Confidentiality,” for more details. Note that changing this setting does not take effect until the next time the computer is rebooted.
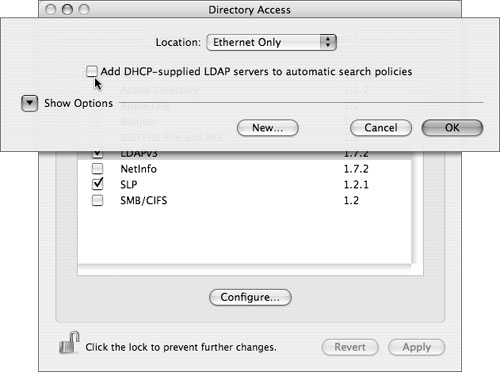
• Add Dynamic Host Configuration Protocol (DHCP)–supplied Lightweight Directory Access Protocol (LDAP) servers to automatic search policies. This option is automatically disabled if no LDAP server configuration is received from a DHCP server the first time the computer boots. Nonetheless, it’s a good idea to make sure this is disabled and remains disabled. The risk of having it enabled is that an attacker could hook up a specially configured DHCP/LDAP server, and the client would trust the information in that server. This might include an administrator account with a password that the attacker chose. This setting is not available in the System Preferences utility. To check or change it, open the Directory Access utility, select the Services tab, click the padlock icon, authenticate, select the LDAP line, and click the Configure button.
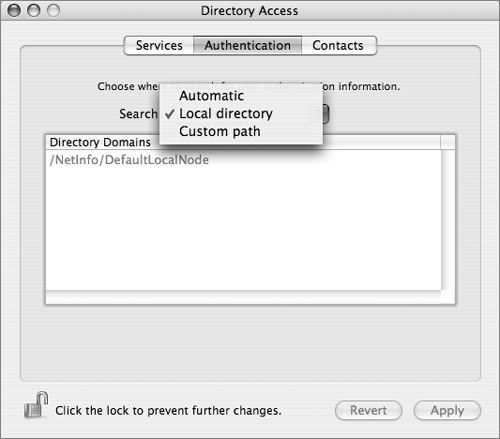
• Turn the authentication path option to “Local directory.” This prevents any chance of remotely authenticating to a remote server by allowing authentication to only the local NetInfo database.
• Bluetooth is a wireless protocol intended for connecting relatively lightweight devices (cell phones, headphones, keyboards, mice, etc.) to each other or to computers. It has basic security built in, but its level of security is not adequate for critical situations. Disabling or limiting Bluetooth access will be discussed in Lesson 15, “Mobility Security Concerns.”
Configuring a Client Network
The basic purpose of secure network configuration is to maximize security and minimize access. The default configuration of Mac OS X is already relatively minimal in terms of the network-accessible services it provides, but it tends to enable network access over all available interfaces (Ethernet, AirPort, modem, FireWire, and so on), and for both IP version 4 (IPv4) and version 6 (IPv6). To control network access, there are two main changes that you should make to the network settings:
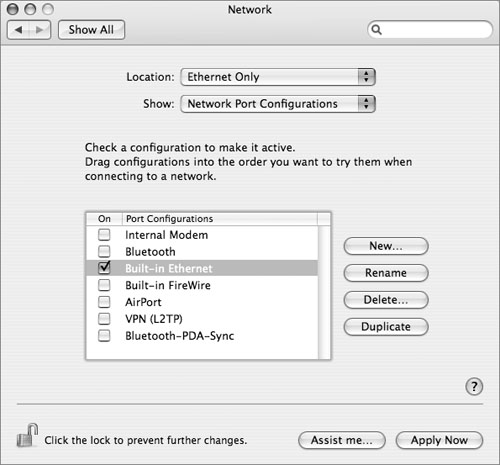
• Disable unneeded network interfaces. In the Network preferences pane, review the network locations listed in the Location pop-up menu. For each location, select Network Port Configurations (these are actually network interfaces, not ports, but the interface calls them ports) from the Show pop-up menu, and deselect all ports (interfaces) that are not actually needed. This will limit unintended and unauthorized connections.
• Disable IPv6. IP version 6 is intended as a replacement for the currently popular IPv4 protocol; however, it is not yet widely supported in most organizations, or on the Internet. Because of this, it is rarely needed. Since support for securing it is also not universal—for example, the firewall built into Mac OS X does not filter it—you should disable it unless you actually need it.
IPv6 is controlled on a per-port (interface) configuration basis; as a result, disabling it requires reviewing each network location just as you did to limit the active ports. For each location, go through each active port (those listed in the Show pop-up menu) and, for each one, select the TCP/IP tab, click the Configure IPv6 button, and select Off in the Configure IPv6 pop-up menu. Then click OK and go on to the next active port.

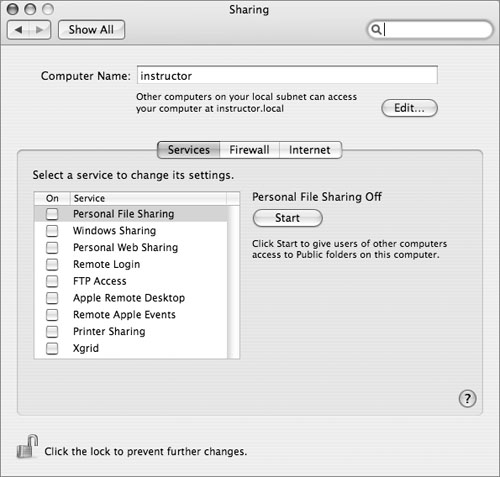
In addition to disabling these two settings, the System Preferences Sharing pane has a variety of options for enabling and controlling network access to Mac OS X. From a security perspective, less access is almost always better than more access. So the most secure sharing settings are:
• All services off
• Firewall on
• Internet Sharing off
But this is not always practical, so you should understand the implications of the available sharing options.
Services
On the Services tab in the Sharing preferences pane, you can enable a number of different network sharing protocols. As a general rule, each sharing protocol represents a potential security hole and should be enabled only if it is needed.
Personal File Sharing
This enables Apple Filing Protocol (AFP) serving from this computer. Enabling AFP raises a possible security issue: Since guest access is always enabled, a network attacker can easily connect and get a list of user accounts and users’ Public folders.
Which folders are accessible over an AFP connection depend on the details of how the connection is made:
• Guest connections are allowed access to all users’ Public folders.
• Connections that authenticate as a normal user are allowed access to the authenticated user’s home folder and other users’ Public folders.
• Connections that authenticate as admin users may be treated like normal users (above), or may be allowed to access to all volumes mounted on the computer with sharing enabled. In the default configuration, the difference is dependent on which version of AFP the client supports; older clients get access to entire volumes by default.
You can turn off guest access by changing the guestAccess key in the file com.apple. AppleFileServer.plist (located in /Library/Preferences) from Yes to No. Since most preference files are now saved as binary files, you will need an application called Property List Editor, which is installed with Apple Developer Tools.
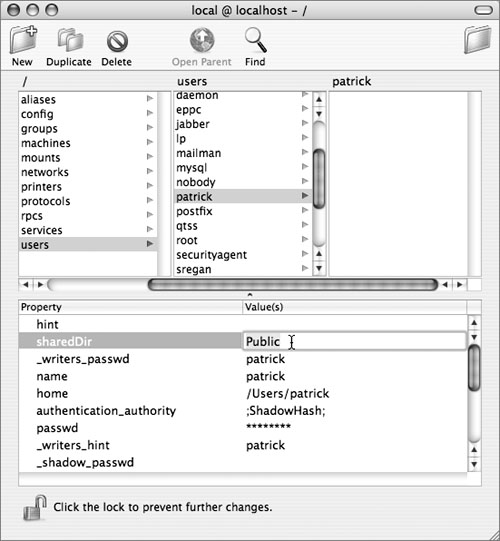
You can also turn off the sharing of a user’s Public folder by opening NetInfo Manager (located in /Applications/Utilities), selecting the “users” category, and clicking the user whose Public folder you want to stop sharing. Authenticate as a local administrator and select the value for the sharedDir attribute (NetInfo calls them properties) and remove it. Click another user to prompt NetInfo Manager to ask you to save the changes.
Windows Sharing
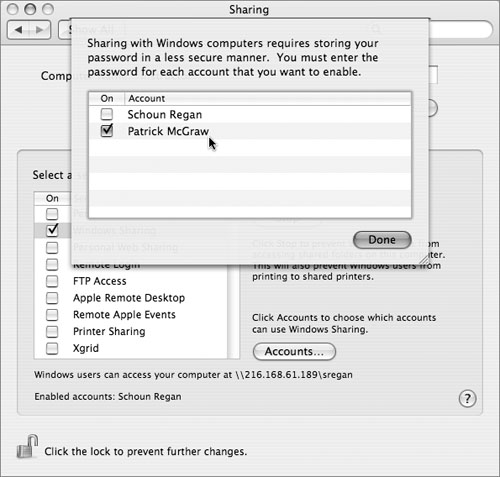
This enables Server Message Block/Common Internet File System (SMB/CIFS) serving from this computer. Doing so raises somewhat different issues than enabling AFP. First, since the password hashes that Mac OS X normally uses to authenticate users are not compatible with CIFS, accounts that will be accessed via Windows Sharing need to have their password hashes stored in additional formats. Unfortunately, one of these formats, known as NTLMv1, is particularly susceptible to dictionary attack; if an attacker manages to get a copy of the hashes (stored in /private/var/db/shadow/hash, which is readable only by root), the attacker has a good chance of recovering users’ passwords. Only accounts that need Windows access should have their passwords stored this way.
Also, Windows sharing does not just share the users’ Public folders; it shares their entire home folders. This can lead to exposure of files that should not be network-accessible. Fortunately, this exposure is limited because guest access to the home folders is not allowed over SMB.
Personal Web Sharing
This enables the Apache Web server, serving the contents of the folder /Library/WebServer/Documents as well as each user’s Sites folder. By default, each of these contains a generic placeholder page, which generally doesn’t represent much of a security risk, although it does allow an attacker to test what user names are in use on the system—a first step toward a password-guessing attack.
Replacing these documents with real content—adding CGI scripts to /Library/WebServer/CGI-Executables or changing the config files for Apache—carries the same risks as running an Apache-based Web server on any other platform, with several notable additions:
• Since the standard Mac OS Extended file system is not case-sensitive, realm and other access restrictions can sometimes be bypassed by using nonstandard capitalization in a URL. This is mitigated in two ways in the default configuration file: the mod_hfs_apple module blocks nonstandard capitalization, and the built-in access restrictions (for example, to block reading of .htaccess files) use case-insensitive patterns like “^.([Hh][Tt]|[Dd][Ss]_[Ss])”.
• The Macintosh Finder creates files named .DS_Store throughout the file system with information about folder display formats, icon arrangement, and so on. If these files are served over the Web, they can leak information about the structure of files on the server to a Web client. The default config file includes a directive to block access to these files (see the example pattern above).
• The Mac OS X file system allows access to files’ contents through unusual syntax, such as “filename/..namedfork/data” or “filename/rsrc,” which might get past normal access restrictions. The default config file includes directives to block access via these tricks.
All of these possible problems are blocked by directives in the default httpd.conf file. If you modify or replace this file, take care to retain and/or extend these directives.
Remote Login
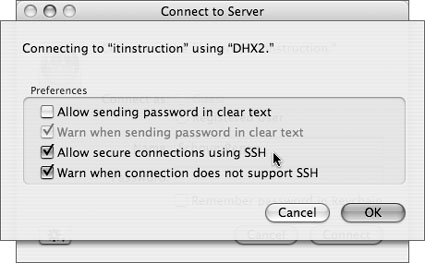
This enables remote shell access to the local computer over the Secure Shell Protocol (SSH). SSH is relatively secure and can be used to increase the security of other protocols (by tunneling them over an SSH connection); however, its power and flexibility make it a double-edged sword. Among the possible security problems SSH can raise are:
• SSH allows remote access to the entire file system (subject to standard authorization limitations) via just logging in and viewing files, or using the Secure Copy (SCP) or Secure File Transfer Protocol (SFTP) commands/subprotocols. Unlike other file sharing protocols, this access cannot be (easily) restricted to chosen share points.
• Since SSH can tunnel TCP/IP connections, it can provide a way to bypass firewall protection. For example, if a company’s firewall is set to block all incoming AFP access, a user with SSH access to any computer behind the firewall can use that access to connect to any AFP server behind the firewall. The AFP connection will, as far as the company network and the AFP server can tell, appear to be originating from the computer the user has used SSH to log in to.
FTP Access
This enables File Transfer Protocol (FTP) serving from the local computer. FTP is a very old and insecure protocol; among its problems are:
• Passwords are normally passed in plaintext and are trivial for a network sniffer to capture.
• FTP gives access to the entire file system (subject to standard permissions limitations), not just selected share points as with AFP or SMB.
Some implementations (such as the one supplied with Mac OS X Server) include improved security features such as Kerberos authentication and the ability to control which folders are accessible via FTP. By default, the FTP server configuration included with Mac OS X does not do any of these things. Thus its use is not recommended in a secure environment.
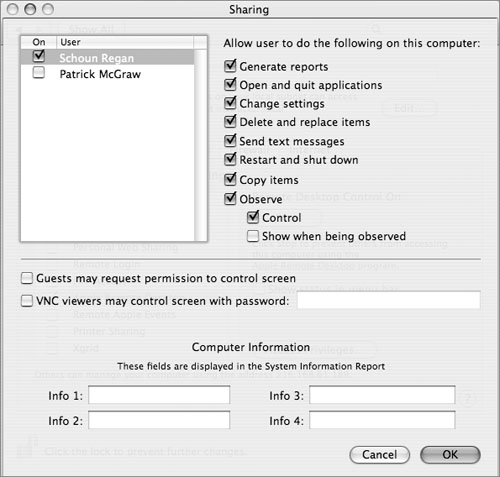
Apple Remote Desktop
This enables remote control and monitoring of the computer from an Apple Remote Desktop (ARD) administrator workstation. ARD can be an extremely useful tool for remote administration, monitoring, and support, but it also carries its fair share of security risks.
To administer the computer, the administrator user must authenticate as one of the users on the computer. You can control which users are allowed to do this and which operations they may perform. Many of the operations have a high potential for misuse (for example, screen observing could be used to spy on a user), so access to these capabilities should be strictly limited.
Remote Apple Events
This enables remote computers to send Apple events to the local computer (such as AppleScript events). This should not be enabled in a secure installation.
Printer Sharing
This enables access to the local computer’s print queues via Internet Printing Protocol (IPP). Aside from the inherent risk of publishing unintended information about printers and their status, this also opens several possibilities for network-based attacks:
• Denial of Service (DoS) attacks can be launched by submitting large print jobs. (No doubt followed by spam that is advertising sales for replacement paper and ink!)
• Some printers can be configured via PostScript code; a malicious print job may be able to use this to cause problems with the printers themselves.
• Since some parts of job processing on the local computer takes place under the root identity, it might be possible for a malicious job to exploit a bug in a print driver to gain root access to the local computer.
Xgrid
This enables the local computer to act as an Xgrid agent, accepting jobs from an Xgrid controller. There are three main areas of security risk that this feature opens up:
• The risk of a malicious job being used to attack the local system. This risk is minimized by running jobs under a completely unprivileged identity (or user) named “nobody.” Nonetheless, jobs still have the equivalent of guest access to files throughout the computer, as well as the ability to monitor local activity through unprivileged commands (for example, the ps command—and some programs use sudo in such a way that administrator passwords may be displayed by ps).
• The risk of running unauthorized jobs (such as those that have not been through the Xgrid controller’s submission process). Xgrid has two features to limit this problem. It can be configured to accept jobs only from a specified controller (and since the agent initiates the connection to the controller, spoofing would be difficult). It can also require the controller to authenticate with either a password or a single sign-on (Kerberos) ticket. Since the password may be widely known—all agents use the same password—single sign-on is the more secure option.
Note
Single sign-on is available only if the agent and controller are members of an Open Directory master domain.
• The risk that the compute jobs themselves may be attacked, by having their data, results, or programs stolen or tampered with. Since jobs are run under the same identity used for other minimal-access processes, and because their data is stored in relatively accessible locations (such as the /tmp directory), there is relatively little protection against attack by nearly anyone with access to the local system (including even previously-executed Xgrid jobs).
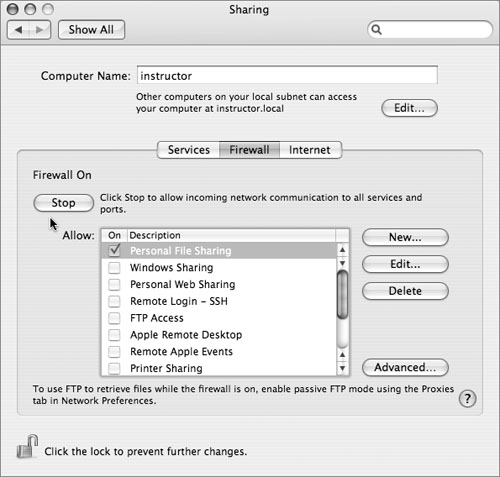
Firewall
The Firewall tab provides a basic interface for configuring the firewall built into the Mac OS X kernel. When enabled, it blocks incoming TCP connections (except for specifically allowed services), but allows all outgoing, local, and (by default) UDP traffic. It also does not filter IPv6 traffic, so disabling IPv6 is recommended when the firewall is in use (as mentioned earlier in this section).
The default configuration of Mac OS X 10.4 does not provide any network services over TCP (except to itself), so this default configuration is not strictly necessary for network security. What it does do is provide protection against unintended network services, such as third-party or user-level programs that may open network ports and create security holes. The firewall blocks everything but the services you’ve explicitly allowed (or enabled on the Services tab), giving you a master-switch protection against such problems.
Services fall into four different categories, depending on how “built in” they are, and each is allowed by slightly different methods:
• Services that have been enabled on the Sharing tab are automatically allowed.
• Protocols enabled in other places (Network Time, iTunes, iPhoto, and iChat) are available in the Allow list. To allow access to them, simply select the box next to the protocol.
• Common services that may be added by third-party software (such as ICQ, Retrospect, and VNC) are preconfigured but not included in the standard list. To allow one of these, click the Add button, choose the service from the Port Name pop-up menu, and click OK. This adds the service to the main list and automatically allows it.
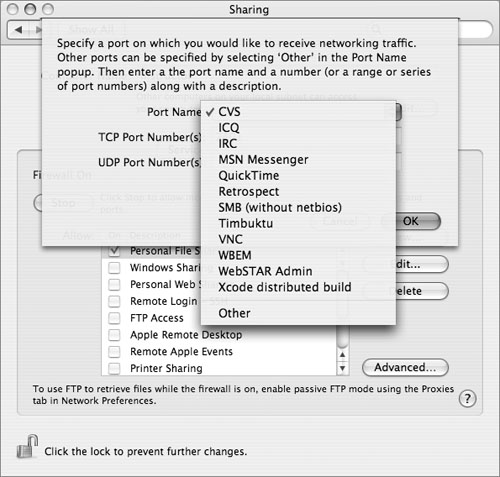
• You must manually add services that don’t fall into any of the above categories. To do so, click the Add button, choose Other from the Port Name pop-up menu, enter the TCP and/or UDP port numbers that the service uses, and enter a short description (or name) for the service. Then click OK to add the service to the main list and allow access to it.
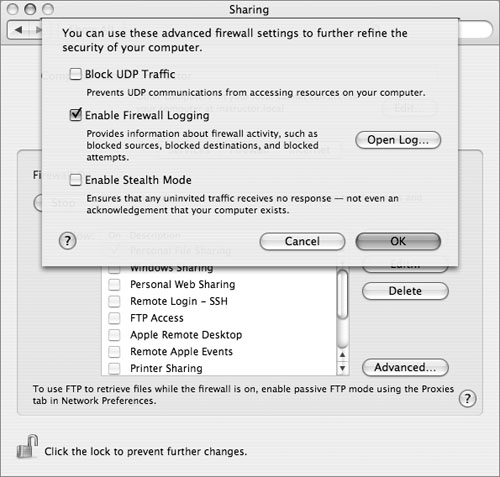
Click the Advanced button to make some additional changes to the firewall’s behavior:
• Block UDP Traffic: Turns on filtering of UDP as well as TCP traffic. Unlike TCP traffic, the default for UDP is not to block all traffic other than what has explicitly been allowed; it implicitly allows access to ports 53 and 5353 (standard DNS and multicast DNS/Bonjour, respectively), 67 and 68 (DHCP and BootP requests and replies), 137 and 427 (SLP and SMB service advertisements, respectively), and 631 (IPP printer sharing advertisements). It also adds a keep-state rule to automatically allow replies to UDP packets sent from the local computer.
• Enable Firewall Logging: Logs blocked packets to /var/log/ipfw.log; click the Open Log button to launch the Console utility and view this log. In most normal circumstances, the firewall will block a lot of irrelevant packets (random chatter on a campus network and/or Windows-oriented worm attacks on the Internet), and this file can grow quite large. Generally, logging should be left disabled unless a significant network event or attack is in progress, or a network problem is being debugged.
• Enable Stealth Mode: Disables sending denials in response to blocked packets. Some attack programs use the replies they receive to profile a target computer. As a result, not replying at all can limit the information you leak. Unfortunately, this is not a panacea. Some information can be inferred from just the pattern of which probes get replies (even immediate rejection) and which get no reply.
Internet Sharing
The Internet Sharing feature of Mac OS X allows a workstation to act as a NAT-enabled gateway router between two networks—much like the router/NAT capability of Mac OS X Server—but without the configurability or security controls. This feature can be very convenient for home users, allowing, for instance, a computer to share a DSL Internet connection with other computers over its AirPort interface. In a secure network, it is mainly a security risk. For instance, if the home computer is connected to a corporate network, it would become in effect a rogue wireless base station allowing access to the corporate network. In the default configuration, it will not even require a WEP password for access.
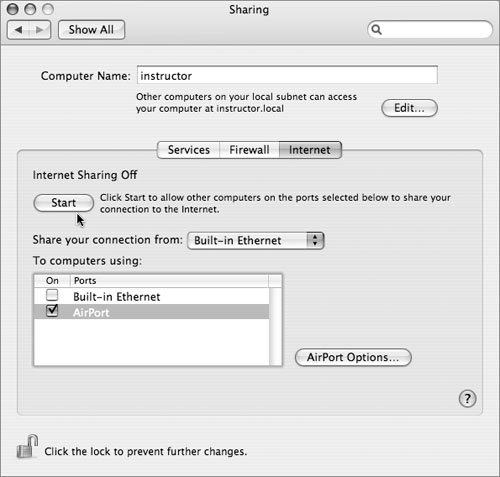
So the simple rule for Internet Sharing is: Don’t enable it if you value your network integrity. Enabling it does require administrator rights, but since its implications extend so far beyond the integrity of the local desktop (the normal limits of what an administrator can mess up), you may want to take additional steps to make sure it does not get activated. One option is to delete or rename the program that implements sharing. To delete it, launch the Terminal utility and run the following command:
sudo rm /usr/libexec/InternetSharing
Note that this will not prevent Internet Sharing from being selected in System Preferences, but it will prevent it from actually functioning. Also, it is possible that a subsequent system update may replace (effectively reinstalling) the Internet Sharing program. Check after system updates (especially if they mention improvements to the Internet Sharing feature) and delete it again if necessary.
Enabling Temporary Administrative Access
Mac OS X provides several methods for a user to temporarily enable administrative access from a less-privileged starting point. These mechanisms allow users who need administrator access to do most of their work in an unprivileged account, and enable their privileges only when they’re actually needed.
The most commonly used mechanism is the Authorization framework, which displays the standard Authenticate dialog whenever a padlock icon is unlocked, the installer is run, etc. The rules for how to authorize users for various operations are defined in the /etc/authorization file. Normally most operations require authentication with an administrator account, but do not require that operations be performed while logged in as an administrator. As long as you know the name and password for your adminenabled identity, you can use this to perform administrative functions from within a nonadmin account.
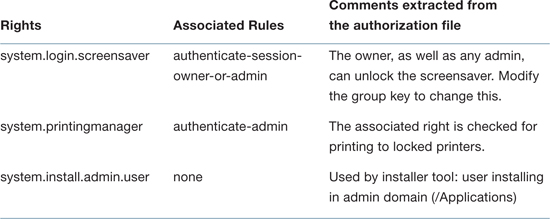
The /etc/authorization file maintains both rights and rules. Rights are described by what you are attempting to do at the moment. Do you want to unlock a System Preference? Do you want to install software? Do you want to drag a file not owned by you (in a folder not owned by you) to the trash? These are rights.
Rules simply define whether certain conditions are met. For example, a rule might be to allow an owner of a file or any user with administrative privileges to permit the right to take place. The following table shows some examples of rights, rules, and comments extracted from the /etc/authorization file:
Not all rights have associated rules. A right may look for a given user, permission, or an authentication mechanism. Whatever is associated with the class key will be used when attempting to comply with that right. An example of what is currently associated with a class:
• rule
• user
• allow
• deny
• evaluate-mechanisms
Note
Rights can also have their authentication credentials shared with other rights.
Fast User Switching
For operations that actually require being logged into an administrator account, Fast User Switching (if enabled) allows you to log in to an administrator account without shutting down your normal environment, doing what you need to do, then logging out the administrator identity and going back to normal. This is actually a good idea even for operations that could be done simply with the Authorization dialog, because once an Authorization right is enabled for a particular application, it remains active by default for 5 minutes (300 seconds) unless it is explicitly disabled (and it’s not always easy to disable rights). If the right had been enabled from within an administrator account, switching back to a normal account would make the right inaccessible, removing the possibility that some other operation might sneak through on the coattails of the one you really wanted to authorize.
Command-Line Operations
For command-line operations, there are two commands—su and sudo—that allow you to either temporarily open a more privileged shell session, or perform specific commands with a higher privilege level. Their functions are similar, but different enough that it’s important to understand and be able to use both.
su is the traditional UNIX command for switching user identities. Entering the command
su localadmin
will attempt to open a shell session with the user identity localadmin. It requires that the password for the localadmin account be entered. To go back to the normal account, use the exit command to close the shell that su opened under the alternate identity.
Using su to switch to the root user is not possible in a standard Mac OS X configuration for two reasons:
• Root does not have a password and, even if it did, su has a special security restriction that allows only members of the wheel group to su to root.
• By default, root is the only member of the wheel group.
This command is useful, however, to switch from a nonadministrator account to an administrator user account.
sudo is a newer program intended to provide a more flexible capability to run single commands from a different user identity (especially root). Unlike su, it does not open a session in its default mode; instead, it switches identities, runs the specified command, then switches back to normal (or at least, back to the identity you were using before). Also, unlike su, sudo requires the password for the account you’re switching from, not the account you’re switching to. (To save typing, it also caches credentials. Once you provide your password, you will not be asked for it again for the next 5 minutes.
Note
Each time you use sudo, the credential is renewed; so this is really a 5-minute timeout between invocations.
The file /etc/sudoers defines which accounts are allowed to perform which operations using which temporary identities. By default, only members of the admin group are allowed to do anything—and they are allowed to do virtually anything.
For example, consider the command
sudo srm -rf '/Trash'
What this command does is attempt to execute the command
srm -rf '/Trash'
under the root identity. If the command is run from an administrator user account, and the administrator’s password is provided correctly, it will succeed.
You can also use sudo to open a shell session, rather than just execute a single command. Using its -s flag invokes this mode:
sudo -s
Because this -s option leaves the privileged session open and possibly available for misuse, this is not recommended. The safest way to use root is to get in, do exactly what you need to do, and get right back out; this is exactly what sudo does in its normal (single-command) mode.
Because using sudo to get root access does not require either a root password or wheel membership, it is the preferred tool for getting root access on the command line in Mac OS X.
You can use su and sudo together to get root access while logged in as a normal (nonadmin) user: First use su to switch to an administrator identity, then from there use sudo to perform commands as root. Both commands will require the same administrator password to authorize their operations. This may seem redundant, but the two-step process provides protection against things like misuse of cached sudo credentials. For example, if you run sudo while logged into an administrator account and then run a malicious program, the program could use the cached credentials to gain full root access.
A weakness in the Secure Empty Trash or srm approach is that programmers often utilize a technique called a “safe save.” When an application needs to save changes to a file, it does not write out the changes to the original file. Instead, it renames the original file to a temporary name, so for example, it might rename Myfile.doc to Myfile.doc~. Then it writes the new content to a new file which has the same name as the original and deletes the renamed original file. This ensures that the old content is not deleted until after the new content has safely been written to disk.
However, the deletion of the renamed original file does not go through the Secure Empty Trash or srm process and leaves a copy of the document on the disk in unallocated free space, which is precisely the vulnerability that Secure Empty Trash or srm seeks to avoid. To prevent this problem you can use one of two approaches. The first is to regularly run the Erase Free Space tool from Disk Utility on your volume on a regular basis, but that can take a long time if you have a large amount free space on your drive. The second approach is to store your documents on an encrypted disk image, whether through FileVault or a stand-alone disk image. By using an encrypted disk image, any erased files are still left on the disk in encrypted form, making them unrecoverable to an attacker.
More Info
For more information on creating encrypted disk images, see Lesson 14, “Optimizing Data Confidentiality.”
Using FileVault
The Mac OS X FileVault feature converts a user’s home folder to a disk image encrypted with that user’s login password. FileVault images are encrypted with the Advanced Encryption Standard using a 128-bit key (AES-128). When a user logs in, the home folder is automatically mounted and the login password is used to decrypt and encrypt home folder contents as they are used, so files can be accessed normally. When the user is not logged in, the contents of the folder are inaccessible, even through mechanisms (such as root mode) that can normally bypass file protections. Because of this, FileVault is the preferred method to secure a user’s files when Mac OS X integrity cannot be guaranteed (especially when proper physical security is not possible, as with laptops).
When the user is not logged in, the disk image of the home folder is stored in /Users/username/username.sparseimage. When the user logs in, the /Users/username folder is renamed to /Users/.username (which makes it invisible), a new folder named /Users/username is created, and the disk image is mounted over the /Users/username folder. When the user logs out, the mount folder is deleted and the folder that contains the disk image is renamed.
If the computer should happen to crash, this leads to a scary-looking situation where the user’s disk image appears to have vanished into thin air. Don’t panic. The disk image is still there, it’s just hidden in the invisible /Users/.username folder. The next time the user logs in, everything should be restored automatically.
Encrypted disk images can also be created and mounted manually. These can be used in addition to or instead of FileVault to provide additional control over the security level of files. Using a manually created disk image with a different password (not the user’s login password) would be appropriate for storing extremely sensitive files because they would be available only when the disk image is specifically mounted, not whenever the user is logged in. Using a manual disk image instead of FileVault would be appropriate if only certain files need to be stored securely, and those files can be stored in a user-defined location (not preference files or other files that are automatically stored in the user’s Library folder).
FileVault has several limitations that you should consider before enabling it for any user account:
• The contents of an encrypted disk image are vulnerable to corruption. Normally, file corruption is only likely to render individual files unusable. Since the user’s entire home folder is stored by FileVault as a single disk image, corruption of that image may render the entire contents of the home folder inaccessible. This makes backups particularly important to protect FileVault users against data loss.
• Forgetting the password to a FileVault-protected account is a more serious problem than with a normal account. The master password (discussed in the next section) can be used to reset FileVault-protected account’s passwords, but if both the normal account password and the master password are lost or forgotten, you won’t be able to recover the contents of the FileVault account.
• FileVault-protected home folders can be difficult to integrate into a backup strategy. When the user is not logged in, only the disk image will be accessible, not the files in the home folder. Since this file will be modified at least slightly every time the user logs in, an incremental or differential backup strategy that backs up only files that have changed since the previous backup will need to back up the entire image every time. On the other hand, if the user is logged in, the disk image may be inaccessible (hidden behind the mounted home folder).
• Because FileVault protects all of the contents of the home folder—even folders that are intended to be publicly available—FileVault users cannot publish files using their Public folder (Personal File Sharing) or Sites folder (Personal Web Sharing).
• Because Windows Sharing requires storing low-security hashed user passwords, FileVault accounts should not be enabled for Windows sharing. (See “Configuring a Client Network,” earlier in this lesson.)
• Passwords—including those used to protect FileVault accounts—sometimes get paged out to the virtual memory swap files. To avoid leaking the password by this path, you should enable encrypted virtual memory on all computers on which FileVault will be used.
• Access to FileVault-protected files will be slower than normal, due to the need to encrypt and decrypt then as they are used.
Setting a Master Password for FileVault
Before you can enable FileVault for any user accounts, you must set a master password for FileVault. This password provides an emergency safety net for FileVault-protected accounts; without it, losing the user’s login password would result in the loss of all data in the user’s home directory. The master password is used to encrypt a Keychain, which secures an encryption backdoor that can be used to reset access to FileVault accounts if their passwords are lost.
The password assistant gives you suggestions for different types of passwords:
• Memorable
The Memorable passwords are still secure, since they include a word from the local dictionary, followed by a number 1 to 3 digits long, followed by a punctuation mark, followed by another word from the local dictionary.
• Letters & Numbers
• Numbers Only
• Random
• FIPS-181 compliant
To set a master password for FileVault:
1 Open System Preferences and choose the Security pane.
2 Click the Set Master Password button.
3 Authenticate as an administrator by entering an administrator user name and password.
4 Enter the master password you have chosen in the Master Password and Verify fields, or click the ? button to open the Password Assistant.
Note
Since the master password provides backdoor access to all FileVault-protected accounts, choosing a strong password is very important. The recommended procedure is to use the Password Assistant to generate a long random-type password, write it on a slip of paper, seal the paper in an envelope (so you can tell if it has been opened and used), label the envelope clearly (remember to include information to identify which computer this master password applies to), and store the envelope in a secure location.

5 Leave the Hint field blank.
6 Click the OK button.
Using the Master Password to Reset a Lost Account Password
If the password for a FileVault-protected account is lost, the only way to properly reset it is with the master password. Normal password reset options (using the System Preferences Account pane) do not work. Some reset methods, such as running the Password Reset utility from the Install DVD, may appear to work, but at most they will reset the user’s login password, not the FileVault encryption password. If these passwords do not match, the user still will not be able to log in.
To reset a FileVault account’s password, use the login window to attempt to log in to the account three times, entering a wrong password each time. After the third unsuccessful attempt, LoginWindow will ask for the master password. If it is provided successfully, you can provide a new password for the account. Both the account’s login password and the disk image’s encryption password will be switched.
One password that will not be switched is the encryption password for the account’s login Keychain. This password will remain set to the old (lost) password. During the reset process, LoginWindow claims that it will create a new (blank) Keychain and move the old one aside, but it may not actually do this.
To create a new (blank) login Keychain with a password that matches the login and disk image passwords, navigate to ~/Library/Keychains and rename or delete the login.keychain file. Then log out of and back into the account; a new Keychain will be created automatically. Since the FileVault recovery mechanism does not handle the Keychain’s encryption, there will be no way to recover the contents of the old Keychain unless its password can be found or recovered. Instead, the user will have to reenter her various service passwords into the new Keychain.
Enabling FileVault
The FileVault conversion process is started within the account to be converted. The conversion should be the only thing happening on the computer. No other users may be logged in, and no other programs may be running. Since the conversion process can take time, plan the conversion for a time when the computer can sit effectively idle until it is done. Last-minute conversions (just before the user leaves with his PowerBook to catch a flight) are a recipe for trouble.
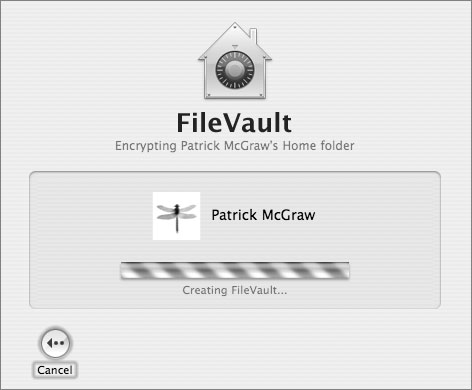
To enable FileVault:
1 If Fast User Switching is enabled, log out all active user sessions.
2 Log in to the account to be converted to FileVault protection.
3 Open System Preferences and choose the Security pane.
4 Click the Turn On FileVault button.
5 If necessary, authenticate as an administrator by entering an administrator user name and password.
6 Enter the current account’s password.
7 If there is currently any important information stored in the account’s home directory, select the “Use secure erase” checkbox.
If the account has just been created and has not been used yet, it’s acceptable to leave this box deselected.
8 Click the “Turn on FileVault” button.
You will be automatically logged out, and the FileVault conversion process will proceed automatically.
If there is much data in the user’s home folder, encrypting it and securely erasing it may take a while; do not attempt to use the computer while this process takes place.
What You’ve Learned
• When using Open Firmware Password, all startup keys are disabled except the Option key.
• Fast User Switching back to the Login Window is an excellent way to increase security.
• By default in Mac OS X, every time the computer boots, it automatically logs in to the initial administrator account without requiring a password; use the Accounts preferences pane.
• Enabling Stealth Mode disables sending denials in response to blocked packets.
• When a user with a FileVault home folder is not logged in, the disk image of that home folder is stored in /Users/username/username.sparseimage.
References
Apple Knowledge Base Documents
The following Knowledge Base documents (located at www.apple.com/support) provide further information about using the command-line interface:
Document 106482, “Setting up Open Firmware Password Protection in Mac OS X 10.1 or later”
Document 301416, “Mac OS X 10.4: If FileVault “secure erase” is interrupted, data loss may occur”
Document 25695, “Mac OS X 10.3, 10.4: FileVault—How to verify or repair a home directory image”
Document 25614, “Mac OS X 10.3, 10.4: FileVault—Home directory, Public folder unavailable while logged out”
URLs
Open Firmware commands: www.firmworks.com/QuickRef.html
Apple security: www.apple.com/macosx/features/security
Mac OS X v10.4 Security Help: http://docs.info.apple.com/article.html?path=Mac/10.4/en/cdb_scr.html
Lesson Review
1. Open Firmware Password requires what version of the Firmware?
2. Open Firmware Password disables what?
3. What command line utilities are used to manage disk images?
4. Using Secure Virtual Memory secures what files from being read?