
Lesson 29. Mounting Remote File Systems
|
Time |
This lesson takes approximately 2 hours to complete. |
|
Goals |
Understand the concept of user share mounts Differentiate between static mounts and dynamic mounts Configure Mac OS X to automatically mount a volume on startup or login Use command-line tools such as mount, umount, and nfsstat to troubleshoot mounts Understand how disk arbitration manages the mounting and unmounting of remote file systems |
Mac OS X connects to various file-sharing services such as the Apple Filing Protocol (AFP), File Transfer Protocol (FTP), network file system (NFS), and Server Message Block (SMB) for Windows.
This lesson discusses the mechanics behind the connections, the various methods of mounting share points, and some variances that make the experience different, based on several criteria. While the easiest methods of connecting to a server are through the Network icon in the Sidebar or the Connect to Server option in the Go menu (both from the Finder), some additional methods, such as using the mount command from the command line, will also be examined in this lesson.
Understanding User Mounting
Service discovery protocols let you view a list of computers or volumes and click to initiate a mount. In Mac OS X, you view the list by clicking the Network icon in the Sidebar.
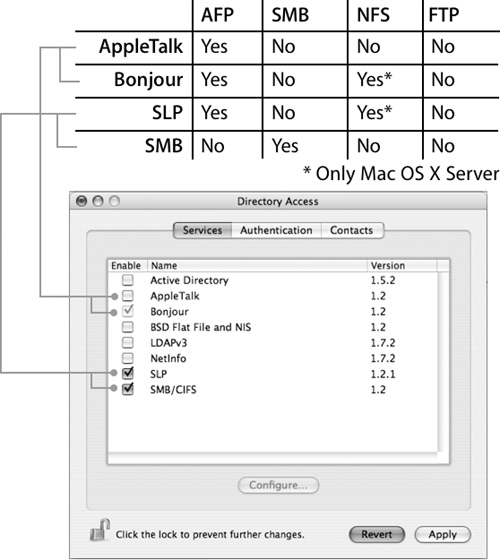
Apple supports four service discovery protocols: AppleTalk, Bonjour, Service Location Protocol (SLP), and SMB, as shown in the following figure. No single service discovery protocol discovers all file services on Mac OS X. None of the protocols discovers FTP, and only SMB discovers SMB. Browsing is not implemented for FTP, and NFS browsing is available only if the server is running Mac OS X Server. To manage those methods, you use Directory Access to enable and disable service discovery protocols.
Discovering Services on a Windows Network
Windows users can browse SMB services by selecting My Network Places. Browsing is possible because Windows networks establish service discovery with a computer that maintains a list of available computers.
On each subnet of a Windows network, the workgroup members elect one computer as the Local Master Browser, as illustrated in the following figure. The Workgroup members may elect additional local browsers as backup browsers.
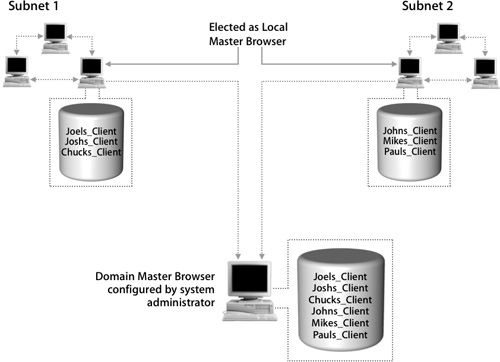
The system administrator can designate one server as the Domain Master Browser (DMB) to circulate browse lists outside of Internet Protocol (IP) subnets. The DMB registers with the WINS server. Local Master Browsers look for this name and send updates to the DMB, which then combines the lists and sends them back.
When a Windows user selects My Network Places, the client computer connects to a browser, obtains a copy of the browse list, and displays it.
Using the Network Browser
On Mac OS X, when you click the Network icon in the Sidebar, the Finder displays a list of browsable servers. You will see any local computers on your network, or you can select different network areas or workgroup names to see the servers they include.
To initiate a mount, as illustrated in the following figure, select a computer and click Connect, and enter the authentication information if necessary. Once you have mounted the server volumes, the contents of the server appear in the Finder window. The server (or share point) appears on the desktop and in the Sidebar, although this behavior can be modified by adjusting the Finder preferences.
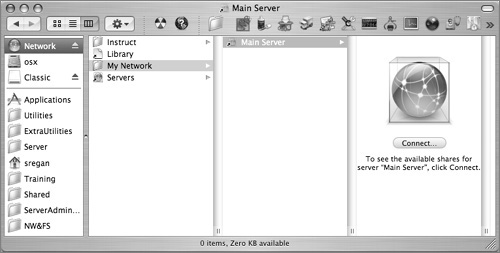
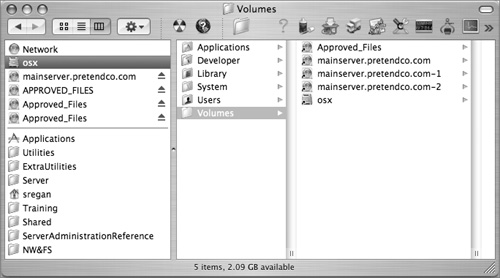
In Mac OS X, volumes mounted via the Network icon in the Sidebar actually mount in subdirectories under /Volumes. Later in this lesson, you will view these mounts from the command line.
Mounting Using Connect to Server
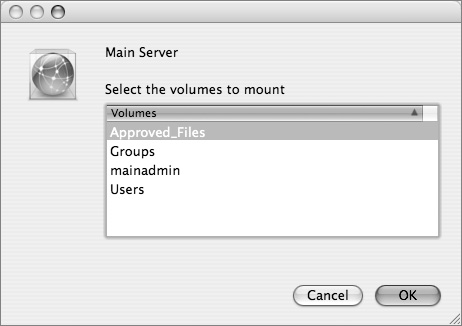
You invoke the Connect to Server command either from the Finder’s Go menu or by pressing Command-K in a Finder window. As shown in the following figure, you specify the URL of a server, and the Finder attempts to connect.
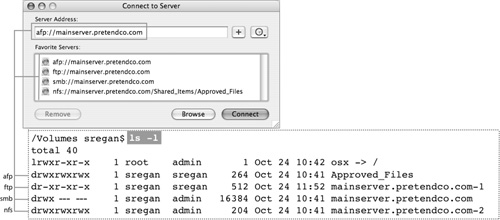
When you use Connect to Server to connect to an AFP server, AFP displays a list of volumes you can mount. Both administrators and regular users see a list of share points when mounting over AFP. It is also not necessary to type the letters afp before the IP address or name of the server, as Connect to Server will default to AFP.
When you mount using Connect to Server, a volume icon appears on your desktop and in the Sidebar. You can change your Finder preferences so that you do not see volume icons on your desktop.
Connect to Server actually mounts each share point on a subdirectory of /Volumes that is named for the share point or server being mounted. You can see the actual mount points by choosing Go to Folder from the Go menu and typing /Volumes, as shown in the following figure.
You can connect to all four service types (AFP, SMB, FTP, and NFS) using the Finder, but FTP mounts read-only, so you can download files but not upload them to the server.
Browsing is not implemented for FTP, and NFS browsing is available only if the server is running Mac OS X Server.
Mounting From the Command Line
To mount a volume using the mount command, you need a folder to mount on. Use mkdir or choose New Folder under the Finder’s File menu to create the folder prior to mounting.
Note
The commands disktool –e, disktool –u, diskutil eject, and diskutil unmount can unmount physically attached volumes and are preferable to umount for that purpose, although they may not work consistently when used on command-line mounts.
The following examples show how to use the mount command for AFP, SMB, FTP, and NFS:
• AFP Mount:
mount –t afp afp://mainadmin:[email protected]/Approved_Files /Users/sregan/
Documents/MyAFPMount/
• SMB Mount:
mount –t smbfs //[email protected]/Approved_Files /Users/sregan/
Documents/MySMBMount
• NFS Mount:
mount –t nfs mainserver.pretendco.com:/Shared_Items/Approved_Files /Users/sregan/Desktop/
MyNFSMount/
Note
Though it’s not possible to show it properly on the printed page, all of these URLs should be typed on one line with no paragraph returns.
The syntax for the three protocol types is similar in that each requires you to specify the type argument with the –t option to the mount command. Also, for all three protocols, you use %20 instead of a space because URLs cannot contain spaces. (In the previous examples, however, there were no spaces in the URL and so there was no need to use %20).
Other URL features, however, are different. For example, the syntax for AFP and SMB requires you to specify the share point on the server by the share name, but NFS syntax requires that you specify the full path to the shared folder. (That is, you must know where the folder resides on the NFS server in order to mount it from the command line.)
NFS requires no authentication, but AFP and SMB do. AFP and SMB will prompt for the user name and password if you don’t supply them on the command line. For additional options you can pass to the mount command, see the mount man page.
When you mount from the command line, icons usually appear automatically. If an icon does not appear once the volume is mounted, type disktool –r.
Note
If you have mounted a volume from the command line, you should unmount it from the command line. If you try to unmount the volume by dragging the icon to the Trash, the Finder might stop responding. If that happens, relaunch the Finder.
Listing and Unmounting Mounted Volumes
The mount command, with no arguments, lists all mounted file systems:
instructor:~ sregan$ mount
/dev/disk0s3 on / (local, journaled)
devfs on /dev (local)
fdesc on /dev (union)
volfs on /.vol
automount –nsl [135] on /Network (automounted)
automount –fstab [150] on /automount/Servers (automounted)
automount –static [150] on /automount/static (automounted)
afp_005An80ZHyoM001Eic06SdO0–1.2c000006 on /Users/sregan/Desktop/MyAFPMount (nodev,
nosuid, mounted by sregan)
//MAINADMIN@*SMBSERVER/APPROVED_FILES on /Users/sregan/Desktop/MySMBMount (nodev,
nosuid, mounted by sregan)
mainserver.pretendco.com:Shared_Items/Approved_Files on /Users/sregan/Desktop/MyNFSMount
(nodev, nosuid, mounted by sregan)
The nodev option means you cannot use special files in /dev on the mounted volume. The nosuid option means the setuid/setgid bits on commands located on the server volume are not honored if you execute them from the client.
Note
All three protocols are used to mount the same directory, something that would not be practical in real-world use. It is shown here for comparison purposes.
The umount command unmounts a volume. (The command for unmounting is umount, not “unmount.”) The following lines show unmounting the three volumes from the desktop.
instructor:~ sregan$ umount Desktop/MyAFPMount/
instructor:~ sregan$ umount Desktop/MySMBMount/
instructor:~ sregan$ umount Desktop/MyNFSMount/
Some details about using umount:
• Unmounting from the command line will not remove the directories created for the mounts when using NFS and SMB.
• If the directory created for the mount has items inside the directory, they will be hidden when the mount is made. When unmounted, the original data will be shown again. It may be necessary to relaunch the Finder to see the original files again.
• If the volume is in use, the umount command will fail unless you force an unmount by using the –f option.
Mounting a Volume at Login
To set up an automatic mount as a user, use Connect to Server or the Network browser in the Sidebar to mount the volume. Then select your account in the Accounts pane of System Preferences and click Login Items, as the following figure illustrates.
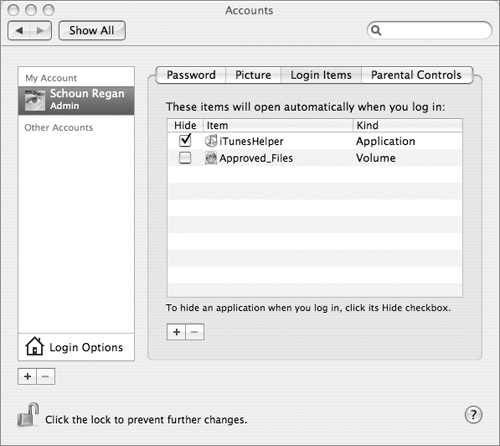
There are two methods for adding the volume to your startup items:
• Click the Add (+) button and locate the server in the Recent Servers folder in your home Library folder.
• Drag the volume’s icon into the list of items.
Any user can add a mounted volume to her startup items so that it automatically mounts when she logs in.
Now each time you log in to your Mac OS X computer, the login dialog for the mount will appear. If you add your password to Keychain, or if a Kerberos infrastructure has been implemented, the mount will occur automatically. Note that this is specific to a single user, unlike automounting with the automount daemon.
If you start up the computer while the server is unavailable, you may experience a delay while automount attempts to mount the volume. To prevent this delay, hold the Shift key when logging in to disable login items.
Mounting With the automount Daemon
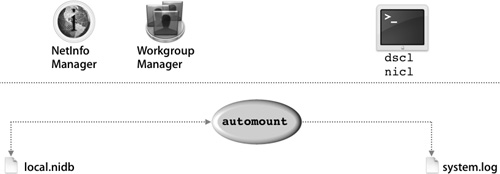
You can configure your computer to mount volumes automatically on startup by adding a mount record to the NetInfo database. When the automount daemon runs at startup, it reads the mount record and attempts to mount the volume. This type of automount is supported for AFP, SMB, and NFS. The following figure shows what tools are available to manage local automounts and what log file the automount daemon writes to.
You can add the mount record from the command line using dscl or nicl, or from the NetInfo Manager utility. You can also download and install the Mac OS X Server tool Workgroup Manager and use it to configure mount records in the local domain.
This type of mount cannot be disabled during startup, so avoid using it on mobile computers or for mounting a server that is frequently unavailable.
Note
To avoid having to include a password in the mount record, use this type of mount only for NFS servers or for AFP servers that allow guest access.
Using Mount Records
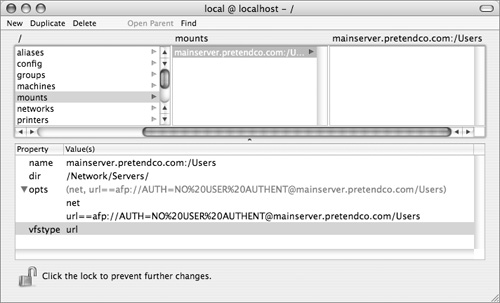
A mount record consists of the following properties:
• name: The server’s name and the full path to the folder that is to be mounted; for example, mainserver.pretendco.com:/Users.
• vfstype: Set to nfs for NFS mounts and url for AFP or SMB mounts.
• dir: The local folder where clients will mount the share point. Dynamically mounted share points always have a value of /Network/Servers/.
• opts: Mount options. There may be both, one, or neither of the options net and url.
• net indicates that the share point is to be dynamically mounted.
• url is the URL path to an AFP share point; for example, url==afp://;NO%20USER%[email protected]:/Users.
The mount record shown in the following figure causes automount to mount the share called Users onto /Network/Servers/mainserver.pretendco.com. This occurs the first time a user attempts to list or access the volume. The name of the user who initiated the mount will appear in the output from the mount command. The automount daemon then unmounts the volume when the user logs out.
Troubleshooting
When attempting to mount volumes from another computer, you might encounter filefork issues, the insecurity of NFS mounts, how Mac OS X reacts to the loss of a connection, more than one mounting of the same volume, and security issues related to Fast User Switching. You will also learn some tips for resolving browsing and mounting issues.
Using Forked Files Over AFP
The Hierarchical File System Plus, HFS Plus, supports forked files, but other file systems, such as UFS, do not. When copying files between local volumes, Mac-specific utilities handle forks correctly, as do command-line utilities such as cp and mv, but only on Mac OS X systems. (Apple engineered such command-line utilities to handle resource forks properly.) The Windows graphical user interface does not support resource forks as well. A similar issue exists with file-sharing services. Only AFP supports forked files; NFS, SMB, and FTP do not.
AFP was designed to handle forked files. When a forked file is written on a Mac OS X computer over AFP to a volume on a server, the File Manager on the Mac OS X computer treats the AFP mount point as if it were an HFS Plus file system. That is, it keeps the forked file intact. AFP also preserves the intact forked file as it is copied. Once the forked file is received on the server computer, the server’s File Manager preserves the forked file if the volume is HFS Plus, or splits the file into two flat files if the volume is a flat-file system, such as UFS.

Using Forked Files Over NFS
NFS, SMB, and FTP were not designed to handle forked files. The example shown in the following figure illustrates what happens when you copy a forked file over NFS. (This example shows NFS but applies to other non-AFP file systems as well.)
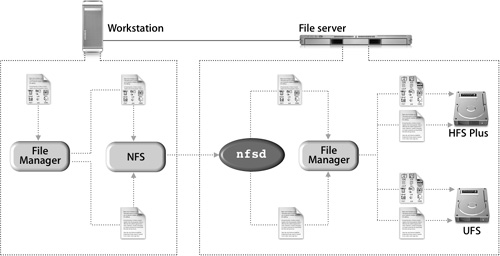
When you write a forked file on a Mac OS X computer over NFS to a volume on a server, the File Manager on the Mac OS X computer treats the NFS mount point as if it were a flat-file system. That is, it splits the file into two flat files. Because NFS on the server writes two separate files, the File Manager on the server computer stores the data as two flat files, regardless of the volume’s file-system type.
When a forked file is stored as two flat files on an HFS Plus file system over NFS, the file looks like a normal file when viewed from Mac OS X, but not when viewed from the server. Mac OS X graphical user interface applications executing on the Mac OS X computer expect forked files on an NFS volume to be stored as two flat files, because the File Manager on the Mac OS X computer treats the NFS mount point as if it were a flat-file system. Applications executing on the server, however, expect files on an HFS Plus file system to be intact.
For the same reasons, when a forked file is created locally on an HFS Plus file system on the server and the volume is mounted on Mac OS X over NFS, the file looks normal when viewed from the server but not when viewed from Mac OS X.
Understanding NFS Security
NFS is inherently less secure than the other protocols because it does not authenticate users. The NFS server compares the IP address of your computer only with the list of computers that are authorized to mount the volume. The only time it does this comparison is when you mount the volume. Anyone with a packet sniffer can pretend to be an authorized client.
NFS was developed when only trusted people could create an account; in a few places, this assumption is still true, such as in small, standalone research networks.
In addition, NFS assumes that the user database on the client computer is exactly the same as the one on the server. If your user ID is 503 on your client computer, the NFS server believes that you are user 503 on the server. Potentially, this allows a client administrator to steal another user’s identity on the server. All he would have to do is create a new user on his computer, and then change the user ID in his local NetInfo database. This is a tremendous security issue when root is enabled.
NFS has some options that help administrators work around this problem. An NFS server administrator can:
• Limit clients
• Share the volume as read-only
• Share the volume with root or all users mapped to nobody (uid –2)
• Restrict access to the mount point based on IP address or subnet
• Implement a policy of users creating and enabling encrypted disk images
Note
Know the security policy on NFS servers that you mount. If you believe that a server is insecure, caution users against storing sensitive documents there. If users need only to download from the server, you can mount it as read-only.
Disconnecting When Volumes Are Mounted
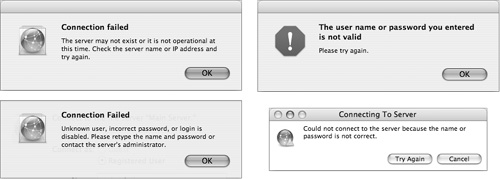
Sometimes your computer may lose its connection to a server due to circumstances beyond your control. If you lose your network connection while you have volumes mounted, or if a server from which you have mounted becomes unavailable, Mac OS X will display an error message asking whether to disconnect from servers whose volumes you have mounted.
The following figure shows the dialogs that appear when an AFP, SMB, or NFS share has been disconnected abruptly, whether from a network disconnection or a service shutdown. The dialogs with the thin bar across the top are called Inspector windows and appear over any windows. The larger dialogs with a thicker bar across the top may not appear over all windows, so anyone using the computer at that time may not be alerted to the shutting down of a server. The three dialogs with the red octagon appear when the service has stopped abruptly but the network connection to the server is still valid.
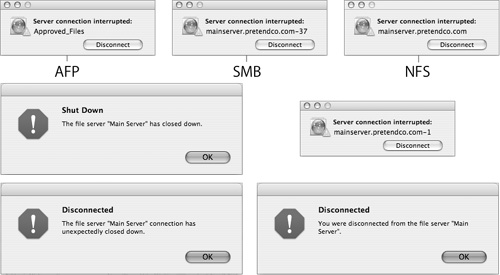
Mac OS X version 10.4 will reconnect automatically if a connection is lost. This information (the automount daemon and the kernel write messages about lost connections) is output to the system.log file.
Here is an example of a mount that was successful, followed by the physical network connection being lost, and then a reconnect minutes later. The volume reconnects automatically and attempts to reconnect every 10 seconds:
Oct 24 16:48:08 instructor kernel[0]: AFP_VFS afpfs_mount: /Volumes/Approved_Files, pid 402
Oct 24 16:48:22 instructor kernel[0]: UniNEnet::monitorLinkStatus – Link is down.
Oct 24 16:48:25 instructor launchd: Server 0 in bootstrap 1103 uid 0: "/usr/sbin/lookupd"[380]: exited
abnormally: Hangup
Oct 24 16:48:25 instructor configd[32]: posting notification com.apple.system.config.network_change
Oct 24 16:48:29 instructor lookupd[406]: lookupd (version 365) starting – Mon Oct 24 16:48:29 2005
Oct 24 16:49:59 instructor kernel[0]: AFP_VFS afpfs_Reconnect: doing reconnect on /Volumes/
Approved_Files
Oct 24 16:49:59 instructor kernel[0]: AFP_VFS afpfs_Reconnect: connect to the server /Volumes/
Approved_Files
Oct 24 16:49:59 instructor kernel[0]: AFP_VFS afpfs_Reconnect: connect on /Volumes/Approved_
Files failed 65.
Oct 24 16:50:04 instructor kernel[0]: AFP_VFS afpfs_Reconnect: posting to KEA retry for /Volumes/
Approved_Files delayCnt 6
Oct 24 16:50:04 instructor KernelEventAgent[43]: tid 00000000 received VQ_NOTRESP event (1)
Oct 24 16:50:04 instructor KernelEventAgent[43]: tid 00000000 type 'afpfs', mounted on '/Volumes/
Approved_Files', from 'afp_005An80ZHyoM001Eic06SdO0–1.2c000009', not responding
Oct 24 16:50:04 instructor KernelEventAgent[43]: tid 00000000 found 1 filesystem(s) with problem(s)
Oct 24 16:50:09 instructor kernel[0]: AFP_VFS afpfs_Reconnect: connect to the server /Volumes/
Approved_Files
Oct 24 16:50:09 instructor kernel[0]: AFP_VFS afpfs_Reconnect: connect on /Volumes/Approved_
Files failed 65.
The log is snipped here due to its length. A reconnect is attempted every 10 seconds between these entries.
Oct 24 16:50:29 instructor kernel[0]: AFP_VFS afpfs_Reconnect: connect to the server /Volumes/
Approved_Files
Oct 24 16:50:29 instructor kernel[0]: AFP_VFS afpfs_Reconnect: connect on /Volumes/Approved_
Files failed 65.
Oct 24 16:51:39 instructor kernel[0]: UniNEnet::monitorLinkStatus – Link is up at 100 Mbps – Full Duplex
Oct 24 16:51:40 instructor configd[32]: posting notification com.apple.system.config.network_change
Oct 24 16:51:40 instructor lookupd[427]: lookupd (version 365) starting – Mon Oct 24 16:51:40 2005
Oct 24 16:51:48 instructor kernel[0]: AFP_VFS afpfs_Reconnect: connect to the server /Volumes/
Approved_Files
Oct 24 16:51:48 instructor kernel[0]: AFP_VFS afpfs_Reconnect: Opening session /Volumes/
Approved_Files
Oct 24 16:51:48 instructor kernel[0]: AFP_VFS afpfs_Reconnect: Logging in with uam 10 /Volumes/
Approved_Files
Oct 24 16:51:48 instructor KernelEventAgent[43]: tid 00000000 received VQ_NOTRESP event (1)
Oct 24 16:51:48 instructor kernel[0]: AFP_VFS afpfs_Reconnect: Restoring session /Volumes/
Approved_Files
Eventually, automount unmounts the volumes, and they no longer appear in the Network browser, in the Sidebar or desktop, or in the output of the mount command.
Note
If you reestablish your link to the network or the server becomes available again, the spinning ball icon might appear when you attempt to use the Finder. Relaunch the Finder to get rid of the icon.
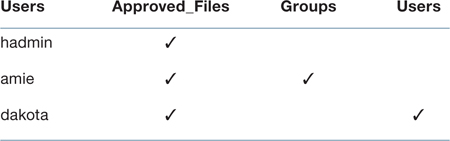
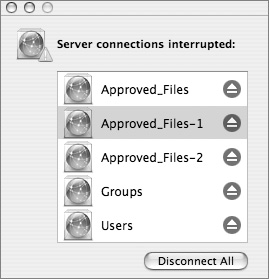
Working With Multiple Mounts and Multiple Users
Normally, all mounted volumes unmount when a user logs out. However, if Fast User Switching is enabled and more than one user is logged in, mounted volumes are not unmounted automatically when a user logs out. The volumes remain mounted and are accessible to all users logged in to the computer.
The following output shows several volumes mounted by several users who have logged in using Fast User Switching. (The table before the output should help you decipher the text.)
Mount Points
Amie–iBook:~ hadmin$ mount
/dev/disk0s3 on / (local, journaled)
devfs on /dev (local)
fdesc on /dev (union)
volfs on /.vol
automount –nsl [117] on /Network (automounted)
automount –fstab [136] on /automount/Servers (automounted)
automount –static [136] on /automount/static (automounted)
afp_005An80ZHyoM001Eic06SdO0–1.2c000006 on /Volumes/Approved_Files (nodev, nosuid,
mounted by hadmin)
afp_005An80ZHyoM001Eic06SdO0–1.2c000007 on /Volumes/Approved_Files–1 (nodev, nosuid,
mounted by amie)
afp_005An80ZHyoM001Eic06SdO0–2.2c000008 on /Volumes/Groups (nodev, nosuid, mounted by amie)
afp_005An80ZHyoM001Eic06SdO0–1.2c000009 on /Volumes/Approved_Files–2 (nodev, nosuid,
mounted by dakota)
afp_005An80ZHyoM001Eic06SdO0–2.2c00000a on /Volumes/Users (nodev, nosuid, mounted by dakota)
If a disconnect happens, a collective inspector dialog appears after a few minutes, as shown in the following figure, informing the logged-in user that several mounts have become available and offering to disconnect the orphaned mount points. However, a successful rejoining of the server or the Mac OS X computer to the network will result in a reconnect.
Troubleshooting Browsing
If a computer does not appear in the Network browse list on your computers, try the following:
• Try other services from the same server. If more than one protocol is affected, you should troubleshoot your network connection.
• Check Directory Access. The service discovery protocol you need may have been disabled.
• If you’re browsing for AFP service from a pre–Mac OS X computer, you might need AppleTalk. Be sure AppleTalk is enabled on only one network interface. The pre–Mac OS X computer must be able to make the connection via something other than AppleTalk, as AppleTalk can discover share points but cannot connect to them.
• Try browsing from a different computer. If the service appears there, find out what is different on that computer. Look at Network preferences and Directory Access settings, for example.
Troubleshooting Mount Issues
When attempts to mount a volume fail, several other dialogs commonly appear.
If you can browse a computer but cannot connect, try the following:
• Look for network problems. Check physical connections and try to ping the server. Try other services from the same server. If more than one protocol is affected, you should troubleshoot your network connection.
• Check whether a firewall is configured to block the port you are trying to access between the two systems.
• Restart automount with the –d flag to enable debug mode. Repeat the attempts to mount.
• Verify the permissions of the folder you’re mounting on.
• Verify that the URL you are using is correct.
• Try connecting from a different computer. If the service appears on that computer, find out what is different. Look at Network preferences and Directory Access settings, for example.
• If you get a login dialog but cannot mount the volume, the connection is good and authentication is the problem. Verify the user name and password.
• If you have a problem mounting from the Finder, try mounting from the command line. You may get more information from error messages.
Recognizing Connection Errors
Sometimes when the Finder cannot connect to a server, it provides an error message. If the Finder detects an error before it attempts to mount, the message will not contain an error code. Two causes of this are nonexistent computers and bad authentication information, as shown in the following figure.
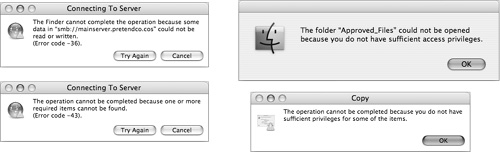
If you try to mount a volume that is not being shared, you will get an error message with error code –36.
You might see some of the following error messages when mounting from the command line:
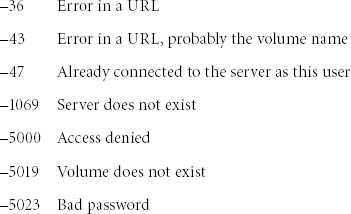
You can look up error codes on Mac OS X or Mac OS X Server by viewing the file/System/Library/Frameworks/CoreServices.framework/Versions/A/Frameworks/CarbonCore.framework/Headers/MacErrors.h.
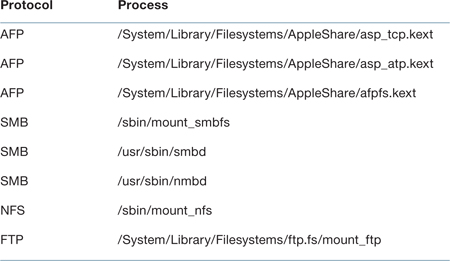
Sometimes processes write error messages to the system log. Look for the following process names in Console. The error might be related to file sharing.
Checking Server Availability
If users cannot connect to a server, you should check access to the server itself.
You can use Port Scan in Network Utility to scan for open network ports on the server. There are several command-line utilities you can use to verify that SMB or NFS service is available on a server.
SMB
To see what an SMB server is sharing, type
smbclient –L hostname –N
The results should look something like this:
Domain=[RECOVERY] OS=[Unix] Server=[Samba 3.0.10]
Sharename Type Comment
________ ____ ______
Groups Disk macosx
Public Disk macosx
Users Disk macosx
IPC$ IPC IPC Service (Mac OS X)
ADMIN$ IPC IPC Service (Mac OS X)
Anonymous login successful
Domain=[RECOVERY] OS=[Unix] Server=[Samba 3.0.10]
Server Comment
________ ______
MY–MAIN–SERVER Mac OS X
Workgroup Master
_________ ______
RECOVERY
Testing whether you can authenticate with a specific user name and password uses the format
smbclient //hostname/share –U user%password
where password is your password on the SMB server.
This should give you an smb: > prompt. (Type exit to exit the prompt.) If you don’t get the prompt, there’s a problem with either the user name or password.
To check that the NetBIOS name maps to a particular IP address, type
nmblookup –U IPaddr hostname
where IPaddr is the IP address and hostname is the hostname of the SMB server. It should respond with the same IP address and hostname.
NFS
To query the state of an NFS server, you can use rpcinfo and showmount.
To see whether the NFS processes on the server have registered with portmap, type
rpcinfo –p servername
where servername is the name of the NFS server. The output should show nfs and mountd.
For example:
rpcinfo –p mainserver
program vers proto port
100000 2 tcp 111 portmapper
100000 2 udp 111 portmapper
100024 1 udp 1020 status
100024 1 tcp 1017 status
100021 0 udp 1008 nlockmgr
100021 1 udp 1008 nlockmgr
100021 3 udp 1008 nlockmgr
100021 4 udp 1008 nlockmgr
100021 0 tcp 1016 nlockmgr
100021 1 tcp 1016 nlockmgr
100021 3 tcp 1016 nlockmgr
100021 4 tcp 1016 nlockmgr
100005 1 udp 989 mountd
100005 3 udp 989 mountd
100005 1 tcp 1014 mountd
100005 3 tcp 1014 mountd
100003 2 udp 2049 nfs
100003 3 udp 2049 nfs
100003 2 tcp 2049 nfs
100003 3 tcp 2049 nfs
To see what volumes are being exported (shared) by the server and who is allowed to mount those volumes, use showmount –e servername.
showmount –e mainserver
and
showmount –e mainserver.pretendco.com
To see which other computers have mounted NFS volumes from the server, use showmount servername.
For example:
showmount mainserver
and
showmount mainserver.pretendco.com
What You’ve Learned
• Mac OS X supports four file-sharing protocols for maximum compatibility with other operating systems:
• AFP, primarily used by other Macintosh computers
• SMB, primarily used by Windows computers
• FTP, used by most computers
• NFS, primarily used by other UNIX-based systems
• You can use the Finder’s Network browser to locate servers that offer share points over various protocols, such as AFP and SMB.
• To manage mounts from the command line, use mount to mount, umount to unmount, and nfsstat to troubleshoot NFS mounts.
• One way to have mounts at login is to first mount the volume, then drag it inside the Login Items tab of the Accounts preferences pane within System Preferences, which makes an alias for mounting at login.
• Knowing the specifics behind what happens when you use Connect to Server, such as where the mount occurs in the local file system, can help you better troubleshoot problems as they arise.
References
Apple Knowledge Base Documents
The following Knowledge Base document (located at www.apple.com/support) provides further information on file services.
Document 106439, “‘Well Known’ TCP and UDP Ports Used By Apple Software Products”
Books
Ts, Jay; Eckstein, Robert; and Collier-Brown, David. Using Samba, 2nd ed. (O’Reilly, 2003).
You can also find a copy of the book on your Mac OS X computer at /usr/share/swat/ using_samba/toc.html.
URLs
Apple developer documentation: http://developer.apple.com/documentation
Samba: www.samba.org
NFS protocol specification: www.ietf.org/rfc/rfc3530.txt
Lesson Review
1. What are some important differences between AFP and NFS?
2. How do you configure your workstation to automount remote volumes on startup?
3. What process actually mounts volumes when you use the Network browser?
4. Where do volumes mount when you use the Network browser?
5. Where do volumes mount when you use Connect to Server?
Answers
1. Apple Filing Protocol was designed to handle forked files, and NFS was not. AFP performs user authentication, while NFS relies on IP address and user ID.
2. Add a startup item in your account preferences, or add a mount record to the NetInfo database using Workgroup Manager, NetInfo Manager, dscl, or nicl.
3. The automount daemon performs the actual mount.