
Lesson 27. File Permissions and Flags
|
Time |
This lesson takes approximately 1 hour to complete. |
|
Goals |
Learn how file modes other than read and write can be used to implement file usage policies Set and remove execute permissions on a script or program, and understand that the program cannot be run without the execute bit set Set and remove execute (search) permission on a folder, and demonstrate the effect on a user’s ability to list the contents of that folder Use chmod to set the sticky bit on a folder, and understand that a user cannot delete or rename files owned by others in that folder Use chflags to set flags Understand what a umask is and what role it has in setting permissions policy for new files |
By now you have learned how to set basic file and folder permissions. In this lesson, you will learn to set additional permissions from the command line, as well as how to set and clear a file lock using the Finder and the command line. You will also learn some monitoring and troubleshooting techniques, such as finding locked files or files with specific permissions, and using Disk Utility to repair permissions.
Understanding Permissions
On Mac OS X and other UNIX-based operating systems, files and folders have an attribute known as the file permission mode. This mode determines how the file’s owner, group, and others may access the file. You can view the mode in a long ls listing. For example:
% ls -l
lrwxr-xr-x 1 david david 5 7 Jan 09:57 DirLink -> MyDir
lrwxr-xr-x 1 david david 6 7 Jan 09:57 FileLink -> MyFile
drwxr-xr-x 2 david david 68 7 Jan 09:56 MyDir
-rw-r--r-- 1 david david 6 7 Jan 09:57 MyFile
-rw-rw-r-- 1 david david 498 7 Jan 09:58 NewFile
-rwxr-xr-x 1 david david 369 7 Jan 09:59 Script
In a long ls listing, the leftmost character indicates the type of file: d for directory or folder, l for symbolic link, and - for a regular file. The next nine characters represent the file mode, which consists of three sets of three bits. The three sets correspond with Owner, Group, and Other permissions. The three bits in each set correspond with read (r), write (w), and execute (x) permission. A hyphen (-) replaces the r, w, or x character for permissions that are not set.
The following figure shows the correspondence between the information you see in the Finder’s Get Info window and the information you see in a long ls listing.
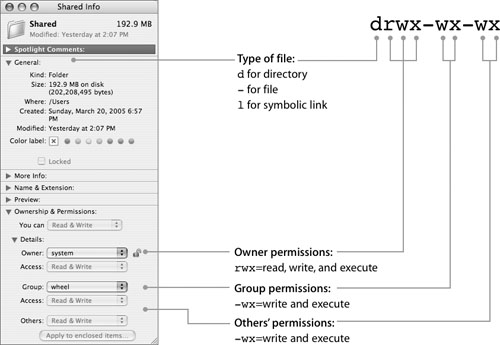
The Finder’s Get Info window enables you to choose from three types of access permission on a file and four on a folder. The figure shows the available Finder permission choices and how they appear at the command line. Note that the Finder automatically sets x permission on a folder whenever you choose “Read only,” “Read & Write,” or “Write only” from the Finder.

If you use the command line to set permissions, other permission combinations are available.
Note
Copying files using the Finder may change their permissions, as viewed from the command line. When you create a new file from the command line on Mac OS X, the file’s group is set to the group of the parent folder, even if the user who creates the file is not a member of that group. In some versions of UNIX, a file’s group is set to the group of the user who creates the file.
Setting Permissions With chmod
You use the chmod (change mode) command to set the permission mode from the command line. Because “owner” and “other” both begin with the letter o, you use u (user) for owner permission.
The symbolic mode argument shown in the following figure consists of three characters, one from each table.
You will learn about the setUID, setGID, and sticky bits later in this lesson. You will also learn about numeric and absolute arguments to the chmod command.
Why Set or Clear x Permission?
There are three cases in which you might find it useful to set or clear the x permission from the command line. You can:
• Allow or restrict execution of a program or script
• Restrict long listing of a folder while allowing short listing
• Restrict display of folder contents while allowing access to contents
To grant or deny program execution, set or clear the x permission:
student17$ ls -l Ascript; ./Ascript
-rwxr--r-- 1 david david 29 14 Jan 11:15 Script
bash: ./AScript: Permission denied
To deny long but grant short directory listing, set r and clear x permission:
student17 $ ls -ld ADir; ls -l ADir
drwxrw-r-- 3 david david 102 27 Jan 18:48 ADir
ls: Information.txt: Permission denied
To deny directory listing but grant file access by name, clear r and set x permission:
student17$ ls -ld ADir; ls ADir; cat ADir/Docz.txt
drwx--x--x 4 david david 106 28 Jan 14:42 ADir
ls: ADir: Permission denied
This is the contents of Docz.txt.
Grant or Deny x Permission on a File
To execute a program or shell script, you must have both r and x permission to it. When a programmer creates an application or command-line utility, the software that builds the program sets x permission automatically. When you create a script, you must set x permission on it with the chmod command.
As an administrator, you can deny x permission to restrict execution of a command to the file’s owner or group. For example:
david$ ls -l shutdown
-r-sr-xr-- 1 root operator 20636 16 Nov 09:19 shutdown
david$ /sbin/shutdown
/sbin/shutdown: Permission denied.
Deny x and Grant r Permission on a Folder
Execute permission on a folder is sometimes called search permission. Without search permission, you cannot perform a long listing of the folder’s contents. You can perform a short ls listing (as long as you have r permission to the folder), so you can view the filenames and copy the files.
As an administrator, you can prevent users from seeing the other information fields in the long listing by denying x permission. For example:
david$ ls -ld modetest
drwxrw-r-- 3 root david 102 27 Oct 48 12:20 modetest
david$ ls modetest
Information.txt
david$ ls -l modetest
ls: Information.txt: Permission denied
Grant x and Deny r Permission on a Folder
A user who has x but not r permission on a folder cannot display the contents of that folder at all. The user can, however, access a file in that folder by name (if the user has r permission to the file).
This might be useful when an administrator wants to provide quick selective access to a file, without changing permissions on server folders, as opposed to a long-term strategy for providing selective access to files.
Granting x and denying r on a folder can be useful when you want to make a file available to a limited set of users—for example, to limit file access over FTP. Users who know the name of the file can get it, but other users cannot see the name in a folder listing. For example:
• I have x but not r permission to the folder:
david$ ls -ld noreaddir
drwx--x--x 4 root david 26 136 Sep 14:42 noreaddir
• I cannot list the folder contents:
david$ ls noreaddir
ls: noreaddir: Permission denied
• I can cat a file in the folder if I know its name:
david$ cat noreaddir/Documentxyz.txt
This is the contents of Documentxyz.txt.
Controlling File Deletion From a Folder
Users need write permission to a folder in order to add, delete, or rename a file. By denying w permission to a folder, you can prevent users from deleting files or adding files.
If you grant a user w permission to a folder:
• The user can create files in that folder.
• The user can delete files—even files owned by other users—in that folder.
Using the Sticky Bit
What if you want finer control than just one owner of a folder being able to delete everything? How do you allow users to add files to a folder, but prevent users from deleting each other’s files from the folder? You set the sticky bit on the folder using chmod:
$ chmod +t MyDir
$ ls -ld MyDir
drwxrwxrwt 3 david david 102 Oct 28 16:27 MyDir/
Note
You omit the u, g, and o when you set the sticky bit.
In the following example, user david owns a folder with the sticky bit set. Owner, group, and other all have rwx permission. User laura cannot delete user david’s file.
laura$ ls -ld nodeldir
drwxrwxrwt 3 david david 102 28 Oct 16:27 nodeldir/
laura$ rm nodeldir/efile
override rw-r--r-- david/david for nodeldir/efile? y
rm: nodeldir/lfile: Operation not permitted
A user can remove or rename a file in a folder with the sticky bit set only if both of these statements are true:
• The user has write permission to the folder.
• The user is the owner of the file, the owner of the folder, or a system administrator.
Note that the sticky bit does not prevent a user from changing or overwriting another user’s file. A user who has write permission to a file can change the contents of that file, even if the sticky bit is set on the folder. To prevent overwriting, users must deny write access to group and other on files they create.
On some versions of UNIX, new folders inherit the sticky bit from their parent folder. This is not true on Darwin/Mac OS X.
Starting a Process As a Different User
When a program has the setUID (set user ID on execution) bit set, that program always executes with the user ID of the owner of the file, regardless of who actually executes the program. In a long ls listing, a file with the setUID bit set has an s in place of an x in the owner (user) permissions.
A program with the setGID (set group ID on execution) bit set executes with the group ID of the file’s group. In a long ls listing, a file with the setGID bit set has an s in place of an x in the group permissions.
In early UNIX, someone added a feature to mail so users could mail a file, but that person forgot that mail ran setUID to root. As a result, you could read any file, regardless of its permissions, by mailing it to yourself!
Modern programming techniques for eliminating flaws in setUID programs include privilege bracketing: Programmers use a system call to make some sections of the code run as root and other sections run as an unprivileged user.

The setUID and setGID bits are important because some commands installed on your computer must run with the user or group ID of an administrator in order to perform their function. For example, the passwd command must execute as root to modify your user information when you change your password.
Note
If a program is installed with the setUID or setGID bit set, do not clear it!
If a program that runs as root contains a security flaw, a malicious user might be able to obtain root access to a computer by exploiting that flaw. Programmers try to eliminate vulnerabilities, but they don’t always succeed. You can find examples of setUID-related security vulnerabilities by searching for setUID on the CERT webpage, www.cert.org. Mac OS X does not honor the setUID or setGID bit on shell scripts.
Warning
Utilities on your computer rely on file permissions to prevent users from causing inadvertent or malicious damage. To avoid exposing your computer to malicious or inadvertent damage, do not set the setUID or setGID bit on utilities installed on your computer.
Set the SetUID and SetGID Bits
You set the setUID bit using the command chmod u+s filename. Clear the setUID bit using the command chmod u-s filename. Use g in place of u to set and clear the setGID bit.
A long ls listing shows the letter s in place of x in the owner bits for setUID. For example:
-rwsr-xr-x 1 david david 60 20 Nov 17:52 myprogram
A long ls listing shows the letter s in place of x in the group bits for setUID. For example:
-rwxr-sr-x 1 david david 60 20 Nov 17:52 myprogram
Using Numeric Arguments to chmod
You can set the mode of a file or folder by using numeric arguments to chmod. Numeric arguments enable you to set exactly the mode you want with just one command.
Don’t recursively use chmod with numerical arguments on home directories. Use the textual method when you want to operate only on specific permissions categories (user, group, and other). The numerical method always sets all three categories, which is not appropriate for home directories.
In the following figure, the first table shows that the r, w, and x bits correspond with the values 4, 2, and 1. The second table shows the value of each triplet.
You can set the sticky bit on a folder by adding 1000 to the mode. For example,
$ chmod 1755 mydir
will set the permissions to
-rwxr-xr-t 1 david david 68 Nov 20 20:28 mydir
You can set the setUID bit by adding 4000 to the mode. For example,
$ chmod 4755 myprog
will set the permissions to
-rwsr-xr-x 1 david david 102 Nov 20 20:28 myprog
You can set the setGID bit by adding 2000 to the mode.
Note
Before you use numeric arguments to chmod, look at the current mode of the file or folder to be sure you do not inadvertently clear the sticky, setUID, or setGID bit.
Setting Permission Policy Within the Session: umask
The umask (user mask) masks the mode bits when you create a file or folder. The umask enables you to set a permission policy within a Terminal session.
For folder creation, subtract the umask from a maximum of 777 to see what the folder creation mode will be.
For file creation, subtract the umask from a maximum of 666 to see what the file creation mode will be.
For example, when the umask is 022, folders are created with mode 755 (drwxr-xr-x), and files are created with mode 644 (-rw-r--r--).
The umask command with no arguments lists the current umask. The default umask in Terminal is 022.
Use the umask command to set the umask within a session. You can omit leading zeros, so 22 is equivalent to 022 and 2 is equivalent to 002.
When the umask is 002, new folders you create have mode 775 (drwxrwxr-x), and new files have mode 664 (-rw-rw-r--). For example:
$ umask 002
$ umask
2
$ echo Test > testfile
$ mkdir testdir
$ ls -l
drwxrwxr-x 2 david david 68 28 Oct 17:06 testdir
-rw-rw-r-- 1 david david 16 28 Oct 17:06 testfile
When you set the umask in Terminal, it is effective only for the session in which it is set. You can set the umask for all of your Terminal sessions by setting the umask in your .profile, .login, or .cshrc files.
Unfortunately, the defaults command uses decimal numbers, and umask values are octal numbers. To set a umask of 22, you would use the argument -int 18, not -int 22.
As administrator, you can set a global, systemwide umask by adding an umask command to the script /etc/rc. The umask will apply to the Finder and other graphical user interface programs, as well as the Terminal interface.
A user can set a per-user umask that applies to the Finder and other Utilities, as well as the Terminal interface, by using the defaults command. For example,
defaults write -g NSUmask -int 2
will set the umask to 002.
Understanding Access Control Lists
Access control lists (ACLs) are a new feature in Mac OS X v10.4. File-system ACLs provide a much more granular set of permissions options than the traditional UNIX permissions explained so far. In addition to more granular permissions, now you can also assign different permissions to different users or groups, where with traditional UNIX permissions, you were limited to setting permissions to only one user and one group. By default, file-system ACLs are disabled on volumes in Mac OS X. Before you can use ACLs, you must turn them on for that particular volume:
fsaclctl -p /Volumes/MyACLedDrive -e
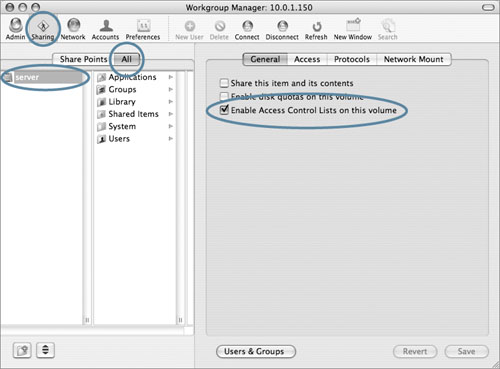
To determine first if ACLs are already enabled on a volume, type fsaclctl -p /Volumes/ MyACLedDrive. If you’re using Mac OS X Server, you can also use Workgroup Manager to turn on file-system ACLs, as seen in the following figure.
Once you’ve enabled ACLs for the volume, you must assign specific rights to a file. As with traditional UNIX permissions, you use the chmod command to do this, but you must add the +a argument.
Some examples include:
chmod +a "admin allow write" file1
chmod +a "guest deny read" file1
chmod +a "admin allow delete" file1
When you need to see what ACLs are attached to a given file, you use ls with the -le options:
ls -le file1
-rw-r--r--+ 1 juser wheel 0 Apr 28 14:06 file1
owner: juser
1: guest deny read
2: admin allow write,delete
Workgroup Manager also makes the task of assigning and viewing ACLs easier, as shown in the following figure.
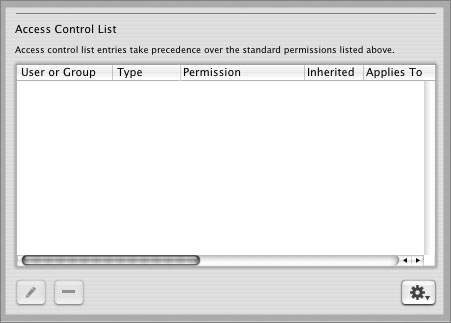
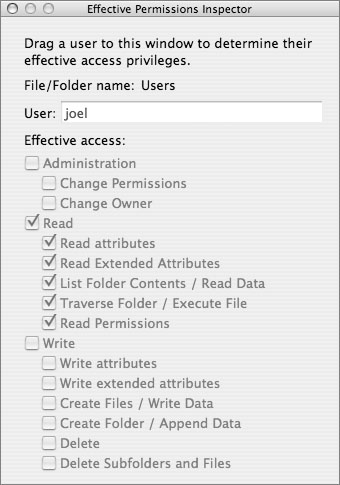
As you can imagine, ACLs get very confusing very quickly. Again, Workgroup Manager comes to the rescue with the Effective Permissions Inspector. Just select a file or folder in Workgroup Manager, pull down the gear menu in the lower-right corner, and select Show Effective Permissions Inspector. With this tool, you can type in any user name, and it will parse through all of the ACL entries—many of which may be overlapping—and show you quickly which permissions that specific user will have on that file or folder.
Warning
File-system ACLs are very complex and you should test them very carefully to ensure that you’ve set up the correct set of permissions.
Protecting Files With Flags
Sometimes you might need to ensure that no user, even the owner, inadvertently moves, changes, or deletes a certain file.
Mac OS X and other BSD-UNIX (Berkeley System Distribution) file systems support flags, in addition to permission modes. Flags help define what can be done to a file, such as deleting it or changing a symbolic link. The most important flag in Mac OS X is the uchg flag, which locks files. An ordinary user cannot change, move, or delete a file that has this flag set. The root user can override this flag, and the file owner can clear it.
If you set or clear the uchg flag from the command line, the Finder will update the icon the next time you click it.
The Finder uses the uchg flag to lock a file when you click Locked on the File Info window, as shown below. When you lock a file in the Finder, the file’s icon changes to include a small lock image.

You can also set and clear the uchg flag from the command line. To set the flag from the command line, use
chflags uchg filename
If you have installed the developer tools, you can also use the SetFile command to set the uchg flag. Type /Developer/Tools/SetFile -a L filename.
To list flags, type ls -lo. To clear the flag, type chflags nouchg filename.
This example shows the effect of the uchg flag:
$ rm Ffile
override rw-rw-r-- david/david uchg for Ffile? y
rm: Ffile : Operation not permitted
As the example shows, an ordinary user cannot delete a file with the uchg flag set. When the root user attempts to remove a file with the uchg flag set, the rm command automatically clears the uchg flag.
A file lock has no effect on the containing folder. That is, you can move a folder containing a file with the uchg flag set. As a result, locked files in folders moved to the Trash can cause problems later when you try to empty the Trash.
The chflags command and ls -o are unique to BSD variants of UNIX. Do not assume that all experienced UNIX system administrators know about them. Linux uses chattr and lsattr to set and view flags. Solaris has no equivalent.
Warning
A similar flag exists called schg that should generally never be used. If a file has the schg flag set, nobody can remove or modify the file, which will likely cause problems. Even system administrators and the root user can’t modify the file. Unfortunately, this also means nobody can modify the flags of the file to remove the schg flag. If you do come upon a file with the schg flag set, you’ll need to boot into single-user mode to remove it.
Monitoring and Troubleshooting Permissions and Flags
This section examines how to obtain information about permissions and flags and how to correct some common problems. You will learn how to use options to the find command to find files with specific permissions or flags set. You will also learn what Disk Utility’s permission check does and does not do.
Finding Files by Permission Mode
You can use the -perm option to the find command to identify files with specific permissions. Specify +1000 to list folders with the sticky bit set. Specify +4000 to list setUID programs, +2000 to list setGID programs, and +6000 to list both.
For example, the following find command lines find setUID and setGID programs, respectively, and then perform a long listing on each one.
$ find . -perm +4000 -exec ls -l {} ;
-rwsr-xr-x 1 root wheel 36516 23 Sep 23:39 ./ps
$ find . -perm +2000 -exec ls -l {} ;
-r-xr-sr-x 1 root operator 23336 23 Sep 23:47 ./df
Finding Locked Files
Locked files in the Trash might cause the Finder’s Empty Trash process to fail.
You can use the -flags option to the find command to identify files with specific flags set. Specify +uchg to list files locked with the uchg flag. For example:
$ cd /Applications/Adobe Acrobat 5.0/
$ find . -flags +uchg
./Distiller/Settings/eBook.joboptions
./Distiller/Settings/Press.joboptions
./Distiller/Settings/Print.joboptions
./Distiller/Settings/Screen.joboptions
Repairing Disk Permissions in Disk Utility
Occasionally a program or install package will modify permissions resulting in applications that are not running correctly. You can run Disk Utility to repair permissions on your system drive as a regular maintenance task.
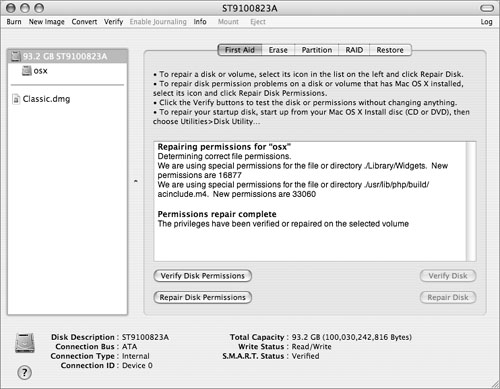
Disk Utility uses the receipts from the installation of Mac OS X or Mac OS X Server as a reference for file permissions. If files are not installed as part of an installer package, then Disk Utility will not be able to verify or repair the permissions on those files.
The permissions for installed files are stored in the bill of materials (BOM) files under /Library/Receipts. The Mac OS X installer uses a BOM to determine which files to install, remove, or upgrade. You can use the lsbom command to view the permissions in a BOM. For example:
$ lsbom -p ?Mf /library/Receipts/BSD.pkg/Contents/Archive.bom
root/admin drwxrwxr-t .
root/admin drwxrwxr-x ./Library
root/admin drwxrwxr-x ./Library/Documentation
root/admin drwxrwxr-x ./Library/Documentation/Commands
root/admin drwxrwxr-x ./Library/Documentation/Commands/bash
Because home folders are not part of any package, Disk Utility does not repair them. For example if the user changes permissions on files and folders they own, permissions on those will not be repaired.
What You’ve Learned
• Use the chmod command to set file and folder permissions from the command line.
• Some extra permissions not available from the Finder can be set from the command line.
• The umask controls default file permissions.
• You can lock or unlock files from the Finder or use the chflags command from the Terminal.
• Use the find command to find locked files and files with specific permissions.
• Disk Utility’s permission check will return some, but not all, of the file permissions to their correct state.
• File-sytem ACLs are a powerful way to go beyond basic UNIX file permissions.
References
Administration Guides
“Mac OS X File Services Administration”: http://images.apple.com/server/pdfs/File_Services_v10.4.pdf
Apple Knowledge Base Documents
The following Knowledge Base documents (located at www.apple.com/support) provide further information about file permissions and flags.
Document 106712, “Troubleshooting permissions issues in Mac OS X”
Document 302469, “Mac OS X: Resolving permissions (umask) issues in a server-based group folder environment”
URLs
File System Overview: http://developer.apple.com/documentation/MacOSX/Conceptual/BPFileSystem/Articles/BSDInfluences.html#//apple_ref/doc/uid/20002286
Security Overview: Permissions: http://developer.apple.com/documentation/Security/Conceptual/Security_Overview/Concepts/chapter_3_section_9.html
Grokking Darwin ACLs: www.afp548.com/article.php?story=20050506085817850&query=acls
UNIX Permissions Lesson and Quiz: www.lsa.umich.edu/lsait/admin/mac/PermQuiz.pdf
Lesson Review
1. Describe three useful folder permissions that you can set only from the command line.
2. Describe the difference between setUID and setGID.
Answers
1. You can prevent users from seeing a long listing of a folder’s contents by denying execute permission. If you set execute but not read permission on a folder, users who know the name of a file can get it, but other users cannot find it. If you set the sticky bit on a folder, a user may remove or rename files in that folder only if the user has write permission for the folder and the user is the owner of the file, the owner of the folder, or the system administrator.
2. When a program has the setUID bit set, that program always executes with the user ID of the owner of the file, regardless of who actually executes the program. A program with the setGID bit set executes with the group ID of the file’s group.
3. You cannot delete the file, but you can edit it.
4. It should work on BSD-based versions of UNIX, but probably won’t on other versions.