
Lesson 14. Optimizing Data Confidentiality
|
Time |
This lesson takes approximately 2 hours to complete. |
|
Goals |
Review standard UNIX permissions Configure appropriate file-system permissions and ACLs to provide data security Determine when to use SUID and GUID permissions Audit for inappropriate SUID and GUID permissions Restrict the administrator’s home folder permissions so that other users cannot browse it Learn the location and function of file-system access control lists Configure Mac OS X computers for optimum data confidentiality by encrypting sensitive data on the local file system Understand the encryption features of FileVault Create a secure documents folder by encrypting a disk image Disable possible data leaks by encrypting the swap space, wiping clean free space, and using secure empty trash |
In a collaborative, networked computing environment, the ability to share your information with others benefits group productivity. However, controlling access to that data is of incredible importance; information accidentally made available to the wrong person can seriously compromise the success of your project or company.
In this lesson, you will work with several security techniques to ensure that only intended recipients see the data you want to share.
Securing File Systems Permissions
Mac OS X is built on a foundation of UNIX, which includes advanced features such as file and folder-level permissions and, new to Mac OS X 10.4, access control lists (ACLs). Permissions ensure that the owner of the file or folder controls is authorized (and who isn’t authorized) to have access to that file or folder.
Here are the folders included in a typical Mac OS X user’s home folder. In this case the user, osxuser1, opened Terminal (/Applications/Utilities) and entered ls -l ~osxuser1 on the command line to view this output:
powerbook:~ osxuser1$ ls -l
total 0
drwx------ 7 osxuser1 osxuser1 238 18 Mar 00:03 Desktop
drwx------ 12 osxuser1 osxuser1 408 24 Mar 10:50 Documents
drwx------ 25 osxuser1 osxuser1 850 15 Feb 12:17 Library
drwx------ 3 osxuser1 osxuser1 102 24 Feb 2004 Movies
drwx------ 3 osxuser1 osxuser1 102 24 Feb 2004 Music
drwx------ 5 osxuser1 osxuser1 170 24 Feb 2004 Pictures
drwxr-xr-x 5 osxuser1 osxuser1 170 24 Mar 10:50 Public
drwxr-xr-x 5 osxuser1 osxuser1 170 24 Feb 2004 Sites
By reviewing the UNIX permissions, you see that each folder—“d” for directory in UNIX parlance—is owned by user osxuser1, and associated with the group osxuser1. Before Mac OS X 10.3, the group may have appeared as “staff” (or, occasionally, “wheel”), but beginning with Mac OS X 10.3, for increased security, when a new user is added to the system, a group is automatically created with the same name as the user’s short name.
Except for the Public and Sites folders, only user osxuser1 has access to the remaining folder contents. Permissions for Group and Others are all “-”.
For the Public, Sites, and other folders, user osxuser1 has full rwx (read, write, and execute) permissions, but the Group also has the permissions r-x (a read-only folder), and Others also have r-x permissions.
By default, a home directory for a Mac OS X user has no access to anyone but the owner for most of the folders, with exceptions being made for the Public and Sites folders.
The Sites folder (intended to be used for an individual’s website) is accessible by others. Only information intended to be accessible to all users should be placed in the Sites folder. This folder is not intended to be a location for a secure website, but for a user’s “personal” website. The Public folder allows its owner to share information with everyone in a controlled manner. All users can view the contents of the Public folder, but they cannot modify or add any contents, except through the Drop Box folder (which will be explained later).
Here are the contents of user osxuser1’s Public folder:
powerbook:~/Public osxuser1$ ls -l
total 12536
drwx-wx-wx 4 osxuser1 osxuser1 136 3 Jul 12:10 DropBox
-rw-r--r-- 1 osxuser1 osxuser1 29637 7 Nov 2004 GremInterior.jpg
drwxr-xr-x 3 osxuser1 osxuser1 102 3 Jul 12:13 Misc
-rw-r--r-- 1 osxuser1 osxuser1 64512 27 May 2004 Quarterly05.xls
-rw-r--r-- 1 osxuser1 osxuser1 711734 1 Jul 11:34 Scott.tiff
-rw-r--r-- 1 osxuser1 osxuser1 5605250 25 Aug 2003 cowbell.mp3
Every file and folder is readable by everyone (-rw), yet only the owner, osxuser1, has write access to the files and folders contained in the Public folder, so these files cannot be modified by others. And since the Public folder can be modified only by the owner, the files and folders cannot be deleted or renamed.
The Drop Box allows others to “drop something off” in the Public folder, but only the owner of the folder can see what has been left there. Think of placing a letter into a public mailbox. Once you leave the letter and close the door, only the postal carrier has access to that letter (not even you can retrieve it). This is because user osxuser1 has full rwx access, but the Group and Others access is only -wx, meaning a write-only folder.
Let’s say that a user named deborah wants to grab a copy of the file Quarterly05.xls, make modifications to it, and drop that file in osxuser1’s Public folder. Deborah (or anyone else with access to the system) can use the Finder to navigate to osxuser1’s Public folder and copy (not move) the file into her home directory. She can then modify that file and drop it in the Drop Box folder in osxuser1’s Public folder. User deborah cannot replace the file that existed in the Public folder because she does not have write permission into that folder, thus the Drop Box is the alternative.
Setting Access Rights for Files and Folders
What if you have a file that you want only a certain user or group of users to be able to read? The default Public folder setup is not sufficient for this, and you will need to go a little further to control the granularity of access.
A user can create a folder or file with more granular permission control from either the Finder (which refers to the three levels of granularity as Owner, Group, or Others) or from the CLI (User, Group, or Others). The user can (if authenticated) also change the User/Owner of the file or folder or Group associated with the file or folder.
Note that the Finder allows only certain permissions options, whereas the command-line interface (CLI) allows all eight possible permutations of rwx to apply to each of the three levels of granularity.
Also note that there is no way from the Finder to control Group membership—you can select from preexisting Groups, but cannot create your own, or modify who is (or isn’t) in either new or preexisting groups.
The Sticky Bit
The Public folder/Drop Box system employed by Mac OS X is very powerful and, as you have seen, extensible into even more granular control by you. Another powerful aspect of the UNIX permissions system is something called the “sticky bit.”
The sticky bit solves the problem of how to control permissions on a single collaborative folder in such a way that you can create your own new folders and files for other to have access to (with a granularity which you control) without fear of those same others being able to delete or modify your files (which would be annoying, to say the least).
Without the sticky bit, it might seem intuitive to create a collaborative folder called Collaborate with rwx permission enabled for each user who wants to collaborate (whether that’s everyone, or it is controlled via a specific group). Sure enough, users who have write access to that folder will be able to create their own folders and files, but there is a problem: The same power that enables users to create files and folders in the Collaborate folder also allows them to delete or rename any file or folder within that folder—nothing prevents them from deleting or renaming other collaborative users’ files or folders!
The sticky bit ensures that this cannot happen. When the sticky bit is enabled on a folder (it cannot be enabled on a file), each user can create his or her own files and folders, but others are not allowed to delete, rename, or modify those files or folders (since they are not the owner).
The sticky bit is already utilized in a default Mac OS X installation on the Shared folder, as seen by using the CLI to view the permissions on the /Users folder:
powerbook:/Users osxuser1$ ls -l /Users
total 0
drwxrwxrwt 9 root wheel 306 26 Jun 14:54 Shared
drwxr-xr-x 18 deborah deborah 612 24 Dec 2004 deborah
drwxr-xr-x 21 local local 714 25 Jun 00:57 local
drwxr-xr-x 15 preso preso 510 22 Aug 2004 preso
drwxr-xr-x 24 osxuser1 osxuser1 816 26 Jun 14:55 osxuser1
Notice the “t” in the permissions for the Shared folder; this delineates a folder that has the sticky bit set.
To set the sticky bit on another folder, you must use the CLI. (This option is not available in the Finder.)
You can create your Collaborate folder within the /Users/Shared folder, and make it usable only by the owner of the folder (you will use the administrative user local for this example) and members of the group users (a group designed for all nonadmin users, and automatically created and populated on Mac OS X).
1 Log in to the CLI as the admin user local.
2 Navigate to the /Users/Shared folder:
powerbook:~ local$ cd /Users/Shared
3 Make the Collaborate folder:
powerbook:/Users/Shared local$ mkdir Collaborate
powerbook:/Users/Shared local$ ls -l
total 0
drwxrwxrwx 6 root wheel 204 9 May 2004 Adobe PDF 6.0
drwxr-xr-x 2 local wheel 68 11 Jul 10:57 Collaborate
drwxrwxr-x 2 root wheel 68 19 Nov 2003 Faxes
drwxrwxrwx 3 osxuser1 wheel 102 20 Jun 2004 SC Info
drwxr-xr-x 7 osxuser1 wheel 238 21 Apr 20:58 WO
4 Change the group of the Collaborate folder to users:
powerbook:/Users/Shared local$ sudo chown :users Collaborate
Password:
5 Set the permissions to User rwx, Group rwx, Other “---”:
powerbook:/Users/Shared local$ chmod 770 Collaborate
powerbook:/Users/Shared local$ ls -l
total 0
drwxrwxrwx 6 root wheel 204 9 May 2004 Adobe PDF 6.0
drwxrwx--- 2 local users 68 11 Jul 10:57 Collaborate
drwxrwxr-x 2 root wheel 68 19 Nov 2003 Faxes
drwxrwxrwx 3 osxuser1 wheel 102 20 Jun 2004 SC Info
drwxr-xr-x 7 osxuser1 wheel 238 21 Apr 20:58 WO
6 Set the sticky bit:
powerbook:/Users/Shared local$ chmod +t Collaborate
powerbook:/Users/Shared local$ ls -l
total 0
drwxrwxrwx 6 root wheel 204 9 May 2004 Adobe PDF 6.0
drwxrwx--t 2 local users 68 11 Jul 10:57 Collaborate
drwxrwxr-x 2 root wheel 68 19 Nov 2003 Faxes
drwxrwxrwx 3 osxuser1 wheel 102 20 Jun 2004 SC Info
drwxr-xr-x 7 osxuser1 wheel 238 21 Apr 20:58 WO
You have successfully created your Collaborate folder! Now take it for a test drive. First, the admin user local will create a folder within the Collaborate folder, and then a normal user (osxuser1 as an example) will also create a folder within the Collaborate folder. (osxuser1 is in the users group).
1 Make a folder in Collaborate called localshare:
powerbook:/Users/Shared local$ cd Collaborate
powerbook:/Users/Shared/Collaborate local$ mkdir localshare
powerbook:/Users/Shared/Collaborate local$ ls -l
total 0
drwxr-xr-x 2 local users 68 11 Jul 11:12 localshare
2 Log in as osxuser1 and create a folder:
powerbook:~ osxuser1$ cd /Users/Shared/Collaborate
powerbook:/Users/Shared/Collaborate osxuser1$ mkdir osxuser1share
powerbook:/Users/Shared/Collaborate osxuser1$ ls -l
total 0
drwxr-xr-x 2 local users 68 11 Jul 11:12 localshare
drwxr-xr-x 2 osxuser1 users 68 11 Jul 11:51 osxuser1share
3 As the normal user, try to delete the localshare folder:
powerbook:/Users/Shared/Collaborate osxuser1$ rm -rf localshare
rm: localshare: Operation not permitted
4 As the normal user, try to delete your own newly created folder:
powerbook:/Users/Shared/Collaborate osxuser1$ rm -rf osxuser1share
You are able to make and remove your own folder, but you are not able to remove the one created by local.
Working With Access Control Lists
The standard UNIX permissions model has some limitations that prevent it from allowing as much granular access control as a user may desire. For example, imagine a college English class with a teacher and students, and a workflow that allows each student to do certain things (like get homework assignments and submit them when they are finished) but does not allow anyone but the teacher to populate the “assignments” folder or be able to read each student’s submitted assignment.
One way to solve this problem is to create a folder called ENG_101_Assign, owned by eng101teacher, who would have rwx privileges. A group could be created called eng101, which would contain all of the students in English 101 (and, optionally, also the teacher). The ENG_101_Assign folder could be assigned to the eng101 group, and Group privileges could be r-x (read only). Permission for Others would be “---” (no access), ensuring that only students registered in the class have access.
You would also put in a Drop Box for submission of homework assignments, owned by eng101teacher with rwx privileges, Group ownership by eng101 with -wx (write only) privileges, and Other privileges of “---”. Students would use an enforced nomenclature for submitting their assignments (such as Eng101Assign5_studentinitials), and because of the time stamping of the UNIX file system, the teacher would know when the assignments were submitted.
This is one way to accomplish this task. It of course has its limitations and might not be as expandable and adaptable as one would like.
You might want to add some more granularity and features. First, you would like to allow not only the teacher to have “admin” access to the assignments (be able to put them into the ENG_101_Assign folder and view the contents of the Drop Box folder), but also allow a teacher’s assistant to do the same. Also, you want to allow tutors to have specific access to certain student’s assignments to assist them. You also want an automated school records system to have limited access to the ENG_101_Assign folder so the submissions and tracking can be done over the Internet. And, of course, the district superintendent wants to have visible access to everything. (But as a Mac OS X system admin, you are smart enough to not give out total access.)
How would you solve this problem? Given the limitations of the standard UNIX permissions system, you would have a very difficult time doing this by finagling folder ownership and group access, and you would have to basically “trick” the file structure to do what you want with potentially a multitude of folders and groups.
Thankfully, in Mac OS X 10.4, a system called access control lists (ACLs) was incorporated, which allows much more granular control of access to files and folders.
Understanding ACL Attributes
ACLs consist of individual access control entries (ACEs). These entries are specific to a file-system volume and are set on individual files or folders. Each ACE contains the user or group associated with the entry, and permission information to control granularity, some of which is applicable only for folders, some of which is applicable only for files, and some of which is applicable to both.
The attributes that apply to all file-system objects (folders and files) include the following:
• delete: Allow deletion.
• readattr: Allow reading of an object’s basic attributes (implicitly granted if object can be looked up).
• writeattr: Allow writing of an object’s basic attributes.
• chown: Allow changing the ownership of the object.
The attributes that apply only to folder objects include the following:
• list: Allow listing of the entry.
• search: Allow the folder to be looked up by name.
• add_file: Allow adding of files.
The attributes that apply only to nonfolder objects include the following:
• read: Allow read access (like an “r” permission).
• write: Allow write access (like a “w” permission).
• execute: Allow execute access (like an “x” permission).
• append: Allow write access, but only for appending to the file, not overwriting what already exists.
Folders also allow ACL inheritance, meaning that files within the folder, or subfolders, can inherit the rules that apply to their parent folder:
• file_inherit: Allow ACL inheritance to files within the folder.
• directory_inherit: Allow ACL inheritance to subfolders within the folder.
• only_inherit: ACL properties of the folder apply only to items within the folder (files and subfolders), but do not apply to the folder itself.
Creating ACLs Using the CLI
In Mac OS X, there is no GUI to create ACL entries. (Mac OS X Server does provide a very nice GUI interface via Workgroup Manager.) So, in order to create your ACL entries, you need to first enable ACLs for the volume (they are turned off by default) with the following command:
powerbook:~ local$ sudo /usr/sbin/fsaclctl -p / -e
This enables ACLs on the root volume / (this can be any mounted volume), and -e means “enable.” (You could also give -d to “disable.”)
Once ACLs are enabled on a volume, you can apply ACLs to any file or folder on that volume. In order to do this, use the same chmod command that controls standard UNIX permissions, but with the new ACL arguments, some of which you will now look at.
More Info
For more complete information on the new ACL arguments, including all of the available options for ACLs, please refer to the man page for chmod.
To view ACLs, add the argument -e to the ls –l command:
powerbook:~ local$ ls -le
-rw-r--r--+ 1 osxuser1 osxuser1 0 Apr 28 14:06 file1
Notice the + after the set of standard permissions, but you haven’t added any ACE entries to this file, so there’s nothing else to see yet. To change that to allow all members of the admin group to write to file1, execute the following command:
powerbook:~ local$ sudo chmod +a "admin allow write" file1
To view your handiwork, look again:
powerbook:~ local$ ls -le
-rw-r--r--+ 1 osxuser1 osxuser1 0 Apr 28 14:06 file1
owner: osxuser1
1: admin allow write
Notice the additional ACL information for the file, and the one ACE that allows members of the admin group to write to this file.
To deny read access to the guest group for file1:
powerbook:~ local$ sudo chmod +a "guest deny read" file1
powerbook:~ local$ ls -le
-rw-r--r--+ 1 osxuser1 osxuser1 0 Apr 28 14:06 file1
owner: osxuser1
1: guest deny read
2: admin allow write
ACEs are numbered from 1 to n (for n ACEs in the ACL). The order of entries is important—lists are evaluated top to bottom (rule 1 to n), with new entries usually being added to the top of the list. (The exact explanation of this ordering is explained later in this section.)
Note that Allow and Deny matches work differently for ACLs. Allow matches are cumulative for all matches that apply to a user, whether from user or group ACE matches. Deny matches apply upon the first ACE match.
It is possible to specify which rule number you would like to use when adding your ACE. To override the default ordering when adding an ACE, use the +a# rulenum syntax:
powerbook:~ local$ sudo chmod +a# 2 "others deny read" file1
powerbook:~ local$ ls -le
-rw-r--r--+ 1 osxuser1 osxuser1 0 Apr 28 14:06 file1
owner: osxuser1
1: guest deny read
2: others deny read
3: admin allow write
To rewrite a specific ACE, use the =a# rulenum syntax:
powerbook:~ local$ sudo chmod =a# 2 "others deny read,execute" file1
powerbook:~ local$ ls -le
-rw-r--r--+ 1 osxuser1 osxuser1 0 Apr 28 14:06 file1
owner: osxuser1
1: guest deny read
2: others deny read,execute
3: admin allow write
To delete an ACE, use the -a# rulenum syntax:
powerbook:~ local$ sudo chmod -a# 2 file1
powerbook:~ local$ ls -le
-rw-r--r--+ 1 osxuser1 osxuser1 0 Apr 28 14:06 file1
owner: osxuser1
1: guest deny read
2: admin allow write
To create an ACE inheritance rule, use the +ai or +ai# rulenum syntax:
powerbook:~ local$ sudo chmod +ai "others allow read" file1
powerbook:~ local$ ls -le
-rw-r--r--+ 1 osxuser1 osxuser1 0 Apr 28 14:06 file1
owner: osxuser1
1: guest deny read
2: admin allow write
3: others inherited allow read
Notice that the just-added inheritance rule did not get placed at position 1, but was instead placed at the end. When new ACEs are added to an ACL, each entry is sorted into one of the following four categories:
• Local deny
• Local allow
• Inherited deny
• Inherited allow
Unless overridden with the +a# rulenum or +ai# rulenum syntax, new rules will be placed in the first position available within their category. In this case, you already had one local deny rule (category 1), one local allow rule (category 2), and no inherited deny (category 3) or inherited allow (category 4) rules, so the first inherited allow, a category 4 rule, gets placed after all category 1 through 3 rules.
More Info
See the man page for chmod to see a more complicated example that includes all ACE categories.
Note
In addition to directly navigating to a home folder using the Finder, a user may also obtain access to your home folder via AFP (enabled in the System Preferences Sharing pane by allowing Personal File Sharing), SMB (enabled in the System Preferences Sharing pane by allowing Windows Sharing), and FTP.
Understanding SUID/SGID
In addition to access permissions, there is another permission-related aspect for files (it does not apply to folders) known as set user ID on execution (SUID) or set group ID on execution (SGID). This is a powerful, but potentially dangerous, attribute for a file, so understanding its purpose is crucial, because only certain files should have this bit set (and you should flag those files that should not have it set).
By setting the SUID bit on an executable file, you are telling the file system that, no matter who launches the executable file, the file will execute as though it was launched by the assigned owner of the file. For instance, the command passwd allows any user to change his or her own password. However, this program needs to run with the privileges of root (so it can appropriately modify the Open Directory password), which a user probably does not have the ability to do otherwise. So, when any user runs /usr/bin/passwd, it needs to run as though it was executed by the root user, since you don’t want to give admin or root access to all users.
The SUID bit is set for /usr/bin/passwd as follows:
powerbook:/ local$ ls -l /usr/bin/passwd
-r-sr-xr-x 1 root wheel 35092 Mar 20 16:26 /usr/bin/passwd
Instead of the user x bit being set, it is shown as s. Since SUID is set, whenever anyone runs /usr/bin/passwd, it will run as though it was run by root (since root owns the file). Note that an executable does not necessarily need to be owned by root, it could be another owner, but if the SUID bit is set, the file will execute as though launched by the owner of the file, not by the user who actually launched the file.
The same logic applies to SGID, except instead of the file executing as though it was launched by the owner of the file, it will execute as though the person who executed it belongs to the group associated with the file (even if he or she doesn’t). For instance, the lsof command needs access to attributes of the UNIX system that require membership in the kmem group, so its SGID bit is set:
powerbook:/usr local$ ls -l ./sbin/lsof
-rwxr-sr-x 1 root kmem 111356 Mar 26 14:04 ./sbin/lsof
Finding Files With SUID/SGID
As part of your regular security audit, it is important to identify files that have either the SUID or SGID bit set, because these could be potential security breaches if exploited. To find all of the files on your file system that have the SUID bit set, execute the following command:
sudo find / -perm +4000 -print
To identify all files with SGID, execute the following:
sudo find / -perm +2000 -print
To identify all files with both SUID and SGID, execute the following:
sudo find / -perm +6000 -print
As mentioned earlier, it is necessary for a healthy and happy UNIX that some files have either SUID or SGID. However, you need to proactively ensure that the files with these bits set are actually the correct versions of the executable, and not surreptitiously placed clones that give an attacker inappropriate access to your system.
One good way to ensure that your files are correct is to do a regular MD5 audit on the files you know have either SUID or SGID (as discovered with the find commands just listed). An MD5 checksum ensures that the files on your hard disk(s) have not been changed—if the checksum is different, you have a potential replacement, and this could be an issue. (Or it could just be an updated version of the command, but you need to be proactive to decide which it is.)
Understanding Keychain Security
The Mac OS X Keychain mechanism is an often-misunderstood, underutilized component of security. The Keychain infrastructure allows a user to store passwords in a 3DESencrypted, OS-level password database, so that users do not have to enter passwords each time they are needed. Instead, the OS will, for Keychain-aware applications, search through the user’s keychains to see if the password already exists.
Keychain-aware applications utilize the Apple-provided Keychain Services, provided in the Security Framework. The Security Framework is maintained by Apple to provide convenience wrappers around the CDSA (www.opengroup.org/security/cdsa.htm) library included with MacOS X, facilities for manipulating keychains, and more. Programmers who include support for Keychain Services in their applications can then leverage the power of Mac OS X security.
Keychain-aware applications that are included in Mac OS X include Safari, iTunes, Mail, and the Finder’s Go > Connect to Server command. If a Keychain-aware application finds a valid keychain entry in any of the keychains in the search path, it will then attempt to use that password automatically to authenticate the user. If the password is correct, the user will be automatically logged in; if it is not correct, or if no keychain entry exists for that password, the user will be given the opportunity to enter the password (and, optionally, save that password in the keychain to prevent having to enter it again).
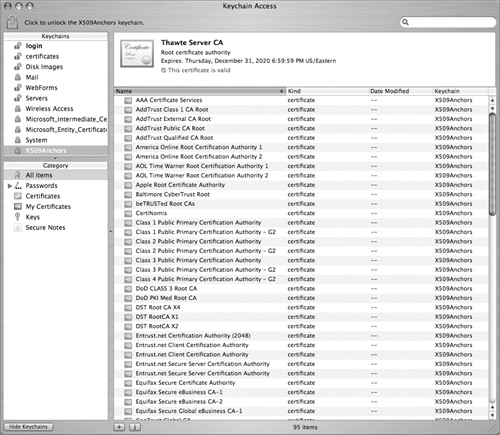
The application Keychain Access allows a user to manipulate his or her keychains (as you shall see in a later example) and also create new keychains (both on a per-user and global basis).
Mac OS X has a set of core OS keychains it uses to store SSL certificate authority information (located in /System/Library/Keychains) and also global keychains that apply to all users on the system (in /Library/Keychains). Each individual user’s keychain is stored in his or her home folder (~/Library/Keychain) with the name login.keychain.
In the version of Mac OS X prior to 10.3, each user’s personal keychain would be named with his or her associated short name, for instance osxuser1. keychain. You may run across this naming convention for accounts that have been updated from older version of Mac OS X.
A default installation of Mac OS X would show the following keychains in those locations:
powerbook:~ local$ ls /System/Library/Keychains/
X509Anchors X509Certificates
powerbook:~ local$ ls /Library/Keychains/
System.keychain
powerbook:~ local$ ls ~/Library/Keychains/
login.keychain
Each keychain is password-protected and must be unlocked by the OS before the entries contained within can be used. The OS will attempt to unlock the keychains it uses automatically if it knows the password (which it does for the System and X509 keychains).
When a new account is created, the login keychain is created and password-protected with the exact same password as used for the user’s login. So, when the OS attempts to utilize an entry within a user’s login.keychain, it will attempt to unlock it with the user’s login password (entered at the login window). If the user has not changed the password on the keychain, the OS will be able to unlock it without user intervention; if the user has changed the keychain password, the user will be asked to enter the keychain password to unlock the keychain.
A user may add other keychains, both global and local. A custom global keychain can be used to store passwords for all users on the system, but it can be password-protected so that it is not automatically unlocked like the default System.keychain is. A custom local keychain can be used for more sensitive information that the user does not want to have in his or her default local.keychain, because it will not be unlocked automatically by the OS.
A system administrator can prepopulate a global or local keychain, and then place it into the correct place for usage: /Library/Keychains for global keychains and ~/Library/Keychains for user-specific ones.
Keychain-Aware Applications in Action
When a Keychain-aware application wants to search for keychain entries that are appropriate to it, it will follow this flow:

Assuming that an entry does not previously exist in any keychain, the user will hit the section of the flowchart that states “App asks user for user name and password.” If the user enters the correct password, the entry is now stored in the user’s login.keychain.
Look at the diagram again, knowing that there is a valid keychain entry. At the “Keychain entry found?” question, we now have a Yes, and proceed to the next question: “App always has access to entry?” The first time through this flow, this will not be the case, so you can proceed to “Keychain API asks user to allow access?”, which appears as a dialog to the user.
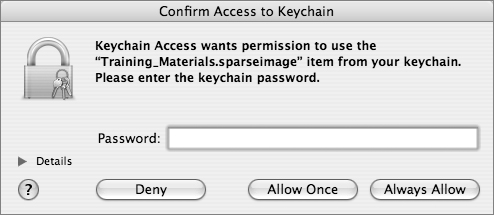
If the user clicks Deny, the keychain entry, even though it exists, will not be utilized. If the user clicks Allow Once, the keychain entry is used this one time, and the next time through the flowchart, the user will be presented with this dialog again. If the user clicks Always Allow, that keychain entry will be marked as always available in a Keychain ACL list.
Modifying Keychain ACLs
Each keychain entry has a separate access control list with three possible levels of strictness:
• Always allow access: Applications can always read this item without any additional authentication or warning. This setting is generally not recommended.
• Confirm before allowing access: Before an application can read this item, the user will be presented with a dialog that asks whether the application should be denied access to the item, given access to the item once, or always given access to the item. Recommended for lower security passwords where convenience is more important than high security, such as a server in another department that the user may access once in a while.
• Confirm before allowing access and ask for keychain password: In addition to asking the user to deny, allow access once, or always allow access to the item, the user will also be asked for the keychain’s password. This is the most secure option and is recommended for most uses.
In addition, applications may be given access to an item without requiring user interaction on an application-by-application basis. When a user clicks the Always Allow button in the access confirmation dialog, that application requesting access is added to the item’s “Always allow access” list automatically. Once this is done, it is as though the item had the “Always allow access” option selected for that particular application, but any other applications still need to ask for confirmation before they can access the item. You can also add and remove applications from this list by using the Keychain Access application.
Controlling Keychains With Keychain Access
To control how your keychains function, use the Keychain Access application (located in /Applications/Utilities/Keychain Access).
View and Modify Keychain Entries
You can add as many keychains as you like and move items from one keychain to another to increase security. These keychains can all have different passwords and contain different items. For example, you can have one keychain for your Web forms, one for your certificates, one for servers, email, VPN, and so on. Each keychain will have a different password and can be locked separately. Use the Keychain Access application to create each keychain.
Perform Keychain First Aid
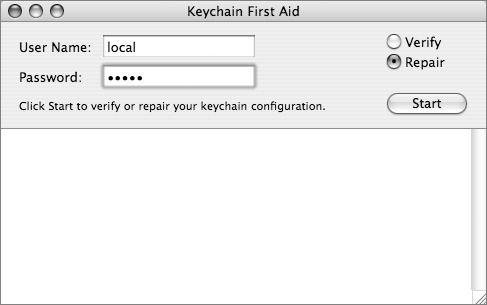
Sometimes keychains can start acting crazy and they need to be repaired. Corrupted keychains reveal themselves in many ways, including you being naggingly asked to use or store an entry in a keychain, even though you know you have done it at least once already. Another potential problem is a keychain password for local.keychain getting out of sync with the login password, and then forgetting the original local.keychain password (which prevents you from changing it).
Within Keychain Access is a menu item called Keychain First Aid (which was formerly a separate application), which can be used to repair keychains gone awry. In Keychain Access, choose Window > Keychain First Aid to enable this repair.
Using Encrypted Disk Images
If you have downloaded software for Mac OS X from the Internet, you may have noticed that the file format of choice for storing installer packages ends with the suffix .dmg. This type of file is known as a disk image—a very powerful method of storing multifolder and multifile hierarchies in a single, Internet-friendly file.
Disk images appear to the Mac OS X file system as though they are mounted drives—if you’ve mounted one by double-clicking it, you notice that a disk-like image shows up on your desktop and in the Finder (and, for those who prefer the CLI, it gets mounted in the standard location /Volumes). A disk image may be read-only or read/write; it may be fixed in size or resizable as its contents grow; and it may be one of many file-system types: HFS+ (aka Mac OS Extended) and its journaled or case-sensitive varieties, UFS (UNIX File System), or the MS-DOS file system.
When you are done with a disk image, you “eject” it. The disk image will then be unmounted, and all contents are reconstituted back into the original .dmg file. In other words, with a read/write disk image, you can modify the contents of the mounted disk image as though it was a virtual drive. When you “eject” that disk image, all of your changes are folded back into the original .dmg file, so when it is reopened, it will be as though you mounted the disk again with your changes intact.
So how can you leverage these single-file-based virtual drives for security? Disk images can be password-protected (double-clicking the disk image to open it will require the user to enter a password) and encrypted (so if the disk image falls into the wrong hands, its contents cannot be easily obtained). You can create as many password-protected, encrypted disk images as you want, with different passwords for different users (whether they are meant to be shared or not), and you can populate each disk image as though it was its own very secure virtual drive (which, basically, it is).
Password-protected, encrypted disk images ensure that your highly sensitive data can be safely packaged up in an easy-to-use and very secure file, which you can then share with selected recipients or keep to yourself.
You can use Disk Utility to create encrypted disk images. Like any other disk image file, an encrypted disk image can be copies or created on network volumes or removable media, including USB flash media and FireWire drives. You can also burn encrypted disk images onto a CD-R or DVD-R disk for archival purposes. Each encrypted disk image is protected by a password, which may be composed of 7-bit ASCII characters and can be 1 to 255 characters in length.
Creating Encrypted Disk Images
You can create disk images using either the GUI Disk Utility tool or the CLI hdiutil:
hdiutil create sizespec [options] imagepath
hdiutil provides much more power and granularity in creating disk images than Disk Utility does, including the ability to create MS-DOS file-system images and unformatted disk images.
More Info
For more information, see the man page for hdiutil.
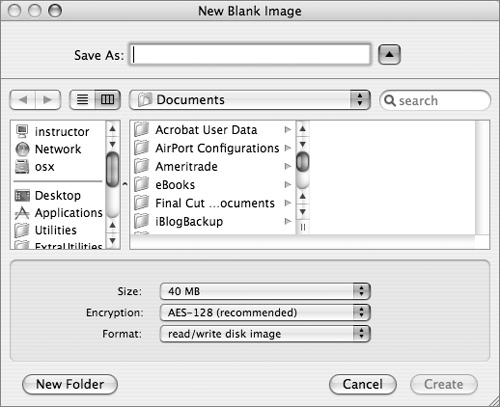
To create an encrypted disk image, do the following:
1 Open Disk Utility (/Applications/Disk Utility).
2 Click New Image.
3 From the Encryption pop-up menu, choose AES-128 (recommended).
4 From the Size and Format pop-up menus, choose a size and format.
5 Click Create.
Note
Because Disk Utility uses 128-bit encryption, your data will be irretrievably lost if you forget the password.
Enabling FileVault
The Mac OS X FileVault system leverages the power of the disk image by providing OS-level support to turn a user’s entire home folder into an encrypted, password-protected disk image. FileVault is an all-or-nothing system for a user’s home folder, so it’s best to understand some of the issues involved—a lost password can make the contents of the folder irretrievable.
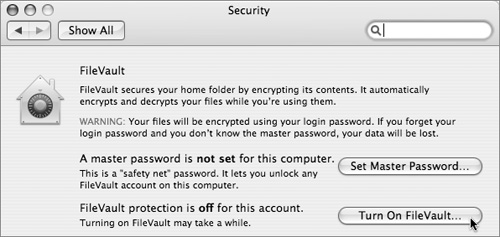
Setting Master Password
Mac OS X features an important security feature called the master password, which is set from the Security pane of System Preferences. When set, it should not be shared with anyone. This master password allows you to log in as any user on the system.

As a system administrator, it is very important that you set a Mac OS X master password before any of your users use FileVault for their home directories. This master password is the only potential emergency backdoor to unlock a user’s home folder if he or she has forgotten his or her own password (or if the user has been specifically locked out of his or her home folder due to job termination or a security breach). If another administrative user creates the master password before you, it is possible you do not know that password.
Turning On FileVault
FileVault is enabled on a per-user basis from the Security pane of System Preferences.
Besides the very real problem of accidentally losing access to all of a user’s data in his or her home folder, there are some other caveats when using FileVault. First, the ability to share information through the Public and Sites folder is no longer possible, since those folders are now password-protected and encrypted along with the rest of the home folder. Second, backups will potentially be much larger, because it’s harder to track incremental changes from an encrypted image than to look at the files and folders themselves.
One key issue when using a FileVault home directory is resetting user passwords. If a user should forget his or her password, the user’s entire home directory would be irretrievably lost if not for the Master Password mechanism. This allows a system administrator who knows the master password to recover the user’s home directory.
Note
The master password is not related to any administrator user’s password, and in fact should not be the same as any user’s password.
When you set a master password on a machine, the system creates a new keychain file at /Library/Keychains/FileVaultMaster.keychain. The password for the new keychain file is the master password. The system then generates a X.509 private key and certificate. It stores the certificate in /Library/Keychains/FileVaultMaster.cer, and the private key in the newly created keychain.
Note
For enterprise deployments, you can copy the two files FilevaultMaster.cer and FileVaultMaster.keychain to /Library/Keychains on another machine and it will automatically use the same master password.
When a user’s home directory is converted to a FileVault home directory, the system generates a 128-bit random encryption key, which is used to encrypt the disk image. Two copies of this key are then encrypted and stored along with the disk image—the first is encrypted using the user’s password, the second is encrypted using the FileVaultMaster. cer certificate. When the user logs in normally, the password that he or she enters is used to decrypt the first copy of the disk image’s encryption key so the user can mount and access the disk image.
However, if an administrator needs to reset the user’s password, he or she can enter the master password for the machine to unlock the FileVaultMaster.keychain file and retrieve the private key. This private key then decrypts the second copy of the disk image’s encryption key, letting the administrator recover the contents of the user’s home directory. However, that does not allow the administrator to recover the user’s original password since it only retrieves the underlying encryption key for the disk image, not the password for the first copy.
Performing Additional Data Security Measures
There are other ways an attacker can obtain information that should be secret from your system, and Mac OS X is proactive in plugging these holes.
Securely Erasing Disks
Disk Utility and the diskutil command-line utility can erase either an entire volume or just the free (unused) space, with several different levels of security. Simply writing over the old data with zeros or random data might seem sufficient, but it can actually leave behind traces of magnetization from what used to be on the disk. These traces are very difficult to extract, but for security-critical data it’s best to use a multipass erase to make sure all traces have been overwritten.
Note
Overwriting the disk takes time proportional to the number of times the disk is overwritten. If the disk is large and/or slow, it could take several hours per pass, so budget your time accordingly.
Under Disk Utility’s Erase tab, clicking the Security Options button gives you the options shown in the following figure.
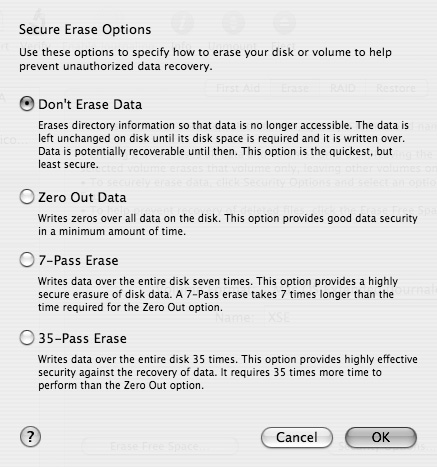
• Don’t Erase Data: This is the default setting. It leaves the disk’s previous contents vulnerable to recovery.
• Zero Out Data: This option writes zeros over the entire disk, rendering its previous contents safe from normal disk editing and data recovery tools. However, it may still be possible to recover data from the drive by removing the platters from the drive and using a highly sensitive read mechanism to pick up residual magnetism that the erasure did not completely wipe out.
• 7-Pass Erase: This option writes data over the entire disk seven times, thus masking any residual magnetism behind multiple layers of new data, and making recovery extremely difficult. This mode is designed to comply with the United States Department of Defense’s National Industrial Security Program Operating Manual (NISPOM, aka 5220.22-M).
• 35-Pass Erase: This option writes data over the entire disk 35 times, making recovery even more difficult than with the 7-Pass option. This uses a sequence of patterns known as the Gutmann algorithm.
More Info
For additional information on the Gutmann algorithm, visit www.cs.auckland.ac.nz/~pgut001/pubs/secure_del.html.
If you are using diskutil to erase a disk or volume, the following command-line options are available:
• sudo diskutil zeroDisk diskname: Equivalent to the Disk Utility Zero Out Data option, this writes zeros over the entire disk.
• sudo diskutil secureErase 1 diskname: Writes random data over the disk once.
• sudo diskutil secureErase 2 diskname: Equivalent to the Disk Utility 7-Pass Erase option.
• sudo diskutil secureErase 3 diskname: Equivalent to the Disk Utility 35-Pass Erase option.
• sudo diskutil randomDisk [times] diskname: Writes random data over the entire disk the specified number of times. Note that for the same number of passes, this will provide less security than the 7-pass or 35-pass options, as these use include patterns designed to make sure each bit gets thoroughly erased; the random data might or might not contain good patterns for every bit.
If you want to be doubly sure that all data has been erased, use the diskutil randomDisk or secureErase option, followed by the diskutil eraseDisk option, followed by the command
sudo od /dev/disk4s7
You will change the number (in this case, 4) and the slice (in this case, 7) to reflect the appropriate device you want to erase.
If the disk was zeroed successfully, the output should look something like this:
localhost:~ george$ sudo od /dev/disk1
0000000 000000 000000 000000 000000 000000 000000 000000 000000
*
356000000
localhost:~ george$
After verifying that the volume is truly zeroed, you can use Disk Utility or diskutil to partition it and create volumes.
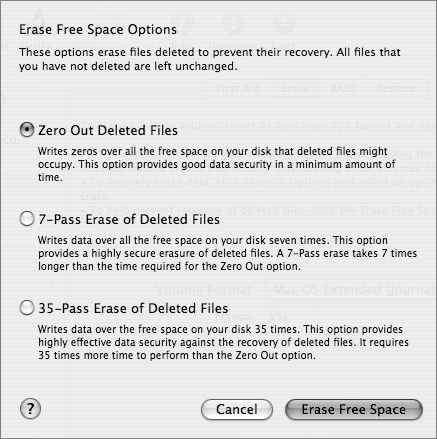
Erasing Free Space
Erasing free space with either Disk Utility or diskutil is very similar to erasing an entire volume (although diskutil has fewer erasure options).
Under Disk Utility’s Erase tab, the Erase Free Space button enables you to overwrite free space with zeros, perform a 7-Pass Erase, or perform a 35-Pass Erase. These are directly analogous to the options for full erasure listed in the previous section.
With diskutil’s secureErase option, adding the freespace option restricts the erasure to just free blocks:
sudo diskutil secureErase freespace 1 diskname
sudo diskutil secureErase freespace 2 diskname
sudo diskutil secureErase freespace 3 diskname
Note
When using Disk Utility or diskutil, free space can be erased only from a mounted volume, not an entire disk.
Using Secure Empty Trash
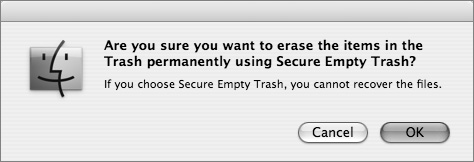
When files are removed from a volume, either by taking out the Trash or by using the CLI rm command, the blocks on the volume are freed up for use by other files by unlinking the blocks. However, the content of those blocks is not modified, so potentially secret data may still be contained on the volume (and easily obtained by scouring the volume).
To prevent this from happening, a secure version of rm, called srm, may be used to not only free up the blocks by unlinking, but also overwrite those blocks with either all 0s, using seven U.S. DoD–compliant passes, or with a single pass of random data.
More Info
See the man page for srm to see how to enable these different options.
The Mac OS X Finder now has a GUI menu option called Secure Empty Trash, which uses srm to remove the Trash instead of using the default rm. To empty the Trash securely, choose Finder > Secure Empty Trash.
Using Encrypted Swap File
The built-in virtual memory system on Mac OS X functions by swapping out currently unused RAM memory to a file on the boot volume called a swap file. So, at least temporarily, memory that would otherwise be inaccessible if it was in RAM is stored on the boot volume in a well-known place that could be easily copied and then analyzed. Passwords, financial data from an Excel spreadsheet, or anything that the OS decides to temporarily swap out of RAM and onto the boot volume can potentially be stored here.
If you want this to happen in a secure way (it is not possible to disable virtual memory, and you really wouldn’t want to), you can tell the operating system that you would like it to use an encrypted swap file. To do this, run System Preferences and navigate to the Security pane. Select the “Use secure virtual memory” box (if it is not already), and you will then have an encrypted swap file.
![]()
This may cause minor slowdowns in the swapping of virtual memory (since everything needs to be encrypted and decrypted now), so decide how important this is to you.
If you want to make a backward check of your swap files, you can boot into single-user mode and erase all of those older swap files (they may not be cleared automatically after crashes) by using the srm command on the swap files:
# srm /var/vm/swapfile*
What You’ve Learned
• When the sticky bit is placed on a folder, only the owner of an item within that folder can delete or edit that item.
• You can use fsaclctl to work with Access Control Lists on Mac OS X and Mac OS X Server.
• By setting the SUID bit on an executable file, you are telling the file system that, no matter who launches the executable file, the file will execute as though it was launched by the assigned owner of the file.
• Mac OS X has a set of core OS keychains it uses to store SSL certificate authority information; the keychains are located in /System/ Library/Keychains.
• The command line srm uses seven U.S. DoD–compliant passes, or a single pass of random data to erase data.
References
Administration Guides
“Mac OS X Server Getting Started”: http://images.apple.com/server/pdfs/Getting_Started_v10.4.pdf
“Mac OS X Server File Services Administration for Version 10.4 or Later”: http://images.apple.com/server/pdfs/File_Services_v10.4.pdf
“Mac OS X Server Windows Services Administration for Version 10.4 or Later”: http://images.apple.com/server/pdfs/Windows_Services_v10.4.pdf
“Mac OS X Server Command-Line Administration for Version 10.4 or Later”: http://images.apple.com/server/pdfs/Command_Line_v10.4.pdf)
Lesson Review
1. What folders are read access by others in every user’s home folder?
2. What three levels of granularity can be set when using standard UNIX permissions?
3. What is the command to set the sticky bit for a folder?
4. How do you enable ACLs on the local volume using Mac OS X?
5. Name four attributes permitted on all objects.
6. How do you find all items on your local hard disk that have both SUID and GUID set on them?
7. What is the command-line utility that permits the creation and management of disk images?
Answers
4. sudo /usr/sbin/fsaclctl -p / -e
5. delete, readattr, writeattr, chown