
Lesson 20. Web Security
|
Time |
This lesson takes approximately 2 hours to complete. |
|
Goals |
Configure Safari security features Establish a secure website using SSL Redirect from an HTTP site to an HTTPS site Set up WebMail securely with SSL Set up WebDAV securely with SSL Set up a proxy server to block selected sites |
The most secure you can make your computer (short of not powering it on in the first place) is to not connect it to the Internet. The very thing that makes the Information Age what it is also comprises your computer’s greatest security risk. Nonetheless, being connected to the Internet is the essence of modern computing.
The World Wide Web is the first thing most people think of when they envision the Internet—and then they think of pop-ups, viruses, cookies, identify theft, their kids getting into pornography sites...
System administrators think of these things too, but their list also includes getting hacked, downtime, and the never-ending balancing act of providing more and better services versus reducing vulnerabilities and risk. You can configure Safari, the Apple browser, for yourself and your users to increase security, and if you provide Web services, you can reduce the vulnerabilities of your servers while providing the services you want.
Securing the Web Client
The browser that Apple provides with Mac OS X 10.4, Safari 2.0, provides a number of security features that make it relatively simple to set up a safe browsing environment for you and your users. One of the main concerns is a site that executes malicious code upon loading the webpage or that tricks the user into activating the code. A common example is a site that pops up additional windows, often masquerading as Windows alert boxes or games, deceiving the user into clicking them, and then executing more malicious code. Even though most malicious software, or “malware,” out there is written targeting Windows, Java and JavaScript are cross-platform, as are many plug-ins. It is a good practice to enable services only when you get to a trusted site that requires them—and then turn them back off again.
Setting Security Preferences
Most of the Security options are available by opening Safari preferences and selecting the Security tab.
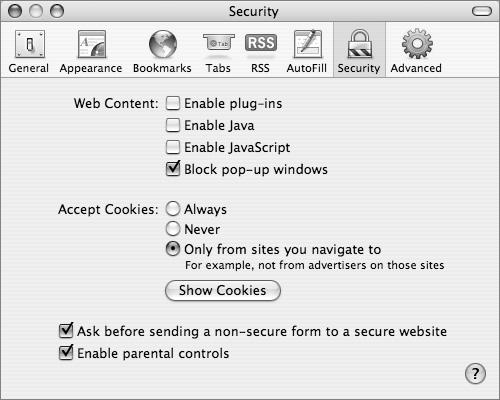
The Security tab offers these options:
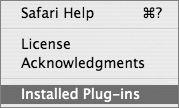
• Browser plug-ins are programs that extend the capability of your browser. The QuickTime and Flash plug-ins are perfect examples—they let you play QuickTime and Flash content, such as movies or sounds, that are embedded in the webpage. To see the plug-ins that Safari has installed, go to Safari’s Help menu and select Installed Plug-ins.
• Java is a software platform and programming language that allows highly portable programs to be run in many different environments, including browsers. Because there are malicious programmers out there, there is a way to turn off Java.
• JavaScript is a scripting language that can be used in webpages and run by browsers, or used in server-based applications, similar to Common Gateway Interface (CGI) programs. It is often used to create menus, validate forms before submitting them, track user history, and provide interactive effects.
• In addition to being an annoyance, pop-up windows are often used for “phishing,” or attempting to trick users into providing sensitive information or executing additional malicious code. However, as with plug-ins, Java, and JavaScript, there are legitimate uses for pop-up windows. This feature is also accessible through the Safari application menu.
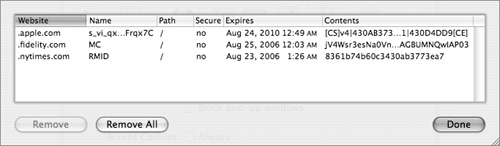
• Cookies are files that websites store on your computer to save user information such as shopping preferences and shopping carts, and to gather accurate statistics on their visitors—total number of new versus repeat visitors, for example. But the information that cookies gather can be sold for marketing, and some infrastructure providers gather information about you across multiple sites. Safari lets you decide how to handle cookies and to view the individual cookies.
• If you select the “Ask before sending a non-secure form to a secure website” checkbox, Safari will ask for approval before sending unencrypted form information to a secure site.
When you enter a secure website (HTTPS), the data transferred between the client and the server is encrypted with the Secure Sockets Layer (SSL) protocol. Aside from the URL beginning with “https,” your secure connection is signified by a padlock icon in the upper-right corner of the browser window. The SSL encryption algorithm is generated in conjunction with a digital certificate, which also helps establish the website as authentic. By clicking that padlock, you can view the credentials of the certificate and evaluate its authenticity.
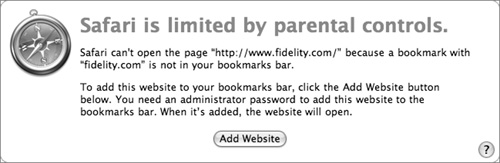
• Selecting the “Enable parental controls” checkbox does two things: It restricts the ability of the current account to modify the “New windows open with” and “Home page” settings under Safari’s general preferences, and it requires an administrator to add each allowed website. You do this by navigating to a site, clicking the Add Website button, and providing an administrator name and password. The site is added to the browser’s Bookmarks bar.
Note
The website restriction becomes active as soon as you select “Enable parental control,” but the “New windows open with” and “Home page” restrictions do not—you must quit and restart Safari for that change to be in effect.
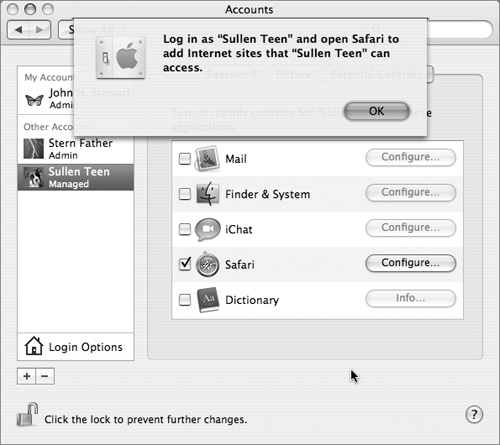
“Enable parental control” is also available through System Preferences > Accounts > Parental Controls.
Tip
All of the websites that were in the Bookmarks bar before you turned on parental control will be allowed sites. If you have a long list of sites you want to add, add them to the Bookmarks bar before you turn on parental controls.
Note
“Enable parental control” will be grayed out if you are logged in as an administrator. You must be logged in as the user being “controlled.”
Using Safari on a Public Access Mac
If the computers you maintain are set up securely, there should be little need for this feature, but what if you are using a public access computer, or a computer with a questionable security configuration? In the Safari application menu, there are three methods (in addition to Block Pop-Up Windows) to make sure you don’t leave sensitive information from your browsing session behind.
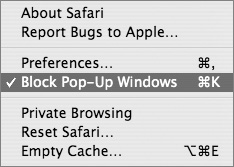
• If you select Private Browsing, the sites you’ve visited are not being added to the history, the Downloads window is cleared when you quit Safari, no information—including names and passwords—is saved in AutoFill, and searches are not added to the Google search box. While browsing, you can still use the Back and Forward buttons to navigate sites, but when you close the window, that information is gone.
Note
Do not confuse Private Browsing with Anonymous Browsing, which is concerned with your browsing being monitored from outside the computer. Internet service providers (ISPs) can monitor your browsing, including what file types you are downloading, and commercial sites collect information such as your Internet Protocol (IP), what Web browser you are using, and who your ISP is. Consequently, there are Anonymous Browsing services that offer various degrees of “anonymization.” These vary from simple proxy servers that retrieve webpages for you, without your information being sent to the remote site, to services that also encrypt your browsing transaction from end to end.
• Reset Safari erases your browsing history, empties the cache, clears the Downloads window and Google search entries, and removes cookies and AutoFill text.
• Empty Cache deletes webpage contents that were stored locally. The reason for caching files in the first place is to speed the browsing of sites that you have already visited, as those files can now be accessed from your hard drive rather that waiting for them to download every time you visit the page—especially sites you visit frequently, like your home page. It is a good idea to empty the cache on public computers when you are done using them, as the cache files may contain personal or sensitive information such as passwords or credit card numbers.
Note
Private Browsing performs essentially the same function as Reset Safari, but you turn it on when you start your browsing (as opposed to resetting Safari and emptying the cache when you finish browsing).
Using a Proxy Server
You can go one step further to control the content that reaches your client computers, and that is to filter them through a proxy server. Originally, proxy servers were utilized to speed Web access—it was much faster to grab cached content from your local server than to reload it over a slow Internet connection. Yet with current access speeds, it is usually not worth the effort of maintaining the service. However, proxy servers do allow you to easily block access to specific sites, and optionally import free or commercial blacklist files. This is less restrictive—and less precise—than Safari’s built-in “allowed sites” mechanism. It has an advantage in that it scales well—you can have a great number of clients using the server as a proxy.
Setting up a proxy server will be covered later in this lesson. To configure Safari as a proxy client:
1 From Safari’s application menu, select Preferences and click the Advanced tab.
2 Click the Proxies: Change Settings button.
This will open System Preferences > Network.
3 Open System Preferences > Built-in Ethernet and click the Proxies tab.
Note
You must configure proxy settings for each network interface that has Internet access. Potentially this includes Ethernet, AirPort, Modem, Bluetooth, Built-in FireWire, and VPN.
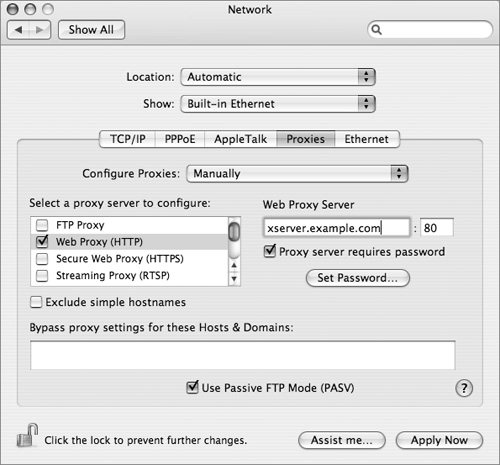
4 Select the proxy server you want to configure—in this case, Web Proxy (HTTP).
5 Enter the address or DNS name of your Web proxy server.
6 Enter a user name and password for the proxy server, if necessary.
7 Click the Apply Now button.
From this point on, all of your client’s Web traffic will be funneled through the proxy server, including its site-blocking filter.
Web Security
Websites present many security risks. Without protection, anyone can read private information that you post on a website as long as they have the URL to the site. Also, when users send private information, such as a credit card number, to the server through a form, anyone with a packet sniffer can read the information because it is sent in clear text.
Included with the standard installation of Apache on Mac OS X Server is mod_ssl, an open source, freely-distributed add-on module to Apache. This module lets Apache use OpenSSL, enabling cryptographically-protected connections to Web servers via the SSL and Transport Layer Security.
Enabling SSL for Apache allows encrypted access to your Web services. SSL lets Web applications access your server in a secure way, hides passwords passed to your server in Web-based forms from packet sniffers, and encrypts data transmitted to a browser.
The mod_ssl package is not merely another module in Apache: It goes to the core of Apache by implementing its Extended Apache Programming Interface (EAPI). In addition, mod_ssl interfaces with the OpenSSL libraries for encryption, decryption, and other services.
SSL in Apache (HTTPS) typically runs on port 443, the standard HTTP-SSL port registered with IANA. However, you can configure it to run on any other port. by creating a virtual host to handle the HTTPS content.
Tip
To enable mod_ssl, select ssl_module in the Modules pane in Server Admin, click Save and then restart the Web service.
You can find documentation for mod_ssl on your Mac OS X Server computer at /Library/Documentation/Services/apache_mod_ssl/index.html.
Setting Up Secure Web Services
Perhaps the three most universal guidelines for keeping a server secure are:
• Don’t turn on more services than you need to provide.
• Keep up-to-date on vulnerabilities and patches.
• Read your log files.
The reasoning of the first guideline is simple: The more exposure to the outside world, the more potential vulnerability and the possibility that an exploit of one service could compromise another service. Also, the more services running, the more there is to maintain and monitor. Apple respects this guideline by providing a secure default configuration: All native services are off, and all communications ports are closed.
Keeping up-to-date is obvious enough, but it becomes increasingly difficult to balance with the other demands on our time. Apple helps ease this load by working with security watchdog organizations such as CERT and FIRST, as well as tapping into the rapid development pace and diligence of the open software community. Apple passes the benefit of this effort along by way of the Software Update utility; set it to update daily, and you can reap disproportionate rewards of Apple’s frequent security (and other) updates with almost no effort.
“Did you look at the log files?” This constant inquiry from the UNIX sages is a good indicator of the usefulness of this technique. Regularly checking logs helps you with not only the obvious problems, but also with things that aren’t obvious but may well be problems. The Apple Console utility consolidates all of the system’s logs into a searchable, dynamic log viewer.
Establishing a Secure Website Using SSL
Most of the information on the Web is not sensitive; in fact, accessibility is perhaps the biggest single basis for its incredible popularity. But the Web is also increasingly serving private and sensitive information, including e-commerce, medical records, filing taxes, and Web-based e-mail. In the vast majority of cases, these transactions are encrypted with a protocol called Secure Sockets Layer (SSL).
Secure websites rely on certificates to provide two central tenets of their security:
• That your server can be trusted because it has an authentic certificate
• For the encryption of the interaction
Viewing Certificates
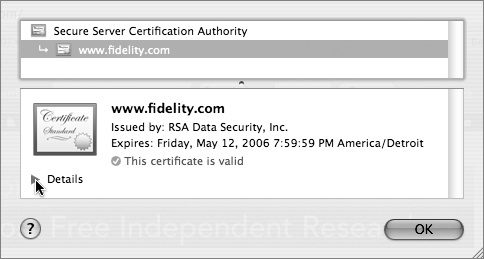
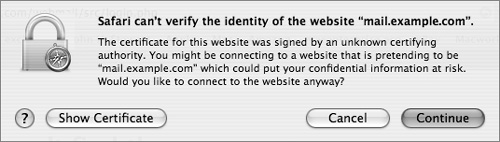
Unencrypted Hypertext Transfer Protocol (HTTP) traffic typically travels over port 80: When you type in an HTTPS URL, you are telling your browser to initiate a secure (SSL) connection to port 443 of the Web server. The browser and server negotiate the strongest cipher they have in common, and then the server sends the browser its X.509 certificate. If the browser can’t verify the identity of the secure website, it will display a dialog allowing you to examine the certificate. To view the certificate, click the Show Certificate button.
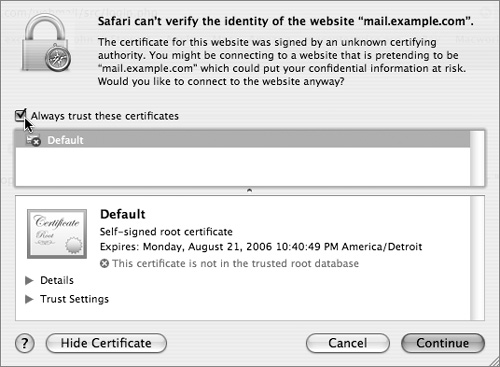
If it is a server you trust (your own, for example), you can select the “Always trust these certificates” checkbox, after which you’ll need to authenticate to add the certificate to your keychain. The next time you go to that site, the certificate will be trusted. Your browser then uses the certificate as an encryption key for the secure connection.
Setting Up a Secure Website
The following steps walk you through setting up a secure Web mail server site. If you’d like to have WebMail running on your server, you must have the IMAP mail server set up and running properly. Basically, there is just a one-checkbox difference between Webserving mail and not!
1 Install the Server Admin utilities (included with Mac OS X Server, or downloadable from the Apple website).
2 Launch /Applications/Server/Server Admin and connect to your server.
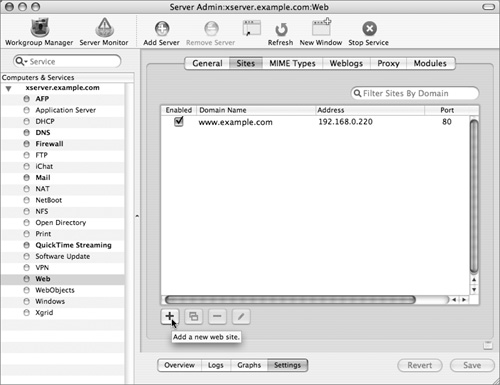
3 Select the Web service in the left frame and open the Settings tab using the button at the bottom of the main window.
4 Click the Sites tab in the top of the main window and click the “Add a new website” (+) button.
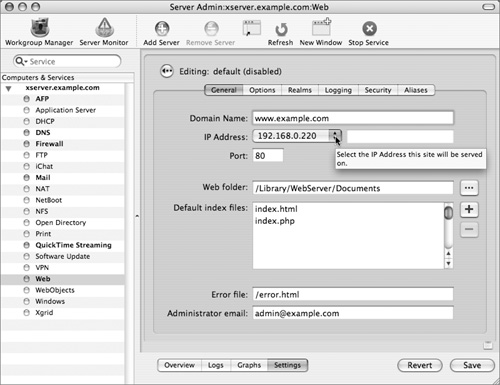
5 Enter the domain name of your server, select its IP address from the drop-down menu, and click the Options button.
6 Turn off the Performance Cache, turn on WebMail, and click the Security tab.
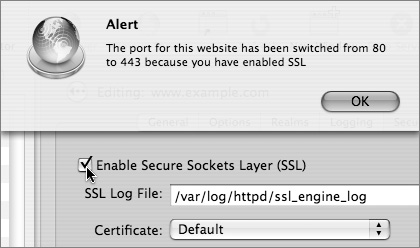
7 Select the Enable Secure Sockets Layer (SSL) checkbox and click OK.
8 In the Certificate drop-down menu, select Custom to configure your certificate (we’re using the server’s default certificate in this example).
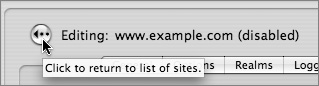
9 In the upper-left corner of the frame, click the button to return to the list of sites.
10 Click the Enabled button next to your new secure website (the one on port 443).
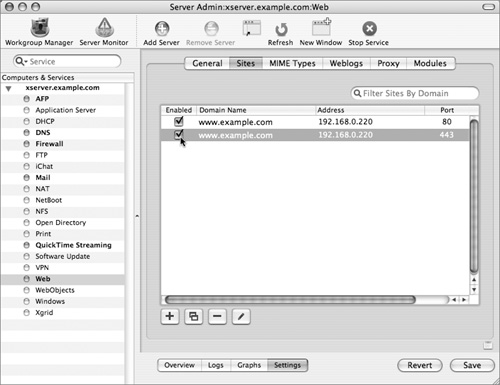
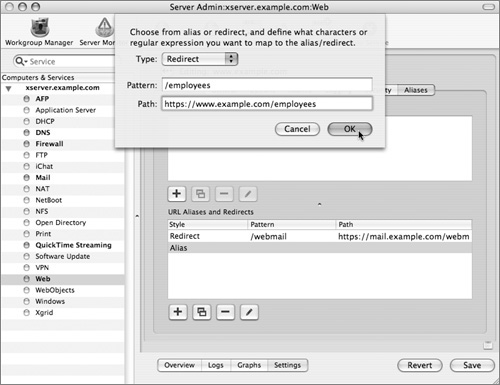
11 Select the unencrypted site (the one on port 80), click the “Edit selected website” (/) button, and click the Aliases tab.
12 Click the “Add new alias or redirect” (+) button.
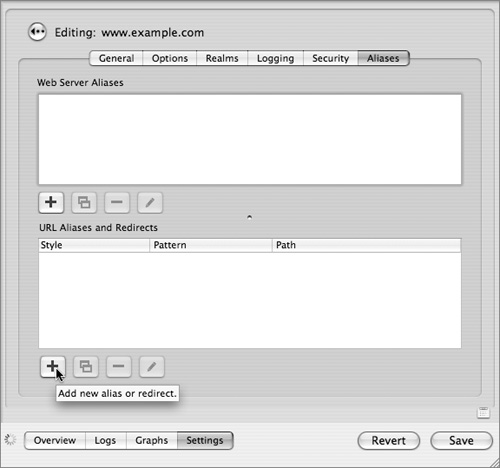
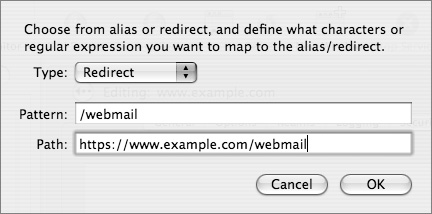
13 Select Redirect from the drop-down menu, then enter /webmail for the pattern and https://www.example.com/webmail for the path. Click OK.
14 Click the Return button to return to the list of sites.
15 Click the Save button in the lower-right corner of the window.
16 If the Web service was running when you added your new secure site, the following dialog will come up. Click Restart to restart the Web service.
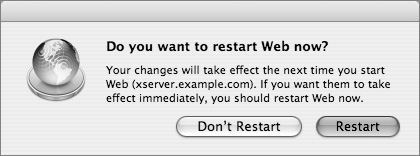
Alternately, if the Web service was not running, you can start it now by clicking the Start Service button.
17 To check your work, open a browser and type www.example.com into the URL field.
The browser should take you to your unencrypted site.
18 In the URL field, type in www.example.com/webmail.
The redirect that you created in steps 11 through 14 should redirect you to the secure WebMail site.
Note
Redirects must follow particular formatting requirements. The Pattern field cannot contain the http://domain_name portion of the URL—it must be a search term such as a file or directory (for example. anything you might type in after the domain name of the site). The path must be a fully qualified domain name, such as a complete URL.
We’ve seen in other lessons the usefulness of certificates and encryption, and we put them to use here in our exercise. If you are serving a lot of static pages, the performance cache (step 6) can improve how quickly pages are served by keeping them stored in RAM. With pages that are created dynamically, this can cause problems or incompatibilities, as the content would not all fit into RAM. Therefore, we disabled it in order to use WebMail.
Is WebMail really as simple as one checkbox? Well, yes and no. After mail services are deployed in a compatible mode, yes. WebMail simply ties in with the IMAP mail services already running on your server, and gets its user account information from Directory Services, just as the mail services do. The compatible mode is as follows:
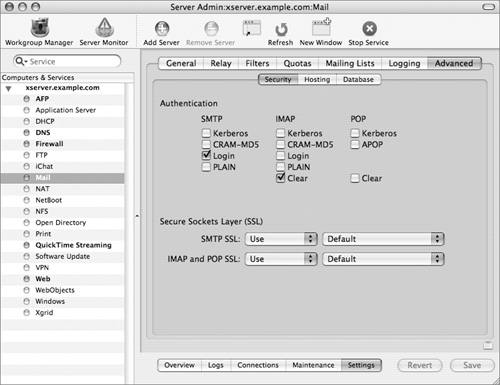
Look in Server Admin > Mail > Settings > Advanced > Security. At the minimum, you must choose the following settings:
• Login for SMTP
• Clear for IMAP
• Use for both SMTP SSL and “IMAP and POP SSL.”
WebMail’s default configuration uses these settings, and does not use SSL. Because we are serving WebMail from a secure site, all traffic between the browser and the server is encrypted with SSL.
You can (and should!) have more secure authentications options selected for your mail client users. For example, you might have Kerberos, CRAM_MDS, and Clear all selected for IMAP authentication methods. The weakness of this is that you are now relying on your users to configure their mail clients securely; with this configuration, nothing is requiring them to use SSL, or preventing them from using Clear authentication.
The final requirement for one-click WebMail is that your Web service is running on the same server as your mail service. That way, no unencrypted data is passing between two servers.
Note
Though it is possible to configure WebMail to use SSL (thereby allowing you to require SSL for mail clients), the PHP implementation on Mac OS X was compiled without the necessary openssl PHP extension.
Configuring Secure WebDAV
Web Distributed Authoring and Versioning (WebDAV) was originally conceived of as a way to allow Web authors to access website files and make changes to them using HTTP, all on a live website. Since then, it has become a much more widely used method of file sharing because of its ease of use, much of which comes from the fact that it uses HTTP and because it runs over the same ports as the Web—so firewalls are seldom a barrier to use.
Since Web serving is typically about read-only access for everyone, configuring WebDAV requires that you:
• Define realms (folders) to restrict access to WebDAV users (via Server Admin > Web > Settings > Realms).
• Define User & Group access to those realms (via Server Admin > Web > Settings > Realms).
• Allow file system-level Read & Write file permissions to the www user and group for each realm folder (via Workgroup Manager).
Creating Realms and Adding Access
The following procedure will add WebDAV to the services you are offering via SSL. This will be an “employees only” area of the website.
1 Launch /Applications/Server/Server Admin and connect to your server.
2 Select the Web service in the left frame, open the Settings tab using the button at the bottom of the main window, and click the Sites tab at the top of the frame.
3 Select the secure site you created in the previous exercise, and click the “Edit selected website” (/) button.
4 Click the Options tab and select WebDAV, then click the Realms tab.
5 Click the “Add a new realm” (+) button.

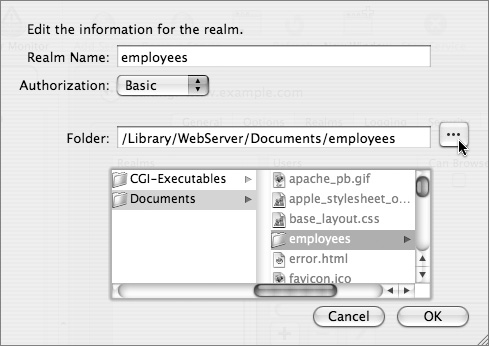
6 Either type in the path to the folder you want to make accessible, or navigate to it by clicking the path button (...) and selecting the folder you want. Click OK.
7 Click the “Add a new group to the currently selected realm” button.
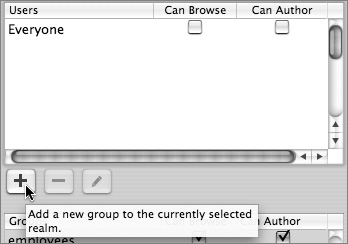
Note that there is a typo in the pop-up note—it should be user, not group.
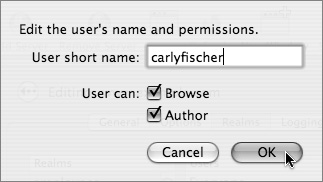
8 Enter the user short name, and select the access privileges you want the user to have.
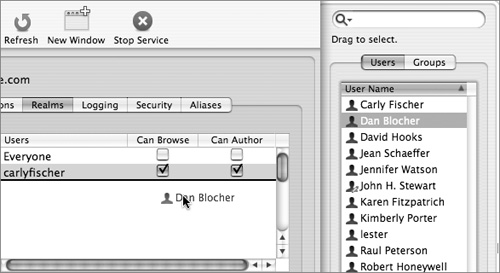
Alternatively, you can click the Users & Groups button, drag in the users, and set their permissions by selecting the appropriate checkboxes.
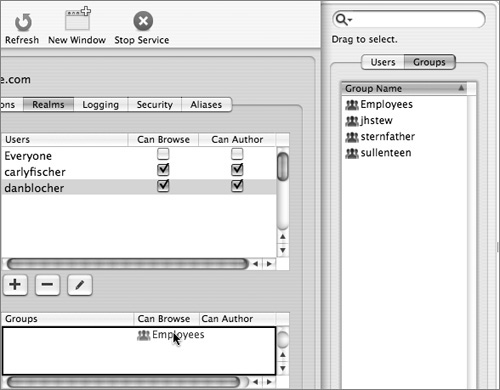
9 Add the groups you’d like to have access to realm the same way, either by clicking “Add a new group to the currently selected realm” button or by clicking the Users & Groups button, selecting the Groups tab, and dragging the appropriate Groups to the Groups box. Select the appropriate permissions.
10 When you are finished adding the users and groups you want and assigning their access privileges, click Save.
11 As in the previous exercise, add a Redirect to your unencrypted site to redirect users from the unencrypted site to the encrypted site.
12 If necessary, restart the Web service to make the changes take effect.
Setting File Permissions
The last part of getting WebDAV going is setting the proper file permissions. The default location of the Web directory is /Library/WebServer/Documents; it and its contents owner is root, and its group is admin. For Web folders, the owner and group (root and admin) have read, write, and execute privileges, and others have read and execute privileges (775, in UNIX parlance). For Web documents, the owner and group have read and write privileges, and others have read privileges (664). You simply need to change the both the owner and group of the directories you are making available via WebDAV to www and www, respectively. This may seem like it’s setting quite unrestricted privileges, but remember that the users, groups, and permissions you set up in realms are what restrict access via the Web.
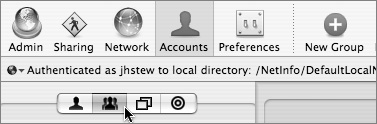
1 Launch /Applications/Server/Workgroup Manager and connect to your server.
2 Click the Accounts icon in the toolbar at the top of the window, and then click the Groups tab beneath it.
3 Click the New Group button in the toolbar at the top of the window, and type a name for the group.
4 Click the “Add group members” (+) button and drag users (and optionally groups) to the Members area of the new group window.
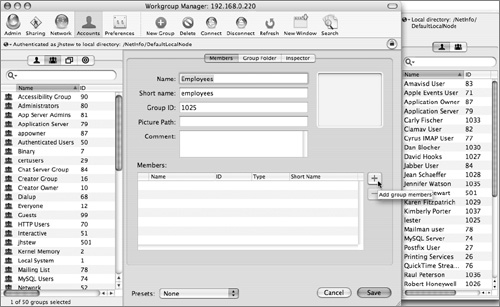
5 When you are finished populating your members list, click Save.
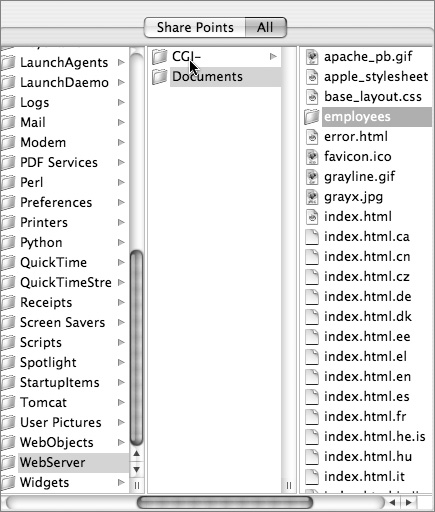
6 Click the Sharing icon in the upper left of the toolbar, and then click the All tab underneath.
7 Select the folder you want to share out via WebDAV.
The example folder, employees, is inside /Library/WebServer/Documents.
8 In the right frame, click the Access tab at the top, and click the Users & Groups button at the bottom to reveal the Users & Groups drawer.
9 Drag the World Wide Web Server user (whose short name is www) to the Owner field, then click the Groups tab in the Users & Group drawer.
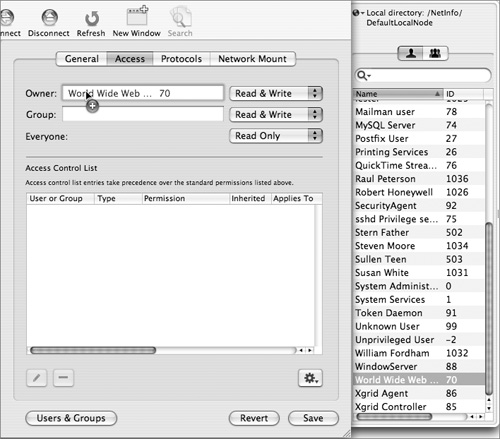
10 Drag the HTTP Users group to the Group field.
11 Click the Save button and quit Workgroup Manager.
In this configuration, you used Basic authentication, because you are running WebDAV in an SSL-encrypted site, so all communication between the browser and the Web server is encrypted. You should either encrypt your sessions in SSL or use Kerberos authentication (or both)—the other methods alone give a false sense of security to users, and their account passwords can easily be compromised.
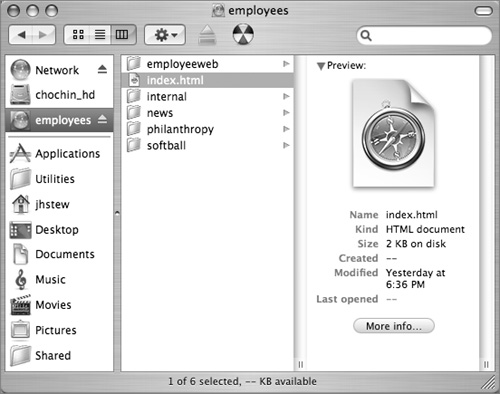
So how do you access the site? With a browser, it works the same way getting to WebMail does: type www.example.com/employees into the URL field of Safari, and you will be redirected to https://www.example.com/employees and asked to authenticate. Notice that the lock icon is in the upper-right corner of your browser window, indicating a secure session.
In the Finder’s Go menu, select Connect to Server and type in the entire URL—the Finder does not follow Redirects.

A WebDAV authentication dialog will open—log in with your name and password.
A Finder window will appear with your WebDAV share mounted:
Setting Up a Filtering Proxy Server
Setting up a proxy server is actually a very simple process. The more involved part is maintaining the blocked hosts list.
1 Launch /Applications/Server/Server Admin and connect to your server.
2 Select the Web service in the left frame, open the Settings tab using the button at the bottom of the main window, and click the Proxy tab at the top of the frame.
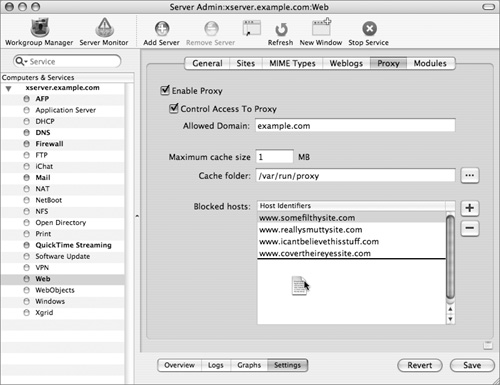
3 Select the Enable Proxy and Control Access To Proxy checkboxes.
4 Click the “Add a new host to the list” (+) button to type individual hosts into the “Blocked hosts” list box.
You can also drag a comma-delimited (csv) or tab-delimited (tsv) text file of addresses into the “Blocked hosts” list box.
5 Click the Save button.
Those clients you configure to use this proxy server will now be filtered through it, allowing you to restrict access to specific Web hosts. It’s also strongly recommended that you restrict your proxy server usage to just your domain, as it is a security risk. When the cache space fills up, the oldest information will be dumped. You may need to adjust this setting, but if your primary reason for using proxy caching is to filter incoming traffic, you can probably leave the size quite small.
Note
There are both commercial and free block lists available; they are what make proxy filtering worthwhile. The results, though, will only be as good as the block lists, and won’t be perfect, either.
What You’ve Learned
• A proxy server is used to block access to various websites and is configured using the Web services section of Server Admin.
• Websites configured to use SSL default to port 443.
• Redirects are an excellent way to automatically send a request for one page to another page.
• Realms are an excellent way to restrict access to portions of a website.
• The performance cache should not be used with secure websites.
References
URLs
Apache HTTP Server: http://httpd.apache.org
Apple Computer, Mac OS X 10.4 Security Help: http://docs.info.apple.com/article.html?path=Mac/10.4/en/cdb_scr.html
Apple Computer, Mac OS X 10.4 Server Documentation: www.apple.com/server/documentation
Apple Computer, Mac OS X 10.4 Server Web Technologies Support: www.apple.com/support/macosxserver/webtechnologies
Apple Computer security: www.apple.com/macosx/features/security
CERT® Coordination Center: www.cert.org
Forum of Incident Response and Security Teams (FIRST): www.first.org
OpenSSL: www.openssl.org
SquirrelMail Web Mail Server: www.squirrelmail.org
WebDAV: www.webdav.org
Lesson Review
1. Name three types of Web content that Safari can block.
2. What does Reset Safari do? How is this different from Private Browsing?
6. Name a security drawback of proxy server filtering.
Answers
1. Plug-in–based content, Java content, JavaScript content, pop-up windows, cookies, and sites not allowed by parental controls
2. Reset Safari erases your browsing history, empties the cache, clears the Downloads history and Google search entries, and removes cookies and AutoFill text. Private Browsing is essentially the same but it is activated on public machines before using them to prevent the data from being written in the first place.
3. A Redirect is a function of the Apache module mod_alias that enables you to search an incoming URL string for a particular directory or file path, and forward it to a complete URL.
4. Host it in an HTTPS SSL–encrypted site. Though SquirrelMail itself is capable of SSL, it requires a PHP extension that Mac OS X Server configuration lacks.
5. The default for owner is root, and for group is admin. They both must be reset to www.
6. The security is only as good as your “Blocked hosts” list, and the Web is always changing. Maintaining the “Blocked hosts” list can be very involved.