2. Tell More Than the Time with Apple Watch
In This Chapter
![]() Getting acquainted with the Apple Watch
Getting acquainted with the Apple Watch
![]() Finding and installing Apple Watch apps
Finding and installing Apple Watch apps
![]() Updating the Apple Watch’s OS and apps
Updating the Apple Watch’s OS and apps
![]() Discover ways to use Apple Watch as a health and fitness tool
Discover ways to use Apple Watch as a health and fitness tool
In April 2015, Apple released the Apple Watch and, like the iPhone before it, it quickly began changing the way people interact with mobile technology and the Internet. In this case, Apple has provided a tool that can be comfortably worn on a wrist (see Figure 2.1).

Like the iPhone and iPad, you can interact with the Apple Watch in several ways, such as by using its touch screen display, pressing its built-in button, turning or pressing its Digital Crown, or by speaking directly to the watch using the Siri feature. Plus, thanks to the technology that’s built in to Apple Watch, it has the ability to collect data and wirelessly communicate with your iPhone to access and share information via the Internet.
The Digital Crown is the dial on the right side of the watch, which is used for several different purposes, depending on the function or app that’s being used. For example, the Digital Crown can be pressed to access the watch’s Home screen, or it can be turned to scroll up and down or zoom in/out on content being displayed.
Thanks to several of the apps that come preinstalled, as well as a growing selection of optional, third-party apps, Apple Watch is proving to be a powerful tool that can handle a wide range of fitness and health-related tasks, as covered later in this chapter.
Because of its durability, you can wear the Apple Watch comfortably during rigorous activities (shown in Figure 2.2), like during your daily workout. Keep in mind that some Apple Watch models are more durable and weather resistant than others.

Discover the Apple Watch
Three versions of the Apple Watch are available: Apple Watch Sport, Apple Watch, and Apple Watch Edition. Each version of the watch has multiple options, like the size of the watch face and the type(s) of watch bands available. All versions of the Apple Watch include the same built-in processor and technologies, all operate using the same version of the Apple Watch OS (operating system), and all run the same collection of preinstalled and optional apps.
![]() Note
Note
All versions of the Apple Watch have a built-in heart rate sensor, GPS capabilities, gyroscope, and accelerometer; operate using Apple’s proprietary S1 professor chip; and have other technologies built in that allow the watch to be used for a wide range of health and fitness-related tasks. The differences among the various Apple Watch versions are the materials the watch and watch band are constructed from, and the price.
The Apple Watch is sold at Apple Stores and by select authorized Apple resellers. You can also purchase it online directly from Apple’s online-based store (www.apple.com).
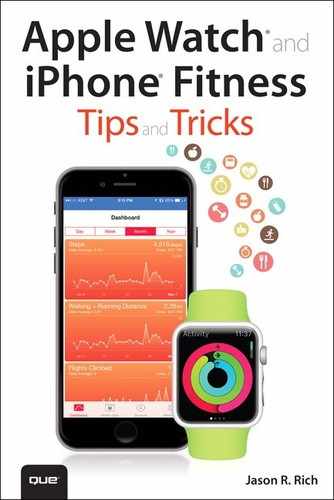
As someone interested in health and fitness, your best bet is likely the Apple Watch Sport, for which ten configurations are available. These versions of the Apple Watch are designed for activity-oriented people and are the most durable. All versions of Apple Watch are available in two sizes: 42mm and 38mm. Both sizes function exactly the same. As shown in Figure 2.3, the difference is the height and width of the touch screen display (watch face and housing).
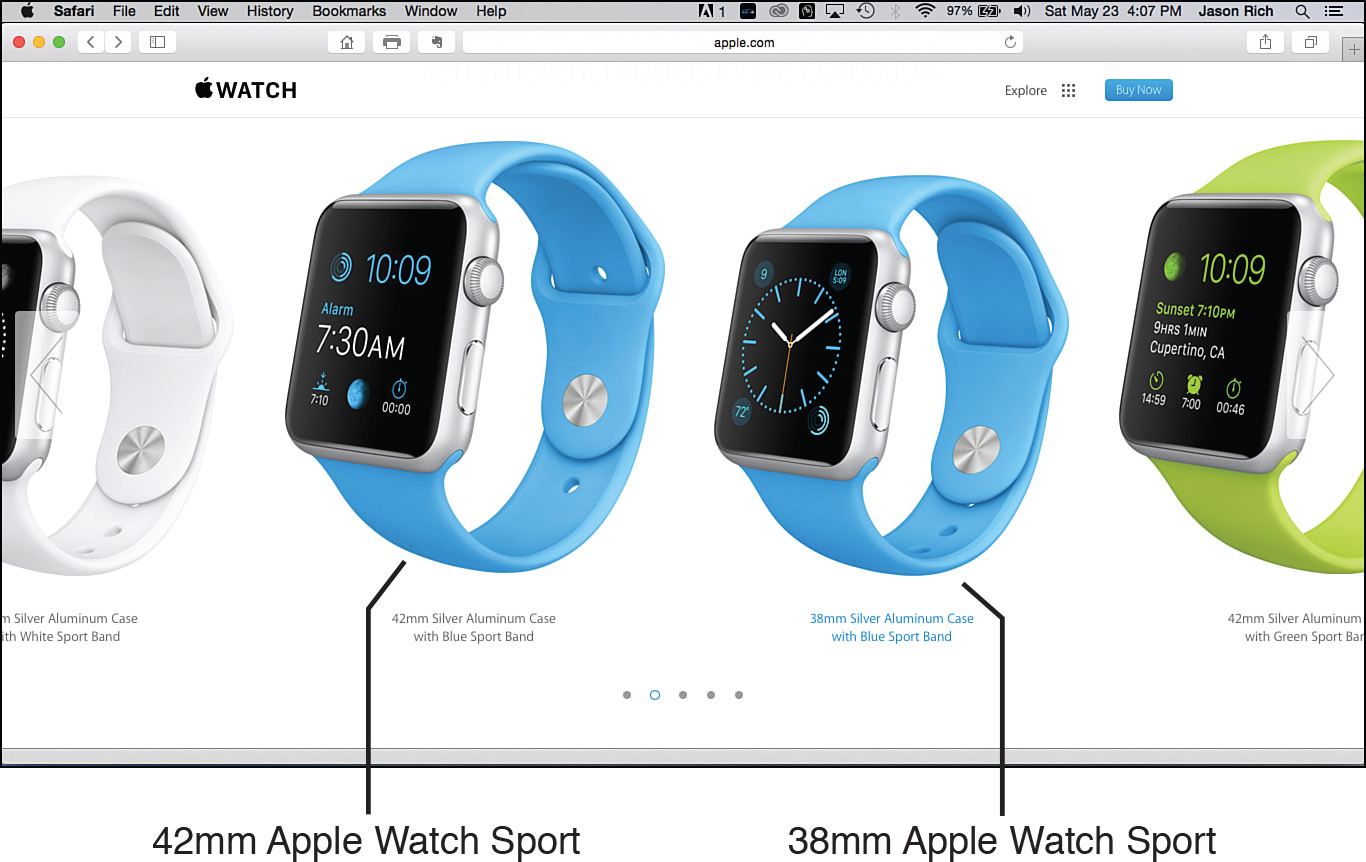
FIGURE 2.3 Apple’s website (www.apple.com) enables you to compare all the various Apple Watch models and styles, as well as the interchangeable watch bands available for them.
![]() Tip
Tip
If you purchase an Apple Watch with a leather or stainless steel band, but want to use it for fitness-oriented activities without ruining the band, the Apple Watch Sport Band (for non-Apple Watch Sport models) is sold separately (http://store.apple.com/us/watch/bands). It is made from fluoroelastomer and comes in a variety of colors. Apple Watch watch bands can be changed in less than 15 seconds.
Apple Watch Sport’s housing is made of an extremely strong, durable, and lightweight anodized aluminum (which is 60 percent stronger than standard aluminum) and is available in silver or space gray. Strengthened, scratch-resistant Ion-X glass protects the touch screen display.
The watch band that comes with the Apple Watch Sport is made from waterproof, durable, flexible fluoroelastomer, which is a hybrid plastic and rubber-like substance that’s soft and comfortable to wear. The band comes in five colors (white, blue, pink, green, or black).
The 38mm version of Apple Watch Sport costs $349.00, whereas the 42mm version of Apple Watch Sport costs $399.00. More expensive, but less durable, versions of Apple Watch and Apple Watch Edition are available, ranging in price from $549.00 to $17,000.00 (for a version of Apple Watch Edition that’s made from 18-karat yellow gold).
![]() Note
Note
From a fashion standpoint, and depending on your level of activity, you can easily wear the mid-priced Apple Watch ($549.00 to $1,099.00) with formal business attire, or with your favorite workout outfit. However, this version of the watch is a bit less durable. Some of the watch bands (including those made from leather) are water resistant, but not necessarily waterproof. A fluoroelastomer Sport Band, available in black or white, is also available for this version of the Apple Watch (in addition to the Apple Watch Sport models).
The versions of the Apple Watch that comprise the Apple Watch Edition collection are designed to be highly fashionable, are much more expensive, and not really suitable for use during high-intensity activities that might include exposure to harsh climates or water.
![]() Tip
Tip
Apple Watch watch bands are interchangeable. If you plan to wear your Apple Watch on a daily basis to work and typically dress in business attire, but you also want to wear your watch when engaged in more rigorous activities and workouts, consider choosing the mid-priced Apple Watch (as opposed to the Apple Watch Sport), and purchasing both a more formal (leather or stainless steel) watch band, as well as a fluoroelastomer Sport Band for it.
All versions of the Apple Watch come with the watch, one watch band (which you select), a proprietary magnetic charging cable, and a USB adapter. Each watch also comes with a standard limited warranty, one year of hardware repair coverage, and up to 90 days of free support.
For an additional $49.00 (for all Apple Watch Sport models), the optional AppleCare+ protection plan is available. This extends the coverage for two years, and includes up to two incidents of accidental damage (each of which is subject to a $69.00 service fee). Without AppleCare+, Apple Watch repair costs are rather high.
AppleCare+ does not cover the loss or theft of the watch. For this type of coverage, in addition to coverage for accidental damage, third-party insurance is available, although this insurance does not include Apple’s technical support.
Especially if you’re active, and will be using the Apple Watch while engaged in high-intensity activities, investing in AppleCare+ or third-party insurance is definitely worthwhile.
![]() Tip
Tip
One independent company that offers optional Apple Watch insurance is SquareTrade (www.squaretrade.com/smartwatch-warranty). A two-year plan that includes a $75.00 per claim deductible is priced at $69.00. A two-year plan that has no deductible is priced at $159.00. Neither of these plans covers loss or theft of the watch, but do cover repairs due to accidental damage or hardware failure.
Interact with Your Apple Watch
Most interaction with the Apple Watch involves using your finger to tap, swipe, drag, or press and hold down (Force Touch) something on the display.
In addition to the usual finger gestures adapted for use on the watch’s touch screen, you use the Digital Crown in two ways: by pressing it inward, or turning the crown to scroll or zoom.
You use the button located just below the Digital Crown by pressing it inward. Depending on what you’re doing with the watch at any given time, how you use the Digital Crown and the button will vary.
The Apple Watch also responds to specific movements of your wrist. For example, if you move your wrist so you can view the watch face, the display automatically turns on (wakes up) and displays the selected watch face. Likewise, if you have the “Hey Siri” feature turned on, as soon as you wake up the watch by moving your wrist, you can activate Siri by saying “Hey Siri,” and then issuing your question, command, or request by speaking to the watch.
Depending on how you have the watch set up, and which app you’re using, the watch responds to you in several ways. For example, it can display information onscreen, activate the haptic engine and tap your wrist or vibrate, and/or generate sound.
Prepare Your Apple Watch
You need to do a few things before you can wear and use your new Apple Watch for your favorite health and fitness applications. After you charge the watch’s battery, you need to pair it with your iPhone to establish a wireless Bluetooth connection between the two devices.
Pair Your Apple Watch with Your iPhone
Before using your new Apple Watch, you need to pair it with your iPhone. You only need to do it once. Before you begin, make sure your iPhone model is compatible with Apple Watch, running at least iOS 8.4, and has its Bluetooth mode turned on (refer to Chapter 1, “Use the iPhone as a Powerful Health and Fitness Tool”).
To establish the required Bluetooth connection between your Apple Watch and iPhone, follow these steps:
1. Turn on the Wi-Fi feature of your iPhone, and make sure it’s connected to the Internet via a Wi-Fi hotspot or wireless home network. Your iPhone’s 3G/4G/LTE cellular data connection will not work for this process.
![]() Note
Note
Proximity: During this initial pairing process, place your iPhone and Apple Watch close together. In the future, the Bluetooth connection works when the two devices are up to 150 feet apart.
2. On your iPhone, launch the Apple Watch app. Tap on the My Watch icon that appears in the bottom-left corner of the screen (see Figure 2.4).
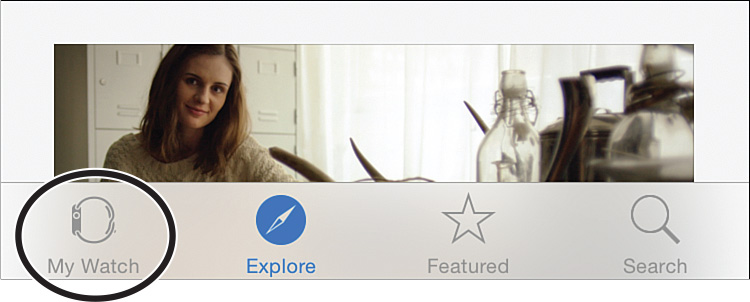
FIGURE 2.4 The My Watch icon appears at the bottom of the Apple Watch app when it’s running on the iPhone.
3. On the Apple Watch, after it’s on, select your language by rotating the Digital Crown. You can also swipe up or down on the screen to scroll through the menu listings.
4. Tap on the Start Pairing button that appears on your Apple Watch after you choose a language.
5. Tap on the Start Pairing button that appears on your iPhone. At this point, the pairing animation should appear on your Apple Watch’s screen.
6. As directed by the watch and iPhone, hold your iPhone directly over the Apple Watch’s screen, and center the watch face in the iPhone’s viewfinder. Hold the iPhone and Apple Watch in this position until the Apple Watch Is Paired message appears.
7. The Set Up As New option appears on the iPhone’s screen. Tap on it.
8. From the Apple Watch app that’s running on the iPhone, select on which wrist (left or right) you plan to wear the Apple Watch, and then tap on the Agree button when the Terms and Conditions information appears.
9. When prompted, enter your Apple ID username and password. This activates the Digital Touch, Apple Pay, and Handoff features on your Apple Watch.
10. As the setup process continues, a prompt appears for you to create a passcode for your Apple Watch. You do this, too, from the Apple Watch app on your iPhone. This passcode is used for security purposes later, when you use Apple Pay, for example.
11. Toward the end of the initial pairing process, your iPhone will sync all of your compatible (and optional) apps to your Apple Watch, including the fitness apps you have installed on the iPhone that have an Apple Watch counterpart. You can also install additional fitness apps later—for example, on both your iPhone and Apple Watch. Tap on the Install All option to transfer all of these compatible apps. At the same time, applicable appspecific data that’s stored on your iPhone will transfer as well.
During the pairing process between the Apple Watch and iPhone, be sure to keep the two devices close together.
The Apple Watch chimes when the pairing and syncing process is complete. You’re now ready to customize your Apple Watch for wearing and using it.
Customize Your Apple Watch
You can customize your experience wearing and using the Apple Watch in several ways, many of which are relevant to using your watch as a health and fitness device. Some of your options include:
![]() Choosing and then customizing the watch face
Choosing and then customizing the watch face
![]() Adjusting the Apple Watch’s Notifications options
Adjusting the Apple Watch’s Notifications options
![]() Customizing the Glances screens
Customizing the Glances screens
![]() Personalizing the App Layout on the watch’s App screen
Personalizing the App Layout on the watch’s App screen
![]() Selecting personalized settings for the sound, haptics, text size, and screen brightness
Selecting personalized settings for the sound, haptics, text size, and screen brightness
![]() Adding additional apps to the Apple Watch to expand its capabilities
Adding additional apps to the Apple Watch to expand its capabilities
With the exception of choosing and customizing a watch face, you handle the majority of these customization and personalization options via the Apple Watch app on your iPhone, after you pair the iPhone and Apple Watch.
Customize Your Watch Face
To customize your Apple Watch’s watch face, tap on the screen to wake it up, and then press and hold down your finger on the screen while viewing the currently active watch face. Tap on the Customize button (shown in Figure 2.5), and then follow the directions offered on Apple’s website (https://help.apple.com/watch/#/apdb0c5fb937).
When customizing your Apple Watch, one of the first things you’ll do is select a watch face, and then you are able to customize that watch face with what Apple calls “Complications,” which are specific pieces of data that can display on the watchface, such as your heart rate, details from the watch’s Activity app, the date, or the current weather.
Choose a watch face that appeals to you visually, but keep in mind that certain watch face options offer more flexibility regarding the information displayed. For example, some of the watch faces always display and make details accessible from the Activity app (shown in Figure 2.6) and/or the stopwatch functionality that’s built in to the watch.
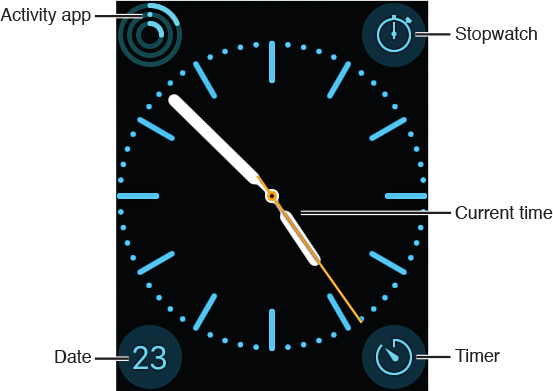
FIGURE 2.6 Details from the Activity app and other information display on your selected watch face. Tap on an app’s icon to launch it right from the watch face.
Chapter 5, “Use the Activity, Workout, and Other Fitness Apps,” covers more about the Activity app that comes preinstalled on the Apple Watch (and that’s available for the iPhone).
![]() Note
Note
In addition to Watch OS2 (which is an operating system update for the Apple Watch released in Fall 2015), it’s widely believed that in early 2016, Apple will begin releasing “smart bands” for Apple Watch. These optional bands will have additional sensors built into them, which will allow the watch to monitor or track additional information such as blood pressure, respiratory rate, blood oxygen levels, and body temperature. Smart bands will greatly expand the health and fitness tracking capabilities of Apple Watch, without the need to replace the watch itself with a newer model.
Use the Apple Watch App on the iPhone to Customize Other Watch Settings
When you’re ready to customize other Apple Watch options and settings, after pairing your iPhone with the Apple Watch, launch the Apple Watch app on your iPhone, and tap on the My Watch icon that appears in the bottom-left corner of the screen.
As you can see in Figure 2.7, the My Watch menu screen offers a variety of options for customizing your Apple Watch. Tap on one option at a time to adjust specific settings.

Personalize the Appearance of the App Screen
Tap the App Layout option, the first option on the My Watch menu screen. On the iPhone’s screen, the App screen of the Apple Watch appears. The app icons represent the apps currently installed on your Apple Watch.
To move the app icons around, one at a time, place your finger on an app icon and drag it to the desired location. The changes you make to the appearance of the App screen transfer to your Apple Watch almost instantly.
Figure 2.8 shows the Layout screen being customized on the iPhone, and Figure 2.9 shows the App screen on the Apple Watch. To exit out of this screen and save your changes, tap on the “< My Watch” option at the top-left corner of the screen; you return to the My Watch menu of the Apple Watch app on your iPhone.
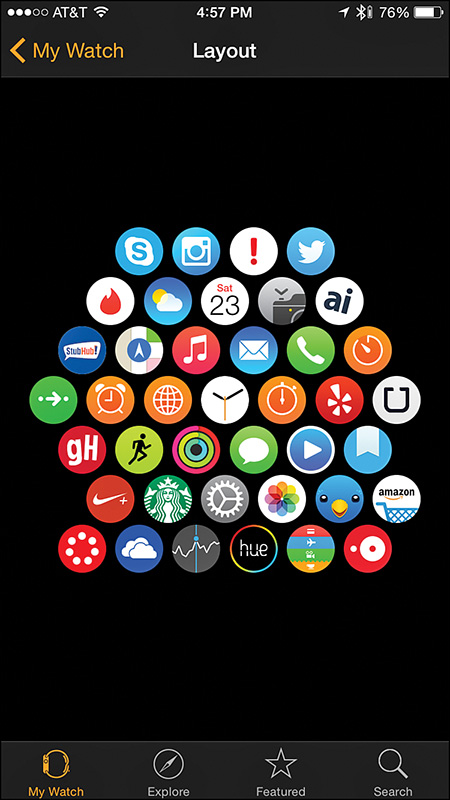
FIGURE 2.8 This Layout screen is being customized on the iPhone from the Apple Watch app. This watch already has several third-party apps installed.
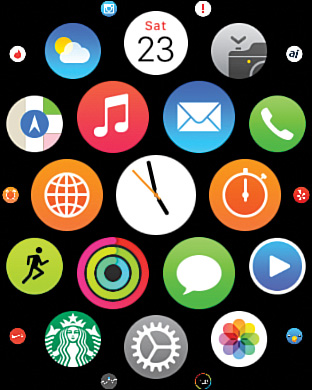
FIGURE 2.9 At any time, press the Digital Crown to reveal the App screen on the Apple Watch to launch and use an installed app.
Use the App screen on your Apple Watch to launch apps. To access this screen at anytime, gently press the Digital Crown. Then, to launch an app, tap on its icon. To navigate around the watch’s App screen, place your finger on the display and drag it around. Rotate the Digital Crown to zoom in or out as you’re looking at this screen.
Any time you install an app onto the Apple Watch, an app icon for it appears on the App screen in a location determined by the watch. To change this location at any time, access the App Layout screen of the Apple Watch app on your iPhone, place your finger on the app icon you want to move, and drag it to a different location on the watch’s Home screen. The changes you make will be reflected within seconds on the watch automatically.
Enable Airplane Mode
Just like the iPhone, you can put the Apple Watch in Airplane mode. When enabled, Airplane mode restricts the watch from sending or receiving information via Bluetooth.
Instead of having to turn on or off Airplane mode separately on your iPhone and Apple Watch each time you board an airplane, from the Apple Watch app, tap on the Airplane Mode option, and then turn on the Mirror iPhone virtual switch (shown in Figure 2.10).
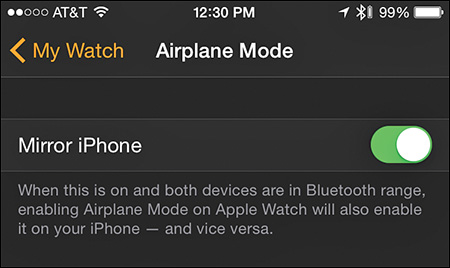
FIGURE 2.10 From the Apple Watch app on the iPhone, tap on the My Watch icon, followed by the Airplane Mode option, and then turn on the virtual switch associated with the Mirror iPhone option.
By turning on this virtual switch, any time you enable Airplane mode on your iPhone, Airplane mode turns on automatically on your Apple Watch (and vice versa).
To manually enable or disable Airplane mode from your Apple Watch:
1. Tap on the display to wake up the watch face screen, place your finger near the bottom of the watch’s display, and swipe up.
2. Swipe horizontally to access the watch’s Connected glance screen.
3. Tap on the Airplane icon to turn Airplane mode on or off (see Figure 2.11).
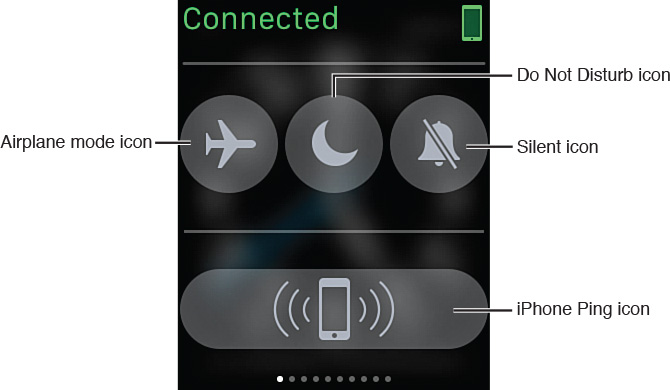
FIGURE 2.11 Tap on the Airplane mode icon on the Apple Watch’s Connected screen to turn this feature on or off.
Tap on the Do Not Disturb icon to turn this feature on or off. Tap on the Silent icon to turn the Apple Watch’s speaker on or off, and tap on the Pinging option to generate an audible alarm on your iPhone to help you locate it quickly, assuming it’s within about 150 feet of your Apple Watch.
Customize the Glance Screens
Glance screens not only display the watch face and provide access to the various apps on your Apple Watch, they also give you quick access to specific information. Many of the watch’s built-in features (such as the heart rate sensor), as well as preinstalled apps and some third-party apps, have glance screens.
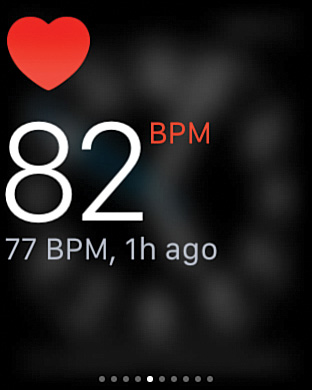
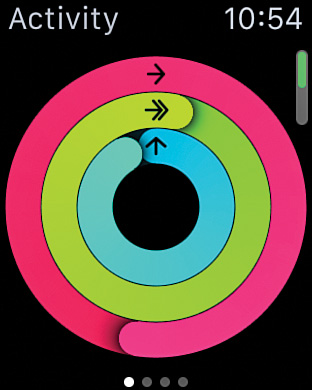
A glance screen offers a way to view summarized app-specific information quickly, without your launching a specific app on your Apple Watch. For example, the Heart Rate glance screen (shown in Figure 2.12) displays your current heart rate, whereas the Activity app glance screen (shown in Figure 2.13) shows a multi-colored graphic depicting the current day’s Movement, Exercise, and Standing data (more about that in Chapter 5).
To access the glance screens, make the watch face screen appear by tapping on the display or moving your wrist to look at the watch. Place your finger near the bottom of the display and swipe up. The last-viewed glance screen appears. Swipe sideways to scroll between the various glance screens.
To determine what glance screens display and in what order, launch the Apple Watch app on your iPhone, tap on the My Watch option, and from the My Watch menu, tap on the Glances option (refer to Figure 2.7).
The apps listed at the top of the screen and below the Settings heading are the ones currently set up to display glances (see Figure 2.14). Tap on an app’s red-and-white negative sign icon to deactivate that app’s glance screen.
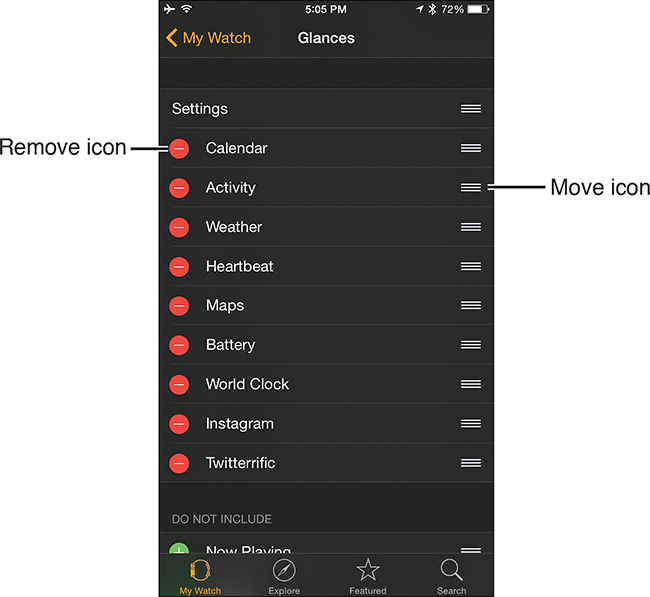
To change the order of the active glance screens, place and hold your finger on an app’s move icon and drag it up or down to the desired location.
Toward the bottom of the Glances menu screen of the Apple Watch app (shown in Figure 2.15), under the Do Not Include heading, are the apps and Apple Watch functions that have an inactive glance option. To include any of these app-specific glance screens as part of your glance display, tap on an app’s green-and-white plus-sign icon. That listing disappears from its current location on the Glances screen and reappears below the Settings heading.
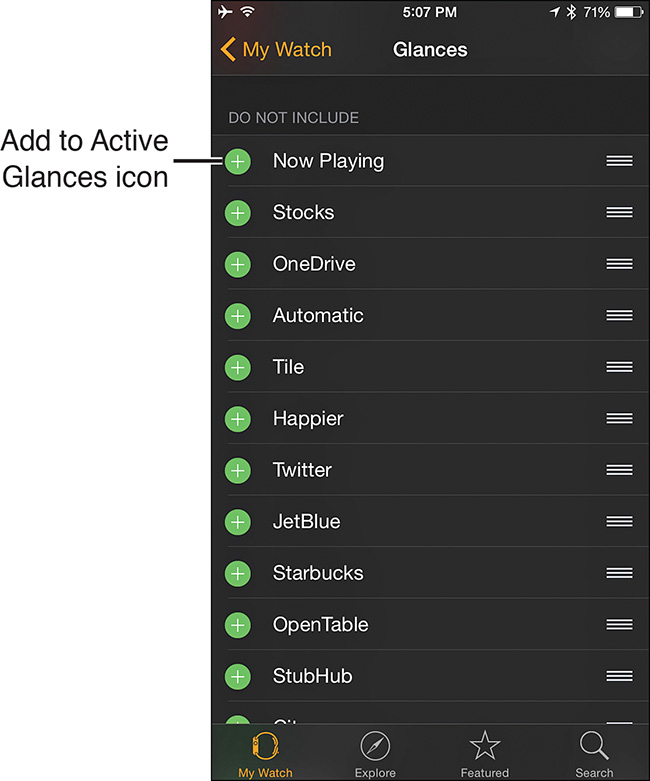
FIGURE 2.15 All apps and Apple Watch features that have a glance screen appear under the Settings or Do Not Include heading.
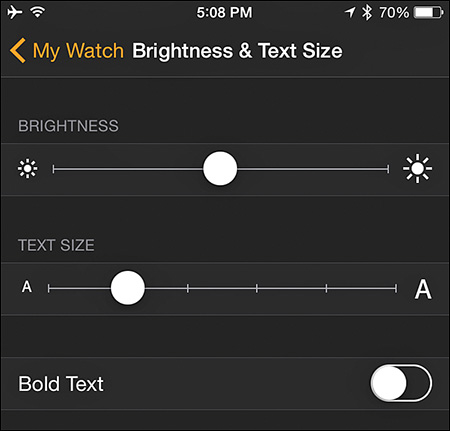
Adjust Screen, Sound, and Haptic Engine–Related Settings
Being able to see information the Apple Watch’s screen displays and hearing any audio the watch generates is important. You also want to be able to feel the watch’s haptic engine feedback.
The My Watch menu screen of the Apple Watch app on the iPhone contains options for customizing screen brightness, text size, sound, and haptics (see Figure 2.16).
FIGURE 2.16 Adjust the screen brightness, text size, and other options from the My Watch menu screen of the Apple Watch app on the iPhone.
Tap on the Brightness & Text Size option to manually adjust the screen brightness and text display size sliders. To make text easier to read, turn on the Bold Text option (shown in Figure 2.17).
Tap on the Sound & Haptics menu option to access the sound and haptics settings (shown in Figure 2.18). Use the slider to adjust the volume of the watch’s built-in speaker, turn the Mute feature on and off, and adjust the intensity of the haptic engine.
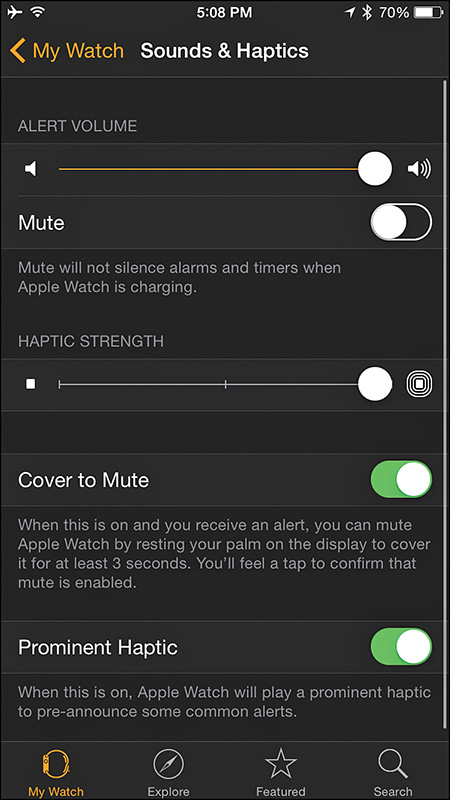
To be able to quickly mute the watch if an audible alert, alarm, or notification goes off in the future (while you’re in a meeting, for example), enable the Cover to Mute option.
This option lets you quickly activate the watch’s Silent feature by simply covering the watch’s display with your palm for two to three seconds. When the Silent feature is on, the watch immediately stops generating any sound through its speaker until you manually turn off the feature.
To turn the Silent feature on or off, with the watch face displayed, swipe up to view the Glance screen, and then swipe sideways to access the Connected screen. Tap on the Silent icon to toggle it between the on and off position. (When the icon is red, Silent mode is on.)
Customize the Watch’s Notifications Options
Just like your iPhone, the Apple Watch has a Notifications function and a Notification Center screen. This functionality allows the watch to monitor all the compatible apps running on your watch and display alerts, alarms, and notifications related to those apps on a single screen.
To customize the Notifications options of the Apple Watch, and choose the apps you want the watch to continuously monitor, from the My Watch menu screen (on the iPhone), tap on the Notifications option. From the app’s Notifications screen (see Figure 2.19), turn the Notifications option on or off, and adjust Notifications-specific settings for each compatible app by tapping its listing.
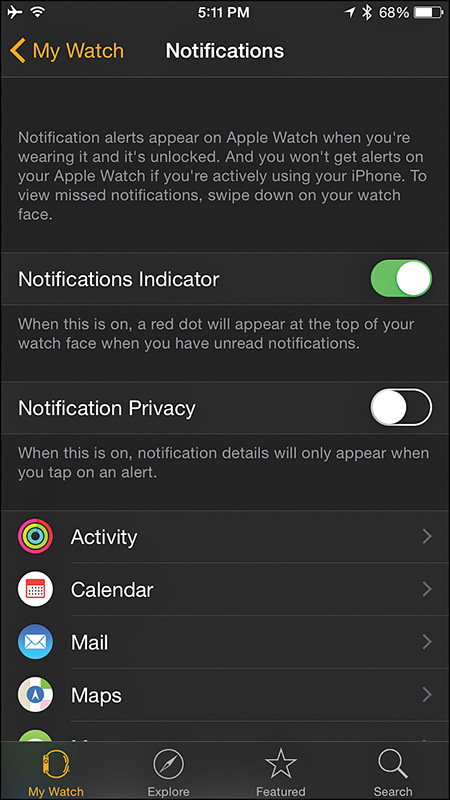
FIGURE 2.19 Decide how you want specific Apple Watch apps to generate and display alerts, alarms, and notifications.
![]() Tip
Tip
When you’re wearing the watch, you access the Notification Center screen by activating the watch face, placing your finger near the top of the screen, and then swiping down.
As you view the listing of alerts, alarms, or notifications generated by specific apps, tap on any listing to launch that app and see the relevant content.
Adjust the Rest of the Watch’s Settings
Also displayed on the My Watch menu screen of the Apple Watch app (on the iPhone) are a handful of other menu options for customizing specific settings or options. Tap on one option at a time to display a relevant submenu.
![]() Tip
Tip
To learn what each of these additional options does and how to use them, consult the interactive Apple Watch User Guide that’s available online (http://help.apple.com/watch/#/) or read a how-to book, like My Apple Watch (Que), that focuses more on how to use the watch’s general options, as opposed to the health, fitness, diet, and sleep-related watch applications.
Keep the Apple Watch’s Operating System Up to Date
Periodically, Apple releases updates to the Apple Watch OS, which is the operating system that controls the smartwatch. To continue getting the most out of your Apple Watch, and ensure full compatibility with all apps, you definitely want to make sure your watch has the most recent version of the operating system installed.
You upgrade the Apple Watch’s operating system via the Apple Watch app on the iPhone. Follow these steps to download and install Apple Watch OS updates as they become available:
1. Make sure your Apple Watch and iPhone are paired, and the wireless (Bluetooth) link is active.
2. Make sure your iPhone is connected to the Internet via a Wi-Fi connection. (A cellular data connection will not work.)
3. Plug the Apple Watch into an external power source via its supplied magnetic charging cable, and make sure the battery is at least 50 percent charged before proceeding.
4. From the iPhone’s Home screen, launch the Apple Watch app.
5. Tap on the My Watch icon located in the lower-left corner of the screen.
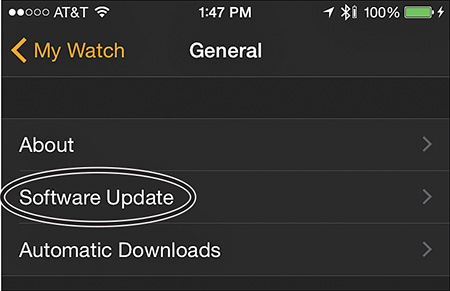
6. Tap on the General option that appears on the My Watch menu screen.
7. Tap on the Software Update option (shown in Figure 2.20).
8. If a software update is available, a message stating this appears on the screen, as shown in Figure 2.21. (If no update is available, a message saying, “Your software is up to date” appears. In this case, exit out of the Apple Watch app by pressing the Home button.)
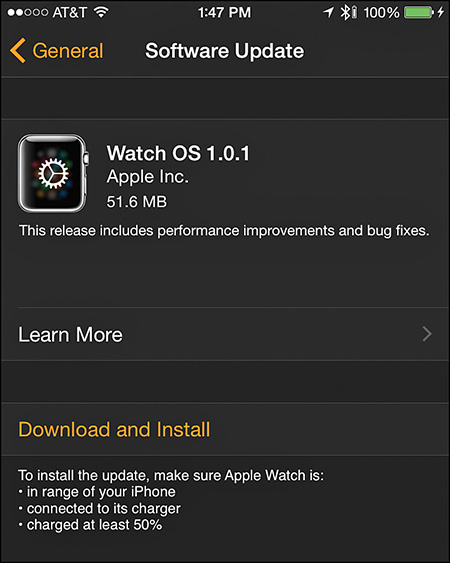
9. Tap on the Download and Install option. The operating system update file(s) download to your iPhone, and then wirelessly and automatically transfer to your Apple Watch. This process takes between 3 and 10 minutes.
After the new operating system software transfers to the Apple Watch, the watch automatically resets. When the OS update process completes, your selected watch face displays, and the watch is again ready to use.
![]() Note
Note
Most Apple Watch OS updates are released to fix known bugs and add performance improvements to the watch and the apps that come preinstalled with it. Apple also uses Apple Watch OS updates to introduce new features and functions to the watch.
When applicable, preinstalled Apple Watch apps automatically get updated during an Apple Watch OS update. However, all apps that you install yourself onto the watch might require periodic updates as well. The App Store app on the iPhone handles these updates in exactly the same way as an iPhone app update described in Chapter 1.
When an app updates on your iPhone edition of the app, the Apple Watch edition automatically updates as well.
Discover the Activity and Workout Apps That Come Preinstalled with Apple Watch
Right out of the box, Apple Watch is designed to be a powerful health and fitness tool. Activity and Workout are two apps that come preinstalled on the Apple Watch, and that work with the iPhone. Chapter 5 covers how to use these apps in more detail.
![]() Note
Note
You can also use Stopwatch, Timer, and the Music app as fitness tools.
Use the Activity App
Activity, shown in Figure 2.22, is designed for use on an ongoing basis, throughout your day. The app takes advantage of the watch’s built-in sensors and continuously monitors your level of movement, exercise, and periods of inactivity (as long as you’re wearing the watch).
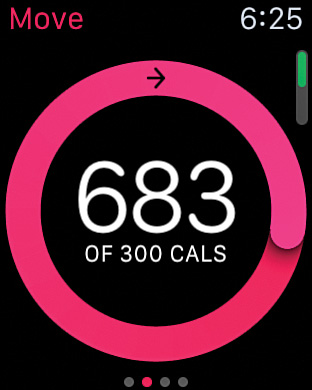
FIGURE 2.22 As you wear the watch, the Activity app tracks all of your movement all day and helps you achieve pre-set goals.
As you’ll discover, this information displays in several ways, and syncs automatically with the Activity and Health apps running on your iPhone. The Activity app also shares data with other health and fitness apps, as needed.
The Activity app can help you become more active throughout your day via three daily fitness goals, Move, Exercise, and Stand, which you set up the first time you activate the app. For example, the watch can tap your wrist using its haptic engine and display a message to remind you to stand up for at least one minute every hour (see Figure 2.23).
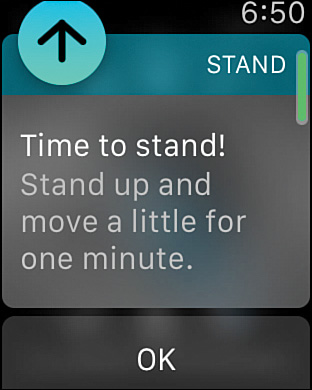
FIGURE 2.23 The Activity app reminds you to stand up and move around for at least one minute every hour.
The Activity app also encourages you to Move more throughout your day to burn a pre-determined number of calories, whereas the app’s Exercise component encourages you to be active for at least 30 minutes per day. (This means participating in the equivalent of a brisk walk, or more intense activities.)
As soon as you activate the Activity app on your Apple Watch, the iPhone edition of the app automatically installs itself on your phone, so you can better view and utilize the data the Apple Watch collects. On the Apple Watch, the Activity app displays data only from the current day. The iPhone edition of Activity, however, enables you to see and analyze all the Activity data collected for every day you’ve worn the watch.
Use the Workout App
You use the Workout app, shown in Figure 2.24, for whenever you engage in any type of cardio fitness workout session, such as jogging, running, bike riding, or using an elliptical machine (or treadmill). The Workout app collects and displays real-time stats, such as time, distance, calories, pace, and speed.

FIGURE 2.24 The Workout app can help you set fitness goals, track your workouts, and view your progress in real time.
Like in the Activity app, the data the watch collects and displays automatically syncs with the iPhone, and a growing selection of other health- and fitness-oriented apps, including the Health app that comes preinstalled with iOS 8.2 on the iPhone, can use this data.
The Health app on the iPhone collects real-time health and fitness-related data from the iPhone, Apple Watch, and other compatible equipment (such as a Bluetooth scale, for example), as well as data you manually input, and then monitors, analyzes, stores, and potentially shares that information from the one, centralized Health app.
![]() Tip
Tip
Chapter 4, “Work with the iPhone’s Health App,” focuses exclusively on how to utilize the Health app with the iPhone, Apple Watch, and other health and fitness-related apps and equipment you might use.
Just as Notification Center monitors apps and keeps track of all alerts, alarms, and notifications, and then displays this information in one centralized place, the Health app serves a similar purpose, but deals exclusively with health, fitness, nutrition/diet, and sleep-related data and information.
Find and Install Additional Health and Fitness-Related Apps
The Apple Watch comes with a handful of apps preinstalled. In addition to these apps, however, you can download and install an ever-growing selection of Apple and third-party apps from the App Store.
Two of the ways to find, download, and install these apps include the following:
![]() Launch the App Store app on your iPhone, and locate apps that have an Apple Watch component to them. Installing one of these apps onto your iPhone installs the Apple Watch component automatically as well. An app’s description in the App Store highlights compatibility with the Apple Watch, as you can see in Figure 2.25.
Launch the App Store app on your iPhone, and locate apps that have an Apple Watch component to them. Installing one of these apps onto your iPhone installs the Apple Watch component automatically as well. An app’s description in the App Store highlights compatibility with the Apple Watch, as you can see in Figure 2.25.
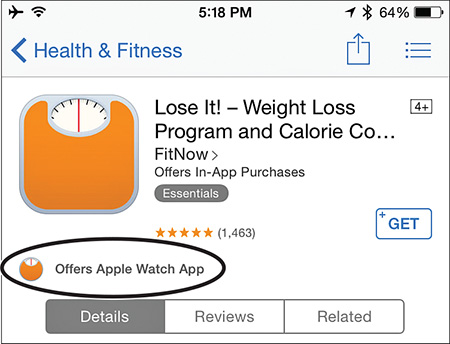
FIGURE 2.25 In the App Store, all iPhone apps that are also compatible with the Apple Watch are clearly labeled with the message, “Offers Apple Watch App.”
![]() From the Apple Watch app on the iPhone, tap on the Featured or Search icons at the bottom of the screen to find, browse, download, and install only iPhone apps that have an Apple Watch component.
From the Apple Watch app on the iPhone, tap on the Featured or Search icons at the bottom of the screen to find, browse, download, and install only iPhone apps that have an Apple Watch component.
The Cost of Apps
The App Store allows app developers to release iPhone and Apple Watch apps using a variety of pricing options, which include
![]() Free apps—These apps you can download and install for free.
Free apps—These apps you can download and install for free.
![]() Paid apps—These apps have a one-time purchase price. After you buy the app, you can download and install it on your iPhone and Apple Watch, as well as any other compatible iOS mobile devices that are linked to your Apple ID account. Paid apps range in price from $0.99 to $9.99 or higher. The app developer sets the one-time purchase price.
Paid apps—These apps have a one-time purchase price. After you buy the app, you can download and install it on your iPhone and Apple Watch, as well as any other compatible iOS mobile devices that are linked to your Apple ID account. Paid apps range in price from $0.99 to $9.99 or higher. The app developer sets the one-time purchase price.
![]() In-app purchases—A free or paid app can offer in-app purchases. Making the purchase while using the app (via the credit or debit card that’s linked to your Apple ID, or a pre-paid iTunes gift card) unlocks various features, functions, or components of the app that are otherwise not available.
In-app purchases—A free or paid app can offer in-app purchases. Making the purchase while using the app (via the credit or debit card that’s linked to your Apple ID, or a pre-paid iTunes gift card) unlocks various features, functions, or components of the app that are otherwise not available.
![]() Tip
Tip
The App Store indicates any apps listed as free, but that have in-app purchases associated with them. Scroll down to the bottom of the app’s Details screen, and look for the In-App option. Tap on it for details about what paid options are available for the app, and discover how much they cost before you install and use the app. This also applies to subscription-based apps.
![]() Advertiser-supported apps—These apps are typically free, but as you use the app, display ads (typically in the form of small banners) appear on the screen.
Advertiser-supported apps—These apps are typically free, but as you use the app, display ads (typically in the form of small banners) appear on the screen.
![]() Subscription-based apps—These apps are typically offered for free, but to fully utilize the app or access information related to the app, you must pay for and acquire an ongoing daily, weekly, monthly, or annually paid subscription while using the app. As covered later in this book, a variety of fitness, diet, and nutrition-related apps that allow you to communicate with a coach, trainer, or specialist via text message or video call from the app are among the types of apps that use a subscription-based payment model.
Subscription-based apps—These apps are typically offered for free, but to fully utilize the app or access information related to the app, you must pay for and acquire an ongoing daily, weekly, monthly, or annually paid subscription while using the app. As covered later in this book, a variety of fitness, diet, and nutrition-related apps that allow you to communicate with a coach, trainer, or specialist via text message or video call from the app are among the types of apps that use a subscription-based payment model.
![]() Note
Note
You acquire Apple Watch and iPhone apps together. Currently, all the optional apps that you can download and install onto the Apple Watch also have a corresponding iPhone app. Thus, when you acquire and install the iPhone edition of an app, the Apple Watch version automatically gets installed onto the watch. If the app has a fee, you only pay for it once for access to it on all iOS mobile devices (including your Apple Watch) that are linked to the same Apple ID account.
Use the Apple Watch App to Find and Install Apps onto Your Watch
The only way to find, download, and install apps onto your Apple Watch is to use the Apple Watch app on your Internet-connected iPhone. If you already know the name of the app you’re looking for, such as one of the third-party apps you’ll be reading about in subsequent chapters of this book, tap on the Search icon in the lower-right corner of the Apple Watch app, and then enter what you’re looking for within the Search field (see Figure 2.26).
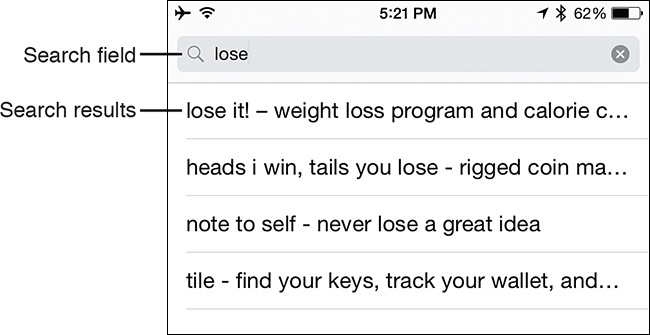
FIGURE 2.26 In the Apple Watch app on the iPhone, tap on the Search icon and enter a keyword or search phrase in the Search field to find Apple Watch apps.
In the Search field, enter the title of the app, such as “Nike+ Running” or “Lose It!.” A list of related apps appears. Tap on a search result listing to display more detailed information about an app.
From one of the more detailed listings (shown in Figure 2.27), you can either acquire the app by tapping on the Get or Price button, or tap on the app’s title or app icon to display the Details screen for the app. This functionality works just as it does for other iOS App Store purchases you’re likely already familiar with.
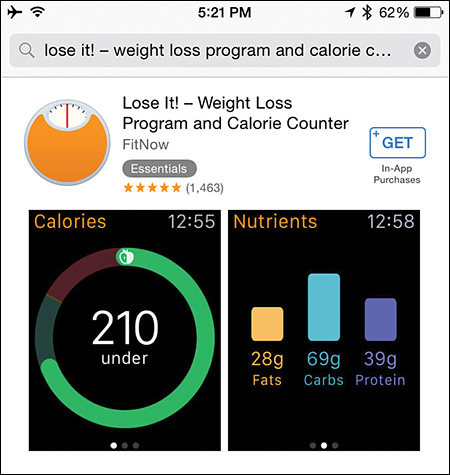
FIGURE 2.27 Search results appear as condensed app listings. (Only one relevant result is shown here.) Tap on the app’s name or icon to display more information, or tap on the Get or Price button to acquire, download, and install it onto your iPhone and Apple Watch simultaneously.
![]() Tip
Tip
In the Search field, enter a relevant keyword or search phrase for the type of app you’re looking for, instead of an app’s title. For example, if you were looking for the Nike+ Running app, but didn’t know the exact name of it, you could enter the keyword “Nike,” or “running” in the Search field to find listings for all related apps.
For free apps, the Get button appears as part of an app’s listing and description in the App Store. For apps you have to purchase, the price appears in the button, instead of “Get.” Tap on this button to acquire the app.
When prompted, enter your Apple ID password (or use the iPhone’s TouchID sensor, if applicable) to confirm your purchase and, if necessary, pay for the app using the credit/debit card that’s linked with your Apple ID account (or part of your iTunes gift card’s available balance).
If, however, you have already downloaded and installed the app, you will see the Open button. If you have the app, but it’s not currently installed on your iPhone/Apple Watch, an iCloud logo appears. Tap on this cloud-shaped logo to download and install the already-acquired app onto your device.
This book introduces you to many popular third-party apps that are available from the App Store that you can use on your Apple Watch (with your iPhone). New apps, however, are continuously released.
To learn more about the latest Apple Watch apps, launch the Apple Watch app on your iPhone, and tap on the Featured icon at the bottom of the screen (shown in Figure 2.28). This Apple Watch App Store screen lists apps based on categories Apple is showcasing. For example, under the Get Started heading is a collection of apps that Apple recommends to new Apple Watch users.
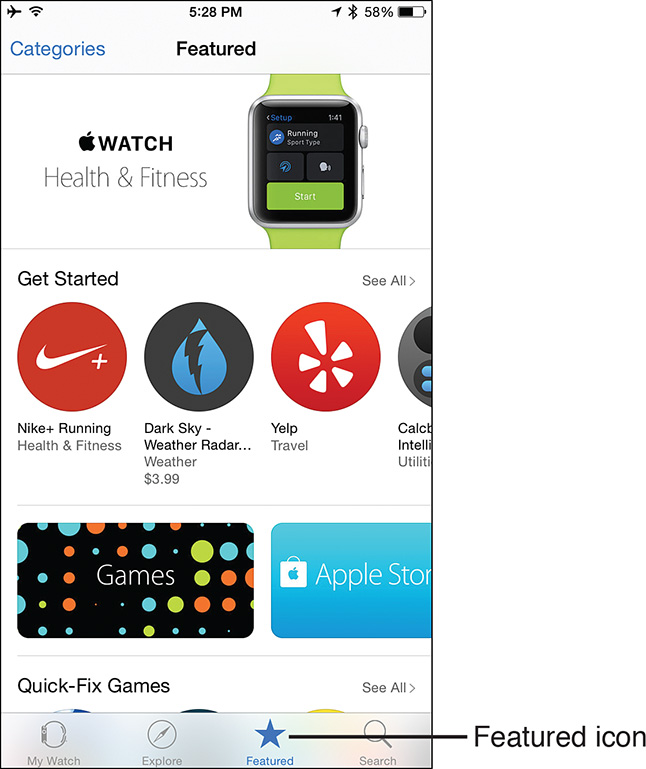
If you want to focus your search for apps based on a particular category, tap on the Categories option in the top-left corner of the screen, and then tap on a particular category. The majority of apps featured in this book fall under the Health & Fitness category.
Tapping on the Health & Fitness category option displays the available apps, starting with those that Apple opts to feature or showcase. To the right of the Get Started or More to Explore heading, tap on the See All option (shown in Figure 2.29) to view a more comprehensive listing of apps (shown in Figure 2.30).
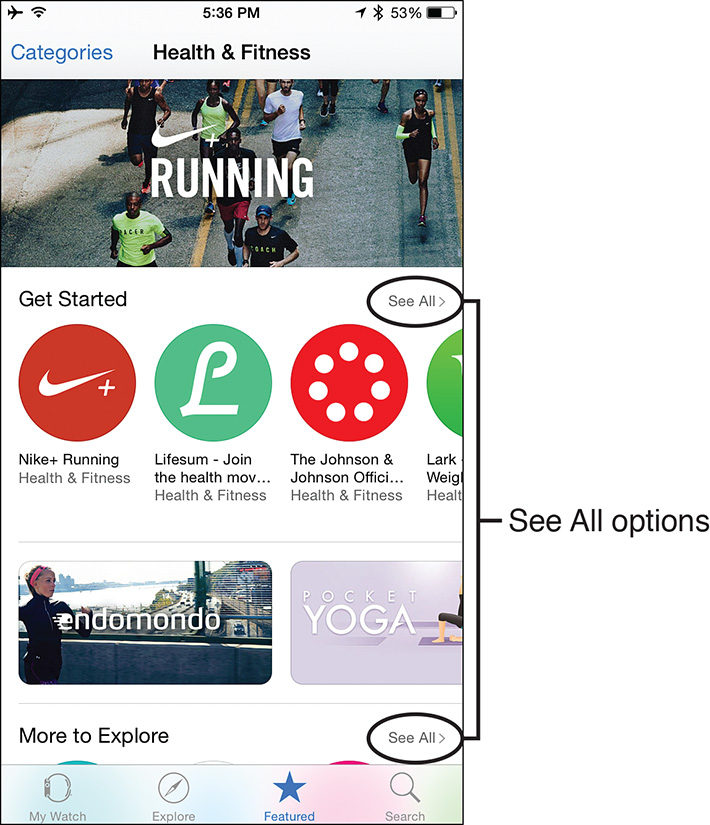
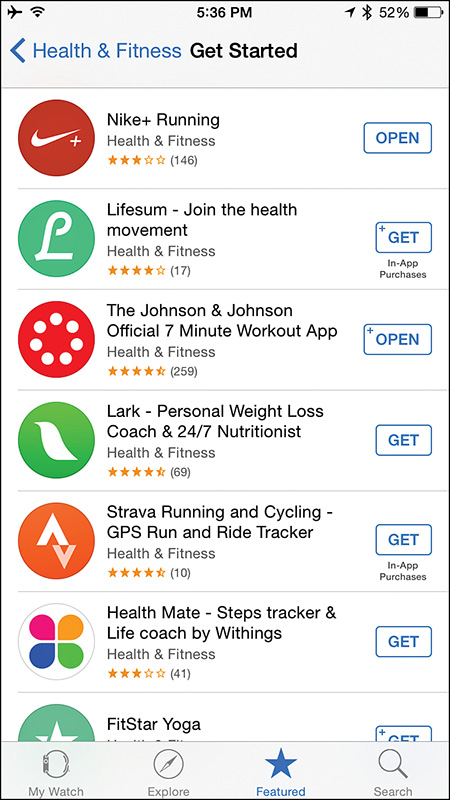
FIGURE 2.30 Tap on the See All option to see a comprehensive app listing. Scroll down to view all apps.
Remember, you can tap on any app’s icon or title to view more details about the app, or tap on the Get or Price button to acquire the app. Installing additional apps onto your Apple Watch (and iPhone) can greatly expand the health and fitness-related tasks that these devices can handle.
New health, fitness, diet, nutrition, and sleep-related apps are introduced via the App Store literally every day. In addition to brand-new apps, many more popular and existing iPhone apps are continuously being redesigned to include Apple Watch compatibility. Thus, to stay current and ensure access to the latest selection of Apple Watch apps to assist you in achieving your health, fitness, and/or dieting goals, be sure to check out the Featured section of the App Store (via the Apple Watch app) often.
Pebble Time as a Viable Apple Watch Alternative
Although the Apple Watch is still a relatively new piece of wearable technology that can handle many of the same tasks as popular fitness and activity trackers from companies like Jawbone, Fitbit, and Garmin, the Apple Watch can also handle a wide range of other health and fitness-related tasks that are unique to the watch. This functionality is based on which app(s) you utilize with your Apple Watch and iPhone.
However, other smartwatches on the market can do most of what the Apple Watch is capable of. For example, just weeks after the release of Apple Watch, Pebble released its iPhone-compatible, second-generation Pebble Time watch.
Released in late-May 2015, the Pebble Time (shown in Figure 2.31) is priced at just $199.00, has a battery that lasts for a full week, and offers a full-color display. The display, however, is not a touch screen, and this watch has fewer built-in sensors than the Apple Watch. Yet, with some of the optional apps available for it, it’s designed to work with several different fitness and activity trackers currently on the market.
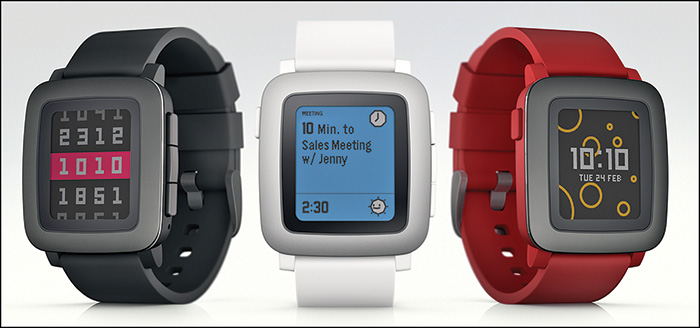
FIGURE 2.31 The Pebble Time smartwatch is a lower-cost alternative to the Apple Watch. It, too, works with an iPhone, and has optional health and fitness apps available for it. Photo courtesy of Pebble ©2015.
If you already own an activity or fitness tracker that’s compatible with the Pebble Time watch, and the price of this watch is more appealing to you than the Apple Watch, you might discover that the Pebble Time watch can meet your needs and serve you well as a wearable health and fitness tool.
![]() Tip
Tip
To learn more about the Pebble Time smartwatch, visit www.getpebble.com. Optional apps for the Pebble Time watch are available from the Pebble App Store, which you can access via your iPhone by first installing the free Pebble Smartwatch app.
Along with the Apple Watch and Pebble Time smartwatch, a handful of less popular smartwatches are available that you can use for health and fitness-related purposes, but that do not necessarily rely heavily on a connection with the iPhone.
These watches are available from companies such as LG Electronics, Sony, Motorola, Samsung, Garmin, and TomTom, and are typically sold by consumer electronics stores, such as Best Buy, as well as sporting goods stores, such as REI or Eastern Mountain Sports.
![]() Note
Note
Some smartwatches, like those from Garmin and TomTom, are designed specifically for hikers, bikers, golfers, and people who utilize GPS information to navigate with precision during their activities.
Although many of these watches can be used for health and fitness-related tasks, covering them is beyond the scope of this book, which primarily focuses on the Apple Watch and iPhone, as well as activity/fitness trackers (and other accessories) that you can use with the iPhone.
![]() Note
Note
In addition to full-featured smartwatches that offer a viable and often lower-cost alternative to the Apple Watch, fitness enthusiasts can invest in an activity/fitness tracker that wirelessly links with the iPhone.
As discussed in Chapter 3, “Use Fitness Trackers and Other iPhone and Apple Watch Accessories,” you can get these wearable devices from companies such as Fitbit and Jawbone, and use them to easily collect, analyze, and share different types of movement, location, and fitness-related data.