
Working with Images
Sprites are fundamental to games, and before you can create a game, you need to be able to draw its cards, characters, and other objects on the screen. In this section you will work with the fundamental components of graphic displays for Android 3.0. We will also work out the components of sprites and move our images across the screen. This will become the basis for our future projects. Take a look at Figure 2-1 to see what our game will look like. This start sprite is actually bouncing back and forth.

Figure 2-1. The completed Graphics Program.
![]() Note If you get lost, copy the code from the Google Code project connected to this book. Then go back to the lessons, and you’ll be able to understand how the program works by manipulating aspects of it.
Note If you get lost, copy the code from the Google Code project connected to this book. Then go back to the lessons, and you’ll be able to understand how the program works by manipulating aspects of it.
Creating a Image Display Surface
To get started, you need to open a new Eclipse project. In the last chapter, you created a new project in Eclipse entitled FirstApp. That code is no longer of any use to you. Start over with an entirely new project:
- Select File New Project Android Project on the Eclipse main menu.
- When the New Android Project dialog box appears, complete it. You probably remember this process from the previous examples, so feel free to fill out the form by yourself.
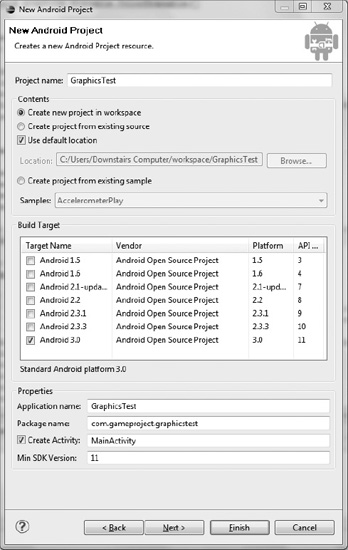
- The name of your app is GraphicsTest. Make sure the completed form looks like the one shown in Figure 2-2. Getting used to making new projects in Eclipse is very important because it’s often the easiest way to start over with a clean slate if something goes wrong.
- When the form is complete, click Finish. If you need help filling out the other fields, refer back to Chapter 1.
Before you can display images on a tablet, you need a canvas in which to render them. You build that surface in the main routine of your program. Follow these steps:
- The files from the first project are probably still open in your main editing panel. Close them by right-clicking next to the file tabs and selecting Close All. This doesn’t delete the code, but rather closes the editing screens that display it.
- Open the file tree for the GraphicsTest project in the Eclipse Package Explorer (located at left onscreen). You want to examine the Java code, so open the
srcfolder, and then continue expanding until you seeMainActivity.java. Figure 2-3 shows where you find the files.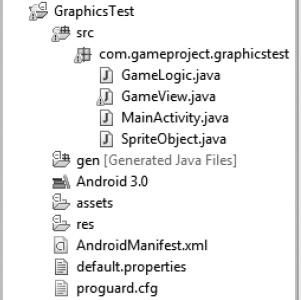
Figure 2-3. Package Explorer for GraphicsTest
- Open
MainActivity.javain the editing pane, and you see the same generic code that you saw generated in the first chapter.- In Chapter 1, you got by with a single file of Java code and an XML file to handle the layout. Sadly, a game that involves lots of movement and changing of graphics can’t be readily built using XML. Therefore, you need a Java file that is dedicated to running the graphics for your game.
- To do this, create a new class by right-clicking
com.gameproject.graphicstestin the GraphicsTest Package Explorer. Select New Class. A dialog box opens and asks what you want your new class to be called. Type GameView, and be careful to leave all the other fields with their default values. When you’re done, you find two files (MainActivityandGameView) in yoursrcdirectory.- Open the
GameView.javafile in the viewing pane. There you should find the code shown in Listing 2-1.
Listing 2-1. GameView.java
package com.gameproject.graphicstest;


public class GameView {


}
You add to this primitive source to draw an image file to the screen. Before you start this, however, you must learn the fundamentals of views and displays in Android.
How the Android View Class Works
So far, you’ve only used two Android classes in your projects: Activity and Bundle. Activities hold the functions that handle the creation, running, and closing of an app. They’re the lifeblood of any Android game. The Bundle class is merely a method of saving the current status of the program.
Now, however, you look at the View class. Views handle the graphics and appearance of the screen while an application’s running. All of your games will create a class that extends the View class and gives you this functionality. Often, you have significantly more code in your View class than in your Activity class because the majority of a game consists of manipulating objects on the screen.
All functional View classes must have two distinct parts. The first is a constructor method. Like any class, when you create an instance of it, you need to call a function that defines various aspects of the object. In the View class, you can load your images and determine the starting position for all your sprites.
The next critical part of the View class is a method that renders the images to the screen. This is called every time you move an image because the image must be redrawn in its new location.
Although this is an abstract way to see the class, it helps you get through the code. Before you dive in, however, let’s look at the mechanics of actually taking a file and displaying it on the screen.
![]() Tip If you’re curious about the
Tip If you’re curious about the View class or any other Android class, visit http://developer.android.com/reference/packages.html and find the package you’re looking for. Here Android provides documentation on how to use the classes and the various methods that each class contains.
How Android Renders Images
The View class is only a part of the whole way that images are rendered to the screen. The other building blocks include an image, a way to store the image, a method to draw it, and the final result on the screen.
Images are stored in the project. The next section goes over how you add an image. Once the image is stored in the application, you access it by assigning it to a bitmap. A bitmap is your way of describing an image and get it ready for blitting to the screen.
Before it can be put on the display, it must be rendered through a canvas. A canvas holds the methods that draw the image. Inside a view, you call on the canvas to handle the drawing process. Views are designated sections of the screen that they control. In your case, the view owns the entire screen real estate. The canvas then draws the image to the screen.
Rendering an Image
To really understand how the View class works in Android, let’s use it to display an image:
- You need an image file to load onto the screen. You may have an image file ready to go, or you may need to create one. Any image on your computer that has a
.pngor.bmpextension is fine.
- If you have a ready-to-use image, make sure it’s no more than 500 × 500 pixels.
- If you want draw your own image, I usually use either Inkscape (
http://inkscape.org/) or GIMP (www.gimp.org/) as my graphics editor because both are free to use. If you prefer your own graphics editor, that’s fine as well.- Drag the file into the
resdrawable-mdpifolder of your GraphicsTest project. Eclipse asks if you want to copy it; click Yes, and you’re ready to go.- If you look closely in the
resfolder of the project, you see it contains three folders that start with worddrawable. These all specify a certain resolution of graphics on the device. For games that are built for the tablet, you use the medium definition folder; but if you were developing for phones, you would want to have a different version of each image at the three resolutions to ensure that most phones could render them as quickly as possible.- With the
GameView.javafile open in the editing pane, replace the code from Listing 2-1 with the code shown in Listing 2-2. This code renders your image to the tablet’s screen. I explain what each piece does afterward.Listing 2-2.
GameView.javapackage com.gameproject.graphicstest;
import android.content.Context;
import android.graphics.Bitmap;
import android.graphics.BitmapFactory;
import android.graphics.Canvas;
import android.graphics.Color;
import android.view.View;
class GameView extends View {
public GameView(Context context) {
super(context);
}
    @Override

    public void onDraw(Canvas canvas) {

        Bitmap star = BitmapFactory.decodeResource(getResources(), R.drawable.star);

        canvas.drawColor(Color.BLACK);

        canvas.drawBitmap(star, 10, 10, null);

    }

}- Wow, things got complicated quickly. The code in Listing 2-2 is actually very straightforward, and you can probably understand most of it without much explanation.
- The first major change is the addition of numerous new
importstatements. The majority of these invoke the graphics package from Android, whereas the last invokes theViewclass. The first import involves theContextclass that you use as an argument for functions.- The start of the actual code shows how the class you created extends the functionality of the
Viewclass. This is a common practice in Java and simply inherits the methods and variables of theViewclass for your own use. If you didn’t do this, you would be unable to draw images to the screen.- The first function,
GameView, is a dummy function that doesn’t initiate anything. You use it later, but right now, keep it there to satisfy Java’s requirements of a class.- Finally, the meat of the source is the
onDrawmethod that handles the changes to the screen. You use the@Overridenotation to run your version of theonDrawfunction rather than the originalonDraw()provided by theViewclass. The argument to the method includes the very importantCanvasthat is responsible for the drawing of the image. The next line simply creates a newBitmapobject and uploads your image file into it. Because the image file I’ve used is namedstar.png, I’ve named its bitmapstar. Substitute the name of your image in the three places that you seestarwritten in this code. Alternatively, you can rename your imagestar.pngand not have to change the code at all.- Next, you have the
Canvasobject color the entire screen black. This is redundant because black is the default, but it’s good practice to keep this line. If you prefer a different background color, replaceblackwith the name of your color. Note that Android accepts most traditional color names; but if you’re looking for a specific shade of pink, you have to write out the RGB value, as shown in this statement:canvas.drawColor(Color.argb(0, 100, 100, 100));- The
argbfunction takes the amount of alpha, red, green, and blue color as arguments in the form of an integer.- The last line of the Listing 2-2 calls the
drawBitmapmethod to draw the image to the screen. Notice that the arguments of this function are(Bitmap bitmap, float left, float top, Paint paint. You don’t use thePaintobject, so you pass anullvalue to it. You can change the locationof the image by editing the values of the distance of the image from the top and left. After this, you want to see the fruits of your labor. Although you have a way to render an image to the screen, your application will never use it because the start of the program doesn’t call the drawing method. You change this by creating an instance ofGameViewinMainActivity. To do this, you must change a single line in theMainActivity.javafile to point to yourGameViewclass.- At the top of Eclipse, open the
MainActivity.javafile. Find the line that looks like this:setContentView(R.layout.main);- You likely remember this as the line that tells the device to load the
main.xmlfile as the layout of the app. You want to replace that XML withGameView.java. This is readily done by adding the statement in Listing 2-3 inside the MainActivity constructor.Listing 2-3. Using
GameView.javaas the ViewsetContentView(new GameView(this));- The adition of this statement creates a new instance of the
GameViewclass and loads it as the view of the application. You’re now ready to try out your handiwork.- Click the green play button at the top of Eclipse, and the application starts. Follow the procedure from Chapter 1 when the simulator has begins to play the new app. If all goes well, your image, which began life as a
.pngfile, is vibrantly displayed on the screen.
This result certainly isn’t very exciting, so your next goal is to move the image on the screen.
Working with Sprites
Before you can move an image around the screen, you have to call it something. Games don’t move images or shapes around but use sprites instead—objects whose presence on the screen is represented by an image but whose methods and properties provide the functionality and state you need to control and keep track of them. There are a number of advantages to creating a dedicated Sprite class. You can easily add animation sequences and rotation, and even keep track of the lives or ammo of each sprite. Before you create a Sprite class, let’s work on a better way to display sprites and a more advanced game loop to handle their consistent movement and updating.
Rendering Sprites
You need to do some major revisions to the View class you created. First, let’s use the SurfaceView class rather than the View class. This is a subtle distinction, but the SurfaceView class has advantages that speed up your rendering. You cover the ins and outs of the SurfaceView class when you look at animations in a later chapter. Listing 2-4 shows the new code for GameView.java. Change your current code to this new revision. It forms a base for your more advanced applications of images and sprites.
package com.gameproject.graphicstest;


import android.content.Context;

import android.graphics.BitmapFactory;

import android.graphics.Canvas;

import android.graphics.Color;

import android.view.SurfaceHolder;

import android.view.SurfaceView;


public class GameView extends SurfaceView implements

                SurfaceHolder.Callback {


     public GameView(Context context) {

        super(context);


        setFocusable(true);


        }


     @Override

     public void surfaceChanged(SurfaceHolder holder, int format, int width, int height) {

        }


        @Override

        public void surfaceCreated(SurfaceHolder holder) {


        }


        @Override

        public void surfaceDestroyed(SurfaceHolder holder) {

        }


        public void onDraw(Canvas canvas) {

                canvas.drawColor(Color.BLACK);

        }


        public void update() {

        }


}
Right now, GameView.java doesn’t perform any meaningful operations besides making the canvas black. You removed the drawing functions from the class so that you can implement them in your Sprite and Thread classes later. The first important piece of the new GameView class is that it now implements SurfaceHolder.Callback. This is responsible for controlling the surface and enabling you to draw on it from when it’s created until it’s destroyed. With this, you’re given three methods you override: surfaceChanged, surfaceCreated, and surfaceDestroyed. You soon populate some of these with your instructions for dealing with sprites and the game loop.
You also use the constructor method of GameView when you need to initiate instances of your Sprite class. At the end of the code, you have onDraw and update functions. You used onDraw() to put your image on the screen earlier in the chapter, so it should look familiar. The update function is new; you use it to call each sprite to update itself. With an ability to handle the images, you can now explore how the game runs.
Building a Game Loop
To run the game well, you tap into the power of Java’s Thread class. If you’ve done programming in a modern language, you’ve likely run into threads before. A thread is an independent routine that the device executes. Threads are nearly always used with other threads in what is called multithreading. This basically means that threads exist autonomously and are often run simultaneously by a program to perform different functions. An example is running the graphics of a game in one thread and handling the physics in another thread. Obviously these two things must happen at the same time, so you multithread the program.
To build Android games, you use the Java Thread class. You can find the source for the Thread class in Java.lang.Thread. You don’t have to import this because it’s assumed to be available; however, it’s critical to remember that this is the class you’re using. For your purposes, threads are very simple. You create a class that extends Thread, and then you override the run method and put your game loop there. From that place, you can change the view or deal with collisions or gather input.
Now that you see the changes that we have made in GameView, let’s create the all important extension of the Thread class:
- Make a new class in Eclipse, and name it
GameLogic. BecauseGameView.javahandles the appearance of your game, it’s only appropriate thatGameLogic.javahandles the behind-the-scenes computations.
Tip As you make more and more source code files, it’s a great help to name the classes very specifically. If you have a game that involves different types of sprites or objects, don’t label the classes
SpriteOne,SpriteTwo, and so on. I always attempt to name a class after its exact function, such asEnemySpriteorFlyingSprite.- Listing 2-5 shows the entire listing for
GameLogic.java. Similar to your implementation of theSurfaceViewclass, the current code is very spartan. Copy the code from Listing 2-5 to replace the original code ofGameLogic.
package com.gameproject.graphicstest;


import android.graphics.Canvas;

import android.view.SurfaceHolder;


public class GameLogic extends Thread {


     private SurfaceHolder surfaceHolder;

     private GameView mGameView;

     private int game_state;

     public static final int PAUSE = 0;

     public static final int READY = 1;

     public static final int RUNNING = 2;


     public GameLogic(SurfaceHolder surfaceHolder, GameView mGameView) {

        super();

        this.surfaceHolder = surfaceHolder;

        this.mGameView = mGameView;

     }


     public void setGameState(int gamestate) {

        this.game_state = gamestate;

     }

     public int getGameState(){

        return game_state;

     }


     @Override

     public void run() {


        Canvas canvas;

        while (game_state == RUNNING) {

                canvas = null;

                try {

                        canvas = this.surfaceHolder.lockCanvas();

                        synchronized (surfaceHolder) {

                                this.mGameView.update();

                                this.mGameView.onDraw(canvas);

                        }

                }

                finally {

                                if (canvas != null) {

                                        surfaceHolder.unlockCanvasAndPost(canvas);

                                }

                        }

                }

        }

}
Here is a list of the important methods of GameLogic.java and how each functions:
SurfaceHolder(): Creates a means of manipulating the canvas. In the code for therun()function, it locks and unlocks the canvas that you draw on. Locking the canvas means that only this thread can write to it. You unlock it to allow any thread to work with it.Gameview(): Creates an instance of yourGameViewclass and uses it to call theupdateandonDrawmethods that you saw in the previous section.setGameState(): Creates a system for storing the state of the game at any given time. Later, you use this when you have a Pause screen or want to display a message when the player wins or loses the game. The game state also determines how long you perform the game loop.run(): When the game is in the running state, attempts to lock the canvas and then performs your necessary operations, releases the canvas, and prepares to start the process over again.
Although GameLogic.java may appear simple enough, it doesn’t handle many of the issues that a game deals with. First, there is no timing system in place. The loop will run as fast as the processor will allow it to run, so a fast tablet will go quickly and a slower tablet will have a dramatically lower speed. Later, the chapter addresses this with a very simple way to regulate the amount that a sprite moves when you have a goal of around 30 frames per second (fps).
GameLogic.java also doesn’t handle any tasks like input or collision detection that will be implemented later. For now, GameLogic is a tool to perform operations repeatedly without complicating the GameView class.
Creating a Sprite
The next step in building your game is to create the Sprite class. Although your game needs only one instance of GameLogic and GameView, you can have dozens of sprites in your game; so the code must be generic, yet allow you to perform all of your necessary operations on the sprites.
Because there is no real basis for a Sprite class in any Android package, you create the code from scratch. Basic variables are the root of your class. Examples are the x and y coordinates of the sprite as well as the sprite’s image itself. You also want to store the sprite’s speed in each direction. Eventually, the health and other aspects of your sprites will also be stored here. To keep the Sprite class pristine, you label all of these variables as private and use a function to change their values and retrieve their values. This is common practice and prevents you from inadvertently changing the values when you meant to retrieve them, or vice versa.
Listing 2-6 shows the code for your SpriteObject class. Go through the normal process of creating a new class in Eclipse, and then fill it with this code. The code does some very simple tasks, so you shouldn’t have much trouble understanding it.
Listing 2-6. SpriteObject.java
package com.gameproject.graphicstest;


import android.graphics.Bitmap;

import android.graphics.Canvas;
public class SpriteObject {


        private Bitmap bitmap;

        private int x;

        private int y;

        private int x_move = 5;

        private int y_move = 5;


        public SpriteObject(Bitmap bitmap, int x, int y) {

                this.bitmap = bitmap;

                this.x = x;

                this.y = y;

        }


        public int getX() {

                return x;

        }


        public int getY() {

                return y;

        }


        public Bitmap getBitmap() {

                return bitmap;

        }


        public void setX(int x) {

                this.x = x;

        }


        public void setY(int y) {

                this.y = y;

        }

        public void setBitmap(Bitmap bitmap) {

                this.bitmap = bitmap;

        }


        public void draw(Canvas canvas) {

             canvas.drawBitmap(bitmap, x - (bitmap.getWidth() / 2), y - (bitmap.getHeight() /

2), null);

        }


        public void update() {
                        x += (x_move);

                        y += (y_move);


        }


}
The last two methods of this class—draw() and update()—are the most intriguing. The draw function is called from the game loop in GameLogic.java. You use the update operation to increment the x and y coordinates before you render the image to the screen. Notice that you can change the speed of movement by altering the variables manually, or you can create functions that let you change the speed of the sprite based on an event like collisions or user input.
Running a Game
With some quick fixes to your GameView class, you can have a completed app that sends your sprite shooting down the screen. The first order of business is to create an instance of both the GameLogic and the SpriteObject class within GameView so you can tap into your newly created classes:
- Open the
GameViewclass so you can add some code to it.- Put the two instances of your classes (shown in Listing 2-7) before the
GameViewconstructor.Listing 2-7. Making Instances of Your Classes
private SpriteObject sprite;

private GameLogic mGameLogic;- Inside the
GameViewclass, you call the constructor of both classes. Be extra careful about how the arguments are structured, however. The final line gives you the ability to work with the device. Add the code in Listing 2-8 inside theGameViewconstructor.Listing 2-8. Constructing the New Classes
sprite = new SpriteObject(BitmapFactory.decodeResource(getResources(), R.drawable.star), 50,

50);

mGameLogic = new GameLogic(getHolder(), this);

getHolder().addCallback(this);SpriteObjecttakes a bitmap and the coordinates of the sprite. The way to get the bitmap resource is identical to what you did in the first example in this chapter.GameLogictakes aSurfaceHolderand aGameView. The functiongetHolder()is part of theSurfaceViewclass that lets you send the current holder to the method.- Now you get to take advantage of the new objects in the
surfaceCreatedfunction. Listing 2-9 shows the code you use to start the game loop as soon as the application creates the surface.- With the meat of your game started, you have to put your methods into the
onDrawandupdateroutines, as shown in Listing 2-10. Notice that theGameViewclass has no call to these functions; they’re instead called from theGameLogicclass.Listing 2-10. Using the Objects in the Game
public void onDraw(Canvas canvas) {

        canvas.drawColor(Color.BLACK);

        sprite.draw(canvas);

}


public void update() {

        sprite.update();

}- The
onDrawmethod gets the sprite to draw itself, and then theupdatefunction has the sprite perform its ownupdatefunction. Separating theupdatemethods fromGameViewreduces the clutter inside the class. Whenever a specific task must be performed, do it in a separate function to keep your main code clean.- All of your code is in place, and the game can now be executed. Make sure all of the Java sources are saved, and then start the simulator by clicking the green Eclipse play button.
![]() Note If you receive errors about not being able to find a class, you may have created your Java files in a different folder. In the file tree in the left pane, make sure all four files are in the
Note If you receive errors about not being able to find a class, you may have created your Java files in a different folder. In the file tree in the left pane, make sure all four files are in the src folder.
If all goes well, you should see the image quickly crossing the screen from upper left to lower right. As you noticed before, depending on the computer or device that is running the program, the sprite may move quickly or slowly. With the ability to control the movement of your sprite, you can change the x_move and y_move values to speed it up or slow it down. The next section deals with cleaning up the user interface and getting ready for some intense games.