
A P P E N D I X A
Testing Android Games on a Real Device
If you’re going to make games for an Android tablet, you definitely need to test them on the real thing. Android has a built-in way to do this that eliminates many of the hurdles that developers went through in the past to test their creations on videogame consoles and other mobile platforms. The marketplace for apps has very little tolerance for programs that have bugs or issues that could easily have been fixed during product testing.
This appendix guides you through a quick process to set up your tablet for testing. To follow along, you need an Android 3.0 tablet. There are many tablets on the market as I write this, with more arriving weekly, so it’s impossible to list all of them. When I choose a device, I rarely look for the state-of-the-art tablet, but rather for the one that is most popular. If most people use the device that you use, then your results will be similar to those of the majority of your users.
Choose a tablet with a widely recognized brand name and a large following. If you have friends with tablets, you should test your applications on all of them. The process described here doesn’t take long, so you should have no trouble doing this.
Because you’re going to be debugging, the hardware interface requires that you specify your application as debuggable. You do this by setting a parameter in AndroidManifest.xml, the Android manifest file. When you look at your project folder in the Eclipse project explorer, you don’t see the manifest file in it. Figure AppA-1 shows where to find this file.
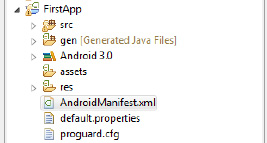
Figure AppA-1. Android manifest file
You add a very simple parameter to the XML that defines the project as a debuggable program. Listing AppA-1 contains the code for the entire manifest, with the part that you must insert bolded.
Listing AppA-1. Android Manifest File
<?xml version="1.0" encoding="utf-8"?>

<manifest xmlns:android="http://schemas.android.com/apk/res/android"

      package="com.gameproject.firstapp"

      android:versionCode="1"

      android:versionName="1.0">

    <uses-sdk android:minSdkVersion="11" />


    <application android:icon="@drawable/icon" android:label="@string/app_name"

android:debuggable="true">


        <activity android:name=".Main"

                  android:label="@string/app_name">

            <intent-filter>

                <action android:name="android.intent.action.MAIN" />

                <category android:name="android.intent.category.LAUNCHER" />

            </intent-filter>

        </activity>


    </application>

</manifest>
The next step varies a little from device to device. Google recommends going to the Application folder on the tablet, then going to the Development folder, and selecting USB Debugging. If this doesn’t work for your tablet, do a quick search to find out how to turn on this type of debugging.
Now you need a driver for your specific USB device. This isn’t the same as the one you may have installed when you connected the tablet to your computer for regular use. You need to choose one from the list of USB drivers on Google’s Android developer page: http://developer.android.com/sdk/oem-usb.html. The process to install these is easy enough.
Take for example the Motorola tablet, which I own. I clicked the link to go to Motorola’s homepage for developer drivers. Because I run my programs on a 64-bit version of Windows, I chose the latest handset USB driver. (Whether tablets are handsets is arguable, but the drivers are the same.) I followed the setup process and was ready to go.
![]() Note If you’re developing on a Macintosh computer, you don’t need to worry about USB drivers: you’re all set. Linux users, however, have a bit of work on their hands. For more information, check out the official Android documentation about setting up a device for development:
Note If you’re developing on a Macintosh computer, you don’t need to worry about USB drivers: you’re all set. Linux users, however, have a bit of work on their hands. For more information, check out the official Android documentation about setting up a device for development:
http://developer.android.com/guide/developing/device.html#setting-up.
If you follow these directions correctly, you can now test your programs on the device. Go to Eclipse, and run the program as usual. Instead of defaulting to the emulator, you should be presented with a choice between the device you added and the emulator. Select the device that you plugged in, and you can interact with your app the way your users will.
Pay careful attention to the fact that some applications only work on a physical device. These include apps that rely on accelerometer data or Bluetooth connections.