
Polishing the Application
Although your game is playable as is, it could use some polishing. A welcome screen would be a nice addition so players can learn about the game before jumping into it. You have a lot of options when it comes to adding this feature, but making a rudimentary entrance screen is easy, and you can fine-tune it for each game. In this section, you add a screen and then a button to start up the game.
Adding an Splash Screen
Because GameView.java takes care of the actual game and its appearance, your startup page is handled by MainActivity.java. Instead of setting the screen to show GameView, you present a quick layout and then give the user the ability to enter the game. This makes your work more professional and easier for the user. To expand on this concept, you could play a short video clip to introduce the game, but I leave that to your imagination.
Take a look at Figure 10-1 to see what your splash screen looks like. This section discusses ways of adding features and items to it if you desire a more complete intro screen.
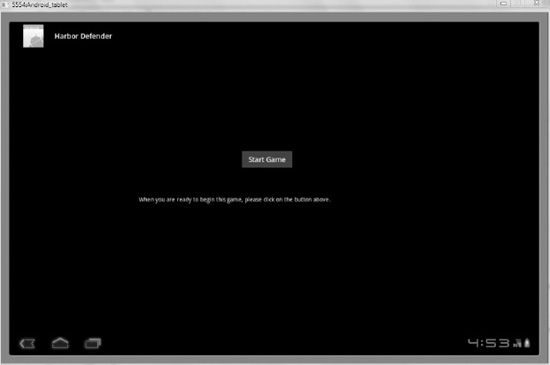
Figure 10-1. Introduction to your game
To achieve the look in Figure 10-1, let’s go back to a concept explored in Chapter 1. The appearance of the app is generated in main.xml, where you can create the interface by dragging buttons and text onto the screen. You then edit the text and elements. The following steps show how to do this:
- Find your main.xml file in the Harbor Defender project by navigating the folders:
reslayoutmain.xml.- Open
main.xml, and select “10.1in WXGA (tablet)” from the drop-down menu near the top. The first order of business is to look at the code for the main.xml file.- Select
main.xmlon the small tab near the bottom of the screen.- Replace the existing code with the code in Listing 10-1.
Listing 10-1. Main.xml
<?xml version="1.0" encoding="utf-8"?>


<AbsoluteLayout

          xmlns:android="http://schemas.android.com/apk/res/android"
          android:orientation="vertical"

          android:layout_width="fill_parent"

          android:layout_height="fill_parent"

        >


</AbsoluteLayout>
You replace the existing LinearLayout with an AbsoluteLayout. Both of these are frameworks to which you can add layout elements. The AbsoluteLayout, however, lets you quickly specify the exact location for the elements, whereas the LinearLayout aligns all of the items toward the left. This is critical when you add the parts of your welcome screen.
5. Return to the graphical layout by selecting the small Graphical Layout tab at the bottom of the screen.
6. You use the palette of items on the left to create your layout. Figure 10-2 shows what this will look like. Drag a Button and a TextView onto your screen. They contain filler text for now, but you edit it shortly.
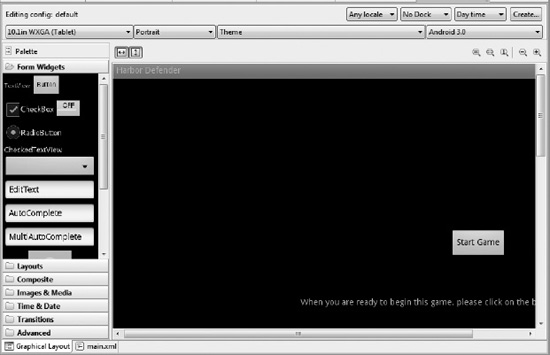
Figure 10-2. Using the palette on the left to drag the TextView and Button objects onto the screen
7. It’s time to go back to the view of the code. Select the main.xml tab at the bottom of the screen. You should observe that two new elements (Button and TextView) have appeared in your AbsoluteLayout element.
8. You need to plug in your text and change the id of the button. Check out the bold code in Listing 10-2. You can use different words, but the important part is to remember the name or other identifier that you assign to the button’s id.
Listing 10-2. Main.xml
<?xml version="1.0" encoding="utf-8"?>


<AbsoluteLayout

          xmlns:android="http://schemas.android.com/apk/res/android"

          android:orientation="vertical"

          android:layout_width="fill_parent"

          android:layout_height="fill_parent"

        >


    <Button

android:text="Start Game"

android:layout_width="wrap_content"

android:id="@+id/startgame"

android:layout_height="wrap_content"

android:layout_x="557dip"

android:layout_y="249dip"></Button>


    <TextView

android:layout_width="wrap_content"

android:layout_height="wrap_content"

android:text="When you are ready to begin this game, please click on the button above."

android:id="@+id/textView1"

android:layout_x="310dip"

android:layout_y="361dip"></TextView>


</AbsoluteLayout>
The layout_x and layout_y lines specify where the items are located. If you want to precisely determine where the button and text are, you can edit these values. You use the id tags to reference the objects in the code, as you do in the next section.
Responding to a Start Game Button Press
Now that you have a nice display to put up for the user, you need to make it interactive. It’s critical to allow the player to quickly start the game. This is especially important for a returning player. Remember that if the person is coming back to your game, they expect to begin playing very quickly and don’t want to see instructions or be hassled by intro videos.
To display your new layout and then let the user navigate to the real game, let’s go back to MainActivity.java. Here you do a simple input test and then show the actual game. Originally, however, you need to put Main.xml as the view of the game rather than GameView.java. Follow these steps:
- Open
MainActivity.javain the editing pane of Eclipse.- Add the following
importstatement to the top of the file:
3. Change the onCreate() method for MainActivity.java so it looks like Listing 10-3. The bold portions are changed from your previous work. You have to import Android.view.View in order to make it work.
Listing 10-3. MainActivity.java
@Override

public void onCreate(Bundle savedInstanceState) {

    super.onCreate(savedInstanceState);


    mGameView = new GameView(this);


    setContentView(R.layout.main);


    mSensorManager = (SensorManager)getSystemService(SENSOR_SERVICE);

    mAccelerometer = mSensorManager.getDefaultSensor(Sensor.TYPE_ACCELEROMETER);


    final Button button = (Button) findViewById(R.id.startgame);

    button.setOnClickListener(new View.OnClickListener() {

        public void onClick(View v) {


            setContentView(mGameView);

        }

    });


}
The first setContentView() tells the app to load main.xml as the layout. The button section listens for a click of the button. Once that happens, you call another setContentView() to show GameView on the screen. This is the simple method you use to initialize the game.
When you’re assigning the value of the button, you use the function findViewById; and as the argument, you use the id of the button. This is the reason you make the button id something that can easily be identified as the item that starts the game.
4. Run the game, and you’re presented with your welcome screen. Continue by pushing the Start Game button, and the application functions as normal.
Congratulations: you’ve finally finished the code portion of the book! The next section deals with doing the final compilation of the game and preparing to distribute it. You’re getting closer to sharing your creation with other users.