
What’s Needed
Now that we know why we are learning to write code and generally what this platform offers, we are going to need a little bit of hardware to complete the projects discussed in the rest of this book. Even though we will focus our discussions primarily on programming the Arduino, the hardware is what makes programming the Arduino so much fun. The best place to get started with prototyping electronic circuits with the Arduino is through one of the many starter kits available from various retailers for anywhere from $40 to $100 USD or about €30 to €70 EUR. SparkFun Electronics (www.sparkfun.com) offers the Starter Kit and Inventor’s Kit; Adafruit Industries (www.adafruit.com) the Budget Pack or Starter Pack; MAKE Magazine’s Maker SHED (www.makershed.com) with either a Getting Started Kit or the Mintronics Survival Pack; or the Arduino Store’s (http://store.arduino.cc) Workshop Kit. Figure 1-7 shows what this assembled kit might look like.
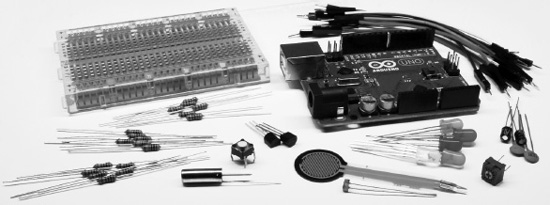
Figure 1-7. Getting started hardware kit
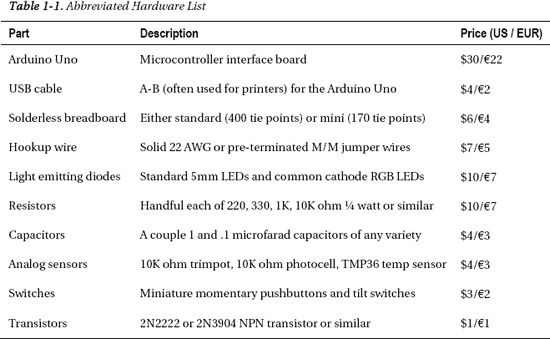
While each of these kits will have more or less what you need, Table 1-1 provides a simple shopping list of some of the specific hardware that we will use in the following pages, which you might want to purchase individually or at least check whether or not the kit you are considering contains these items. Prices are only approximate and are listed just to give you an idea on the costs.
Keep in mind that this is just a general list of recommended parts; feel free to purchase something different—as long as it’s somewhat similar to what’s listed—and to order from vendors of your choice. For example, rather than using an Arduino Uno, the standard Arduino interface board, maybe you’re interested in wearables or e-textiles and would like to use a LilyPad Arduino instead. That’s fine, just be sure to read up on the differences between the recommended hardware and your own on the Arduino Hardware page at http://arduino.cc/en/Main/Hardware. Likewise, many of the items on the list, such as resistors, are kind of like horseshoes in that close enough will usually get the job done. For a more detailed list that includes all the parts used in this book, refer to the expanded hardware list in the appendix at the end of this book.
This minimal list of hardware will get you through about half of the book with other specific components necessary for the more advanced projects. When required, information on additional parts will be provided at the start of the chapter or section. While detailed in each chapter, these projects will include the use of temperature sensors, force/flex sensors, light sensors, accelerometers, wind sensors, liquid crystal displays, stepper motors, hobby servos, and other sorts of hardware. Although, rather than mandate a hefty toolbox of equipment, the projects and code will be written with as much flexibility as possible to allow the use of other sensors or actuators, depending on what you have available and your own personal interests and project ideas.
To keep things simple, we will power the Arduino Uno from the USB port of our computer using a USB cable for each one of the projects in this book. Once we upload the programs to our boards, however, the program is permanently stored on the board just like a USB flash drive. We could (if we wanted) power the Arduino board from an external power source, such as DC power supply or battery, and not need the USB cable at all. For more information, refer to the section “Connecting & Powering Arduino” on the Arduino Playground at http://arduino.cc/playground/Main/ArduinoCoreHardware.