
LiquidCrystal library
Earlier in this book we looked at one way to see the information coming out of the Arduino using both the Serial Monitor and code that uses the Serial library, which we will revisit in the next chapter. We can also use any of a number of different displays to show visual information and even create a simple user interface to provide visual feedback. These displays could include the simple monochrome character LCD that we used in the last chapter, a color graphical LCD, seven-segment and alphanumeric LEDs, and even text overlays for composite video or e-ink displays. Since we can’t cover all of these here, we are going to go back to our character LCD that we used in the last project and look at some of the other things that the library will allow us to do with code examples, which will include displaying text, working with symbols and custom characters, and even creating very basic animations.
Obviously, to use the LiquidCrystal library we need an LCD. The schematic and illustration in Figures 9-1 and 9-2 show a simpler circuit than the one from last chapter that will be used for the next few example sketches. LCDs like these use the HD44780 driver and have a parallel interface with up to eight data bus pins, but we are only going to use four marked DB4-7. In addition, we need to connect the RS or register select pin to tell the display whether to display data or perform a command and the EN or enable pin to let the display know that data is waiting for it. The RW or read/write pin is simply tied to ground to keep the display in a read state and the V0 pin controls the contrast of the display and can be connected to the middle pin of a trimpot or to a resistor. To keep things simple, we have connected the positive or anode side of the backlight LED marked LED+ to a 220 ohm resistor that is then connected to +5v.

Figure 9-1. LiquidCrystal schematic

Figure 9-2. LiquidCrystal illustration
Example Code: Arduino Haiku
With the circuit wired up, we can get into our first source code example found in Listing 9-1 to demonstrate the basic functions of the LiquidCrystal library. For this sketch, we will display some text in the form of a haiku written by John Maeda. In short, this sketch will display four screens of text separated by a 5-second delay. After the two lines of text have been printed to the display and it has paused long enough for us to read it, the LCD is cleared removing any text from the display and then it starts over at the top left of the screen.
Listing 9-1. Arduino Haiku Source Code
#include <LiquidCrystal.h>

LiquidCrystal lcd(5, 6, 7, 8, 9, 10);


void setup() {

  lcd.begin(16, 2);

}


void loop() {

  lcd.print("All I want");

  lcd.setCursor(0,1);

  lcd.print("to be,");

  delay(5000);


  lcd.clear();

  lcd.print("is someone that");

  lcd.setCursor(0,1);

  lcd.print("makes new things");

  delay(5000);


  lcd.clear();

  lcd.print("And thinks");

  lcd.setCursor(0,1);

  lcd.print("about them.");

  delay(5000);


  lcd.clear();

  lcd.setCursor(0,1);

  lcd.print("- John Maeda");

  delay(5000);


  lcd.clear();

  delay(5000);

}
To understand how these functions work, we will need to examine them more closely after we get the code uploaded, beginning with the LiquidCrystal() function.
LiquidCrystal()
The LiquidCrystal() function creates a new instance for the library (so we can use the library in our sketches), gives it a variable name, and assigns the pin numbers for the LCD. This function must be used the first time we want to use the library. There are several different formats for the functions syntax, but we will stick with the following simple one:
LiquidCrystal name(rs, en, db4, db5, db6, db7)
In this function, name can be any unique name that we want following the normal rules for variable names, but to make things easier we will stick with the convention of using lcd in our code. To make wiring easier and to leave certain I/O pins open on the Arduino board, we will skirt tradition here and assign the digital pins 5, 6, 7, 8, 9, 10 as the pin numbers for the rs, en, db4, db5, db6, db7 pins respectively. This comes together in our source code as the following line:
LiquidCrystal lcd(5, 6, 7, 8, 9, 10);
Now that we have created an instance of the LiquidCrystal library, we will use the variable name lcd in front of each of the functions that are a part of that library, as you will see in the next function.
begin()
With the library instance created, we need to start the library and define what size LCD we intend to use. To do that, we use the function begin() inside the setup() function.
begin(cols, rows)
For a 16-character wide by 2-character tall LCD like the one we have been using, we would use 16, 2 for the function parameters. For larger or smaller sized displays we would adjust these numbers to suit, as in 20, 4 or 8, 1. The function as it appeared in our example follows:
lcd.begin(16, 2);
This statement links the begin() function to our instance lcd and specifies a 16 × 2 display. Now that we’ve got the library set up correctly, let’s look at some of the functions that we can use with this library.
![]() Note While LCDs of other sizes will work for these examples, the code may act a little odd or need modification.
Note While LCDs of other sizes will work for these examples, the code may act a little odd or need modification.
print()
To actually send information to our LCD, we can use the print() function for basic character strings in one of the following two syntax formats:
print(data)

print(data, BASE)
Data can include any text strings, bracketed by double quotes (“ and ”), and values or variables that include char, byte, int, long, or string data types. Any numerical value sent to the print() function will be converted to a text string. For integer values, a base can optionally be specified as either BIN for binary or base 2, DEC for decimal or base 10, HEX for hexadecimal or base 16, or OCT for octal or base 8. For a simple character string like in our example sketch, we used the following statement:
lcd.print("All I want");
This statement prints the text All I want beginning with the current cursor position and proceeding one character at a time to the right (by default) of that position. To send an integer value, we might write a line like the following:
lcd.print(analogRead(A0), DEC);
By combining the analogRead() function, this statement will read the value of the analog in pin A0 and print that value to the LCD in decimal format. Because the print() function will keep on spitting out characters to the right of the current position each time the function is called, we need to use some additional functions to control the position of the cursor.
clear()
The clear() function will clear all of the contents of the display and position the cursor in the top left of the display. There’s not much to the functions syntax because there are no values to pass to it, so let’s look at the following example of the function as used in our code:
lcd.clear();
Like I said, not much to it. Because of the way LCDs display data, this function can be useful for clearing the screen in order to write new data to it without overwriting data or sending data off the edge of the LCD.
setCursor()
When we want to move the position of the cursor on the display without clearing the display, we can use the setCursor() function to position the cursor anywhere on the display. Its syntax looks like the following:
setCursor(col, row)
All we need to do with this function is provide a number between 0 and 15 for the horizontal column position and either 0 or 1 for our two-row display. A position of 0,0 for example would be the top left corner of the display and 15,1 would be the last character on the bottom-right corner. The following is a line from our example code:
lcd.setCursor(0,1);
This line is used to set the cursor to the beginning or left-hand side of the second row of the display before writing the second line of text. In our haiku sketch, we used the clear() function to not only clear the display, but to also return the cursor to the top left of the display so setCursor(0,0) was not needed.
Example Code: Symbols and Characters()
So far, we have only displayed simple characters on the LCD by using what is easily entered from our keyboard. To make more interesting symbols on the display, the HD44780 driver has a number of special symbols, like ¢, °, Ω, or π, which can be accessed using a code that tells the display what symbol to show. These character displays also have the capability of displaying up to eight custom characters of our own design. The source code in Listing 9-2 provides an example of using both the built-in symbols as well as some new ones that we will create ourselves.
Listing 9-2. Symbols and Characters Source Code
#include <LiquidCrystal.h>

LiquidCrystal lcd(5, 6, 7, 8, 9, 10);


byte degree = B11011111;

byte cents = B11101100;

byte sqRoot = B11101000;

byte divide = B11111101;

byte pi = B11110111;

byte omega = B11110100;

byte rgtArrow = B01111110;

byte lftArrow = B01111111;


byte symbols[] = {degree, cents, sqRoot, divide, pi, omega, rgtArrow, lftArrow};


byte smiley[] = {B00000,B00000,B01010,B00000,B10001,B01110,B00000,B00000};

byte skull[] = {B00000,B01110,B10101,B11011,B01110,B01110,B00000,B00000};

byte bell[] = {B00000,B00100,B01110,B01110,B01110,B11111,B00100,B00000};

byte note[] = {B00000,B00100,B00110,B00101,B00101,B01100,B01100,B00000};

byte heart[] = {B00000,B00000,B01010,B11111,B11111,B01110,B00100,B00000};

byte fish[] = {B10000,B00000,B01000,B10000,B01101,B11110,B01101,B00000};

byte lock[] = {B00000,B01110,B10001,B10001,B11111,B11011,B11011,B11111};

byte unlock[] = {B00000,B01110,B10001,B10000,B11111,B11011,B11011,B11111};


byte* characters[] = {smiley, skull, bell, note, heart, fish, lock, unlock};


void setup() {

  lcd.begin(16, 2);


  for (int i=0; i<8; i++) {

    lcd.setCursor((i*2),0);

    lcd.write(symbols[i]);


    lcd.createChar(i, ((byte*)characters[i]));

    lcd.setCursor((i*2),1);

    lcd.write(i);

  }

}


void loop() {}
This example is maybe not the most dynamic sketch we’ve ever written, but it gives us a sense of the types of characters that can be displayed on our display. Once we have the sketch uploaded, we can then look at the functions that we use to both display these symbols and characters as well as those that create the new characters, in order to better explain the example source code.
write()
Where the print() function prints strings of text to the LCD, the write() function is used to send a character to the display. The syntax for both functions is similar:
write(data)
The character to be sent to the display is specified in a numerical data format or through a variable name. From our example code, it is as follows:
lcd.write(symbols[i]);
This line displays whatever symbol is named at the current index in the symbols[] array determined by the loop counter. The symbols[] array is just a way to run down a list of each of the eight symbols defined in the earlier variable declarations, using a for loop to print them to the display. Our example code continues to print each of the eight pre-defined symbols using the setCursor() function to space each one out on the first line.
Declaring the address for the symbol at the beginning of our code and calling that variable name later is only one way to use the write() function. We can actually specify the symbol to be displayed in many different ways. For example, the symbol for cents, ¢, can be written multiple ways, as shown in the following sample fragment:
byte cents = B11101100;

lcd.write(cents);

lcd.write((B11101100));

lcd.write(236);

lcd.write(0xEC);
This block of code will display four ¢ symbols in a row on the display because each of these different values refers to the same thing. Just like our example code earlier, the first line declares a byte data type variable named cents and assigns it the 8-bit binary value B11101100. The variable cents is then called in the second line to print the first symbol. The second symbol is printed by specifying the binary number directly in the write() function. Because the value B11101100 is not a real number so to speak, the B is used to tell the compiler that the following number is binary not decimal, we need to place this value in a second pair of parentheses to force the compiler to evaluate this value as a binary number. The third line uses the decimal value 236 and the fourth the hexadecimal value 0xEC for the third and fourth symbols.
To find the numerical value that corresponds to the symbol that we want to use, we need to have a look at the LCD’s data sheet, a document that gives us the technical specification of the device. Figure 9-3 is a small part of the symbol set that is available to a particular LCD found in a data sheet for the driver chip, like the one hosted by SparkFun at www.sparkfun.com/datasheets/LCD/HD44780.pdf. These may vary depending on the chip used by the LCD, so refer to the specific data sheet for your display.
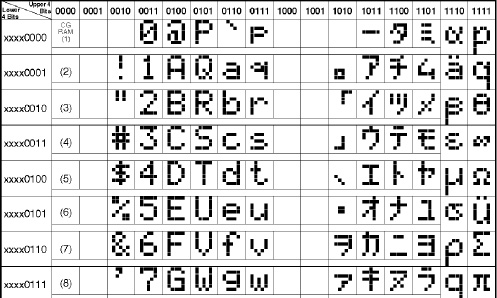
Figure 9-3. Partial symbol codes from data sheet
To use a symbol like the Greek omega, Ω, for example, we need to cross reference the first four bits, or 1s and 0s, at the top of the chart with the second four on the left. That will give us the binary number 11110100 that we can then use with the write() function to display the symbol on the LCD. Likewise, pi, π, would be the symbol at 11110111. We can then convert this value to another base if we particularly wanted to and use that as the parameter for the write() function as we mentioned earlier.
createChar()
While the LCD has many different symbols built into its driver chip, we might want to create a symbol like a smiley face, music note, or even a fish. Our character display can store eight custom characters numbered 0–7, each occupying a 5 × 8 grid of pixels. Creating a custom character to display on the LCD is a two-step process. First, we need to define a bitmap array that corresponds to each dot for the character and, second, we need to use the createChar() function to send our bitmap to an address in the displays memory. The syntax for this function is as follows:
createChar(number, data)
The number parameter is the number of the custom character with a range of 0–7. The data is the array name that stores the bitmap image. Before fully explaining our example code, let’s look at the following hypothetical statement to make a smiley face:
lcd.createChar(0, smiley);
This line will create a new character at the number 0 according to the pattern in the array smiley[]. One way of creating this array is as follows:
byte smiley[] = {B00000,B00000,B01010,B00000,B10001,B01110,B00000,B00000};
Because each character is a collection of dots in a 5 × 8 grid, we can create an array of bytes, one byte for each row and one bit for each column. A 1 represents a pixel that is on and 0 a pixel that is off. Our example is written to save space, but it is common to write these arrays in the following format:
byte smiley[] = {

  B00000,

  B00000,

  B01010,

  B00000,

  B10001,

  B01110,

  B00000,

  B00000

};
While this way takes up more space on the screen, if you squint just right you can make out the smiley face in the code. With the array defined and the custChar() function called to assign our character to a position, we then use the write() function to display the character on the screen, like so:
lcd.write(0);
One useful utility for creating custom characters is the Character Creator shown in Figure 9-4 and found online at http://icontexto.com/charactercreator/.
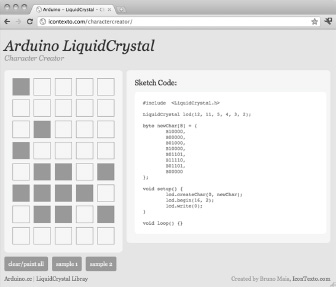
Figure 9-4. Arduino LiquidCrystal Character Creator
Simply toggle each block to draw your character and then copy and paste the generated code in the right panel into your Arduino sketch. And that’s all there is to creating custom characters. The library fortunately takes on all the hard work of writing this information to the LCD’s memory so that we can display this character, or even make a new character, whenever we want.
So now going back to our earlier example code that displays eight custom characters on the second row of our display, we first defined eight character arrays that included characters called smiley, skull, bell, note, heart, fish, lock, and unlock. We then made an array called characters[] to create an index of each of these individual character names. Because this is an array of arrays, similar to our discussion of character arrays in the last chapter, we need to use the “*” symbol after the data type to indicate that this is an array of pointers—basically references to places in memory where the arrays are stored.
In our for loop, we created each character in turn using the following line:
lcd.createChar(i, ((byte*)characters[i]));
Here, our character number is determined by the for loop counter and the name of the array is determined by the index of the characters[] array. To get this array to point to the correct character array, we need to remind the compiler that characters[i] is a pointer by adding (byte*) in front of the array name bracketed by parenthesis. This turns that array into a pointer that the compiler can reference, creating the appropriate character. I know I said we wouldn’t talk much about pointers, but it’s not that hard and plenty of reference material abounds if you want find out more.
Example Code: Fish Tank Animation
We are almost done with the LiquidCrystal library, with only one more example and a couple new functions to go. By using these new functions with some custom characters, we can create a rather lowtech 8-bit animation—maybe something like a fish swimming in a fish tank. The example in Listing 9-3 takes two strategies for creating an animation. First, it moves the character around the screen by using functions that scroll the data to the left or right. Second, it displays multiple characters at the same location with a delay in between each one to create a simple flipbook style animation.
To make this code work, we designed multiple fish characters that include different directions the fish might swim, as well as a few characters so that the fish can blow bubbles. Four functions are created to control the fish’s movement: scrollLeft(), scrollRight(), stopCenter(), and blowBubbles(). By calling each function, and passing the number of steps in the case of the scrolling functions, we can get the fish to move around the LCD while keeping track of it the entire time using the variables x and y.
Listing 9-3. Fish Tank Animation Source Code
#include <LiquidCrystal.h>

LiquidCrystal lcd(5, 6, 7, 8, 9, 10);


byte fishLeft[8] = {B00000,B00000,B00000,B00000,B01101,B11110,B01101,B00000};

byte fishRight[8] = {B00000,B00000,B00000,B00000,B10110,B01111,B10110,B00000};

byte fishCenter[8] = {B00000,B00000,B00000,B00000,B00100,B01110,B00100,B00000};

byte fishBubbles1[8] = {B00010,B00000,B00100,B00010,B00100,B01110,B00100,B00000};

byte fishBubbles2[8] = {B00000,B00100,B00010,B00000,B00100,B01110,B00100,B00000};

byte fishBubbles3[8] = {B00100,B00000,B00000,B00000,B00100,B01110,B00100,B00000};


byte x = 0;

byte y = 0;


int time = 600;


void setup() {

  lcd.begin(16,2);

  lcd.createChar(0, fishBubbles1);

  lcd.createChar(1, fishBubbles2);

  lcd.createChar(2, fishBubbles3);
  lcd.createChar(3, fishLeft);

  lcd.createChar(4, fishRight);

  lcd.createChar(5, fishCenter);

}


void loop() {

  scrollRight(9);

  stopCenter();

  blowBubbles();

  y = 1;

  x += 1;

  scrollLeft(5);

  stopCenter();

  blowBubbles();

  y=0;

  scrollRight(10);

  delay(time*10);

  x = 0;

  y = 0;

}


void scrollRight(int steps) {

  lcd.setCursor(x, y);

  lcd.write(4);

  delay(time);

  for (int i=0; i<steps; i++) {

    lcd.scrollDisplayRight();

    delay(time);

    x++;

  }

  lcd.clear();

}


void scrollLeft(int steps) {

  lcd.setCursor(x, y);

  lcd.write(3);

  for (int i=0; i<steps; i++) {

    lcd.scrollDisplayLeft();

    delay(time);

    x--;

  }

  lcd.clear();

}


void stopCenter() {

  lcd.setCursor(x, y);

  lcd.write(5);

  delay(time);

  lcd.clear();

}
void blowBubbles() {

  for (int i=0; i<3; i++) {

    lcd.setCursor(x, y);

    lcd.write(i);

    delay(time);

  }

  lcd.clear();

}
This sketch uses many of the LiquidCrystal functions that we have already discussed, but it also adds a couple new ones. Let’s look at these two functions before moving on to our next library.
scrollDisplayLeft() and scrollDisplayRight()
Each time these functions are called, the display will be shifted one character to the left or right, depending on which function we call. We placed these functions in for loops with a delay and a counter to track the horizontal position of the cursor. Take for example the following:
for (int i=0; i<steps; i++) {

  lcd.scrollDisplayRight();

  delay(time);

  x++;

}
This loop will call the function scrollDisplayRight() once each time through the loop for the total number of steps passed to the function. The loop will also delay for the specified amount of time and increment the horizontal position by one.
That might seem like a pretty exhaustive look at the LiquidCrystal library, but believe it or not there are even more functions to do all sorts of things that we haven’t even mentioned here. However, rather than dwelling too long on this one library, let’s keep moving to some of the other interesting libraries that we need to talk about.