
Project 4: Noisy Cricket
As a means to explore the uses of the Arduino’s digital pins and to discuss the different digital functions, we are going to look at a new project: the Noisy Cricket. This project will make quite an annoying racket when left alone, but it will quickly hush up when someone gets near it—just like a real cricket. We will use a simple and inexpensive motion sensor as a trigger, although a tilt switch, mat switch, or any other simple on or off sensor will do. Wire the whole thing up and power it from a battery, then go find a hard-to-reach place for the cricket to call home and see how many people you can drive insane with it!
Hooking It Up
This circuit can be as simple or complex as you want to make it. We will go with the easy route, using an inexpensive, passive infrared (PIR)motion detector. We are somewhat partial to the ones from Parallax or Adafruit, listed in the appendix at the end of this book, for their ease of use and connectivity. A PIR motion detector is really good at detecting a change in the nearby ambient infrared temperature usually caused by the movement of warm-blooded creatures like us. It needs three connections: +5 VDC, GND, and OUT, however, double-check the sensor’s technical specifications to make sure the correct connections are made to the right pins. The output pin is usually configurable and can provide a logic level HIGH when motion is detected and LOW otherwise. Alternatively, you could stick with the tilt sensor circuit from earlier or some other form of digital switch or sensor.
For the speaker, we are using a piezo buzzer, which uses a piezoelectric crystal coupled with a small diaphragm to make sound. Some piezo speakers are polarized and will have a side marked ‘+’ that should be connected to the Arduino output pin. Instead of a piezo, a more conventional small, simple 8 ohm speaker like you would find in an electronic toy or alarm clock could also work with a 100 ohm series resistor placed between the output pin and the speaker. Figures 5-4 and 5-5 show how all of this goes together.
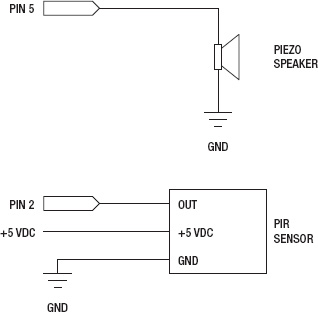
Figure 5-4. Noisy Cricket schematic
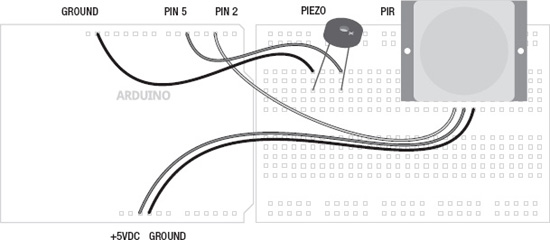
Figure 5-5. Noisy Cricket illustration
Uploading the Source Code
The code in Listing 5-1 should bring life to our noisy cricket while at the same time show off some of the complex behaviors that can be achieved by simply turning a pin on and off. This sketch is built around the idea of adding behavior to the chirp so there is a whole block of variables that can be changed to affect its character, which we will explain more fully in our summary.
Listing 5-1. Noisy Cricket Source Code
const int speakerPin = 5;

const int sensorPin = 2;


const int highChirp = 20;

const int lowChirp = 14;


const int chirpCycle = 70;

const int chirpPause = 8;

const int numChirps = 10;

const int midChirp = 150;

const int skittish = 5000;


void setup() {

  pinMode(speakerPin, OUTPUT);

  pinMode(sensorPin, INPUT);

}


void loop() {

  while (digitalRead(sensorPin) == LOW) {

    for (int i=1; i<=numChirps; i++) {


      for (int j=1; j<=highChirp; j++) {

        digitalWrite(speakerPin, HIGH);

        delayMicroseconds(chirpCycle * 10);

        digitalWrite(speakerPin, LOW);

        delayMicroseconds(1000-(chirpCycle * 10));

      }


      digitalWrite(speakerPin, LOW);


      if (i == numChirps/2) delay(midChirp);

      else delay(lowChirp);


    }

    if ((random(chirpPause)) == 1) delay(random(200,1000));

    else delay(midChirp);}

  delay(skittish);

}
Source Code Summary
While at first glance there seems to be quite a lot going on in this sketch, if we take the time to break it down into its various parts, it’s fairly easy to understand. Let’s start with the block of variables and what they do.
These first two lines define which pins are connected to which device. In this case, we have connected the PIR motion detector to pin 2 and the speaker is connected to pin 5.
const int highChirp = 20;

const int lowChirp = 14;
Crickets chirp fairly fast. These second two lines set up the length of time (measured in milliseconds) that the chirp is on, using the variable highChirp, and off, using the variable lowChirp. With our numbers, the chirp will be on for a little bit longer than it is off, giving the chirp a more natural irregularity.
const int chirpCycle = 70;

const int chirpPause = 8;

const int numChirps = 10;

const int midChirp = 150;

const int skittish = 5000;
These five variables are what give our little cricket its character. The variable chirpCycle is used in a block of code that will give the chirp a higher frequency of sound than if we simply turned the pin on. chirpCycle refers to the duty cycle that the pin is on for every 1 millisecond, measured in a percentage or 70%, in our example. Increasing or decreasing this percentage will affect the pitch of the sound generated. chirpPause is used after the main chirp sequence to give the cricket a 1 in 8 chance of pausing for a longer time than normal. In our chirp sequence, numChirps determines the number of chirps in a cycle. The value 10 works for a good cricket sound but increasing or decreasing this will create a cricket that is more or less active. midChirp represents a brief pause measured in milliseconds in the middle of the chirp cycle. The final variable, skittish, is how long the cricket will stay quiet after movement has been detected. Next, we move on to our setup() function:
pinMode(speakerPin, OUTPUT);

pinMode(sensorPin, INPUT);
After all of the variables have been defined, our setup() function will set each of the I/O pins according to whether we intend to use them as inputs or outputs. More on this later, so let’s move on to our loop() function.
while (digitalRead(sensorPin) == LOW) {

  for (int i=1; i<=numChirps; i++) {
The first line of our loop() function reads the state of the sensor pin and as long as it remains LOW, meaning that movement has not been detected, the second line will begin the chirp cycle for as many chirps that have been specified.
for (int j=1; j<=highChirp; j++) {

  digitalWrite(speakerPin, HIGH);

  delayMicroseconds(chirpCycle * 10);

  digitalWrite(speakerPin, LOW);

  delayMicroseconds(1000-(chirpCycle * 10));

}
This entire block of code is a replacement for turning on the speaker pin once. So why use five lines of code instead of one? The reason is to create a higher pitch sound by turning on and off the pin at a higher rate of speed, or frequency. This for loop will cycle through once each millisecond for a number of times specified by highChirp. This will have the effect of sounding like a solid tone for as long as specified, in this case 20 milliseconds since highChirp is equal to 20.
While we have used the delay() function previously, albeit with little explanation, delayMicroseconds() is another type of delay that appropriately enough measures time in microseconds rather than milliseconds. This means that delay(1) and delayMicroseconds(1000) are equal to the same amount of time. Using our chirpCycle of 70%, delayMicroseconds(chirpCycle * 10) will delay for 700 microseconds after the pin is turned on and delayMicroseconds(1000-(chirpCycle * 10)) will delay for 300 microseconds when the pin is turned off.
Next up, we need to turn off the speaker for either a longer delay midway through the chirp cycle, or for a short delay the rest of the time. The following two lines will check to see if we’ve hit the midway point or not:
digitalWrite(speakerPin, LOW);


 if (i == numChirps/2) delay(midChirp);

 else delay(lowChirp);
So far these lines of code have the effect of chirping five times in quick succession with only a slightly longer delay before chirping another five times. Once in a while it might be nice to toss things up a bit.
if ((random(chirpPause)) == 1) delay(random(200,1000));

    else delay(midChirp);
And these two lines do exactly that. As specified by chirpPause, we are providing a random chance of 1 in 8 that the cricket might pause for a breath of air that might last between 200 and 1000 milliseconds, or 0.2 up to 1 second in length. To accomplish this we are using the random() function that will be discussed in a later chapter.
delay(skittish);
Finally our last line of code in the loop() function is only ever reached when the PIR motion detector senses movement and sends a signal of HIGH to the Arduino. At this point, the cricket will wait for 5 seconds before checking to see if there is movement again. If someone remains too close to the cricket, it will stay quiet until they go away—and after running the cricket for any length of time I’m sure you will try to keep it quiet as much as you can.