
Project 2: 7-Color Blink
If you’ll remember the RGB color wheel in Figure 2-1 of the last chapter, we can mix red, green, and blue light to create millions of different colors. For our next project, we will take the simple three-color sketch from the last chapter and improve upon it by introducing simple color mixing to get seven colors, while pausing for a little longer on white for effect. This will give us an opportunity to introduce working with variables and demonstrate some basic operations, as well.
Hooking It Up
This project uses the very same hardware from the last chapter, as shown in Figures 3-1 and 3-2, which only make a repeat appearance here for convenience sake.

Figure 3-1. 7-Color Blink schematic
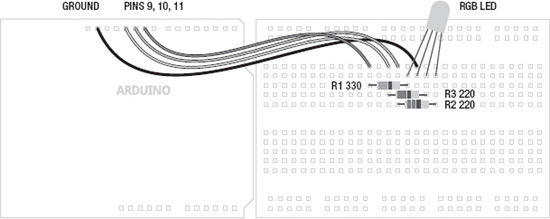
Figure 3-2. 7-Color Blink illustration
Uploading the Source Code
The source code for this project in Listing 3-1 should look vaguely similar to our first project’s code. It is a little longer now to create a sequence that will result in seven individual colors. We’ve also replaced the numbers 9, 10, and 11 with the variable names red, green, and blue, and added variables for the timing of the sketch. This will help us to read the code better and understand what exactly is going on.
const int red = 9;

const int green = 10;

const int blue = 11;


int time = 1000;

int multiple = 2;


void setup() {

  pinMode(red, OUTPUT);

  pinMode(green, OUTPUT);

  pinMode(blue, OUTPUT);

}


void loop() {

  digitalWrite(red, HIGH);     // red

  delay(time);

  digitalWrite(green, HIGH);   // yellow

  delay(time);

  digitalWrite(red, LOW);      // green

  delay(time);

  digitalWrite(blue, HIGH);    // cyan

  delay(time);

  digitalWrite(green, LOW);    // blue

  delay(time);

  digitalWrite(red, HIGH);     // magenta

  delay(time);

  digitalWrite(green, HIGH);   // white

  delay(time*=multiple);

  digitalWrite(blue, LOW);     // reset

  digitalWrite(green, LOW);

  time/=multiple;

}
Source Code Summary
To kick things off, we start our sketch with a block of code that defines each of the variables that will be used in our code. In this way we will know, for example, that the red LED is connected to pin 9 and the time delay between colors is 1000 milliseconds, or 1 second. If we wanted to change any of these values, to set different pin numbers for the RGB LED or to increase or decrease the delay time, we would only have to change the value in one single location, speeding up changes to the sketch and making it that much easier to understand. This will become more important later on when our sketches begin to do more interesting things with our variables, but for now let’s look at the following first line of code in more detail:
const int red = 9;
This line declares that the first variable is named red; identifies the variable’s data type as an integer, or int; and then tells the compiler that this variable should stay constant using the const modifier. Finally, this one line of code will also assign the numerical value 9 to the variable named red. In this way, the keywords red, green, blue are all variable names that we made up to identify the pin that each color of the RGB LED is connected to, while time is a variable to store the time period that each color stays on for, and multiple will be used to delay for a longer period on white just to give it a little emphasis.
Later in the sketch, we substitute the numbers that might be found inside the various statements with the variable names that we set up earlier so that every time that name is called, the compiler knows to look up the appropriate value. By using variables in our code, the following two lines will be functionally equivalent:
pinMode(red, OUTPUT);


pinMode(9, OUTPUT);
The rest of the code is just a slightly longer version of our last project sketch. In addition to red, green, and blue, you should now see yellow, cyan, magenta, and even white. Pretty nifty, huh? In addition to turning on and off each color of LED, we turn on two colors at the same time to make the intermediary colors, and all three colors to make white. Inside the loop() function, we begin with red, then add green to make yellow, turn off red to make green, add blue to make cyan, turn off green to make blue, turn on red to make magenta, and then turn on green to make white. At this point, we perform a compound operation to multiply the time delay with another variable called multiple to create a longer delay on the white color. We then reset our colors by turning off blue and green, leaving only red, perform another operation on the time delay to return it back to its original value, and then we start the loop all over again.
Now that we have seen variables in action, let’s look at them in much greater depth to find out how we can put them to work for us.