
Timing Functions
Because the Arduino's microcontroller can move fairly quickly, at least relative to what we can perceive, it is often necessary to make use of various delays to slow things down. We have already briefly mentioned some of the functions and techniques used for slowing things down, but this section will go into them in greater detail and provide some examples of why you might look at other methods for creating a delay beyond the standard Arduino functions.
delay()
From the very beginning with our first Blink sketch, we have made use of the delay() function to create a short pause in the middle of a program. There's really not a whole lot to the function, but there are some things we need to be aware of. The syntax for the function follows.
delay(time)
Time is specified in milliseconds, where a delay of 1000 milliseconds equals 1 second, 2000 milliseconds equals 2 seconds, and so on. This value can be expressed as a constant or variable in the unsigned long data type. Yes, that means as an unsigned long, it is theoretically possible to express a delay of 4,294,967,295 milliseconds, or roughly seven weeks long. In the interest of full disclosure, I have not personally verified this.
The delay time period needs to be expressed in a positive or unsigned value, or the delay() function will freak out and do things you would not expect, like rolling over a negative number to a really large positive number—and then you find yourself waiting seven weeks to find out. Likewise, you might, possibly through an arithmetic operation, specify a time delay that is equal to the expression 60 * 1000 in an attempt to create a delay that is 1 minute long. Because both of these values are expressed as signed integer constants, the result of 60 * 1000 is not 60,000 as you might expect, but rather something like -5, 536. This is a little glitch in how these values are processed—because both are signed integers, the result is also expressed as a signed integer.
Since now is as good of a time as any, let's look at how to fix this problem by forcing a specific data type using an integer formatter to get a result more compatible with our function. Table 7-1 provides several integer formatters that pertain to this discussion.
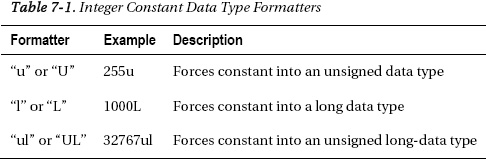
Given our example of wanting to create a hypothetical delay of 60 seconds, or 1 minute, through the expression 60 * 1000, we would need to force one of these constants into a long data type to keep the value in the positive range by tacking on the L formatter, as in: 60 * 1000L. Because one of the values in this expression is now of the larger, long-data type, results from this expression will remain in the long data type, giving us the value of 60,000 that we were looking for.
Now that we are somewhat aware of problems with excessive delays created by the wrong data types, we can move on to using counter variables in place of integer constants to create a changing delay period. Take the following code sample:
for (int i=250; i>0; i-=5) {

  digitalWrite(13, HIGH);

  delay(i);

  digitalWrite(13, LOW);

  delay(i);

}
for (int i=0; i<250; i+=5) {

  digitalWrite(13, HIGH);

  delay(i);

  digitalWrite(13, LOW);

  delay(i);

}
This sample code uses multiple for loops to vary the speed at which the LED on pin 13 blinks. Beginning with a quarter second on and a quarter second off, the first for loop will decrement the counter variable i until it hits 0. Using this variable in our delay() function, we can speed up and slow down how quickly the LED blinks.
delayMicroseconds()
Rather than a long delay, we can use the delayMicroseconds() function to delay for a much shorter time like we did in Chapter 5. As with delay(), there is not much to its syntax, as follows:
delayMicroseconds(time)
Unlike delay(), time here is specified in microseconds, or millionths of a second, where a time period of 1000 microseconds would equal 1 millisecond or 0.001 of a second, 10,000 would equal 10 milliseconds or 0.01 of a second, and so on. While the value for time is specified as a long integer, it is only known to work up to a maximum delay value of 16,383. Likewise, delays below 3 microseconds don't work reliably either. Instead, use the delay() function for reliable operation for anything over a few thousand microseconds.
Like we did in the Noisy Cricket project to create a different tone, it is possible to use delayMicroseconds() to create a low-tech PWM for pins without PWM available to them. Take the following sample code:
digitalWrite(13, HIGH);

delayMicroseconds(100);

digitalWrite(13, LOW);

delayMicroseconds(900);
By turning on and off the pin very quickly it is possible to simulate a dim LED, just as we did with PWM except that this time it is on pin 13. In this sample code, in the time span of 1 millisecond, we turn on the LED for 100 microseconds and off for 900 microseconds for a 10% duty cycle resulting in a fairly dim LED.
So that's two simple methods for creating a delay using the built-in Arduino functions; however, the problem with delay functions in the Arduino library is that nothing else can run while the delay is in effect. Imagine a while loop that cycles through for as many milliseconds as we specify and does nothing else other than check the current time until the delay time has passed. Of course, that's not entirely true as some hardware-based functions will still function normally including PWM, hardware serial, and hardware interrupts. Regardless, there is no reason for the Arduino just sitting there doing nothing when we can use it for other things. To create a delay without a delay function we can use something called a hardware timer.
millis()
Inside the microcontroller on the Arduino board there are three on-board hardware timers that work in the background to handle repetitive tasks like incrementing counters or keeping track of program operations. Each of these timers is already being used in one capacity or another, usually for handling hardware PWM and system timing. The millis() function makes use of one of these hardware timers to keep a running counter of how many milliseconds the microcontroller has been running since the last time it was turned on or reset. Because this function uses a hardware timer, it does its counting in the background with no impact on the flow or resources of our source code. The millis() function should look familiar from Chapter 5, where we used it to count button presses.
There is no additional syntax or parameters for the millis() function. By calling the function, it returns a value in milliseconds that can be used like any other variable as part of a conditional test, to perform arithmetic operations on, or assigned to other variables. Because this function returns a value in an unsigned long data type, it will overflow, or reset to 0, in about 50 days. It can also create strange problems if an expression is performed on it using other data types like integers. To make use of the millis() function, we might write a line of code like the following:
unsigned long startTime = millis();
In this example, we declared a variable called startTime as an unsigned long data type and assigned the current value of millis() to this variable. This way we can keep track of the starting time of some statements or event that might need to be compared to later. Because the delay() function stops all other code from running for the entire time period of the delay, we can keep track of time using millis() to avoid using the delay() function. In way of example, Listing 7-1 provides an alternative blink example that uses millis() instead of the conventional delay().
Listing 7-1. Blink Without delay()
const int ledPin = 13;


int state = LOW;


unsigned long startTime = 0;

unsigned long interval = 500;


void setup() {

  pinMode(13, OUTPUT);

}


void loop() {

  if (startTime + interval < millis()) {

  state = !state;

  digitalWrite(ledPin, state);

  startTime = millis();

  }

}
This example code can be combined with other things—like reading switches or sensors, or turning on motors or other actuators, or creating a pattern of LED flashes all operating at different intervals— and because it does not use a delay() function, everything else in the sketch will continue to work. In our example, it does this by keeping track of the amount of time that the Arduino interface board has been on and compares this to an interval. If the interval has passed, then it will toggle the state of the LED and write that state to the LED pin—alternating between HIGH and LOW each time through the compound statement. Let's take a look at the following few lines of the code:
This declares our counter and interval numbers in the unsigned long data type to avoid any weirdness with performing arithmetic or comparison operations using the millis() function.
if (startTime + interval < millis()) {
This line starts our counter by adding our interval to the start time and checking to see if this value has been exceeded by the time recorded by the millis() function. If millis() is the larger number, then the allotted time has passed and we should execute the enclosed statements. If the interval hasn't passed then we will skip this block of code and continue on to the rest of the sketch, which for this example is empty.
state = !state;

digitalWrite(ledPin, state);

startTime = millis();
Inside the if statement, these three lines begin by toggling the state of the LED so that if it starts as LOW it will now be HIGH and vice versa. The second line outputs whatever state we are on currently to the LED pin. Then we end the block of code by starting our timer over again, assigning the current time to our new start time.
By having multiple intervals and multiple start times we could theoretically have multiple or even staggered “delays” happening simultaneously with no real impact to any of them. As neat as this is, this technique is not necessarily a better delay() because there will be times when disabling inputs or otherwise stopping the normal program flow is necessary, or if the added complexity is simply not worth it. Debouncing a switch in code, as shown earlier, is one good example where it is necessary to stop reading the inputs for a very brief time just to make sure the signal received was the intended signal.
micros()
Where the millis() function returns the current operating time in milliseconds, the micros() function does the same, but in microseconds. This could be used in exactly the same manner as millis(), just on a much smaller scale, effectively returning the value 1000 for every 1 that millis() would return.
Unlike millis(), micros() will overflow, or reset back to 0, every 70 minutes or so. It also only has a resolution of 4 microseconds on the Arduino Uno, meaning that every value returned by the micros() function will be a multiple of 4.