3
Selectors
WHAT YOU WILL LEARN IN THIS CHAPTER:
- How to use class and ID selectors
- How to use the universal selector
- How descendant selectors can be used
- The pseudo selectors used to style links
In this chapter, you learn about the different types of selectors that CSS supports. In Chapter 2, you learned about the type selector, which applies style sheet declarations by using the HTML element's name. Selectors in CSS have spotty support with regard to IE 6; therefore, almost of the examples at this stage are designed to work in all of the browsers you reviewed in Chapter 1. Don't worry! Advanced selectors are discussed in Chapter 14 for those brave enough, or lucky enough, not to have to support IE 6.
We have already seen the type selector in use, that is a selector that references a type of HTML element, so let's continue our discussion of selectors with the most common and widely supported ones: class and ID.
CLASS AND ID SELECTORS
Class and ID selectors are the most widely supported. In fact, they are as widely supported as the type selector introduced in Chapter 2. There are two types of selectors. The class selector, which references the class attribute used on HTML elements, is the more generic of the two, meaning it may encompass many elements in a given document, even elements of different types or purposes. On the other hand, you can use the id attribute on only one element in an HTML document, so we use it in CSS to reference an element that is unique per page. Besides using it in CSS, you can also use an element's class or ID to access it via a scripting language such as JavaScript. You can also link to the location of the element with an ID name using fragment identifiers. Anchors are appended to URLs to force a browser to go to a specific place in a document. You can think of the id attribute as an element's address inside a document: No two addresses can be the same.
CLASS SELECTORS
The following code shows an example of a class name selector.
<style type“=text/css”>
    .planet {
        margin: 10px 0;
        padding: 20px 20px 20px 200px;
        border: 1px solid #FFF;
        background-position: 20px 20px;
        background-repeat: no-repeat;
    }
</style>

<div class=“planet jupiter”>
    <h2>Jupiter</h2>
</div>
The class name selector begins with a dot, followed by the class name itself, which you choose. In the preceding code, the class name selector is .planet. The class name should be comprised of letters, numbers, and hyphens only, to provide the best compatibility with older browsers. Class names must start with a letter and cannot include spaces.
The dot appearing before the class name in the CSS rule tells CSS that you are referencing a class selector. The dot does not need to appear in the class attribute value itself; in fact, it cannot, because the value of the class attribute is just the class name itself.
When used in this context, the type of element doesn't matter — in other words, you can also apply the class to other elements. What if you wanted to give both a <div> and an <img> element the same class name and have a style sheet rule that applies to <div> elements but not <img> elements? You can do that, too. Limiting a class selector to a type of element is demonstrated in the following code.
div.planet {
    margin: 10px 0;
    padding: 20px 20px 20px 200px;
    border: 1px solid #FFF;
    background-position: 20px 20px;
    background-repeat: no-repeat;
}
This code shows the combination of two types of selectors that you are already familiar with, the type selector you learned about in Chapter 2, and the class selector. When you append a type selector to a class selector, you limit the scope of the style sheet rule to only that type of element. In this example, the rule is limited so that it only applies to <div> elements and no other type of element. You can still create additional rules that reference other elements, such as a new rule that only applies to <img> elements with a class name of planet, such as img.planet, but the rule that you see in the preceding applies exclusively to <div> elements with a class name of planet.
![]() NOTE There must not be a space between the element name and the class selector. Including a space gives us a different type of selector, called a descendant selector, which we will look at later in this chapter.
NOTE There must not be a space between the element name and the class selector. Including a space gives us a different type of selector, called a descendant selector, which we will look at later in this chapter.
As you have seen, elements can also be assigned more than one class name, for example, class=“planet jupiter”. The value of this class attribute actually contains two class names: planet and jupiter. Each class name in the attribute is separated by a space. In the corresponding style sheet, the two classes may be referenced by two separate rules, as illustrated in the following code.
.planet {
    margin : 10px 0;
    padding : 20px 20px 20px 200px;
    border : 1px solid #FFF;
    background-position: 20px 20px;
    background-repeat: no-repeat;
}

.jupiter {
    background-image: url(jupiter.jpg);
}
The two style sheet rules in this code result in the <div> element, with both planet and jupiter class names receiving the declarations of both rules.
If you're thinking to yourself that jupiter looks like a good candidate to be an ID — there is only one Jupiter, but many planets — you're right. We'll revisit this in a few minutes when we look at ID selectors.
![]() NOTE It is considered best practice to use “semantic” class names in HTML and CSS — that is, class names that describe the function of an element, not its appearance. In the preceding example we could have used a class of border-1px-solid-white as follows:
NOTE It is considered best practice to use “semantic” class names in HTML and CSS — that is, class names that describe the function of an element, not its appearance. In the preceding example we could have used a class of border-1px-solid-white as follows:
.border-1px-solid-white {
    border : 1px solid #FFF;
}
and it would be perfectly valid. However if we wanted to change the border to a different color we would either have to change our HTML to use a different class name, border-1px-solid-yellow perhaps, or have class names that don't match the result of applying the style.
By using a class name like planet we describe what we want planet type elements to look like without tying ourselves to overly descriptive names that may later become out of date or plain wrong.
You should apply the same principle to IDs — describe an elements function, not it's appearance.
The class names may also be chained together in the style sheet, as shown here:
.planet.jupiter {
    background-image: url(jupiter.jpg);
}
The preceding rule applies only to elements that reference both class names in their class attribute.
Unfortunately, IE 6 interprets chained class names per the CSS 1 specification, which did not allow chained class names in the style sheet. In IE 6, only the last class name in the chain is recognized. In the preceding example, IE 6 would interpret the .planet.jupiter selector as .jupiter only.
While this has been fixed in later versions of IE it makes the use of chained classes unreliable if you must support IE6, so while it is a powerful technique it is best avoided by beginners. The consequence is that all elements with a class of jupiter will be affected by .planet.jupiter even those that do not also have a class of planet.
Whereas classes are meant to reference more than one element, IDs are meant to reference only one element in a document.
ID Selectors
ID selectors are unique identifiers; an ID is meant to be unique, defined once per document. Like the class selectors discussed in the previous section, a special character precedes ID selectors in a style sheet. To reference an ID, you precede the ID name with a hash mark (or pound sign, #). Like class names, this name cannot contain spaces and must start with a letter. You should use names that only include letters, numbers, hyphens and undersores for compatibility with the older browsers. You see how this is done in the following code.
<style type=“text/css”>
    #jupiter {
        background-image: url(jupiter.jpg);
    }
</style>

<div class=“planet” id=“jupiter”>
    <h2>Jupiter</h2>
</div>
Since there's only one Jupiter in the solar system, Jupiter lends itself as a good example of the concept of an ID selector. Just as there is only one Jupiter in the solar system, the ID name jupiter can be used only once in a document, on one element.
Browsers are forgiving of multiple ID names per document as far as style sheets are concerned. However, using an ID name more than once in a document can cause conflicts with other applications of unique ID names. For example, ID names can be used to link to a location within a document (as HTML anchors), or when referencing an element by ID name from JavaScript. When you have an ID name appearing more than once in the HTML document, on more than one element, the browser won't know which one you're linking to, or which one you want to refer to from JavaScript, and will generally select only the first element with the ID. Always use the ID name for its intended purpose, just once per document.
An ID name must be unique in so far as other ID names are concerned, but it may be repeated as a class name, should you want to do so. It's generally best to avoid this though as it's easy to get confused and use the wrong kind of selector, resulting in styling the wrong element(s).
Although only one element in a HTML document may have an ID of jupiter, the CSS may contain as many references to an ID as are necessary. The uniqueness rule only applies to naming the elements, not the references to them.
Now that you've had a proper introduction to the different types of things that ID and class name selectors are capable of, try the following proof-of-concept exercise that lets you see how ID and class selectors work.
TRY IT OUT Class and ID Selectors
To see how class and ID selectors work, follow these steps.
- Enter the following markup into your text editor:
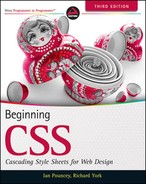
<!DOCTYPE html PUBLIC “-//W3C//DTD HTML 4.01//EN” “http://www.w3.org/TR/html4/strict.dtd”> <html lang=“en”> <head> <meta http-equiv=“Content-Type” content=“text/html; charset=utf-8”> <title>Example 3-1</title> <style type=“text/css”> body { width : 650px; margin : 0 auto; background : #000; color : #FFF; font : 12px sans-serif; } h1 { font-size : 24px; } h2 { font-size : 18px; margin-top : 0; } a { color : #FFF; } a:focus, a:hover { text-decoration : none; } table { margin-bottom : 10px; border-spacing : 0; } caption { margin-bottom : 10px; font-size : 14px; font-weight : bold; text-align : left; } th, td { padding : 0 10px 0 0; text-align : left; } div.planet { margin : 10px 0; padding : 20px 20px 20px 200px; border : 1px solid #FFF; background-position : 20px 20px; background-repeat : no-repeat; } #jupiter { background-image : url(jupiter.jpg); } #saturn { background-image : url(saturn.jpg); } #uranus { background-image : url(uranus.jpg); } #neptune { background-image : url(neptune.jpg); } </style> </head> <body> <h1>The gas giants</h1> <div class=“planet” id=“jupiter”> <h2>Jupiter</h2> <p>Jupiter is the fifth planet from the Sun and the largest planet within the Solar System. The Romans named the planet after the god Jupiter. It is a gas giant with a mass two and a half times the mass of all the other planets in our Solar System combined.</p> <table> <caption>Jupiter Facts</caption> <tbody> <tr> <th>Distance from the Sun</th> <td>78,412,020 km</td> </tr> <tr> <th>Equatorial Radius</th> <td>71,492 km</td> </tr> <tr> <th>Volume</th> <td>1,425,500,000,000,000 km<sup>3</sup></td> </tr> <tr> <th>Mass</th> <td>1,898,700,000,000,000,000,000,000,000 kg</td> </tr> </tbody> </table> <a href=“http://solarsystem.jpl.nasa.gov/planets/profile.cfm?Object=Jupiter”> More Jupiter facts</a> </div> <div class=“planet” id=“saturn”> <h2>Saturn</h2> <p>Saturn is the sixth planet from the Sun and the second largest planet in the Solar System, after Jupiter. Saturn is named after the Roman god Saturn, equated to the Greek Cronus (the Titan father of Zeus), the Babylonian Ninurta, and the Hindu Shani.</p> <table> <caption>Saturn Facts</caption> <tbody> <tr> <th>Distance from the Sun</th> <td>1,426,725,400 km</td> </tr> <tr> <th>Equatorial Radius</th> <td>60,268 km</td> </tr> <tr> <th>Volume</th> <td>827,130,000,000,000 km<sup>3</sup></td> </tr> <tr> <th>Mass</th> <td>568,510,000,000,000,000,000,000,000 kg</td> </tr> </tbody> </table> <a href=“http://solarsystem.jpl.nasa.gov/planets/profile.cfm?Object=Saturn”> More Saturn facts</a> </div> <div class=“planet” id=“uranus”> <h2>Uranus</h2> <p>Uranus is the seventh planet from the Sun, and the third-largest and fourth most massive planet in the Solar System. It is named after the ancient Greek deity of the sky Uranus the father of Cronus and grandfather of Zeus.</p> <table> <caption>Uranus Facts</caption> <tbody> <tr> <th>Distance from the Sun</th> <td>78,412,020 km</td> </tr> <tr> <th>Equatorial Radius</th> <td>25,559 km</td> </tr> <tr> <th>Volume</th> <td>69,142,000,000,000 km<sup>3</sup></td> </tr> <tr> <th>Mass</th> <td>86,849,000,000,000,000,000,000,000 kg</td> </tr> </tbody> </table> <a href=“http://solarsystem.jpl.nasa.gov/planets/profile.cfm?Object=Uranus”> More Uranus facts</a> </div> <div class=“planet” id=“neptune”> <h2>Neptune</h2> <p>Neptune is the eighth and farthest planet from the Sun in our Solar System. Named for the Roman god of the sea, it is the fourth-largest planet by diameter and the third-largest by mass.</p> <table> <caption>Neptune Facts</caption> <tbody> <tr> <th>Distance from the Sun</th> <td>4,498,252,900 km</td> </tr> <tr> <th>Equatorial Radius</th> <td>24,764 km</td> </tr> <tr> <th>Volume</th> <td>62,526,000,000,000 km<sup>3</sup></td> </tr> <tr> <th>Mass</th> <td>102,440,000,000,000,000,000,000,000 kg</td> </tr> </tbody> </table> <a href=“http://solarsystem.jpl.nasa.gov/planets/profile.cfm?Object=Neptune”> More Neptune facts</a> </div> </body> </html> - Save the preceding document as example_3-1.html. Figure 3-1 shows what Example 3-1 looks like when rendered in Safari. You should see something similar in Firefox, IE, Chrome and Opera.
In Example 3-1, you put your newly acquired class and ID selector skills to use by rewriting our example site from Chapter 1 to make use of ID selectors and class selectors qualified by a type selector.
Now that you have worked through this simple, proof-of-concept demonstration of class and ID selectors for yourself, continue to the next section, which discusses the universal, or wildcard selector.
THE UNIVERSAL SELECTOR
The universal selector is an asterisk. When used alone, the universal selector tells the CSS interpreter to apply the CSS rule to all elements in the document. The following code shows what a universal selector looks like.
* {
    font-family: Arial, Helvetica,sans-serif;
}
This rule is applied to all elements contained in the document. The universal selector applies to everything, including form input fields and tables of data. It applies style to any and every element present in a document. In this case all elements would have font-family: Arial, Helvetica,sans-serif; applied to them.
You probably won't use the universal selector very often because, as you will see later in this book, there are better ways of applying styles to the whole document.
DESCENDANT SELECTORS
In CSS, descendant means an element that is a child, grandchild, great grandchild, and so on, of another element. Descendant selectors apply style based on whether one element contains another. Take, for example, the following code.
<div class=“planet” id=“jupiter”>

    <h2>Jupiter</h2>

    <p>Jupiter is the fifth planet from the Sun and the largest planet within the
    Solar System. The Romans named the planet after the god Jupiter. It is a gas
    giant with a mass two and a half times the mass of all the other planets in
    our Solar System combined.</p>

    <table>
        <caption>Jupiter Facts</caption>
        <tbody>
            <tr>
                <th>Distance from the Sun</th>

                <td>78,412,020 km</td>
            </tr>
            <tr>
                <th>Equatorial Radius</th>
                <td>71,492 km</td>
            </tr>
            <tr>
                <th>Volume</th>
                <td>1,425,500,000,000,000 km<sup>3</sup></td>
            </tr>
            <tr>
                <th>Mass</th>
                <td>1,898,700,000,000,000,000,000,000,000 kg</td>
            </tr>
        </tbody>
    </table>

    <a href=“http://solarsystem.jpl.nasa.gov/planets/profile.cfm?Object=Jupiter”>
    More Jupiter facts</a>

</div>
In this example the <h2>, <p>, <a> and <table> elements are child elements of the <div>; <caption> and <tbody> are child elements of the <table> but also descendants of <div> (in this case, grandchildren). The reverse is also true, <h2>, <p>, <a>, <table> and all the elements within the table have <div> as a common ancestor.
To target an element based on its ancestor we write the CSS that you see in the following code.
div.planet h2 {
    font-size : 18px;
    margin-top : 0;
}
Descendant selectors are used to select an element based on its context within the document. In the preceding code, you select a <h2> element but only if the <h2> element is a descendant of the <div> element with a class of planet.
Descendant selectors aren't limited to just two elements; you can include more elements in the ancestral lineage, if it suits your needs. Each selector in a descendant selector chain must be separated by a space. This is demonstrated in the following code.
div.planet table td {
    padding : 0 10px 0 0;
    text-align : left;
}
In fact, the entire lineage from the eldest ancestor, the <html> element, down through the generations to the element you want to select, can be included in a descendant selector chain.
In the next section, I present another type of selector, pseudo-class selectors.
PSEUDO-CLASSES
Pseudo-classes are used to represent dynamic events, a change in state, or a more general condition present in the document that is not easily accomplished through other means. This may be the user's mouse rolling over or clicking on an element. In more general terms, pseudo-classes style a specific state present in the target element, for example, a previously visited hyperlink. Pseudo-classes allow the author the freedom to dictate how the element should appear under different conditions. There are many more pseudo-classes than are listed here. I will cover more, such as the nth-child pseudo class which allows you to select an element based on its position within a document, later in the book.
Unlike normal classes, pseudo-classes have a single colon before the pseudo-class property.
Dynamic Pseudo-Classes
The following are considered dynamic pseudo-classes. They are a classification of elements only present after certain user actions have or have not occurred:
- :link: Signifies unvisited hyperlinks
- :visited: Indicates visited hyperlinks
- :hover: Signifies an element that currently has the user's mouse pointer hovering over it
- :focus: Signifies an element that currently has focus, for example if the user has used their keyboard to navigate to a link
- :active: Signifies an element on which the user is currently clicking
If you want to apply styles to an anchor regardless of its state you can, of course, still use the good old type selector without a pseudo class.
The first two dynamic pseudo-classes that I discuss are :link and :visited.
:link and :visited
The :link pseudo-class refers to an unvisited hyperlink, whereas :visited, of course, refers to visited hyperlinks. These two pseudo-classes are used to separate styles based on user actions. An unvisited hyperlink may be blue, whereas a visited hyperlink may be purple. Those are the default styles your browser applies. Using dynamic pseudo-classes it is possible to customize those styles.
In the following code, unvisited links are styled with the :link dynamic pseudo-class. They receive meduimblue text. Visited links, on the other hand, have magenta text.
There is one exception to this, however. Webkit browsers will apply :link pseudo class styles to all links, not just unvisited ones. Therefore it is a good idea to define the same properties in :link and :visited rules so that the correct styles are applied.
![]() NOTE For obvious reasons, the :link and :visited pseudo-classes apply only to <a> elements.
NOTE For obvious reasons, the :link and :visited pseudo-classes apply only to <a> elements.
The order in which dynamic pseudo-classes appear in the style sheet is important and has to do with the cascade, which I discuss in Chapter 4. If the :link pseudo-class is defined after the :focus pseudo-class in the style sheet, the :link pseudo-class takes precedence: The declarations with the :link pseudo-class override those defined for the :focus pseudo-class. As you see in Chapter 4, this has to do with how specific the selector is; in this example, the specificity is the same.
![]() WARNING A mnemonic device used to remember the order in which dynamic pseudo-classes (as applied to links) must appear in style sheets is LoVe HAte, or :link, :visited, :hover ,and :active. :focus does not fit in this mnemonic, but as you will see you should always include a :focus style alongside :hover styles.
WARNING A mnemonic device used to remember the order in which dynamic pseudo-classes (as applied to links) must appear in style sheets is LoVe HAte, or :link, :visited, :hover ,and :active. :focus does not fit in this mnemonic, but as you will see you should always include a :focus style alongside :hover styles.
:hover and :focus
The :hover pseudo-class refers to an element over which the user's mouse pointer is currently hovering. While the user's mouse pointer is over the element, the specified style is applied; when the user's mouse pointer leaves the element, it returns to the previously specified style. The :focus pseudo-class behaves in the same way, but for keyboard focus. To provide the same experience to keyboard and mouse users, it is good practice to include them both and is common for them to receive the same style.
The :hover and :focus pseudo-classes are applied in the same way that the :link and :visited pseudo-classes are applied. I like to put :focus first as it stops me forgetting it. An example appears in the following code.
When the user either hovers over the <a> element with their mouse or uses the keyboard to navigate to it, this code causes the text within the <a> element to be underlined.
a{
    text-decoration : none;
}

a:focus,
a:hover {
    text-decoration : underline;
}
![]() NOTE In IE 6, the :hover pseudo-class applies only to hyperlinks (which is incorrect under the CSS 2 specification), whereas other browsers recognize the :hover pseudo-class on any rendered element, per the CSS 2 specification. This problem is fixed in IE 7 and later.
NOTE In IE 6, the :hover pseudo-class applies only to hyperlinks (which is incorrect under the CSS 2 specification), whereas other browsers recognize the :hover pseudo-class on any rendered element, per the CSS 2 specification. This problem is fixed in IE 7 and later.
:active
The :active pseudo-class refers to an element that the user is currently clicking and holding down the mouse button on. The specified style remains in place while the user holds down the mouse button, and the element does not return to its original state until the user releases the mouse button.
The following code shows the :active pseudo-class in use. When the user clicks an <a> element, while the mouse button is held down, and before it is released, the element is said to be active, in which case the styles in the :active pseudo-class rule are applied.
![]() NOTE In IE 6 and IE 7, :active applies only to hyperlinks; whereas, other browsers allow it to be applied to any element.
NOTE In IE 6 and IE 7, :active applies only to hyperlinks; whereas, other browsers allow it to be applied to any element.
a:active {
    color : red;
}
Now that you have been introduced to dynamic pseudo-class selectors, you can try them out for yourself in the following example.
TRY IT OUT Dynamic Pseudo-Class Selectors
To try out dynamic pseudo-class selectors, follow these steps.
- Enter the following markup into your text editor:
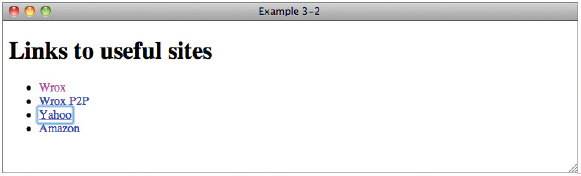
<!DOCTYPE html PUBLIC “-//W3C//DTD HTML 4.01//EN” “http://www.w3.org/TR/html4/strict.dtd”> <html lang=“en”> <head> <meta http-equiv=“Content-Type” content=“text/html; charset=utf-8”> <title>Example 3-2</title> <style type=“text/css”> a:link { text-decoration : none; color : meduimblue; } a:visited { color : magenta; } a:focus, a:hover { text-decoration : underline; } a:active { color : red; } </style> </head> <body> <h1>Links to useful sites</h1> <ul> <li><a href=“http://www.wrox.com/”>Wrox</a></li> <li><a href=“http://p2p.wrox.com/”>Wrox P2P</a></li> <li><a href=“http://www.yahoo.com/”>Yahoo</a></li> <li><a href=“http://www.amazon.com/”>Amazon</a></li> </ul> </body> </html> - Save the preceding markup as example_3-2.html. You should see output in your browser like that in Figure 3-2.
How It Works
In Example 3-2, you tried out the dynamic pseudo-classes for yourself. There were four dynamic pseudo-classes in use.
The first dynamic pseudo-class that you used styles unvisited links. Unvisited links receive the color meduimblue and have the underline removed.
a:link {
    text-decoration : none;
    color : meduimblue;
}
The second dynamic pseudo-class that you used styles visited links. Visited links receive the color magenta.
a:visited {
    color : magenta;
}
The third selector that you used, the :hover and :focus dynamic pseudo-classes, applies styles when the user's mouse cursor hovers over a link or when the link has keyboard focus. When a user's mouse cursor comes over a link or has the link has keyboard focus, the link is underlined.
a:focus,
a:hover {
    text-decoration : underline;
}
Last, you used the :active dynamic pseudo-class, which applies style when the user clicks and holds down the mouse button on a link. When the user clicks and holds down the mouse button, the link is red.
a:active {
    color : red;
}
EXERCISES
- How would you apply a style to an element based on its class?
- How many class names can one element have?
- How would you apply a style to an element based on its ID?
- How would you apply a style to an element based on its class and type?
- If you wanted to style a link a different color when the user's mouse hovers over it, what might the selector look like?
![]() WHAT YOU LEARNED IN THIS CHAPTER
WHAT YOU LEARNED IN THIS CHAPTER
In this chapter, you learned about the basic selectors in CSS. To recap, you learned the following:
| TOPIC | KEY CONCEPTS |
| Types of selector | Class, ID, Universal and Pseudo-classes can be used to target different elements in HTML. |
| Class Selectors | Classes can be applied to as many elements as you want, and CSS can be used to target them. |
| ID Selectors | An ID can only be applied to one element in a document, and can be combined with classes. |
| Descendant Selectors | Descendant selectors can be used to target elements based on the ancestors, for example a <h2> inside a <div> with a class of planet. |
| Pseudo-Classes | Pseudo-classes can be used to style elements based on user interaction, for example a link that has been visited. |