17
Controlling Opacity and Visibility
WHAT YOU WILL LEARN IN THIS CHAPTER:
- How to modify the opacity of an element
- How to set the visibility of an element
The last CSS I will teach you is how to change the opacity of an element, that is how transparent an element is, and also how to set the visibility of an element, allowing you to hide it from view.
THE OPACITY PROPERTY
First, you'll look at the opacity property; it has a very simple syntax, as you can see from the following table.
| PROPERTY | VALUE |
| opacity | <number> Initial value: 1 |
An opacity value of 1 indicates that an element is fully opaque. An opacity value of 0 on the other hand makes the element completely invisible. You can specify opacity to two decimal places.
![]() NOTE All major browsers, except IE 6, 7, and 8, support the opacity property. There are proprietary methods of setting opacity in IE versions less than 9 that I won't cover here, but see Appendix B for links to more information.
NOTE All major browsers, except IE 6, 7, and 8, support the opacity property. There are proprietary methods of setting opacity in IE versions less than 9 that I won't cover here, but see Appendix B for links to more information.
You should make sure that transparency is an optional part of the visual design, so that users of modern browsers are rewarded with a prettier visual experience, but the site remains attractive and usable in older browsers.
TRY IT OUT Using the opacity Property
To demonstrate the use of the opacity property, follow these steps.
- Enter the following markup:
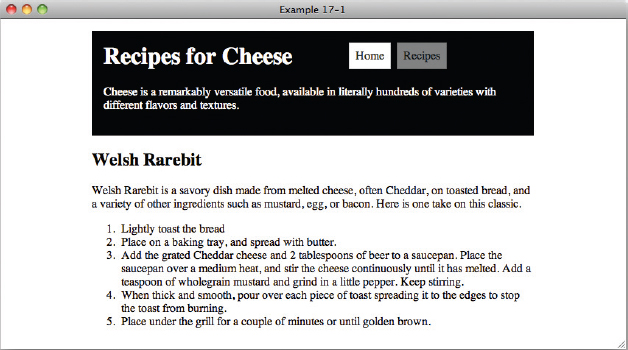
<!DOCTYPE html PUBLIC “-//W3C//DTD HTML 4.01//EN” “http://www.w3.org/TR/html4/strict.dtd”> <html lang=“en”> <head> <meta http-equiv=“Content-Type” content=“text/html; charset=utf-8”> <title>Example 17-1</title> <style type=“text/css”> body { width: 600px; margin: 1em auto; } h1 { float: left; margin-top: 0; } .header { background: #000; color: #FFF; padding: 1em; } .header .intro { clear: both; } .navigation { float: right; margin: 0; list-style: none; } .navigation li { float: left; } .navigation a { display: block; margin-left: 0.5em; padding: 0.5em; border: 1px solid #CCC; background: #FFF; color: #233; text-decoration: none; } li { opacity: 1; } li.current { opacity: 0.5; } li.last { opacity: 0; } </style> </head> <body> <div class=“header”> <h1>Recipes for Cheese</h1> <ul class=“navigation”> <li><a href=“#”>Home</a></li> <li class=“current”><a href=“#”>Recipes</a></li> <li class=“last”><a href=“#”>Suggestions</a></li> </ul> <p class=“intro”>Cheese is a remarkably versatile food, available in literally hundreds of varieties with different flavors and textures.</p> </div> <div class=“recipe”> <h2>Welsh Rarebit</h2> <p class=“intro”>Welsh Rarebit is a savory dish made from melted cheese, often Cheddar, on toasted bread, and a variety of other ingredients such as mustard, egg, or bacon. Here is one take on this classic.</p> <ol> <li>Lightly toast the bread</li> <li>Place on a baking tray, and spread with butter.</li> <li>Add the grated Cheddar cheese and 2 tablespoons of beer to a saucepan. Place the saucepan over a medium heat, and stir the cheese continuously until it has melted. Add a teaspoon of wholegrain mustard and grind in a little pepper. Keep stirring.</li> <li>When thick and smooth, pour over each piece of toast spreading it to the edges to stop the toast from burning.</li> <li>Place under the grill for a couple of minutes or until golden brown.</li> </ol> </div> </body> </html> - Save the preceding CSS and markup as example_17-1.html. This example results in the output in Figure 17-1 in Safari and other desktop browsers.
How It Works
In Example 17-1, I have added a black background to elements with the class of header and a white background to each of the opacity elements in the navigation. I have also added classes of current and last to the navigation li elements.
All li elements are styled as follows:
    li {
        opacity: 1;
    }
An opacity value of 1 is the default, and so in normal cicumstances you would specify this unless you needed to override an inherited opacity value. As you can see in Figure 17-1, the background to the first navigation link remains a solid white.
The second li element with a class of current is styled as follows:
        li.current {
            opacity: 0.5;
        }
An opacity value of 0.5 makes the li element 50% transparent. Figure 17-1 shows that the background to the link is now gray, as you would expect with a black background behind a semi-transparent white background.
The third li element with a class of last is styled as follows:
      li.last {
           opacity: 0;
     }
An opacity value of 0 makes the li element completely transparent; in Figure 17-1, the link has been made invisible.
Play around with the opacity values to see opacity levels between these three levels of transparency.
Example 17-1 shows that an opacity value of 0makes elements invisible, but there is a property that gives you much more control over the visibility of elements: the imaginatively named visibility property.
THE VISIBILITY PROPERTY
The visibility property has a very simple syntax, as you can see from the following table.
| PROPERTY | VALUE |
| visibility | visible | hidden Initial value: visible |
There isn't much that should surprise you here; the following code will make an element invisible:
visibility: hidden;
While this code will make an element visible:
visibility: visible
An element with a visibility value of hidden still remains in the normal document flow and takes up space; it is just not visible on screen and is ignored by most assistive technologies such as screen readers. Interactive elements such as links and buttons are no longer clickable or accessible by screen reader. Other than the space it takes up on the page, a hidden element is effectively not there.
To see this in action, and for the last time in this book, let's Try It Out.
TRY IT OUT Using the visibility Property
To demonstrate the use of the visibility property, follow these steps.
- Enter the following markup:
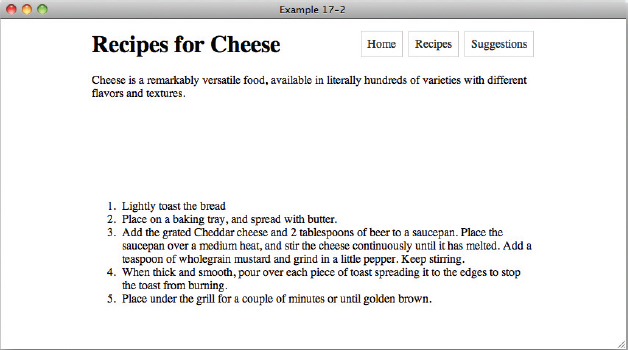
<!DOCTYPE html PUBLIC “-//W3C//DTD HTML 4.01//EN” “http://www.w3.org/TR/html4/strict.dtd”> <html lang=“en”> <head> <meta http-equiv=“Content-Type” content=“text/html; charset=utf-8”> <title>Example 17-2</title> <style type=“text/css”> body { width: 600px; margin: 1em auto; } h1 { float: left; margin-top: 0; } .header .intro { clear: both; } .navigation { float: right; margin: 0; list-style: none; } .navigation li { float: left; } .navigation a { display: block; margin-left: 0.5em; padding: 0.5em; border: 1px solid #CCC; background: #FFF; color: #233; text-decoration: none; } .recipe { visibility: hidden; border: 1px solid #000; } .recipe ol { visibility: visible; } </style> </head> <body> <div class=“header”> <h1>Recipes for Cheese</h1> <ul class=“navigation”> <li><a href=“#”>Home</a></li> <li><a href=“#”>Recipes</a></li> <li><a href=“#”>Suggestions</a></li> </ul> <p class=“intro”>Cheese is a remarkably versatile food, available in literally hundreds of varieties with different flavors and textures.</p> </div> <div class=“recipe”> <h2>Welsh Rarebit</h2> <p class=“intro”>Welsh Rarebit is a savory dish made from melted cheese, often Cheddar, on toasted bread, and a variety of other ingredients such as mustard, egg, or bacon. Here is one take on this classic.</p> <ol> <li>Lightly toast the bread</li> <li>Place on a baking tray, and spread with butter.</li> <li>Add the grated Cheddar cheese and 2 tablespoons of beer to a saucepan. Place the saucepan over a medium heat, and stir the cheese continuously until it has melted. Add a teaspoon of wholegrain mustard and grind in a little pepper. Keep stirring.</li> <li>When thick and smooth, pour over each piece of toast spreading it to the edges to stop the toast from burning.</li> <li>Place under the grill for a couple of minutes or until golden brown.</li> </ol> </div> </body> </html> - Save the preceding CSS and markup as example_17-2.html. This example results in the output in Figure 17-2 in Safari and other desktop browsers.
How It Works
In Example 17-2, I have applied a style of visibility: hidden; to elements with the class of recipe. This makes this element and its descendants invisible. As you (can't!) see in Figure 17-2, the h2 and p elements that are children of the div with the class of recipe are no longer displayed but still take up space in the layout.
The ol element that is also a child of the div with the class of recipe is visible, and that is because I have also applied the following rule:
        .recipe ol {
            visibility: visible;
        }
That's right; you can make elements inside invisible elements visible again!
In the next chapter, you look at styling content for mobile devices.
EXERCISES
- What range of values is valid for the opacity property?
- What value would you give the opacity property to make an element fully transparent, effectively making it invisible?
- What other property can you use to make an element invisible, and what value would you use?
![]() WHAT YOU LEARNED IN THIS CHAPTER
WHAT YOU LEARNED IN THIS CHAPTER
In this chapter, I showed you some of the challenges of writing CSS for mobile devices. You learned the following:
| TOPIC | KEY CONCEPTS |
| Opacity | The opacity property can be used with a range of values, from 0, which makes an element completely transparent; to 1, which makes an element fully opaque. |
| Visibility | The visibility of an element can be controlled with the font property. Invisible elements reserve space in a page. |