![]()
In this chapter, a high action, space shooter game will be built by using the same state machine built in Chapter 10. A few new game development techniques will be introduced as well, including object pooling, time-based animation, and pixel-perfect collision detection.
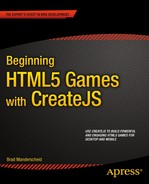
Space Hero is a space shooter game where the enemy ships fly down from the top of the screen and fires bullets at you, the hero. The hero ship also fires bullets, and it can maneuver around the screen using all direction keys on the keyboard. The features we want to accomplish in the development of Space Hero include the following:
- Use the asset management approach learned in Chapter 9.
- Use the same application class, and its corresponding state machine, that was built in Chapter 10.
- Use sounds for ship explosions and background music.
- Create three scenes: the main game menu, the game level, and a game over screen.
- Use the UI components built in Chapter 8.
- Create an object pool to store sprites for reuse in the game.
- Use a third party library to handle pixel-perfect collision detection for the bullets and ships.
- Use bitmap fonts for the scoreboard.
- Use the keyboard for controlling the ship’s movement and the firing of its bullets.
Figure 11-1 shows the game being played in its complete state.
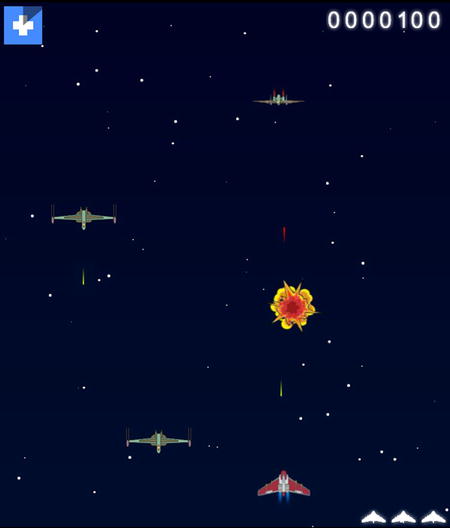
Figure 11-1. The completed Space Hero game
Before getting into the game code that drives the Space Hero game, let’s take a look at the files you will be using and reusing to build the application.
Several files and procedures need to be set up for the creation of this game project. This section will walk you through the necessary steps to prepare for the Space Hero game.
The HTML file used for this game will include several JavaScript files. It will also create an instance of the application and fire its init function, which will initialize the application. The index file will also be used to declare a handful of global variables for use throughout the application. Listing 11-1 shows the entire index.html file.
Listing 11-1. The index.html File for Space Hero
<!DOCTYPE html>
<html>
<head>
   <title>SPACE HERE</title>

   <!--CREATEJS-->
   <script src="js/lib/easeljs-0.7.1.min.js"></script>
   <script src="js/lib/soundjs-0.5.2.min.js"></script>
   <script src="js/lib/preloadjs-0.4.1.min.js"></script>
   <script src="js/lib/tweenjs-0.5.1.min.js"></script>
   <script src="js/lib/BitmapText.js"></script>

   <!--NDGMR-->
   <script src="js/lib/ndgmr.Collision.sprite.js"></script>

   <!--GAME CLASSES-->
   <script src="js/state.js"></script>
   <script src="js/utils/Utils.js"></script>

   <!--COMPONENTS-->
   <script src="js/classes/components/Preloader.js"></script>
   <script src="js/classes/components/SimpleButton.js"></script>

   <!--SCENES-->
   <script src="js/scenes/GameMenu.js"></script>
   <script src="js/scenes/Game.js"></script>
   <script src="js/scenes/GameOver.js"></script>

   <!--MANAGERS-->
   <script src="js/classes/managers/AssetManager.js"></script>
   <script src="js/classes/managers/SpritePool.js"></script>

   <!--SPRITES-->
   <script src="js/classes/sprites/Explosion.js"></script>
   <script src="js/classes/sprites/HealthMeter.js"></script>
   <script src="js/classes/sprites/LifeBox.js"></script>
   <script src="js/classes/sprites/Scoreboard.js"></script>
   <script src="js/classes/sprites/EnemyShip.js"></script>
   <script src="js/classes/sprites/HeroShip.js"></script>
   <script src="js/classes/sprites/Bullet.js"></script>

   <!--APPLICATION-->
   <script src="js/SpaceHero.js"></script>

</head>

<body onload="init();">
   <img src="img/bg.png" style="position: absolute">
   <canvas id="canvas" width="600" height="700" style="position:
      absolute"></canvas>
</body>

<script>
   var ARROW_KEY_SPACE = 32;
   var ARROW_KEY_UP = 38;
   var ARROW_KEY_DOWN = 40;
   var ARROW_KEY_LEFT = 37;
   var ARROW_KEY_RIGHT = 39;

   var stage;
   var canvas;
   var spritesheet;
   var screen_width;
   var screen_height;

   function init() {
      window.game = window.game || {};
      game.main = new game.SpaceHero();
   }
</script>
</html>
As you can see, there are quite a bit of JavaScript files in this application. We will be covering each of these new scripts, as well as the reuse of old ones, in depth in this chapter.
Reviewing the Sprite Sheet Files
The sprite sheet files for this chapter are available with the book’s source code download. The animation frames for this sprite sheet were created in Flash CC and imported into Zoe using the same procedures learned in Chapter 6. Start by opening up the sprite sheet image sprites.png.
The sprites.png sprite sheet file contains all graphics needed for the game, with the exception of the background image, which was added to the DOM under the canvas element. Figure 11-2 shows the amount of graphics needed for the animations and static sprites.
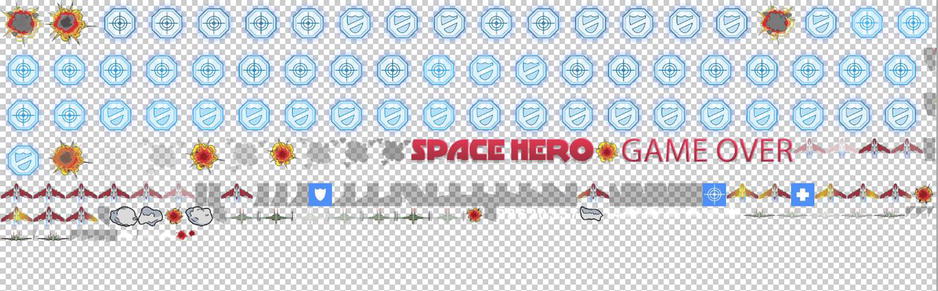
Figure 11-2. The full sprite sheet image for all graphics and animations in Space Hero
The sprite sheet for Space Hero contains mostly animation frames for various elements in this high action game. It also includes some bonus power ups and other sprites that can be used to further enhance the gameplay when you complete this game project.
The Space Hero sprite sheet JSON object, created with Zoe, will be loaded in the preload process. Take a look at the data now to get an idea how it is formatted and the amount of animations you’ll be using in the game (see Listing 11-2).
Listing 11-2. The Sprite Sheet Data sprites.json, Used For All Sprites in Space Hero
{
   "framerate":24,
   "images":["assets/sprites.png"],
   "frames":[...],
   "animations":{
      "1": {"frames": [138], "speed": 1},
      "2": {"frames": [139], "speed": 1},
      "4": {"frames": [141], "speed": 1},
      "5": {"frames": [142], "speed": 1},
      "6": {"frames": [143], "speed": 1},
      "7": {"frames": [144], "speed": 1},
      "0": {"frames": [137], "speed": 1},
      "8": {"frames": [145], "speed": 1},
      "3": {"frames": [140], "speed": 1},
      "9": {"frames": [146], "speed": 1},
      "asteroid3": {"frames": [37], "speed": 1},
      "enemy2Hit": {
         "frames": [21, 22, 23, 24, 25, 26],
         "next": "enemy2Idle",
         "speed": 1
      },
      "powerup": {
         "frames": [39, 40, 41, ... 67],
         "speed": 1
      },
      "asteroid4": {"frames": [38], "speed": 1},
      "shield": {
         "frames": [68, 69, 70, ... 96],
         "speed": 1
      },
      "life": {
         "frames": [147, 148, 149, ... 154, 155, 98],
         "speed": 0.4
      },
      "shieldHUD": {"frames": [97], "speed": 1},
      "heroPrize": {
         "frames": [1, 2, 3, ... 13],
         "speed": 1
      },
      "progessHUD": {
         "frames": [98, 99, 100, ... 133],
         "speed": 1
      },
      "powerHUD": {"frames": [134], "speed": 1},
      "enemy1Hit": {
         "frames": [28, 29, 30, 31, 32, 33],
         "next": "enemy1Idle",
         "speed": 1
      },
      "asteroid2": {"frames": [36], "speed": 1},
      "enemy1Idle": {"frames": [27], "speed": 1},
      "healthHUD": {"frames": [34], "speed": 1},
      "star1": {"frames": [98], "speed": 1},
      "explosion": {
        "frames": [
           156,
           157,
           158,
           159,
           160,
           161,
           162,
           163,
           164,
           165,
           166,
           167,
           168,
           169,
           170,
           171,
           172,
           172,
           173
        ],
        "speed": 0.4
      },
      "star2": {"frames": [174], "speed": 1},
      "star3": {"frames": [175], "speed": 1},
      "heroIdle": {"frames": [0], "speed": 1},
      "enemy2Idle": {"frames": [20], "speed": 1},
      "gameOver": {"frames": [177], "speed": 1},
      "asteroid1": {"frames": [35], "speed": 1},
      "bullet": {"frames": [135, 136], "speed": 1},
      "heroHit": {
         "frames": [0, 14, 15, 16, 17, 18, 19],
         "next": "heroIdle",
         "speed": 0.4
      },
      "title": {"frames": [176], "speed": 1}
   }
}
As you can see in the animation objects, the speed and next properties are included. The Zoe interface gives you the ability to adjust these properties on each animation so you can control their speed and dictate what frame should load when an animation is complete. This is a great feature of Zoe; it allows you to command each ship to sit back at its idle frame when various in-game animations are complete.
The AssetManager class is nearly identical to the one built in Chapter 9. The functionality is the same, but the actual assets will be different. Similar to application class, the AssetManager.js file can be reused, only this time, the code that lists and loads the assets should be changed to fit the application. Listing 11-3 shows the list of assets being declared and loaded in the initialize function.
Listing 11-3. The Assets Added and Loaded in the AssetManager Class
//sounds
p.EXPLOSION = 'explosion';
p.SOUNDTRACK = 'soundtrack';

//graphics
p.GAME_SPRITES = 'game sprites';

//data
p.GAME_SPRITES_DATA = 'game sprites data'

//events
p.ASSETS_PROGRESS = 'assets progress';
p.ASSETS_COMPLETE = 'assets complete';

p.assetsPath = 'assets/';

p.loadManifest = null;
p.queue = null;
p.loadProgress = 0;


p.initialize = function () {
   this.EventDispatcher_initialize();
   this.loadManifest = [
      {id:this.EXPLOSION, src:this.assetsPath + 'explosion.mp3|' +
         this.assetsPath + 'explosion.ogg'},
      {id:this.SOUNDTRACK, src:this.assetsPath + 'dreamRaid1.mp3|' +
         this.assetsPath + 'dreamRaid1.ogg'},
      {id:this.GAME_SPRITES_DATA, src:this.assetsPath + 'sprites.json'},
      {id:this.GAME_SPRITES, src:this.assetsPath + 'sprites.png'}
   ];
}
Creating the Application Class
The ExplodingAsteroids.js class was the main application script used in the Exploding Asteroids exercise built in Chapter 10. The state machine that will run the game in this chapter uses the same scene names, and the state events used will be identical. This class can be used to fit the needs for Space Hero. Create a copy and change the name of the file to SpaceHero.js.
![]() Note As you build more games and applications, it might be a good idea to give this class a generic name, such as App.js or Main.js. This can make it easier to copy over to new applications.
Note As you build more games and applications, it might be a good idea to give this class a generic name, such as App.js or Main.js. This can make it easier to copy over to new applications.
The action sprites that make up the Space Hero gameplay are one hero ship, two enemy ships, bullets, and explosions. In this section, you will prepare each sprite for the game.
Creating the Hero Ship
The hero ship is the ship that is controlled by the player. The object of the game is to steer this ship away from danger while destroying as many enemy ships as you can. The frames that make up the hero ship are demonstrated in Figure 11-3.
Figure 11-3. The sprite frames for the hero ship
There are three animations that make up the hero ship. The two used in this exercise are its idle frame and its damage sequence, which plays a white glow animation to indicate damage being taken from an enemy bullet. The third sequence can be used to indicate power ups that can be used if you wish to extend the game after this chapter.
You’ll notice that there are only 11 frames that make up the hero ship. This is because Zoe was smart enough to find similar frames and reused them in the animation objects that make its sequences. This technique of reusing, or stacking frames, can drastically reduce the size of your sprite sheets.
Among other things, the class for the hero ship handles the state of the ship for idle and damage animations. Listing 11-4 shows the entire HeroShip class.
Listing 11-4. The HeroShip Class , Declared in HeroClass.js
(function (window) {

   window.game = window.game || {}

   function HeroShip() {
      this.initialize();
   }

   var p = HeroShip.prototype = new createjs.Sprite();

   p.Sprite_initialize = p.initialize;

   p.EXPLOSION_COMPLETE = 'explosion complete';
   p.EXPLOSION_OFFSET = 55;
   p.INVINCIBLE_TIME = 1500;

   p.invincible = false;
   p.shouldDie = false;
   p.speed = 500;
   p.nextX = null;
   p.nextY = null;

   p.initialize = function () {
      this.Sprite_initialize(spritesheet, "heroIdle");
      this.regX = this.getBounds().width / 2;
      this.regY = this.getBounds().height / 2;
   }
   p.takeDamage = function () {
      this.gotoAndPlay("heroHit");
   }
   p.explode = function () {
      this.gotoAndPlay('explosion'),
      this.regX = this.regY = this.EXPLOSION_OFFSET;
      this.on('animationend', this.explosionComplete, this, true);
      createjs.Sound.play(game.assets.EXPLOSION);
   }
   p.explosionComplete = function (e) {
      this.stop();
      this.dispatchEvent(this.EXPLOSION_COMPLETE);
   }
   p.reset = function () {
      this.shouldDie = false;
      this.gotoAndStop('heroIdle'),
      this.regX = this.getBounds().width / 2;
      this.regY = this.getBounds().height / 2;
   }
   p.makeInvincible = function () {
      this.invincible = true;
      this.alpha = .4;
      setTimeout(this.removeInvincible.bind(this), this.INVINCIBLE_TIME);
   }
   p.removeInvincible = function () {
      this.invincible = false;
      this.alpha = 1;
   }

   window.game.HeroShip = HeroShip;

}(window));
The class starts with some constants for an explosion event, the offset for the explosion sequence, and the time the ship should be invincible after a new life starts. They are followed by some Boolean variables that determine if the ship is invincible or if it should die in the next render cycle. Some speed and position values are also declared.
The takeDamage method is called when a bullet collides with it. This will play the sequence "heroHit", which will cause a white, glowing shimmer. The explode method will be called from the game in the render cycle, which will play the explosion frames and an explosion sound. The registration points are adjusted so that the explosion will be properly placed. A listener is set on this animation, which will fire explosionComplete to stop the animation and dispatch the EXPLOSION_COMPLETE event.
The reset method resets shouldDie to false, puts the frame back on idle, and resets its registration points. Lastly, the makeInvincible method prevents damage from being inflicted on the ship by setting isInvincible to true and setting its alpha value to .4. The invincibility is reset with a setTimeout method using the INVINCIBLE_TIMEconstant.
Creating the Enemy Ships
There are two enemies in the game, each with their own damage animation frames. These ships will periodically move down the screen and fire bullets that the hero must dodge. The frames that make up the enemy ships are demonstrated in Figure 11-4.

Figure 11-4. The sprite frames for the enemy ships
Although there are two enemy ships, only one sprite class will be created. This class will randomly decide what the ship’s type should be, 1 or 2, and display the appropriate frame. The type property will also dictate the amount of hit points it should have and the total points it will give when destroyed. The complete EnemyShip class is shown in Listing 11-5.
Listing 11-5. The EnemyShip Class, Declared in EnemyShip.js
(function (window) {
   window.game = window.game || {}

   function EnemyShip(startX) {
      this.initialize(startX);
   }

   var p = EnemyShip.prototype = new createjs.Sprite();

   p.Sprite_initialize = p.initialize;

   p.type = null;
   p.HP = null;
   p.points = null;

   p.lastFired = 0;
   p.fireDelay = 2000;

   p.speed = 150;
   p.nextY = 0;
   p.shouldDie = false;

   p.initialize = function (startX) {
      this.type = Utils.getRandomNumber(0, 2) + 1;
      this.HP = this.type * 3;
      this.points = this.type * 100;
      this.Sprite_initialize(spritesheet, "enemy" + this.type + "Idle");
      this.regX = this.getBounds().width / 2;
      this.regY = this.getBounds().height / 2;

   }
   p.takeDamage = function () {
      this.gotoAndPlay("enemy" + this.type + "Hit");
      this.HP--;
      if (this.HP <= 0) {
         this.shouldDie = true;
      }
   }
   p.reset = function () {
      this.type = Utils.getRandomNumber(0, 2) + 1;
      this.shouldDie = false;
      this.HP = this.type * 3;
      this.points = this.type * 100;
      this.gotoAndPlay("enemy" + this.type + "Idle");
   }

   window.game.EnemyShip = EnemyShip;

}(window));
The type, HP, and points properties are crucial variables for the behavior of each ship. The type, which will be randomly assigned in the initialize function, will decide the frame, hit points, and worth of each ship sprite. The next set is used for firing bullets. The lastFired variable holds the time when the last enemy bullet was fired, and fireDelay is the time that should pass before the next attack. The speed variable is used to determine how fast it should move down the stage, and nextY is set and used in the update/render cycle during the game loop. Finally, shouldDie is used to determine if the ship should blow up during the next render cycle.
Next is a small series of methods. The initialize function randomly determines what type of ship the enemy should be and adjusts the appropriate properties. When the ship is hit, its takeDamage function will immediately play either the enemy1Hit or enemy2Hit animations, depending on the ship’s type. Its HP value is decreased by one and is followed by a conditional to check if the ship should die. If so, the shouldDie property is set to true. This property will be examined during the render cycle in the game loop.
The final function, reset, will reset its properties by choosing a new type. This might seem strange now, but these ship sprites will be recycled and served up from an object pool. This technique will be looked at in detail in the upcoming “Using Object Pools” section.
Creating the Bullets and Explosions
Bullets are shot from both the enemy and hero ship, and travel at a velocity that is faster and in the opposite direction of the ship that fired it. When a bullet hits a ship, an explosion animation will take the ship’s place. Figure 11-5 demonstrates the frames used for both the bullet and explosion sprites.
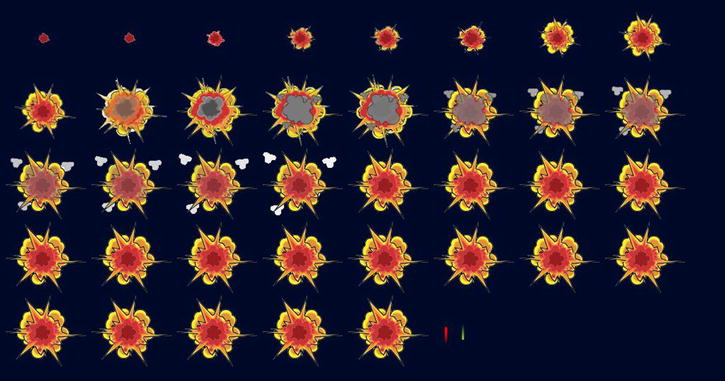
Figure 11-5. The sprite frames for the explosion and bullets
There are two bullet frames, one green and one red. The red bullets are fired from the hero and the green from the enemies. The Bullet class renders the appropriate frame (see Listing 11-6).
Listing 11-6. The Bullet Class, Declared in Bullet.js
(function (window) {

   window.game = window.game || {}

   function Bullet() {
      this.initialize();
   }

   var p = Bullet.prototype = new createjs.Sprite();

   p.Sprite_initialize = p.initialize;

   p.speed = 500;
   p.nextY = null;
   p.shouldDie = false;

   p.initialize = function () {
      this.Sprite_initialize(spritesheet, "bullet");
      this.paused = true;
   }
   p.reset = function () {
      this.shouldDie = false;
   }

   window.game.Bullet = Bullet;

}(window));
Similarly to the EnemyShip class, the bullet sprite has properties for speed and its next position, plus a Boolean value to determine its fate in the next render cycle. The sprite consists of two frames, so it is initially paused on frame one, which is the red bullet for the hero. This will be advanced to frame 2 for enemies from within the game code. An object pool will also be created for the bullets, so a reset function is needed to reset the object for later use. The Explosion class will be recycled in a similar way, as shown in Listing 11-7.
Listing 11-7. The Explosion Class, Declared in Explosion.js
(function (window) {

   window.game = window.game || {}

   function Explosion() {
      this.initialize();
   }

   var p = Explosion.prototype = new createjs.Sprite();

   p.Sprite_initialize = p.initialize;

   p.initialize = function () {
      this.Sprite_initialize(spritesheet, 'explosion'),
      this.paused = true;
   }
   p.reset = function(){
      this.gotoAndStop('explosion'),
   }

   window.game.Explosion = Explosion;

}(window));
The acronym HUD stands for heads-up display. These are typically the messaging elements that are persistent during a game level. In Space Hero, three HUD elements are needed. The health meter, score, and life indicators are all sprites that make up the HUD in the game.
Reviewing the HUD Sprite Frames
There are a few animations and static frames that make up the graphics for the HUD game elements. The frames used for these HUD sprites are shown in Figure 11-6.

Figure 11-6. The sprite frames for the HUD elements
The first large set of frames might look a little odd. This is the health meter animation that will increase in a clockwise animation as the hero takes damage. It will be placed over the health icon, shown in the bottom right corner of Figure 11-6. These items are separated so the sequence can be used above the other bonus HUD elements provided in the sprite sheet.
The ship icon indicates a life in the life box, and will represent one life in the number of lives left in the game. It includes a series of frames to show an animation of the ship icon blurring out when the hero ship explodes. Lastly, the numbers 0 through 9 are used for the bitmap font that will be used for the score.
The health meter represents the amount of health left in the current life of the ship. It consists of an animated sprite that gradually covers a static sprite underneath. The health meter is shown in action in Figure 11-7.

Figure 11-7. The HealthMeter sprite diplaying damage
The HealthMeter class extends Container and controls the behavior of the health meter (see Listing 11-8).
Listing 11-8. The HealthMeter Class, Declared in HeroMeter.js
(function (window) {

   window.game = window.game || {}

   function HealthMeter() {
      this.initialize();
   }

   var p = HealthMeter.prototype = new createjs.Container();

   p.meter = null;
   p.maxDamage = null;
   p.damage = 0;
   p.empty = false;

   p.Container_initialize = p.initialize;

   p.initialize = function () {
      this.Container_initialize();
      this.x = this.y = 5;
      this.buildMeter();
   }
   p.buildMeter = function () {
      var health = new createjs.Sprite(spritesheet, 'healthHUD'),
      this.meter = new createjs.Sprite(spritesheet, 'progessHUD'),
      this.maxDamage = this.meter.spriteSheet
         .getAnimation(this.meter.currentAnimation)
         .frames.length - 1;
      this.meter.paused = true;
      this.addChild(health, this.meter);
   }
   p.takeDamage = function (damage) {
      this.damage += damage;
      var perc = this.damage / this.maxDamage > 1 ? 1 : this.damage /
         this.maxDamage;
      var frame = (this.maxDamage * perc);
      createjs.Tween.get(this.meter)
         .to({currentAnimationFrame:frame}, 100)
         .call(this.checkHealth, null, this);
   }
   p.checkHealth = function (e) {
      if (this.meter.currentAnimationFrame == this.maxDamage) {
         this.empty = true;
      }
   }
   p.reset = function (e) {
      this.damage = 0;
      this.empty = false;
      this.meter.currentAnimationFrame = 0;
   }

   window.game.HealthMeter = HealthMeter;

}(window));
The meter property holds the meter animation, which will be updated when the hero ship takes damage. The maxDamage property will be set in the buildMeter method and will match the total frames of the meter animation. The damage value will be incremented on hero hits and will be used to determine what frame in the meter sequence the animation should advance to. The empty property will be set to true when the final frame in the sequence is reached and will be used to tell the game that the ship should explode. How this works will be closely looked at next in the buildMeter method. Lastly, the meter animation is paused, and both sprites are added to the container and positioned.
The buildMeter function creates two sprites, one for the health icon and another for the meter. The maxDamage value is set to the number of frames in the meter animation. At the time of writing this book, there is no method in the API to access the number of frames in a sprite’s current animation. You can still access this by chaining a few methods and properties that are available.
this.maxDamage = this.meter.spriteSheet
         .getAnimation(this.meter.currentAnimation)
         .frames.length - 1;
You can access the sprite’s SpriteSheet object by referencing its spriteSheet property. You can use then use the getAnimation method to access any animation object in the sprite sheet object. To get this animation, you need to pass in the string that defined the animation object. You could easily hard-code this value to suit your needs here, but the string can also be retrieved by accessing the sprite’s current animation. This is a better approach in case the animation name changes in the future. Finally, with the animation object referenced, the length of its frames array is set to the maxDamage property.
The takeDamage method will be called when a bullet hits the hero ship. It’s written so it can take variable damage and is instantly used to tack on to the damage property. Next, the new damage value needs to be used to determine the percentage of total damage allotted to the ship. Remember, total damage is tied to the number of frames in the meter animation, so this percentage can be used to find the appropriate frame in the sprite. If the last strike caused enough damage to exceed its animation frames, it’s set to the value of maxDamage, its last frame. Finally, the target frame number on meter is tweened to using TweenJS.
createjs.Tween.get(this.meter)
         .to({currentAnimationFrame:frame}, 100)
         .call(this.checkHealth, null, this);
This demonstrates how dynamic TweenJS can be. Instead of simply tweening a display object’s position or visual property, you can tween an animation to a specific frame. When the tween is complete, the checkHealth function is called, which will set the empty property to true if all of the meter’s frames have been used up and the static health sprite is completely covered by it.
Lastly, the reset function will reset the meter when a player starts a new life in the game.
The scoreboard will use bitmap fonts to display the current score in the game. The Scoreboard class (see Listing 11-9) will be a container that will create and add a BitmapText object when the score has been updated.
Listing 11-9. The Scoreboard Class, Declared in Scoreboard.js
(function (window) {

   window.game = window.game || {}

   function Scoreboard() {
      this.initialize();
   }

   var p = Scoreboard.prototype = new createjs.Container();

   p.scoreTxt;
   p.score = 0;

   p.Container_initialize = p.initialize;

   p.initialize = function () {
      this.Container_initialize();
      this.x = screen_width - 165;
      this.y = 5;
      this.updateScore(0);
   }
   p.updateScore = function(points){
      var formattedScore;
      this.removeAllChildren();
      this.score += points;
      formattedScore = this.addLeadingZeros(this.score, 7);
      this.scoreTxt = new createjs.BitmapText(formattedScore, spritesheet);
      this.addChild(this.scoreTxt);
   }
   p.addLeadingZeros = function (score, width) {
      score = score + '';
      return score.length >= width ? score : new Array(width –
         score.length + 1).join(0) + score;
   }
   p.getScore = function () {
      return this.addLeadingZeros(this.score, 7);
   }
   window.game.Scoreboard = Scoreboard;

}(window));
The Scoreboard class holds two properties, the score and the score BitmapText display object. When the scoreboard should be updated, the updateScore method is called, which accepts the number of points that the score should be increased by. Since a new bitmap text object needs to be created to update the message, the old one is removed by removing all of the children in the container. The new score is then updated and passed through the addLeadingZeros method. This function takes the new score and adds the appropriate number of leading zeros so that the total length of the score text is always 7. This method takes two parameters, the score and the number of characters the returned string should be. For example, if the current score were 1600, the returned value from the addLeadingZeros method would be 0001600. This is primarily for effect and to mimic the look of a classic score board (see Figure 11-8).
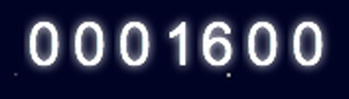
Figure 11-8. The Scoreboard HUD element
A simple method is then added to the class to get the current score. This is used later in the game when the score needs to be accessed for messaging in the game over screen.
The life box is the area designated to display the number of lives the player currently has. It will contain a sprite for each life and is located in the lower right corner of the game board. The complete LifeBox class is seen in Listing 11-10.
Listing 11-10. The LifeBox Class, Declared in LifeBox.js
(function (window) {

   window.game = window.game || {}

   function LifeBox(numLives) {
      this.numLives = numLives;
      this.initialize();
   }

   var p = LifeBox.prototype = new createjs.Container();

   p.numLives = null;

   p.Container_initialize = p.initialize;

   p.initialize = function () {
      this.Container_initialize();
      this.buildSprites();
      this.positionBox();
   }
   p.buildSprites = function () {
      var i, life;
      var xPos = 0;
      for (i = 0; i < this.numLives; i++) {
         life = new createjs.Sprite(spritesheet, 'life'),
         life.paused = true;
         life.x = xPos;
         this.addChild(life);
         xPos += life.getBounds().width;
      }
   }
   p.positionBox = function () {
      this.x = screen_width - this.getBounds().width;
      this.y = screen_height - this.getBounds().height;
   }
   p.removeLife = function () {
      var life = this.getChildAt(0);
      life.on('animationend', function (e) {
         e.target.stop();
         this.removeChild(e.target);
      }, this)
      life.play();
   }

   window.game.LifeBox = LifeBox;

}(window));
This class is a container that will hold a sprite for every life the player currently has. It accepts one parameter in its constructor, numLives, which is assigned to the one and only property on the class. The initialize method then calls on two functions, the first creates the sprites for the container and the second positions it.
A loop is created based on the number of lives that the game will give the player at the start of the game. During the loop, a life sprite is created, paused, added to the container, and then positioned accordingly in a horizontal fashion. The container itself is then positioned at the bottom right corner of the game in the positionBox function.
When a player loses a life, the removeLife method is called. The first child, which will always be the left-most sprite, is referenced and its animation frames are played. A listener is set on this animation, which will stop when complete, and then it is removed from the container. Figure 11-9 shows three lives in the LifeBox container.

Figure 11-9. The LifeBox HUD element
The technique of using object pools is common among game developers. The concept is simple. Instead of creating a new instance of something every time you need one, you create several of them right away and stick them into an array. When you need the object, you grab it from this array. When you are finished with it, you put it back. To build the game’s object pools, you will be using a custom class that will create these pools (see Listing 11-11).
Listing 11-11. The SpritePool Class, Declared in SpritePool.js
(function () {

   var SpritePool = function (type, length) {
      this.pool = [];
      var i = length;
      while (--i > -1) {
         this.pool[i] = new type();
      }
   }
   SpritePool.prototype.getSprite = function () {
      if (this.pool.length > 0) {
         return this.pool.pop();
      }
      else {
         throw new Error("You ran out of sprites!");
      }
   }
   SpritePool.prototype.returnSprite = function (sprite) {
      this.pool.push(sprite);
   }

   window.game.SpritePool = SpritePool;

}());
The constructor of the SpritePool class takes two parameters. The first is the type of object that should be created and pooled. This allows you to use this class to pool any type of object you wish. The second is the number of instances that should be created. Be sure that this number is high enough to handle enough concurrent instances that will be needed in your game. This process usually takes a few guesses, but ultimately should be low enough to be efficient but high enough to support your needs.
To create an object pool, simply create an instance of the SpritePool class.
var bullets = new game.SpritePool(game.Bullet, 20);
Now when you need an instance from the pool, you can call on the getSprite method.
var bullet = bullets.getSprite();
stage.addChild(bullet)
When you are finished, be sure to send it back so that it can be reused in the game by using the returnSprite method.
bullets.returnSprite(bullet);
stage.removeChild(bullet);
You will be using this convenient class to create several object pools in Space Hero. Let’s now move on to the scene container classes that will be used in the game.
There are three scenes in Space Hero. This section will go over each scene in detail, starting with the main menu.
The main menu will start out with a dramatic, slow moving title that creeps down the screen from the top and rests in the center of the screen. This is followed by revealing a play button, which should switch to the game state when clicked. The entire GameMenu class is seen in Listing 11-12.
Listing 11-12. The GameMenu Scene Class, Delcared in GameMenu.js
(function (window) {

   window.game = window.game || {}

   function GameMenu() {
      this.initialize();
   }

   var p = GameMenu.prototype = new createjs.Container();

   p.playBtn = null;

   p.Container_initialize = p.initialize;

   p.initialize = function () {
      this.Container_initialize();
      this.addTitle();
      this.addButton();
   }
   p.addTitle = function () {
      var titleYPos = 200;
      var title = new createjs.Sprite(spritesheet, 'title'),
      title.regX = title.getBounds().width / 2;
      title.x = screen_width / 2;
      title.y = -50;
      createjs.Tween.get(title).to({y:titleYPos}, 5000)
         .call(this.bringTitle, null, this);
      this.addChild(title);
   }
   p.addButton = function () {
      this.playBtn = new ui.SimpleButton('Play Game'),
      this.playBtn.on('click', this.playGame, this);
      this.playBtn.regX = this.playBtn.width / 2;
      this.playBtn.x = canvas.width / 2;
      this.playBtn.y = 400;
      this.playBtn.alpha = 0;
      this.playBtn.setButton({upColor:'#d2354c', color:'#FFF',
         borderColor:'#FFF', overColor:'#900'});
      this.addChild(this.playBtn);
   }
   p.bringTitle = function (e) {
      createjs.Tween.get(this.playBtn).to({alpha:1}, 1000);
   }
   p.playGame = function (e) {
      createjs.Sound.play(game.assets.EXPLOSION);
      this.dispatchEvent(game.GameStateEvents.GAME);
   }
   window.game.GameMenu = GameMenu;

}(window));
The title is a sprite and uses TweenJS to crawl down the screen. The play button, which uses the SimpleButton component is styled, added to the container, and then faded up with the bringTitle function. The button will call playGame to play an explosion sound and dispatch the appropriate game event to start the game. The menu screen is shown in Figure 11-10.
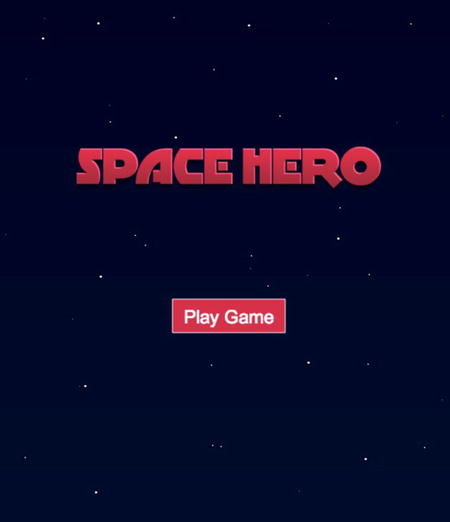
Figure 11-10. The main menu scene with crawling title and play button
The game scene is where all of the game-playing magic takes place. There is quite a bit of code that will go into it, so a template for the class is temporarily made so you can finish up the application classes before diving into game code. The start of the Game class is shown in Listing 11-13.
Listing 11-13. The Game Scene Class Template, Declared in Game.js
(function (window) {

   window.game = window.game || {}

   function Game() {
      this.initialize();
   }

   var p = Game.prototype = new createjs.Container();

   p.Container_initialize = p.initialize;

   p.initialize = function () {
      this.Container_initialize();
      var me = this;
      setTimeout(function(){
         me.dispatchEvent(game.GameStateEvents.GAME_OVER);
      },3000)
   }

   window.game.Game = Game;

}(window));
When the game initializes, a simple setTimeout method is used, which will dispatch the game event to move on to the game over scene. This is temporary. Meanwhile, there is one more scene container class to set up.
The game over scene is the final screen in the game, and it should appear when the player loses all of their lives. A Game Over title, which is another sprite from the sprite sheet, will scale up while rotating in a full circle. The score is also displayed to show the player how well they did in the game. Below that are two buttons that play the game again or return the player to the main menu. The entire GameOver class is show in Listing 11-14.
Listing 11-14. The GameOver Scene Class, Declared in GameOver.js
(function (window) {

   window.game = window.game || {}

   function GameOver() {
      this.initialize();
   }

   var p = GameOver.prototype = new createjs.Container();

   p.Container_initialize = p.initialize;

   p.initialize = function () {
      this.Container_initialize();
      createjs.Sound.stop();
      this.addMessage();
      this.addScore();
      this.addButton();
   }
   p.addMessage = function () {
      var msg = new createjs.Sprite(spritesheet, 'gameOver'),
      msg.regX = msg.getBounds().width / 2;
      msg.regY = msg.getBounds().height / 2;
      msg.x = screen_width / 2;
      msg.y = 250;
      msg.scaleX = msg.scaleY = 0;
      createjs.Tween.get(msg).to({scaleX:1, scaleY:1, rotation:360}, 500);
      this.addChild(msg);
   }
   p.addScore = function () {
      var scorePoint = {x:220, y:310};
      var scoreTxt = new createjs.BitmapText(game.score, spritesheet);
      scoreTxt.x = scorePoint.x;
      scoreTxt.y = scorePoint.y;
      this.addChild(scoreTxt);
   }
   p.addButton = function () {
      var playBtn, menuBtn;
      var playBtnPoint = {x:140, y:380};
      var menuBtnPoint = {x:310, y:380};
      var me = this;
      playBtn = new ui.SimpleButton('Play Again'),
      playBtn.on('click', this.playAgain, this);
      playBtn.setButton({upColor:'#d2354c', color:'#FFF',
         borderColor:'#FFF', overColor:'#900'});
      playBtn.x = playBtnPoint.x;
      playBtn.y = playBtnPoint.y;
      this.addChild(playBtn);
      menuBtn = new ui.SimpleButton('Main Menu'),
      menuBtn.on('click', this.mainMenu, this);
      menuBtn.setButton({upColor:'#d2354c', color:'#FFF',
         borderColor:'#FFF', overColor:'#900'});
      menuBtn.x = menuBtnPoint.x;
      menuBtn.y = menuBtnPoint.y;
      this.addChild(menuBtn);
   }
   p.playAgain = function (e) {
      this.dispatchEvent(game.GameStateEvents.GAME);
   }
   p.mainMenu = function (e) {
      this.dispatchEvent(game.GameStateEvents.MAIN_MENU);
   }

   window.game.GameOver = GameOver;

}(window));
In this scene, a series of methods add, position, and animate the elements on the screen. The game over screen is shown in Figure 11-11.
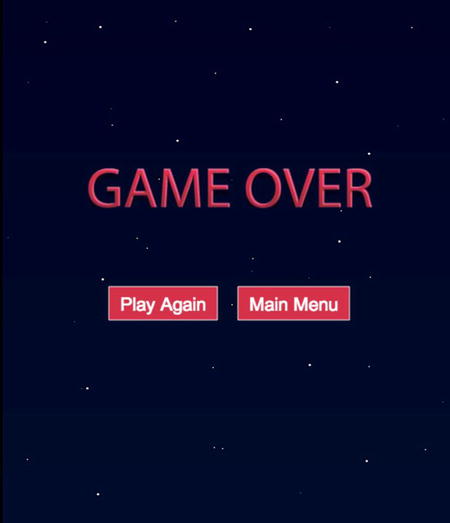
Figure 11-11. The game over screen with option to replay or return to main menu
You now have all assets loading in, the state manager in place, and all sprites and game scenes written. At this point, make sure you can cycle through each state by clicking on the buttons in the menu screens. When you play the game, you should see nothing but a star field for three seconds before switching to the game over screen. With everything working correctly, it’s time to add action to this empty space.
The application files are now completely set up; the only thing left is to program the game. The Game class was set up in the “Creating the Game Scene” section. Remove the temporary setTimeout function that was set up to automatically move on to the game over screen. Your initialize method should now simply look like the following:
p.initialize = function () {
   this.Container_initialize();
}
The game takes many variables, which are declared at the top of the class (see Listing 11-15). The variables are grouped into categories that are labeled by comments. Many of these variables may look new to you but will be explained in full throughout following sections.
Listing 11-15. The Properties Declared for the Game Class
// Hero
p.heroShip = null;
p.heroBulletPool = null;
p.heroBullets = null;

// Enemies
p.enemyPool = null;
p.enemies = null;
p.enemyBulletPool = null;
p.enemyBullets = null;
p.enemyLastSpawnTime = null;
p.enemySpawnWaiter = 2000;

// SPRITES
p.stars = null;
p.explosionPool = null;
p.healthMeter = null;
p.lifeBox = null;
p.scoreboard = null;

// GAME VARIABLES
p.leftWall = null;
p.rightWall = null;
p.ceiling = null;
p.floor = null;
p.betweenLevels = true;
p.numLives = 3;
p.delta = null;

// Controls
p.leftKeyDown = false;
p.rightKeyDown = false;
p.upKeyDown = false;
p.downKeyDown = false;
A series of variables are first set up for the hero and enemies. These properties hold the instances of each ship, all bullets in play, and a few values to determine the speed at which the enemies will attack. The next series declares a group of properties that will hold references to all other sprites and HUD elements in the game.
Next up are some values that will be used during gameplay to evaluate scenarios and sprite positions. The walls create the bounds that the hero ship is allowed to move in. The betweenLevels Boolean property decides if the game loop should continue or wait a moment while the hero ship explodes and resets. The numLives variable is used to determine if the player should continue playing after exploding. Finally, the delta property is set from the ticker that runs the game and is used to calculate the positions of the moving sprites. This will be explained in the upcoming “Using Delta for Time Based Movement” section.
As usual, the initialize method calls a list of methods that set up a new game. The first method is used to initialize the game arrays and set a few properties (see Listing 11-16). The other initializing methods create the game sprites, hero ship boundaries, and set the controls. Lastly, the background music is started.
Listing 11-16. The Initializing Methods for the Game
p.initialize = function () {
   this.Container_initialize();
   this.setProperties();
   this.buildStarField();
   this.buildSprites();
   this.setWalls();
   this.setControls();
   createjs.Sound.play(game.assets.SOUNDTRACK);
}
p.setProperties = function () {
   this.heroBulletPool = [];
   this.heroBullets = [];
   this.enemyPool = [];
   this.enemies = [];
   this.enemyBulletPool = [];
   this.enemyBullets = [];
   this.stars = [];
   this.explosionPool = [];
   this.betweenLevels = false;
   this.enemyLastSpawnTime = 0;
}
The setProperties method initializes the arrays in the game. It is imperative that you not initialize array properties when declaring them in your classes. Doing so will cause these arrays to be shared among all instances of the class. For example, you will be adding bullet objects to the heroBullets array during gameplay. When you are finished with the Game instance, the final value of heroBullets will carry over to a new instance of the game. This can easily be avoided by creating a function when initializing the game to initialize all of the class’s arrays.
Several sprite objects are initialized at the beginning of the game. A function is created for creating all stars in the star field and another to create the hero ship, the object pools, and the HUD elements. These two functions are shown in Listing 11-17.
Listing 11-17. Creating the Stars and Game Sprite Object Pools
p.buildStarField = function () {
   var star;
   var numStars = 20;
   for (i = 0; i < numStars; i++) {
      star = new createjs.Sprite(spritesheet, 'star3'),
      star.speed = Utils.getRandomNumber(100, 200);
      star.x = Math.random() * screen_width;
      star.y = Math.random() * screen_height;
      this.addChild(star);
      this.stars.push(star);
   }
}
p.buildSprites = function () {
   this.heroShip = new game.HeroShip();
   this.heroShip.on(this.heroShip.EXPLOSION_COMPLETE, this.checkGame,
      this);
   this.heroShip.x = screen_width / 2;
   this.heroShip.y = screen_height - this.heroShip.getBounds().height;
   this.heroBulletPool = new game.SpritePool(game.Bullet, 20);
   this.enemyBulletPool = new game.SpritePool(game.Bullet, 20);
   this.enemyPool = new game.SpritePool(game.EnemyShip, 10);
   this.explosionPool = new game.SpritePool(game.Explosion, 10);
   this.healthMeter = new game.HealthMeter();
   this.scoreboard = new game.Scoreboard();
   this.lifeBox = new game.LifeBox(this.numLives);
   this.addChild(this.heroShip, this.healthMeter, this.scoreboard,
      this.lifeBox);
}
The stars created in buildStars are randomly positioned in the container and added to the stars array. These are stored in an array so they can be accessed and moved during the game loop.
Several elements are created in the buildSprites method. First, the hero ship is created and positioned at the bottom of the screen. A listener is set on the sprite for when the ship has finished exploding. When this event occurs, the check game is called to evaluate what should happen next. This will be covered in the “Building the Check Functions” section.
Next, the enemy ships, bullets, and explosions are created by using the SpritePool class. These pools are set to the appropriate game properties and will be used to add and recycle sprite objects during the game. Finally, the HUD elements are instantiated and added to the container.
The controls are set up similarly to the paddle controls in Break-It. However, this time you have the ability to move up and down and fire bullets. The bounds for the hero ship are first created in setWalls. Next, the controls are set by adding keyboard listeners to the document, which will fire the appropriate handlers. These methods are shown in Listing 11-18.
Listing 11-18. Setting Up the Walls and Keyboard Controls
p.setWalls = function () {
   this.leftWall = this.heroShip.getBounds().width / 2;
   this.rightWall = screen_width - this.heroShip.getBounds().width / 2;
   this.floor = screen_height - this.heroShip.getBounds().height;
   this.ceiling = screen_height - (this.heroShip.getBounds().height *
      3);
}
p.setControls = function () {
   document.onkeydown = this.handleKeyDown.bind(this);
   document.onkeyup = this.handleKeyUp.bind(this);
}
p.handleKeyDown = function (e) {
   e = !e ? window.event : e;
   switch (e.keyCode) {
      case ARROW_KEY_LEFT:
         this.leftKeyDown = true;
         break;
      case ARROW_KEY_RIGHT:
         this.rightKeyDown = true;
         break;
      case ARROW_KEY_UP:
         this.upKeyDown = true;
         break;
      case ARROW_KEY_DOWN:
         this.downKeyDown = true;
         break;
   }
}
p.handleKeyUp = function (e) {
   e = !e ? window.event : e;
   switch (e.keyCode) {
      case ARROW_KEY_LEFT:
         this.leftKeyDown = false;
         break;
      case ARROW_KEY_RIGHT:
         this.rightKeyDown = false;
         break;
      case ARROW_KEY_SPACE:
         this.spawnHeroBullet();
         break;
      case ARROW_KEY_UP:
         this.upKeyDown = false;
         break;
      case ARROW_KEY_DOWN:
         this.downKeyDown = false;
         break;
   }
}
Notice the use of the native JavaScript method bind. This is used to set the event handler’s scope. These event handlers should look very familiar. The global constants for the key codes are used to detect the key pressed. The arrow keys will set the proper game properties to true when the key is pressed down and back to false when they are released. These values are evaluated during the update cycle to determine if and where the hero should be placed in the next render cycle. The space bar, which will fire a bullet, is only evaluated in the handleKeyUp handler. This is done so the player needs to release the key to fire, instead of a constant rapid fire that would occur when holding down the spacebar.
Creating the Game Loop
The game is now initialized. It is time now for the action. Remember that the state machine will fire a run method on the current scene with every tick, if it has one to call. This game does have a run method, and it is used to create the game loop in the game. The run method is shown in Listing 11-19.
Listing 11-19. The run Function Runs the Game Loop
p.run = function (tickEvent) {
   this.delta = tickEvent.delta;
   if (!this.betweenLevels) {
      this.update();
      this.render();
      this.checkForEnemySpawn(tickEvent.time);
      this.checkForEnemyFire(tickEvent.time);
      this.checkHeroBullets();
      if (!this.heroShip.invincible) {
         this.checkEnemyBullets();
         this.checkShips();
      }
      this.checkHealth();
      this.checkHero();
   }
}
The run method does quite a few things. Remember that the state machine passes the tick event into the game scene’s run method. This is done because there are a few properties on the tick event that will help you in the game. The first property used is the delta property, which is assigned to the game property delta. This property is used to determine the next position for each moving sprite when updating. This technique is referred to as time-based animation, as opposed to frame-based animation, which has been used in all previous game loop exercises. The delta property tells you the difference in time since the last tick and can be used to determine how far the sprite should move, based on a predetermined speed value. This allows you to get smoother, more consistent sprite animations over varying framerates due to inconsistent processor speeds. This technique will be used when updating all sprites in this game.
After storing away the current delta value, a quick check is run to determine if the game is between levels. If the game is not currently between levels (i.e. the hero is not currently exploding), a series of game loop functions are called. Each of these functions will run the game and check for scenarios that call for further action. The first two functions are the update and render functions, which are seen in Listing 11-20.
Listing 11-20. The update and render Functions
p.update = function () {
   this.updateStars();
   this.updateHeroShip()
   this.updateEnemies();
   this.updateHeroBullets();
   this.updateEnemyBullets();
}
p.render = function () {
   this.renderStars();
   this.renderHeroShip();
   this.renderEnemies();
   this.renderHeroBullets();
   this.renderEnemyBullets();
}
The update and render functions calculate and move the sprite positions during the game loop. This technique was used in Break-It, and it works the same here in Space Hero. The updating and rendering of the game sprites will be closely looked at in the upcoming sections.
The update functions calculate the current positions and states of all active sprites and determine where they should be rendered next. All update functions will be examined in detail next.
All stars in the game should move in a constant manner down the screen. This gives the illusion of the ships traveling through space. Listing 11-21 shows the update function for the stars.
Listing 11-21. The udpateStars Method Moves All Stars Down the Screen
p.updateStars = function () {
   var i, star, velY, speed, nextY;
   var len = this.stars.length;
   for (i = 0; i < len; i++) {
      star = this.stars[i];
      velY = star.speed * this.delta / 1000;
      nextY = star.y + velY;
      if (nextY > screen_height) {
         nextY = -10
      }
      star.nextY = nextY;
   }
}
The stars array is looped through to access each star in the game. The star’s next position is calculated and dynamically assigned to each star as nextY. If the star’s next y position puts it below the height of the screen, it is recycled by placing it above the stage. Since the star sprites are so minimal, the need to make a class specifically for them was bypassed.
Updating the Hero and Enemy Ships
The ships in the game are updated similarly to the stars in that their nextY and/or nextX properties are updated for the next render cycle. Both update functions are seen in Listing 11-22.
Listing 11-22. Updating the Hero and Enemy Ships
p.updateHeroShip = function () {
   var velocity = this.heroShip.speed * this.delta / 1000;
   var nextX = this.heroShip.x;
   var nextY = this.heroShip.y;
   if (this.leftKeyDown) {
      nextX -= velocity;
      if (nextX < this.leftWall) {
         nextX = this.leftWall;
      }
   }
   else if (this.rightKeyDown) {
      nextX += velocity;
      if (nextX > this.rightWall) {
         nextX = this.rightWall;
      }
   }
   else if (this.downKeyDown) {
      nextY += velocity;
      if (nextY > this.floor) {
         nextY = this.floor;
      }
   }
   else if (this.upKeyDown) {
      nextY -= velocity;
      if (nextY < this.ceiling) {
         nextY = this.ceiling;
      }
   }
   this.heroShip.nextX = nextX;
   this.heroShip.nextY = nextY;
}
p.updateEnemies = function () {
   var enemy, i, velY;
   var len = this.enemies.length - 1;
   for (i = len; i >= 0; i--) {
      enemy = this.enemies[i];
      velY = enemy.speed * this.delta / 1000;
      enemy.nextY = enemy.y + velY;
      if (enemy.nextY > screen_height) {
         enemy.reset();
         this.enemyPool.returnSprite(enemy);
         this.removeChild(enemy);
         this.enemies.splice(i, 1);
      }
   }
}
The hero ship’s next position is factored by calculating its velocity. Its velocity is calculated by comparing its speed against the current delta value. The keys currently being pressed on the keyboard determine what direction the ship should travel; if the new position should put the ship out of bounds, the values are adjusted accordingly to keep it in.
The enemy ships are animated automatically, and their positions are also calculated by using the delta technique used with the stars and hero ship. Much like the stars, when an enemy travels past the screen, it needs to be reset. In the case of an enemy, which was spawned from an object pool, its reset process is a little more detailed. First, the reset method is called on it. If you recall, this function creates a new random type and updates its properties accordingly. Next, it is returned back to the object pool from where it was spawned and removed from the display list. When the enemy was spawned, a reference to it was pushed into the enemyShips array for updating, so it needs to be removed from it to prevent further updates.
this.enemies.splice(i, 1);
This is done in the same way that the bricks were removed in Break-It, and is the reason for backwards looping through the enemyShips array. Updating the bullets is done in a similar fashion.
Updating the Hero and Enemy Bullets
The bullets act very similar to the enemy ships. The only real difference is that hero bullets travel up instead of down. Listing 11-23 shows these two bullet updating methods.
Listing 11-23. Updating the Hero and Enemy Bullets
p.updateHeroBullets = function () {
   var bullet, i, velY;
   var len = this.heroBullets.length - 1;
   for (i = len; i >= 0; i--) {
      bullet = this.heroBullets[i];
      velY = bullet.speed * this.delta / 1000;
      bullet.nextY = bullet.y - velY;
      if (bullet.nextY < 0) {
         this.heroBulletPool.returnSprite(bullet);
         this.removeChild(bullet);
         this.heroBullets.splice(i, 1);
      }
   }
}
p.updateEnemyBullets = function () {
   var bullet, i, velY;
   var len = this.enemyBullets.length - 1;
   for (i = len; i >= 0; i--) {
      bullet = this.enemyBullets[i];
      velY = bullet.speed * this.delta / 1000;
      bullet.nextY = bullet.y + velY;
      if (bullet.nextY > screen_height) {
         this.enemyBulletPool.returnSprite(bullet);
         this.removeChild(bullet);
         this.enemyBullets.splice(i, 1);
      }
   }
}
Rendering the sprites is pretty straightforward. All of the calculations were handled in the updating process. Other than a few checks that are first needed for the bullets and enemies, the render process simply puts the sprites in their new position. These render functions are shown in Listing 11-24.
Listing 11-24. The render Functions Put the Game Sprites in their New Positions
p.renderStars = function () {
   var i, star;
   for (i = 0; i < this.stars.length; i++) {
      star = this.stars[i];
      star.y = star.nextY;
   }
}
p.renderHeroShip = function () {
   this.heroShip.x = this.heroShip.nextX;
   this.heroShip.y = this.heroShip.nextY;
}
p.renderHeroBullets = function () {
   var bullet, i;
   var len = this.heroBullets.length - 1;
   for (i = len; i >= 0; i--) {
      bullet = this.heroBullets[i];
      if (bullet.shouldDie) {
         this.removeChild(bullet);
         bullet.reset();
         this.heroBulletPool.returnSprite(bullet);
         this.heroBullets.splice(i, 1);
      }
      else {
         bullet.y = bullet.nextY;
      }
   }
}
p.renderEnemyBullets = function () {
   var bullet, i;
   var len = this.enemyBullets.length - 1;
   for (i = len; i >= 0; i--) {
      bullet = this.enemyBullets[i];
      if (bullet.shouldDie) {
         this.removeChild(bullet);
         bullet.reset();
         this.enemyBulletPool.returnSprite(bullet);
         this.enemyBullets.splice(i, 1);
      }
      else {
         bullet.y = bullet.nextY;
      }
   }
}
p.renderEnemies = function () {
   var enemy, i;
   var len = this.enemies.length - 1;
   for (i = len; i >= 0; i--) {
      enemy = this.enemies[i];
      if (enemy.shouldDie) {
         this.scoreboard.updateScore(enemy.points);
         this.enemies.splice(i, 1);
         this.removeChild(enemy);
         this.spawnEnemyExplosion(enemy.x, enemy.y);
         enemy.reset();
         this.enemyPool.returnSprite(enemy);
      }
      else {
         enemy.y = enemy.nextY;
      }
   }
}
Before the bullets and enemies are ultimately placed in their new positions, you need to check if they were deemed dead during the update process. In the case of a bullet, it is reset in the same way it is when passing below the screen. With the enemies, a few more things need to done. Other than its reset actions, the scoreboard should be updated, and an explosion should be spawned in its place.
A few things were spawned in the update/render process. These sprites were spawned in a series of spawning functions that will be covered next.
When a bullet is fired, an explosion occurs, or a new enemy ship should appear, they are spawned. The functions that were called to create these new spawns are shown in Listing 11-25.
Listing 11-25. The Spawn Functions Create New Enemy Ships, Bullets, and Explosions
p.spawnEnemyShip = function () {
   var enemy = this.enemyPool.getSprite();
   enemy.y = -enemy.getBounds().height;
   enemy.x = Utils.getRandomNumber(enemy.getBounds().width,
      screen_width - enemy.getBounds().width);
   this.addChild(enemy);
   this.enemies.push(enemy);
}
p.spawnEnemyBullet = function (enemy) {
   var bullet = this.enemyBulletPool.getSprite();
   bullet.currentAnimationFrame = 1;
   bullet.y = enemy.y;
   bullet.x = enemy.x;
   this.addChildAt(bullet,0);
   this.enemyBullets.push(bullet);
}
p.spawnHeroBullet = function () {
   var bullet = this.heroBulletPool.getSprite();
   bullet.x = this.heroShip.x;
   bullet.y = this.heroShip.y - this.heroShip.getBounds().height / 2;
   this.addChildAt(bullet, 0);
   this.heroBullets.push(bullet)
}
p.spawnEnemyExplosion = function (x, y) {
   var explosion = this.explosionPool.getSprite();
   explosion.x = x - 45;
   explosion.y = y - 30;
   this.addChild(explosion);
   explosion.on('animationend', this.explosionComplete, this, true);
   explosion.play();
   createjs.Sound.play(game.assets.EXPLOSION);
}
p.explosionComplete = function (e) {
   var explosion = e.target;
   this.removeChild(explosion);
   this.explosionPool.returnSprite(explosion);
}
The single, most important feature that all of these functions share is the utilization of an object pool. When a bullet, ship, or explosion is needed, it is pulled from the object pool it was pushed into when it was created. When an enemy is spawned, it is placed at a random horizontal position, slightly above the screen. With the bullets, they are placed in the center and under the ship that shot it.
When an enemy explosion is spawned during the render process, the coordinates of the ship that caused it were passed into spawnEnemyExplosion. This is because that ship should be replaced with an explosion sprite in the exact same position. A little position adjusting is needed because the ship and explosion bounds and shapes are different. A listener is set on the sprite for when its animation is complete. It is then played, along with an explosion sound. When the animation is finished, the explosionComplete function is called, which will remove it from the display list and return it back to the object pool from which it came.
The final process of the game loop is to run some check functions. Among these checks is the evaluation of collisions. You will be using a third party library for these collision detections. Let’s look at this library, and how to obtain it, before moving into the check functions.
Detecting Pixel-Perfect Collision
Because we are not dealing with simple rectangle shapes in this game, merely checking the rectangle bounds of each sprite will not do. Because of the complexity that goes into this type of detection, a third party library will be used to handle the heavy lifting of pixel-perfect collision detection.
A great collision detection library has been written by Olaf Horstmann to work with EaselJS. It’s extremely easy to use once included in your application. To use it, first go to the web site and download it from github.com at https://github.com/olsn/Collision-Detection-for-EaselJS. Once included in your application, it is used as follows:
var collision = ndgmr.checkPixelCollision(sprite1, sprite2);
The method will either return an object or the value of false. Checking for collision is as simple as follows:
if(collision){
   //collision detected
}
Now that the library is obtained and included in the game, let’s move back into the game code and examine the check functions.
Building the Check Functions
The final phase of the game loop is the check functions. These functions check on a variety of situations and determine if things should happen. These functions check if something should explode, if the game or level should be over, or if an enemy should fire a bullet.
Checking Time for Enemy Spawns and Attacks
When an enemy should be spawned, or when it should fire a bullet, are both determined by time. The two functions that decide these actions are shown in Listing 11-26.
Listing 11-26. Checking Time to Determine If New Enemies or Enemy Bullets Should be Created
p.checkForEnemySpawn = function (time) {
   if (time - this.enemyLastSpawnTime > this.enemySpawnWaiter) {
      this.spawnEnemyShip();
      this.enemyLastSpawnTime = time;
   }
}
p.checkForEnemyFire = function (time) {
   var enemy, i;
   var len = this.enemies.length - 1;
   for (i = len; i >= 0; i--) {
      enemy = this.enemies[i];
      if (time - enemy.lastFired > enemy.fireDelay) {
         this.spawnEnemyBullet(enemy);
         enemy.lastFired = time;
      }
   }
}
When these two functions are called, a reference to the time property on the tick event was passed into them. This time property holds the time that has elapsed since Ticker was initialized.
this.checkForEnemySpawn(tickEvent.time);
This time value can be used to detect the time that has passed since the last bullet was fired for each enemy. If it’s time to fire a bullet, a new bullet is spawned, and the lastFired property on the enemy is reset back to 0. The spawning of an enemy is done the same way by comparing the time to enemyLastSpawnTime.
A collision can happen between bullets and ships, and between enemy ships with the hero. Listing 11-27 shows these collision detection functions.
Listing 11-27. Checking for Collisions with Bullets Against Ships and Ships Against Ships
p.checkHeroBullets = function () {
   var i, b, bullet, enemy, collision;
   for (i in this.enemies) {
      enemy = this.enemies[i];
      for (b in this.heroBullets) {
         bullet = this.heroBullets[b];
         collision = ndgmr.checkPixelCollision(enemy, bullet);
         if (collision) {
            enemy.takeDamage();
            bullet.shouldDie = true;
         }
      }
   }
}
p.checkEnemyBullets = function () {
   var b, bullet, collision;
   for (b in this.enemyBullets) {
      bullet = this.enemyBullets[b];
      collision = ndgmr.checkPixelCollision(this.heroShip, bullet);
      if (collision) {
         bullet.shouldDie = true;
         this.heroShip.takeDamage();
         this.healthMeter.takeDamage(10);
      }
   }
}
p.checkShips = function () {
   var enemy, i;
   var len = this.enemies.length - 1;
   for (i = len; i >= 0; i--) {
      enemy = this.enemies[i];
      if (enemy.y > screen_height / 2) {
         collision = ndgmr.checkPixelCollision(this.heroShip, enemy);
         if (collision) {
            this.removeChild(enemy);
            this.enemies.splice(i, 1);
            this.spawnEnemyExplosion(enemy.x, enemy.y);
            this.heroShip.shouldDie = true;
            break;
         }
      }
   }
}
All hero bullets are checked to see if they collide with any enemy ship. If a bullet collision is detected on an enemy ship, its takeDamage method is invoked, and the bullet’s shouldDie is set to true so it can be disposed of in the next cycle. The same approach is used to check enemy bullets against the hero. A collision there will cause damage to the ship and update the health meter as well.
When detecting ship-on-ship collisions, the check on each enemy’s position is first run to determine if the enemy is anywhere near the ship. This is simply done by using the middle of the screen. If the enemy is not passed this point, then you know the check would be wasteful. With a ship-on-ship collision, the enemy should explode instantly. In other words, you shouldn’t wait till the next tick to determine if the enemy should die, and the destruction process should happen now. This is done because the hero’s death will temporarily stop the update/render cycle. The hero’s fate is determined by its own upcoming check function, so its shouldDie property is simply set to true.
Checking If the Hero Should Die
When it’s time for the hero to die, the appropriate actions are taken in checkHero, which checks on the hero’s shouldDie property. So far, the only death deciding factor on the hero has been a ship-on-ship collision. A quick check on the hero’s health is first run to also determine if the hero should explode (see Listing 11-28).
Listing 11-28. Checking If the Hero Should Die
p.checkHealth = function (e) {
   if (this.healthMeter.empty) {
      this.heroShip.shouldDie = true;
   }
}
p.checkHero = function () {
   if (this.heroShip.shouldDie) {
      this.numLives--;
      this.heroShip.explode();
      this.lifeBox.removeLife();
      this.betweenLevels = true;
   }
}
Checking the empty status of the health bar is done in the checkHealth method. If it is empty, the hero ship should be set to die. Finally, the checkHero method is run to check the hero’s status.
If the hero should die, the number of lives is decreased by one. Next, the explode method is fired on the hero, which will play the explosion within itself by playing the explosion sequence. A life is removed from the life box and the betweenLevels Boolean is set to true, which will temporarily stop all action. Whether the game should continue is factored next in the final check function.
If you recall, you set a listener on the hero ship instance for when the explosion animation is complete. This is how the checkGame function is called (see Listing 11-29).
Listing 11-29. Checking if the Game Should Continue or End After a Hero Explosion
p.checkGame = function (e) {
   if (this.numLives > 0) {
      this.heroShip.reset();
      this.heroShip.makeInvincible(true);
      this.healthMeter.reset();
      this.betweenLevels = false;
   }
   else {
      game.score = this.scoreboard.getScore();
      this.dispose();
      this.dispatchEvent(game.GameStateEvents.GAME_OVER);
   }
}
p.dispose = function () {
   document.onkeydown = null;
   document.onkeyup = null;
}
If there are more lives to spare, the hero ship is reset. It is then set to be invincible by invoking its makeInvincible method. This is so the player has a few seconds to dodge oncoming danger after the game is set back into action. The health meter is reset and the betweenLevels game property is set back to false, which will resume the action.
If the player is out of lives, the game should end. First, the current score is retrieved and stored in the global game namespace. Remember, you referenced this value when adding the score to the game over screen. Next, the dispose method is called and the game event GAME_OVER is dispatched.
The dispose method is created for cleanup before the game scene is removed in the state machine. In this case, the listeners are removed from the keyboard since they are no longer needed in the application. This also prevents unwanted results with the keyboard the next time a game instance is created.
That concludes the game code for Space Hero. A lot of code was introduced, which was broken into smaller sections to help you understand the structure of a high action game. You can find the complete game code in the Game.js file along with the other source code. You can download the code from the Source Code/Downloads tab on this book’s Apress product page (www.apress.com/9781430263401). You should be able to follow it from beginning to end, but if you find yourself stuck on any section of the code, stop and refer back to the section in this chapter that examined it.
Summary
The game created in this chapter demonstrates how you can organize your loaded assets and game code into several manageable classes. The concept of object pooling was introduced to enhance the performance in your games, and the use of the delta property in Ticker can further assure fluid movements when dropping frames. Precise, pixel-perfect collision detection was also accomplished by taking advantage of an open source, third party library that was built specifically to work with EaselJS.
In the next chapter, you’ll take a look at how a game created with CreateJS can be optimized for mobile browsers. You’ll enhance touch responsiveness and look at ways to scale your games to fit different screen sizes.