
CHAPTER 1
Game Planning and Programming Basics
In this chapter, we present some fundamental concepts of planning and programming games that you should keep in mind when creating games. You'll learn the basic ideas involved in creating a game and discover how XNA makes game development easy for you.
Planning the Game
The effort involved in creating a good game starts long before the coding phase. Somewhat undervalued by nonprofessional game programmers, planning is the most important phase of your game development project. In this phase, you define the guidelines for all the next stages.
Before thinking about which game you'll create, you need to choose your target market. This choice will define the direction for your entire game development effort.
Target Market
NPD Group, a market research company, divides the market into six categories (information copyrighted by NPD Group, 2008):
- Heavy gamers, who constantly play games and are responsible for most of the market sales
- Avid console gamers, who buy mainly console games and might play console games many hours a day
- Mass-market gamers, who usually buy only blockbuster games
- Prefer-portable gamers, who prefer playing games using portable devices
- Secondary gamers, who usually don't buy games and play games bought by other people
- Infrequent gamers, who play games occasionally
We won't provide an extensive study of these segments, but will highlight some significant points about the two "edge" categories.
Infrequent gamers are also called casual players. Games for this player category must be easy to play, without a complex storyline, and must provide challenging but brief levels to give the player a feeling of accomplishment in short matches. Games for such a market usually don't rely on highly detailed 3D graphics or extraordinary sound effects, and include card games (poker, hearts, solitaire, and so on), puzzles (Tetris, Sudoku, crosswords, and so on), board games (mah-jongg, chess, checkers, and so on), and similar. Don't be fooled by the simplicity of such games. Although they might be easier to develop, they rely on balanced levels and game play to sustain the appeal for the players, which can be hard to achieve.
Heavy gamers are also called hard-core gamers. These players take playing games seriously. They usually prefer difficult challenges and a good storyline that helps the players immerse themselves in the game world. Games for such players usually include extremely detailed 3D environments, engaging background music and sound effects, and a long game-play experience with many challenges.
Game Genre
Once you choose the target market, the next logical step is to define the game genre. There are many divisions of game genres, but, sticking with NPD Group's research approach, the game genre with the greatest growth in the past couple of years is family entertainment. Of all the games sold in 2007, 17.2 percent were categorized as family games—that's more than one of every six games sold. In addition, of the games sold in 2007, 56.6 percent were rated Early Childhood (EC), Everyone (E), and Everyone 10+ (E10+). The NPD Group's data indicate that only 15 percent of games sold last year were rated Mature (M). (This information is copyrighted by NPD Group, 2008).
Also, according to the Entertainment Software Association (ESA) web site (http://www.theesa.com), more women over 18 years old (around 33 percent of all game players) than boys under 18 years old are playing games. Also, 26 percent of Americans over the age of 50 played video games in 2008. This is a huge difference from the early years of video games, when most gamers were males younger that 25.
If you are planning to sell your game, or simply distribute it freely to as many people as possible, it's important to keep this kind of information in mind. Choosing the target market and the game genre for your game will help you to narrow down your choices about which game to develop. And, if you already have a game in mind, thinking about these points will help you to refine your ideas to the next step: defining the team involved in the game development project and choosing your place in such a team.
The Game Team
Another important game development concept is the game team. Smaller teams, or even a single multiskilled person, might create games for casual players. Creating games for hard-core players might involve a team with dozens of people skilled in different areas.
Although you might be able to develop games on your own, developing a game is always more than simply coding. You'll need nice graphics and sound effects, and you'll need to design the game levels, just to name a few different activities in the game project. In a big game development project, you'll need skills such as the following:
- Project management:
- Someone must be in charge of controlling the time involved, the scope of your project, the resources needed, communications, coordination between team members, and so on. Even if you're developing a game with a few friends, it's crucial to define who's in charge—who will solve problems and define the project's direction.
- Script writers:
- The script writers are responsible for writing the game's storyline, ultimately defining the challenges to face and the mysteries to solve. They usually help define the whole game background, such as the game characters, the dialogue, and the level division.
- Level designers:
- Level designers usually create and use tools to define each of the game levels, according to the programming requirements given by the coding team and the story written by the script writers.
- Artists:
- Artists is a broad category, encompassing concept art creators, computer art creators, the people responsible for texturing (creating textures for the 3D models), computer colorists, and so on. These folks create the splash (opening) game screen, game menus, and static images, and might also create the art for the marketing team.
- Modelers:
- These people are responsible for creating the 3D models for the game, following the concept and computer art.
- Animators:
- Creating a 3D model is not the same thing as animating it, so some teams include specialists in creating the model animations for the game. This team also creates the cut-scenes (the video sequences presented in the beginning of the game and at special points in the game, such as when a player wins a challenge, or at the beginning and end of each level).
- Musicians:
- This is also a broad category, which ranges from the responsibility for writing (and playing) the game background and ambience music to the people who create voices and sound effects for the game.
- Programmers:
- Programmers are in charge of writing the game code, including all math and physics calculations needed to create the desired game effects. This book is intended for people in this category.
- Testers:
- It's not a good idea for the same person who wrote the code to be responsible for testing it. The goal for the testers is to find as many bugs as they can. They attempt to do unexpected things inside the game, so the bugs surface in the game development process, instead of during the player's game.
This list could continue. A big game team could also include people who are responsible for preparing and conducting the marketing efforts for the game; people who deal with publishing channels; and people who take care of the needed hardware and software infrastructure for the game development and, sometimes, for the game publishing (if the project includes Internet game servers, for example).
Game Planning
Choosing the game's target market and genre, and selecting the right people for the game project, aren't the only key points you need to think about when planning your game. Here are some items you simply can't afford to overlook when planning your game:
- Game goal:
- Everything starts with a clearly defined game goal: to win the World Cup, to defeat the evil mage and avoid the world's destruction, to save as many lemmings as you can in each level, and so on. This goal ultimately guides the creation of the game storyline and defines whether it's an innovative game or just another clone of a best-selling title.
- Ending criteria:
- Along with the game goal, it's also important to define the game-end criteria: when to end the game, which includes the player's winning criteria (usually the game goal or some goal related to it) and the game over criteria (when the number of lives reaches zero, when time is up, and so on). When defining the game over criteria, it's also important to define how the player will return to a new game. Providing a saving or autosaving feature is crucial for long games, but might diminish the challenge for a short game such as chess or solitaire.
- Storyline:
- Closely related to the game goal, the storyline provides a background that explains and justifies the game goal and is crucial to keep the player immersed in the game. When the game has a storyline to be followed (not all games have one), everything in the game must contribute to it. The wrong music or a small out-of-place detail in a game would break the illusion as much as seeing someone using a wristwatch in a movie such as Gladiator or Troy. Creating nonlinear storylines makes the players feel like their decisions affect the game flow, which, although hard to achieve, greatly improves the gaming experience.
- Playability:
- Playability refers to how easy and fun the game is to play. The first 15 playing minutes are vital for players to decide if they will keep playing, so the game should provide a balance of easy-to-control movements for beginners and complex (and harder to use) movements for advanced players.
- Replayability:
- This term refers to the desire players have, after finishing a game, to play again. For simple games such as Tetris, the appeal of playing again is obvious, but for more complex games, you must plan this appeal in the form of built-in features (such as extra levels unlocked every time the player finishes the game), or as game extensions the player can download or buy.
- Forgiveness:
- Entering in the details of game play, this concept refers to the programmer's ability to provide the correct balance between mathematical accuracy and playability. For example, in a shooter game, if the player shoots a bullet that passes close to an enemy without touching the enemy, it's better to count it as an accurate shot. On the other hand, the programmer might choose to decrement the player's energy only for enemy shots that hit the player character's torso, ignoring bullets hitting head, arms, and legs, to make the game easier.
- Challenge:
- You might say that challenge is the opposite of forgiveness. It's the game's ability to provide difficult but not impossible challenges to beat. If the game is too easy or too hard, the player will simply exchange it for a better-balanced one. The game can provide different skill levels to choose from, and must offer levels with increasingly difficult challenges to keep the player interested.
- Reward:
- Rewarding players when they win is as important as offering good challenges for them to beat. These rewards might be special items, money, energy, lives, unlocking new levels, and so on. They include in-level challenge prizes (such as an amount of gold and extra experience gained for every monster defeated), end-of-level awards (such as presenting a cut-scene and giving bonus points), achievements (either LIVE achievements, which are presented in your game profile at Xbox 360 LIVE, or in-game achievements, such as the achievements in the Spore game), and a big show at the game ending. Remember that nothing is more frustrating for a player than spending dozens of hours to win a game, only to see a puny "congratulations" screen at the end!
- Saving and registering:
- How the game saves the evolution of player characters throughout the game and the means it provides to the players to register their experience are important parts of the game's playability and reward system. In long games, providing a way for players to start easily from where they left off, a way to register their high scores and compare their scores to other people's scores, and even the ability to "take pictures" from the game to present later to their friends might make the difference needed to provide the right appeal.
- Game ecosystem:
- Nowadays, the game team must remember that a video game isn't just the individual piece of game software. It includes communities of players on the Internet, homemade extensions created by fans, and so on. These considerations must guide all game development—from planning a long-term game franchise, coding a game that allows expansions, and establishing marketing approaches to increment the participation of fans in online communities, among other initiatives.
- Polishing:
- A great game is great only if every detail is planned and developed to contribute to player immersion. Such details should be tested to make sure they work as planned. If a game appears to offer some freedom of choice to the player, but presents a "you can't do this" message—or, even worse, an error message—every time the player tries something imaginative, it's halfway to a total failure. Remember to include test time in every game project, even the simpler ones!
Enough planning for now. In the next section, you'll create your first XNA project and explore the game programming concepts behind it.
XNA Game Programming Concepts
In this section, you'll create an empty XNA game solution, and then dig into the solution details to understand the basic concepts behind the program.
If you haven't done so already, download and install the latest version of XNA Game Studio and Visual C# Express Edition from the download section of the XNA Creators Club web site (http://creators.xna.com). If you already have Visual Studio 2008 Professional, XNA 3.0 will work just fine with that version. The examples in this book work in either programming environment.
Note XNA 3.0 runs with Visual C# Express 2008 or Visual Studio Professional 2008. XNA 2.0 runs with the 2005 version of these tools. If you open a project created with XNA 2.0, an upgrade wizard will pop up and convert most of the project to the new version.
Once everything is in place, follow these steps:
- Start Visual C# and choose File
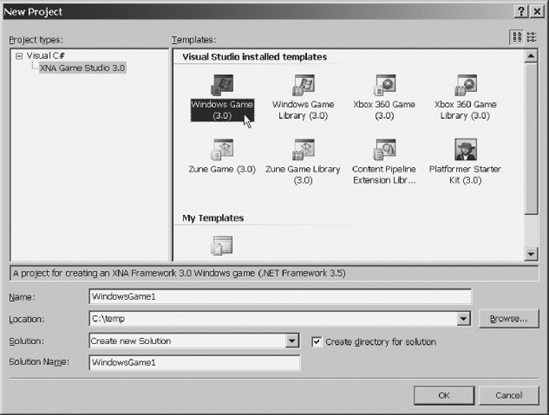
 New Project. You'll see the New Project dialog box, as shown in Figure 1-1.
Figure 1-1. Creating a new Windows Game (3.0) project in Visual C# Express Edition
- In the New Project dialog box, click the Windows Game (3.0) project type. Notice the Location field in this dialog box; it shows the location in which your project will be created. You're free to change this location to another directory of choice. Click OK to create a new game project named
WindowsGame1. - Once the project is created, click the Start Debugging icon (the green arrowhead) in the toolbar, or press the F5 key to run the newly created game. Although it's not impressive right now—just a blue screen—as you'll see, this project has all the basics you need to start coding a game.
- Close the game window.
Notice the files that were created for you, which appear in the Solution Explorer window, as shown in Figure 1-2.
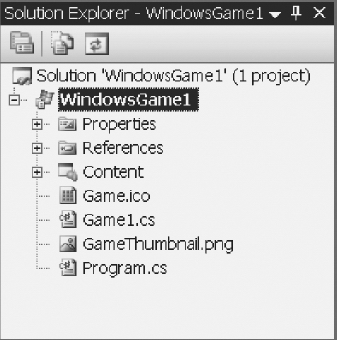
Figure 1-2. The Solution Explorer window for a new Windows Game project
Along with an icon file (Game.ico) and a thumbnail file (GameThumbnail.png), your new project has two code files: Program.cs and Game1.cs. Also, it has a Content folder, which will contain the game content (sounds, images, 3D models, and so on).
To better understand what XNA provides for you, let's look at the basic game structure.
General Game Structure
The central logic for every game includes preparing the environment where the game will run, running the game in a loop until the game ending criteria is met, and cleaning up the environment.
The idea of having the main program logic running in a loop is crucial for a game, because the game needs to keep running whether or not it has user interaction. This doesn't happen with some commercial applications, which do something only in response to user input.
The following pseudocode presents a game structure, including the game loop:
Initialize graphics, input and sound controllers

Load resources

Start game loop.  In every step:

    Gather user input

    Perform needed calculations  (AI, movements, collision detection, etc.)

    Test for game ending criteria - if met, stop looping

    Draw (render) screen, generate sounds and game controller feedback

Finalize graphics, input, and sound

Free resources
This is a simplified view—for instance, you can load resources inside the game loop when beginning each game level—but it still provides a good idea about a game's internal details.
Before XNA, this game structure had to be coded from scratch, so you needed to contend with many details that weren't directly related to your game. XNA hides most of this complexity from you. When you create a new Windows Game project, the two code files created encompass creating an object of the Microsoft.Xna.Framework.Game class (Game1 object), presenting the code with the meaningful methods of this class you need to override, and calling the Run method, which starts the game loop.
The next pseudocode fragment presents Game1 methods organized as the generic game loop presented before, so you can understand the general structure of the code before entering its details.
Game1() - General initialization (Game1.cs)

Initialize() - Game initialization (Game1.cs)

LoadContent() - Load Graphics resources (Game1.cs)

Run() - Start game loop (Program.cs).  In every step:

   Update() - Read user input, do calculations, and test for game ending (Game1.cs)

   Draw() - Renderization code (Game1.cs)

UnloadContent() - Free graphics resources (Game1.cs)
Comparing the two preceding pseudocode excerpts, you can see that the Windows Game project type provides you with a ready-made basic game structure, so you can start by adding your game-specific code.
Now, let's look at the details for the Program.cs file. Open this file, and you will see that it contains only ten code lines (not counting the using statements):
static class Program

{

    static void Main(string[] args)

    {

        using (Game1 game = new Game1())

        {

            game.Run();

        }

    }

}
This code fragment includes the Program class, where you have the XNA application entry point—the Main function. This function has only two lines: one for creating the game object from the Game1 class, and another for calling the Run method of this object, which, as you already know, starts the game loop.
Note that by creating the object in a using statement, it is automatically freed when the statement ends. Another point to remember is that the args argument on the Main function receives the command-line parameters used when calling the game. If you wish to include command-line arguments in your game—such as special cheat codes for helping you test the game—this is where you need to deal with them.
The Game1 class is implemented in the Game1.cs file. A quick look at the Game1 class reveals that it's derived from the Microsoft.Xna.Framework.Game class, the base class offered by XNA that encapsulates window creation, graphics, audio and input initialization, and the basic game logic we already talked about.
Note You can rename the Game1 class to better reflect your game; for example, you might name it Breakout for a Breakout game clone. If you do this, don't forget to rename the corresponding variable declaration and creation in the Program.cs file.
Now open the Game1.cs file. We'll explore its details in the next sections.
Game Initialization
The Game1 class starts by defining and creating objects that will reference the graphics device manager, most commonly referred to in the gaming world as the device, and a SpriteBatch object, used to draw text and 2D images. The Game1 class constructor also configures the root directory for the content manager, which is the entry point for the XNA Content Pipeline, so that the XNA Framework is informed of where to find game content (graphics, sounds, 3D models, fonts, and so on). The following code bit presents the device and content manager initialization:
public class Game1 : Microsoft.Xna.Framework.Game

    {

        GraphicsDeviceManager graphics;

        SpriteBatch spriteBatch;


        public Game1()

        {

            graphics = new GraphicsDeviceManager(this);

            Content.RootDirectory = "Content";

        }
In the next sections, you'll see some details about the device and the Content Pipeline, so you can get an overall idea of what's happening behind the scenes.
The Graphics Device Manager
The graphics device manager is your entry point to the graphics handling layer. It includes methods, properties, and events that allow you to query and change this layer. In other words, the device represents the way to manage the access to the graphics card's features.
For now, all you need to know is that by creating the graphics object of the GraphicsDeviceManager class, a game window is created for you, and you'll use the graphics object when performing any graphics operation. All the complexities of querying the features and initializing the 3D graphics layer are hidden from you.
The Content Pipeline
The Content Pipeline is one of the most interesting features XNA provides, because it simplifies how your game deals with content generated by different content generation tools.
In a non-XNA game, you need to worry about how to load game content such as audio, graphics, and 3D models. Where is the content located? How will your program read this content? Do you have the correct libraries to read the content in the format it was generated in by the commercial 3D tool you used to create it?
The Content Pipeline streamlines the processing of all game content so you can deal with it easily. It comprises a number of steps, which include importers to read the content and generate a well-known format, a processor that reads this format, a content compiler that generates the ready-to-use content, and finally the content manager. Figure 1-3 presents a high-level view of the Content Pipeline.
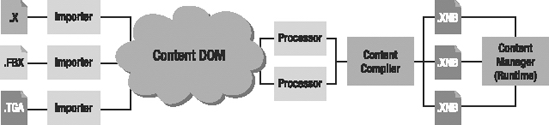
Figure 1-3. The XNA Content Pipeline
One interesting thing about the Content Pipeline is that it is based on content you effectively include in your C# project. That means that when the project is built, the content is transformed into a recognizable format and moved to a known directory, so the program will always know where to find the content and how to read it.
XNA 3.0 also offers content discovery and playing features that allow your game to load and play sounds without using the Content Pipeline. These features were created for Zune support, as you will see in Chapter 7.
When including content in your XNA program, you use one of the content importers provided as part of the framework. These importers normalize the content data, putting it in a format that can be easily processed later. The importers support the following file formats:
- 3D file formats: X (used by DirectX), FBX (transport file format, originally created by Autodesk and supported by most commercial and many freeware tools)
- Material file formats: FX (effect files, which can be used to describe 3D model rendering details or add effects to the 3D scene)
- 2D file formats: BMP, DDS, JPG, PNG, and TGA (the most commonly used image file formats)
- Font description: SPRITEFONT (XML files used by XNA, which describe how to generate a texture map from a specific font type size; the game then uses the images on the texture map to write text on the screen)
- XML files: XML format files copied to the game deployment directory, which can be used to store game settings, for example
- Audio file formats: XAP (audio project generated by the XACT tool), WAV, WMA, and MP3
After the importers process the content, when the game is running, the processors will read this content and generate an object the game can handle.
Finally, the game uses the content manager to read such objects so they can be easily used.
You can extend the content compiler to include new processors, and you can also extend the Content Pipeline with new importers, so you don't need to stick to the predefined formats.
Tip You can find many examples of how to extend the Content Pipeline at the XNA Creators Club web site (http://creators.xna.com). For instance, the skinned mesh sample presents a Content Pipeline extension to read animation data from FBX files.
Game Initialization Methods in an XNA Game
Looking back at the game logic pseudocode, you can see that before entering the game loop, you must do the needed initialization and load the game resources. In addition to the general game initialization done in the class constructor, seen in the previous sections, such initialization is done in the Initialize and LoadContent methods. For now, all you need to know is why there are two initialization routines; later chapters will provide more details about each of these methods.
The Initialize method is called once when you execute the Run method (which starts the game loop), just before the game loop starts. This is the correct place to include any nongraphical initialization routines, such as preparing the audio content.
The Initialize method also includes a call to its base method, which iterates through a GameComponents collection and calls the Initialize method for each of them. That means that for more sophisticated games, you can create game components that the Game class will also call. But don't worry about this detail right now; we'll get back to it upcoming chapters.
The graphics are loaded in a separate method because sometimes the game needs to reload the graphics. The graphics are loaded according to the current device settings to provide maximum performance. So, when these settings change (such as when you change the game resolution or when you go from windowed to full-screen mode), you need to reload the graphics. The LoadContent method is called every time the game needs to load or reload the graphics.
Game Finalization
Because XNA's internal closing routines and XNA's garbage collector do most of the finalization routines for you, the finalization is simplified.
The basic game project you created includes an overload for the UnloadContent method. Like its peer used to load graphics, this method is called every time the game needs to free any graphics resources you have loaded.
Advanced games might include specific routines in each game class to load and unload graphic resources, which would be called by the Game class's load and unload methods.
Game Loop
Most of the game processing occurs inside the game loop. Here, the game checks if there is player input to process, the game characters' artificial intelligence is calculated, the game components' movements are executed, the collisions between them are considered, the game-ending criteria are checked, the controller vibration is activated, the sound is played, and the screen is drawn.
The Microsoft.Xna.Framework.Game class provides two overridable methods that are called by the game loop: Update, where you must include the game calculations, and Draw, where you draw the game components. Let's take a closer look at these methods, presented in the next code snippet, to highlight some relevant details:
protected override void Update(GameTime gameTime)

{

    // Allows the game to exit

    if (GamePad.GetState(PlayerIndex.One).Buttons.Back ==

        ButtonState.Pressed)

            this.Exit();

    // TODO: Add your update logic here

    base.Update(gameTime);

}


protected override void Draw(GameTime gameTime)

{

    graphics.GraphicsDevice.Clear(Color.CornflowerBlue);

    // TODO: Add your drawing code here

    base.Draw(gameTime);

}
The first important point to discuss is the gameTime parameter received by both methods. This parameter is crucial to all the game logic, because the game must know how much time has passed since the last step of the game loop to do the correct calculations—for example, to calculate the correct position for the game components according to their speeds in the game. Let's take a closer look at the GameTime class properties:
ElapsedGameTime:- This property represents the amount of game time since the last time the game loop was called. Dealing with game time means that the game loop is called a fixed number of times per second, so the game logic can use game time as a basic unit of time to perform calculations. Creating games based on game time instead of real time is easier, because the game can define movements expressed in units per game update, simply incrementing the game components by the calculated rate in every update. When the
IsFixedTimeStepproperty of theGameclass istrue, this class ensures thatUpdatewill be called the correct number of times per second, dropping frames in a game slowdown if necessary.
ElapsedRealTime:- This property represents the amount of real time since the last time the game loop was called. By setting the
IsFixedTimeStepproperty of theGameclass tofalse, the game loop will run at maximum speed, being called as many times as possible per second. This could increase the code complexity, but also might allow for greater speed in the game.
TotalGameTimeandTotalRealTime:- These properties represent the total amount of time since the game started, counted in game time (fixed units per second) or real time.
IsRunningSlowly:- If the
Gameclass is calling theUpdatemethod less than defined in theGame.TargetElapsedTimeproperty, this property is set totrue, so the game has the information to do any needed adjustments.
Another detail worth mentioning about the Update method is that it comes with predefined code for ending the game when the Back button is pressed in the Xbox 360 controller:
if (GamePad.GetState(PlayerIndex.One).Buttons.Back == ButtonState.Pressed)

    this.Exit();
The GamePad class allows access to the current state of the controller and enables the game to fire the controller vibration. The class doesn't buffer user input, so the information you gather is exactly synchronized with current user interaction. As you can infer from the previous code, you can check for buttons, triggers, thumbsticks, or directional pad status. We'll talk about dealing with player input in the next chapter, including gamepad, mouse, and keyboard input.
The Draw method includes a line to clear the graphics device, filling the game window with a single color—CornflowerBlue:
graphics.GraphicsDevice.Clear(Color.CornflowerBlue);
As we stated earlier, the device (represented here by the graphics variable) is your interface to the graphics layer and will be used in every graphics operation. In this case, the code uses the GraphicsDevice property, which exposes properties and methods that allow reading and configuring many details about game rendering. We won't get into further details about this class now; you'll learn more about it in the next chapters.
Summary
This chapter covered basic game programming concepts presented in an XNA Windows Game project type. These general concepts are present in any game, so make sure you understand the idea behind the general game structure, especially the idea of the game loop:
Initialize graphics, input and sound controllers

Load resources

Start game loop.  In every step:

    Gather user input

    Perform needed calculations  (AI, movements, collision detection, etc.)

    Test for game ending criteria - if met, stop looping

    Draw (render) screen, generate sounds and game controller feedback

Finalize graphics, input, and sound

Free resources
It's also important to review the mapping of this general structure for games to the XNA Game class overridable methods:
Game1() - General initialization (already written for us)

Initialize() - Include nongraphics initialization here

LoadContent() - Include graphics initialization here

Run() - Start game loop.  In every step:

    Update() - Include code here to read and process user input, do calculations

                for AI, movements, and collisions, and test for game ending

    Draw() - Include the drawing (renderization) code here

UnloadContent() - Free graphics resources
In the next chapter, you'll write some simple examples that explore 2D game programming concepts, so you'll be ready to start creating 2D games with XNA.