
Chapter 9. Web Page Services
Maybe you still are not sure whether you need a full-blown website with your own web server, but you know you want more than the websites covered in the previous chapter have to offer. Fortunately, there are a lot of people like you who want most of the functionality of a website but don’t want the hassle of advanced functionality and lack the necessary technical knowledge. There is a type of website creation tool just for this group of people and this tool is commonly called web page services.
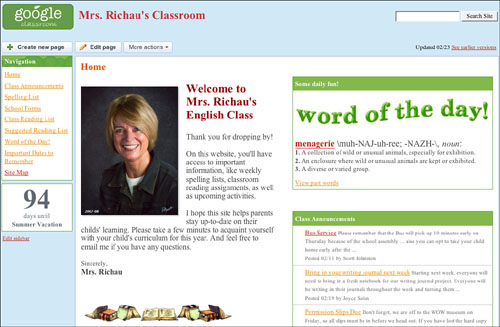
These services enable users to create websites using just their web browser (see Figure 9.1). These sites have many features of a standalone website (pages, images, links, widgets) but don’t require that you set up a web server or pay for a host. If you are interested in creating a site that won’t get much traffic and needs to be as cheap as possible, this is definitely an option. It won’t have all the bells and whistles, but it will do exactly what you need.
This chapter covers how to sign up for and build sites that use these web page services. I discuss the features and limitations of each of these sites. They are all free, but each has different features, so explore them all before making a choice. The sites covered in this chapter are
note
These web page services are always being updated and improved, so the instructions and images in this book might appear slightly different than what’s on your computer screen.
We all know that Google.com is pretty much the standard in web search engines, but did you know they also have a web page service? The web page service is called Google Sites and was released in 2008. Google Sites is actually based on the web page service of a company Google purchased called Jotspot. This section covers how to sign up for Google Sites, define a website address, create pages, and apply themes.
Google Sites uses an existing Google account or allows you to create a new one.
If you already have a Google Account (for Gmail, Google Reader or Google groups) all you need to do is use the same email and password for Google Sites. If you have a Google account, skip this section and move on to “Creating a Google Site,” which appears later in this chapter.
tip
If you are doing any work on the web these days, it is essential to have a Google account. It allows you access to all of Google’s sites and is free!
To sign up for a new Google account, you can start at the Google Sites home page.
1. Open a browser and type http://sites.google.com/. This opens the Google Sites home page (see Figure 9.2).

2. Click the Create an Account Now link. This takes you to the Create a Google Account page (see Figure 9.3).
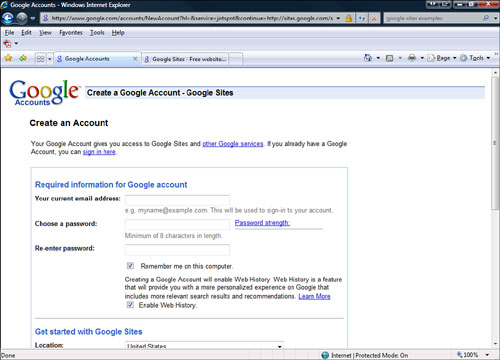
3. In the Required Information for Google Account section, enter a current email address and a password, and then re-enter the password.
4. In the next section, Get Started with Google Sites, you have the option of entering your location, there’s a word verification, and you can read the Google Sites Terms of Service.
5. After reading yet another thrilling Terms of Service, click the I Accept. Create My Account button.
6. An email is sent to the email account you provided and contains the information verifying your account. Read this email and follow the instructions.
7. After you have logged in, return to the Google Sites home page (sites.google.com).
After you have logged in to your Google account, return to the Google Sites home page so you can begin building your first Google Site.
1. Open your browser to http://sites.google.com/ and click the Create a Site button. This opens the Create New Site Page (see Figure 9.4). This page takes you through the beginning steps of setting up a Goggle Site.
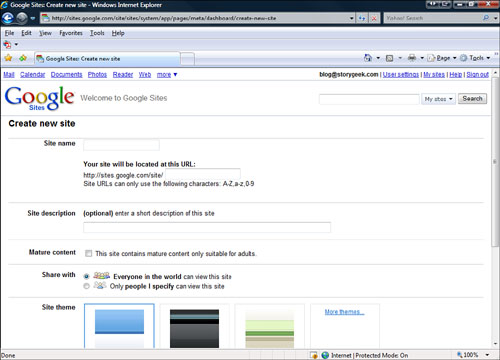
2. In the Site Name field enter the name of your Google Site. This can be anything you want it to be, but make sure it is a good representation of your content.
3. Next, define your site URL. This is how people will find your site. Google Sites creates a URL based on your site title as a suggestion, but this can be changed. The URL can include numbers or letters (both lowercase and uppercase), but can’t have spaces. This comes at the end of http://sites.google.com/site/.
note
You can’t have your own domain name with Google Sites. Your site has to exist under the umbrella of Google Sites. If you want your own domain name, this and other web page services might not be for you.
4. Enter a site description. This is what is displayed if someone searches for your site. It also helps you have a clear definition, in your own mind, of your website.
5. If your site includes or may include mature content (adult graphics, text, or sounds), then check the Mature Content box.
note
By default, Google Sites sets up two pages for you. The first page is the Home Page; the second is a site map that automatically creates a list of the pages on your website and how they are connected.
6. Next, chose to make your website either private or public. A private site allows only people you specify (with Google accounts) access to your site. Having your site open to the public means anyone can see it and search for it.
7. Google Sites have preloaded Site Themes. These themes give your website color and personality. There are about two dozen themes, but Google adds more all the time.
8. Enter the text code shown to verify you are a real person.
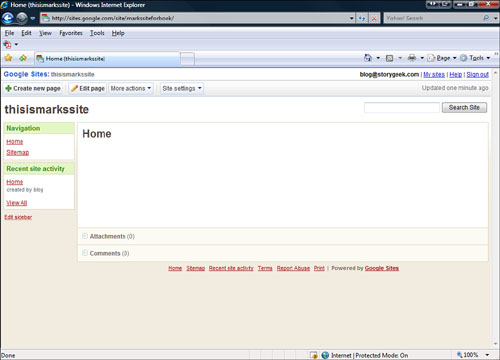
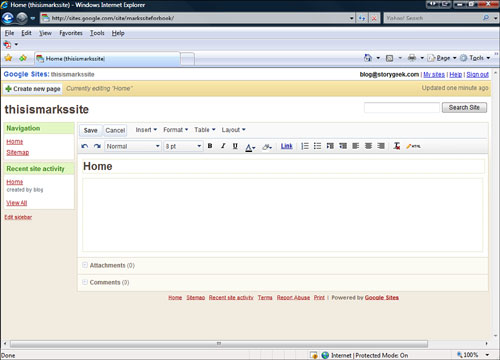
9. Finally, click Create Site. This creates the basics for your site and takes you to the Google Site web page editor and opens the home page. The Google Sites page viewer (see Figure 9.5) is what you use to create your site.
Each page in your Google Site can be edited separately. You can add a number of elements, enter and format text, add a table, or change the page layout. Just follow these steps:
1. Open sites.google.com and select your site under the list of My Sites.
2. Select Home from the navigation list.
3. Click the Edit Page button. This opens the Edit Page editing tool (see Figure 9.6). Use this tool to edit the text on the page, including the title and body text.
4. If you want to change the web page title, click the title area and edit the text.
5. To add or edit text to the body of a web page, click in the body area and enter the text. You can use the text formatting toolbar to set the font type, size, bold, italics, underline, color, or highlight. You can also use this toolbar to view and edit the page’s HTML.
6. If you want to add some special features to the web page, use the Insert drop-down menu. Each of the available objects are useful in different situations, so have fun with them. The following can be added to a website:
![]() Image
Image
![]() Link
Link
![]() Table of Contents
Table of Contents
![]() Horizontal Line
Horizontal Line
![]() Google Calendar Object
Google Calendar Object
![]() Google Document Object
Google Document Object
![]() Picasa Web Slideshow
Picasa Web Slideshow
![]() Google Presentation Object
Google Presentation Object
![]() Google Spreadsheet Object
Google Spreadsheet Object
![]() Google Spreadsheet Form Object
Google Spreadsheet Form Object
![]() Google Video Object (Google video or YouTube video)
Google Video Object (Google video or YouTube video)
![]() Recent Post Gadget
Recent Post Gadget
![]() Recently Updated Files Gadget
Recently Updated Files Gadget
![]() Recent List Items Gadget
Recent List Items Gadget
![]() Text Box Gadget
Text Box Gadget
![]() More (click to see the latest Google Gadgets)
More (click to see the latest Google Gadgets)
7. If you want to format text in ways not available on the text formatting bar, select the text and then use the Format drop-down.
8. If you want to insert a table, or edit an existing one, use the Table drop-down.
9. If you want to change the layout of the page, you can use the Layout drop-down to choose a one- or two-column layout.
10. When finished, click the Save button. Your page is now displayed with your changes.
Your Google Site starts with your home page, but you are free to add more pages. To add a new page, follow these steps:
1. Click the Create New Page button to add a new web page to your Google Site. This opens the Create New Page screen (see Figure 9.7).
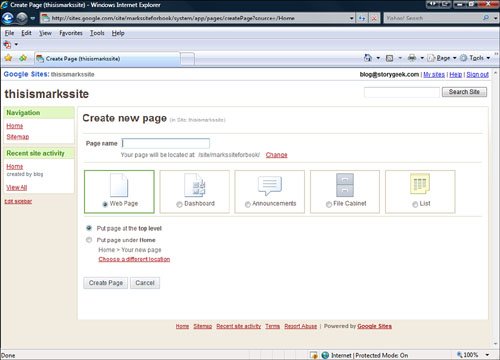
2. In the Page Name field, enter the page’s title.
3. Select the type of page you wish to add: Web Page, Dashboard, Announcements, File Cabinet, or List.
4. If you want the page to be at the same level as your home page, select Top Level. If you want the new web page under your home page, select that option.
5. Click Create Page. This adds the page and opens it in Edit mode.
As you are creating more pages, you may need to move the pages around. To move a page,
1. From the More Actions menu, click Move. The Move Page screen opens (see Figure 9.8). You use this screen to drag the page to the place where you want it.
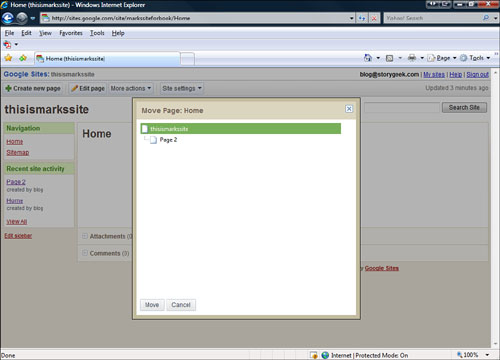
2. Click Move.
You might create a page that you later don’t need. To delete a page,
Each page has its own settings. These include showing the page in navigation bars, showing the page title and links to other pages, or allowing comments. You can also change the page URL. To edit page settings, follow these steps:
1. From the More Actions menu, click Page Settings. The Page Settings screen opens (see Figure 9.9).
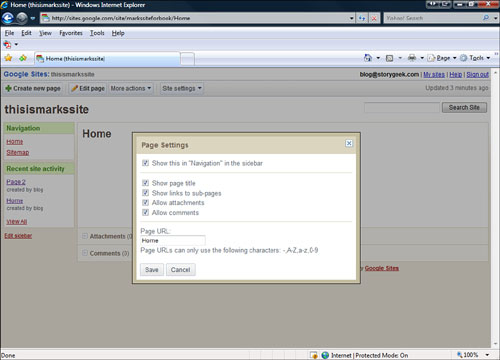
2. Edit the settings you want.
3. Click Save.
As with each page, there are a number of Google Site settings you can change. These include
![]() Site sharing
Site sharing
![]() Appearance
Appearance
![]() Other settings, such as the options you set when you set up the site.
Other settings, such as the options you set when you set up the site.
You can access all these settings through the Site Settings Menu.
There are some features and limitations with Google Sites you should be aware of before making your decision to stick with it. Pay close attention to these features and limitations before making this your permanent website.
SnapPages is a relative newcomer on the web page service front. The site was launched in 2007, and its best feature is that it minimizes the time and effort it takes to create good-looking web pages. In my opinion, these are just about the best-looking free web page services I have found. It is a shame their free version is so limited. Their templates are beautiful and very easy to use. SnapPages offers a one-stop shop for limited website creation. This section covers how to sign up for SnapPages, edit pages, add photos, and apply themes.
To use SnapPages you need to sign up for a SnapPages account. Start at the SnapPages home page:
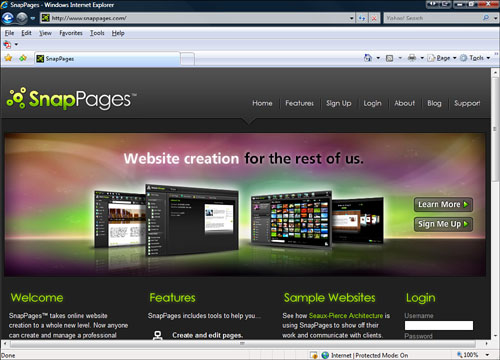
1. Open a browser and type http://www.snappages.com/. This opens the SnapPages home page (see Figure 9.10).
2. Click the Sign Up link at the top of the page. This takes you to the Sign Up for an Account page (see Figure 9.11).
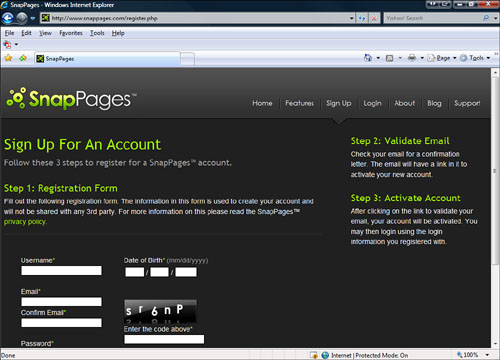
3. Enter your username, email (twice), password (twice), your date of birth, and the code displayed on the page.
4. Click the Submit button.
5. An email is sent to the email account you provided, which contains the information about verifying your account. Read this email and follow the instructions.
After you have logged in to your SnapPages account, return to the SnapPages home page so you can begin building your first SnapPage:
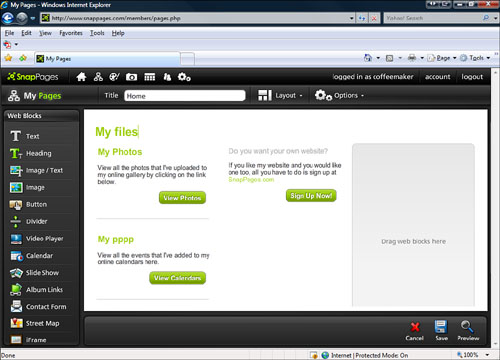
1. Open your browser to http://www.snappages.com/ and click the My Control Panel link. This opens your control panel (see Figure 9.12). This is your work area for creating pages, adding photos, and applying themes.

note
By default, SnapPages sets up three pages for you. The first page is the Home Page, the second is for photos, and the third is your calendar.
2. Click the My Pages button. It’s the button first on the right and looks like a page and a globe. This opens up the SnapPages editor. You can add new pages or edit these existing pages. The URL for your site is http://<username>.snappages.com/Home.htm.
Each page in your SnapPages site can be edited separately. You can add a number of elements, enter and format text, or change the page layout. To edit your pages, follow these steps:
1. Open snappages.com and click My Pages on your control panel, then select your home page.
2. Click the Edit Page button. This opens the page editing tool (see Figure 9.13). This looks like your page but all the text is editable. Use this tool to edit the text on the page, including the title and body text.
3. If you want to change the web page title, click the title area or any heading text and edit the text.
4. To add text to the body of a web page, or to edit text, click in the body area or any body text and enter or edit the text.
5. If you want to add some special features to the web page, use the Web Blocks menu. Each of the objects listed are useful in different situations, so have fun with them. The following can be added to a website:
![]() Text
Text
![]() Heading
Heading
![]() Image/Text
Image/Text
![]() Image
Image
![]() Button
Button
![]() Divider
Divider
![]() Video Player
Video Player
![]() Calendar
Calendar
![]() Slide Show
Slide Show
![]() Album Links
Album Links
![]() Contact Form
Contact Form
![]() Street Map
Street Map
![]() iFrame
iFrame
6. If you want to change the page’s layout, use the Layout menu to choose a layout.
7. When finished, click the Save button. Your page is now displayed with your changes.
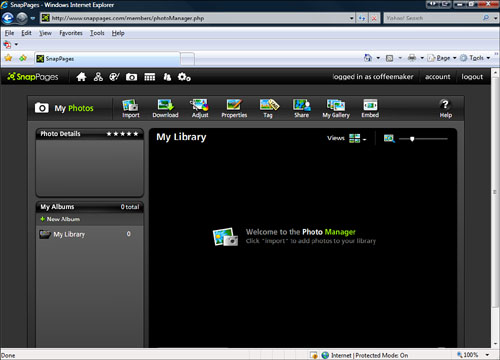
SnapPages enables you to easily add and edit photos. The Photo Manager tool (see Figure 9.14) allows you to upload and edit photos to use on your page.
As with each page, there are a few SnapPage settings you can change. These include
![]() Site Name
Site Name
![]() Site Tagline
Site Tagline
You can access these settings through the My Settings menu on the control panel.
SnapPages has some features and limitations you should be aware of before making a decision to stick with it. Pay close attention to these features and limitations before making this your permanent website.
Netvibes is a different kind of web page creation service. It enables you to create a start page that contains links to your favorite news sources, To Do list, weather, Facebook, flickr, craigslist, dig, eBay, and many others. It essentially brings the whole web to you on one page. The service also lets you share that page with others to make it a group project home page. This section covers how to set up your netvibes account, run the start wizard, add content, and make your page public.
To get all the benefits of netvibes, you need to sign up for an account. This enables netvibes to remember all your settings. To sign up for netvibes, follow these instructions:
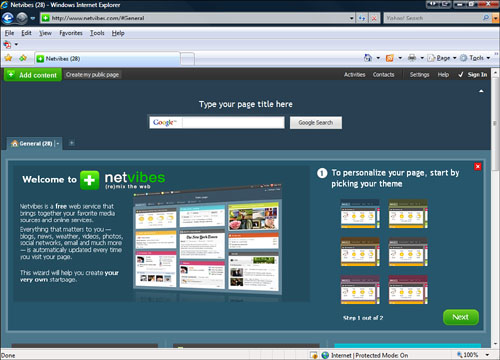
1. Open a browser and go to http://www.netvibes.com/. This opens the default netvibes start page (see Figure 9.15). Netvibes has some excellent default features (such as news, weather, and stock market information).
2. Click Sign In at the top-right corner. This opens the login window.
3. To create a new account, click Sign Up. This opens the Sign Up window (see Figure 9.16).
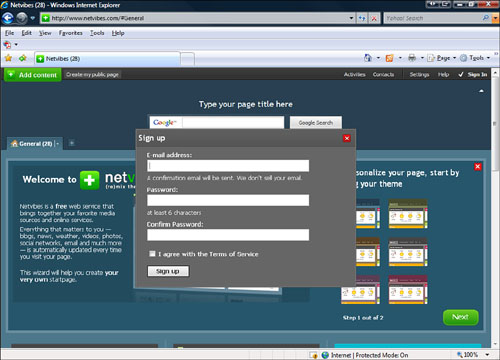
4. Enter your email and password, and then confirm the password.
5. After reading them (or not), agree with the Terms of Service.
Netvibes offers both public and private versions of its pages. You can have one public and one private page per email account. A private page can be seen by only you, whereas a public page can be viewed by anyone. Public pages are excellent ways to keep a group such as a business or class up on the latest information.
After you have decided on a public or private page, you need to personalize your netvibes page. Follow these steps to personalize your page:
1. Select a theme from the list, and then click Next.
2. Enter your city and select your country from the drop-down list. This provides local information to you on your netvibes page.
3. Check your interest in the Interests section and select the widgets you wish to add.
4. Click Done. Your netvibes page is displayed.
5. To further customize the content on your netvibes page, click Add Content at the top of the page and add the content you want.