
Chapter 19. Building a Blog Site with WordPress
In This Chapter
![]() Building a Blog Using WordPress.com
Building a Blog Using WordPress.com
![]() Setting Up Your Own Blog with WordPress Software
Setting Up Your Own Blog with WordPress Software
![]() Before Installing Your Software
Before Installing Your Software
Blogging is something you might have heard about over the last few years. What began as personal journals online has expanded to change the way journalism, politics, and businesses are communicating. This project covers what a blog is and how to use open source software called WordPress to build your own blog. WordPress runs on a website that allows you to create blogs hosted by WordPress. Also, to run and manage your own blog, you can download the WordPress software and install it on your own web host.
A blog is simply a web journal or log. The word blog is just a shortened form of web log. People have been writing logs and diaries for as long as there has been writing. Blogging is an electronic extension of these written words.
To put it simply, a blog is a list of dated entries that have the latest entry at the top of the web page.
The subject matter can be anything—and I do mean anything. There are blogs about food, knitting, and politics, or anything that gives you the urge to write. I write a blog, my wife writes a blog, and her mother writes three blogs (I always knew my mother-law had a lot of things to say and now so does everyone else). You can write about anything. The best advice is to write about something you love. You don’t even have to be an expert. Lots of people blog about how they learn more about the things they love.
When you tell some folks that you write a blog or ask them about blogging, they can’t imagine why anyone would want to write a blog. They say, “I have nothing to say, “or “Who would be interested in what I have to say?” To be honest, I think everyone has something to say, and who cares if only one other person reads your blog?
Actually you will be surprised who does listen to you. Blogging is a cheap and easy way to share your thoughts on anything you are interested in.
One of the web’s innovations is the ease of publishing things such as blogs. Before the Internet you had to have a printing press or convince a publisher to print something you had written. The Internet cuts out the middle man and enables anyone to publish easily. When blogging began, a blog was just a web page. This page had to be created in HTML and was a serious amount of work. So to add a new blog entry, the early blogger needed to write HTML code. This was a hassle, to say the least. Over time, websites specifically meant for bloggers began to show up. One of these was livejournal.com. LiveJournal made writing a blog easy. You signed up for an account and were off blogging about whatever you wanted to. The problem was that, for some people, LiveJournal was too restrictive. Bloggers could not create their live journals exactly the way they envisioned them. People wanted more control.
Ever have the feeling you are missing something that’s happening, maybe something on the web? It could be a stock tip, a big news story, or good news about your Aunt Winona. Syndication helps with that. With blogs and other sites, but predominantly with blogs, syndication enables you to have the website alert you when a blog is updated.
WordPress is a company that offers two services that are run out of two websites: WordPress.com and WordPress.org. WordPress.com enables you to set up and create blogs on their website. WordPress.org (run by the same folks) enables you to download the WordPress software and set it up on your own hosting site. If you are just starting out in the blogging world, I would suggest you start with WordPress.com.
WordPress.com is one of the biggest blog sites in the world. It hosts more than 3 million blogs and hundreds of thousands of posts. The site serves as a hosting site and a home for the open source version of the WordPress software. Not only can you set up a blog in just a few minutes, but you can search for other blogs and communicate with other users who use WordPress.com. Using WordPress.com is 100% free.
If you are up for something a little more difficult and you want a little more freedom, learn how to install WordPress software on your own web host, which is covered in the second part of this workshop.
Like most software, WordPress has a version. A version number is a simple way for people using and developing the software to make sure they are all using and talking about the same thing. For this workshop, I will be talking about WordPress version 2.6. You will probably be working with a later version, so there might be slight changes to how the software works. As a rule of thumb, you should have the latest version of the software.
Five Reasons to Use Wordpress.com to Host Your Blog
![]() You are brand new to blogging—WordPress.com makes it easy to get up and running quickly while connecting you to a larger community of more experienced bloggers.
You are brand new to blogging—WordPress.com makes it easy to get up and running quickly while connecting you to a larger community of more experienced bloggers.
![]() You have low technical ability—WordPress.com is a nice and easy way to access some very complicated technology that you never have to worry about.
You have low technical ability—WordPress.com is a nice and easy way to access some very complicated technology that you never have to worry about.
![]() You don’t want to spend any money for a blog—A Wordpress.com blog is free. You can’t save more money than that.
You don’t want to spend any money for a blog—A Wordpress.com blog is free. You can’t save more money than that.
![]() You don’t care about bells and whistles—If you want a simple, well run, robust blog and don’t care about the latest gadgets or add-ins, WordPress.com is for you.
You don’t care about bells and whistles—If you want a simple, well run, robust blog and don’t care about the latest gadgets or add-ins, WordPress.com is for you.
![]() You don’t need your own domain—WordPress.com blogs are all hosted under the WordPress.com domain. If not having your own domain isn’t an issue for you, then maybe WordPress.com might be a good choice for you.
You don’t need your own domain—WordPress.com blogs are all hosted under the WordPress.com domain. If not having your own domain isn’t an issue for you, then maybe WordPress.com might be a good choice for you.
![]() You have your own domain—If you want a specific domain name, the WordPress software has no domain name restrictions.
You have your own domain—If you want a specific domain name, the WordPress software has no domain name restrictions.
![]() You want a different theme than the default themes—You can find thousands of WordPress themes all over the Internet. Running your own version of WordPress software enables you to use them.
You want a different theme than the default themes—You can find thousands of WordPress themes all over the Internet. Running your own version of WordPress software enables you to use them.
![]() You care about bells and whistles—If you want every little add-on and the ability to control every little detail of your WordPress blog, you might want to download the software.
You care about bells and whistles—If you want every little add-on and the ability to control every little detail of your WordPress blog, you might want to download the software.
![]() You have good technical knowledge—Installing, configuring, and using WordPress software requires a good knowledge of some technical things.
You have good technical knowledge—Installing, configuring, and using WordPress software requires a good knowledge of some technical things.
![]() Your hosting service offers WordPress installs—My hosting service lets me automatically install WordPress. This gives me the best of both worlds.
Your hosting service offers WordPress installs—My hosting service lets me automatically install WordPress. This gives me the best of both worlds.
Building a Blog Using WordPress.com
Let’s imagine how someone might use a blog. Bill is a woodworker. He loves the smell of sawdust in his workshop. He goes to the lumberyard and picks out his supplies, takes them home, and makes cabinets for his wife to put the family china in. He is proud of his work and enjoys the compliments visitors to his home pay him. One day, Bill heard from a friend that there were woodworking blogs on the Internet. In the past Bill used the Internet only to look up an address or movie times; he never thought of looking for information about woodworking. At home he began looking into it and found hundreds of woodworking blogs. People had written blog entries on plans, wood shop design, choosing materials, and all things related to woodworking.
Bill loved reading about other people doing woodworking projects and looking at pictures they took during construction and finished products. After reading a number of blogs, Bill decided he wanted to try it on his own. Let’s build Bill his very own woodworking blog.
This section of the workshop covers getting a blog up and running on WordPress.com. If you are interested in running your own version of WordPress and hosting it somewhere else you should skip ahead to the second section of this project.
Before you begin at WordPress.com you need the following:
![]() An idea for your blog
An idea for your blog
![]() A name for your blog
A name for your blog
![]() An email address
An email address
Signing Up for WordPress.com
caution
Because Wordpress.com is a website that is constantly being updated, these instructions may be different than what you see.
Before you begin using WordPress.com, you need to sign up for the service. Don’t worry—it’s free and gives you access to their software and a whole community of people using WordPress.com.
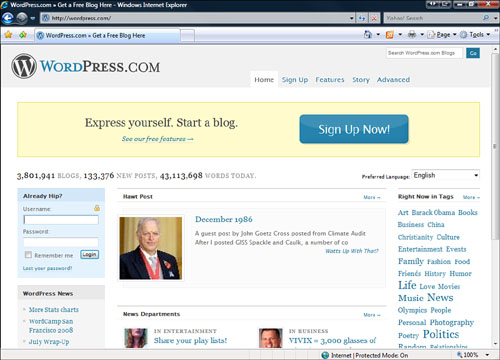
1. Open your web browser and navigate to http://www.WordPress.com. This is the home page for WordPress.com, and it’s the place where you sign up for blog hosting service (see Figure 19.1).
2. Click the Sign Up Now button. The Sign Up page appears (see Figure 19.2). On this page, enter all the information you need to set up your blog on the WordPress.com servers.
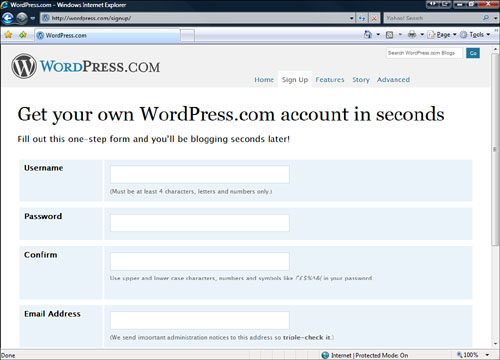
3. In the Username field, enter a username for your WordPress.com account. When choosing a username, you want to make it unique and easy for you to remember. For example, Bill might choose something like “woodworkingbill.” WordPress.com requires your username to be at least four characters long and have only letters and numbers in it.
4. Next, in the Password field, enter a word or phrase you are going to use for your password. As you enter your password, WordPress.com evaluates it and lets you know whether it is a good one. When choosing a password, make it unique and easy to remember. Try to have a combination of letters and numbers. The case of the letters matters also, so use a combination of upper- and lowercase. WordPress.com also allows you to use the characters !ӣ$%^&( in your password.
5. In the Confirm field, enter your password again. WordPress.com asks you to confirm your password to make sure you get it right.
6. In the Email Address field, enter your email address. This enables WordPress.com to communicate information and administration notes. Make sure it is correct.
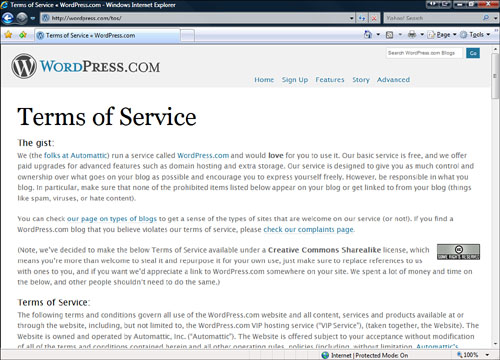
7. Beside the Legal Flotsam box, click Fascinating Terms of Service. This opens the Terms of Service Page (see Figure 19.3). Terms of Service is a nice title for a bunch of legal information about using the WordPress.com website. You should read over this if you have the time and patience.
8. When you are finished with the Terms of Service page, click the Back button on your browser. You are returned to the WordPress.com Sign Up page.
9. When you return to the Sign Up page, the Legal Flotsam box should be checked. If it isn’t, check it now.
10. Next, because you are here to create a blog, click the Gimme a Blog button.
11. Click Next. This opens the Blog Information page (see Figure 19.4). You use this page to give basic information about the blog you are starting.
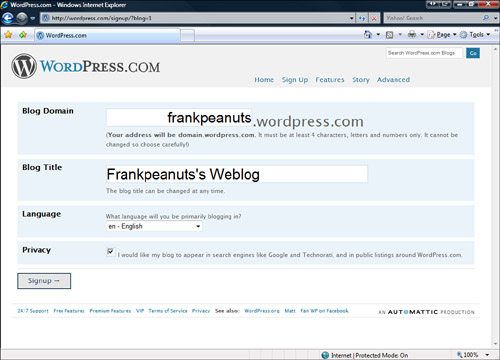
12. The Blog Domain field is filled out with what WordPress.com thinks you might want as your blog domain address. This is a subdomain of the WordPress.com domain, so you don’t need to pay any domain fees or register it. You can edit the Blog Domain only once, so choose wisely. You can use letters and numbers only (no symbols) and need to have at least four characters.
caution
After you click Signup at the bottom of this page, the blog domain cannot be changed. Double-check it before proceeding.
13. The Blog Title field is filled out with what WordPress.com thinks you might want as your blog title address. This can be changed at any time. Make the name representative of what you want to talk about in the blog. Bill chooses Bill’s Wood Working Weblog.
Geek Speak
subdomain
A subdomain is a domain under an existing domain. When you type blog1.domain.com or blog2.domain.com, both go to the same domain and different subdomains. A domain can have unlimited subdomains under it.
14. Next, select the language you want your blog and configuration pages to use. Your blog comes with several things: navigation, configuration, and help pages that are displayed in a particular language.
15. Select your privacy settings. If you want to have your blog listed in search engines such as Google and Technorati, and in public listings around WordPress.com, click the check box beside Privacy. If you prefer to keep your blog more private, ensure this privacy box is unchecked.
16. Click Signup. You are now signed up with WordPress.com with your very own blog. Next you need to activate your account.
After you have signed up for WordPress.com, you need to activate your account. WordPress.com is a public website that bad guys can use for bad things. These bad guys want to use WordPress.com’s servers for nefarious purposes. To keep bad behavior to a minimum, WordPress.com asks you to activate your account.
WordPress.com sends an email to the address you provided when you signed up. The website tells you it can take up to half an hour to get the email, but it is usually instantaneous. When you receive the email message, read it and follow the instructions in the email. The instructions include a link to activate your blog.
After you have clicked on the link to activate your blog, WordPress.com tells you that your site is active and gives you your username and password. Now you’re ready to log in to your blog or view it (see Figure 19.5).
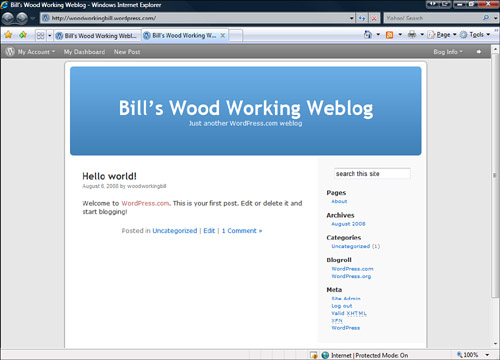
Notice that a blog entry is here already. WordPress.com creates a blog entry so you can see what one looks like. The title of the entry is “Hello World” and the text welcomes you to blogging with WordPress.com.
When you have a blog on WordPress.com, you have a public side and a behind-the-scenes side. The public side is what the world sees when they visit your blog domain. WordPress.com calls the behind-the-scenes side the Dashboard. The Dashboard is where you write and manage entries, change the look of the blog, and do other administrative tasks. When you log in to your blog you are given access to the Dashboard. You can log in to your WordPress.com blog in the following ways:
![]() Go to http://YOURBLOGDOMAIN/wp-login.php.
Go to http://YOURBLOGDOMAIN/wp-login.php.
Geek Speak
Meta menu
The Meta menu is the menu on your blog that lets you access admin pages. It is nothing more than links to special pages.
![]() On your blog, choose Login under the Meta menu.
On your blog, choose Login under the Meta menu.
![]() Go to WordPress.com and sign in under Already Hip. Then select your blog under Your Blogs.
Go to WordPress.com and sign in under Already Hip. Then select your blog under Your Blogs.
Logging in to WordPress.com by any of these methods brings you to the same place—your WordPress.com Dashboard (see Figure 19.6).
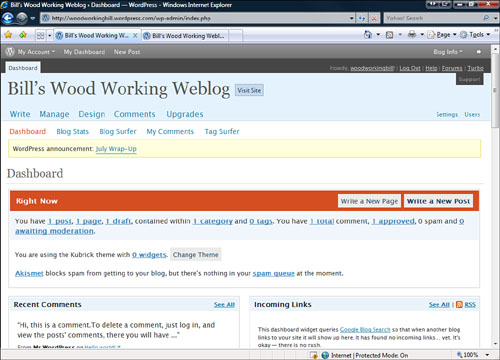
The WordPress.com Dashboard is a set of pages that enables you to
![]() Write blog posts
Write blog posts
![]() Manage blog posts
Manage blog posts
![]() Change the design of your blog
Change the design of your blog
![]() Manage the comments on your blog
Manage the comments on your blog
The next section of this project covers all these activities.
Now that you have created your blog, what’s next? You need to fill it with blog entries. You do this by writing a new blog entry.
1. On the Dashboard, click the Write tab near the top of the page. This opens the Write Post screen. This is the page you use to add new posts to your blog (see Figure 19.7). Posting a blog entry has two steps:
1. Saving—When you save the post, it is stored in your blog.
2. Publishing—When you publish a blog post, it becomes visible to people looking at your blog.

2. Enter a title for your blog post in the Title field. The title appears at the top of the blog entry and acts as a hyperlink to the blog entry. Your blog can be viewed as all your entries or one entry at a time. When you click on the blog entry title, only that entry is displayed.
3. Enter the blog post in the Post field. This is a special kind of text box. When you type in the box the text looks as it will appear on the blog. This is sometimes called WYSIWYG.
You can bold, italicize, and make text appear with a strike through it. There are a number of other formatting options for the text, including margins, bullets, and automatic numbering. This is the meat of your blog entry. Experiment with this part of writing blogs. Add pictures or other multimedia elements. Have a look at other blogs, see what they include, and if you like it, add it to your blog.
Geek Speak
WYSIWYG
WYSIWYG stands for What You See Is What You Get. It is pronounced whizzy-wig, and it means the text and graphics appear when you create them as they will in the finished document.
4. After you have edited your post, click Save. The post is now saved to your blog.
5. When you are ready for other people to see your post, click Publish. Now your blog post is visible to anyone who goes to your blog. Don’t worry: If you want to you can unpublish the post.
6. Go to your blog and check out your new entry.
After you have some blog entries created you might need to manage them. The management functions include
![]() Seeing the current status of posts
Seeing the current status of posts
![]() Editing existing entries
Editing existing entries
![]() Viewing stats of posts
Viewing stats of posts
On the Dashboard, click the Manage tab near the top of the page. This opens the Manage Posts screen (see Figure 19.8). This is the page you use to manage posts to your blog. This page lists all the posts currently saved on the blog, with the most recent post at the top of the list. It also shows you who wrote the post and its current status.
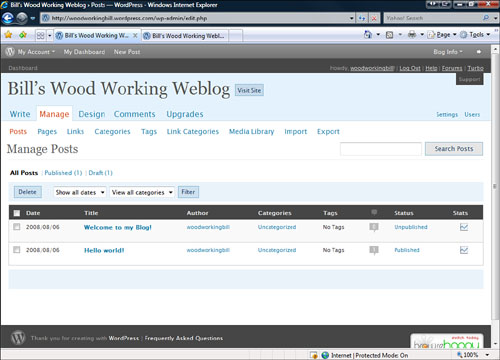
![]() To edit a blog post, click on the Title or Status.
To edit a blog post, click on the Title or Status.
![]() To view the stats of a post, click the status icon on the end of each post’s entry.
To view the stats of a post, click the status icon on the end of each post’s entry.
![]() To search the posts, enter what you are looking for in the Search field and click Search Posts.
To search the posts, enter what you are looking for in the Search field and click Search Posts.
The design of your blog is how it visually appears to your blog viewers. WordPress.com has templates of designs called themes.
When you sign up your blog, you can choose from among a number of preloaded themes that cover a wide range of looks and features. Again, have fun exploring different looks for your blog.
To change the theme of your web log
1. On the Dashboard, click the Design tab near the top of the page.
2. Select a theme and click on it. A preview of the theme applied to your blog appears (see Figure 19.9).
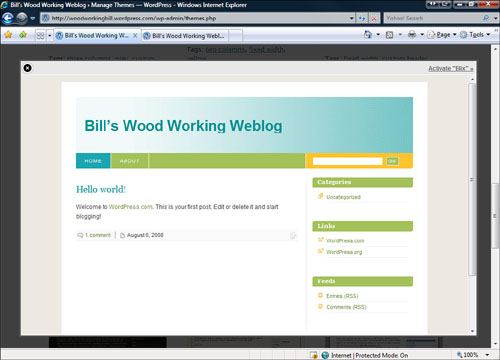
3. To apply the theme to your blog, click Activate in the top-right corner. To go back to your original design, click the X <Close Icon> on the left corner.
Keep checking your Design page because new designs are sometimes added, and something new may be more to your liking.
People who read your blog may have something to say about your blog posts. A comment is a textual addition to a blog entry. If someone reads your post and is compelled to leave a reply, WordPress.com gives them an easy way to do this. WordPress.com also enables you to moderate the comments. That means you can decide what comments are visible on your blog.
Geek Speak
spam
Just like your email box, your blog can have spam comments added to it. The term spam refers to unwanted solicitations to your email or blog. Lots of people will try to fill your blog with spam comments, but WordPress.com helps you keep this to a minimum.
With WordPress.com you can approve, mark as spam, unapprove, or delete comments.
On the Dashboard, click the Manage tab near the top of the page. This opens the Manage Comments screen, which is where you can manage comments on your blog.
![]() To approve a comment, select the check box beside it and click Approve. This makes it visible to anyone reading your blog.
To approve a comment, select the check box beside it and click Approve. This makes it visible to anyone reading your blog.
![]() If you find a spam comment, select the check box beside it and click Mark as Spam. This reports the origin of the comment to WordPress.com as spam in an effort to lower the number of spam comments on everyone’s blogs.
If you find a spam comment, select the check box beside it and click Mark as Spam. This reports the origin of the comment to WordPress.com as spam in an effort to lower the number of spam comments on everyone’s blogs.
![]() To remove a comment you previously approved, select the check box beside it and click Unapprove. This makes it invisible to anyone reading your blog.
To remove a comment you previously approved, select the check box beside it and click Unapprove. This makes it invisible to anyone reading your blog.
![]() To permanently delete a comment, select the check box beside it and click Delete. This removes the comment from your blog.
To permanently delete a comment, select the check box beside it and click Delete. This removes the comment from your blog.
What if you’ve already tried the WordPress.com solution and been happy with it, but you want to expand the functions of your blog or enhance the look and feel? Or maybe you’re more of a techie geek and you want something more than WordPress.com has to offer. If so, here’s the “wait, there’s more” that you’ve been expecting.
If you want to have more control over your blog site and have the technical knowledge to install, configure, and maintain it, downloading the WordPress software from WordPress.org could be the solution for you. Setting up your blog with the WordPress software enables you to add your own plug-ins, design your own themes, and control when your software is updated.
After you have decided to install your own WordPress software, you need to do a few things before you begin.
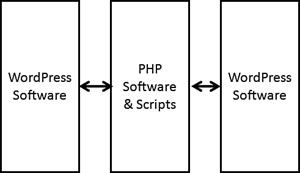
As you can imagine, quite a bit is going on in the background of WordPress software. It’s important to know what parts are involved and how they work with each other. There are a number of parts all working together to make your blog work correctly. When you use WordPress.com (as in the previous part of the chapter), all this is taken care of for you. When you use the WordPress software you are on your own, so you need to understand the architecture of a WordPress blog (see Figure 19.10).
Geek Speak
architecture
When you first hear the term architecture you probably think of people sitting behind art tables designing buildings. What I mean in this instance is computer architecture. Architecture is just a fancy term for the relationship between different software and hardware. The architecture of a system describes what computers are involved and what software runs on them. It also describes how the data is transferred between these computers.
This is the software that creates and runs your blog, including the website pages, themes, and add-ons.
PHP is a scripting language that helps you create a dynamic web page. This enables the WordPress software to create web pages on the fly. The PHP scripts also talk to the MySQL database to gather data and build dynamic pages.
You are probably wondering how much this is going to cost you. Nothing. All the software you need to run WordPress software is free. It isn’t trial software that you use for only a period of time before you have to pay for it. This software is given away for free. Do something amazing with it.
Before starting your installation of WordPress software, you need to do some simple things with your hosting service, and there are some tools you’ll need.
![]() If you need help finding a host, see Chapter 2, “Choosing a Location for Your Site, p. xxx.
If you need help finding a host, see Chapter 2, “Choosing a Location for Your Site, p. xxx.
To run WordPress 2.6, your web hosting service must provide the following:
![]() PHP version 4.3 or greater
PHP version 4.3 or greater
![]() MySQL version 4.0 or greater
MySQL version 4.0 or greater
![]() (Optional) Apache mod_rewrite module (for clean URIs known as Permalinks)
(Optional) Apache mod_rewrite module (for clean URIs known as Permalinks)
note
Without access to PHP and MySQL on your web server you cannot run WordPress software. If one of these pieces is missing you need to use WordPress.com or look for another blogging solution.
You might have to edit some text files to get your WordPress install up and running. A text file is simply a file with words and numbers in it that doesn’t contain formatting.
![]() TextWrangler (Mac)—An excellent Mac text editor.
TextWrangler (Mac)—An excellent Mac text editor.
FTP stands for File Transfer Protocol and is a fancy name for the software that allows you to easily transfer files between computers. When you are installing software such as WordPress, you need to move files between computers easily. An FTP client is a program that helps you do this.
This section covers how to download and install the open source software from wordpress.org. Read the instructions carefully, and remember to back up any important files.
The first step of setting up your own WordPress software is downloading it. Follow these steps to download the WordPress software:
1. Go to http://wordpress.org/download/.
Geek Speak
zip files
Zip files are collections of files that are compressed together into one file. When you unzip the file it expands the compressed files contained in the zip file and stores them on your hard drive.
2. Click the Download WordPress button. A zip file will be downloaded to your computer.
3. After the download completes, double-click the zip file to open it.
4. Unzip this file to your hard drive.
For the next steps you need to consult WordPress documentation. Differences in hosts and how you install and configure WordPress affect what actions you should take. Here are some documentation sources to help you with your installation:
![]() Installing Wordpress—http://codex.wordpress.org/Installing_WordPress
Installing Wordpress—http://codex.wordpress.org/Installing_WordPress
![]() Installing WordPress on Tiger—http://maczealots.com/tutorials/wordpress/
Installing WordPress on Tiger—http://maczealots.com/tutorials/wordpress/
![]() Installing WordPress locally on Fedora Linux—http://techiecat.catsgarden.net/article/install-wordpress-locally-on-fedora.html
Installing WordPress locally on Fedora Linux—http://techiecat.catsgarden.net/article/install-wordpress-locally-on-fedora.html
![]() Installing WordPress on Ubuntu with LAMP—http://www.supriyadisw.net/2006/12/wordpress-installation-on-ubuntu-with-lamp
Installing WordPress on Ubuntu with LAMP—http://www.supriyadisw.net/2006/12/wordpress-installation-on-ubuntu-with-lamp
This is by no means a super quick and easy process. Take your time and read the instructions thoroughly.
There are a lot of ways to customize your WordPress blog. The two main ways are to add new themes and plug-ins. Themes change how your blog looks, and plug-ins add new functionality.
There are lots of people making themes beyond what come installed with the WordPress software. A theme is just a collection of text and graphics files that tells WordPress how to display your blog information. Adding new themes is easy, and they offer all sorts of exciting looks to your blog.
Several excellent sites offer WordPress themes. You can do a Web search for “WordPress themes” or go to the following sites:
![]() WordPress.org Official Theme Directory—http://wordpress.org/extend/themes/
WordPress.org Official Theme Directory—http://wordpress.org/extend/themes/
![]() Best Word Press Themes—http://www.bestwpthemes.com/
Best Word Press Themes—http://www.bestwpthemes.com/
![]() Kate’s Theme Viewer—http://themes.rock-kitty.net
Kate’s Theme Viewer—http://themes.rock-kitty.net
To install new themes, follow these steps:
1. Download the theme zip file from one of the locations just listed.
caution
Do not pay for themes. There are literally thousands of free excellent WordPress themes, so don’t waste your money!
2. Extract the zip file to your hard drive. The zip file expands to a folder. Keep this folder exactly as it is unzipped.
3. Open your FTP client and connect to your host server.
4. Navigate to the wp-content/themes directory.
5. Move the complete theme folder into the themes directory.
6. Select the theme as previously described in the section “Changing the Design of Your Blog.”
The best way to add functionality is through plug-ins. A plug-in is a group of programming files that tell WordPress what new functionality to add. Plug-ins run within WordPress and enable you to expand the functions of your website. Maybe you want to add a calendar, connect to Facebook, Twitter, or other web 2.0 sites through your blog.
Several excellent sites have WordPress plug-ins. You can do a web search for “WordPress plug-ins” or go to the following sites:
![]() Official WordPress Plug-ins Repository—http://wordpress.org/extend/plugins/
Official WordPress Plug-ins Repository—http://wordpress.org/extend/plugins/
caution
Do not pay for plug-ins. There are literally thousands of free excellent WordPress plug-ins, so don’t waste your money!
![]() WordPress Plug-in Database—http://wp-plugins.net/beta/
WordPress Plug-in Database—http://wp-plugins.net/beta/
To download new plug-ins, follow these steps:
1. Download the plug-in zip file from one of the locations just listed.
2. Extract the zip file to your hard drive. The zip file expands to a folder. Keep this folder exactly as it is unzipped.
3. Open your FTP client and connect to your host server.
4. Navigate to the wp-content/plugins directory.
5. Move the complete plug-in folder into the themes directory.
6. Log in to the administrator interface of your blog.
7. Click Plug-ins on the top right of the interface.
8. On your blog, access the Plugin Management Panel in your Administration panels.
9. In the list, find the plug-in you just installed.
note
This is just an overview of the process. Read the plug-in documentation carefully to fully install and configure your plug-in.
10. Click Activate.
After customizing your own WordPress sites you might want to go even further. Excellent! Now you’ll want to make your WordPress blog unique. Common personalizations are things like creating or modifying themes, creating plug-ins, or even writing blog entries from your iPhone. Remember to back up your blog before you do this. This means storing a safe working copy of your blog on another computer.
Just because you download a theme and install it doesn’t mean you’re stuck with it. If you have the technical skill, WordPress enables you to access the plug-in files from the administrative interface and edit them.
1. Log in to the administrator interface of your blog.
2. Click Design.
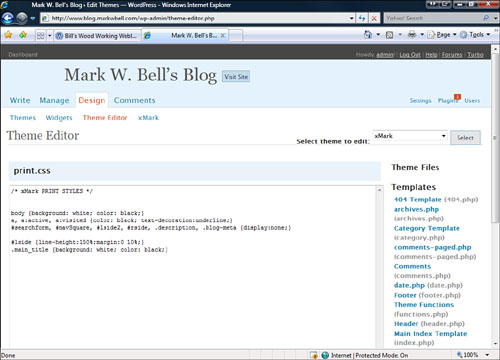
3. Click Theme Editor. The theme editor (see Figure 19.11) enables you to edit the files that make up the theme you are currently using.
4. Select a file on the right side under Theme Files.
5. Edit the file in the text box.
6. Click Update File.
After working a bit with existing themes, you might want to create your own. Creating your own theme can help you customize the CSS, HTML/XHTML, and PHP to your personal needs.
The process of creating themes is covered on the following websites:
![]() Theme Development—http://codex.wordpress.org/Theme_Development
Theme Development—http://codex.wordpress.org/Theme_Development
![]() Templates—http://codex.wordpress.org/Templates
Templates—http://codex.wordpress.org/Templates
![]() Make Your Own WordPress Theme—http://www.cypherhackz.net/archives/2006/12/13/make-your-own-wordpress-theme-part-1/
Make Your Own WordPress Theme—http://www.cypherhackz.net/archives/2006/12/13/make-your-own-wordpress-theme-part-1/
![]() Anatomy of a WordPress Theme—http://boren.nu/archives/2004/11/10/anatomy-of-a-wordpress-theme/
Anatomy of a WordPress Theme—http://boren.nu/archives/2004/11/10/anatomy-of-a-wordpress-theme/
Creating plug-ins is a more ambitious task. You really need to know how WordPress works inside and out before attempting this. Creating a plug-in takes quite a while and involves lots of testing and problem solving, but when a plug-in you have created works, it can be an awesome feeling of accomplishment.
Here are some plug-in creation resources:
![]() Writing a Plug-in—http://codex.wordpress.org/Writing_a_Plugin
Writing a Plug-in—http://codex.wordpress.org/Writing_a_Plugin
![]() Plug-in API—http://codex.wordpress.org/Plugin_API
Plug-in API—http://codex.wordpress.org/Plugin_API
![]() Your First Wordpress Plug-in (video)—http://markjaquith.wordpress.com/2006/03/04/wp-tutorial-your-first-wp-plugin/
Your First Wordpress Plug-in (video)—http://markjaquith.wordpress.com/2006/03/04/wp-tutorial-your-first-wp-plugin/
One of the newest things you can do with WordPress is blog right from your iPhone. WordPress has an iPhone application that allows you to blog, add pictures, and preview your posts. You can even edit existing posts right from your iPhone. If you don’t have an iPhone, just ignore this and let us lucky few tap on screens.
1. Install the WordPress application from the Apple Application store.
2. Enter your blog information.
3. Blog on your iPhone. Just don’t do it when you are driving!
For more information see the WordPress iPhone page, http://iphone.wordpress.org/.