
Chapter 16. Testing Your Website
By now you have probably spent hours on your website. You have let your creative juices flow and now you can’t wait to share it with someone. So you proudly send your URL off to a friend, who looks at the website and comments on only the broken links and missing images. You were expecting her to say how cool your work was but instead she only noticed what you did wrong. This is definitely not the reaction you wanted. To stop this from happening, you need to test your website before showing it to other people.
When you test your website, you simply go over the work you have done and make sure it is correct. Testing can involve very simple things, such as making sure your links work, to more complex things, such as optimizing your HTML code. This chapter gives you some guidelines on what to test as well as some free resources and tools you can use.
Nothing is more frustrating than going to a website and finding links that don’t work or images that are missing. How many times have you clicked on a link and been presented with the dreaded 404 error?
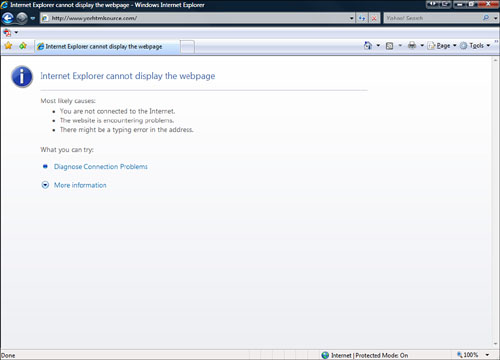
Broken links say a lot about a web designer’s work. When you come across a 404 error on the website, you might think
![]() This website is old and forgotten.
This website is old and forgotten.
![]() This web designer doesn’t care about broken links.
This web designer doesn’t care about broken links.
![]() This web designer did not check any work.
This web designer did not check any work.
![]() This web designer doesn’t know what he or she is doing.
This web designer doesn’t know what he or she is doing.
You don’t want people to think these things about you or your website. You want them to come to your site for the content and not let mistakes or broken links get in the way. Nothing is more embarrassing than when someone emails you about a problem with your website. It’s worse only if no one tells you about the error.
If you’re developing a website for a business or an organization it’s especially important to test the site thoroughly so that the business or organization doesn’t look bad.
A well-tested website makes everyone involved look good. When all your links are working, your images are showing up, and your site is loading correctly in multiple browsers, you can be pleased knowing that your visitors will have a great experience.
A test plan is a list of the things you are going to test before releasing your website. It might be just a list you create for yourself in a Word file, or it might be something more elaborate that your boss or clients want to see. If you are building websites for other people, it is essential that you write up a formal test plan.
You need to think about several things as you create your test plan. “Do all my links work correctly?” is just one question in what can be an overwhelming list of things to test. Your test plan is probably going to go through some changes. Keep a list of things to test for as you are developing your site and it will be easier for you to remember everything when it comes time to test.
I always begin by defining what must work on the website before I can release it. Start at the end by deciding what must work, then work backward. Think of it like starting a journey—you need to know where you are going before you can decide how to get there. For example, the page must load correctly in the major browsers. If this is not the case, you are not finished developing the website. If the page loads correctly, you can cross that off the list and move on to the next test. Defining the minimum necessary to be correct before you can call the website done helps you know when you can release it.
For any website to be called finished, it must have some level of basic functionality. This includes simple things, such as making sure the text looks right and is spelled correctly, to making sure your HTML forms and PHP scripts work correctly. Basically, do all the things that are supposed to work actually work? At a minimum these are the things that need to be checked on a website:
![]() All links go to correct pages
All links go to correct pages
![]() Internal links
Internal links
![]() External links (links to other websites)
External links (links to other websites)
![]() Email links
Email links
![]() No 404 errors
No 404 errors
![]() All forms work correctly
All forms work correctly
![]() Form captures the right data
Form captures the right data
![]() Form hides passwords
Form hides passwords
![]() Form buttons function correctly
Form buttons function correctly
![]() Form results stored correctly
Form results stored correctly
![]() Page displays properly in all major browsers
Page displays properly in all major browsers
![]() Check major browsers at different resolutions (see the section “Testing Browsers”)
Check major browsers at different resolutions (see the section “Testing Browsers”)
![]() All graphic files display properly
All graphic files display properly
![]() No missing graphics icons
No missing graphics icons
![]() Graphics look good at different resolutions and depths of color
Graphics look good at different resolutions and depths of color
HTML is an amazing language that has changed the online world. One of the great features of HTML is that, by and large, it works the same for all browsers. Credit for this goes to the World Wide Web consortium (W3C). This is a group whose goal is to bring the Web to its full potential and act as a gatekeeper of changes to HTML. The W3C offers a number of useful tools to help you validate your HTML. These tools are great, but the W3C’s standards are incredibly high. It is difficult, if not impossible, to find a website with which the W3C’s tools can’t find a problem. Don’t worry: Use the W3C’s validation tool to catch the obvious problems, and don’t sweat the super small stuff.
To use the HTML Validator, follow these steps:
1. Go to http://validator.w3.org/ (see Figure 16.2).
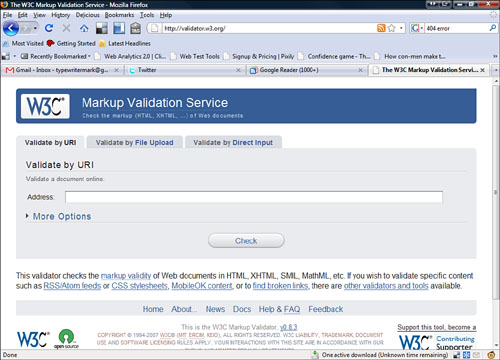
2. Enter your website address in the Address field.
3. Click Check.
The Validator then checks your web page and returns a report with errors or warnings. As I said before, the Validator is probably going to find tons of things “wrong” with your page. Read the report carefully and evaluate whether the errors and warnings are really important. Some errors are major, such as HTML problems you might not have caught, while others are very minor. Review the results, and use the Validator again whenever you make substantial changes to your website.
Not everyone on the web uses the same browser. Whenever one browser seems to have a dominant lead on the market another one comes along. In the early ’90s this became a big problem with web developers because the browsers all began using their own HTML tags and interpreting standard tags in different ways. This means that if you are serious about testing your website, you need to test it on the major browsers.
To test your site on different browsers, you should have the latest versions of the following browsers installed so that you can check your website on them:
![]() Mozilla FireFox
Mozilla FireFox
![]() Microsoft Internet Explorer
Microsoft Internet Explorer
![]() Safari
Safari
![]() Opera
Opera
![]() Flock
Flock
![]() Chrome
Chrome
Keep in mind that some browsers read HTML differently than others. You should always pay attention to a couple of things when checking other browsers (they have all caused problems in the past):
![]() Tables
Tables
![]() Lists
Lists
![]() Forms
Forms
![]() Scripts
Scripts
Just because you have your computer set at one resolution doesn’t mean that everyone has the same resolution. Testing your website at different resolutions shows you how other people can see your website.
Geek Speak
resolution
The resolution of your screen is how many pixels wide or tall it is. Your screen can’t change size but the number of pixels displayed can change. For example, your resolution might be 1024 pixels×768 pixels, whereas mine is 1680×1250. My screen has a higher resolution. Your website will look different on my screen than it does on yours.
Do not design with only your own resolution in mind. It is common for new website designers to think everyone has resolution settings that are the same as those on the developer’s computer. This could not be further from the truth. In the early days of the web, you could depend on people having 800×600 or 1024×768 resolutions, but now with fancy plasma widescreen monitors the list of resolutions in use has grown. Graphics, text, and tables all can look very different at different resolutions.
You can test resolutions in a couple of ways:
![]() Change your own resolution—One way to see how other people see your site at different resolutions is to change the resolution of your monitor and look at your site. This works well but becomes tedious.
Change your own resolution—One way to see how other people see your site at different resolutions is to change the resolution of your monitor and look at your site. This works well but becomes tedious.
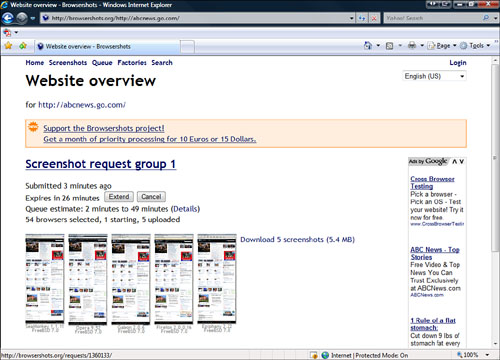
![]() Use a web tool—Several websites can help you see the resolution on different browsers. The best of these is called Browser Shots (http://browsershots.org/). In just a few minutes, you can get images of a website on dozens of browsers at almost as many resolutions and color depths (see Figure 16.3). Browser Shots shows you only pictures, but seeing images can point out problem areas that might show up on other browsers.
Use a web tool—Several websites can help you see the resolution on different browsers. The best of these is called Browser Shots (http://browsershots.org/). In just a few minutes, you can get images of a website on dozens of browsers at almost as many resolutions and color depths (see Figure 16.3). Browser Shots shows you only pictures, but seeing images can point out problem areas that might show up on other browsers.
If a particular part of your website is intended to be printed—something like a map or form—make sure you test it on several different printers to see how the printed page looks.
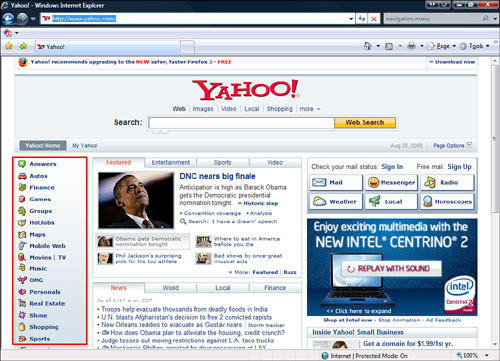
How a visitor navigates around the pages of your website is part of its usability. You need clear markers of where the visitor currently is in the website, where they can go, and standard, easy-to-understand navigational elements on each page. It’s important that all your pages have consistent elements so your visitors don’t get lost in a mess of inconsistent web pages (see Figure 16.4).
Geek Speak
usability
Usability is a fancy word for how easy or hard it is to use your website. You may see or hear it around website testing circles. By doing the tests you are doing in this chapter, you are checking your website’s usability.
Along with consistent navigational elements, you also need to make sure your website is graphically consistent. Each page should look similar to all the others. This doesn’t mean they all have to be exactly alike, but they should share visual elements, such as font, color, and arrangement.
One thing you might think of doing is making a template for each page. A template is just a model for the look and design of each page that you fill with different content. Templates can range from very complex to very simple. To learn how to use templates for your site, refer to Chapter 13, “Building a Site Using HTML.”
For more advanced web designers, testing consistency of design means testing that your CSS is working properly and the styles are applied to the appropriate text. For more information on using a CSS, see Chapter 13.
Your website’s security is worth worrying about. You might have created a simple website for your family photos and don’t think you have anything worth worrying about, but a web vandal could gain access to your site and destroy it, or worse, use your website as a base to destroy other websites or gain access to your personal computer.
The best place to start is to check security with your hosting provider. You might want to ask your server provider whether they offer 128-bit security, spam protection, firewall protection, or something like ModSecurity (http://www.modsecurity.org/), an open source web application firewall.
If you are using something like Google Sites, your website’s security is handled by some of the best security on the web, so you have to worry more about spam than high security risks, but if you are running a business site that collects credit card information, you need to be very concerned with security. Check with your hosting provider about how it ensures your website’s security.
Next, read up on website security testing. Several excellent websites can help with this, including
![]() Open Web Application Security Project (OWASP)—http://www.owasp.org
Open Web Application Security Project (OWASP)—http://www.owasp.org
![]() The World Wide Web Security FAQ—http://www.w3.org/Security/Faq/
The World Wide Web Security FAQ—http://www.w3.org/Security/Faq/
![]() W3C Security Resources—http://www.w3.org/Security/security-resource
W3C Security Resources—http://www.w3.org/Security/security-resource
Unless you are creating a website especially for people with impaired vision, you might not be concerned about how accessible the website is to handicapped folks. The American Federation of the Blind suggests ways in which you can improve the accessibility of your website, such as
![]() Labeling graphics and images
Labeling graphics and images
![]() Labeling links
Labeling links
![]() Viewing your site without graphics
Viewing your site without graphics
(Source: http://www.afb.org/Section.asp?SectionID=57&TopicID=167&DocumentID=2176.)
Also, you might want to make sure your site is accessible to the color blind. For more information about making your site color blind accessible see Chapter 11, “Working with Images.”
Testing is an ongoing process that you really can’t finish, but you can come to a point where you think about letting other people see your creation. Remember, you are never going to get all the errors all the time. Fix what you can as quickly as possible and move on. Don’t let a single error derail your website project.
Also, learn from your mistakes. Figure out what went wrong, and then apply it to the rest of the site or sites you are working on.
You can use a number of tools to help you test your website, ranging from the simple tools mentioned already in this chapter to the following more complex tools:
![]() HTML Tidy—This is another great tool from the folks at W3C. HTML Tidy offers you ways to make sure your HTML is as clean and efficient as possible. The tool goes through all your HTML code and makes suggestions. It checks for connecting tags and orphan code.
HTML Tidy—This is another great tool from the folks at W3C. HTML Tidy offers you ways to make sure your HTML is as clean and efficient as possible. The tool goes through all your HTML code and makes suggestions. It checks for connecting tags and orphan code.
![]() HTML Tidy site—http://www.w3.org/People/Raggett/tidy/
HTML Tidy site—http://www.w3.org/People/Raggett/tidy/
![]() HTML Tidy online version tool—http://infohound.net/tidy/
HTML Tidy online version tool—http://infohound.net/tidy/
![]() UITest.com Web Development Tools—This is a set of tools to help you automatically test your website. This includes accessibility, browsers, coloring, and a site check.
UITest.com Web Development Tools—This is a set of tools to help you automatically test your website. This includes accessibility, browsers, coloring, and a site check.
![]() UITest.com Web Development Tools site—http://uitest.com/
UITest.com Web Development Tools site—http://uitest.com/
![]() Dead-Links.com Free Broken Link Checker—This site checks your website for broken links. A good fast tool for checking for broken links.
Dead-Links.com Free Broken Link Checker—This site checks your website for broken links. A good fast tool for checking for broken links.