Before we actually click on that magic export button, we're going to need to make a few entries into our Project Settings screen, and set up our purchases. Go ahead and open the Project Settings interface (using the gear icon in the top-right of Buildbox).
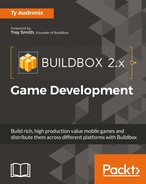
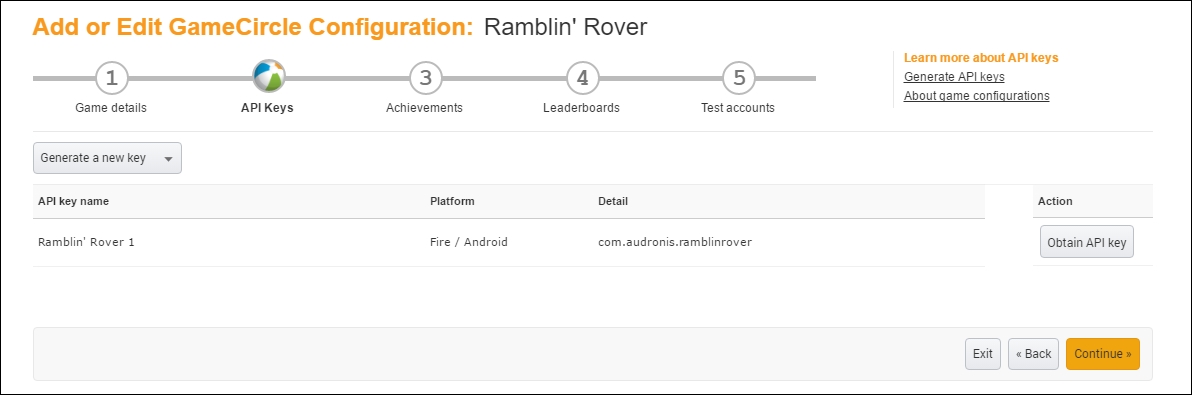
Each distribution channel has different fields on the General screen. But first, let's cover the commonalities. Right away, we're going to have to rename Ramblin' Rover to Ramblin Rover (apostrophes are not allowed in game titles for some channels). Secondly, we're going to need to place our icon (drag it from the Misc folder; it's called Icon1024.png). Finally, every distribution channel requires a Bundle ID.
Bundle IDs have a very specific format. It kind of looks like a reverse URL. Always start with com. Then comes your name or company name (we use Audronis), then the game name. So, it looks like com.audronis.rover in the end.
Let's just rip the band-aid off (so to speak) and get the hardest one over with first...
Ok... buckle up; this is the complicated one. First, it has to be said... you MUST have a Mac to run xCode. Technically, any Hackintosh (running MacOS on non-Apple hardware) is a violation of Apple's EULA (End User License Agreement). So it's not advisable. And if they ever find out, it can result in not only your app being removed from iTunes... but your user account being banned. Thanks Apple. I'm not aware of this ever actually happening. However, the spectre looms, so we advise you to consider this possibility.
We didn't bother with setting up the app in iTunes Connect because xCode needs to open something for the build ID to be known to iTunes connect. Don't worry; we'll set up xCode soon. First, let's just get our game exported.
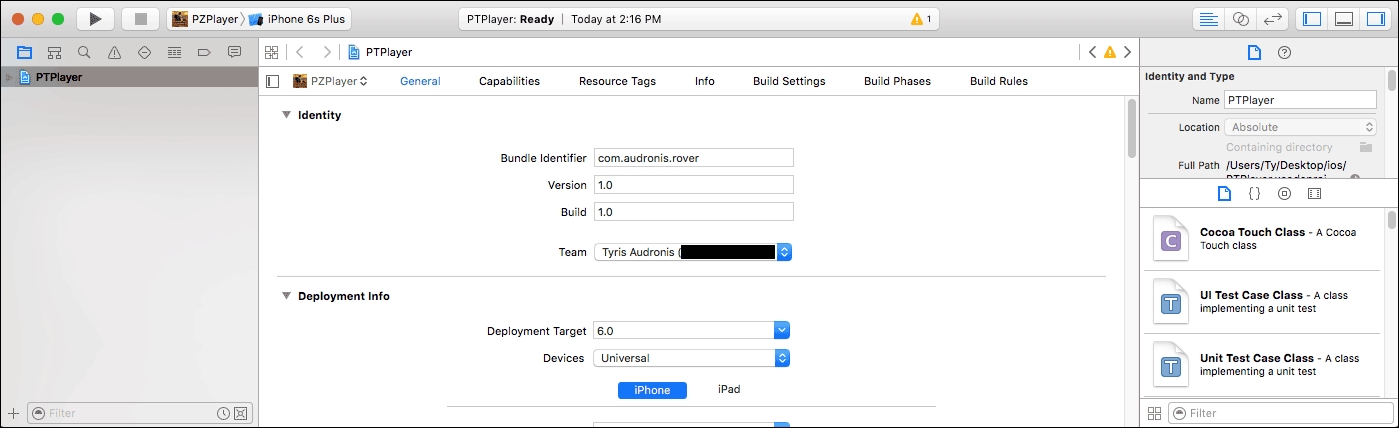
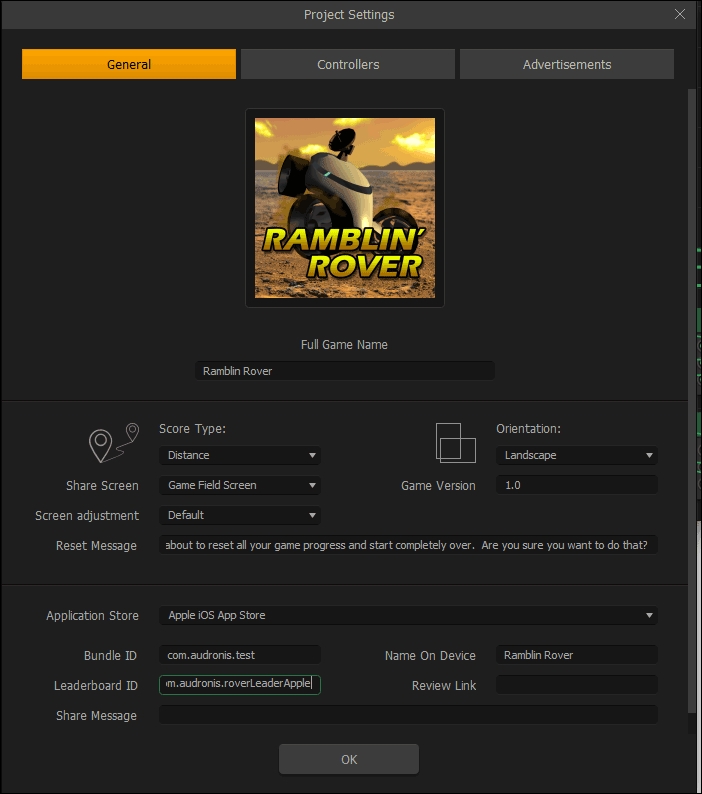
Go ahead and set up the Project Settings interface to look like the following screenshot:
Notice we've used com.audronis.rover for our Bundle ID. For now, we have to leave our Leaderboard ID and Review Link blank. Thanks Apple. You may read that phrase a lot in this chapter. This process is relatively frustrating when compared to Google or Amazon. Go ahead and close the Project Settings window, and let's export this thing!
Go to File | Export | iOS and select an area to send your export to. It takes a bit, so if your Buildbox appears to lock up, don't worry... it's just exporting (there is no progress bar). That's it for Buildbox's end at this point. Now we need to compile using xCode on a Mac.
Don't worry; you don't have to invest in a $2500 Mac Pro. This can be done on a Mac Mini (which you should be able to get on eBay for just a couple hundred dollars). Power isn't necessary for compiling. We're using a 2008 Mac Mini, without so much as a keyboard or mouse. We're just using TeamViewer to access it from our Windows machine. You'll need to get the files from your Windows machine (if you're using Windows) to the Mac (thumb drive, network, Dropbox, and so on). We used a shared drive from our Windows machine to access the files from our Mac across the network. Just don't compile across the network (copy the files to the Mac... way too slow on a network).
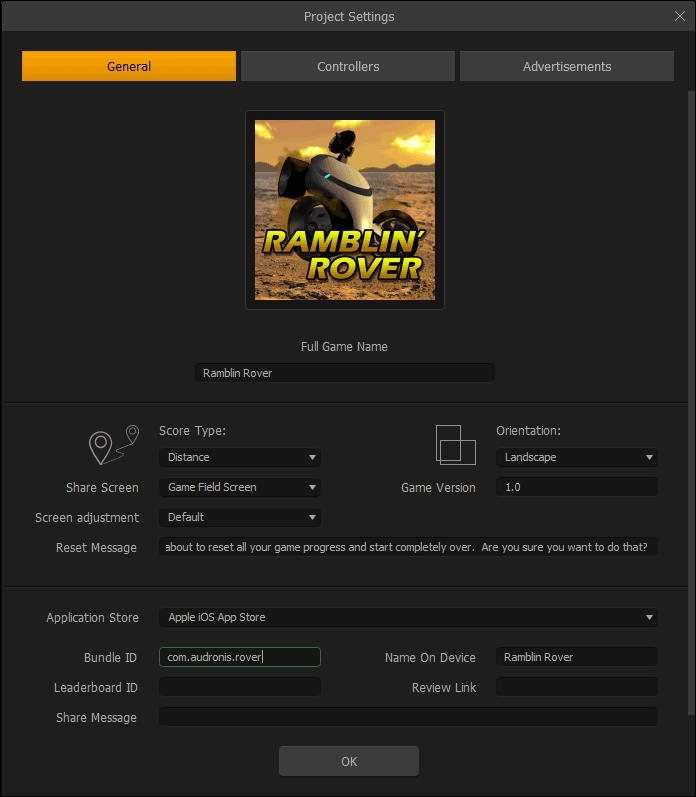
First, you're going to need to download xCode from the App store (it's free). You may need to update your OS to do so. Next, back at the Apple Developer Console (the area where you can view your profiles and certificates). Click on each of your certificates, and download them to your Mac, as follows:

After they're downloaded, double-click each of them, and add them to your Keychain Access. You can double-check your Keychain to make sure they're in there by opening Keychain Access (if you don't know where it is, use the Spotlight Search feature on your Mac to find it). It should look like the following screenshot when the certificates are installed:
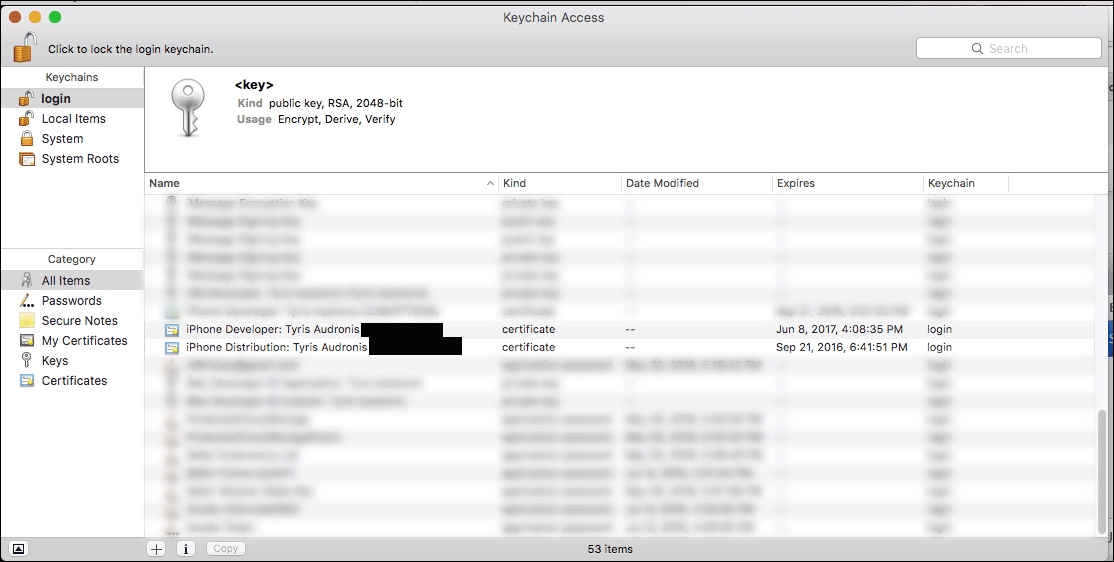
Now, inside the folder containing your Buildbox export, you'll find PTPlayer.xcodeproj. Don't worry that it's not called Ramblin Rover. For some reason, everything that comes out of Buildbox is called PTPlayer. It has literally ZERO effect on the final application name on the device. Double-click this file once xCode is installed (as shown in the following screenshot):
Now that we've got the project opened inside xCode, click on the PTPlayer listing on the left side of xCode. You'll see the project open up, and set the Team entry to you (your iTunes account), as follows:
Ok, now, to let iTunes Connect know that this project exists, we need to build it in a fashion (even though our project isn't complete and ready... we need to execute a build). So we're going to run a test (which builds it for an i-device simulator here on the Mac). From the top-menu, select Product | Run. Now just wait a beat or two (or many more), and an iPhone simulator is started and boots up (with the familiar Apple logo, the home screen, and then Ramblin' Rover starts up). You can surely test and play your game here, or just close the simulator. Your build has been done. Let's move on to iTunes Connect.
Log in to your iTunes Connect account on your web browser (doesn't matter if you use a Mac or PC at this point), and click on My Apps. At the top-left of the screen, you'll see a + icon (add new app). Fill out the form so that it looks like the following screenshot:

See how there is a Bundle ID all ready for you (that reads XC com.audronis.rover -com.audronis.rover)? This is why we did an initial build of our game. When we ran our test, a build (compile) was created, and xCode told iTunes Connect that you're working on an app with that Build ID. Pretty cool if you're doing all your development using xCode... kind of a pain in the badonkadonk if you're using anything else (Unity, Buildbox, and so on). Shall we say it? Thanks Apple. Also, we just made up a number for the SKU. Ok... moving on.
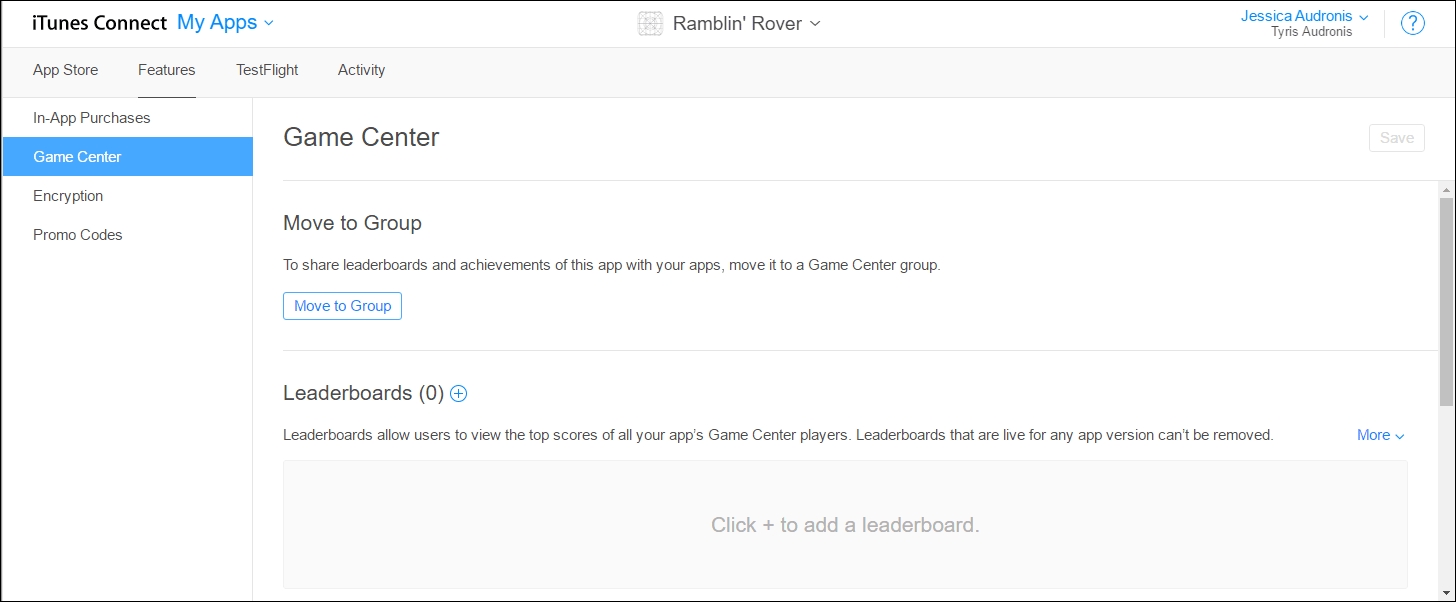
Before we can create our final build of our game, we need to get our leaderboard ID. So, at the top, select Features, and then on the left, select Game Center. You should have a screen like the following:
If you click on the little + icon to the right of Leaderboards, we can create a new leaderboard. Select Single Leaderboard as the type. Fill out the top half of the form as follows:
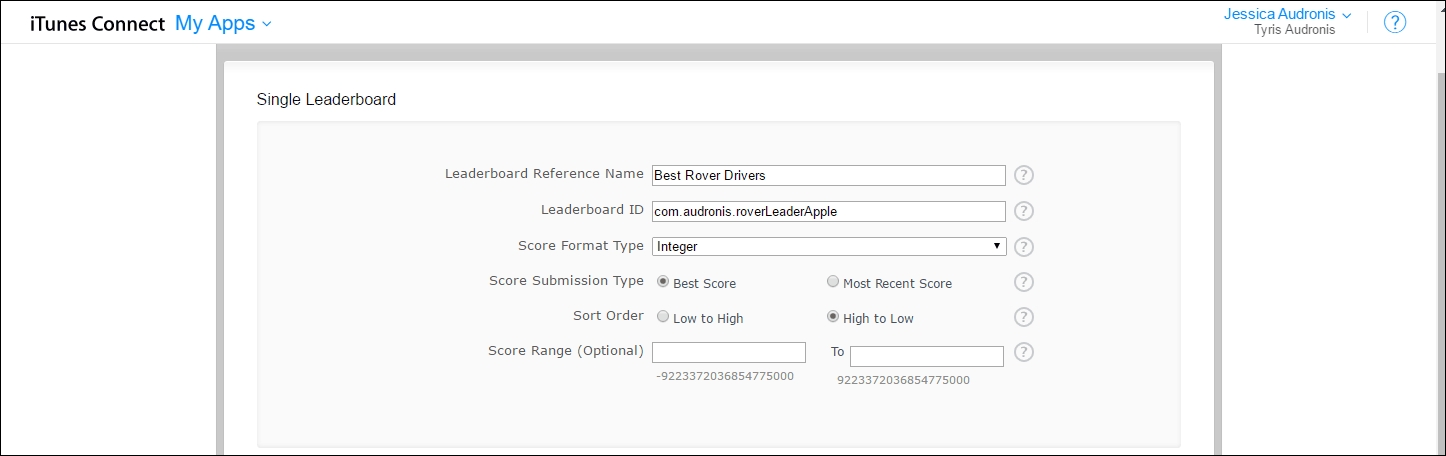
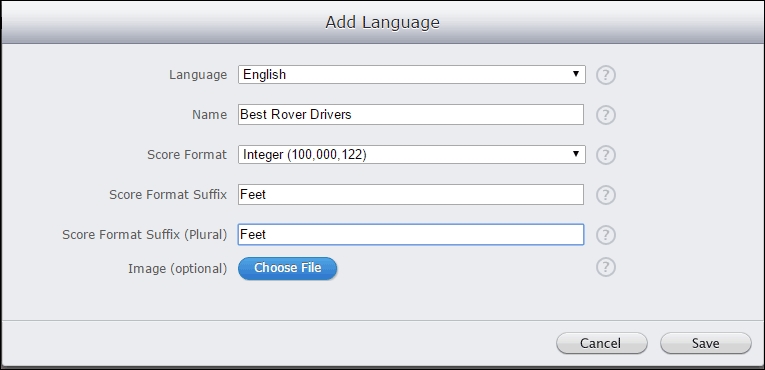
Notice that we used the same format as our Build ID for the Leaderboard ID. You don't have to do it this way. But it is easier to remember. For the Localization section, click on Add Language, and fill out the form as follows:
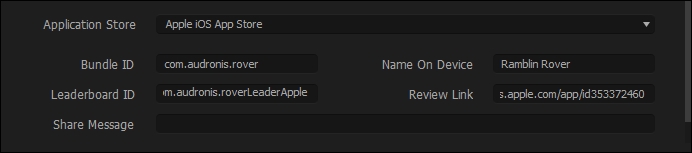
Go ahead and click Save, and then click Save again to save your leaderboard. Copy the Leaderboard ID, and go back to Buildbox, and place it in the Leaderboard ID field of your Project Settings window for iOS, as shown in the following screenshot:
Now we need a review link (which is also our entry on the iTunes app store). The format is
https://itunes.apple.com/app/id####
(where the #### is our app ID). If you click on the App Store entry at the top of the iTunes Connect page, under App Information, you'll find the App ID. As our App ID is 1130059476, our link is
https://itunes.apple.com/app/id1130059476. Use this information for the Review Link field in the Project Settings for iOS in Buildbox. It should look like this:
So, to summarize where we are and why we did things this way... we had to export and compile a test (just so we can export and compile again). This is so we can get our App ID from the iTunes Connect interface to populate our Review Link, and to set up our leaderboards. Again... thanks, Apple. Now, before we export our final, we just need to setup our store IDs.
Inside of the Coin Shop UI (in Buildbox), for each of our purchase buttons, set up the Store Identifier fields as follows:
- 10,000 Credit Purchase button: com.audronis.rover10k
- 100,000 Credit Purchase button: com.audronis.rover100k
- Remove All Ads Purchase button: com.audronis.roverNoAd
Now we have references that we can use in all our stores for these items to complete the purchases, and we'll be able to set them up across all devices. FINALLY! We can now export this thing for iOS (for real this time).
Before we do this, go ahead and close xCode on your Mac, and delete all the previous export folders (on the Mac - and PC if you're using one). We don't want to accidentally upload anything that is incomplete. Now, MAKE SURE YOU SAVE YOUR BUILDBOX PROJECT. Although I've never had Buildbox crash during an export, it would be a crying shame to lose everything now.
Follow the same process as before:
- In Buildbox, go to File | Export | iOS.
- Copy the export folder to your Mac (if working on a PC).
- Double-click the PTPlayer.xcodeproj file to open it in xCode.
- Click on the PTPlayer entry on the left-side of xCode.
- Select your iTunes account from the Team field.
In previous versions of Buildbox and xCode, you had to tick the Requires Full Screen checkbox, and then under Build Settings make sure Enable Bitcode was turned off (we're going to assume you're using the current version of xCode). Now, these should be set by default.
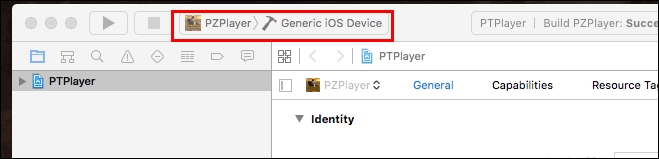
Before we upload this thing, we need to set our scheme from a specific device to Generic iOS Device. This is done at the very top of the xCode window. Just click on whatever device name is currently in there (that is, iPhone 6s) and a drop-down menu will appear where you can choose Generic iOS Device. There is no indication that a drop-down menu is there. So, if you don't know about this... you're left scratching your head wondering "Why can't I do this?" Thanks Apple. We drew a red box around the area we are talking about and how it should look in the following screenshot:
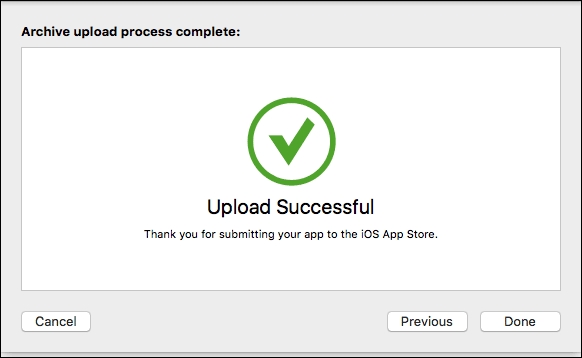
Now go to the top of the screen, and select Product | Archive. This will compile the build and prepare it for upload. After it completes, you'll get the following interface:
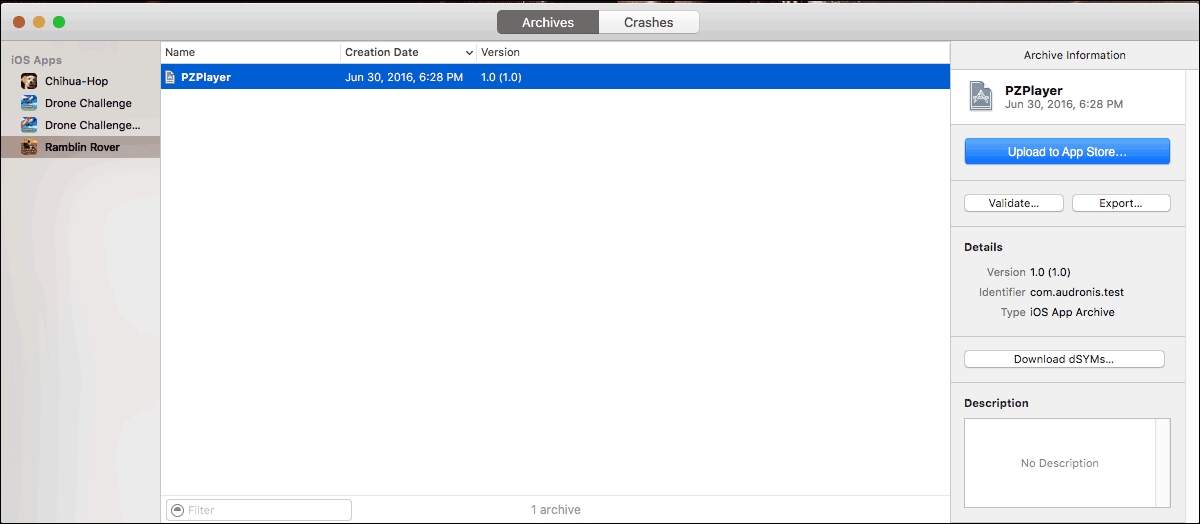
If you have multiple games on the iTunes store, you'll see a list of games on the left. Make sure the proper one is selected (Ramblin Rover), and click Upload to App Store. Just follow any requestors and use default settings at this point. If you get any provisioning errors, either click Reset (if available), or refer back to that section of this chapter to see where you may have gone wrong. This is the point I like to call the pucker moment. This is where anything that can go wrong will. Once you get the following screen, you can let out a sigh of relief, and go on to the iTunes Connect web page for this app. Occasionally, you will get the failed to upload ambiguous error. This is due to the traffic at iTunes Connect. Really, this means it could not validate the upload, so before trying again, go to iTunes Connect, and see if your build is there. If you do have to do it again... you'll need to increment your version number and build number first (back on the General tab of xCode), and re-archive:
On the App Information screen, make sure you set the primary Category to Games, and the secondary to Arcade. Whenever you change a field, make sure to click the Save button at the top-right of the interface.
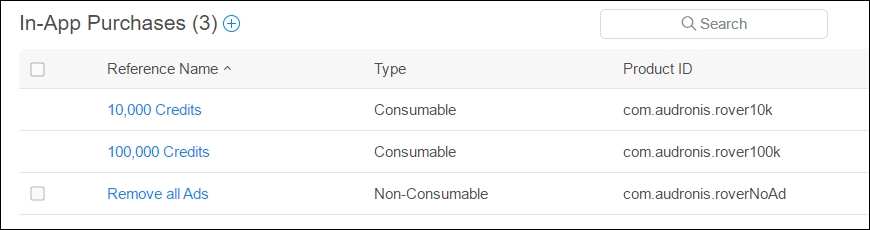
Now, go to Features, and we'll add our In-App Purchases (using the little + icon next to In-App Purchases). Select Consumable as the type. Assign the following values to the following fields:
- Reference Name:
10,000 Credits(this is a reference displayed to the developer for reporting) - Product ID:
com.audronis.rover10k(the same identifier from the Store Identifier field in the Buildbox interface for the purchase button) - Cleared for Sale:
Yes(if you tick No, people will no longer be able to purchase this item) - Price Tier:
Tier 1(this is the $0.99 price tier. You'll see a grid pop up to indicate how much items cost as you select each tier in just about every currency imaginable) - Add Language:
- Language:
English - Display Name:
10,000 in-game Credits(this is what users will see when they go to check out) - Description:
This will instantly add 10,000 credits to your balance.(this is the description players will see when they check out)
- Language:
For the Screenshot for Review, we are going to use the file in the content directory SubmissionPix/iOS/StoreScreenshot.png. The resolution requirements are strict on any images to Apple. If you get it wrong, don't worry... the image requirements come up with the error message. It would be nice if they told you before you got it wrong (rather than just giving a minimum resolution in the description). Again... thanks Apple. Click Save, and you're done.
Now just do the same with the 100,000 credits (using the com.audronis.rover100k Product ID, and substituting 100,000 where appropriate). Also, the Price Tier for this one is Tier 5 ($4.99).
Finally, we add the Remove all Ads button. THIS IS A NON-CONSUMABLE (as it can be restored later, and only needs to be bought once). The values are as follows:
- Reference Name:
Remove all Ads - Product ID:
com.audronis.roverNoAd - Cleared for Sale:
Yes - Price Tier:
Tier 1 - Language:
- Language:
English - Display Name:
Remove all Ads - Description:
This will instantly remove all advertisements in the game.
- Language:
Of course, use the same store screenshot for all three of these. It should look like this when finished:
Now, on the top, go back to App Store, and select Pricing and Availability (left side). Set the Price to USD 0 (Free). Now, buckle up, because the 1.0 Prepare for Submission section is certainly a highway...
iOS submission is strict to say the least. Let's take a look at each section one by one...
Version Information
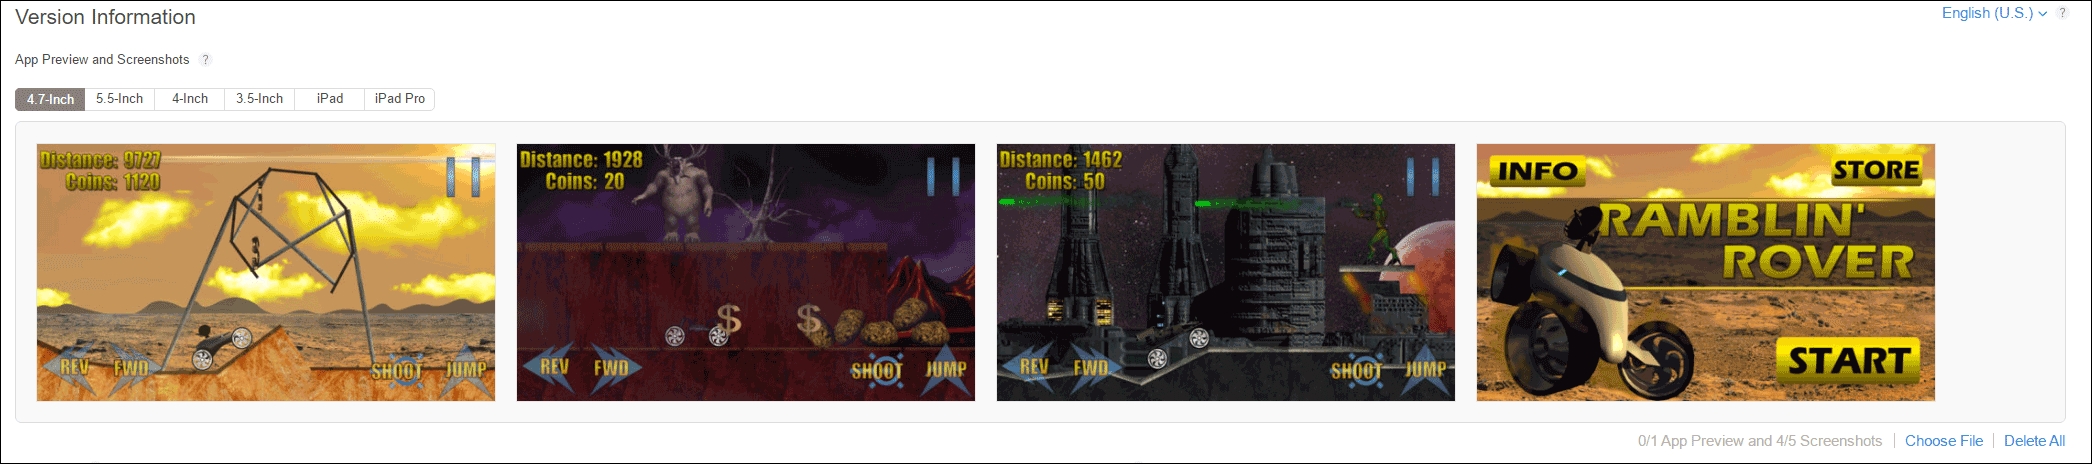
The first thing you'll notice in this section is an area to upload screenshots for every single device offered by Apple iOS. You must upload at least one screenshot at the appropriate resolution for every type of device. Even though the game should look the exact same on every device, we have to do this before we can submit the game. Again... thanks Apple. Are you beginning to see why there are a lot of indie developers that give up on Apple iOS (or at least hate developing for Apple)? Again though...one of the biggest distribution channels around, so what are you going to do?
As our game is in a landscape (widescreen) aspect, we're listing the larger number as first in resolutions. However, if you make a portrait (tall) game, just switch the two numbers, and that will be your target resolution for screenshots. As we'll be taking screenshots from our Preview function within Buildbox, we're giving resolutions without the iOS status bar. If you'd like more resolution listings (with status bar), just click the iOS Screenshot Properties link on the Prepare for Submission page.
The following table shows the acceptable resolutions for devices (at the time of writing... there will be more with future iOS devices):
|
iOS Device Screen Size |
Resolution of image (must be PNG of JPG) |
|
3.5-inch retina display |
960 x 600 |
|
4-inch retina display |
1136 x 600 |
|
4.7-inch retina display |
1334 x 750 |
|
5.5-inch retina display |
2208 x 1242 |
|
iPad |
2048 x 1536 |
|
iPad Pro |
2732 x 2048 |
OK... so we get it. A LOT of screenshots to do. Lucky for you, we've created all the screenshots for Ramblin' Rover (you can create them by just clicking the camera icon in the Preview window of Buildbox, then adjusting the resolutions in your favorite photo-manipulation software).
Upload the pictures contained in the content directory SubmissionPix/iOS/Screenshots (and the appropriate folders) to the appropriate device previews, and put them (just drag them in iTunes Connect) in the order shown here:
Now we fill out the rest of this section's form as follows:
- Description:Explore three planets with your rovers. Drive, jump, flip, and shoot your way as far as you can possibly go. Be careful though... some aliens are friendlier than others, some rovers are easier to drive than others, and the planets are completely different!
- Controls: Use buttons on the interface to drive, shoot, and jump. To flip in the air, rotate the device to lean and do front and backflips. Some rovers' jump jets hold more jumps than others. If you run out, you can recharge your jump jets by performing a flip in the air.
- Keywords:(This is what users will be able to search by, so we include some misspellings):
ramblin,ramblin',rambling,rambelin,rover,rovar,driving,motocross,shooter,shooting,alien. - Support URL: http://www.audronis.com (this is the URL to your website or Facebookpage for the game).
- Marketing URL: (link to the page where there is information about your game... this is optional, so we'll leave this blank).
On to the next section...
Here, all you have to do is select the version you uploaded. Every version that has been uploaded and passed (sometimes the passing can take a day or two, but most often it's within minutes) can be selected here. You should receive an e-mail (in the email address associated with your iTunes account) indicating that the build has passed. Once selected, it should look as follows:

First, just upload an icon file (content directory Projects/RamblinRover/misc/Icon-1024.png). The resolution should be 1024 x 1024. For the Copyright, we enter a year, and the name of the copyright holder and it should be your full legal name (for Ramblin' Rover, it's 2016, Tyris M. Audronis).
AS for the Trade Representative Contact Information, this is in case you are a corporation; it gives contact information for people to contact you through the Korean App Store. We'll leave this one blank.
The Routing App Coverage File is completely optional, and is a text file in GeoJSON format that restricts where your app is available (for instance, if it allows gambling, and you would like to make it unavailable where gambling laws apply). We'll leave this alone (as we want this game available everywhere).
Finally, the Rating. This is where Apple determines what game rating to assign to the game by filling out a questionnaire. You MUST be accurate (or the review team will reject the app). These are the form fields for Ramblin' Rover:
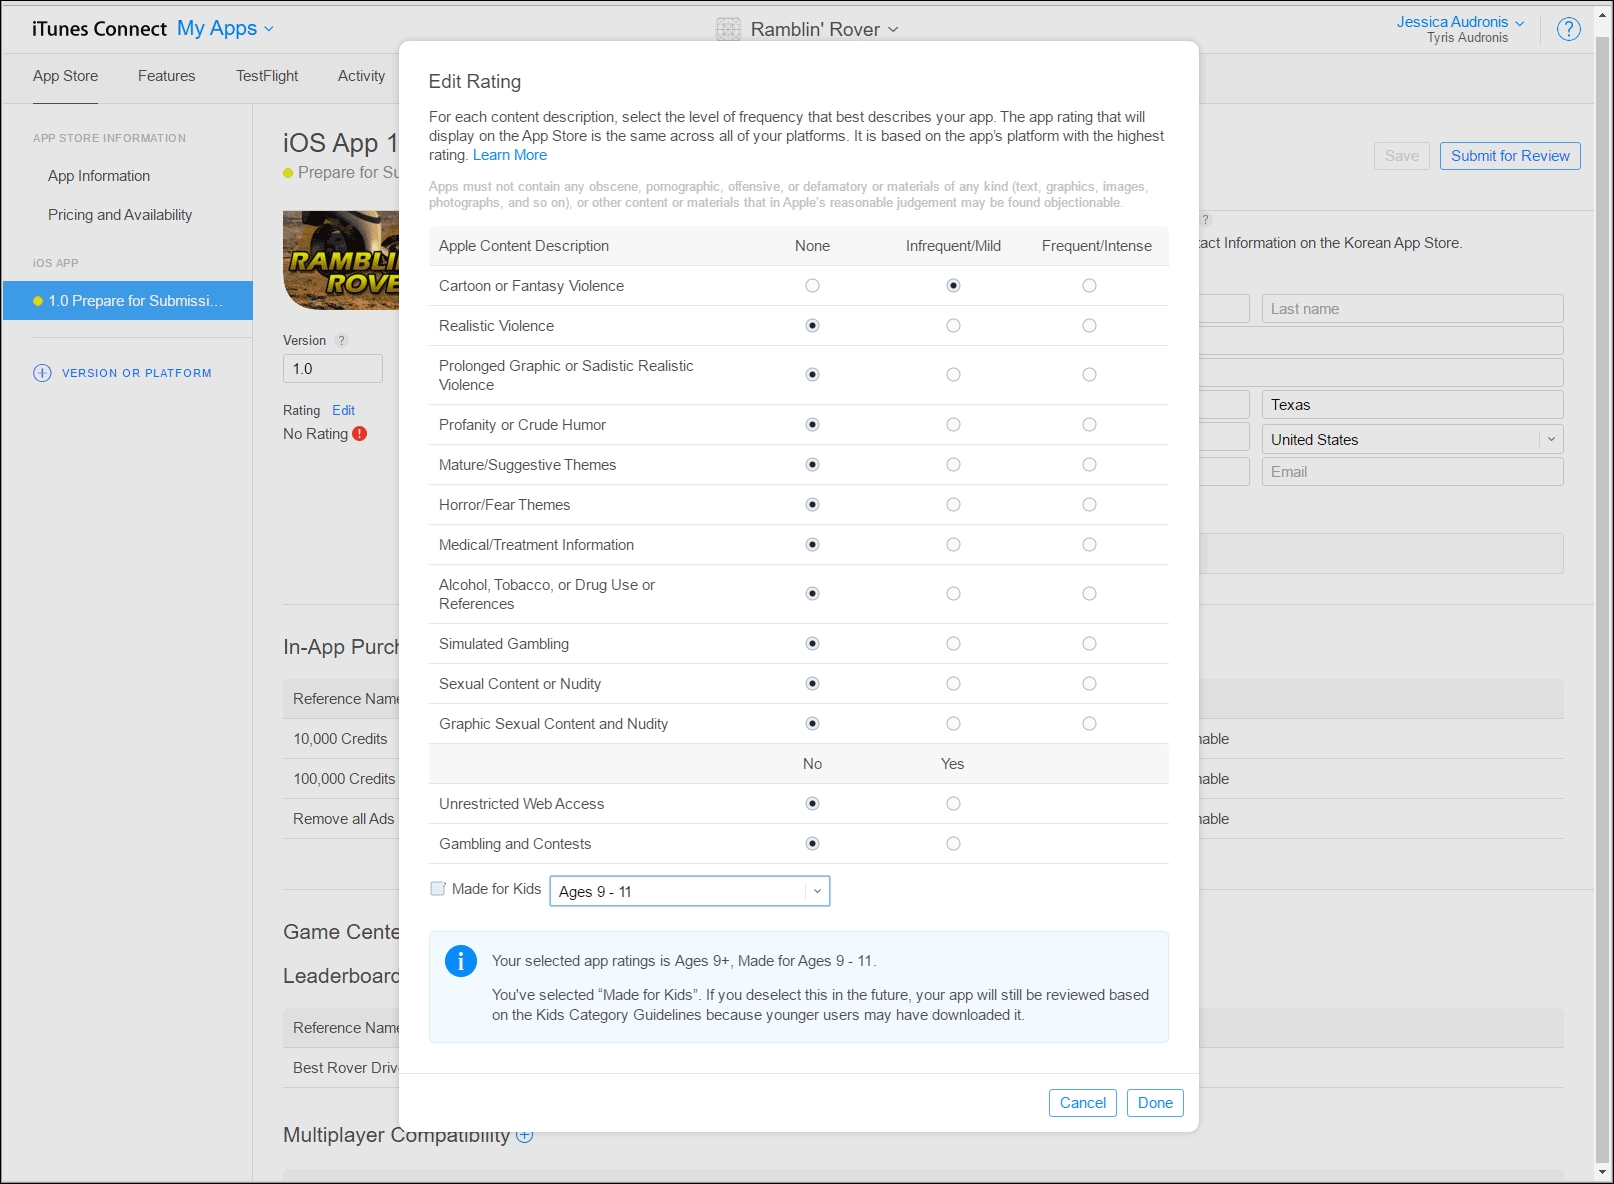
Notice we left Made for Kids unchecked. This is because (at the time of writing), Buildbox has no provision for a Parental Gate. A Parental Gate is a method by which a child cannot make a purchase without parental permission (and simply having to enter an iTunes password is not enough for Apple). So, because we have In-App Purchases... we cannot currently tick Made for Kids. Buildbox support does promise that they're hoping to include a parental gate in future versions, so hopefully by the time you read this... that has changed. After all... having that Made for Kids tag can really help with your download count.
We're going to need a privacy policy as well. There are several services that can host a privacy policy. Remember, we're serving up RevMob ads here, so make sure your privacy policy includes this. We used iubenda to generate and host ours (http://www.iubenda.com).
As we have In-App Purchases, it's imperative that we include a Restore Purchases button (or else due to current rules, it will be rejected). It's simple. In Buildbox, just add a Navigation button to the coin store using the RestorePurchases.png image (in the Buttons folder), and set its Function to Restore Purchases. Why didn't we say this before? Because it's also important to know how to generate a revision version of your app (as these kinds of issue pop up occasionally - especially with iTunes). It's virtually guaranteed that there will be a few oops I forgot moments, and you definitely need to know how to update versions. Keeping up with policies is a weekly task that you should make the time to keep up with (or else you may find your apps have been removed from the stores).
Generating a new version of your app
After adding the Restore Purchases button to your coin store, just go into the Project Settings window and set the Version to 1.01. Now just export the new version, copy it to your Mac, and run another Archive procedure to upload the new version to the iTunes Connect account. Finally, in iTunes Connect, delete (by clicking on the - icon that pops up when you hover over the build) the 1.0 build, and then add the 1.01 build (the same way as before). Now, moving on...
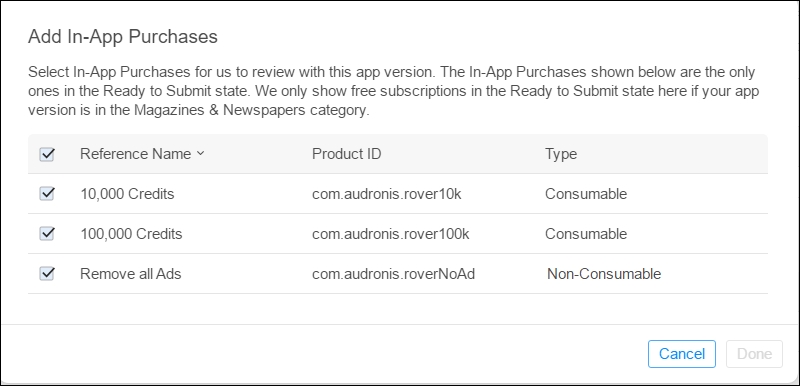
Click the little + icon next to In-App Purchases and select all of the purchases that we set up earlier, as shown in the following screenshot, and then click Done:
Turn on the switch next to the Game Center heading, and add the leaderboard that we set up earlier, in the same way we just added the In-App Purchases.
Just add your contact information here. This is in case the review team has any questions for you that must be answered before they clear it for sale. Under Demo Account, just untick the checkbox. This is only if we've set up something in the code where a demo account can be used without having to purchase anything. As we have no such feature, just untick this and move on.
Here is where you can select whether or not to manually or automatically release the game after Apple reviews your app. You can also schedule a release. Just leave this set on Automatically release this version.
Just click Save, then click Submit for Review (at the top of the page). Now it's just a matter of saying that no copyrights have been infringed upon, and letting Apple know that yes... we do use all IDFA possibilities for RevMob. Yes, RevMob does target ads, and also does track purchases used in the ads (and that's how you get paid). So make sure everything under IDFA is checked. Once you submit... WE'RE DONE!!!
It's all in the hands of Apple now. You just have to wait and see if it gets approved! WHEW! Let's move on now to other distribution channels (which are FAR simpler than iTunes)...
Great timing too (as it can take upwards of a week to get your approval).
Ok... one more just for fun... Thanks Apple.
First things first: let's download the compiler for Android. We're going to need to download and install the Java Developer Kit (JDK) version 7 (http://www.oracle.com/technetwork/java/javase/downloads/jdk7-downloads-1880260.html).
Also, we're going to need the Android Developer Tools (ADT) bundle. Here are the links for various development platforms:
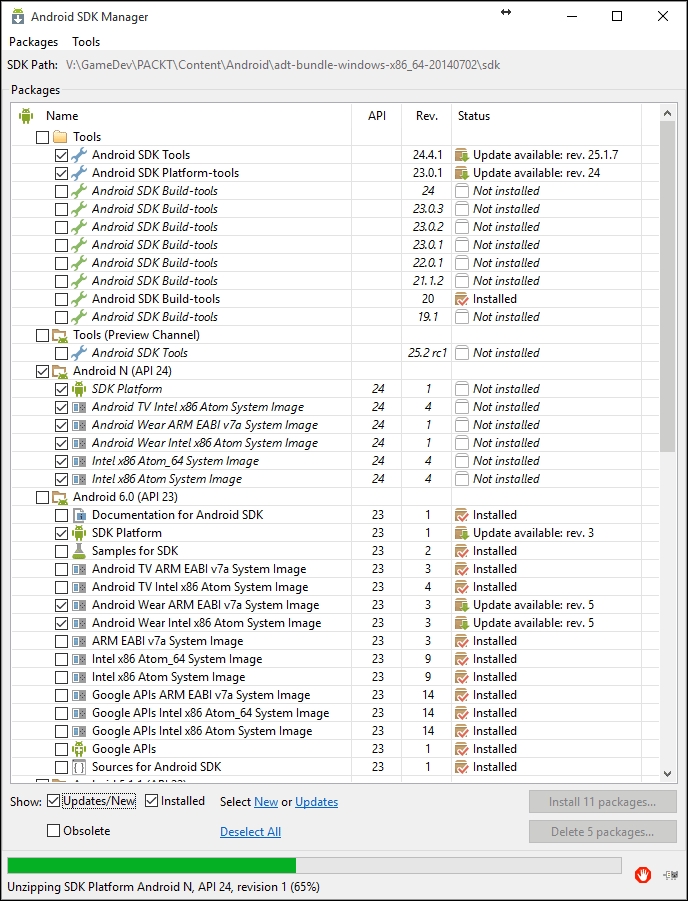
Once you get these installed, make sure you have an Internet connection, and start Eclipse. It will prompt you for selecting a Workspace. A workspace is simply an area on your hard drive where Eclipse can store a project, and all related settings. Then, from the top menu, select Window | Android SDK Manager. Now it's time to install the packages that Eclipse needs to compile for Android. Install Android 6.0 (API 23). If you get error messages (telling you that something can't install because a different package must be installed first)... simply install the packages that Eclipse is asking for and then install API 23. There are occasional updates to these packages, so you'll need to open Android SDK Manager every so often to download updates. It should look like this when downloading:
Ok... now it's time to export and compile! Don't forget to grab the Leaderboard ID from Google Play's game services and include it in the Project Settings within Buildbox for Google Play.
Then... just select File | Export | Android. After selecting a location on your hard drive to export your project, just wait a minute (again, no progress bar) for the export. Once it finishes... move over to Eclipse.
After xCode and iTunes Connect, you may be scarred. Ok... maybe not, but the point is that Eclipse and Google Play are FAR easier to get going. So don't stress, here we go.
Inside Eclipse, select File | Import, and select Existing Android Code into Workspace (as shown in the following screenshot, on the left). Like we said before, when Buildbox exports, it actually outputs the code that a compiler uses to create an executable package (in most cases). On the next screen, navigate to where you exported your Buildbox project, and select the Android folder (as shown in the following screenshot, on the right). Eclipse will detect what the code is, and represent it on this screen. Click Finish to move on:

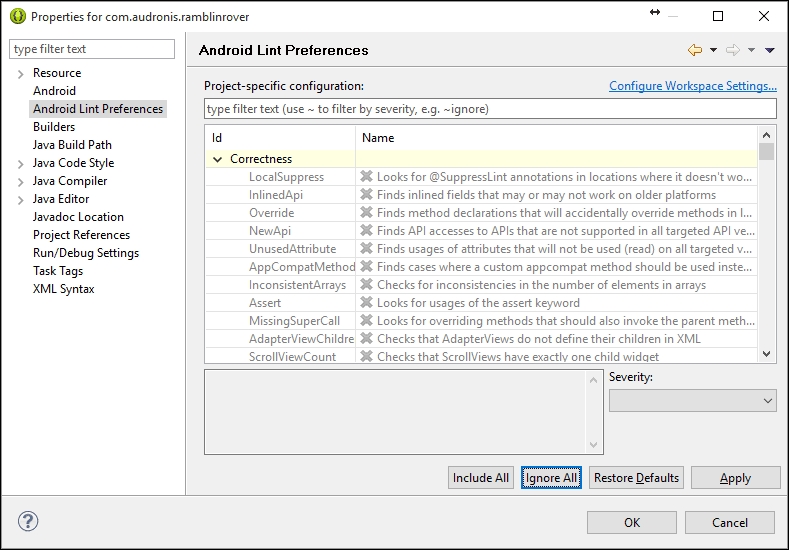
Lint is a tool that Eclipse uses to check for potential bugs in code. Lint is not compatible with Buildbox code, and will not let you compile if it's allowed to check for errors. To disable it, right-click on the main package (on the left side of Eclipse... in this case, com.audronis.ramblinrover) and select Properties. On the following interface, select Android Lint Preferences, and then click on Ignore All. Click OK to move on. It should look like the following screenshot:
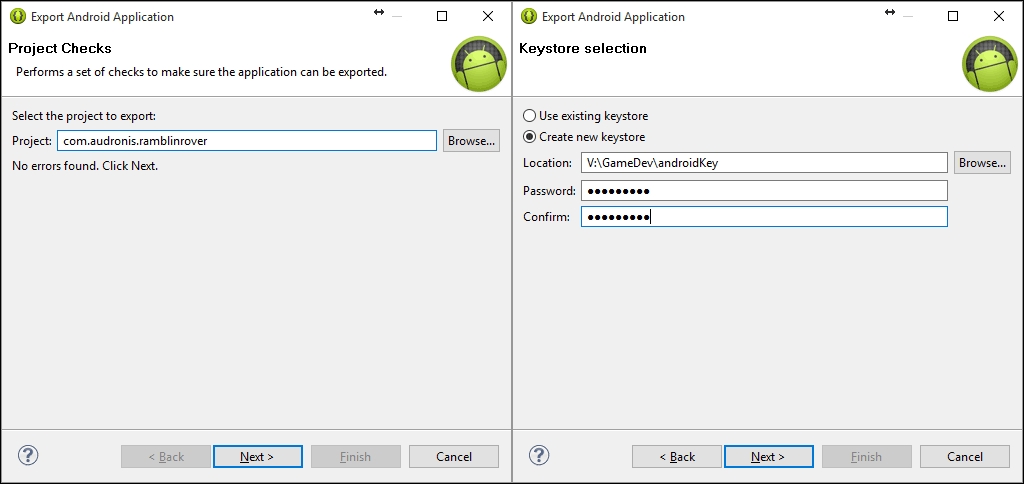
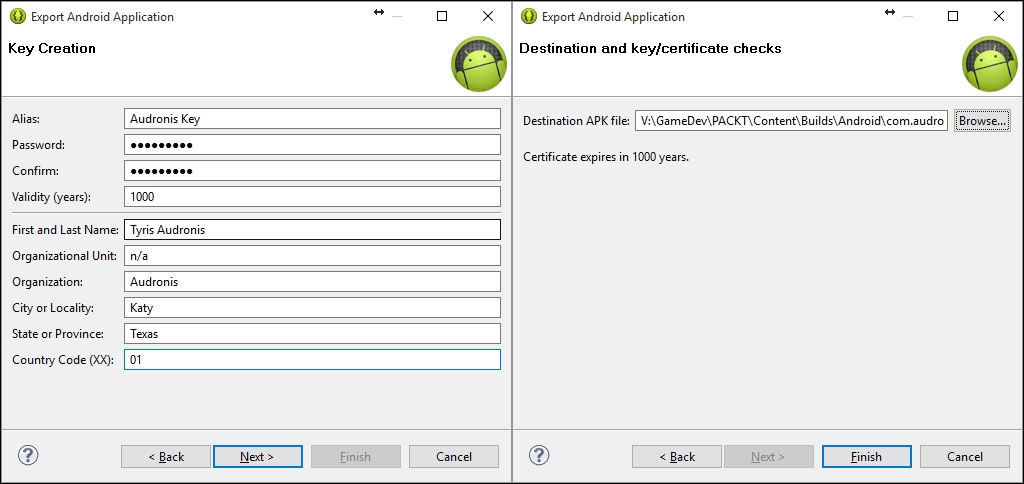
Now we get to compile it! Again, right-click on your main application, but this time select Android Tools | Export Signed Application Package. You can just click Next through the first screen of the interface (see the following screenshot, on the left). This just verifies that this is the application you want to compile. On the next screen, you'll need to create a signing key (to verify that it is in fact you that is creating new versions of your apps and to prevent others from reverse-engineering them). It's simple... just select a location on your hard drive to store your key, and then create a password (that you'll remember). Also, remember where you stored the key, because you can reuse it whenever you compile anything for Android. It should look something like the screenshot on the right:
The next screen only appears when creating a new key. Just fill out the form, and put a ridiculously large number in the Validity field. This is how long your key is good for. We put in the maximum (1000 years). It should look like the left side of the following screenshot. And finally, just select where you want the compiled file (also known as an APK) and we're done with the compile! This screen is shown on the right side of the following screenshot:
Now we just need to get everything setup in our store so people can download our game! Let's start by uploading our game...
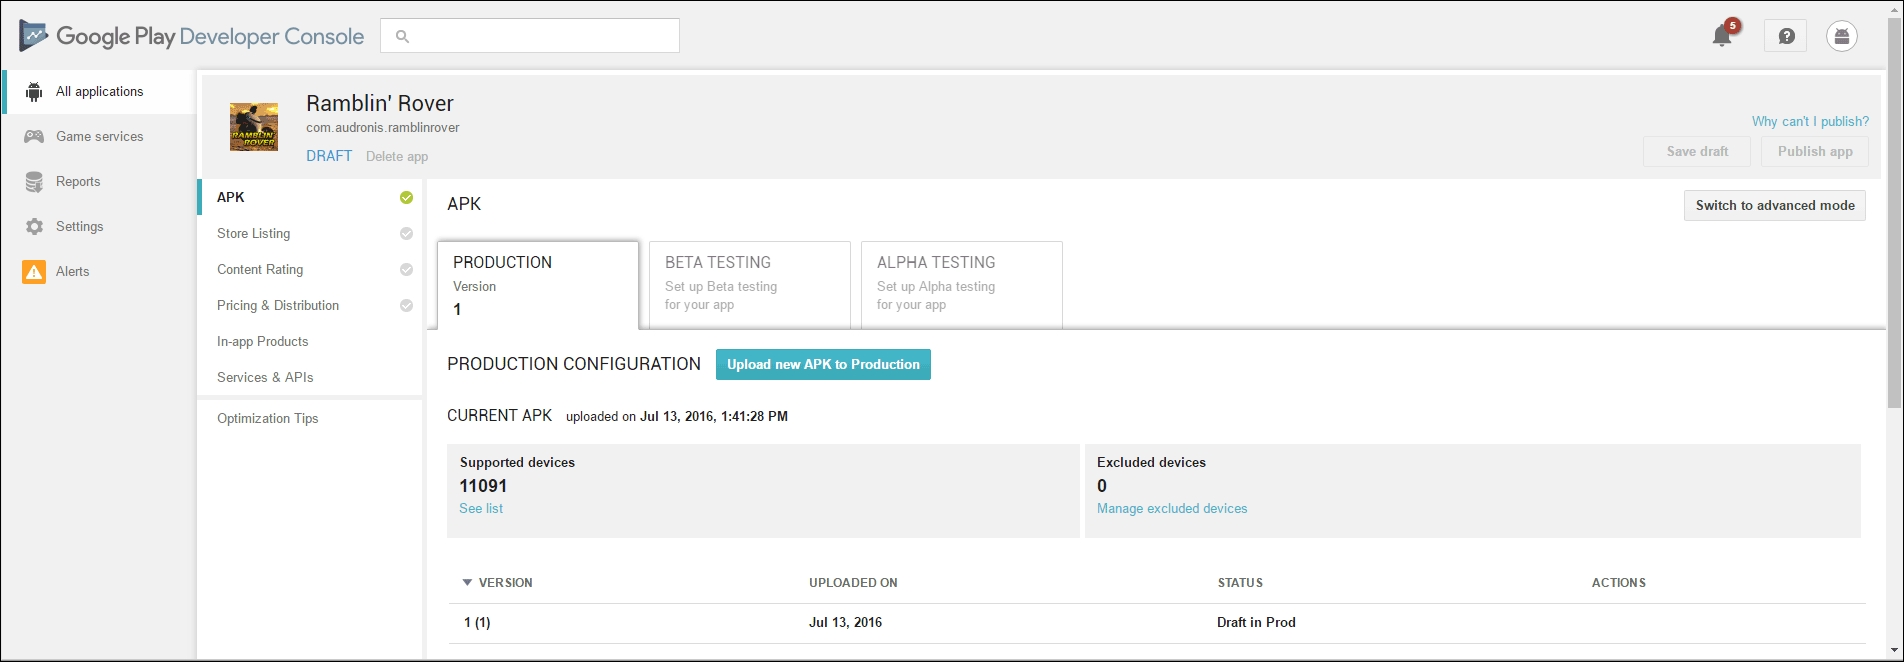
Back in your Google Play Developer Console, go to the APK screen (All Applications | Ramblin Rover | APK). After uploading your APK file (by clicking Upload New APK to Production), the interface should look like this:
From here on, it's fairly self-explanatory. So, let's go through this quickly; on to the Store Listing.
We filled out the Store Listing as follows:
- Title:
Ramblin' Rover - Short Description:
Explore planets with different rovers to find a new home for humanity - Full Description: (We used the same one from our iTunes listing)
- Graphic Assets: (Luckily, the format restrictions here are not nearly as strict as iTunes, so we just used all the same assets from our iOS 5.5 inch listing)
- Hi-res icon: (We used the 512x512 icon in the
miscfolder within our project) - Feature Graphic: (1024x500 image from the same folder)
- Promo Graphic: (180x120 image from the same folder)
- TV Banner: (1280x720 image from the same folder)
- Promo Video: (Link to YouTube video of the gameplay. If you have an nVidia video card, you can easily record this with your preview window in Buildbox using nVidia Shadowplay)
- Application Type:
Games - Category:
Arcade - Content Rating: (Leave blank)
- Website: (Your website URL here)
- Privacy Policy: (Link to same privacy policy from iTunes)
Follow the simple questionnaire on the content rating section. It should be noted that since you have a store and advertising, it is extremely important that you check yes to all questions regarding advertising, sharing location, sharing information, and In-App Purchases (or else you may find your app banned).
After completing the Content Rating section, go back to the Store Listing and apply your rating (you know you're done if after saving a green checkmark appears next to Store Listing).
Again, just fill out the questionnaire. Make sure you select free, distribute to all available countries, and specify that it contains ads. Also, when saved, a green checkmark will appear next to Pricing & Distribution.
For each of your In-App Purchases, add a new
Managed Product
using the same Product IDs from Buildbox (that is, com.audronis.rover10k for the 10,000 credit purchase). Once you've created the product, you can now input all the necessary information as follows:
- Title: Enter the title of the purchase (
10,000 in-game Credits,100,000 in-game Credits, and so on). - Description: We used the same descriptions from the iTunes store (Instantly gives you...).
- Pricing Template: This only applies if you have created a template based on previous pricing... if you haven't, leave this blank.
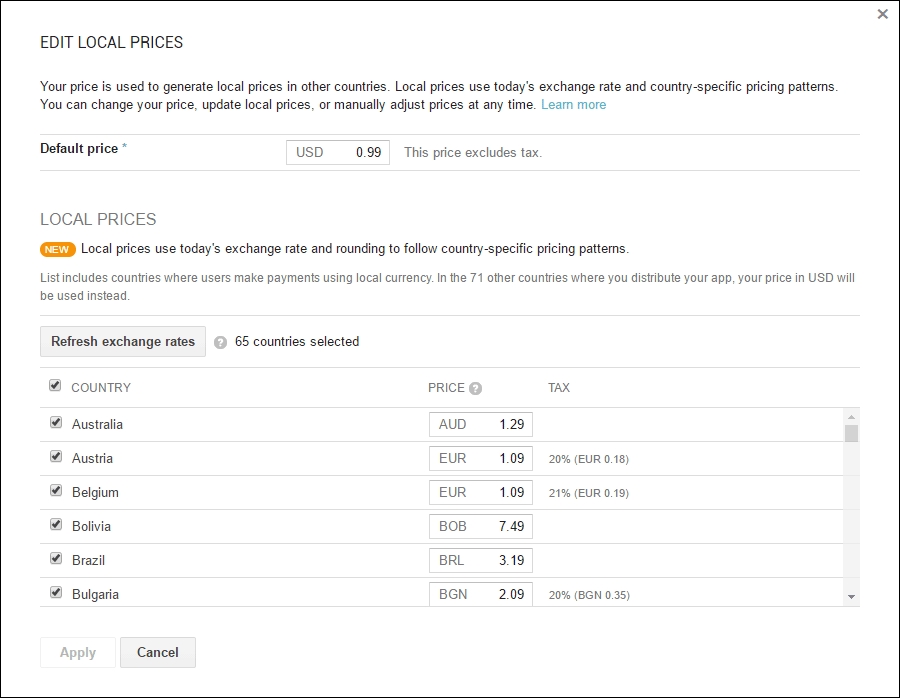
- Price: All you need to do is fill out one country's price, and the rest is filled in based on exchange rates provided by Google. We entered our price for the United States, and all other prices were filled in for us. Just make sure you tick the checkbox at the top of the form, as follows:
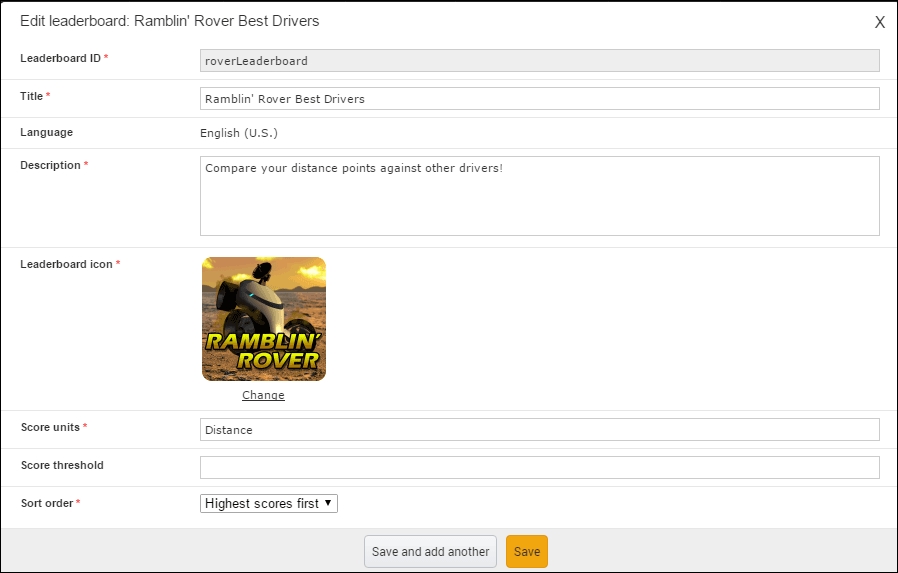
Here is where we're going to link up to Google Play services for our leaderboards. Just click on the button Use Play Game Services, and select Ramblin Rover game services. The SHA1 certificate code from when you compiled the game will automatically be set in the appropriate fields, so all you need to do is click through until you can get to the Game Details for your leaderboards again. We're just going to finish this up.
Fill out this form using the same high-res icon from the main game, and the same feature graphic as well. On the Description, we said Who's the best driver? Compare your distance scores with other players here. It's important to just have a brief description of what the leaderboard is. After saving, you should have a green checkmark for Game Details. All we should need now is achievements, testing, and publishing.
In order to publish an app with leaderboards, you must have at least five achievements based on score. We're going to use Naval ranks for this (as it's popular in Sci-Fi to have Naval ranks associated with space-faring ranks). We'll go from Ensign through Captain (6 ranks in total) using images we put in the misc folder in our content directory. We filled them out as follows:
|
Name |
Description |
Icon |
Points |
List Order |
|
Ensign (Trainee) |
Congratulations, you know how to drive a rover! |
Ensign.png |
5 |
1 |
|
Lieutenant (Junior-Grade) |
Congrats! You are no longer a total noob! |
LtJG.png |
25 |
2 |
|
Lieutenant |
You're almost a professional now! |
LT.png |
50 |
3 |
|
Lieutenant-Commander |
You are now the go-to guy. So, go get 'em! |
LtCMDR.png |
100 |
4 |
|
Commander |
Alright, sir. You're getting downright salty! |
CMDR.png |
150 |
5 |
|
Captain |
Well, you've done it! You're now the man in charge. Everyone now calls you "the old man." |
CAPTAIN.png |
200 |
6 |
At this point... you're done! Just keep clicking Continue to Next Step, and then click on Publish your game. And that's it... no approval process. Just about half an hour of effort, and it's up and ready to download!
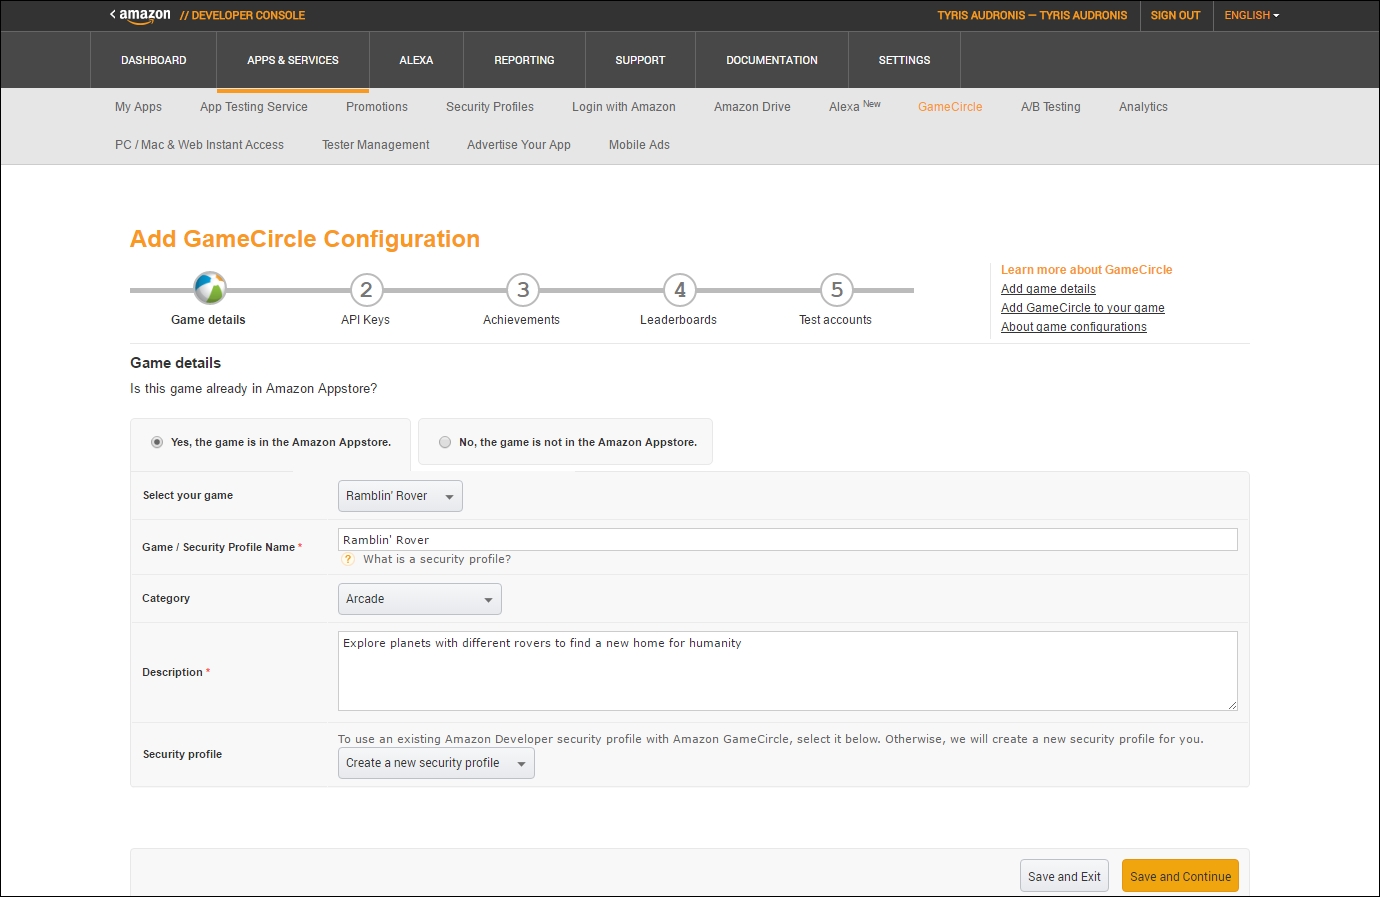
Getting up on Amazon is almost the same as Google Play. There are just a few minor differences. In your Amazon Developer console, you should see text at the top that says GameCircle. Click on this to add the Amazon leaderboard for your game. The first step looks like the following:
Now, before we export from Buildbox, add the Leaderboard ID of your choosing for Amazon in the Buildbox Project Settings for Amazon. Unlike the other distribution channels, you can use a Leaderboard ID of your choosing (we used roverLeaderboard). We'll have to compile it in Eclipse to get our MD5 key. Follow the same process as with Google Play to export and compile in Eclipse (with the exception of exporting as Amazon instead of Android). The final step on the Eclipse compile will show your MD5 and SHA1 keys (generated by Eclipse). On the next screen for GameCircle, you'll need to enter your MD5 key when you generate your new API key. The result looks like this:
Now we move on to creating the actual leaderboard. Unlike all of the other distribution channels, you can name your Leaderboard ID yourself. When you go to add a leaderboard, the form should be filled out as follows:
The rest of the submission forms are very similar to Google Play. Just fill them out, and don't forget to add your In-App Purchases.
Before we get started exporting, there are some alterations we're going to need to make. First off, you may remember that the only ads available are provided via Vungle (and not our currently installed RevMob). So, you're going to want to save a new copy of your project, and go back to replace all of the ads on your UIs with Vungle ads.
Another key difference is that with In-App Purchases, you must set the Content Type for your purchase to Electronic Software Download within the Microsoft Developer Center console. And of course, the removal of ads would be a Durable, and the coins would be a Consumable. Since you already know the principles of submitting an app by now, we'll leave the particulars of the store alone (all app submissions require similar processes). Instead, let's focus on the compiling of the package for the store. Know that you must create your store entry BEFORE you compile, though.
If you don't already have Microsoft Visual Studio, you can download it here: https://www.visualstudio.com/en-us/downloads/download-visual-studio-vs.aspx. There is a free version (Visual Studio Community), and it will work just fine for our purposes. Once it's installed, here is the process:
- From Buildbox, export for Windows Store to a temporary folder on your desktop. For some reason, if you export to another drive, you may run into permission errors.
- Inside of the export directory, double-click on the file
BBPlayer.sfnto open the Visual Studio project that Buildbox created. - Within Visual Studio, on the top menu, select Project | Store | Edit App Manifest:
- Click on the Packaging tab.
- Click on the Choose Certificate button.
- From the Configure Certificate dropdown, select
Create Test Certificate. - Enter your company name (or your name) and then click through the OKs and YESs until you are back on the main Visual Studio Screen.
- From the top menu, select Project | Store | Associate App with Store:
- Log in with your Microsoft Store credentials.
- Select the app entry you created in the Microsoft Store.
- Clean the project (and go back to the main interface by selecting OK).
- From the top menu, select Project | Store | Create App Packages, and follow the defaults clicking
Next. It will take a little while to compile. - When it's finished compiling, click on the Launch Windows App Certification Kit and let it run through your app (it will take some time to complete).
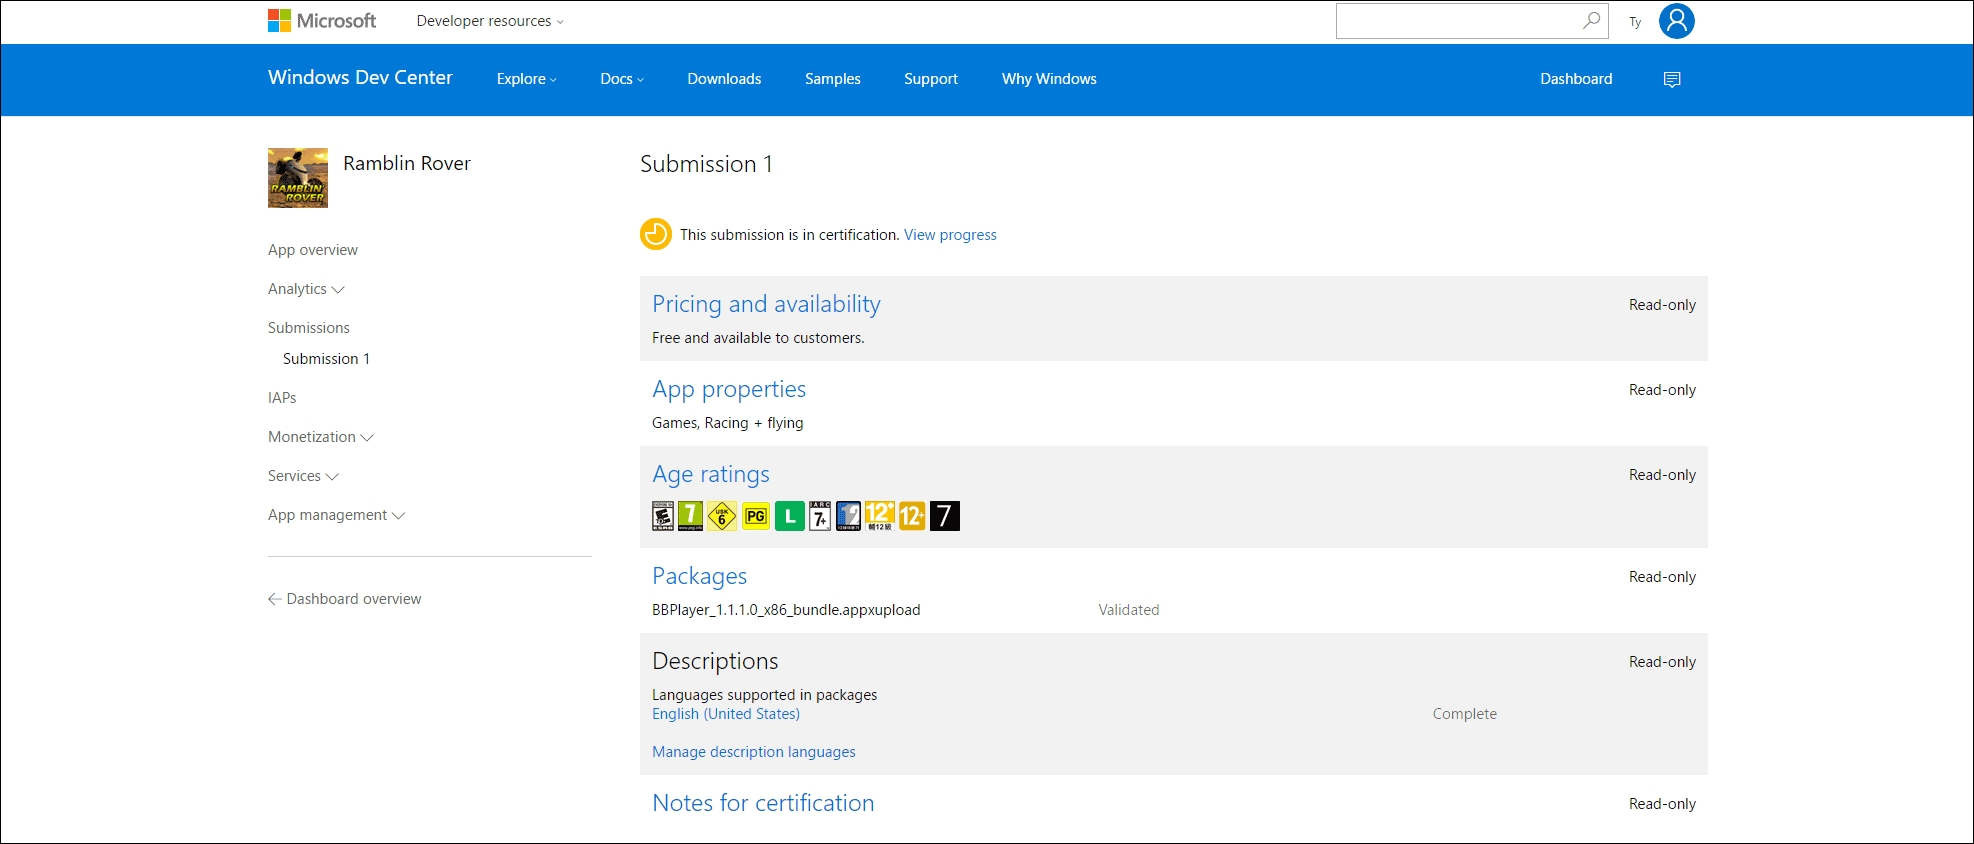
Now you'll have a folder called AppPackages inside of the exported project folders. The file with the .appxupload extension is your final compiled package for upload to the Windows Store. After everything is complete and you've submitted your app, this is what your Windows Store interface should look like:
The first thing you should do is get on Steam Greenlight. As we've said before, you must get approved before you can even upload your app. So, at Steam Greenlight, you'll need to upload photos of your game and describe what it is. Some people even use animated gifs to show gameplay. Be creative; tell a story in your descriptions. Unfortunately, you don't have the chance for users to download a demo of the game, so these images and descriptions need to make people really want to play your game.
Just remember this: Apple is a great example. Their hardware is no different than a Windows machine. The Apple OS is Linux-based, so nearly no difference there. But why does everyone want an Apple? Why can they charge more for it? Marketing.
Know your audience, and try to captivate their interest and get the users to vote for your game. Finally, there are A LOT of games on Greenlight... stand out.
Steam is a bit different than other distribution channels. First... no ads. Steam does not allow games to have ads at this time. So that could cut into your profits in a serious way. Also, Steam does support In-App Purchases, but there are two potential issues:
- Documentation on the actual implementation of In-App Purchases is limited. So, count on having some possible issues with this.
- In-App Purchases are only allowed on free-to-play games. So, our potential profits are going down fast.
With all that in mind, here's my suggestion: remove all ads, add more 100 credit pickups (or even an occasional 1,000), charge $0.99 for the app, and finally lower the price of the Phoenix rover to 50,000 credits.
These adjustments will still generate some profits, make the Phoenix more attainable without spending money, and the price is still low enough so that players may even buy it just to check it out.
The export for Steam is pretty straightforward in Buildbox. The same process of File | Export, and then select Steam. Since we're again using Visual Studio, make sure you compile to a temporary folder on the desktop (or else you may end up with permission errors when you go to compile).
Now, on the desktop go to the folder you exported from Buildbox and double-click the PTPlayer.sfn file. Compiling is actually very simple for Steam using Visual Studio. You just have to make sure to use the right Platform Toolset.
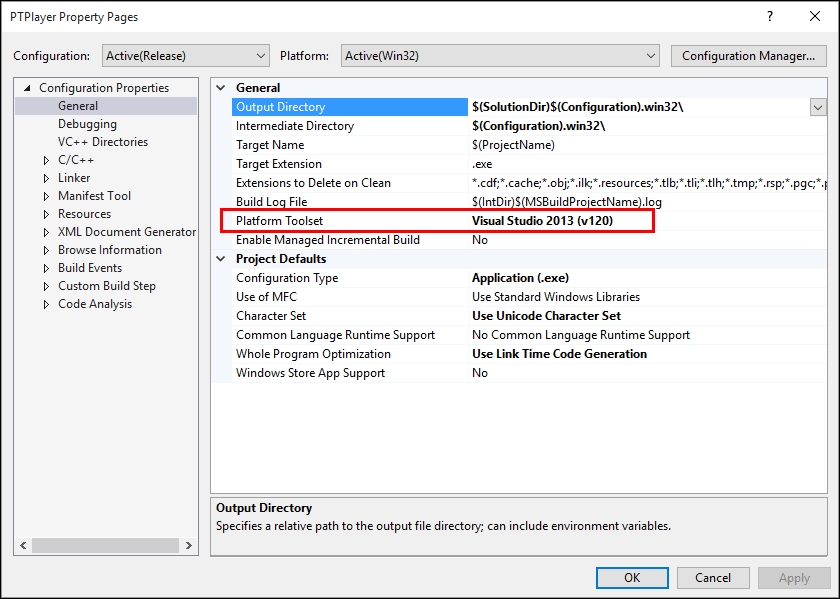
While in Visual Studio, right-click on the PTplayer entry in the Solution Editor window (top-right) and select Properties. We just need to make sure that Visual Studio understands what version of Visual Studio that our exported project is for. Now, under Platform Toolset, select Visual Studio 2013 (v120) from the drop-down menu, as shown in the following screenshot:
If you don't have this option, you'll have to close Visual Studio, and run the installer for Visual Studio again. When given the chance, click the Modify button during install, and add the necessary component. If you're not sure which components to install, the easiest course of action is to just install them all (make sure everything is checked). Then, after installing the components, return and set the Platform Toolset to Visual Studio 2013 (v120).
Only one more step to take: on the top menu, select Build | Build PTPlayer. A lot of text will scroll by in the bottom window. This is Visual Studio compiling your final result. You'll know it's finished (and has succeeded) if the bottom line of the text reads as follows:
========== Build: 1 succeeded, 0 failed, 0 up-to-date, 0 skipped ==========
Steam Greenlight could use some improvements for sure. It's a relatively new distribution channel. As a result, the process is a bit odd (with offering no downloadable previews of the game, and only a few Steam users even know it exists to go vote for games). Unless you have a lot of friends, loved ones, or associates that can go vote for you... you might find your app completely ignored.
Don't be discouraged if this happens. You'll find that sometimes the projects that are greenlit are projects that are not necessarily the best games.
So, you may be wondering why we even bother covering Steam at all. Steam (regular) is a very popular place for players to buy games; and with the outcry from indie developers for Steam to fix their process, you may see the need to compile for Steam sooner rather than later (as they probably will make adjustments to help).
So, although it's not (currently) an optimal distribution channel, you should be versed and ready on the compilation process for Steam. After all, the day may come soon where Steam is the go to for indie developers.