In this chapter, we’ll build a simple Calculator application with four functions: add, subtract, multiply, and divide. When we’re done, our Calculator will contain the menu and window shown in Figure 5-1. In the process of building the Calculator, we’ll learn about Interface Builder, connections, and some of the commonly used Cocoa Application Kit (AppKit) classes.

We’ve chosen to build a calculator as the first “real” application in this text for several reasons. First, calculators are familiar; we’ve all used one, and we sort of know how they work. (When creating an application, the first thing to understand is the problem you need to solve.) Second, calculators are useful. As programmers, we’re constantly having to do silly little things like add two numbers together or convert a number from decimal to hexadecimal (the hex part will be built in Chapter 7). It’s a tool that you can put to work after you build it.
More importantly, a calculator is a good starting point for budding Cocoa developers. In subsequent chapters, we’ll use the Calculator as an infrastructure for learning about Cocoa graphics, printing, multiple windows, file handling, and many other features.
Creating your own calculator puts you in charge of its design. After all, there are many kinds of calculators: some are scientific, some are financial, and some are just simple four-function calculators. Our Calculator will let you key in the sequence “3+4=” by clicking four buttons in a window. The Calculator will display (in order) 3, 3, 4, and 7 in a text output area. If you don’t like the decisions we’ve made and want to change or add functions and features, go right ahead! Our aim is to give you the know-how to create your own applications.
Follow these steps carefully to get started building your Calculator project:
Make sure that the Project Builder and Interface Builder icons are in your dock, then launch PB from your Dock.
Choose Project Builder → Hide Others to simplify your screen.
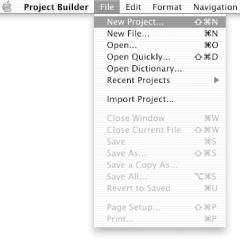
Choose PB’s File → New Project menu command to begin the process of creating a new project (see Figure 5-2). The New Project Assistant dialog opens, as shown in Figure 5-3.
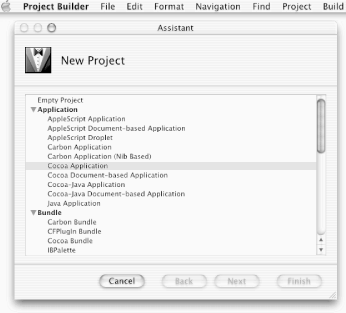
Make sure that Cocoa Application is highlighted, as shown in Figure 5-3, then click Next. The New Cocoa Application dialog shows up, as shown in Figure 5-4.
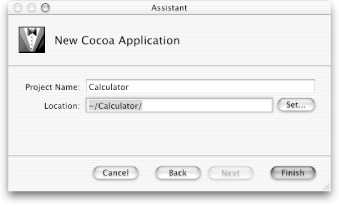
Type “Calculator” in the Project Name field of the New Cocoa Application panel, as shown in Figure 5-4.
Hit the Tab key to fill in the second line, as shown in Figure 5-4, and click the Finish button.
PB’s main window for the Calculator project opens; it should look similar to the window in Figure 5-5.

The main window in PB contains several buttons. The four buttons that look like tools (hammer, whiskbroom, etc.) at the left of the window just below its title bar are “action” buttons that can build, clean, run, and debug your project. The five disabled (dimmed) buttons near the top-right corner of the window are used with the debugger (as discussed in Section 2.4.1 in Chapter 2). Going from left to right, these debug buttons allow you to pause execution, continue execution, step over the method or function call, step into the method or function call, and step out of the current method or function call. Descriptions of the buttons pop up as you move the mouse over them.
The rest of the PB main window is divided into two sets of tabbed views. The vertical set of tabs controls what is seen in the lefthand pane of the window.
This pane (or view) can display one of five different types of information:
The files in your project
The classes in your project
The bookmarks that you have set in your project
The build targets
Any debugging breakpoints that you may have set
The horizontal tabs near the righthand side of PB’s main window display either the Find feature, the Build output, the Run (logged) output, or the Debugger output in the pane that opens above the tabs. Finally, the lower-right corner of PB’s main window is where you can browse or edit a file. The first file that is displayed when you create a new project is the Project Builder Release Notes. Normally, you would edit your source code or display Help or AppKit headers in this (text) pane.
When you first see PB’s main window, the Files tab is highlighted and groups for five types of files (Classes, Other Sources, etc.) associated with your project are shown. You can click the little gray disclosure triangles next to the labels in this Groups & Files pane to show the names of the files in your project. We’ll discuss these different file types later, in Section 5.10.
Click the disclosure triangle to the left of the Resources label in the Groups & Files pane to reveal the
MainMenu.nibandInfoPlist.stringsfiles, as shown in Figure 5-5.The checks next to these files in the target column at the left of PB’s main window mean that the files are part of the Calculator target.
Double-click the
MainMenu.nibfile icon in PB’s main window.
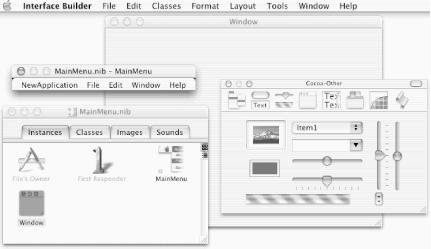
IB will launch and display the
MainMenu.nib interface that was automatically
created by PB when we created a new Cocoa application. This interface
includes a main menu titled
“MainMenu” and a main window titled
“Window”. An associated Nib File
window is also displayed in the lower-left corner of the screen,
below the new menu.
To simplify the screen, choose Interface Builder → Hide Others.
Your screen should contain the same objects as the one shown in Figure 5-6 (although probably not in the exact same location, and the Palettes window may show a different palette).