
In this chapter, we will modify our Calculator application so that a user can choose to work with any of the following bases: base 2, 8, 10, or 16. To do this, we’ll modify the Controller class to keep track of the current base and update the display accordingly. We’ll also have to modify the keyboard-input routines to work with the proper base, called the radix , and ignore keypresses (digit-button clicks) that are invalid for a particular base. Most importantly, we will introduce the concept of delegation , a technique for specifying objects that perform functions for other objects. As for the user interface, we’ll set up a pop-up menu (for the user to change the base) and show how to resize a window programmatically.
The first step toward making our Calculator work with more than one base is to put a control for changing the base in the Calculator window. We’d like to use a radio button control, for several reasons. First, the radio button allows only one selection at a time, which is how our calculator will work. Second, it’s both an input and an output at the same time — it shows a state and lets you change it. In addition to letting the user change the base, the radio button matrix indicates which base is currently selected and shows at a glance all of the choices. Unfortunately, the radio button idea has one major problem — it will take up too much room in our small calculator window. Instead, we’ll use a pop-up menu. It has all of the qualities we need, including using only a small amount of space (although it doesn’t show all choices without a click).
Open your Calculator project in Project Builder by double-clicking the
Calculator.pbprojfile (which you should have put in your Dock or Finder toolbar).Open your project’s main nib in Interface Builder by double-clicking
MainMenu.nibin PB’s Groups & Files pane.Choose Interface Builder → Hide Others to simplify the screen.
Drag the pop-up menu icon from the Cocoa-Other palette and drop it in the middle of the Calculator window, just below the white text area, as shown in Figure 7-1.
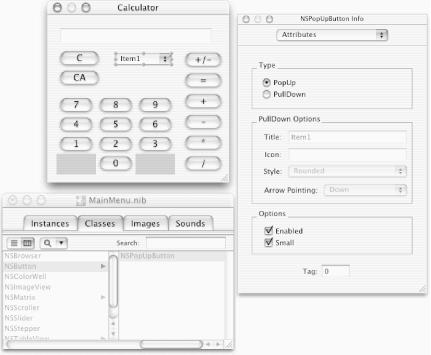
Note that NSPopUpButton, the AppKit class we’re using to install our pop-up menu, is not a menu; rather, it’s a button that is a subclass of NSButton (see the class hierarchy in the Nib File window in Figure 7-1). When you double-click the pop-up menu button in IB, you’ll see the three menu cells that the associated pop-up menu initially contains.
An on-screen pop-up menu is controlled by an instance object of the NSPopUpButton class. An NSPopUpButton object creates an NSMenu object to handle its menu-like functionality.
Click the Small checkbox near the bottom of the NSPopUpButton Info dialog to make the pop-up menu smaller, as shown in Figure 7-1 (we don’t have much room left in our Calculator window).
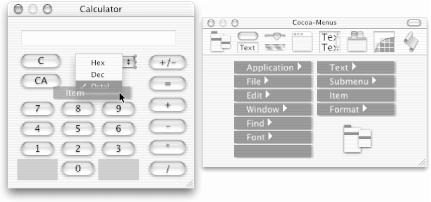
Triple-click on the pop-up menu to expose the menu choices and simultaneously select the first choice (Item1) for editing, as shown on the left in Figure 7-2.

Change “Item1” to read “Hex”, then hit the Tab key.
Change “Item2” to read “Dec”, hit the Tab key, and change “Item3” to read “Octal”. Your pop-up menu should now look like the one on the right in Figure 7-2.
We need one more menu item to allow a fourth option, “Binary” (base 2), as a choice for Calculator end users. We’ll do that next.
Select IB’s Cocoa-Menus palette by clicking the icon at the left of the Palettes window toolbar.
Drag the menu item labeled Item from the Cocoa-Menus palette and drop it below the third menu item (Octal) in the pop-up menu, as shown in Figure 7-3.
Double-click “Item” and change the text to “Binary” (see Figure 7-4).
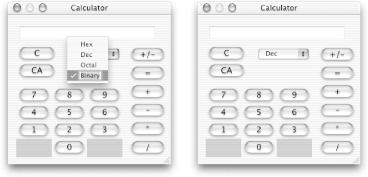
Select the second item in the pop-up menu (Dec). We’ll leave this item selected so that the application will start up as a decimal calculator (remember that the way you leave interface objects in IB is the way they’ll appear when your application launches, unless you write code to change the interface).
Close the pop-up menu by clicking in the Calculator window’s background, but not in the text area or on a button (that is, click above the text area but below the title bar).
Resize the pop-up menu so that it takes up no more room than is needed (click it once and drag a handle to make it smaller).
Your calculator window should look like the one on the right in Figure 7-4.
Pop-up menus work like a combination of the menus and buttons that we’ve used already. Like menus and buttons, they send messages, but unlike either menus or buttons, the last menu item selected remains visible on the top.
In a way that’s similar to what we did with tags on the NSMatrix of digits in the previous chapter, we’ll now set tags for the new pop-up menu.
Double-click on the pop-up menu labeled “Dec” to expose all four menu items.
One by one, select each menu item (e.g., Hex) and make sure that its tag matches the base that is displayed. That is, the Hex menu item should have a tag of 16, and the Dec, Octal, and Binary menu items should have tags of 10, 8, and 2, respectively. (See Figure 7-5.)

As before, select the Dec item and close the pop-up menu by clicking in the Calculator window’s background, but not in the text area or on a button.
Your calculator window should still look similar to the one shown on the right in Figure 7-4.
To make the Controller work with this new NSMatrix that contains a
pop-up menu, we’ll create a new action method called
setRadix:
that will be invoked whenever the user
selects one of the radix choices from the pop-up menu. This setRadix: method will find out which base was
selected in essentially the same way that the enterDigit: method in Chapter 5 found out which digit button was
clicked — it will examine the tag of the sender of the message.
To keep track of the radix that the user selected,
we’ll also add a new instance variable called
radix to the Controller class.
Back in PB, insert the
radixinstance variable and the setRadix: action method declarations shown here in bold intoController.h:. . . @interface Controller : NSObject { IBOutlet id readout; BOOL enterFlag; BOOL yFlag; int operation; double X; double Y; IBOutlet id aboutPanel; int radix; } - (IBAction)clear:(id)sender; - (IBAction)clearAll:(id)sender; - (IBAction)enterDigit:(id)sender; - (IBAction)enterOp:(id)sender; - (void)displayX; - (IBAction)doUnaryMinus:(id)sender; - (IBAction)showAboutPanel:(id)sender;- (IBAction)setRadix:(id)sender; @end
Next we’ll create a function that will convert long integers to binary representations in ASCII characters. We’ll need this function in order to display integers of all bases in the text area at the top of the Calculator window.
Insert the following
ltob( )function intoController.mbefore the@implementationdirective:NSString *ltob(unsigned long val) { int i; char buf[33]; for (i=0; i<32; i++) { buf[i] = (val & (1<<(31-i)) ? '1' : '0'), } buf[32] = '�'; for (i=0; i<32; i++) { if (buf[i] != '0') { return [NSString stringWithCString:buf+i]; } } return [NSString stringWithCString:buf+31]; }
A function in your class implementation file
can be used by any other part of your program — it works like
(and is) a regular C-language function. (Note that the function does
not have access to the class instance variables
(e.g., radix) because it is outside the class
implementation.) The ltob( )
function just listed changes a long integer into an ASCII binary
representation. It places that ASCII representation in a buffer, then
uses this buffer to create an NSString object, which is the return
value of the function. We need this function because Cocoa lacks a
general-purpose function for converting integers to ASCII-encoded
strings of arbitrary bases.
This method sets the radix instance variable to be
the tag (2, 8, 10, or 16) of the pop-up menu item that was selected
and updates the X register.
Replace the original displayX method in
Controller.mwith the new one that follows:- (void)displayX { NSString *s=nil; switch(radix) { case 16: s = [NSString stringWithFormat:@"%x",(int)X]; break; case 10: s = [NSString stringWithFormat:@"%15.10g",X]; break; case 8: s = [NSString stringWithFormat:@"%o",(int)X]; break; case 2: s = ltob((int)X); break; } [readout setStringValue: s]; }
(Remember to replace the entire displayX method; do not leave the old displayX in place.)
This new displayX method converts
the contents of the X register to the base (radix) that the user
previously selected and displays the result in the Calculator
window’s text display area. (Recall that the
readout outlet points to the NSTextField object
near the top of the Calculator window.) Note that the base is
“known” to displayX through the radix
instance variable. Because radix is an instance
variable, it is accessible to any Controller method.
In order for the radix instance variable to be set
to the user-selected base, we need to arrange for the pop-up menu to
send the setRadix: message to the
Controller. As always, when we need an on-screen object to pass
information to a custom object, we must set up a target/action
connection in IB. But IB doesn’t know
about the setRadix: action method
yet, so we must first read the new Controller class definition into
IB:
Make sure that you save the two Controller class files in PB before proceeding (File → Save All).
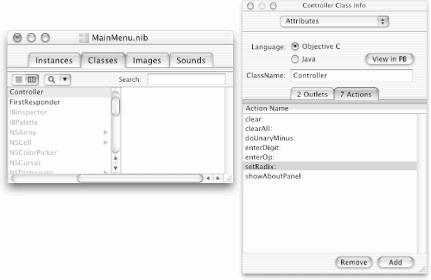
Back in IB, select the Classes tab in
MainMenu.nib, then select the Controller class (under NSObject) in the class hierarchy. (The easiest way to find the Controller class is simply to type C in the Search field — try it!).Choose IB’s Classes → Read Controller.h menu command (note that you don’t have to search for the class interface file in the filesystem, but you do have to with Classes → Read Files).
The new setRadix: action method we
declared in Controller.h should now show up in
the Controller Class Info dialog, as shown in Figure 7-6.
Next, we’ll set up a target/action connection involving this method.
Select the Instances tab in the
MainMenu.nibwindow.Control-drag from the pop-up menu to the Controller object, as shown in Figure 7-7. (The previous step is actually unnecessary, because IB will automatically switch to the Instances pane when you Control-drag a connection to the Nib File window.)
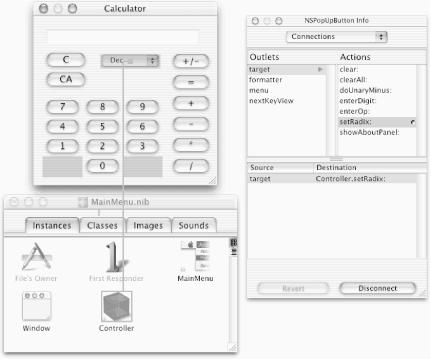
Arrange for the pop-up menu to send the setRadix: action message to the Controller by double-clicking setRadix: in the NSPopUpButton Info dialog, as shown in Figure 7-7.
Back in PB, click the build and run button. Save all files when prompted.
With Calculator running, click the digit button labeled “9”.
Nothing happens! What’s worse, there are ominous messages colored in red in PB’s Run pane, as shown in Figure 7-8. What’s wrong?
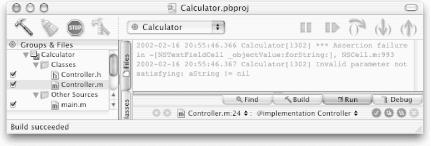
Before you panic, try the following:
Click the Dec pop-up menu and then click Dec again. The decimal digit 9 should appear.
Click the pop-up menu again and drag to Octal. The octal equivalent of decimal 9, namely 11, should appear.
Click the pop-up menu again and drag to Binary. The binary equivalent of decimal 9, namely 1001, should appear.
Quit Calculator.
The
problem that occurred when we first clicked the 9 button is a lack of
programmer initialization. Objective C initializes all of an
object’s instance variables to 0, so when our
Calculator started running, the radix instance
variable had the value of 0. As a result, the
switch statement in the displayX method didn’t
execute any of the options — and no value was set to the variable
s, which remained initialized to nil.
That’s what caused the assertion failure.
One solution is to hardcode the initialization of the instance
variable radix in
Controller.m. We could set
radix to 10 because we set our pop-up menu in IB
to start at Dec. But where can we do this initialization, and what
are the other possibilities?
Our solution will be to create a new method in the Controller class, which is invoked automatically when the application starts up. Cocoa gives us three clean ways to specify initialization code for objects in a user interface:[19]
- The awakeFromNib method
We can specify an initialization with Cocoa’s awakeFromNib method. Cocoa automatically invokes the awakeFromNib method, if such a method exists, for every object it unarchives from a nib file. It does this after all of the objects have been unarchived and connected.
- The notification system
We can use Cocoa’s notification system, which allows objects to broadcast messages without designating connections in advance.
- Delegation
We can use a technique called delegation , where another object is delegated the responsibility of responding to certain types of messages sent to the delegating object.
We’ll use the delegation technique to solve our current initialization problem because it fits nicely in the Calculator application. Later in the book, we’ll use both of the other techniques.
[19] Cocoa actually gives us a fourth way to initialize our objects as well. Because objects in nib files are instantiated using the NSCoder system (which we will describe in Chapter 13), we could create an initWithCoder: method and initialize variables in that method. The fact that we are telling you this in a footnote should be a strong signal that this technique is not to be used except under the most arcane circumstances. For starters, different init methods are called depending on how the object is initialized. A second problem with this method is that the initWithCoder: method is called after each object is created, whereas the awakeFromNib method is called after all of the objects in a nib are instantiated and wired up. That’s why we wrote that Cocoa gives you three clean ways to specify initialization code for objects in a user interface. While there is a fourth technique, in our opinion you shouldn’t use it for initializing a user interface.