
Solutions in this chapter:
Humankind has always been fascinated by labyrinths, and mythology is crowded with heroes busy finding their way out of mysterious buildings. It was not unusual for large European 18th- and 19th-century villas to have a hedge labyrinth in their gardens. Indeed, mazes of different varieties are still common in the amusement parks and games of our era.
The ability to find your way through a maze is considered a good test of intelligence and has been used with mice and other animals to measure their capacities. Now the time has come to test your robots too!
Before building robots capable of solving a maze, we must understand what “solving a maze” means. In other words, we must understand what knowledge and skills are necessary to find the way out. If you ask anybody to solve a simple maze drawn on a sheet of paper, he will probably do it very quickly. But if you ask him to describe the procedure he used, you will likely receive some very generic explanations. This happens because human beings tend to ignore the details of what they do: They employ the knowledge and experience accumulated throughout their lives—especially during their childhood—without realizing that such a simple action actually hides a multitude of operations. If somebody were to stop you on the street to ask for directions, would you explain to her what “turn” and “left” mean? Surely not. However, in regard to robotics, there’s no background knowledge you can take for granted. We explained in Chapter 14 that even an apparently easy task such as moving around the inside of a room or detecting obstacles requires a thoughtful analysis of the environment and of its interactions with your robot.
This is also the kind of analysis necessary to implement maze solving: You need a strategy, and it has to be detailed enough to be translated into program instructions for your robot. For this reason, we will begin exploring some theories about maze solving, which will lay the foundations for the projects that follow.
On the hardware side, the robots that you will come across in this chapter don’t require more parts than what you find in your MINDSTORMS NXT box. As well as teaching some concepts about maze solving, this chapter will also strengthen your skills in working with touch and light sensors, consolidating ideas that appeared in Chapter 4.
Even a simple maze, the kind you can solve in a few seconds with a pencil if you see it printed on a sheet of paper, assumes a completely different perspective when you are inside it. If you don’t have any external reference point and are not allowed to take note of your moves, well, be prepared to spend a few hours!
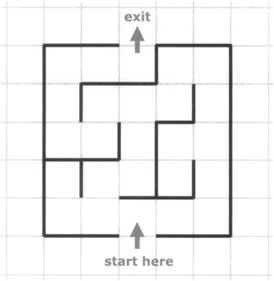
How can external references or note taking help you find your way out of a maze? Because they help you understand where you are. To introduce this concept, we invite you to perform an experiment: You need a friend who will play the role of the robot inside the maze, while you simulate the sensors that return information about the environment around him. Your friend must find the exit from the maze of Figure 17.1 without actually seeing the picture, and only by using your verbal feedback. He can use only four commands inside the maze to direct himself: forward, back, right, and left. You track his position in the maze with a pencil, and if his command is acceptable—that is, if the desired direction doesn’t come up against a wall—you move the pencil to the specified adjacent square, answering “OK”; otherwise, you keep the pencil stationary and answer “wall.”
Will your friend be able to exit the maze under these conditions? Probably yes, but only after a long time, and with an effort that seems enormous when compared to the simplicity of the maze. In the second phase of the experiment, provide your friend with a square sheet and a pencil so that he can log his movements. When you answer “OK,” he will move his pencil to the adjacent square and mark it as “visited,” and when you answer “wall” he will remain in the same square, but will mark the specified side of his square with a line which represents the wall. Now things will go much more smoothly for your friend: Looking at his map, he can avoid visiting the same location more than once, sparing himself many “collisions” and exploring all possible routes until he finds the way out.
Some of you may have noticed that the aids mentioned pertain to the two basic categories described in Chapter 13 regarding knowing your position: absolute and relative positioning. In fact, the use of external reference points represents an application of absolute positioning—you use landmarks to locate yourself—while note taking has many similarities with relative positioning: You deduce your new location knowing the direction and the distance you covered from the previous location.
Finding one’s way in a labyrinth is, in fact, a special case of navigation and requires similar abilities, with the addition of some memory to remember which branches have already been visited. In our previous experiment, the memory was symbolized by the sheet of paper where your friend logged his moves.
Thus, generally speaking, to solve a labyrinth, your robot should be equipped with a navigation system and a map in its memory. There are some notable exceptions, such as labyrinths that simply require slavish application of a rule to lead you to the exit, which could be handled by robots with less demanding equipment.
The strategies we are going to explain work with flat mazes—not just the ones you can draw on a piece of paper, but any labyrinths that can be represented on a piece of paper. For example, hedge and crystal labyrinths usually belong to this category provided that they don’t contain any bridges or tunnels.
The left side-right side strategy solves an incredibly large class of mazes, its rule being quite simple to remember and apply. It states that, when applicable, if you follow the left wall and turn left whenever possible, you will find the exit. Easy, isn’t it? You’re not guaranteed to cover the shortest distance, but you are guaranteed to find the way out. Actually you can just as easily keep to the right side, the two methods being complementary and leading to the exit along different paths. We invite you to test the rule on the simple maze of Figure 17.1 Imagine physically entering the maze and then trying to follow the left wall—eventually, you arrive at the exit. Now try again, this time following the right wall. Again you reach the exit, but from a different route (see Figure 17.2).
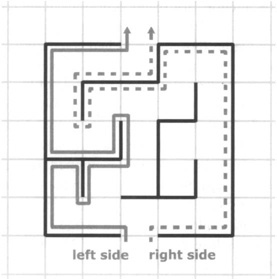
To be more precise, if you follow the right wall, you use the same route you would if you followed the left wall from the exit to the entrance.
This strategy has a great advantage in that you need not know anything about your position and orientation. The only capabilities required are that your robot can follow a wall and that it can recognize the exit when it’s there.
At this point, the crucial question is, when can you apply this rule? There are essentially two cases in which you can do this:
When the maze is flat, and has both the entrance and the exit placed along its perimeter (as in Figure 17.2).
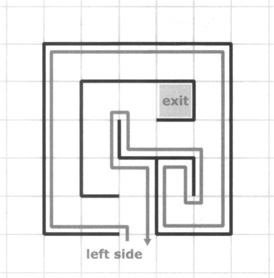
When the maze is flat, and the entrance and exit are points arbitrarily chosen anywhere in the maze, where the latter doesn’t contain any loops. That is, it doesn’t contain multiple paths that connect any two points (see Figure 17.3).

This rule covers many practical cases. However, it doesn’t work when the entrance and exit are not along the perimeter and the maze contains loops, as in Figure 17.4 Notice that the route covered following the left wall brings you back to the entrance without reaching the exit point.
When you cannot apply the rule previously stated, you can rely on two strategies:
Executing random turns
Tracking your route
The first strategy says that whenever you find yourself at an intersection, you decide which way to go at random. Though this method is guaranteed to find the solution sooner or later, that “later” can be a very, very long time if the maze includes more than a handful of intersections!
The second approach solves the more general case of mazes with more than a few intersections, but it requires two valuable ingredients: a position control system and a memory. You must be able to recognize each intersection and mark the branches already explored so as not to explore them again. The right-side rule can still be useful as a basic rule, but when you find yourself in a place you’ve already been, you must be able to backtrack to the first intersection with unvisited branches and take one of those.
We imagine you already see the difficulties in this: You must provide your robot with an affordable navigational aid and an inner map to represent the maze so that you can mark the visited corridors. Fortunately, with the new MINDSTORMS NXT servo motors and RobotC, this mission is not so difficult.
But let’s start with something simpler. We designed the first robot of this chapter, the Maze Runner, to apply the left-side rule inside a maze.
Our Maze Runner applies the left-side rule and follows the left wall of the maze toward the exit. It has no intelligence, only the capability to follow a wall.
To construct the Maze Runner, we used two servo motors, a ball caster, and one ultrasonic (US) sensor. You can replicate the whole robot with parts solely contained in the MINDSTORMS NXT set (see Figure 17.5).
It works on a simple principle: The US sensor keeps the robot at a fixed distance from the left wall. When the distance changes abruptly, it considers this to be an opening to the left. If the gap is large enough for the robot to pass, it turns left. This covers the case of straight walls and left turns, but the robot will also have to face situations in which it hits a wall in front of it and must turn right. For this the robot monitors another encoder, and detects whether it is stalled by comparing the previous encoder reading to the current encoder reading.
We designed the Maze Runner to be as small as possible in the planar dimensions so that it can move through narrower mazes. We mounted the US sensor in front vertically to measure the distance to the left wall, while keeping the robot design compact. Figure 17.6 shows the front view of the Maze Runner, and Figure 17.7 shows the left-side view.
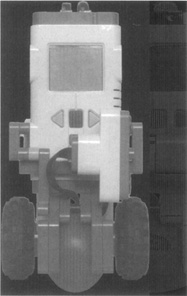
As we discussed in Chapter 6, the motors are an inherent part of the robot’s “chassis.” In our Maze Runner, the robot is divided into three “modules”: the motors, the ball caster, and the NXT brick with the US sensor. As we emphasized in Chapter 6, building a robot in a modular fashion allows you to disassemble and fix each part without reconstructing the whole structure.
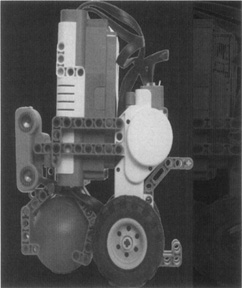
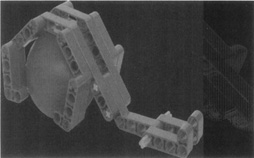
The front ball caster was designed to be as small as possible, and to provide clearance for the US sensor (see Figure 17.8). Now, you may ask why the two L-shaped five-stud pieces are in the back. Well, when the robot moves forward, these two liftarms are in the air. However, when the robot hits a wall, due to the vertical design we found it can easily fall back. These two liftarms prevent this from happening.
“Playing robot” is always a great exercise for devising or testing the strategy you are going to implement in your program. Even before you actually write any code, imagine running the program in your head, and try to explore the test maze of Figure 17.1 following the instructions step by step.
You will discover that this robot is relatively easy to program. The main program is composed of two nested loops (see Figure 17.9). One handles moving forward and turning right and the other handles the task of turning left and resuming forward movement.
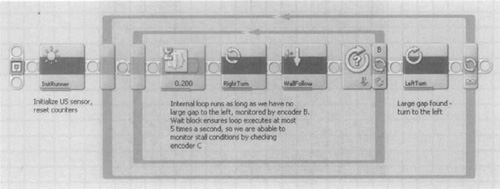
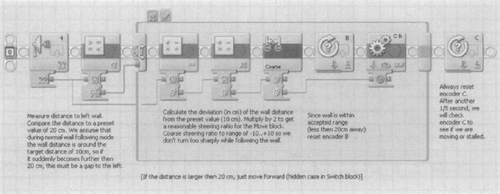
We wrote the program in NXT-G using MyBlocks to ease programming, improve code readability, and allow reuse of program pieces in the future. As you can see in Figure 17.9, this makes the diagram easy to understand. The wall-following MyBlock (see Figure 17.10) measures the distance to the left wall. If the distance is less than 20 centimeters, it assumes there is a wall to the left and provides a steering ratio to the Move block to correct the distance to the target of 10 centimeters. It also resets encoder B, so the nested loop in the main program exits only if there was a large enough gap to the left. Finally, it resets encoder C.
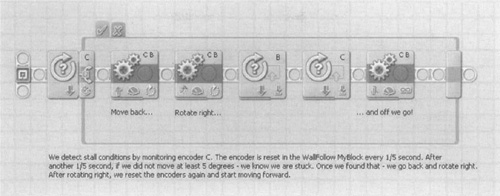
As the robot moves forward, the encoder C value will increment unless we are stuck at a wall. This is checked in the RightTurn MyBlock (see Figure 17.11). If encoder C did not increment at least 5 degrees from the previous loop iteration, we know we got stuck, and we need to retract and rotate to the right before we move forward again.
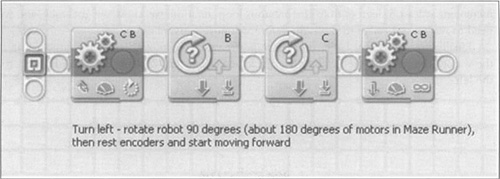
Finally, if encoder B is larger than some preset value, we know there was a large gap in the wall to the left, and the LeftTurn MyBlock (see Figure 17.12) turns the Maze Runner to the left.
Now that you have a maze runner, you presumably would like a maze too! Unless you want to show off your robot at some sort of public exhibit, it’s not necessary to build a lovely structure made from wood or other materials. You can test your creature against a makeshift labyrinth made with small pieces of furniture, piles of books, large boxes, cardboard, or anything else your imagination will suggest. Because we’re using a US sensor to follow the walls, we avoided using soft materials or cloth-coated pieces as these do not reflect ultrasonic waves. Apart from that, the only thing we needed to ensure was that all the “walls” have a reasonably smooth surface at the height of the US sensor, so the sensor measures the distance to the walls correctly. You can find a video of the Maze Runner solving a simple maze (made of piles of books) at www.nxtasy.org (see Appendix A).
To overcome the limitations of the Maze Runner and its “left-side rule” tactic, and to solve the more general case of a labyrinth with an entrance and exit at two arbitrary points, we designed our own Maze Solver.
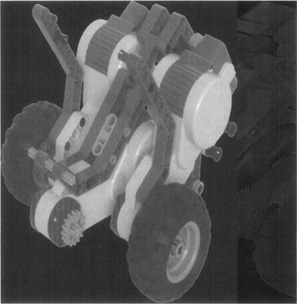
In Figure 17.13, you can see we changed our approach somewhat. We added a third motor to allow rotation of the US sensor so that we can scan in all three directions. The construction is again modular—the three motors and the back wheel caster comprise one module, the sensor with its rotating gear is another, and the third is the NXT brick mounted on top.
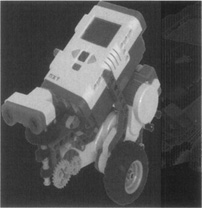
Figure 17.14 shows the rear side of the Maze Solver. The two driving motors are held together with an 11-stud beam and a 10-stud axle, also holding the third motor and the wheel caster.
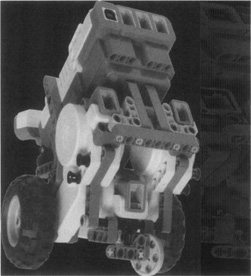
Figure 17.15 shows the front view with the NXT brick and the US sensor removed. The double bent beams connect the sensor motor to the other two motors, setting the angles between the three motors.
Obviously, the hard part in making a maze-solving robot which uses memory is the programming. Our Maze Solver uses the algorithm we briefly described in the “Applying Other Strategies” section for tracking your path. This method is called Tremaux’s algorithm. Before we get into the actual RobotC code, we will describe some concepts and assumptions needed for the program.
First, we define four “directions”—north, west, south, and east. These directions do not have to coincide with the actual four winds. Let’s call the direction of our robot at the entrance “North,” and let the other directions follow the usual convention. The current “direction” will be held in a variable called MyDir. The following code snippet declares the directions and some useful macros to find which direction is to the left/right of another direction:
typedef enum { // Define the directions in space
  North = O,
  West  = 1,
South = 2,
  East  = 3,
} tDirection;

tDirection MyDir : North; // My present direction

// What direction is to the left/right of "Dir"
#define LeftOf(Dir) (tDirection) (((int)Dir+l) % 4)
#define RightOf(Dir) (Dir == North ? East i (tDirection) ((int)Dir-l))
Next, we assume that the maze is flat and has a typical “length scale”—a characteristic length of which all maze dimensions are multiples. We call this length scale “maze units,” and we shall use them to map physical space into a two-dimensional array holding the stored maze map in the robot’s memory. Moving one maze unit forward corresponds to moving one “position”—in other words, changing our position in the map by 1. The map is stored in a variable called Map which holds a value between 0 and 3 for each maze “position”:
Value = 0 This corresponds to a map position which we did not visit, or those which we cannot reach at all.
Value = 1 This corresponds to a position which we’ve passed already; in addition, we have already tried all possible routes emerging from it.
Value = 2 This corresponds to a position we have already visited, but from which we haven’t tested one emerging route. For example, coming at a T-intersection, we need to choose one path. The other path is still unexplored, so we mark this position in the map with a value of 2.
Value = 3 This corresponds to a position in which two emerging routes have been left unexplored. This occurs when we first come to a four-way junction. We’ll pick the right path, leaving the other two for the future.
Why do we bother with these different values? Well, when we move around the maze, we will probably encounter cases in which either there’s no way to proceed (we’ve reached a dead end), or all positions accessible from our present position have already been visited in the past. In such cases, we need to backtrack through our path until we reach a position in which we left an unexplored path. To facilitate the backtracking procedure, we mark these positions on the map with a value of 2 or 3, making it faster to go back to these. The current position in Map is stored in two variables, MyPosX and MyPosY, defined in the following code snippet:
// size of maze map
#define SIZE_X 22
#define SIZE_Y 22
// Hold map of maze.
// 0 - haven't visited this position
// 1 - been here, no unvisited paths from here
// 2, 3 - there are more ways to go from here!
int Map [SIZE_X] [SIZE_Y] ;

int MyPosX = 10, MyPosY = 1; // Keep position in map, start at (10,1)

int MyPath[SIZE_X*SIZE_Y] ; // Hold path traveled
int PathCounter = 0;
As we said earlier in this chapter, we use Dir to describe our robot’s orientation. We define two more useful macros that return a relative map position at a particular “direction”
// Convert directions to relative position in map
#define RelPosX(Dir) (Dir == West ? -1 : (Dir == East ? 1 : 0))
#define RelPosY(Dir) (Dir == North ? 1 : (Dir == South ? -1 : 0))
Now we can easily find out what’s around us in the maze map! Our current position is Map[MyPosX][MyPosY], in front of us is Map[MyPosX+RelPosX(MyDir)] [MyPosY+RelPosY(MyDir)], and to the right (similarly to the left) is Map[MyPosX+RelPosX(RightOf(MyDir))][MyPosY+RelPosY(RightOf(MyDir))]. There is, however, a small problem with the maze boundaries. We do not want to refer to positions outside the array bounds. We solve this with a very widely used “trick.” We define the maze array to be two maze units bigger in each dimension than the real maze. Then, at the start of the program, we set the outer “frame” of the array to a value of 1, and the rest to 0:
// Set initial map
void Initialize_Map() {
  int j, k;
  for (j = 0; j < SIZE_X; j++)
    Map[j] [0] = Map[j] [SIZE_Y-1] = 1;
  for (k = 0; k < SIZE_Y; k++)
    Map[0] [k] = Map [SIZE_X-1] [k] = 1;
  for (j = 1; j < SIZE_X-1; j++)
     for (k = 1; k < SIZE_Y-1; k++)
       Map[j] [k] = 0;
}
Because we consider a value of 1 to be an “exhausted” position, we will never try to reach it as we move around the maze. This will also prevent us from trying to move out of the entrance if we encounter it again!
Finally, we will define some subroutines that do the actual motion; in other words, rotate the US sensor in all directions; rotate the whole body left, right, or 180 degrees back; move forward one maze unit; and check whether we are at the maze exit:
// These functions perform robot actions - you should write these!
void rotate_US_left();
void rotate_US_front() ;
void rotate_US_right () ;
void rotate_robot_left() ;
void rotate_robot_right() ;
void rotate_robot_back();
void move_forward() ;
bool is_in_exit();
As you can see, we intentionally left these functions empty. You must complete these for your robot to be capable of moving a single inch!
We now get to describe the main loop. At each iteration, the code will check which of the three possible ways ahead (left/front/right) is accessible (the Boolean array Walls will contain those which are not accessible) and decide which direction to go next in a variable called NextMove:
#define DecreaseOne(Var) { Var -: 1; Var = ((Var) < 1) ? 1 - (Var) ; }
bool Walls[3] ; // which directions have a wall near? (0 - left, 1 - front, 2 -
right)
int NextMove; // which move should we do next?

#define WALL_NEAR 20

// This subroutine does the actual maze solving using Tremaux's algorithm
void Solve_Maze() {
while (!is_in_exit()) { // loop until we are in the maze exit
  // check in which directions we see walls
  rotate_US_left() ;
  Walls[0] = SensorValue(sonarSensor) <= WALL_NEAR;
  rotate_US_front() ;
  Walls[1] = SensorValue(sonarSensor) <= WALL_NEAR;
  rotate_US_right() ;
  Walls[2] = SensorValue(sonarSensor) <= WALL_NEAR;

  // first, assume all possible paths are unvisited
  Map[MyPosX] [MyPosY] = 3- (int)Walls[0]+(int)Walls[1]+(int)Walls[2] ;
NextMove = -1; // This value will tell that all paths are visited...

// check left path
if (!Walls[0]) {
  // Have we visited the position to our left?
  if
(Map[MyPosX+RelPosX(LeftOf(MyDir))] [MyPosY+RelPosY(LeftOf(MyDir))]==0)
{
      // No. Let's go there now!
      NextMove = 0;
    } else {
      // Yes. Decrease number of new paths here and at the position to the left
      DecreaseOne(Map[MyPosX] [MyPosY]);

DecreaseOne(Map[MyPosX+RelPosX(LeftOf(MyDir))] [MyPosY+RelPosY(LeftOf(MyDir))]) ;
    }
  }

  // check forward path
  if (!Walls[l]) {
    // Have we visited the position in front of us?
    if (Map[MyPosX+RelPosX(MyDir)] [MyPosY+RelPosY(MyDir)]==0) {
      // No. Let's go there now!
      NextMove = 1;
    } else {
      // Yes. Decrease number of new paths here and at the position in front
      DecreaseOne(Map[MyPosX] [MyPosY] ) ;
      DecreaseOne(Map[MyPosX+RelPosX(MyDir)] [MyPosY+RelPosY(MyDir)]) ;
    }
  }

   // check right path
   if (!Walls[2]) {
     // Have we visited the position to our right?
     if
  (Map[MyPosX+RelPosX(RightOf(MyDir))] [MyPosY+RelPosY(RightOf(MyDir))]==0)
  {
        // No. Let's go there now!
        NextMove = 2;
      } else {

// Yes. Decrease number of new paths here and at the position to the right
      DecreaseOne (Map [MyPosX] [MyPosY]);

DecreaseOne (Map [MyPosX+RelPosX (RightOf (MyDir)) ] [MyPosY+RelPosY (RightOf (MyDir))]) ;
    }
  }

  .
  .// next code snippets come here;
  .
}
The first lines of the code check the distance to the wall at each of the four winds. If the distance is smaller than some predefined value, we decide there’s a nearby wall in this direction. We then assume that all accessible directions lead to an unexplored position (i.e., a position in which Map equals 0), and we check the map at each of these directions. If we indeed find it unexplored, we decide to go there next. Otherwise, we decrease the number of “waiting” paths from our present position, as well as from the position we look at. Why the latter? Because the only way we will encounter a visited position while traveling in an unexplored route is if we’re closing a loop, so the previously traveled position must have had more than one path available when we were there. Notice that this code is a “right-hand rule” code: If all paths are accessible and unexplored, the program preference is to first turn right; if not, the next option is to move forward, and the last option is to turn left.
When we decide on the next step (i.e., NextStep is 0, 1, or 2), we rotate the robot toward that direction and move forward:
switch (NextMove) {
  case 0: // go left
    rotate_robot_left () ; // rotate the whole robot left
    MyDir=LeftOf (MyDir) ; // change to new direction
    break ;
  case 2: // go right
    rotate_robot_right () ; // rotate the whole robot right
    MyDir=RightOf(MyDir) ; // change to new direction
    break;
}

if (NextMove i= -i) { // Should we move forward?
  move_forward();
  MyPath[PathCounter++] = NextMove; // keep track of the move we did
  MyPosX += RelPosX(MyDir); MyPosY += RelPosY(MyDir); // change position
  continue; // go back to loop start
}
.
.// next code snippet comes here
.
As you can see, we keep track of the steps we performed: left turn, forward, right turn. If we did not find a path to use, we start backtracking using this path until we reach a position in which there are still unexplored routes:
// If we got here, either we are in a dead end or we visited all possible
// directions from this position. We should backtrack our way out!
rotate_robot_back(); // rotate robot 180 degrees

// go back until you find a position with unexplored paths
while ((Map[MyPosX] [MyPosY] < 2) && (PathCounter-- > 0)) {
  switch (MyPath[PathCounter]) {
    case 0: // go back right
     rotate_robot_right() ; // rotate the whole robot left
     MyDir = RightOf(MyDir) ; // change to new direction
     break;
    case 2: // go back left
     rotate_robot_left(); // rotate the whole robot right
     MyDir = LeftOf(MyDir) ; // change to new direction
     break;
  }
  move_forward();
  MyPosX += RelPosX(MyDir) ; MyPosY += RelPosY(MyDir) ; // change position
}
Once we reach a new emerging route position, we return to the start of the wkile loop and look again for a path to take.
We can still improve our Tremaux’s algorithm program in several ways. Test your strength in RobotC by trying to implement these improvements:
When you decide to backtrack, first check whether backtracking will not lead you past one of the positions around you. This would occur, for example, if you moved in a circle and returned to the starting point. In this case, turning 180 degrees and going back is wasteful; it’s better to move one step and remove the whole loop from MyPath.
When you find that a nearby position is accessible and its Map value is 3, this means it contains an unexplored path; go for it!
If you want to test your skills in maze solving, the first step you have to take is to understand the details involved in the process of finding your way out of a maze. We encourage you to draw a simple maze on a sheet of paper and to “play robot” with it: Take a pencil which represents the position of the robot in the maze and move it according to the “program” you execute in your head. This preliminary study will provide you with the necessary knowledge to successfully build and program your robot.
The robots we discussed in this chapter prove that maze solving is in the range of MINDSTORMS NXT robotics. In discussing the theory, we explained that maze solving requires a robot with both an accurate navigation system and a memory to store a map of the labyrinth. The navigation system is the more demanding of the two requirements (recall Chapter 13 and the problems involved in finding the robot’s location).
We discovered in this chapter that maze solving may be no more complex than wall following. This means your robot needs only minimal intelligence—a trait reflected in our Maze Runner robot. If the maze’s entrance and exit are not placed along its perimeter, a cleverer algorithm is required. We designed our Maze Solver to solve such mazes, using Tremaux’s algorithm.