
You might not realize it, but all objects radiate heat energy (including your coffee table); it's just that you can't see it because heat consists essentially of infrared waves, which are invisible to the human eye (exactly the same as your TV remote control). These waves can, however, be detected by electronic devices designed for such a purpose, such as the infrared receiver in your TV that detects the energy emitted by your remote control when the buttons are pressed.
You probably do realize, however, that living things such as us, our cat, and the mouse under the floorboards generate quite a bit of heat. Passive infrared motion sensors used in security systems and automatic lights are designed to detect this level of heat. The term passive is used because the sensors themselves do not radiate any energy for detection purposes—instead, they just detect the infrared radiation emitted by objects. This is notably different from devices such as ultrasonic sensors and radars, which rely on detecting reflections from objects of the pulses of energy that the sensors send out.
PIR sensors need to be a little smart because they effectively have to cope with constantly varying temperatures in the room. They settle on the background temperature of the room they are in, such as that of a wall or floor that they point to. When an object, such as one of us or our cat, moves between the detector unit and the background object, the temperature in front of the sensor rises to the body temperature quickly, and this in turn triggers the system.
PIR sensor devices come in many formats, including different materials in sensor chips and the lens in front of the sensor view window that can widely affect the range, field of view, and sensitivity of the device. Therefore, your best guide to setting up a sensor will usually be in that little bit of instruction paper that comes with it.
However, regardless of the type of PIR sensor you have, here are some general guidelines when considering where you mount your sensor in order to avoid false triggers:
- Ensure that the device is mounted on a solid foundation and not affected by vibration
- Never mount it in a location where direct or reflected sunlight can be picked up by the lens
- Similarly, never mount the device facing or above heat sources
- Don't mount the unit in draughty locations as this will affect its background temperature calibration
The location of the unit also depends on the area you want to protect. You may want to detect people entering your living room from the hallway, so your coverage area could be defined as being from the corner of the room where the device is mounted to the living room door.
PIR sensors usually offer a fixed field of view (for example 90 or 110 degrees) but have a varying range, depending on the angle at which they are pointing down and the height at which they are located.
In my system, I will use a Gardscan QX PIR Detector for my wired units, which is a pretty good, low-cost unit available from RS Components (the order code is 493-1289). This unit has a field view of 110 degrees and a range of up to 12 meters, depending on the configurable down angle that it's mounted at. The coverage patterns for this particular unit, as taken from its datasheet, are shown in the following figure. Note that from these patterns not every part of the area in front of the device is covered, which is possibly not quite what you expect. This is why positioning the units in accordance with the device's datasheet is so important.
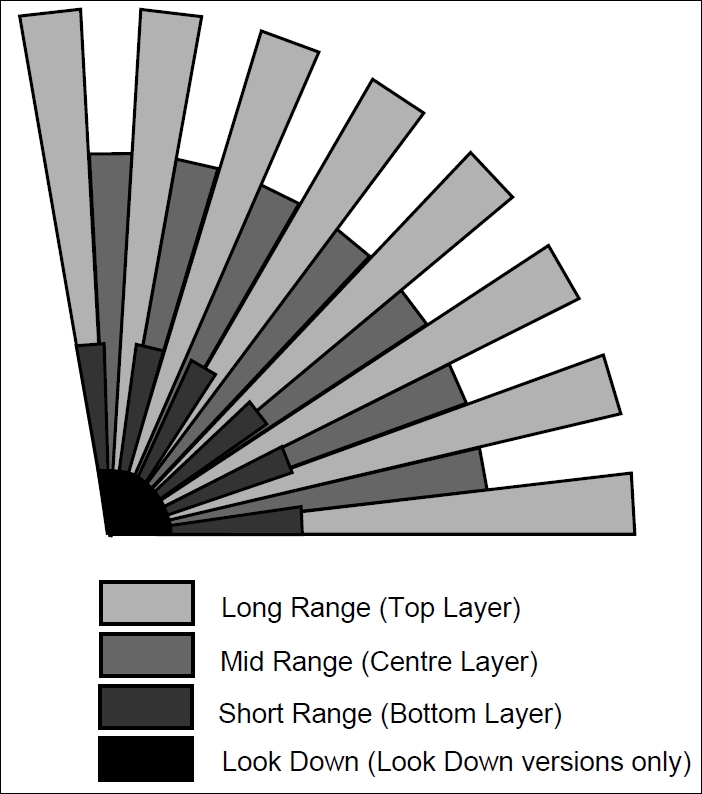
GardScan QX-PIR coverage pattern for its 110 degree field view (top/plan view)
Here is a diagram of the side view as well:
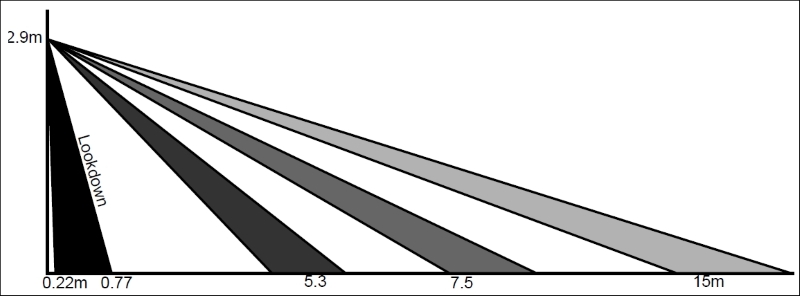
GardScan QX-PIR coverage pattern depending on the angle configured plus a "look-down" window (side view)