Our Web-based control panel is going to be a single PHP-driven HTML5 web page which will be mobile optimized. HTML5 is the latest mark-up standard for web pages and is supported by most modern smartphones and browsers. We will also create a cascading style-sheet (CSS) that will make our page look half reasonable on mobile devices.
To create the web files, I recommend that you use something like the excellent Notepad++ on your desktop computer, rather than doing it directly on the Raspberry Pi. Alternatively, if you are a seasoned web developer, you may already have your IDE of choice.
The first thing we'll do is create an HTML file that we can use to test our layout before we put the HTML into a PHP file to make it interact with our system. This makes it easier to tweak the way we want it to look beforehand, without the PHP scripts getting in the way.
Note
This is not a tutorial on Web development—there is a plethora of books out there on that subject—but I hope the code is clear enough for you to work out what's going on. The code I'm going to show you is fully functional, so you can just use what I give you without having to do any more. Hopefully, it makes your control panel look OK too!
The following mark-up gives you a basic control panel with status for our 8 zones, a master arm and disarm switch, and switches to enable or disable any of our zones.
The <head> section of the code contains some <meta> tags that help mobile devices know that it's a mobile-friendly site. In the main <body> mark-up, we have a section for each zone that contains the zone's name and an on/off switch. Each zone is in its container so that we can also highlight a particular zone that needs our attention, for example, if it's triggered.
You can find the full HTML5 markup for our control panel in the alarm-panel.html file located inside the code folder of chapter 7.
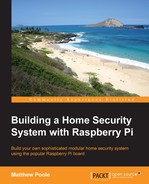
At the moment, this page doesn't look that great (in fact, it looks awful, like something from the 1990s); it isn't particularly good for mobile devices and would most certainly fail the sausage test. So, we're going to apply some styling to make it look not half bad. Although the preceding mark-up contains a reference to a CSS file—we haven't created that file—so this is what our page currently looks like (as I said: it looks awful):
The web control panel without any styling
The following CSS3 mark-up is designed specifically for our control panel, and it makes it look quite nice while also making it usable on touch-screen mobile devices. The CSS is quite long and seems overwhelming, but you don't need to do anything with it, or understand it, if you don't want to—the only thing you need to know is that it's been designed for modern browsers and smartphones, so don't expect it to work on Internet Explorer 7, or probably even IE9!
In essence, it contains the styling for the following:
- Preparing the browser for our mobile layout
- Our text and zone areas
- Creating cool switches instead of boring checkboxes
- Making an area flash on and off when we need it to
/* Clear browser margin and padding defaults */
body, div, dl, dt, dd, ul, ol, li, h1, h2, h3, h4, h5, h6, pre, form, fieldset, input, textarea, p {
margin:0;padding:0;-webkit-text-size-adjust:none;
}

body {
  background: #ffffff;
  color: #4A5651;
  font-family: "Trebuchet MS", Helvetica, sans-serif;
  font-size:10px;
  height: 100%;
  padding:0;
  margin:0 auto;
  max-width:320px;
  min-width:240px;
  text-align: left;
  width:100%;
  -webkit-box-shadow: 0px 20px 40px 0px rgba(0,0,0,0.50);
  -moz-box-shadow: 0px 20px 40px 0px rgba(0,0,0,0.50);
  box-shadow: 0px 20px 40px 0px rgba(0,0,0,0.50);
}

p, .zoneLabel {
  font-size:16px;
  margin:5px;
  line-height:1.4;
  color:#4A5651;
}

#header h1 {
  font-size:20px;
  line-height:40px;
  margin:0;
  padding:0 0 0 15px;
  text-align:center;
  text-overflow: ellipsis;
  font-weight:bold;
}

.zoneControl, .masterControl{
  border-bottom:1px solid #dddddd;
  margin-top:5px;
  margin-bottom:0px;
  padding:5px;
  display:block;
  width:100%;
}

.zoneLabel {
  font-weight:bold;
  text-overflow:ellipsis;
}

input[type="submit"] {
  border: none;
  background-color: #0b70cc;
  color: white;
  height: 32px;
  display: block;
  padding: 4px 7px;
  float: left;
  border-radius: 8px;
  position: relative;
  bottom: 1px;
  margin-left: 4px;
  text-align: center;
}
input[type="submit"]:hover {background-color: #b2ceec;color: #0b70cc;border: none;border: 1px solid #b2ceec;}

/* Flashing animation */
@-webkit-keyframes flash{0%, 50%, 100% {opacity: 1;} 25%, 75% {opacity: 0;}}
@keyframes flash {0%, 50%, 100% {opacity: 1;} 25%, 75% {opacity: 0;}}
.flash {
  -webkit-animation-name:
  flash;animation-name:
  flash;color:#f00000;
}
.animated {
  -webkit-animation-duration: 1s;
  animation-duration: 1s;
  -webkit-animation-fill-mode: both;
  animation-fill-mode: both;
  animation-iteration-count:infinite;
  -webkit-animation-iteration-count:infinite;
}

/*
  ON/OFF SWITCH STYLES
  The rather cool On/Off switch styling was generated on
  https://proto.io/freebies/onoff/
*/
.onoffswitch {
  position: relative;
  width: 90px;
  -webkit-user-select: none;
  -moz-user-select: none;
  -ms-user-select: none;
}

.onoffswitch-checkbox {
  display: none;
}

.onoffswitch-label {
  display: block;
  overflow: hidden;
  cursor: pointer;
  border: 2px solid #FFFFFF;
  border-radius: 20px;
}

.onoffswitch-inner {
  display: block;
  width: 200%;
  margin-left: -100%;
  transition: margin 0.3s ease-in 0s;
}

  .onoffswitch-inner:before, .onoffswitch-inner:after {
    display: block;
    float: left;
    width: 50%;
    height: 30px;
    padding: 0;
    line-height: 30px;
    font-size: 14px;
    color: white;
    font-family: Trebuchet, Arial, sans-serif;
    font-weight: bold;
    box-sizing: border-box;
  }

  .onoffswitch-inner:before {
    content: "ON";
    padding-left: 10px;
    background-color: #34C290;
    color: #FFFFFF;
  }

  .onoffswitch-inner:after {
    content: "OFF";
    padding-right: 10px;
    background-color: #EEEEEE;
    color: #999999;
    text-align: right;
  }

.onoffswitch-switch {
  display: block;
  width: 18px;
  margin: 6px;
  background: #FFFFFF;
  position: absolute;
  top: 0;
  bottom: 0;
  right: 56px;
  border: 2px solid #FFFFFF;
  border-radius: 20px;
  transition: all 0.3s ease-in 0s;
}

.onoffswitch-checkbox:checked + .onoffswitch-label .onoffswitch-inner {
  margin-left: 0;
}
.onoffswitch-checkbox:checked + .onoffswitch-label .onoffswitch-switch {
  right: 0px;
}

.masterswitch {
  position: relative;
  width: 90px;
  -webkit-user-select: none;
  -moz-user-select: none;
  -ms-user-select: none;
}

.masterswitch-checkbox {
  display: none;
}

.masterswitch-label {
  display: block;
  overflow: hidden;
  cursor: pointer;
  border: 2px solid #FFFFFF;
  border-radius: 20px;
}

.masterswitch-inner {
  display: block;
  width: 200%;
  margin-left: -100%;
  transition: margin 0.3s ease-in 0s;
}

.masterswitch-inner:before, .masterswitch-inner:after {
  display: block;
  float: left;
  width: 50%;
  height: 30px;
  padding: 0;
  line-height: 30px;
  font-size: 12px;
  color: white;
  font-family: Trebuchet, Arial, sans-serif;
  font-weight: bold;
  box-sizing: border-box;
}

.masterswitch-inner:before {
  content: "ARMED";
  padding-left: 10px;
  background-color: #F00000;
  color: #FFFFFF;
}

.masterswitch-inner:after {
  content: "OFF";
  padding-right: 10px;
  background-color: #EEEEEE;
  color: #999999;
  text-align: right;
}

.masterswitch-switch {
  display: block;
  width: 18px;
  margin: 6px;
  background: #FFFFFF;
  position: absolute;
  top: 0;
  bottom: 0;
  right: 56px;
  border: 2px solid #FFFFFF;
  border-radius: 20px;
  transition: all 0.3s ease-in 0s;
}

.masterswitch-checkbox:checked + .masterswitch-label .masterswitch-inner {
  margin-left: 0;
}

.masterswitch-checkbox:checked + .masterswitch-label .masterswitch-switch {
  right: 0px;
}
/* END OF SWITCH STYLES */
Web control panel style sheet – alarm-panel.css
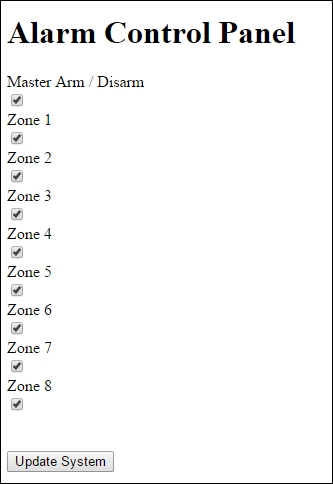
Apply the stylesheet and this is what you end up with (a little bit nicer, I think you'll agree):

The web control panel with styling
Now that we have the layout code defined for our control panel page, we can insert it in our PHP page so that it can be modified dynamically by the PHP script on the Web server, depending on the status of our home security system.
The PHP script will help us achieve the following basic functions:
- Updating the configuration file with the position of the on/off switches for zones
- Arming and disarming the system
- Telling us which zone has been triggered when an intrusion has been detected
Again, I'm not going to go into detail about how the PHP code works, but hopefully the comments within the code will help you follow what's going on, and also help you modify it if you want to change its behavior.
Unless you change some of the PHP configuration, it can be a nightmare trying to work out what's gone wrong if you have a small bug in your code, as basically you are presented with…nothing!
So, before we create and build our PHP page, we'll change a couple of settings in the PHP configuration file to make sure we know if there are any issues:
- Open the configuration file with Nano:
$ sudo nano /etc/php5/cgi/php.ini - The file is a bit large and unwieldy, but battle your way through it, find these settings, and change them as follows:
error_reporting = E_ALL
display_errors = On
- Save the file and exit Nano.
- Finally, restart Lighty:
$ sudo /etc/init.d/lighttpd restart
And here it is… But don't run it yet—there's still a bit more to do…
You can find the full main PHP code in the index.php file located inside the code folder of chapter 7. In our Web server content folder, we should now have the following files:
pi@raspberrypi ~ $ ls -1 /var/www
alarm-panel.css
alarm-panel.html
index.lighttpd.html
index.php
phpinfo.php
Now, before we can actually open this PHP web page successfully, we need to be aware of the fact that the Web server, by default, actually runs as a different user called www-data. This means that it doesn't ordinarily have the right to perform certain operations; in particular, those that interact with the file system.
If you worked through the previous PHP script, you'll see that it actually executes some Linux commands to read and update our alarm.cfg file.
In the same way that we have to put sudo in front of many commands because we're not the root user, it is true for other users as well, including www-data. So, to give the Web server rights to execute certain commands, we need to add it as a sudoer, using the
visudo utility.
Run the utility to open the sudoer configuration file:
$ sudo visudo
At the bottom of the file, add the following line:
www-data ALL=(ALL) NOPASSWD:/bin/cat,/etc/pi-alarm/update-alarm-setting.sh
Then save the file and exit.
The final thing we have to do is create a small Bash script that will handle the task of updating settings in our alarm.cfg file. The reason why we need to do this is because we're going to use the Linux sed command to update the file. The way that we are invoking the sed command means that it needs to create a temporary file. Unless we do a bit of work with configuring the Web server because of its file location context, it won't work. So, it's easier to create a stub Bash script that is called by the PHP script. In this way, the Bash environment deals with the temporary file context.
So, we'll create the following Bash script and save it in our /etc/pi-alarm folder:
#!/bin/bash
#/etc/pi-alarm/update-alarm-setting.sh
############################################
# Provides access to the sed command from  #
# PHP as it needs write access to a temp   #
# folder.                                  #
# $1 - Setting Name                        #
# $2 - Setting Value                       #
############################################

sed -i "s/^($1s*= *).*/1$2/" /etc/pi-alarm/alarm.cfg
update-alarm-setting.sh
And then we need to give the script execution rights:
$ sudo chmod 777 /etc/pi-alarm/update-alarm-setting.sh
This is what we should see in our /etc/pi-alarm folder at this time:
pi@raspberrypi ~ $ ls -1 /etc/pi-alarm
alarm.cfg
update-alarm-setting.sh
Right, after all that, I think we can now launch the control panel page in our browser at
http://<my-pi-ip>.
index.php is configured as a default page in Lighty's config, so you don't need to add it to the end of the URL; just the IP address will suffice.
By changing the switch positions and then clicking on the Update System button, you should find that the setting values get updated accordingly in alarm.cfg. You can now see how this file will be the way for the status to be exchanged between our web console and the security system scripts that we'll develop in Chapter 9, Putting It All Together.
The final operational control panel