
Challenge Handshake Authentication Protocol (CHAP)
</objective> <objective>Password Authentication Protocol (PAP)
</objective> <objective>Permanent Virtual Circuit (PVC)
</objective> <objective></objective> <objective></objective> <objective>Backward Explicit Congestion Notification (BECN)
</objective> <objective>Forward Explicit Congestion Notification (FECN)
</objective> <objective>High-Level Data Link Control (HDLC)
</objective> <objective>Point-to-Point Protocol (PPP)
</objective> <objective></objective> </feature><feature><title>Concepts and Techniques You’ll Need to Master:</title> <objective>Configuring PPP (point-to-point)
</objective> <objective>Configuring Frame Relay
</objective> <objective>Configuring NAT
</objective> </feature>There are two major types of networking: local area network (LAN) and wide-area network (WAN). This chapter discusses WANs.
A WAN is a network that spans a broad geographical area and includes such technologies as ATM, Frame Relay, leased lines, and ISDN. These wide-area networking services are leased from providers.
In its simplest definition, wide-area networking can be broken down into three categories:
Leased line
Circuit switched
Packet switched
Leased line WAN solutions use synchronous serial interfaces to connect two sites together. This is the easiest to configure and provides the best reliability. However, this is also the most expensive over long distances.
The second option is circuit-switched technologies. These technologies include both modems connected to asynchronous interfaces and ISDN technologies. With circuit-switched solutions, you establish a circuit between two sites using a telephone company.
The final option is packet-switched technologies, which also use synchronous serial interfaces similar to leased line solutions, but with these, a virtual circuit is established between two or more sites and your data packets are switched across a service provider’s network. The service provider’s network is transparent to the customer; you will not be able to see any of your provider’s equipment. Packet-switched technologies include Frame Relay, ATM, and X.25. They are commonly used when leased line solutions become cost prohibitive.
With each WAN solution, there is an encapsulation type. Encapsulations wrap an “information envelope” called a frame around your data; it is used to transport your data traffic. If you use leased line as your wide-area networking choice, you can encapsulate your data inside a High-Level Data-Link Control (HDLC) frame, PPP frame, or Serial Line IP (SLIP) frame. For packet-switched networks, you can encapsulate or package your data in X.25 frames, Frame Relay, or asynchronous transfer mode (ATM) frames. (ATM and Frame Relay actually have multiple encapsulations—envelope formats—that you can use.) Finally, in circuit-switched environments, you have HDLC, PPP, or SLIP as you do with leased line, but with circuit-switched solutions, it is more common to use PPP as your choice. This is because of the options available with PPP that are catered to using telephone-based circuit-switched networks. These options include such things as authentication and compression. Table 7.1 illustrates the different encapsulations as they are used by various WAN technologies.
Table 7.1. WAN Encapsulations
Leased Lines | Circuit-Switched | Packet-Switched | |
|---|---|---|---|
HDLC | X | X | |
PPP[*] | X | X | |
SLIP | X | X | |
Frame Relay[**] | X | ||
ATM[***] | X | ||
X.25 | X | ||
[*] Technically, it is possible to have PPP run over ATM and Frame Relay, but it is not necessary to know this for the CCNA exam. [**] Frame Relay actually has two types of encapsulations: IETF and Cisco. [***] ATM has several types of encapsulations, but it is not necessary to know these for the CCNA exam. | |||
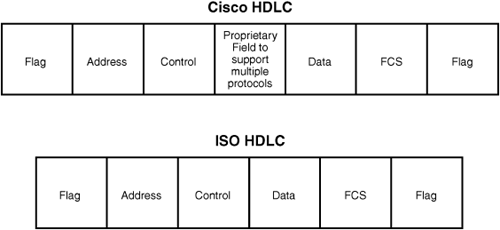
The default encapsulation on a serial interface is HDLC. The original HDLC encapsulation was defined by the International Organization for Standards (ISO), those same folks who developed the OSI model. The ISO version of HDLC had one shortcoming, however; it had no options to support multiple Layer 3 routed protocols. As a result, most vendors have created their own form of HDLC. Cisco is no exception as it has its own proprietary form of HDLC to support various Layer 3 protocols such as IPX, IP, and AppleTalk. Figure 7.1 illustrates the difference between the ISO and Cisco HDLC frame formats.
Point-to-Point Protocol (PPP), defined in RFC 1661, is used to encapsulate network Layer protocols over point-to-point links. PPP can be used over asynchronous, synchronous, or ISDN links.
PPP has two sublayers called Network Control Protocol (NCP) and Link Control Protocol (LCP).
NCP is responsible for supporting multiple Layer 3 protocols. Each protocol has its own NCP, such as the IPCP for IP communication and IPXCP for IPX communication. Think of NCP as the “packager,” as it is responsible for packaging, or encapsulating, your packets into a control protocol that is readable by PPP.
The Link Control Protocol is used for establishing the link and negotiating optional settings. These options include
Compression—. You can compress your data to conserve bandwidth across your wide-area network. Options for compression are Stacker and Predictor.Callback—. With callback, you dial into a router using a modem or ISDN and then disconnect. The other router then calls you back at a predefined number. This option is used for centralized billing and security reasons.Multilink—. Multilink allows you to bundle together more than one link to create more bandwidth. (Traffic will load balance across the links.) For example, you can bundle two 64K channels together to get a combined 128K.Authentication—. You can use authentication to verify a router’s identity when it is connecting into your router. Options for authentication include CHAP and PAP.
You can think of LCP as the “negotiator” because it is responsible for negotiating these options between two routers.
Exam Alert
Know the various options of PPP. Remember CCMA (it sounds similar to CCNA), which stands for compression, callback, multilink, and authentication.
There are two types of authentications you can use with PPP:
Password Authentication Protocol (PAP)
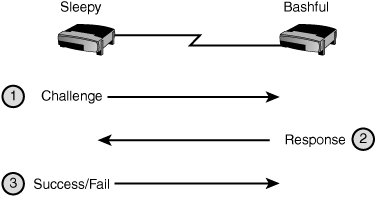
PAP uses a two-way authentication process where the username and password is sent followed by a response message indicating successful or failed authentication. CHAP, however, is much more paranoid about its authentication. It performs a three-way authentication process as shown in Figure 7.2, which takes place not only at the beginning of a connection, but also every two minutes. As if that wasn’t paranoid enough, CHAP never sends the password across the link. Instead, an MD5 hash is used to mask the password.
Configuring authentication is a four-step process:
Configure your hostname.
Configure the username and password list for other routers to authenticate to your router.
Enable PPP encapsulation.
Enable PAP or CHAP authentication.
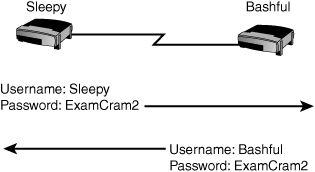
The hostname takes on a special significance with PPP as it is used as the username to authenticate to another router. For example, let’s say that you had two routers named Sleepy and Bashful, as shown in Figure 7.3. For Sleepy, its hostname is used as the username to authenticate to Bashful. For Bashful, its hostname is used as the username to authenticate to Sleepy. Use the hostname command to configure the hostname on each router:
Sleepy:
Router(config)#hostname SleepyBashful:
Router(config)#hostname BashfulNext, configure the username and password for other routers to authenticate to you. For the Sleepy router, you will need to configure a username and password for the Bashful router to authenticate to it. Likewise, you will need to configure a username and password for the Sleepy router to authenticate to the Bashful router. Both routers must use the same password. Use the global configuration username command to configure your username and password. The syntax for this command is
username name password password
For example,
Sleepy:
Sleepy(config)#username Bashful password ExamCram2Bashful:
Bashful(config)#username Sleepy password ExamCram2Tip
The hostnames and passwords are case sensitive. The hostname Sleepy is different from the hostname sleepy. Make sure that you check the case of your letters when configuring PPP authentication.
The third step in configuring PPP is to enable PPP encapsulation on the interface using the encapsulation command. For example, to configure PPP encapsulation on the Serial 0 interface, type the following:
Sleepy(config)#interface serial 0
Sleepy(config-if)#encapsulation ppp
Finally, you will need to configure your authentication. The interface level command to do this is
ppp authentication [chap | chap pap | pap]
If you choose the chap pap option, it will try CHAP authentication first, and if that fails, it will try PAP. Newer IOS versions (12.3 and 12.4) will also support EAP, MS-Chap, and MS-Chap version 2. Following is the final configuration for the two routers using CHAP authentication:
Sleepy:
Router(config)#hostname Sleepy
Sleepy(config)#username Bashful password ExamCram2
Sleepy(config)#interface serial0
Sleepy(config-if)#encapsulation ppp
Sleepy(config-if)#ppp authentication chap
Bashful:
Router(config)#hostname Bashful
Bashful(config)#username Sleepy password ExamCram2
Bashful(config)#interface serial0
Bashful(config-if)#encapsulation ppp
Bashful(config-if)#ppp authentication chap
Verifying and troubleshooting PPP can be done with two commands:
show interfacesdebug ppp authentication
The show interfaces command will show you if the line protocol is up or down and the state of LCP. LCP will report in the closed state if it was unable to establish a connection to another router. Following is a sample output from the Sleepy router:
Sleepy(config)#show interfaces serial0
serial0 is up, line protocol is up
Hardware is QUICC
  MTU 1500 bytes, BW 64 Kbit, DLY 20000 usec, rely 255/255, load 1/255
  Encapsulation PPP, loopback not set, keepalive not set
 LCP Open
Closed: IPXCP
Listen: CCP
Open: IPCP, CDPCP
<...output omitted...>
The debug ppp authentication command will show you your authentication as it happens. Following is the output of this command on a router using CHAP authentication:
Sleepy#debug ppp authentication
PPP serial0: Send CHAP challenge id=34 to remote
PPP serial0: CHAP challenge from Bashful
PPP serial0: CHAP response received from Bashful
PPP serial0: CHAP response id=34 received from Bashful
PPP serial0: send CHAP success id=34 to remote
Frame Relay is a scalable WAN solution that is often used as an alternative to leased lines when leased lines prove to be cost prohibitive. With Frame Relay, you can have a single serial interface on a router connecting into multiple remote sites through virtual circuits.
You should be familiar with many terms when working with Frame Relay. The following sections introduce you to these terms and their definitions.
Your virtual circuits can be either permanent or switched. A permanent virtual circuit (PVC) is always connected and, once up, operates very much like a leased line. A switched virtual circuit (SVC) is established only when it is needed. Of these two, PVCs are much more common.
Circuits are identified by data-link connection identifiers (DLCI). DLCIs are assigned by your provider and are used between your router and the Frame Relay provider. In other words, DLCIs are locally significant.
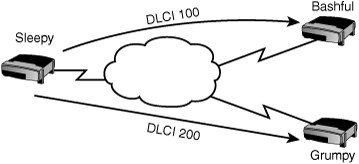
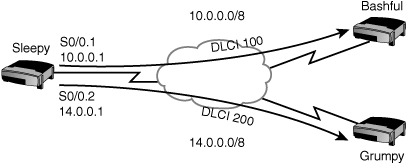
For example, in Figure 7.4, there are three routers named Sleepy, Grumpy, and Bashful. The Sleepy router is connected to a Frame Relay provider that provides permanent virtual circuits to both the Bashful and Grumpy routers. DLCI 100 defines the PVC to Bashful, and DLCI 200 defines the PVC to Grumpy. Although it is not shown in the figure, Bashful and Grumpy will likewise have DLCIs to define their PVCs back to Sleepy.
As an analogy, DLCIs are like shipping docks. If you work for a shipping company, you might have several ships attached to docks that are each going to a different destination. When you have a package to ship, you just need to take it to the ship headed for the destination. It is the captain’s job to know how to reach the destination.
DLCIs are like these docks. They are significant only on your side. You send your packet out the relevant DLCI, and the provider’s job is to figure out how to get that frame to its destination.
Behind-the-scenes is a little helper called the local management interface (LMI) that works as a status enquiry and reporting message. LMI messages are sent between your router and the Frame Relay provider’s equipment to verify and report on the status of your PVC. The three possible states that your PVC can be in are
Active—. Active is good. Active means that everything is up and operational.Inactive—. Inactive is bad. Inactive means that you are connected to your Frame Relay provider, but there is a problem with the far-end connection. The problem is most likely between the far-end router and its connection to the Frame Relay provider. You should contact your provider to troubleshoot the issue.Deleted—. Deleted is also bad. Deleted means that there is a problem between your router and the Frame Relay provider’s equipment. You should contact your provider to troubleshoot this issue.
Because of the frequency of LMI messages sent between your router and the Frame Relay provider, LMI is also used as a keepalive mechanism. Should your router stop hearing LMI messages it will know that there is a problem with your PVC.
There are three types of LMI. These can be manually configured (discussed later in the configuration section) or, with IOS 11.2 and higher, can be auto-detected. The three types of LMI are
Cisco
ANSI
Q933A
The committed information rate (CIR) is the guaranteed rate at which you are allowed to pass data for a particular PVC. When ordering a PVC, you will request a local access rate (the bandwidth of the physical connection) and the CIR for a PVC. For example, you may order a T1, which has a local access rate of 1.544Mb for the Sleepy router, and a CIR of 128K for the PVC to Bashful, and a CIR of 512K for Grumpy.
Frame Relay is generous with its bandwidth. If there is no congestion on your link, you are allowed to burst above the CIR rate. Any traffic sent above your CIR is marked as being Discard Eligible (DE) and, in the event of congestion, will be dropped.
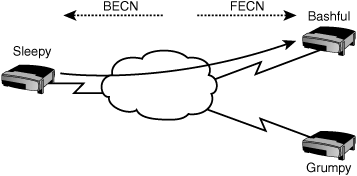
When congestion does occur, congestion notification messages are sent out to notify both the sending and the receiving routers that congestion has occurred and that they should slow down their transmission rates. A Backward Explicit Congestion Notification (BECN) is sent back to the sender and a Forward Explicit Congestion Notification (FECN) is sent forward to the destination to notify them of congestion.
A BECN message is only sent back to the source when the destination sends a frame back. Because the provider must wait for a message to return in order to set the BECN bit in the frame header, the FECN bit is sent to the destination to request some traffic to be sent back in the reverse direction. Without this, the source might never know that congestion has occurred.
In Figure 7.5, traffic is congested going from the Sleepy router to the Bashful router. A FECN is sent to the Bashful router, and a BECN is sent back to the Sleepy router.
Frame Relay needs a mechanism to map Layer 3 addresses with Layer 2 Frame Relay DLCIs. This can be done through a static map command (shown later in the configuration section) or through inverse-arp. Just like Ethernet ARP, inverse-arp is used to map a Layer 3 address to a Layer 2 address. However, Ethernet ARP maps an IP address to a MAC address and inverse-arp works to map an IP address (or other protocol) to a DLCI.
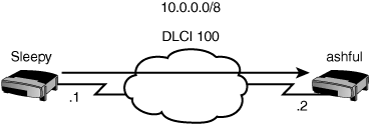
In Figure 7.6 Sleepy will need a Layer 3 to Layer 2 map to connect to Bashful, which has IP address 10.0.0.2. Using inverse-arp, Sleepy will automatically create a map telling it to use DLCI 100 to get to IP address 10.0.0.2.
Frame Relay is a nonbroadcast multi-access (NBMA) medium, which means that broadcast traffic is not allowed to traverse Frame Relay traffic. There are ways, however, to circumvent the NBMA nature of Frame Relay to allow broadcasts to cross the Frame Relay cloud. These are discussed in the configuration section.
The split horizon rule (described in Chapter 10, “Basic Routing”) states that a route learned on an interface should not be advertised back out that same interface. This poses a problem in NBMA networks where multiple circuits can connect to a single interface in a hub-and-spoke topology.
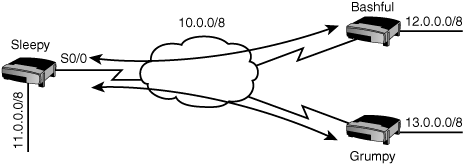
Hub-and-spoke topologies are commonly used to connect multiple branch offices to a headquarters office. For example, in Figure 7.7, the Bashful and Grumpy routers have circuits to the Sleepy router but not to each other. In this example, Sleepy is operating as the headquarters office. When Grumpy advertises its 13.0.0.0/8 network to the Sleepy router, it is sent into serial 0/0, but the Sleepy router is not allowed to send it back out serial0/0. This causes a problem because serial0/0 is also connected to the Bashful router. As a result, the Bashful router will never know about the 13.0.0.0/8 network.
You have four options to get around the split horizon problem:
Disable split horizon with the
noip split-horizoncommand. If you are not careful, this could create a loop.Have a fully meshed topology where every router has a PVC to every other router. This can get expensive.
Use static routes instead of dynamic routing protocols. This is not a scalable solution.
Use subinterfaces. This is your best option.
A subinterface is a subset of an existing physical interface. As far as the router is concerned, the subinterface is a separate interface. By creating subinterfaces, each circuit can be on its own subnet.
There are two types of subinterfaces:
point-to-point—. This maps a single IP subnet to a single subinterface and DLCI.multipoint—. This maps a single IP subnet to multiple DLCIs on a subinterface.
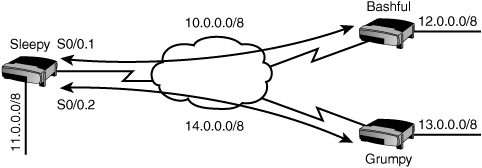
Of these two, only point-to-point subinterfaces address the issue of split horizon. In Figure 7.8, subinterfaces are used on the Sleepy router. Subinterface serial0/0.1 is connected to the Bashful router and subinterface serial0/0.2 is connected to the Grumpy router. Now when Grumpy advertises the 13.0.0.0/8 network to Sleepy, it is sent to the subinterface. Sleepy can forward that information on to the Bashful router because the Bashful router is connected to a different subinterface—a logically (but not physically) different interface.
Configuring Frame Relay involves the following steps:
Changing the encapsulation for Frame Relay
Configuring the LMI type (optional for IOS 11.2 or higher)
Configuring the Frame Relay map (optional unless you are using subinterfaces)
Configuring subinterfaces (optional)
If using a point-to-point subinterface, configuring your DLCI
To begin, select the Frame Relay encapsulation on the interface. There are two types of Frame Relay encapsulations: Cisco and IETF. Cisco is the default. The syntax to set your encapsulation is
encapsulation frame-relay [ietf]
Next, you can configure the LMI type. The three LMI types are Cisco, Ansi, and Q933a. For IOS 11.2 and higher, the LMI type is automatically detected. For earlier IOS versions, enter the following command under the interface:
frame-relay lmi-type [cisco | ansi | q933a]
The third option, configuring a static Frame Relay map, is optional unless you are using subinterfaces. The Frame Relay map will map a Layer 3 address to a local DLCI. This step is optional because inverse-arp will automatically perform this map for you. The syntax for a Frame Relay map is as follows:
frame-relay map protocol address dlci[broadcast] [cisco | ietf]
Table 7.2 describes each of these parameters.
Table 7.2. Frame Relay map Command
Parameter | Description |
|---|---|
Protocol | Layer 3 protocol such as IP or IPX. |
Address | The Layer 3 address of the remote router (such as an IP address or IPX address). |
DLCI | Your local DLCI defining your PVC to the remote router. |
Broadcast | Optional, this allows for broadcasts and multicasts to traverse your Nonbroadcast Multiaccess (NBMA) Frame Relay network. |
Cisco | IETF | Optional, this allows you to change your Frame Relay encapsulation per DLCI. |
For example, if you were connected to another router using DLCI 100 and the router had the IP address of 10.0.0.2, your Frame Relay map statement would be
Router(config-if)#frame-relay map ip 10.0.0.2 100If you want to use a routing protocol across your Frame Relay network, you will need to add the keyword broadcast to the end of this command. Routing protocols use broadcasts and multicasts by default, and Frame Relay does not enable broadcasts and multicasts without the use of the broadcast keyword. If you are using inverse-arp to create your maps for you, inverse-arp assumes that you want to use routing protocols and adds the broadcast feature for you.
If you are using a routing protocol in a hub-and-spoke topology, you will probably want to use subinterfaces to avoid the split horizon problem. To configure a subinterface, remove the IP address off the main interface and put it under the subinterface. Configuring a subinterface involves assigning it a number and specifying the type. The following command creates point-to-point subinterface serial0/0.1:
Router(config)#interface serial0/0.1 point-to-pointTo create a multipoint subinterface, enter multipoint instead:
Router(config)#interface serial0/0.1 multipointAfter entering one of these commands you will be taken to the subinterface configuration mode where you can enter your IP address:
Router(config-subif)#ip address 10.0.0.2 255.0.0.0If you are using a multipoint subinterface, you will need to configure Frame Relay maps and you cannot rely on inverse-arp.
If you are using a point-to-point subinterface, you will need to assign a DLCI to the subinterface. This is only for point-to-point subinterfaces; this is not needed on the main interface or on multipoint subinterfaces. To assign a DLCI to a point-to-point subinterface, enter the following command under the subinterface:
frame-relay interface-dlci dlci
Now let’s put the entire configuration together. The following configuration will configure Frame Relay for the Sleepy router using a point-to-point subinterface to connect to the Bashful router and a multipoint subinterface to connect to the Grumpy router. (A point-to-point could also have been used, but we’ll use multipoint so you can see both methods.) Figure 7.9 shows the topology for the configuration.
interface serial 0/0
encapsulation Frame Relay
!
! Take the IP address off the main interface:
no ip address
!
! Configure the connection to the Bashful router
interface serial 0/0.1 point-to-point
ip address 10.0.0.1 255.0.0.0
Frame Relay interface-dlci 100
!
! Configure the connection to the Grumpy router
interface serial 0/0.2 multipoint
ip address 14.0.0.2 255.0.0.0
Frame Relay map ip 14.0.0.3 200 broadcast
There are three verification commands and one troubleshooting command you should be familiar with for the exam.
The three commands you can use to verify your configuration are
show frame-relay lmishow frame-relay pvcshow frame-relay map
show frame-relay lmi (displayed in the following) will show LMI statistics, including the number of status enquiries sent and received. Because the status enquiries and responses are used as continuous keepalives, these should be incrementing.
LMI Statistics for interface Serial1 (Frame Relay DTE) LMI TYPE = ANSI
  Invalid Unnumbered info 0             Invalid Prot Disc 0
  Invalid dummy Call Ref 0              Invalid Msg Type 0
  Invalid Status Message 0              Invalid Lock Shift 0
  Invalid Information ID 0              Invalid Report IE Len 0
  Invalid Report Request 0              Invalid Keep IE Len 0
  Num Status Enq. Sent 140              Num Status msgs Rcvd 139
  Num Update Status Rcvd 0              Num Status Timeouts 0
show frame-relay pvc (displayed in the following) will inform you to the status of your PVC. The status should read ACTIVE. This is also where you will see if your router is receiving BECN and FECN messages.
DLCI = 100, DLCI USAGE = LOCAL, PVC STATUS = ACTIVE, INTERFACE = Serial0/0

   input pkts 120            output pkts 70          in bytes 5122
   out bytes 3366           dropped pkts 0           in FECN pkts 0
   in BECN pkts 0           out FECN pkts 0          out BECN pkts 0
   in DE pkts 0             out DE pkts 0
   out bcast pkts 7          out bcast bytes 1366
   pvc create time 1d04h, last time pvc status changed 00:30:32
show frame-relay map (displayed in the following) will show you any static maps configured and maps created by inverse-arp. This command will also show you the status of your PVC.
Serial0/0 (up): ip 10.0.0.1 dlci 100(0x64,0x1840), dynamic,
              broadcast,, status defined, active
Exam Alert
Remember, the three show Frame Relay commands and what they do. show frame-relay lmi shows your LMI statistics while show frame-relay pvc and show frame-relay map will show your PVC status.
For troubleshooting, you can execute the debug frame-relay lmi command. This command shows you LMI messages in real-time:
Serial 0/0 (out) : StEnq, clock 202121241, myseq 120, mineseen,
119, yourseen 140, DTE up
PVC IE 0x64, length 0x6, dlci 100, status 0, bandwidth 64000
Network Address Translation (known as NAT in network lingo) has become a generic term for several related but different processes. The basic principle involves changing the source IP of a host in the packet header as its traffic crosses the NAT device. We examine the three main implementations of NAT on Cisco routers, along with the applications, advantages, and disadvantages of the NAT service, and finally the configuration commands to implement, verify, and troubleshoot it.
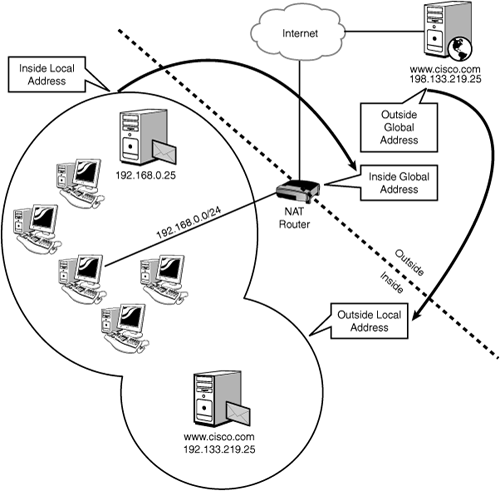
A number of unfortunately confusing terms are associated with NAT that in a typically evil plot are usually testable. Figure 7.10 diagrams a typical, simple NAT setup and accurately locates the terms you need to know.
The terms you need to be familiar with are as follows:
Inside—. This refers (typically) to the private side of the network, usually the source of addresses that are being translated.
Outside—. This is typically the public side of the network, the address space to which inside hosts are being translated.
Inside Local—. These addresses are assigned to inside hosts and are the ones being translated. Inside Local IPs are often RFC 1918 private IPs such as 192.168.
x.x, 172.16–31.x.xand 10.x.x.x, but this is by no means a requirement.Inside Global—. These are the addresses to which Inside Locals get translated; often registered IPs obtained from the ISP.
Outside Global—. These are typically registered IPs assigned to web servers, mail servers, or any host that is reachable on the public network (Internet, usually) itself.
Outside Local—. These are the addresses of Outside Global hosts as they appear on the Inside network; they might or might not have been translated from Outside to Inside, depending on the configuration.
These terms are confusing, and explaining them tends to make things worse.
As a simplification, start with Local and Global: Local addresses are most often the RFC 1918 private ones that we are so familiar with; these will be on the private side of an Internet router. Global addresses are usually real, live, registered IPs, such as www.cisco.com, which at the time of this writing was 198.133.219.25. From this toehold on the terms, you should be able to reconstruct the others—an outside host with a local IP; an inside host with a global IP, and so on.
NAT has three main applications:
If you have more inside hosts than you have outside IP addresses, the NAT service can translate multiple inside hosts to a single outside IP. The two most common scenarios for this are a typical Internet access router, where all the hosts on the inside are granted Internet access using very few—or even just one—outside IP address, or a modification of that example in which a lot of IPs are available, but not enough for our requirements. In both cases, the problem that NAT solves is the depletion of IP addresses; the fact is that very few registered IPs are available any more, so being able to “reuse” them by NATing many hosts to a few of them is very helpful in extending the lifespan of the Internet address space.
NAT can be used to solve two related and vexing network issues: The Overlapping Address Space and the Well-Meaning Admin Error. The Overlapping Address Space happens when we connect to another network that uses the same IP address range as we do; typically, this happens when we merge with another company. The problem is that we will have duplicate routes in different locations when the routers start updating each other, leading to instability, misrouting, and general mayhem.
The Well-Meaning Admin Error happens when the person responsible for the network design either fails to plan for future growth of his network, or simply makes a mistake because of ignorance or arrogance. This most often takes the form of a private network being addressed with public IPs that belong to someone else.
A real-world example of this occurred when a representative from the ISP told their customer (a credit union where I worked) to use the address space of 191.168.0.0 /24 for the inside network. This worked fine until Internet connectivity was required; at which time, it was pointed out that the 191.168.0.0 network was a registered Internet range belonging to an insurance firm in the Carolinas. This did cause some issues (for example, when one wanted to ping a domain controller in the head office in Vancouver, the replies came back from a large router somewhere on the East Coast), but the problem was largely hidden by the NAT service, which translated all those inside local IPs (which were incorrectly using outside global addresses) to appropriate outside global addresses.
NAT can also be used to give a whole cluster of machines (each with different inside local IPs) a single IP address that the clients can use. This is called load distribution, and works well for high-volume server clusters such as databases or web servers in which all the clients can use a single virtual IP to reach the service, and that single IP is NATed to all the real IPs of the physical servers.
The advantages of NAT are first and foremost that it conserves the registered IP address space. There is a critical shortage of IPs now, so being able to connect hundreds of hosts to the Internet through a single address is a huge benefit. NAT also provides a certain degree of security because it hides the originating IP address and, if configured properly, prevents bad guys on the Internet from connecting to inside hosts. (The usual caveats here... NAT alone does not provide adequate security, but it can form a part of a secure configuration.) It also helps as a workaround alternative to having to readdress entire networks when address schemes overlap, and makes it easy to change ISP addresses without having to readdress all the inside hosts.
The disadvantages of NAT are primarily that by its very nature, it changes the source IP of traffic, from the actual IP of the host to the Inside Global IP to which it is translated. Some applications do not like this loss of end-to-end IP traceability and stop working. NAT also makes it more difficult when troubleshooting because of that source IP change—and you might be NATed a couple times or more on the journey through the internetwork. Last, the NAT process introduces a certain delay in the transmission of packets as they are rewritten and the translation information is looked up. Spending more money on your NAT box might help speed this up. Call your authorized Cisco VAR, quick!
Let’s look now at the three main NAT implementations.
Static NAT refers to the creation of a one-to-one mapping of an Inside Local IP to an Inside Global IP. Note that this type of NAT does not conserve IP addresses at all because we need one outside IP for every inside IP. Static NAT gives hosts such as mail or web servers access to the Internet even though they are physically on the private network. Perhaps more importantly, it allows us to access that web server from the Internet by creating a static NAT entry from an outside global IP to the server’s inside local IP.
Configuring a static NAT entry is easy. The only trick is to make sure that you get NAT working in the right direction: You must be very clear when identifying the Inside interface and the Outside. Figure 7.11 shows a simple network that we use to learn NAT configuration.
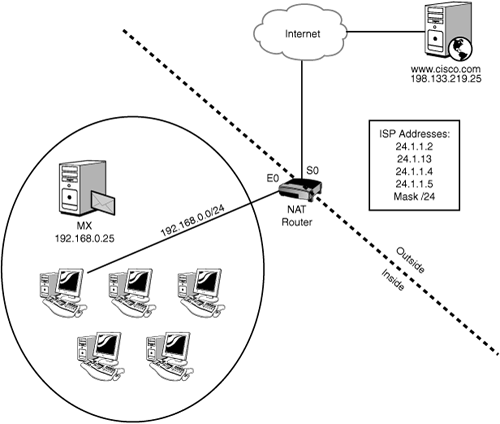
Let’s create a static NAT entry for the MX (Mail Exchanger) server with the IP of 192.168.0.25. The ISP has told us that we can use a block of IP addresses as shown, from 24.1.1.2 through 24.1.1.6, for our Inside Global addresses. We have decided to use 24.1.1.2 for the Inside Global IP of the MX host.
The global-config static NAT command uses fairly logical syntax:
ip nat inside source static <inside local IP> <inside global IP>
For our example, the command to enter on the NAT router would look like this:
NAT(config)#ip nat inside source static 192.168.0.25 24.1.1.2Next, we have to identify the Inside and Outside interfaces:
NAT(config)#interface e0
NAT(config-if)#ip nat inside
NAT(config-if)#interface s0
NAT(config-if)#ip nat outside
And that’s all there is to creating a static NAT entry. Remember that static NAT entries use up one outside IP for every inside IP, so they do not conserve the IP address space at all.
Dynamic NAT enables an inside host to get an outside address when needed; this saves us the trouble of creating multiple static maps, one for each host that wants to use the Internet. Dynamic NAT entries still don’t conserve IPs, since we still need one IP for every host that wants to connect to the Internet. Remember that if you have more hosts than outside IPs, some hosts will not get a translation entry and will not be capable of using the Internet. For this reason, it is not used much for Internet connectivity.
One of the interesting concepts introduced with dynamic NAT is that of the NAT pool: A pool is a defined group of addresses that are available for translation. Configuring dynamic NAT involves identifying which hosts are to be translated, and to which addresses they should be translated. Both of these steps can use the pool command, but it is more common to use an access list for the inside source and a pool for the outside addresses. The syntax to build a NAT pool looks like this:
ip nat pool [pool-name] [first-IP] [last-IP] netmask [mask]
The pool name is arbitrary. You can pick something that is meaningful to you. The first-IP and last-IP are the first and last IPs in the pool range, and the mask is the subnet mask of the network those outside IPs are on. Note that you must have the word netmask in the syntax! Here’s what this command would look like if we used the same network shown in Figure 7.11 and wanted to use the last four IPs in the range that the ISP gave us:
NAT(config)#ip nat pool MyPool 24.1.1.3 24.1.1.6 netmask 255.255.255.0Next, we need to identify what hosts get to be translated; we could build another pool to do this, but it is more commonly done with a standard access list:
NAT(config)#access-list 1 permit 192.168.0.0 0.0.0.255This list permits any address that starts with 192.168.0.x. Note that in this case, the list is not permitting traffic to or from the hosts; rather, it is identifying those hosts that can be translated.
Tip
It is a good idea (a best practice) to specifically deny any hosts that you do not want translated, using your access list. For example, because we already have a static NAT entry for the MX server in our example, we don’t want it to get another dynamic translation, so we would start the access list with the line
NAT(config)#access-list 1 deny host 192.168.0.25So at this point, we have built the pool of addresses that we will be translating to, we have identified which hosts can be translated (and possibly those that cannot), and all that is left is to configure the NAT process itself:
NAT(config)#ip nat inside source list 1 pool MyPool
NAT(config)#interface e0
NAT(config-if)#ip nat inside
NAT(config)#interface s0
NAT(config-if)#ip nat outside
The first line tells the router to use List 1 (which we built previously) to identify which hosts can be translated (these are the Inside Source addresses), and then identifies the pool called MyPool as the addresses to which the Inside Source Addresses should be translated.
The next lines, as before, tell the router which interface should be Inside and Outside. Remember, if you get these backwards, you will be translating the Internet into your private network... that could be bad.
Note that with a pool of only four addresses, the first four hosts who request a translation will get one (which they keep for 24 hours by default), and any additional hosts who request a translation will not be able to get one. The next section shows how PAT resolves this limitation.
PAT (Port Address Translation, also known as an extended NAT entry) leverages the nature of TCP/IP communication by using the source ports of hosts to distinguish them from each other when they are all being translated, possibly to a single outside address.
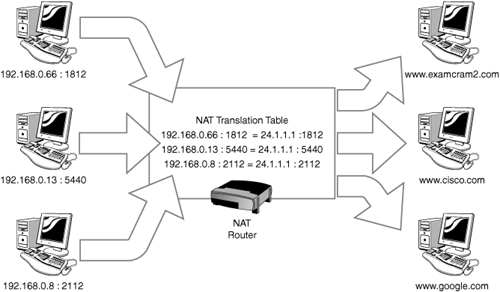
With PAT, an inside host is given a translation entry that uses not only the host’s IP address, but also its source port. Figure 7.12 illustrates the process as three inside hosts are translated to a single outside IP address as they contact different web servers.
So you can see now how PAT can hugely extend the registered Internet address space: We could in theory translate thousands of private IPs to a single IP (often, the IP assigned to our Outside interface) using PAT, by extending the Inside Local IP with the randomly generated source port and mapping that to the Inside Global IP extended by the same port number. With more than 64,000 ports available for this extended translation entry, the chances of two hosts randomly choosing the same source port are slim; if it does happen, the conflicting hosts are forced to reset and choose a different port number. We can further reduce the chances of this conflict happening by using a pool for PAT, which makes it very unlikely indeed that two hosts would get the same port and Inside Global IP from the pool.
The Cisco term for PAT is overload because we are overloading a single Inside Global IP with many Inside Local+Port mappings.
Configuring PAT is very easy; the commands are very similar to dynamic NAT, with the addition of the keyword overload as shown:
NAT(config)#access-list 1 permit 192.168.0.0 0.0.0.255
NAT(config)#ip nat inside source list 1 interface serial 0 overload
NAT(config)#interface e0
NAT(config-if)#ip nat inside
NAT(config)#interface s0
NAT(config-if)#ip nat outside
Note that we have used the parameters interface serial 0 overload at the end of the NAT command; the keyword overload turns on PAT, and the interface serial 0 parameter simply instructs the NAT service to use the existing IP of Serial 0 as the Inside Global IP for the translation. Here is a sample configuration that ties together a static NAT entry, creates a pool, and overloads that pool to enable PAT:
NAT(config)#access-list 1 deny host 192.168.0.25
NAT(config)#access-list 1 permit 192.168.0.0 0.0.0.255
NAT(config)#ip nat inside source static 192.168.0.25  24.1.1.2
NAT(config)#ip nat pool MyPool 24.1.1.3 24.1.1.6 netmask 255.255.255.0
NAT(config)#ip nat inside source list 1 pool MyPool overload
NAT(config)#interface e0
NAT(config-if)#ip nat inside
NAT(config)#interface s0
NAT(config-if)#ip nat outside
Exam Alert
This configuration, because it is such a fundamental and important one for Internet-connected networks, is highly tested. You should practice entering this configuration on a real router or router sim until you are totally comfortable with the commands.
The main command used to verify that your NAT configuration is working is show ip nat translations. The following sample output demonstrates which could have come from the NAT router in our previous examples.
NAT#show ip nat translations
Pro   Inside Global     Inside Local       Outside Local    Outside Global
tcp   24.1.1.1:1812     192.168.0.66:1812  63.240.93.157    63.240.93.157
tcp   24.1.1.1:5440     192.168.0.13:5440  198.133.219.25   63.240.93.157
tcp   24.1.1.1:2112     192.168.0.8:2112   64.233.187.104   64.233.187.104
Note that all three inside hosts have been translated to the same Inside Global IP (which likely means that we have overloaded the S0 interface). We have proved that the PAT service is functioning because we can see the different port number extensions listed for each host. Note that the Outside Global and Outside Local IPs are the same; this is because we are not translating those IPs back into our inside network. If we were trying to solve the overlapping address space problem, those two IPs would be different for each outside host.
The command show ip nat statistics gives us a snapshot of how many translations have been performed, a general overview of how the NAT device is configured, and how much of our pool has been used, as demonstrated in the following output.
NAT#show ip nat statistics
Total translations:  3 (0 static, 0 dynamic, 3 extended)
Outside interfaces:  Serial0
Inside interfaces:  Ethernet)
Hits: 38  Misses:  3
Expired Translations:  0
Dynamic Mappings:
--Inside source
access-list 1 pool MyPool refcount 3
Pool MyPool:  netmask 255.255.255.0
Start 24.1.1.3 end 24.1.1.6
Type generic, total addresses 4, allocated 3 (75%), misses 0
If you can successfully ping a remote host, chances are good that your NAT/PAT config is at least partially functional.
If you do run into problems, it is possible to clear the NAT translations from the router, using clear ip nat translation *. This command clears all dynamic and extended translation entries. To clear a static entry, you must remove the command from your running-config.
Answer B is correct. You should create a subinterface for each DLCI. This will require a different subnet on each subinterface, but you resolve split-horizon issues. Answer A is incorrect because there is not a “split-horizon Frame Relay” command. Answers C and D would technically resolve your problem, but they would limit the functionality of your routers. Therefore, answers C and D are not the best answers. | |
Answers A, B, and D are all correct. The LCP phase is responsible for the initial link-setup and negotiating options such as compression, callback, multilink, and authentication. Answer C is incorrect because this is not a component of LCP. | |
Answers B, C, and E are correct. Answer A is incorrect because HDLC is a wide-area network Layer 2 encapsulation, not a Frame Relay LMI type. Answer D is incorrect because IETF is a Frame Relay encapsulation type, not a Frame Relay LMI type. | |
Answer C is correct. If you were not using routing protocols, the | |
Answer C is correct. Cisco’s HDLC contains a proprietary data field that makes it incompatible with other vendor’s implementation of HDLC. Answers A and B are incorrect because the default encapsulation is HDLC, not PPP or IETF. Although answer D would make some Cisco salespeople happy, answer D is not the correct answer either. Cisco can communicate with other vendors but not with the default encapsulation. | |
Answers B and C are correct. Answer A is incorrect because |