There are many great examples of electronics to install in vehicles: radios, navigation devices, temperature and weather sensors, and audio gadgets. Vehicles have special conditions that builders and installers must take into account. This chapter gives you a look at some of the unique circumstances presented by mobile installations.
You have all the same installation considerations in a vehicle as you do at home — plus new issues such as vibration, temperature, and security to worry about. Just as when putting some new electronics to work at home, if you think things through first and take your time, you'll get the job done right without wasted effort. The key is to be informed!
Ask a dealer representing the manufacturer of your car for service bulletins or guides for installing mobile radios and stereos. Regardless of what you're actually installing, it will have much in common with this type of equipment. Because they sell so many cars and trucks to fleet owners, General Motors, Daimler-Chrysler, and Ford have Web sites or service bulletins discussing how to install radio equipment in their cars and trucks. These are excellent reading, whether you have one of their cars or not.
General Motors:
www.service.gm.com/techlineinfo/radio.htmlDaimlerChrysler:
www.arrl.org/tis/info/pdf/INSTG01.pdfFord:
www.fordemc.com/docs/download/Mobile_Radio_Guide.pdf
Enter your vehicle model and the search term radio installation or audio installation into an Internet search engine such as Google. For example, when installing a ham radio in my car, the first page of hits from a search for Contour radio installation contained www.gmrsweb.com/gmrsbille.html. This site shows how to install mobile radios in a car very much like mine!
You can find many more sites discussing how to install audio equipment in cars, discussing issues of obtaining power, routing cables, and mounting equipment. With some careful searching, you can turn up some information about your vehicle. You may be able to make use of some of the installation tools and materials available from audio installer sites, such as www.installer.com.
Mechanical, electrical, and driving safety are all the utmost importance when installing equipment in a vehicle. Your safety and that of your passengers should be foremost in your mind at all times.
Mechanical safety means attaching your equipment securely and placing the accessories so you minimize the possibility of endangering yourself or your passengers in an accident.
If your electronic devices (such as a radio, speaker, or GPS receiver) will be permanently mounted in a vehicle, resist the temptation to stuff them in the space next to your seat or let them sit on a seat or a dashboard. In an accident, the equipment will come loose and fly around inside the passenger compartment at high speed. Unsecured stuff inside a car causes a lot of unnecessary injuries. You should properly mount or secure the equipment, even if the use is just temporary. If the equipment requires an external antenna, it should be placed where a pedestrian (or you!) won't be easily poked by the antenna's tip. You'll put your eye out with that thing! (Yes, Mom ...)
Electrical safety primarily concerns proper power connections. Resist the urge to throw things together in a hurry to get on the road. (The author once nearly set his own vehicle on fire because he got sloppy with DC power behind the dashboard. Don't let this happen to you!) Take the time to identify the proper circuits, use automotive electrical hardware, protect your wiring from vibration and accidental shorts, and keep these big don'ts in mind:
Warning
Never make an unfused connection to your vehicle's battery.
Never work on wiring with the battery connected.
Don't let the use of the electronics impair your driving. If you view the controls and displays or make adjustments frequently, place them somewhere that minimizes the amount of time your eyes have to leave the road. Configure the equipment to minimize the amount of fiddling around you're required to do. If you find yourself distracted, pull over. Don't install equipment where it obscures the vehicle's controls or obstructs their operation. Just don't.
Warning
It's illegal in many states to install anything (electronic or not) in a location that obscures your vision of the road! Headphones are also illegal, and a growing number of states are placing restriction on the use of mobile phones while driving. All for very good reasons!
For low-power devices, you can obtain DC current from a cigarette-lighter socket by using a lighter-plug cable or adapter. Late-model autos that may not have a lighter socket often have some kind of accessory power socket for powering laptop computers, mobile phones, and so on. These circuits are usually fused at 5 to 10 amps.
Warning
Resist the urge to put in a larger fuse and draw more current. The wiring for accessory circuits is not rated for the heavier load and may heat up. At the least, the voltage drop caused by higher-than-rated current may cause the electronics to operate improperly.
Here are some other important dos and don'ts:
Do disconnect the battery whenever you work on a vehicle's power system. Disconnecting the battery eliminates the possibility of destructive and dangerous short circuits. All you have to do is remove one of the cables going to the battery, positive or negative.
Do be consistent and use red for all positive power wiring and black for ground. Being consistent with the colors lets everyone else who works on your car know what the wires are used for. Use other colors for controls or audio connections.
Tip
Auto parts stores have all the parts you need for properly obtaining power from a car's (or RV's) power system. If you're a boater, you can find similar materials at a marine supply store, along with corrosion prevention compounds.
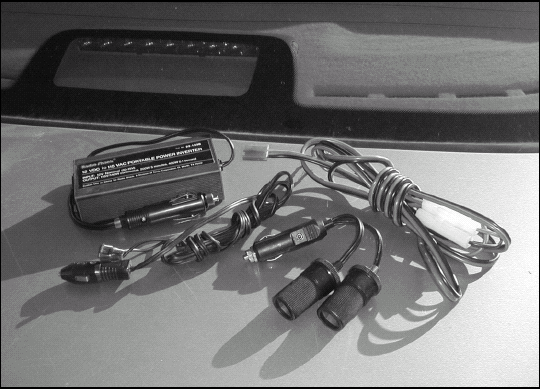
Don't use materials designed for indoor service in a vehicle or boat. Vehicle and marine service is a more severe environment. Vibration, temperature extremes, moisture, and exposure to oils and greases can quickly overwhelm light-duty home wiring materials. Figure 16-1 shows a few examples of power sources that are intended for use in a vehicle.
It's often impractical to add a connection to the existing fuse block. Instead, use a fuse tap, such as those from Crowbar Electrical Parts (www.crowbarelectricalparts.com). Click the Fuse Holders button to find the adapters. These add a connection by using a spare fuse position.
You can find the hot side for the fuse tap by removing the fuse and then using your voltmeter to measure voltage at each terminal. The hot terminal is the one that has voltage with the fuse removed — and is usually the one closest to the middle of the fuse block. Your new circuit must be fused, so add an in-line fuse if the power cable doesn't include a fuse (see Chapter 7). This technique can be used for loads of up to 10 or 15 amps. Connect the ground lead directly to a nearby screw or bracket solidly connected to the vehicle's frame.
Tip
Some circuits are only energized when the ignition switch is turned on. If you want to use your gadget when the engine is turned off, remove the key and then test for voltage at the fuse block.
Warning
From an electrical standpoint, different sections of car and truck bodies (particularly those of trucks) are not always solidly connected together. Before assuming that connecting a negative power lead to a metal body part is the same as connecting it to the battery's negative terminal, use a multimeter to confirm the connection.
If your gadget (or collection of gadgets) is likely to draw more current than a fuse tap can handle, you should obtain power directly from the vehicle's battery. Connecting directly to the battery prevents stress to the vehicle wiring and results in a decrease in the voltage drop to your equipment. If you're installing manufactured equipment use the power cable provided. If the power cable isn't long enough to stretch from the battery, extend the cable with more wire of at least the same size as that in the original cable.
Of course, you have to find a hole in the vehicle's firewall between the engine and passenger compartments in order to get access to the battery. If you use an existing hole, it will likely have a rubber grommet or other protective material to keep the metal from chafing through the insulation. Use that grommet or protective covering for the vehicle wiring. If you have to drill a new hole, be sure to line it with an automotive grommet from the auto parts store. Don't depend on electrical tape over the wires to protect them.
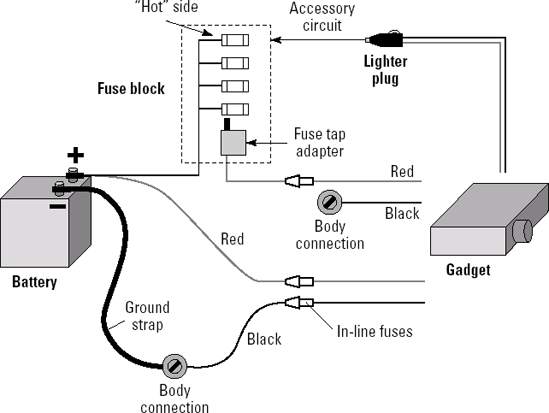
In days gone by, it was often recommended that you run your power cable directly to the battery's terminals. For vehicles with the battery under a seat or in the trunk, this is still the right way. A better solution for today's cars is to run the positive wire to the battery's positive terminal. Run the negative wire to the point at which the battery ground strap is attached to the vehicle — usually on a fender or the engine block. Both leads must be fused to protect the equipment in case of a short circuit! By connecting the negative lead to the vehicle instead of the battery terminal, you protect your equipment from becoming a ground path for other devices. Figure 16-2 illustrates three common methods for getting power from your vehicle; the cigarette lighter socket, a fuse tap, and connecting directly to the battery.
Here are some additional installation tips:
As you make your connections, secure the wires to supporting harnesses or brackets with nylon wire ties or electrical tape rated for automotive use. (At high and low temperatures, ordinary electrical tape adhesive will lose its grip.)
Keep the wires away from moving parts and hot assemblies (such as exhaust system components or heater ducts).
Protect the wires from sharp metal edges that might cut through the insulation aided by the vehicle's vibration.
Don't position a connector or terminal so the wire is pulling on it — over time, vibration will work the wire loose.
Tip
Additional information is available in Web sites about installing vehicle audio systems and books such as Car Audio For Dummies.
In today's crowded cars, finding room for even more electronic gadgetry can be a challenge. How do you find a place so you can see it without it obstructing your ability to drive or getting in the way of your passengers? In general, you want to find a location from which the controls are easy to see and reachable without fumbling around. The device's cabinet must be mounted securely and have sufficient airflow to stay cool, if necessary. In order of desirability, here are several options:
Inside the dashboard: This location is the best, but most of those spaces are usually filled with other electronics and controls, often making this a very difficult place to add equipment.
In the forward center console: Look for blind panels that cover unused accessory-mounting bays. You can often remove ashtrays and storage compartments, as well. Not as difficult as the dashboard, but still crowded.
Under the dashboard: This location can be hard to see (especially when you're driving), but it's an easy spot for installation purposes. Watch out for dangling cords or knee-gouging corners (especially if you have a manual transmission — ouch!). The device will also be difficult to operate if you're not in the correct seat.
On or to the side of the drive shaft hump: In larger cars with center-seating capability, this is also an easy installation location, but often invades leg room space and makes viewing and operating inconvenient.
You should also consider anti-theft security. If you intend to remove your device when you're not in the vehicle, don't mount it so it will be difficult or time-consuming to disconnect. Removing it should take no more than 10 or 15 seconds. If you can't remove it, you may want to try for an installation where it can be hidden with a blank panel. Auto parts stores carry slide mounts so you can quickly remove a radio. These can be adapted to your gadget.
Mounting electronics under a seat or in the trunk can also work well if that is suitable for how it's to be operated. This has the added safety benefit of restraint in the event of an accident.
Tip
Consider building the equipment with a remote control panel at the end of a cable. This works well for switches, indicators, audio output, and power control. Because the remote panel is usually small and lightweight, it's easier to find a mounting location.
Tip
If the mounting location is under a seat, use some sturdy foam as protection from the bumps and bounces of the vehicle. A board or other cover protects your gear from accidental kicks by backseat passengers. Take care to route all cables so they aren't pinched by the seat sliding back and forth.
A unique puzzle comes along when you try to use a handheld device in the car. The best solution is to provide a sturdy pocket that hangs from the dashboard or console. Obtain a carrying case that's just a bit larger than needed and attach it to a convenient location. Cables can then be run to the pocket, where it's a simple matter to plug them in. A fabric or Velcro strap can secure the pocket while you're driving.
Tip
An old truth is that any cable cut to length is too short. Before cutting a wire or cable, make a test installation to be sure it's long enough. If you have to cut it before installing, leave plenty extra and then trim it. You can use the leftovers on other projects.