
16
Malware Analysis for Incident Response
Malicious software continues to be an ever-evolving scourge on enterprise and consumer systems. As soon as defenses are created, malware coders create a new strain that has the power to corrupt or destroy a system. Malware is even being utilized as a weapon against nation states and global organizations. The majority of data breach incidents involve the use of malware to achieve some goal. Organizations in every sector of the economy have faced the threat of malware. With the addition of ransomware attacks such as Conti and Ryuk, organizations have had to spring into action to address these attacks.
With malware an ever-present risk, it is critical that incident response analysts have some knowledge of the methods and tools utilized in the analysis of malicious code. It would be impossible to address the complexities of malware analysis in a single chapter. Therefore, this chapter will focus on the foundational elements of malware analysis, while examining some of the tools that are utilized. This will give any analyst a solid understanding of these methods, which will allow them to see the results of such an analysis in the context of an incident.
In this discussion of malware analysis, the following topics will be addressed:
- Malware analysis overview
- Setting up a malware sandbox
- Static analysis
- Dynamic analysis
- ClamAV
- YARA
Malware analysis overview
Malware analysis, or malware reverse engineering, is a highly technical and specialized field in forensics. Antivirus and threat intelligence utilizes a highly trained cadre of programmers and forensic personnel who acquire malware from the wild, and then rip it open to determine what it does, how it does it, and who may be responsible for it. This is done utilizing two types of analysis: static and dynamic. Like much of digital forensics, each type of analysis affords some advantages, and incident response analysts should be familiar with both.
Malware analysis
This chapter just scratches the surface of a highly specialized facet of cyber security. The intent is to give a few examples of how an analyst can extract actionable IOCs from malware associated with an incident. For a more detailed treatment of the subject, check out Monnappa K A’s Learning Malware Analysis, available at https://www.packtpub.com/product/learning-malware-analysis/9781788392501.
An excellent malware analysis methodology was created by Lenny Zeltser, a malware analysis professional who has an excellent array of resources on his website at https://Zeltser.com. This methodology comprises the following seven steps that aid analysts in their process:
- Create a controlled laboratory environment where examinations can be conducted.
- Examine the behavior of the suspected malware as it interacts with the operating system (OS) environment.
- Examine the suspicious application’s code, to gain a sense of the inner workings.
- Perform dynamic analysis to determine what actions to take that could not be identified in static analysis.
- Determine if the malware is packed and unpack it as necessary.
- Continue the process until the analysis objectives have been completed.
- Prepare a supplement to the forensics reporting and return the laboratory to its state before the analysis.
Generally, malware analysis can be divided into four separate categories, as shown in Figure 16.1, based on a similar diagram created by SANS instructor Allissa Torres. These four categories differ in terms of their tools, techniques, and difficulty. The first and easiest technique to execute is Fully Automated Analysis. In this instance, a copy of the malware is executed in a malware sandbox, an environment created to execute malware so that an understanding of its behavior can be ascertained within a relatively short period. This provides a good picture of the malware’s behavior and IOCs. What this method does not provide is a detailed analysis of the code, which may uncover other specifics, such as potential vulnerabilities leveraged or specific software it may be targeting:
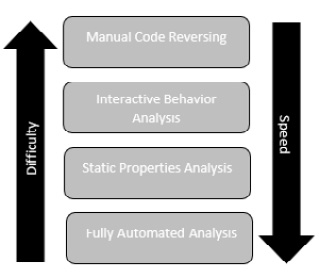
Figure 16.1 – Malware analysis categories
The next technique is static property analysis. In this technique, tools are used to determine the file hash, header, strings, file properties, and other metadata associated with the malicious code. This technique is also very fast but does require some knowledge of malware to analyze and interpret the results. Usually, if the file is run through an automated sandbox along with the static properties analyzed, it is sufficient to gain insight into the behaviors of the malware and extract pertinent IOCs related to an incident.
The next two analysis stages involve a little more expertise, tooling, and time. The third stage, interactive behavior analysis, involves using a combination of automated tools and static property analysis to examine specific elements of the malware. For example, a sample might be executed in a sandbox and specific network behaviors are controlled to determine if the malware attempts to reach out to an external host to download a secondary payload. This stage affords the analysts much more control over the sandbox environment as they can change parameters based on their observations. In this case, the analyst can control the sandbox’s network connection and determine what the specific traffic looks like.
The final stage is manual code reversing. As you might expect given the time and difficulty in this stage, this is a highly specialized skill set. In this stage, the malware sample goes through a reverse engineering process. While this does take time and skill, this insight is critical to fully understanding the code. For example, the Stuxnet malware went through extensive reverse engineering where the analysts were able to determine what specific Programmable Logic Controllers (PLCs) were targeted. Without this insight, the true intent of the malware may not have been discovered.
Stuxnet malware analysis
Stuxnet is still widely discussed in cyber security and cyber warfare circles, even a decade after it was first discovered. It is worth exploring Kim Zetter’s research in her book Countdown to Zero Day: Stuxnet and the Launch of the World’s First Digital Weapon and the 2016 documentary Zero Days. Both provide a deep look at how malware reverse engineering played a significant role in uncovering Stuxnet. A copy of Symantec’s analysis of the Stuxnet virus is included with this book in the supplemental material. It is a good idea to review it as it provides real insight into the expertise and time necessary to conduct a full analysis.
The best approach to extracting the maximum amount of data from a sample of malicious code is to conduct a full examination of the file using static and dynamic analysis techniques. A full spectrum approach that leverages these techniques provides the surest way to gain the best picture of how a sample of malware operates and what the capabilities and potential targets of the malware are. A good example of this is examining the analysis that was conducted on the Stuxnet virus, which was used against the Natanz Uranium enrichment facility in Iran. Exhaustive analysis by researchers at Kaspersky and Symantec provided the cyber and national security community with extensive analysis that showed the sophisticated malware’s capability and target.
There are a few challenges with malware reverse engineering when examining the practice of extracting indicators. First, the tools and techniques for reverse engineering take significant time to acquire. Reverse engineering is a specialized field and given the amount of malware around, it may be difficult to immediately engage someone to conduct full reverse engineering. Second, the process itself is time-consuming. A detailed static analysis where the code is analyzed using binary analysis tools can take time. If other teams such as Incident Response or the Security Operations Center need indicators to block or pivot into investigating, waiting for complete reverse engineering is not advised.
With these challenges in mind, some tools and techniques can be leveraged by threat intelligence and incident response analysts to extract pertinent indicators and TTPs while they wait for the more detailed results of a complete reverse engineering examination. We will examine those tools and techniques later in this chapter.
Malware classification
Malicious software, or malware, is an all-encompassing term for any software that has been created to damage, disable, or produce an unwanted condition within a computer system. This definition, while functional, is also very broad in its categorization of malware. There is malware that is coded specifically to steal credit card numbers from payment systems, while other malware is utilized to take control of a system, allowing an attacker to remotely control that system. Analysts who observe these specific behaviors – such as how a compromised system sends communications out to the internet after infection, or what actions are taken on an infected system – may be able to determine the type of malware, and what the end goal of the attacker may be.
In general, when discussing malware, the following are some of the more specific categories:
- Virus: For a time, the term virus was used for any malicious code that had a detrimental impact on a computer system. As the types of malware increased, the term virus was relegated to mean any code that has an intentionally malicious impact on a system.
- Worm: Often part of a virus, a worm can not only have an impact on a system but is also able to self-replicate and impact other systems connected to it. One of the most famous worms was the Morris worm, which spread worldwide, causing denial-of-service (DoS) attacks across the internet in 1988.
- Trojan: The Trojan horse of mythology is the inspiration for this class of malware. Trojan malware is often hidden within a legitimate application or file. When an unsuspecting user opens the file, the malware infects the system. This type of malware often leverages a social engineering attack to infect a system.
- Keylogger: This specific malware hides in the background of a running system and captures the keystrokes of the user. It then takes this information and sends it to a controller for review. Coders who write keyloggers are often interested in obtaining credentials.
- Rootkit: Rootkits are utilized to conceal other malicious code such as a Remote Access Trojan (RAT), which allows an attacker to take remote command of an infected system.
- Information-stealing malware: Often coded for a single purpose, this type of malware is used to capture information such as credit card numbers or banking credentials, such as the Shylock malware, which was created specifically to capture banking logins.
- Backdoor: Another variation of remote access, this type of malware infects a system, and then allows the attacker to take control of the infected system.
- Downloader: As defenses have become more sophisticated, so have the malware writers. A downloader is part of a multi-stage malware program. The downloader often infects a system, and then reaches out to a remote server for the rest of the code. This method is often utilized to bypass security controls and is useful for enabling malware coders to utilize larger and more sophisticated malware.
- Botnet: A botnet is a series of computers, all controlled through a central system on the internet called a botnet controller. First, the botnet malware infects a system. As the number of infected systems grows, the malware writers can then utilize this botnet to conduct distributed denial-of-service (DDoS) attacks against a single target.
- Ransomware: A relatively new type of malware, ransomware encrypts a victim’s files. The malware then solicits a payment, often in the form of a cryptocurrency such as Bitcoin, from the victim for the decryption key.
- File wipers: A file wiper either destroys the files or can infect the Master Boot Record (MBR) and modify records so that files are no longer accessible to the system.
Many of these variants are used together in a chain. For example, a malware coder may conduct an initial infection of a system, with a RAT disguised as a legitimate application. When an unsuspecting user opens the application, the code executes itself. It then downloads a second payload and further infects the system, allowing the coder remote access. Finally, with remote access, the attack continues, with the attacker identifying a payment system. From there, they load the second piece of malware onto the payment system and capture cleartext credit card numbers.
Another key aspect of malware is how it has evolved. There has been an explosion in how many variants of malware there are and the sheer amount of malicious code there is currently in the wild. Malware is evolving every day, with new techniques of encoding and delivery – as well as execution – changing rapidly. Analysts would be well advised to make a point of keeping abreast of these changes as they are happening so that they are prepared for the latest, and more damaging, code.
Before getting into static and dynamic analysis, we will look at configuring a malware sandbox.
Setting up a malware sandbox
One consideration when analyzing malware is how to handle malware in a safe environment without accidentally infecting your system. The malware sandbox is a controlled environment where analysts can perform both static and dynamic analysis of malware without the risk of infecting a production system. In this case, we will look at two types of sandboxes; the local sandbox allows analysts to configure a system that is entirely under their control, while the cloud-based option allows analysts to leverage dynamic analysis.
Local sandbox
A local sandbox is a system that has been configured with settings and tools in which an analyst can examine malware in a controlled environment. One technique to configure a local sandbox is the use of a virtualization hypervisor such as Virtual Box or VMWare and configuring an operating system on top. There are key advantages to using virtualization for the sandbox. We have already addressed the first: if the analyst infects the system, it will not impact the production system. Second is the snapshot feature. An analyst can configure the sandbox to their preference and then snapshot it. Once the analysis is complete, they can roll back to the snapshot and have a fresh installation.
The first step in the process is selecting the hypervisor. From here, Microsoft makes copies of the most popular Windows OSs, including servers, available. For example, a Windows 10 virtual machine that has already been configured can be downloaded from https://developer.microsoft.com/en-us/windows/downloads/virtual-machines, or the Windows 10 ISO can be downloaded from https://www.microsoft.com/en-us/evalcenter/evaluate-windows-10-enterprise.
Once installed, the analyst can download any tools or scripts to the virtual machine. This can be time-consuming, depending on the number of tools an analyst wants to include. Another option is to leverage preconfigured toolkits such as REToolKit, which is available at https://github.com/mentebinaria/retoolkit. This installer downloads a variety of tools for static and dynamic malware analysis. Another option is to use the Mandiant FLARE v 2.0. FLARE utilizes a PowerShell script to download and configure a local sandbox on a variety of Windows platforms. The installation and usage instructions for FLARE are available at https://github.com/mandiant/flare-vm.
Immediately after completing the sandbox setup, the analyst should take a snapshot of the fresh install. This will allow the analyst to use a fresh install with every analysis, ensuring that there is no cross-contamination. It also means that if the analyst accidentally executes malware, they can simply revert to a fresh installation and try again.
There are a few considerations concerning configuring a local malware sandbox. First, ensure that you remove any network connections. Depending on the hypervisor and how networking is configured, there is a possibility of malware propagating across the network if the virtual machine is sharing network connectivity with other systems. Additionally, there are strains of malware that can escape a virtual machine. You should limit your sandboxes to hosts that you can wipe if necessary. A third consideration is that some variants of malware can identify if they are being executed in a virtual machine. If the analyst is attempting to execute the malware in a sandbox, it may not execute properly if it is one of these “sandbox-aware” variants. This can often cause frustration with analysts.
Cloud sandbox
An option available to analysts that should supplement their local sandboxes is cloud-based versions. These are usually commercial or community resources hosted in the cloud. The analyst can often upload a file or file hash and select the type of operating system; the sandbox does the rest.
The key advantages of using this solution are time and resourcing. The analyst does not have to maintain a sandbox or go through the stress of trying to get the malware to run. Further, this solution often provides results in minutes, including detailed reporting on IOCs and malware behavior.
The one key drawback to these types of solutions is that the analyst sometimes has no control over the data that the solution is collecting. For example, open source solutions such as VirusTotal make their results available to anyone. It is not uncommon for threat actors to monitor such sites for any signs that a target has uploaded a sample. If you are using a cloud sandbox, it is advisable to use one that does not publish the results to the larger security community.
With a sandbox in place, let’s go ahead and look at static malware analysis.
Static analysis
Static analysis involves examining the actual malware code without executing it on a system. For malware researchers, the code may be obtained from systems that are left out to be deliberately infected, or from production systems that have been impacted by the malware.
In this case, incident response analysts can obtain the code or executable through a combination of memory analysis and acquiring the actual executable while analyzing the hard drive. Static analysis often comprises several different techniques, as follows:
- Fingerprinting: One of the most basic techniques is obtaining a cryptographical hash of the code. These hashes can then be compared to other known hashes to determine if the code has been seen before.
- Antivirus scanning: Antivirus vendors often do not catch every virus. For example, some vendors may have analyzed the code and deployed a signature for their product. Other vendors may not have had access to the code or deployed a signature. A good step is to use multiple different antivirus vendors to scan a file.
- String extraction: Malware coders will often include IP addresses, error messages, or other data encoded within the malware in cleartext. Finding these strings may allow the analysts to identify a Command and Control (C2) server or other data that may indicate the purpose of the malware.
- File format: With any executable, legitimate or not, there is metadata associated with it. Malware analysts can view the compilation time, functions, strings, menus, and icons of portable executable format applications.
- Packer analysis: To bypass antivirus programs, malware coders make use of packers. These packers use compression or encryption so that they do not leave a telltale file hash. There are some tools available but, often, conducting a static analysis against packed malware is difficult.
- Disassembly: Reversing the code by using specialized software allows malware analysts to view the assembly code. From here, the analyst may be able to determine which actions the malware is attempting to perform.
Compared to dynamic analysis, static analysis may seem a bit more laborious. While a lot of searching and analysis is done by hand, there are some advantages. First, it is safer to examine the code without having to execute it. This is especially true in organizations where a comprehensive sandbox solution is not in place. Also, it provides a more comprehensive analysis and a better understanding of what the malware coder’s intentions might be.
There are several disadvantages to static analysis as well. This technique requires the malware code in its entirety for the best results. Another key disadvantage is the time necessary to conduct the analysis. With malware becoming increasingly more complex, the time required for a static analysis may be longer than an organization can afford.
This is even more of an issue during an incident where the incident response team may be better off with an analysis that covers most of their issues now, rather than having to wait for the most comprehensive analysis.
Static properties analysis
We will start by examining the static properties of a suspect file. In this case, we will be using a single tool that provides an overview of the file attributes, along with potential indicators. This is a straightforward way to examine using an open source tool. In this example, we will analyze a malware sample from the Malware Bazaar maintained by Abuse.ch. This sample can be found at https://bazaar.abuse.ch/sample/6b69de892df50de9a94577fed5a2cbb099820f7ca618771a93cca4de6196d242/. Once you have downloaded the sample, you will need to uncompress the file using the infected password.
Safe malware handling
The standard practice when handling malware samples is to compress the file with a utility such as 7-Zip and use the password that’s been infected. This accomplishes two things. First, it reduces the chance that an analyst will accidentally detonate the malware in a production environment when moving or copying the malware. Second, if the analyst has not disabled their malware protections on the sandbox, this technique keeps the malware from being quarantined or removed.
Now that we have a sample of live malware, let’s go ahead and look at the specific properties we can find using PEStudio.
PEStudio
In this example, we are going to use the free tool PEStudio (available at https://www.winitor.com/download). This tool quickly extracts artifacts from files for analysis. Once downloaded, the tool opens the following window. Suspected malware files can be either simply dragged and dropped onto the window, as seen in Figure 16.2, or you can add them using the folder icon at the top left of the window:
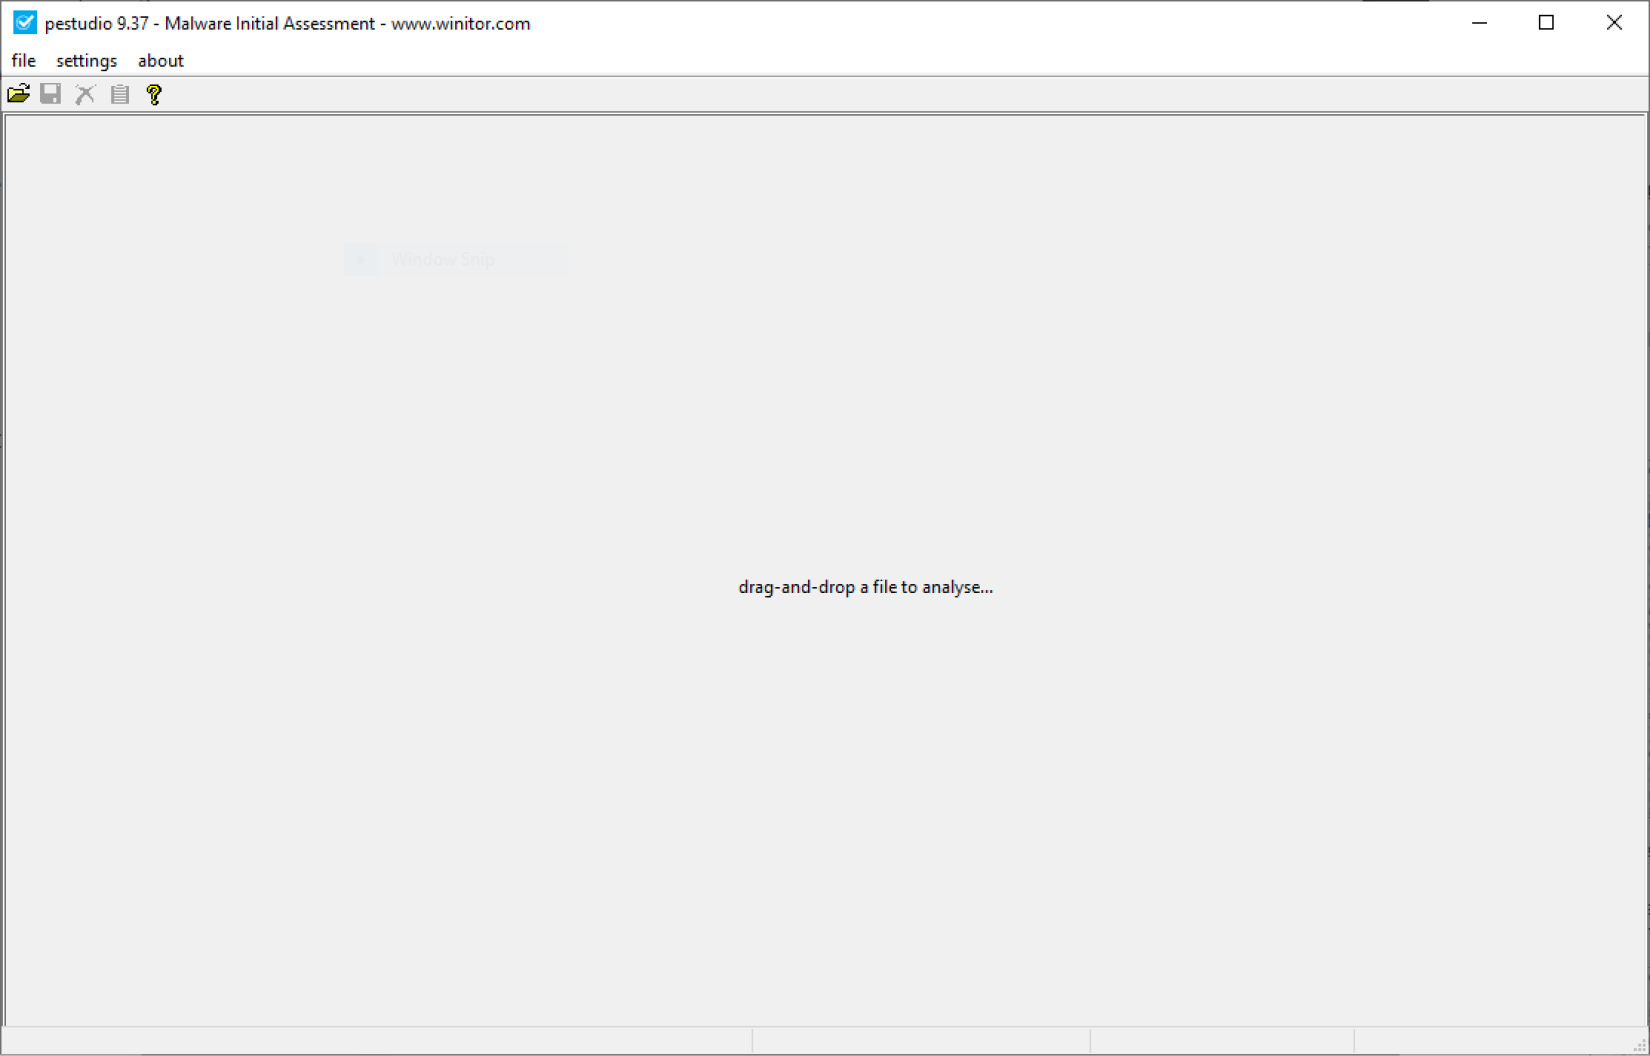
Figure 16.2 – PEStudio’s malware loading window
Go ahead and uncompress the suspect file and drop it into the window. Immediately, the results of the analysis will start to populate, as shown in Figure 16.3. In this case, we can see the file hash, along with other metadata that indicates the file is an executable, as seen in the first-byte-text entry – that is, MZ:
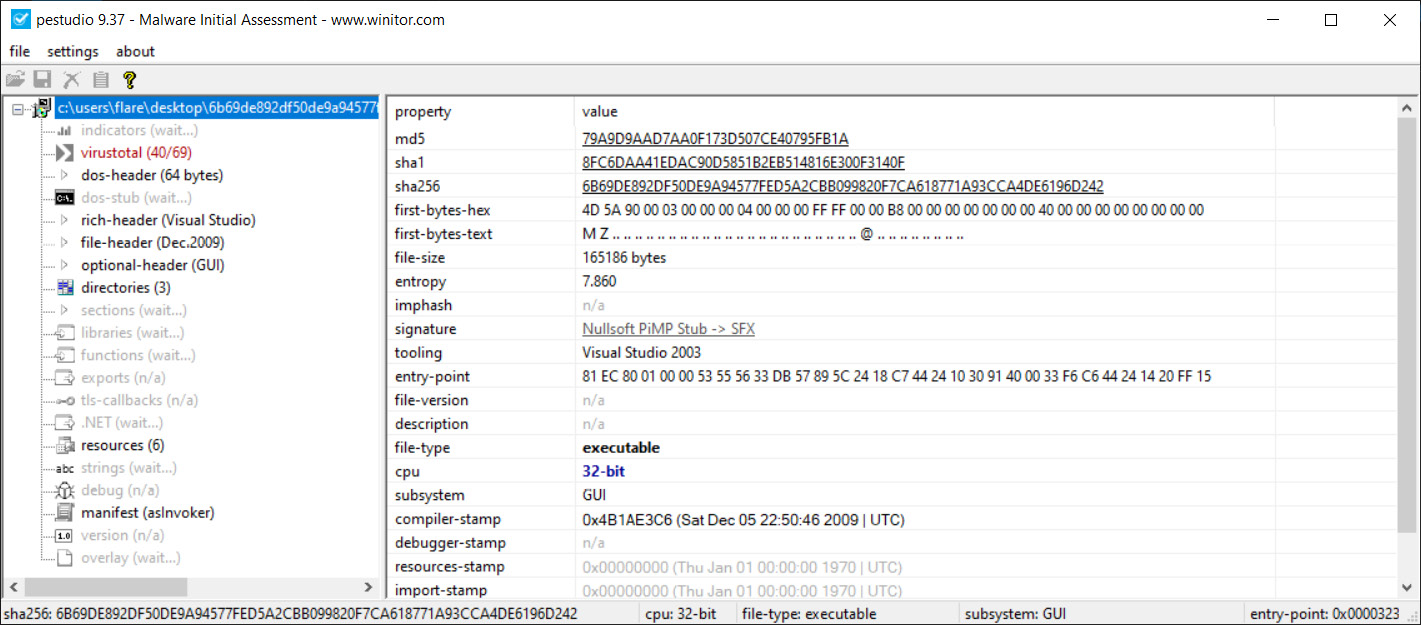
Figure 16.3 – PEStudio metadata view
Clicking on the indicators section, there are 46 separate file indicators. Of these, there are several that are highly suspect. The The file references a URL pattern entry, as seen in Figure 16.4, is especially useful as it indicates the malware coder inserted a malicious URL, http://nsis.sf.net/NSIS_Error, that either establishes Command and Control or downloads a second stage:
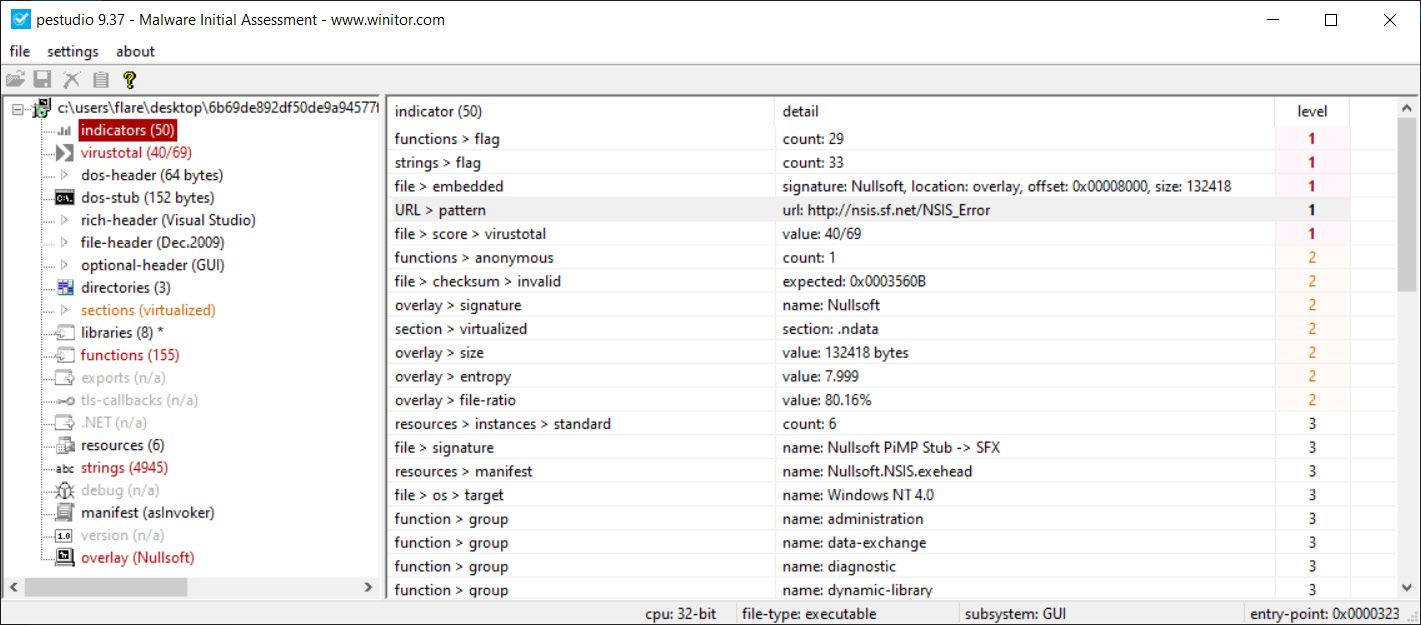
Figure 16.4 – PEStudio indicators view
PEStudio can also extract strings from the malware. This is useful for reconstructing some of the malware’s behavior. For example, in Figure 16.5, we can see that the string at file offset 0x00007066 has a value of RegCloseKey, which indicates that the malware most likely makes changes to the system registry settings. In addition, the strings are one of the best places to look for specific IOCs. In this case, we can see the C2 domain – that is, http://nsis.sf.net/:
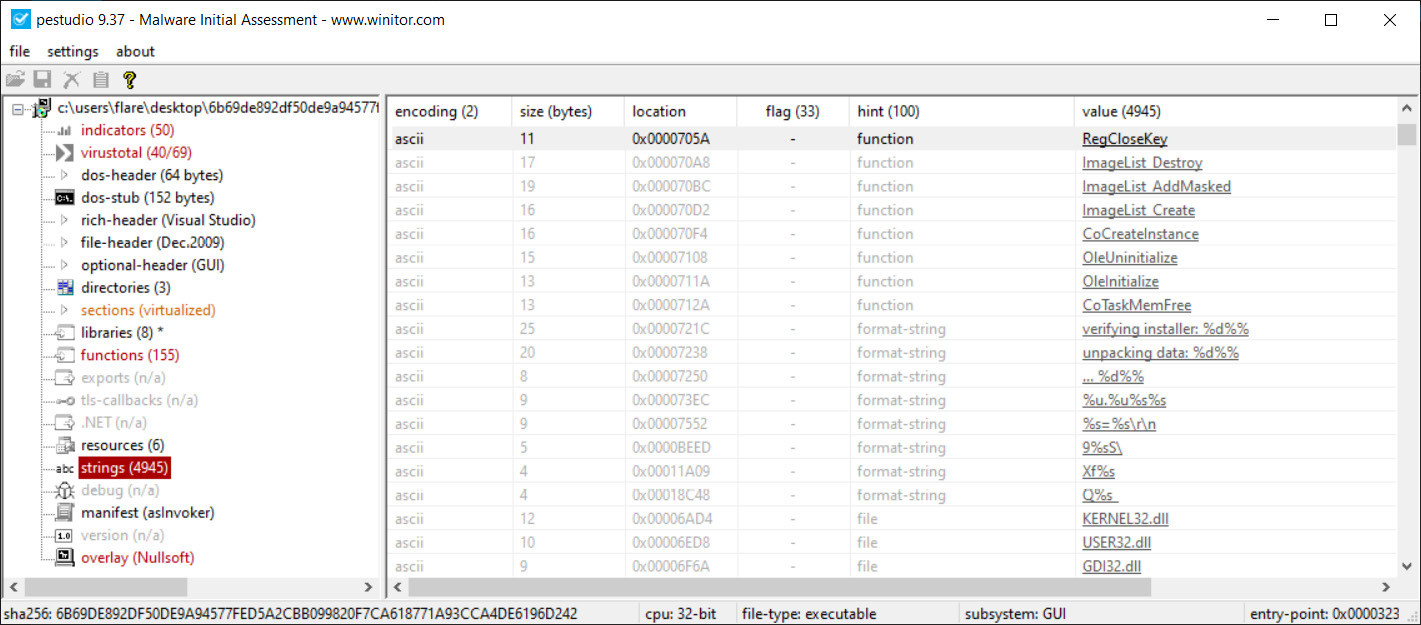
Figure 16.5 – PEStudio strings
PEStudio allows incident responders to get a 10,000-foot overview of suspected malware. Additionally, they may be able to determine if there are specific IOCs that can be extracted. As we saw, we were able to identify at least the domain that this malware used, along with specific behaviors such as the registry modifications. The major disadvantage of relying solely on this approach is that there is still a great deal about this malware that we do not know. Specifics on techniques such as obfuscation and persistence, along with additional actions, are still unknown. To get a sense of those, we will need to perform a much more comprehensive analysis.
Dynamic analysis
In static analysis, the focus is on examining the potential malware in a controlled environment. The focus is on examining the actual code or looking for specific file attributes that could be compared to other sources. In dynamic analysis, the focus is on allowing the potential malware to execute within a controlled environment, and observing the behaviors that the program exhibits.
There are several advantages that dynamic analysis affords malware researchers and incident responders. First, allowing the code to execute fully will remove barriers such as encryption, or other obfuscation techniques that are utilized by malware coders. Second, several automated tools can be leveraged for dynamic analysis. This removes the manual process, which can be very labor-intensive as malware continues to increase in complexity. Finally, dynamic analysis is often much faster, as a researcher can monitor how a piece of potential malware works on a system in real time.
There are two broad categories of dynamic malware analysis that can be utilized, as follows:
- Defined point analysis: In this method, a test OS such as Windows 7 is configured in a live production state. Analysts make a recording of various registry key settings, processes, and network connections. Once these are recorded, the suspected malware is executed on the system. Once the analysts are confident that the malware has been executed completely, they will then compare two points of the system, such as comparing the running processes or identifying changes. This type of analysis can make use of some of the forensic techniques addressed in previous chapters. For example, analysts can take a freshly installed OS and perform a memory capture. This memory capture, and a subsequent one that is taken from the infected machine, gives the analysts a point of comparison to identify specific behaviors of the malware.
- Runtime behavior analysis: In this method, analysts utilize tools such as Process Explorer and other utilities to observe the behavior of the suspected malware while it is executing. Some tools automate a good deal of this process, to give analysts a good understanding of how the malware is executing.
Process Explorer
One of the key tools that allows a detailed examination of malware as it is executing is Process Explorer. This tool is made as part of the Windows Sysinternals suite of tools and provides a no-cost platform for analysts to gain a sense of what each process is running and their parent process, as well as examine CPU usage. Simply download the application from the following site: https://technet.microsoft.com/en-us/sysinternals/process-explorer.
Extract the contents, and then double-click the version of Process Explorer (32-bit or 64-bit version) that is applicable. The following window will appear:
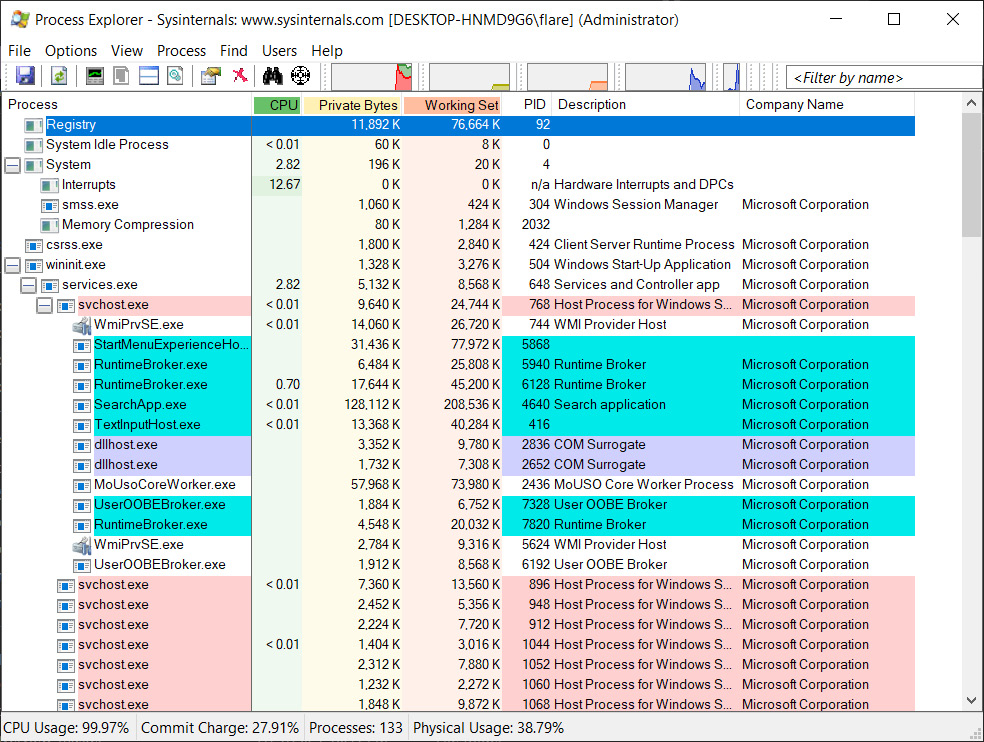
Figure 16.6 – Process Explorer
As can be seen, there are several key pieces of information available to the analyst. The major advantage of this tool is its visual representation. As opposed to attempting to utilize either native Windows tools or other memory analysis tools after capture, analysts can quickly see if any processes look suspicious.
Analysts can send a process and its associated data to https://www.virustotal.com/gui/home/upload. If a suspicious process is identified, Process Explorer will send the information off to the site for analysis and comparison. If a process is identified, click on it in the window. Navigate to Process, and then check VirusTotal. The results will be indicated by a number out of 72, as shown in the following screenshot:

Figure 16.7 – PCHealthCheck.exe VirusTotal check
Another key feature that Process Explorer can provide is the ability to dump the process contents in much the same way that Volatility can. The major difference is that the analyst can conduct the dump without having to acquire a memory image. To dump the memory, click on the process, navigate to Process, and then click Create Dump. The analyst has the option to choose from a minidump or a full dump. As a standard practice, it is advisable to capture a full dump. This dump can then be saved to a directory of choice.
Process Spawn Control
One technique that can be leveraged in examining malware is to create a virtual machine with the appropriate Windows OS. It is best to start with a bare-bones OS, with the Microsoft Office suite installed. Other third-party programs can be installed later if it appears that the malicious code leverages a vulnerability in those applications. A tool that is useful in this type of examination is Process Spawn Control. This PowerShell script, available at https://github.com/felixweyne/ProcessSpawnControl, allows responders to control the execution of malware and observe what actions are taken in Process Explorer. To conduct this type of analysis, take the following steps:
- Start Process Explorer and let it run for a few seconds.
- In the PowerShell terminal, execute the ProcessSpawnControl.ps1 script. Select Run Once, if prompted.
- Process Spawn Control will pause all executables, not just potential malware. Once it is running, open the Windows notepad.exe executable. The following window should appear:
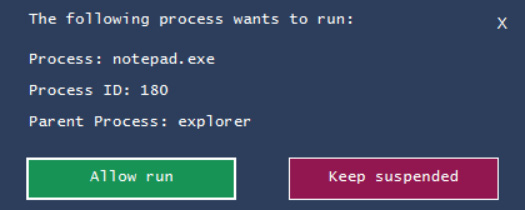
Figure 16.8 – Process Spawn Control notepad.exe suspension
- In the Process Explorer window, the notepad.exe process will appear to be suspended, as shown in the following screenshot:

Figure 16.9 – Process Explorer notepad.exe suspended
- Click on Allow run in the PowerShell dialog box. The notepad.exe process will execute, as follows:
Figure 16.10 – Process Explorer notepad.exe running
Using these tools in combination allows the responder to understand how a potential malware executable functions, and what execution path it may take. This data, combined with other artifacts obtained through memory or log file analysis, can provide additional context to how malware has compromised a system.
While there are distinct advantages to dynamic analysis, incident responders should understand some of the concerns that need to be addressed before detonating suspected malware on a system. First, a controlled environment must be configured.
Suspected malware should never be executed in a production environment. Researchers and incident responders should ensure that any test or analysis environment is completely separated from the production environment.
Another concern is the number of resources that are required to create a proper environment for dynamic analysis. Malware researchers and incident responders make use of a sandbox environment to analyze malware. A sandbox is simply a controlled environment where suspect malware is executed, and the associated analysis can take place. For organizations that research malware, this sandbox can become quite large, as copies of the various OSs and their patch levels should be maintained. For example, for an organization to test a malware sample that impacts the Windows OS, they will often have to have instances of Windows XP, Windows 7, Windows 8, and – finally – Windows 10, along with the various patch levels. This allows them to zero in on the specific OSs that are impacted by the malware. In addition to the OSs, analysts will also need to have images of the memory.
Automated analysis
There is a wide range of providers for automated sandboxes. The one caveat to remember when using these services, especially those that fall under Community access, is that samples that are uploaded for analysis may be made public. Adversaries have been known to monitor various automated sandbox platforms to see when their code is examined. If malware has been extracted from a system under an incident response engagement and then uploaded, you very well may have tipped your hand to the adversary. In cases where Operational Security (OPSEC) is important, there are commercial solutions that do not share samples.
Intezer sandbox
To demonstrate a few of the key features of online sandboxing, we will go ahead and look at the Intezer Analyze sandbox located at https://analyze.intezer.com/, as shown in Figure 16.11. The Community version of the service allows you to search file hashes, similar to what we did when looking at sites such as VirusTotal and Hybrid Analysis. One step that should be conducted before you begin a full analysis is to search the file hash that’s been extracted through a tool such as PEStudio to determine if a sample has already been run in the sandbox. This step saves time. In this case, we will work through running a sample to highlight the features we obtain through a full sandbox analysis:

Figure 16.11 – Intezer Analyze file upload
In this case, we will use the same sample that we examined with PEStudio. The sample can be placed into the sandbox via the web browser either by dragging and dropping the file or browsing the host filesystem. As shown in Figure 16.12, once the sample is dropped into the web browser, the metadata will be populated:
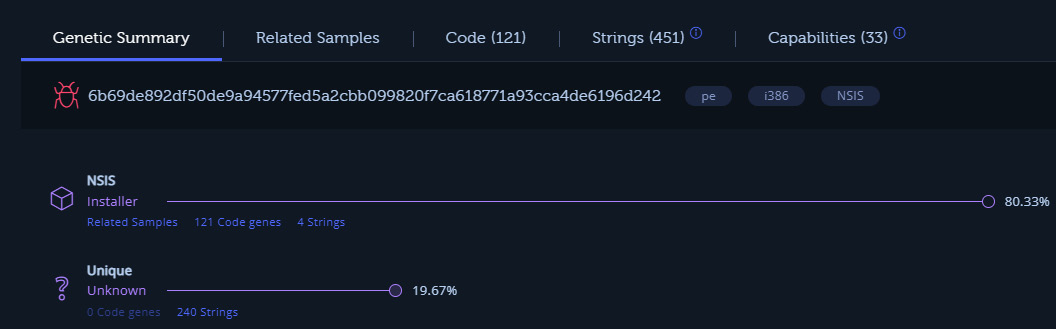
Figure 16.12 – Intezer metadata
The preceding screenshot shows the metadata, including the hash value of the file. Another key piece of data that we see almost immediately with the execution of the file in the sandbox is that the suspect file shares strings and other attributes with the NSIS installer, which makes use of the Nullsoft Scriptable Install System. NSIS is an open source tool used for constructing Windows executables. NSIS malware variants use an obfuscation technique that attempts to appear as a legitimate installer by using non-malicious plugins, such as a bitmap image that serves as a background image and the non-malicious uninst.exe uninstaller. This type of Trojan malware has seen increased use as part of ransomware attacks. This is one of the key advantages of using a service such as this as we gain additional context about the file that we would not have if we had stopped at static analysis:
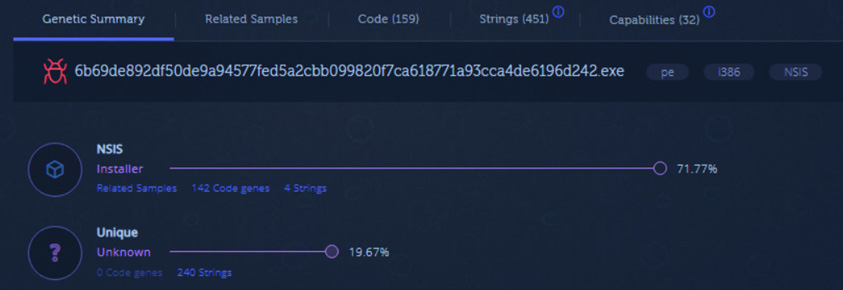
Figure 16.13 – Intezer – Generic Summary
After executing the malware, we will see that, as shown in the following screenshot, the Intezer analysis returns the overall results, indicating that this file is associated with the Loki family of Trojan malware:

Figure 16.14 – Intezer malware conviction
The output of the analysis in Figure 16.15 shows additional samples that have been analyzed by Intezer that utilized the NSIS installer. Reused genes shows the relationship between our analyzed samples and others that have been analyzed in the past. This is common to see with a variety of families of malware:
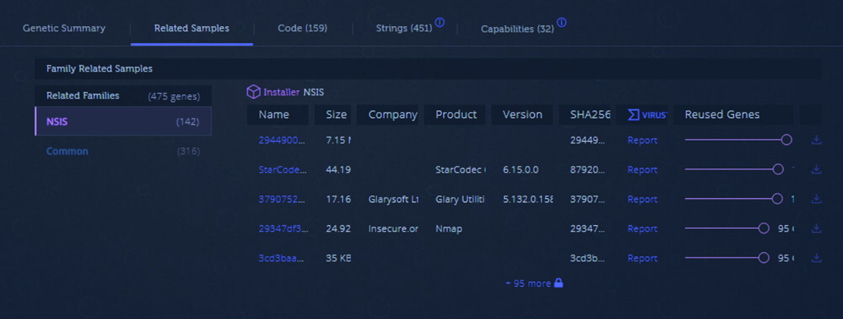
Figure 16.15 – Reused genes
Malware such as Loki is often sold as “commodity malware.” This allows threat actors to purchase the code and modify it as necessary. This means that simply tying back a particular piece of code to a threat actor does not mean that it is simply that threat actor that has access. Threat actors across the globe and with varying degrees of skill will use and reuse code, making attributing malware to a specific group.
The code section shown in Figure 16.16 shows the various code instructions contained within the malware. These may not have immediate value in terms of threat intelligence but often provide a starting point for more detailed static analysis, which, as we indicated earlier, is a time-consuming process:
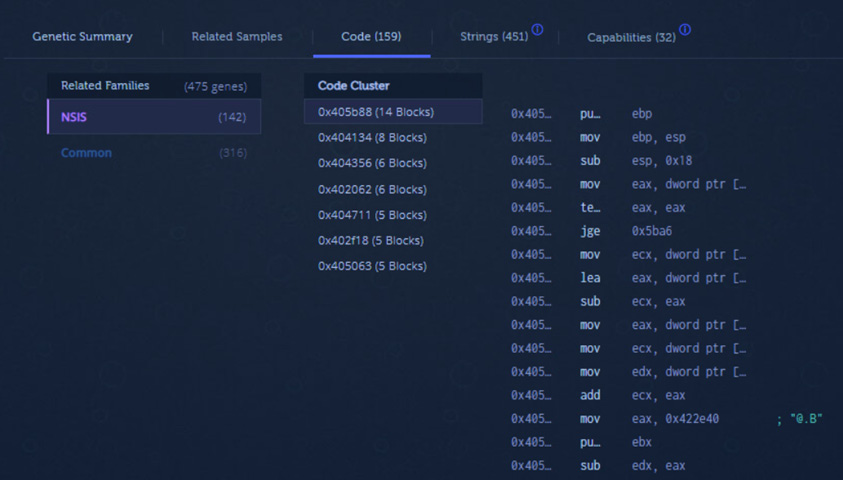
Figure 16.16 – Code analysis
The next tab shows the strings that were extracted during the analysis. Figure 16.17 shows the same URL (http://nsis.sf.net/NSIS_Error) that we first observed when analyzing the code with PEStudio:
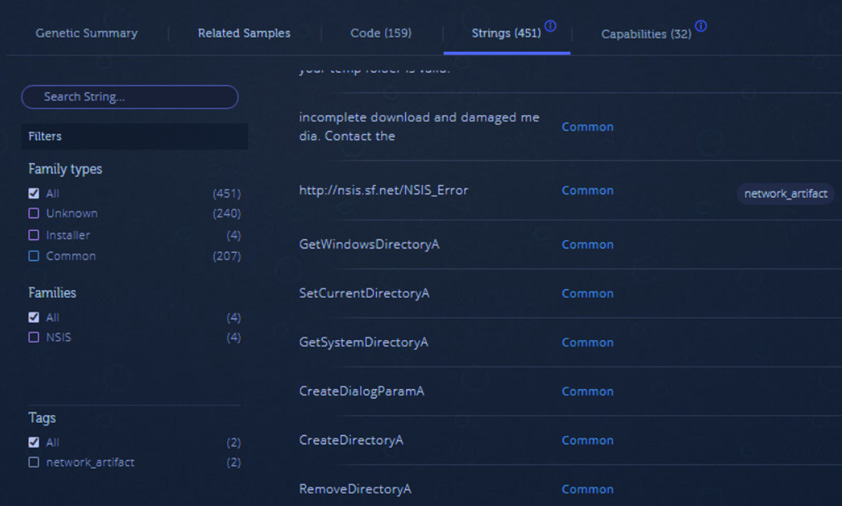
Figure 16.17 – Strings
Under the Capabilities tab, the analysis provides a full breakdown of the MITRE ATT&CK Tactics and Techniques that the malware utilizes. As we can see in the Defense Evasion tactic column, the malware obfuscates files or information. This matches what we know about the NSIS installer package that was identified in the metadata:
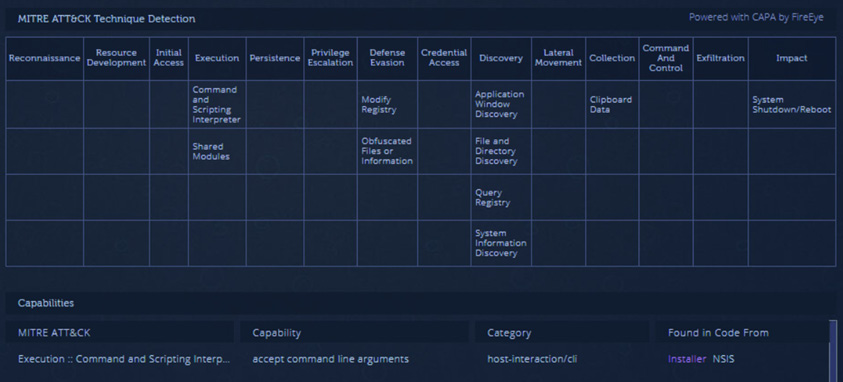
Figure 16.18 – MITRE ATT&CK techniques
Finally, the analysis provides the network and file IOCs that we can see in Figure 16.19:
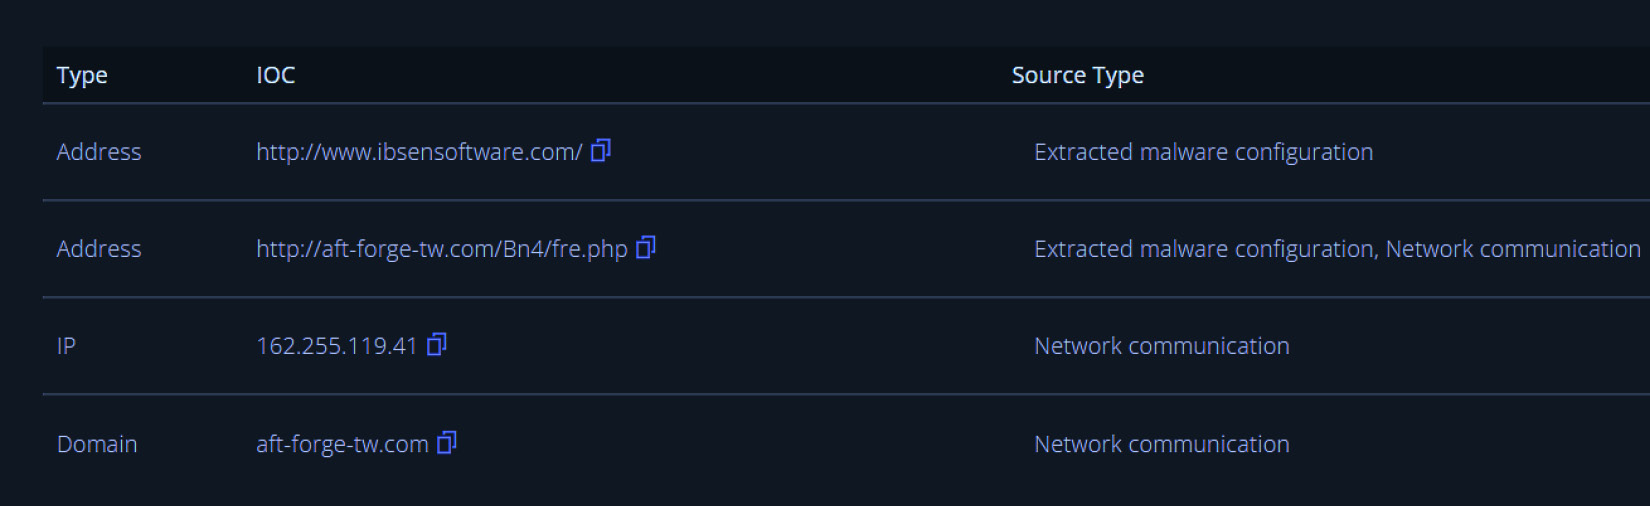
Figure 16.19 – Malware IOCs
When it comes to automated sandboxing, there is a wide range of providers. Other potential options include Joe Sandbox, Hybrid Analysis, and App.any. Antivirus providers will often include a sandboxing feature that provides similar functionality that we explored here. Again, ensure you are fully aware of whether the sandboxing solution makes your uploaded samples available for general use. One technique that is an option where OPSEC is critical is to take the hash value of the file and search the sandbox solution to determine if a file with the same hash value has been uploaded. This will produce the same results without tipping your hand. In the case where there are no other organizations or individuals who have uploaded the same file, it is best to use a solution that does not share the analysis. Often, this is through commercial products that stipulate that your information is not shared.
ClamAV
The first step in conducting a static analysis is to determine if the potential malware under analysis has been previously identified. A single sample’s hash can be uploaded to sites such as VirusTotal, but if a responder has acquired several files through their analysis, they will need to be able to determine if there are any that warrant further examination.
One technique is to use a commercial antivirus scanner to scan the directory. In this case, a free, open source tool that can be leveraged is ClamAV. ClamAV is a command-line utility that allows responders to scan a directory with a variety of suspicious file formats. From here, suspicious files that are identified can be further analyzed by the responder.
To set up ClamAV, download the package at https://www.clamav.net/downloads. In this example, we will use the Windows MSI file to install ClamAV.
The efficacy of ClamAV is largely dependent on the signatures that are included as part of the scanning package. Some malware variants may not have a corresponding signature available and, as a result, will go undetected. Understanding that, ClamAV is a useful way to examine a large number of potential malware files, and to identify those that are already known. The following installation instructions are for the Windows OS:
- Navigate to the ClamAV downloads page at https://www.clamav.net/downloads#otherversions and download the Windows MSI file.
- Run the installer. The default settings will place the ClamAV files in the C:Program FilesClamAV directory.
- Navigate to the ClamAV directory and run the following two commands. These commands will move the configuration files to the appropriate ClamAV directory:
copy .conf_examplesfreshclam.conf.sample .freshclam.conf
copy .conf_examplesclamd.conf.sample .clamd.conf
- After moving the configuration files, open each of the files with WordPad and delete the line that says Example for both configuration files:

Figure 16.20 – Configuration file entry
- After removing the line from both configuration files, the malware signature base needs to be updated. Navigate to the ClamAV folder and run the following in the command line:
C:Program FilesClamAV>freshclam.exe
This will produce the following output:
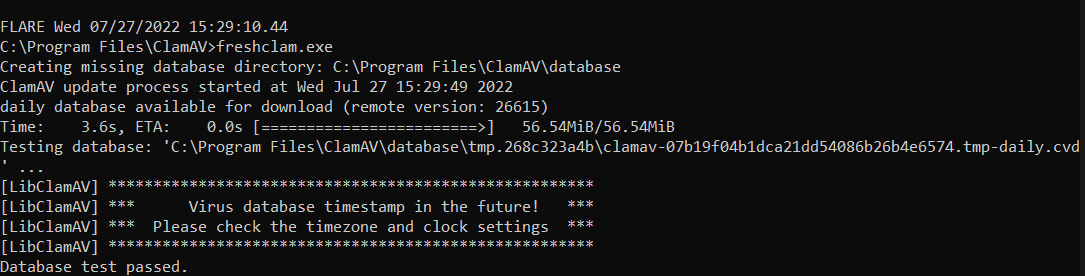
Figure 16.21 – FreshClam signature update
ClamAV can function as a traditional antivirus program but in this case, we will look at using it to scan a directory of suspected files. In this example, files from Malware-traffic-Analysis.net were used. You can download the samples from https://www.malware-traffic-analysis.net/2021/10/13/2021-10-13-Dridex-malware-and-artifacts.zip. Download and uncompress the files. Simply point clamscan.exe at the directory that contains suspect malware and run clamscan.exe. For example, the following command runs Clamscan against a directory called Suspected Malware:
C:Program FilesClamAV>clamscan.exe "C:UsersflareDocumentsSuspected Malware"
This command will load the signature files and then compare the files and produce the following results:
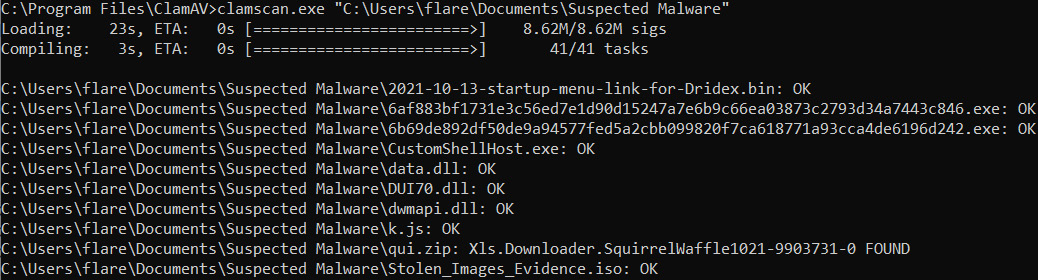
Figure 16.22 – Clamscan output
In this case, there was a file that matches the signature, Xls.Downloader.SquirrelWaffle1021-9903731-0.
The efficacy of ClamAV is largely dependent on the signatures that are included as part of the scanning package. Some malware variants may not have a corresponding signature available and, as a result, will go undetected. Understanding that, ClamAV is a useful way to examine many potential malware files, and to identify those that are already known. A good technique to combat the issue of missing signatures is to leverage several different malware prevention vendors against the same sample. This increases the probability that any suspect files have been identified.
YARA
One tool that has made its way from the malware analysis community into threat intelligence is YARA. This open source tool is often compared to the Linux GREP command for its ability to parse through large amounts of data and indicate if there are matching strings or data patterns. What the acronym YARA stands for is the subject of friendly debate with some going with YARA: Another Recursive Acronym or the author’s preferred Yet Another Ridiculous Acronym. Nomenclature aside, the YARA tool’s ability to act as a Swiss Army knife for incident responders and malware research also has functionality that analysts can leverage.
The YARA tool is maintained by VirusTotal and comes in two components. The first of these is a scanning tool. This tool, written in Python, is the engine that scans files such as memory dumps, disk images, or suspected malicious executables for matching indicators. Due to the tool being open source, along with its capabilities, third-party tools make use of the YARA rule structure. Florian Roth’s Nextron Systems’ Loki scanning tool incorporates YARA into its scanning software. The digital forensics memory analysis tool Volatility is also able to leverage YARA rules when analyzing memory captures.
YARA documentation
Complete documentation on YARA is available at https://yara.readthedocs.io/en/stable/index.html. This resource contains directions on installing the YARA scanning engine on Linux, Windows, and macOS, along with detailed directions on the entire toolset.
The second component of YARA is rules. These rules are similar to other pattern-matching schemas such as the SNORT Intrusion Detection System rules. The scanning engine compares the analysis of the file against a set of rules that contain the IOCs. Given the utilities of YARA, malware analysis providers will often include YARA rules as part of their published analysis such as the following YARA rule, which was taken from the Cyber Security and Infrastructure Security Agency available at https://www.cisa.gov/uscert/ncas/analysis-reports/ar22-115b. It is related to the ISAACWIPER malware variant:
rule CISA_10376640_01 : trojan wiper ISAACWIPER
{
   meta:
       Author = "CISA Code & Media Analysis"
       Incident = "10376640"
       Date = "2022-03-14"
       Last_Modified = "20220418_1900"
       Actor = "n/a"
       Category = "Trojan Wiper"
       Family = "ISAACWIPER"
       Description = "Detects ISACC Wiper samples"
       MD5_1 = "aa98b92e3320af7a1639de1bac6c17cc"
       SHA256_1 = "abf9adf2c2c21c1e8bd69975dfccb5ca53060d8e1e7271a5e9ef3b56a7e54d9f"
       MD5_2 = "8061889aaebd955ba6fb493abe7a4de1"
       SHA256_2 = "afe1f2768e57573757039a40ac40f3c7471bb084599613b3402b1e9958e0d27a"
       MD5_3 = "ecce8845921a91854ab34bff2623151e"
       SHA256_3 = "13037b749aa4b1eda538fda26d6ac41c8f7b1d02d83f47b0d187dd645154e033"
   strings:
       $s0 = { 73 00 74 00 61 00 72 00 74 00 20 00 65 00 72 00 61 00 73 00 69 00 6E 00 67 }
       $s1 = { 6C 00 6F 00 67 00 69 00 63 00 61 00 6C }
       $s2 = { 46 00 41 00 49 00 4C 00 45 00 44 }
       $s3 = { 5C 00 6C 00 6F 00 67 00 2E 00 74 00 78 00 74 }
       $s4 = { 69 73 20 70 72 6F 67 72 61 6D 20 63 61 6E 6E 6F }
       $s5 = {53 74 61 72 74 40 34}
       $s6 = {3B 57 34 74 2D 6A}
       $s7 = {43 6C 65 61 6E 65 72 2E}
   condition:
       all of ($s0,$s1,$s2,$s3,$s4) or all of ($s5,$s6,$s7)
}
There are four components to the preceding YARA rule. Let’s go ahead and look at each portion in detail. The first component is the rule name. In this case, the rule name is rule CISA_10376640_01 : trojan wiper ISAACWIPER.
This identifies the YARA rule and should be meaningful to the author. A good rule to follow is to use the name of the malware variant, just like the preceding rule does.
The second component is the rule’s metadata. In the case of the preceding rule, this is identified with the meta: line. The metadata can include fields that are descriptive of the rule. As in the preceding rule, this includes the author, the incident number, the date, and the various hash values associated with the malware. YARA rules allow for a great degree of flexibility in the metadata portion. Any information that may be helpful can be included.
Next is the meat of the YARA rule and that is its strings. Strings are often obtained through analysis such as the use of PEStudio, as we saw in the previous example. These strings can be hexadecimal, text strings, or regular expressions. The text strings can be used with the following modifiers:
- nocase: This indicates that the strings should not be case-sensitive. This provides the rule author with a bit more leeway when it comes to the text strings found within the malware. For example, if the author wanted to include all variations of the word “malware,” the line within the YARA rule would look similar to $string1 = "malware" nocase.
- wide: Malware binaries often use strings encoded with two bytes per character. The wide modifier searches for strings encoded in this way. Pivoting from the previous example, the modifier can be added to the string: $string1 = "malware" nocase wide.
- fullword: The fullword modifier should be used if the author only wishes to match a string that is delimited by non-alphanumeric characters – for example, in the previous example, if the rule author wanted to match on strings such as malware only and not antimalware or malwared.
- xor: This modifier looks for strings that have been encrypted with an XOR function. This is handy to keep in mind when looking through code associated with known Command and Control frameworks such as Cobalt Strike. In Chapter 16, we will look at common ransomware attacks that use tools that make use of XOR functions to bypass detection controls.
- Base64: Another common tactic among threat actors is to utilize scripts encoded with Base64 encoding. This modifier identifies encoded strings within the malware file.
In the sample YARA rule, the strings are made up of several hexadecimal strings, such as $s1 = { 6C 00 6F 00 67 00 69 00 63 00 61 00 6C }.
The final part of the YARA rule is its conditions. These set the parameters to identify if the sample matches the YARA rule. These are Boolean expressions that computer programmers are already familiar with. YARA can understand both the typical Boolean operators as well as the relational, arithmetic, and bitwise operators as well.
YARA is a flexible tool that can be used to identify the presence of malware or exploits in a variety of file locations. Additionally, YARA is an open source project with a wide range of contributors from commercial antivirus coders to independent researchers that make rules available to the community. In the next chapter, we will look at how these rules can be applied to an incident investigation. Before we conclude, though, we will look at a simple tool that can aid an analyst in crafting their own rules.
YarGen
Incident response and malware analysts will often have to create rules for a large number of malware samples. Depending on the complexity of the malware and the quantity of malware, this can often be a time-consuming process. To help with the creation of YARA rules, Florian Roth has developed a Python-based tool called YarGen that automates the creation of YARA rules.
YarGen can be downloaded from GitHub at https://github.com/Neo23x0/yarGen and installed on any system that can execute Python scripts. Once installed, the script can be run against a directory of malware samples. In this case, we will run the script against the malware sample we examined previously. In this case, the following command will run the script against the sample:
remnux@remnux:~/yarGen-master$ python3 yarGen.py -m /home/remnux/Downloads/malware_samples/
Figure 16.23 indicates the script is being run:
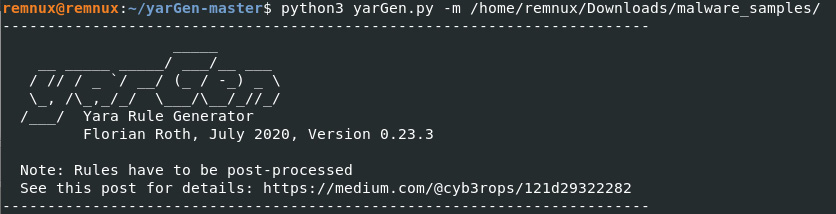
Figure 16.23 – YarGen YARA rule generator
The command products the following YARA rule. It is important to note that the rules should be reviewed and modified as needed as the tool does not perfectly match the strings and other data. Therefore, analysts should put the outputted rule through some cleanup and post-processing to ensure that the rule does not contain any unnecessary strings or conditions that increase the rate of false positives:
 /*
   YARA Rule Set
   Author: yarGen Rule Generator
   Date: 2022-07-27
   Identifier: malware_samples
   Reference: https://github.com/Neo23x0/yarGen
*/
/* Rule Set ----------------------------------------------------------------- */
rule sig_6b69de892df50de9a94577fed5a2cbb099820f7ca618771a93cca4de6196d242
{
   meta:
      description = "malware_samples - file 6b69de892df50de9a94577fed5a2cbb099820f7ca618771a93cca4de6196d242.exe"
      author = "yarGen Rule Generator"
      reference = "https://github.com/Neo23x0/yarGen"
      date = "2021-07-27"
      hash1 = "6b69de892df50de9a94577fed5a2cbb099820f7ca618771a93cca4de6196d242"
   strings:
      $x1 = "<?xml version="1.0" encoding="UTF-8" standalone="yes"?><assembly xmlns="urn:schemas-microsoft-com:asm.v1" manifestVersio" ascii
      $x2 = "<assemblyIdentity version="1.0.0.0" processorArchitecture="X86" name="Nullsoft.NSIS.exehead" type="win32"/><description>" ascii
      $s3 = "ExecutionLevel level="asInvoker" uiAccess="false"/></requestedPrivileges></security></trustInfo><compatibility xmlns="urn:s" ascii
      $s4 = " Install System v2.46</description><trustInfo xmlns="urn:schemas-microsoft-com:asm.v3"><security><requestedPrivileges><request" ascii
      $s5 = "s-microsoft-com:compatibility.v1"><application><supportedOS Id="{35138b9a-5d96-4fbd-8e2d-a2440225f93a}"/><supportedOS Id="{e" ascii
      $s6 = "<?xml version="1.0" encoding="UTF-8" standalone="yes"?><assembly xmlns="urn:schemas-microsoft-com:asm.v1" manifestVersio" ascii
      $s7 = "SHFOLDER" fullword ascii /* Goodware String - occured 37 times */
      $s8 = "NullsoftInst" fullword ascii /* Goodware String - occured 89 times */
      $s9 = "SeShutdownPrivilege" fullword ascii /* Goodware String - occured 153 times */
      $s10 = "mXDZG^H}" fullword ascii
      $s11 = "WyUG"_" fullword ascii
      $s12 = "_`.XJn" fullword ascii
      $s13 = "nTwZvD#" fullword ascii
      $s14 = "gTFeK?" fullword ascii
      $s15 = "snBZR_j" fullword ascii
      $s16 = "vRPe~VSR" fullword ascii
      $s17 = "008deee3d3f0" ascii
      $s18 = "]WJgX>kMix" fullword ascii
      $s19 = ",ywSvQMQ" fullword ascii
      $s20 = "fjUu.$U" fullword ascii
   condition:
      uint16(0) == 0x5a4d and filesize < 500KB and
      1 of ($x*) and 4 of ($s*)
}
In looking over the rule, we can see a few key strings that stand out. First is that the NSIS loader is identified in $x2 = "<assemblyIdentity version="1.0.0.0" processorArchitecture="X86" name="Nullsoft.NSIS.exehead" type="win32"/><description>" ascii. We also can see various ASCII strings that have been extracted in $s10-$s20. This rule also makes use of the file size condition. This condition ensures that the file size matches, reducing false positives. The one key string that is missing is the URL that was identified earlier in our examination of the file with PEStudio. This can easily be incorporated as an additional string as follows:
$x3 = "http://nsis.sf.net/NSIS_Error" ascii
With just a short amount of post-processing, this rule can be applied to other systems, disk or memory images, or other files to determine if the malware is present. YARA has become an often leveraged tool with regards to identifying the presence of malware or exploits on a system and should be included in an analyst’s toolset when they’re working with malware.
Summary
This chapter addressed the various elements of malware analysis for an incident responder. First, having an understanding of malware, in general, is necessary, as it is by far the most prevalent threat available to adversaries. Second, the techniques of malware analysis – static and dynamic – provide responders with tools and techniques to extract key data points. Finally, the use of sandboxing systems allows responders to gain insight into malware behavior and attributes quickly, and in a controlled manner.
In many ways, this chapter has merely scratched the surface concerning malware analysis. It should become apparent that, even with tools for static and dynamic analysis, incident response analysts still have a great deal of skill-building ahead of them if they want to master this highly specialized subset of digital forensics. Although it may be difficult, it is important to have at least a functional knowledge of this type of analysis as cybercriminals and nation states continue to utilize more sophisticated malware. This chapter delved into malware analysis by examining the types of malware currently being seen. An overview of the two primary methods of analysis – static and dynamic – gave some context regarding the tools available. The tools we discussed allow an analyst to identify behaviors in malware that can be used to identify them. Finally, executing malware can provide further details.
The next chapter will tie the use of threat intelligence into malware analysis, to allow analysts to tie their observations to what is happening to other organizations.
Questions
Answer the following questions to test your knowledge of this chapter:
- Which of the following is not a type of malware?
- Trojan
- Keylogger
- Rootkit
- Webshell
- Responders should create a controlled environment in which to conduct malware analysis.
- True
- False
- Which of the following is a type of static analysis?
- Runtime behavior
- String extraction
- Memory addressing
- Malware coding
- Which of the following is a type of dynamic analysis?
- Disassembly
- Defined point
- Packer analysis
- Artifact extraction
Further reading
Refer to the following for more information about the topics covered in this chapter:
- A source for .pcap files and malware samples: https://www.malware-traffic-analysis.net/index.html
- Malware Unicorn: https://malwareunicorn.org/#/
- MalwareJake: http://malwarejake.blogspot.com/
- Florian Roth’s GitHub account: https://github.com/Neo23x0/