38 Special: Photographic Special Effects
Photographer Jeannie Theriault
This is where the fun begins. Okay, I don’t want to discount all the immeasurable fun you’ve had up to this point, but now it gets really fun. This is where we get to play around in Elements and change reality, and then send the client an invoice for our “playtime.” Did the model not have the right color blouse on? No sweat, change it in Elements. Was it an overcast day when you shot the exterior of your client’s house? Just drop in a new sky. Do you want to warm up a cold photo like you did in the old days by screwing on an 81A filter? Now you can do it digitally. Do you want to take your income to the next level? Just shoot a crisp shot of a $20 bill, retouch it a bit, print out a few hundred sheets on your color laser printer and head for Vegas. (Okay, forget that last one, but you get the idea.) This is where the rubber meets the road, where the nose gets put to the grindstone, where the meat meets the potatoes... (Where the meat meets the potatoes? Hey, it’s late.)
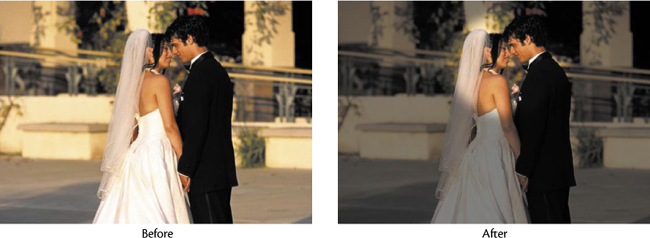
Blurred Lighting Vignette
This technique is very popular with portrait and wedding photographers. It creates a dramatic effect by giving the appearance that a soft light is focused on the subject, while dimming the surrounding area (which helps draw the eye to the subject).
Step One:
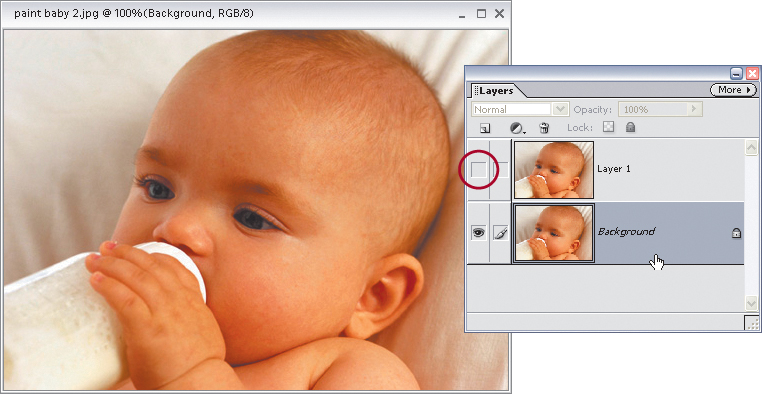
Open the photo that you want to add a soft light vignette to. Go under the Layer menu and choose Duplicate Layer (or just drag-and-drop the Background layer on the Create a New Layer icon at the top left of the Layers palette). This will duplicate the Background layer onto its own layer (Background copy).
BRAND X PICTURES
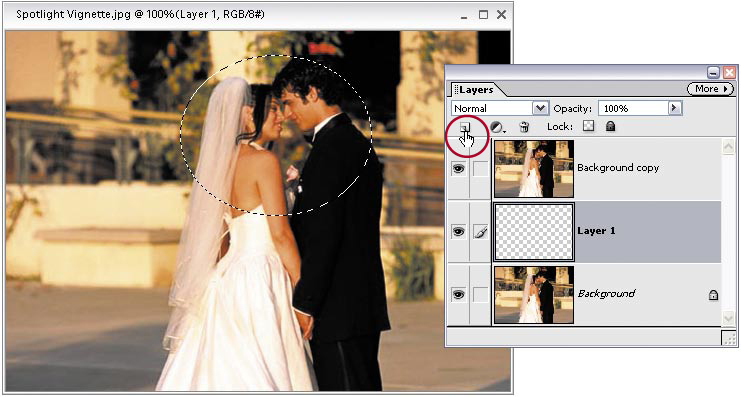
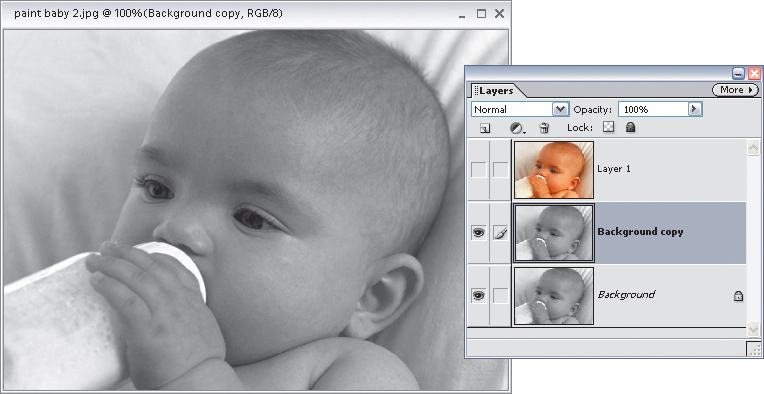
Step Two:
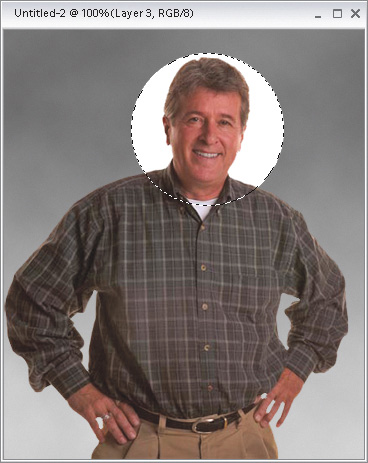
Get the Elliptical Marquee tool from the Toolbox (or press Shift-M until you have the tool) and draw an oval-shaped selection where you’d like the soft light to fall on your subject. In the Layers palette, hold the Control key and click on the Create a New Layer icon. This creates a layer (Layer 1) directly beneath your current layer (Background copy).
Step Three:
In the Layers palette, click back on the top layer (Background copy). Now, press Control-G to group your copied Background layer with the blank layer beneath it. Don’t deselect yet.

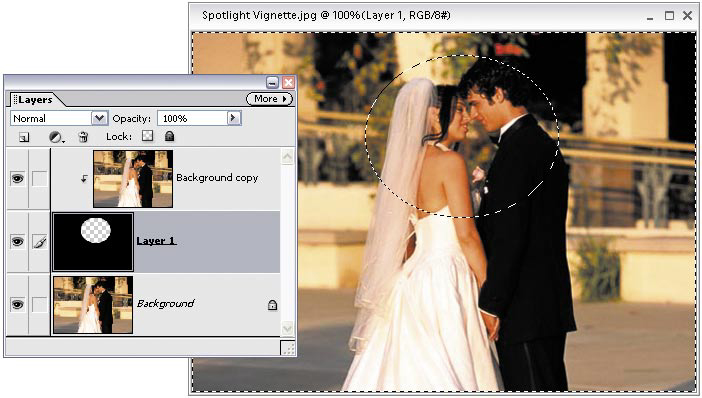
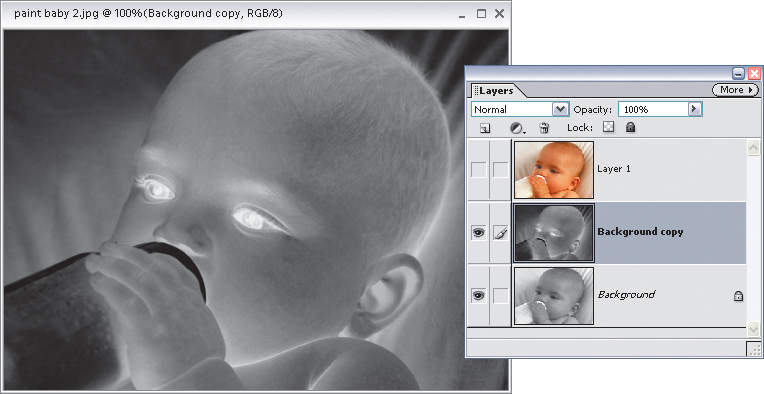
Step Four:
In the Layers palette, click on the middle layer (the blank Layer 1). Go under the Select menu and choose Inverse (which selects everything but the oval). Press the letter D to set your Foreground color to black, then press Alt-Backspace to fill the area around the oval with black. You won’t see the black onscreen, but you’ll see it in Layer 1’s thumbnail in the Layers palette.
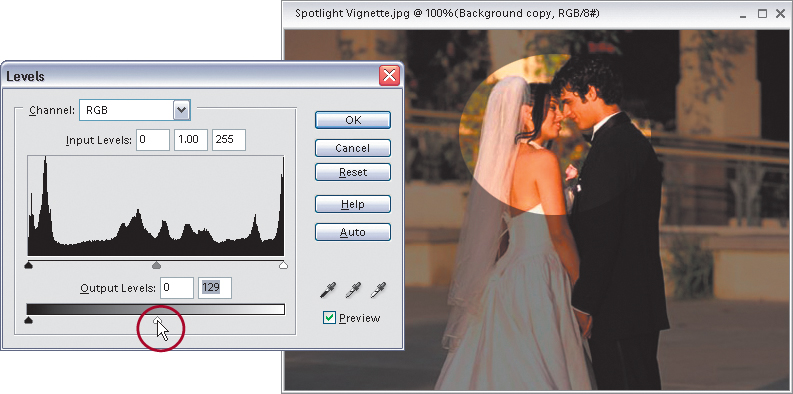
Step Five:
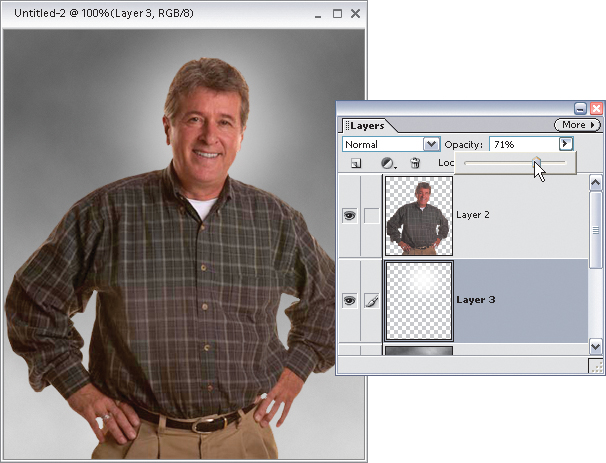
Press Control-D to deselect. In the Layers palette, click back on the top layer. Press Control-L to bring up the Levels dialog. Grab the lower right-hand Output Levels slider and drag it to the left to darken the area outside the oval. When it looks fairly dark, click OK.
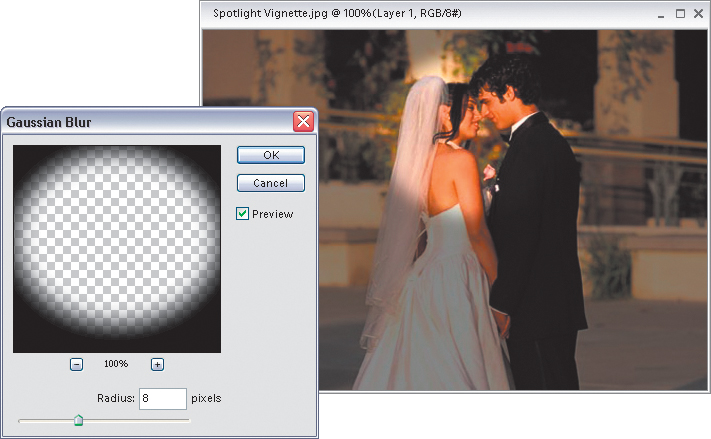
Step Six:
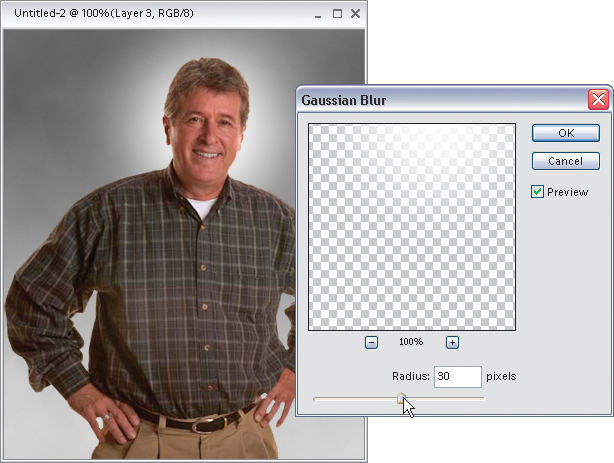
In the Layers palette, click on the middle layer again. Go under the Filter menu, under Blur, and choose Gaussian Blur. When the Gaussian Blur dialog appears, drag the slider all the way to the left, then start dragging it to the right to soften the edges of the oval until the oval area in your photo looks like a soft light. When you click OK to apply the Gaussian Blur, the effect is complete, and now you have a soft-lighting vignette falling on your subject that fades as it moves farther away.
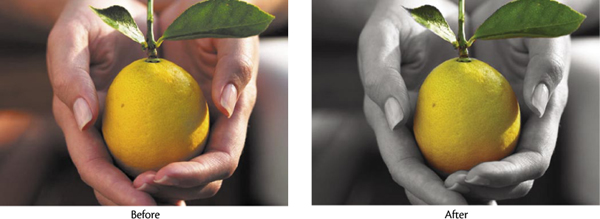
Using Color for Emphasis
This is a popular technique for focusing attention by the use of color (or really, it’s more like the use of less color—if everything’s in black-and-white, anything that’s in color will immediately draw the viewer’s eye). As popular as this technique is, it’s absolutely a breeze to create. Here’s how.
Step One:
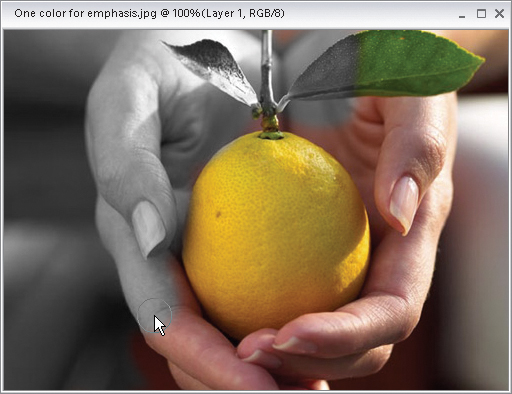
Open a photo containing an object you want to emphasize through the use of color. Go under the Layer menu, under New, and choose Layer via Copy (or just press Control-J). This will duplicate the Background layer onto its own layer (Layer 1).

BRAND X PICTURES
Step Two:
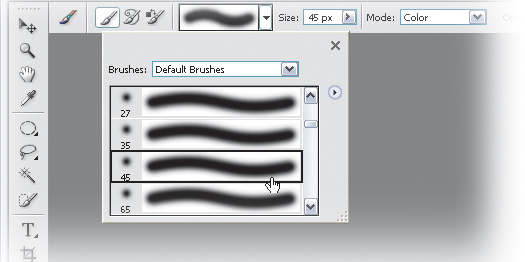
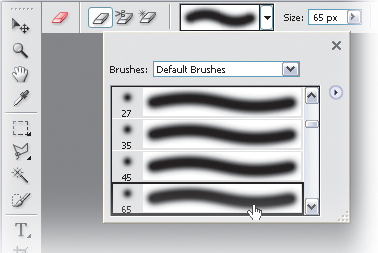
Press B to get the Brush tool from the Toolbox and choose a medium, soft-edged brush from the Brush Picker in the Options Bar (just click on the arrow next to the Brush Preset icon to open the Picker). Also in the Options Bar, change the Mode pop-up menu of the Brush tool to Color.
Step Three:
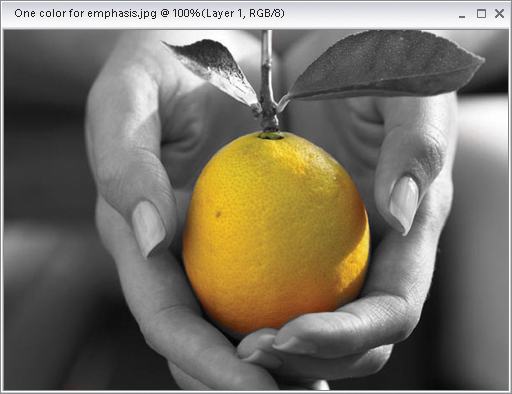
Set your Foreground color to black by pressing the letter D and begin painting on the photo. As you paint, the color in the photo will be removed. The goal is to paint away the color from all the areas except the areas you want emphasized with color.
Tip
If you make a mistake while painting away the color or later decide that there was something else that you really wanted to keep in color (such as the stem and leaves of the fruit in this example), just switch to the Eraser tool by pressing the E key, paint over the “mistake” area, and the original color will return as you paint. (What you’re really doing here is erasing part of the top layer, which is now mostly black-and-white, and as you erase, it reveals the original layer, which is still in full color.)
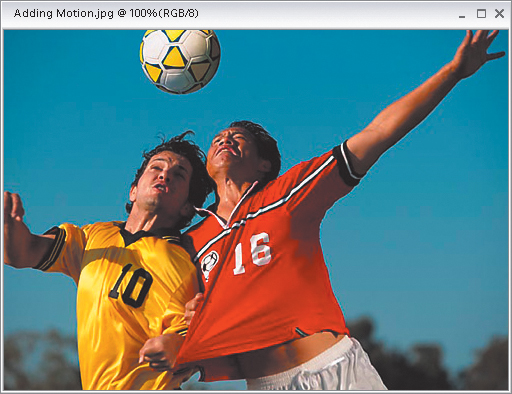
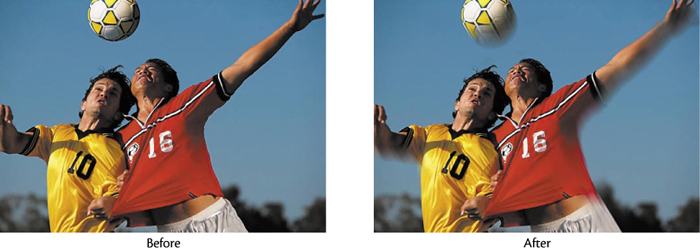
Adding Motion Where You Want It
This is a painless way to add motion to a still photo, and because you’re using a brush to apply the blur, you have a lot of flexibility in where the effect is applied.
Step One:
Open the photo to which you want to give a motion effect.
BRAND X PICTURES
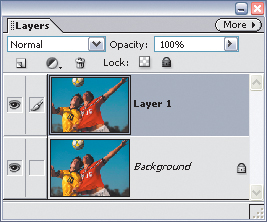
Step Two:
Duplicate the Background layer by going under the Layer menu, under New, and choosing Layer via Copy (or pressing Control-J). This will duplicate the Background layer onto its own layer (Layer 1).
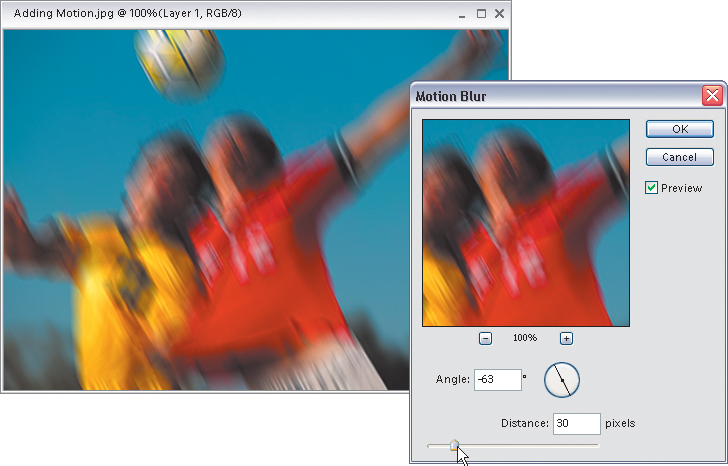
Step Three:
Go under the Filter menu, under Blur, and choose Motion Blur. The Motion Blur dialog will appear presenting two settings: Angle lets you choose which direction the blur comes from, and Distance actually determines the amount of blur. In this case, set the Angle to around -63° so the blur is almost vertical to match the up-and-down motion of the soccer players. Then, increase the Distance amount by dragging the slider until it looks realistic, and click OK.
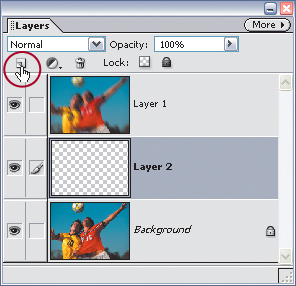
Step Four:
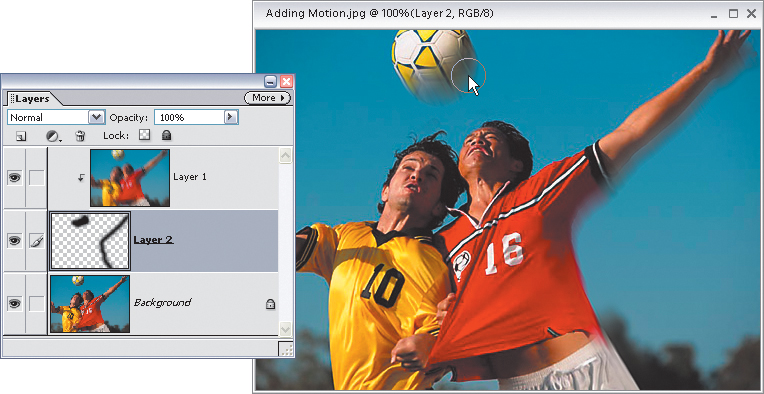
In the Layers palette, hold the Control key and click on the Create a New Layer icon. This creates a layer (Layer 2) directly beneath your current layer. Now, click back on the top layer, then press Control-G to group your blurred copy with the blank layer beneath it. Doing this hides the Motion Blur effect you applied to this layer.
Step Five:
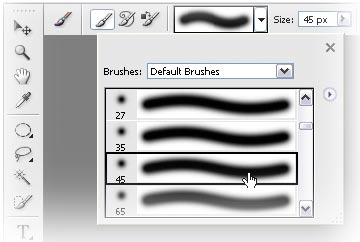
Click on the middle layer (the blank layer). Press B to get the Brush tool from the Toolbox, and choose a medium-sized, soft-edged brush from the Brush Picker (found by clicking the Brush Preset icon in the Options Bar). Press the letter D to set your Foreground color to black, then begin painting over the areas you want to have motion. As you paint, you’ll reveal the Motion Blur that’s already applied to the top layer.
Tip
If you make a mistake and reveal motion in an area where you don’t want it (and a simple Undo [Control-Z] won’t help you), press E to switch to the Eraser tool, then paint over the “mistake” area and the blur will be removed. (What you’re really doing here is erasing part of the top blurred layer, revealing the original layer, which isn’t blurred.)
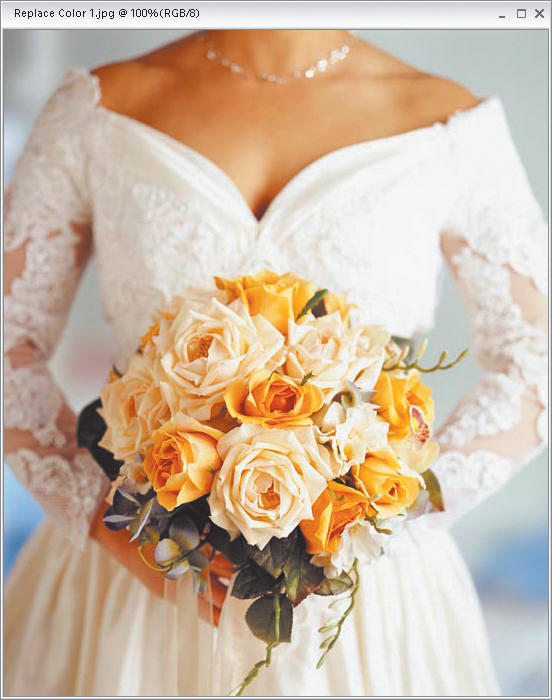
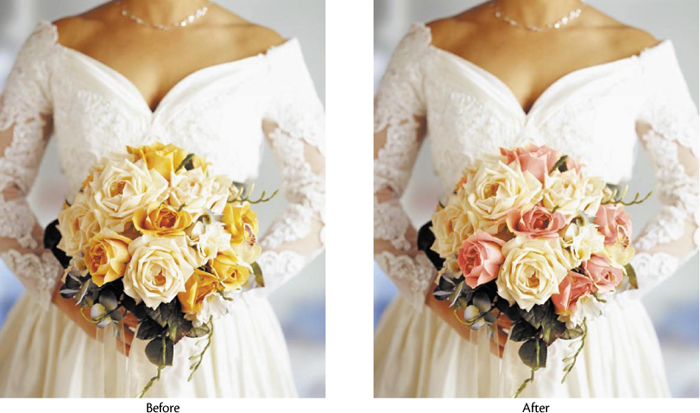
Changing an Object’s Color
Have you ever wanted to change the color of an object (such as a shirt, a car, etc.) in a photo? You have? Then here’s perhaps the fastest, easiest way to change the color of, well...whatever.
Step One:
Open a photo containing an element that needs to be a different color.
BRAND X PICTURES
Step Two:
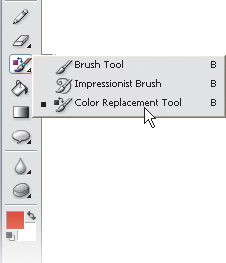
Choose the Color Replacement tool (found in the Brush tool’s flyout menu) in the Toolbox.
Tip
You can adjust the Color Replacement tool’s settings by going to the Options Bar, clicking the down-facing arrow next to the word “Brush,” and choosing your settings in the palette.
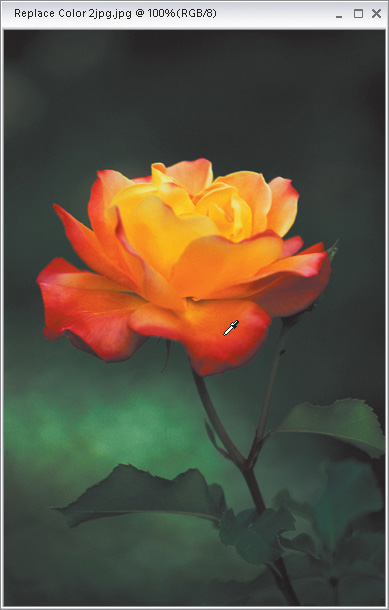
Step Three:
Open another image that has the color you want to use. Alt-click the Color Replacement tool on the color you want to sample within that image. (In this example, I’m sampling the color from another flower.)
Step Four:
Return to the photo you want to colorize. Now paint with the Color Replacement tool using the sampled color.

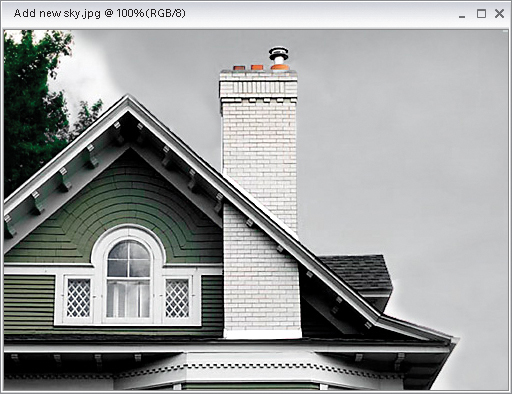
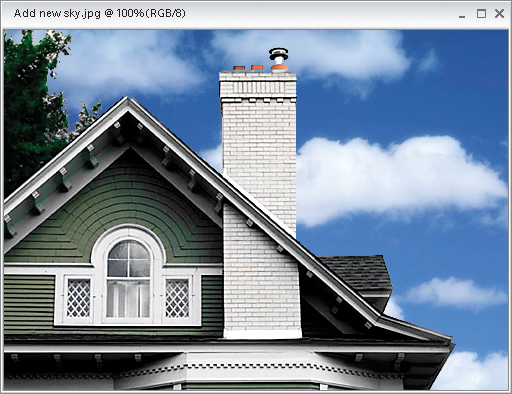
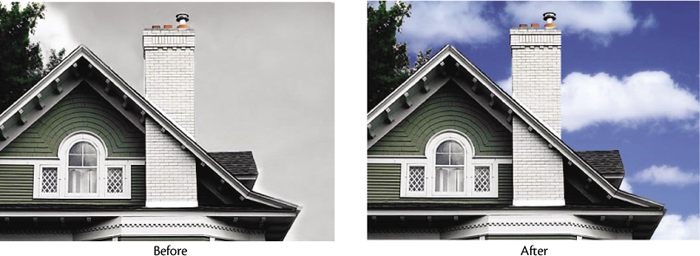
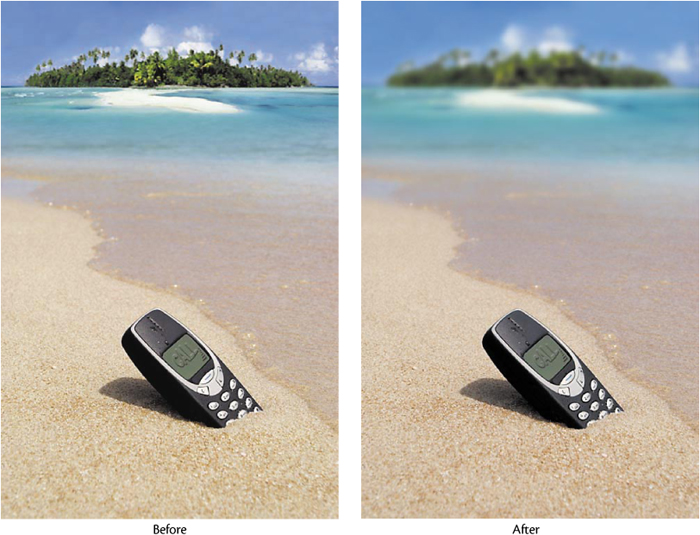
Replacing the Sky
When shooting outdoors, there’s one thing you just can’t count on—the sun. Yet, you surely don’t want to take a photo of your house on a dreary day, or shoot a photo of your car on a gray overcast day. That’s why having the ability to replace a gloomy gray sky with a bright sunny sky is so important. Is it cheating? Yes. Is it easy? You betcha. Do people do it every day? Of course.
Step One:
Open the photo that needs a new, brighter, bluer sky.
BRAND X PICTURES
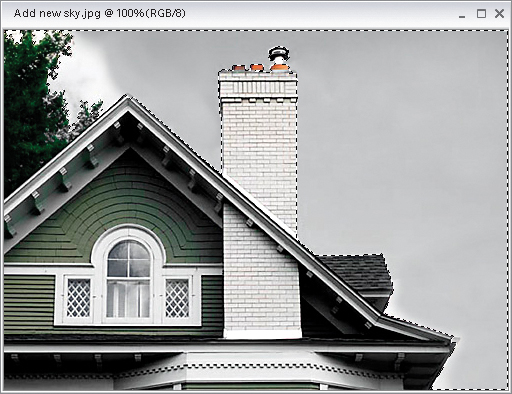
Step Two:
You have to make a selection around the sky. Usually, you can click in the sky area with the Magic Wand tool (W) to select most of it, and then chose Similar from the Select menu to select the rest of the sky—but as usual, it likely selected other parts of the image besides just the sky. So hold the Alt key and use the Lasso tool (L) to deselect any excess selected areas on your image. If needed, hold the Shift key while using the Lasso tool to select any unselected areas of the sky. You can use any combination of selection tools you’d like—the key is to select the entire sky area.
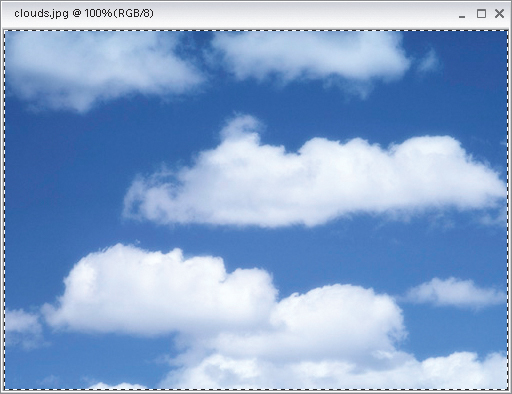
Step Three:
Shoot some nice blue skies and keep them handy for projects like this. Open one of those “blue sky” shots, and then go under the Select menu and choose All to select the entire photo. Then, press Control-C to copy this sky photo into memory.
BRAND X PICTURES
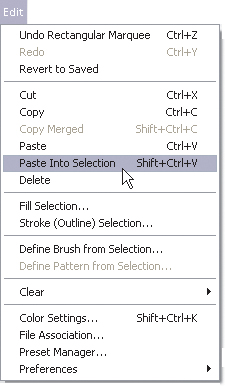
Step Four:
Switch back to your original photo (the selection should still be in place). Create a new layer by clicking on the Create a New Layer icon at the top of the Layers palette, then go under the Edit menu and choose Paste Into Selection. The new sky will be pasted into the selected area in your new layer, appearing over the old sky. Press Control-D to deselect.
Step Five:
If the sky seems too bright for the photo, simply lower the Opacity of the layer in the Layers palette to help it blend in better with the rest of the photo. That’s it—newer, bluer sky.
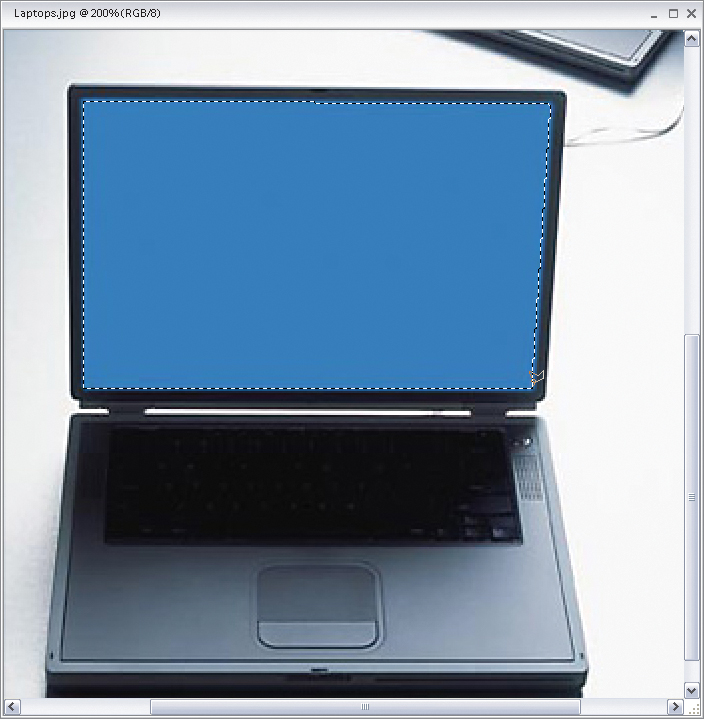
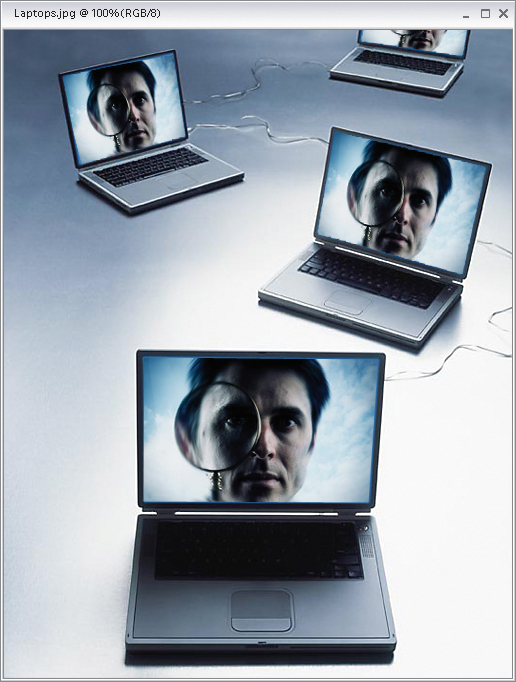
Putting One Photo Inside Another
Putting a photo inside another is a fairly popular collaging technique. In the technique you’re going to do here, you’ll realistically put one image inside another, matching the angles of the photo. Here’s how it’s done.
Step One:
Open the photo that you want to put inside another photo. Press Control-A to put a selection around your entire photo, then press Control-C to copy that photo into memory. Next, open the image that you want the copied photo to appear within.
BRAND X PICTURES
Step Two:
Press Shift-L until you get the Polygonal Lasso tool in the Toolbox (this tool draws perfectly straight selections; if your object doesn’t have straight sides, use another selection tool to create a selection within your image’s object). Click the Polygonal Lasso tool once on the bottom-left corner of your object, and then move your cursor up to the top-left corner and click again (a straight line is drawn between your two clicks). Keep clicking at each corner until you have all sides of the object selected (as shown here).
Step Three:
Now go under the Edit menu and choose Paste Into Selection, and the photo you had in memory will be pasted into your selection. Then press Control-D to deselect. But there’s a problem—the object is likely angled and your photo probably isn’t, so it looks fake. Here’s how to fix it. Press Control-T to bring up the Free Transform command. Hold the Control key, grab the bottom-left corner point, and move it to where it touches the bottom-left corner of your object. You’ll do the same with the other corners—dragging each one to the corresponding corner of your object.
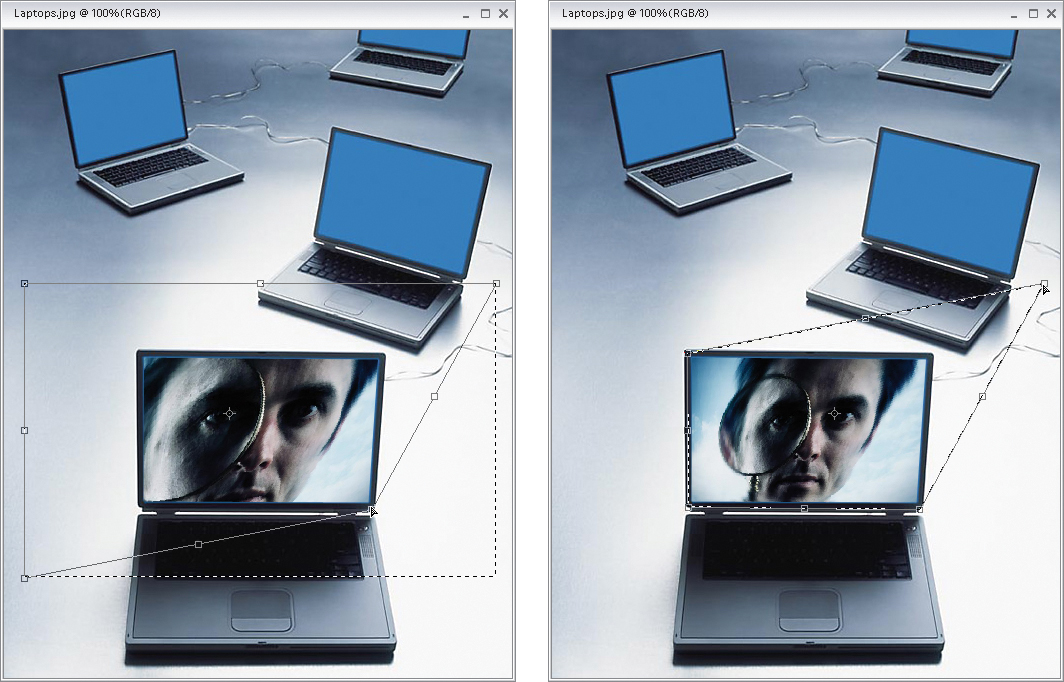
Step Four:
When all four corners are lined up, and your photo has transformed to fit perfectly within the object, press Enter to lock in your changes and complete the effect.
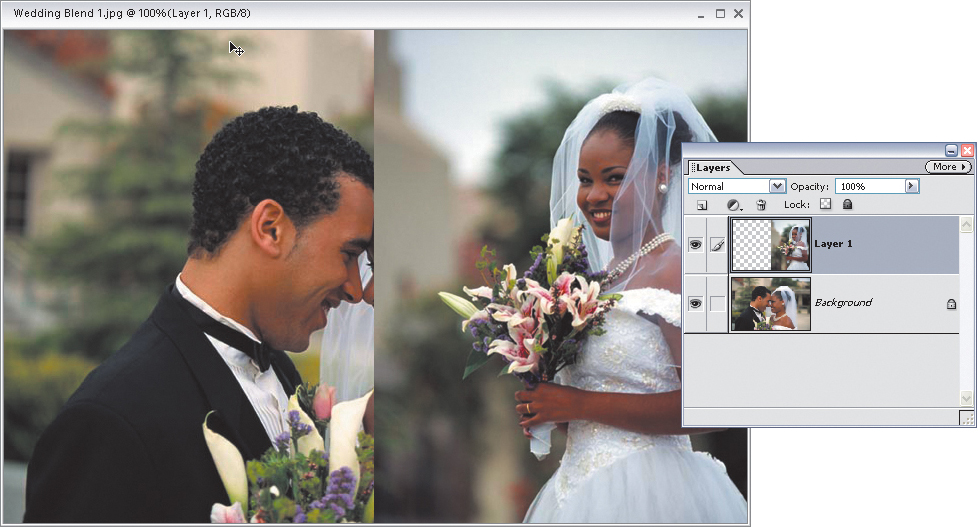
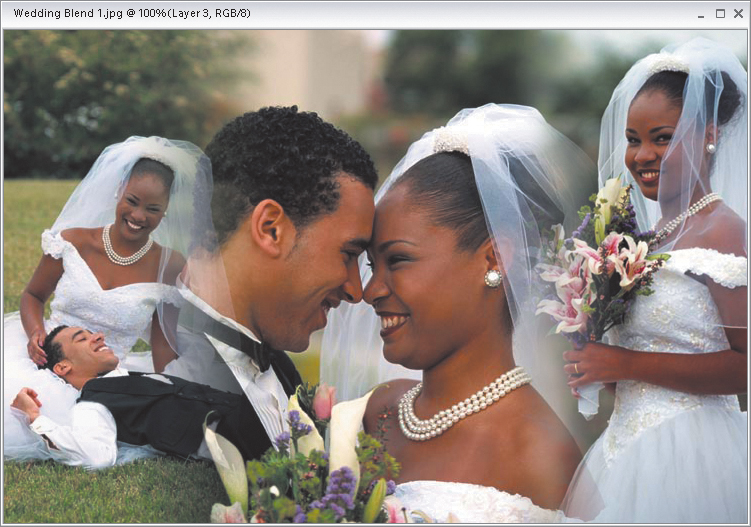
Creating Photo Montages
Here’s a great way to blend any two (or more) photos together to create a photo montage (often referred to as a collage).
Step One:
Open the photo that you want to use as your base photo (this will serve as the background of your collage). Make sure you’re not in Maximize Mode by deselecting it under Window, under Images, and choosing Maximize Mode. Now open the first photo that you want to collage with your background photo.
BRAND X PICTURES
BRAND X PICTURES
Step Two:
Press V to switch to the Move tool, and then click-and-drag the photo from this document right onto your background photo, positioning it where you want it. It will appear on its own layer (Layer 1) in the Layers palette.
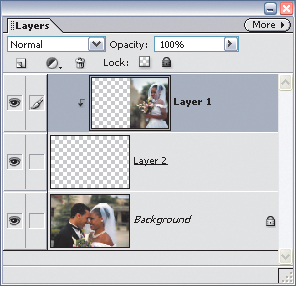
Step Three:
Hold the Control key and at the top of the Layers palette, click on the Create a New Layer icon. This creates a layer directly beneath your current layer. Now, click back on the top layer, then press Control-G to group your photo with the blank layer beneath it. Press the letter D to set your Foreground color to black.
Step Four:
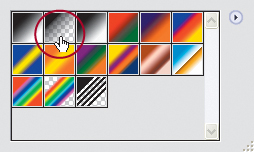
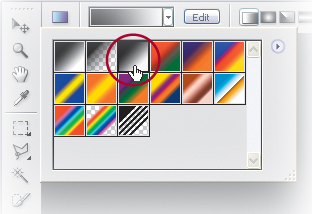
Switch to the Gradient tool by pressing G, and then press Enter to bring up the Gradient Picker. Choose the second gradient in the Picker (this is the Foreground to Transparent gradient).
Step Five:
Click on the middle (blank) layer in the Layers palette to make it active. Click the Gradient tool in the center of your top photo and drag inward toward the center of the document. The point where you first click on the top layer will be at 100% opacity, and the point where you stop dragging will be totally transparent. Everything else will blend in between. If you want to start over—easy enough—just press Control-Z to undo and click-and-drag again. (Be careful: If you drag beyond the image’s border, your Foreground color will appear in the gradient.)
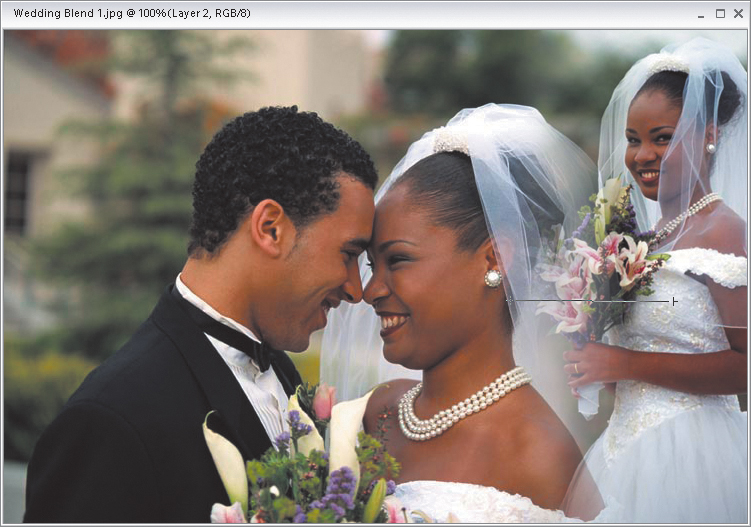
Step Six:
If you want to blend in another photo, click-and-drag that image onto your montage, click on the top layer in the Layers palette, then start again from Step Three. Add as many images as you’d like.
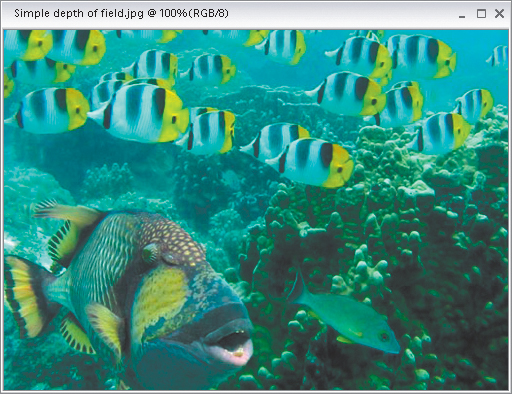
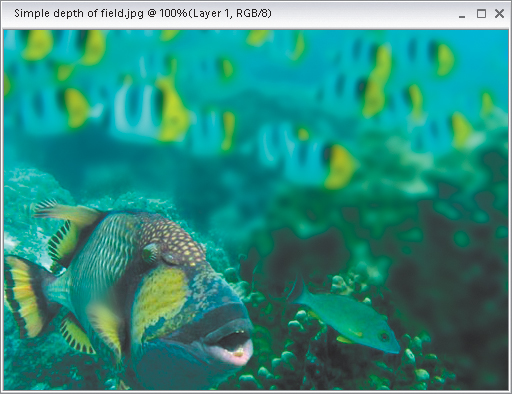
Simple Depth-of-Field Effect
If you want to create a quick depth-of-field effect (where the part of the subject closest to the camera is in sharp focus, and the background is out of focus), I don’t know of a faster, easier way than this.
Step One:
Open the photo that you want to apply the depth-of-field effect to. Press Control-J to duplicate the Background layer (which is named “Layer 1”).
BRAND X PICTURES
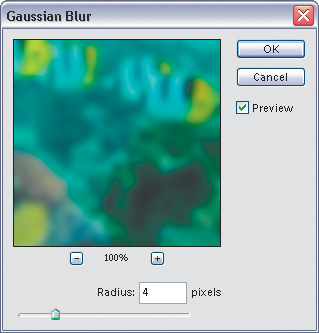
Step Two:
Go under the Filter menu, under Blur, and choose Gaussian Blur. When the dialog appears, change the Radius to 4 pixels and click OK to put a blur over the entire image.
Step Three:
Press the E key to switch to the Eraser tool and choose a large, soft-edged brush from the Brush Picker (which is found by clicking the Brush Preset icon in the Options Bar). Start erasing over the parts of the image that appear in the foreground. Erasing on this blurred layer reveals the original unblurred image on the Background layer.

Step Four:
By leaving these areas sharp, while leaving the background areas still blurry, it creates a simple depth-of-field effect as if you had shot it that way with a camera.

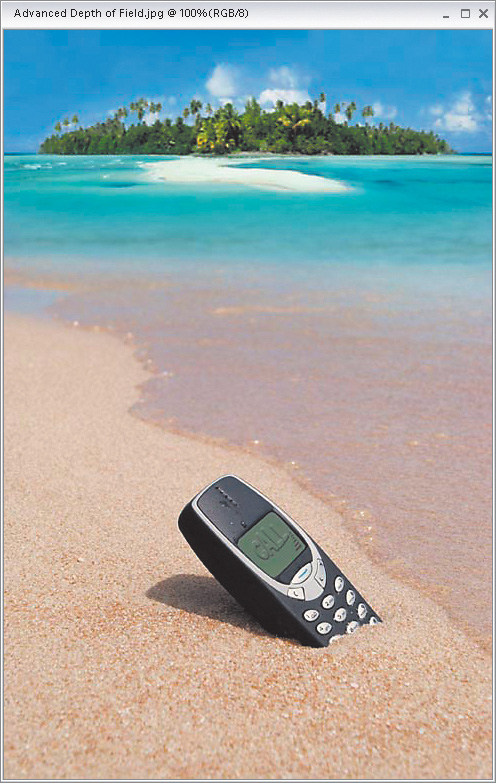
Advanced Depth of Field
In the previous technique, you learned how to create a quick depth-of-field effect using the Gaussian Blur filter. This technique uses the Gaussian Blur filter as well, but I’ll show you a way that you can create a blur that graduates smoothly from the in-focus area to the out-of-focus area.
Step One:
Open the photo to which you want to apply a depth-of-field effect.
BRAND X PICTURES
Step Two:
You’re going to need to create a layer mask for the Gaussian Blur filter to use, but Elements doesn’t really have a layer mask feature like Photoshop CS—but we have a sneaky way around that. Go to the Layers palette and choose Levels from the Create Adjustment Layer pop-up menu. When the Levels dialog appears, don’t do anything, just click OK.
Step Three:
When you create an adjustment layer, a little layer mask is tied to it, and that’s what we’re going to use to create our mask. Press G to switch to the Gradient tool, then press Enter to open the Gradient Picker. When it appears, choose the Black to White gradient (the third one in the Picker).
Step Four:
Take the Gradient tool and click it in the area of the photo that you want to remain in focus (the part that’s the closest to the camera) and drag it to the part of the photo that you want to appear out of focus (toward the background of the image).
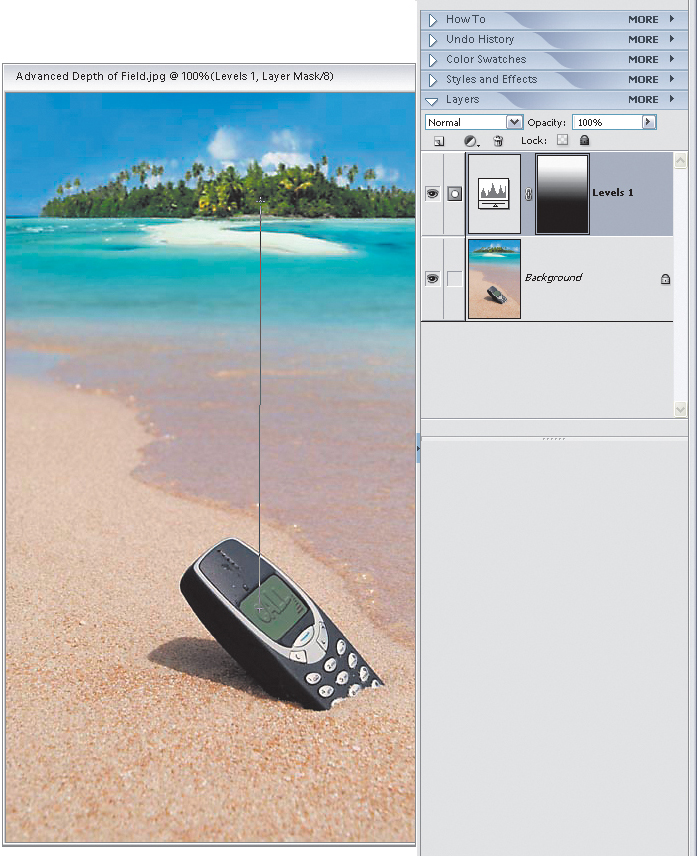
Step Five:
Now you’ll need to make a selection of that gradient (it’s easier than it sounds). Go to the Layers palette, hold the Control key, and click directly on the layer mask thumbnail (you’ll see the gradient you created in that thumbnail) that appears to the immediate right of your Levels adjustment layer thumbnail. This loads your gradient as if it were a selection. Note: It will only appear as a selection on one side of your image, and that’s okay.
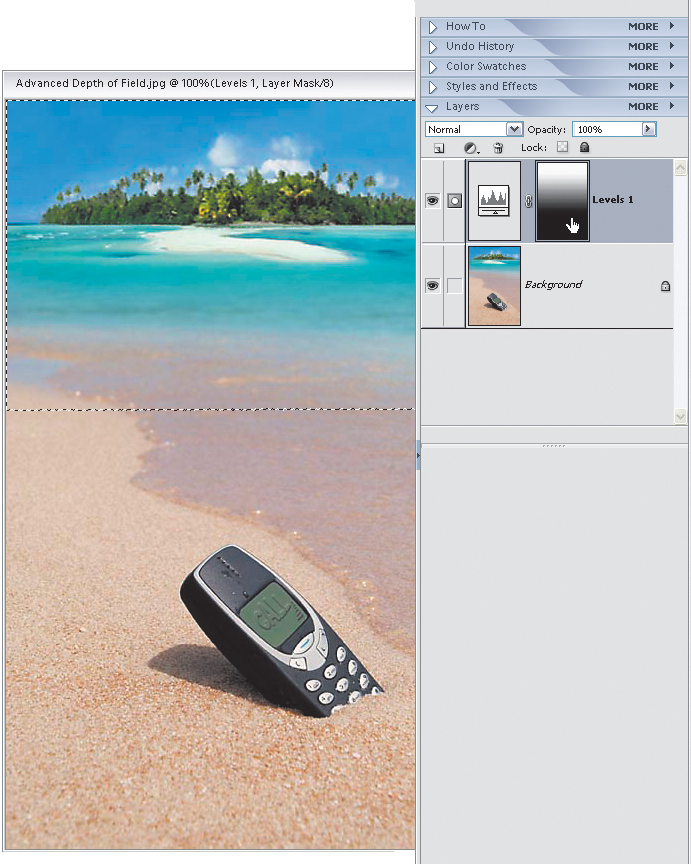
Step Six:
Okay, you’ve done all the hard work—the rest is easy. In the Layers palette, click on your Background layer, then go under the Filter menu, under Blur, and choose Gaussian Blur to bring up the Gaussian Blur dialog. Drag the Radius slider to the right to increase the amount of blur (I used a Radius amount of 4 in this example).
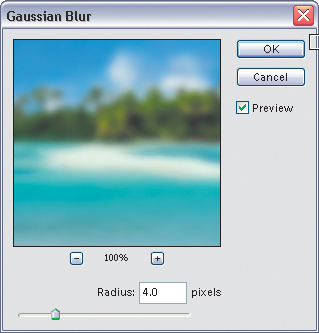
Step Seven:
When the preview looks good to you, click OK to apply your depth-of-field effect. Now deselect by pressing Control-D. This technique makes the Gaussian Blur move smoothly from the in-focus area to the out-of-focus area.

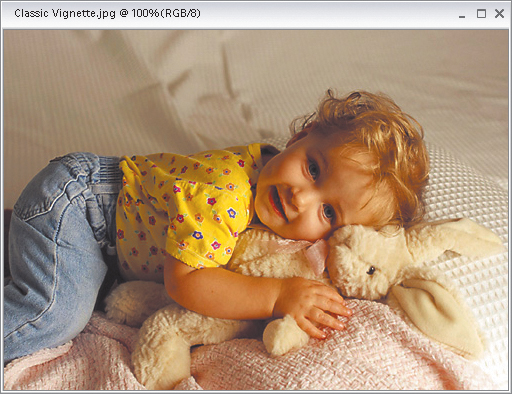
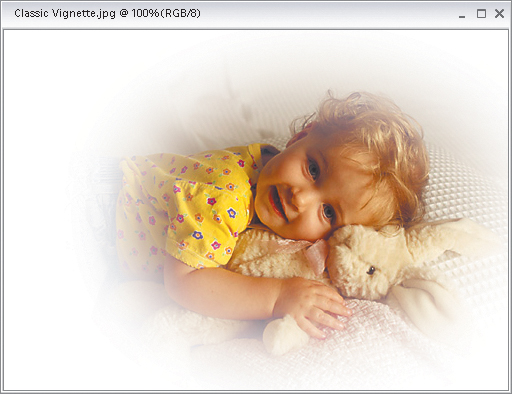
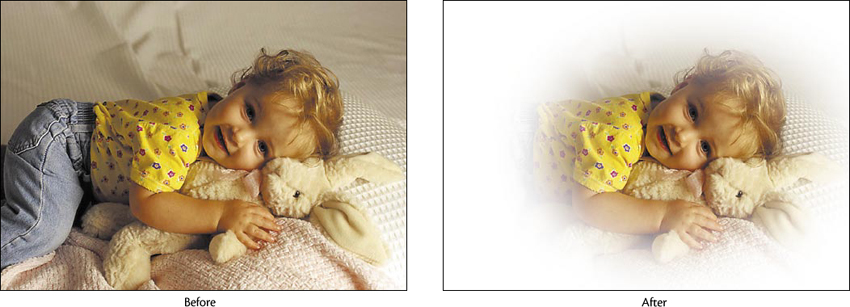
Creating the Classic Vignette Effect
Here’s how to create the classic soft-edged vignette that was originally made popular decades ago by portrait photographers, and still remains popular for wedding photos and portraits of children. A rectangular version is often used for photos used in print ads of high-priced items such as fine homes, jewelry, perfume, etc.
Step One:
Open the photo to which you want to apply the classic vignette effect.
BRAND X PICTURES
Step Two:
Press Shift-M until you get the Elliptical Marquee tool from the Toolbox and draw an oval-shaped selection around the part of the photo you want to remain visible.

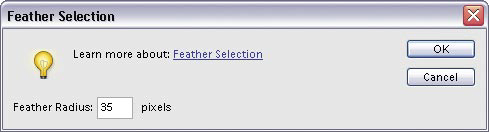
Step Three:
To soften the edge of your selection, go under the Select menu and choose Feather. When the Feather Selection dialog appears, enter 35 or more pixels (the higher the number, the softer the edge) and click OK.
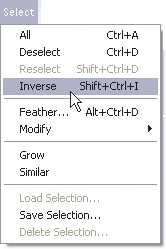
Step Four:
Here’s the thing—you have your subject in a circular selection, and that’s the part you want to keep intact. However, you want everything else deleted, so go under the Select menu and choose Inverse. Doing this selects everything except the area you want to keep intact.
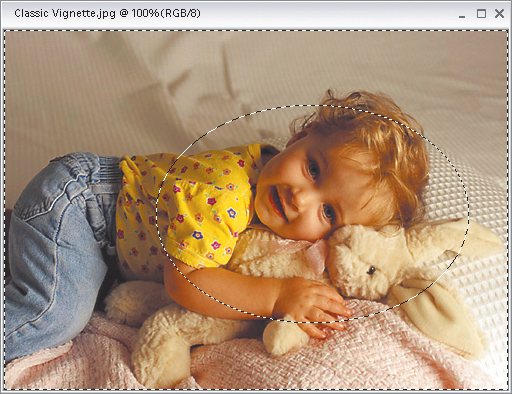
Step Five:
Now, press Backspace to remove the background areas, then press Control-D to deselect. Because you feathered the oval in Step Three, the edges are soft, completing the vignette effect.
Tip
If you’d like to use this soft-edged vignette for collaging with other photos, you’ll need the white areas outside the edge to be transparent and not solid white. To do that, just before Step Two, double-click on the Background layer in the Layers palette. A dialog will appear; just click OK to change your Background layer to Layer 0, and then go on to Step Two.
Sepia Tone Effect
Here’s another technique that was quite popular in the early days of photography. Today, it’s normally used either as a special effect, or in photo-restoration projects where you sometimes have to remove the bad sepia tone from the original (during the tonal correction process) and then add it back in when your restoration is complete.
Step One:
Open the photo to which you want to apply the sepia tone effect.
BRAND X PICTURES
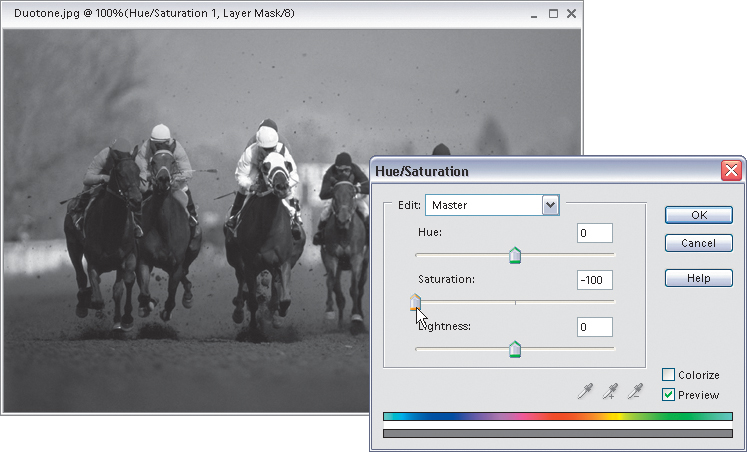
Step Two:
Go under the Enhance menu, under Adjust Color, and choose Adjust Hue/Saturation. When the Hue/Saturation dialog appears, drag the Saturation slider all the way to the left to remove all the color from the image, making it look like a black-and-white photo. Click OK.
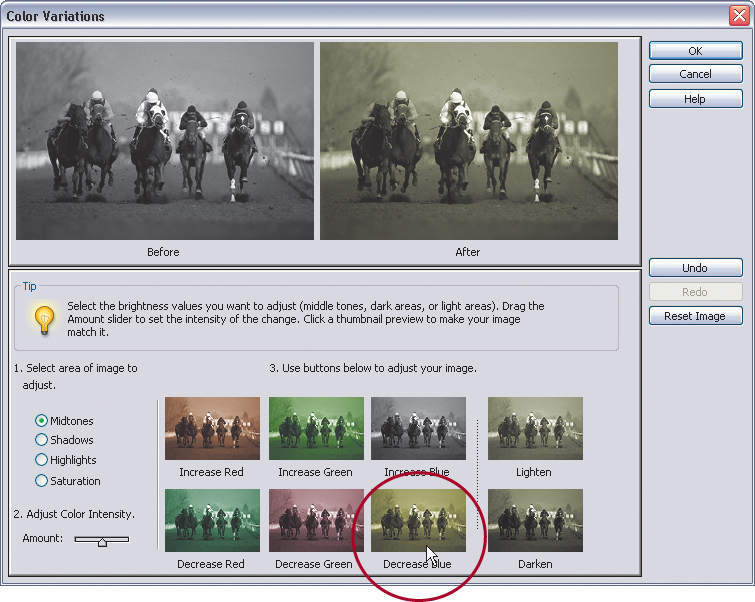
Step Three:
Go under the Enhance menu, under Adjust Color, and choose Color Variations. This dialog shows you what your color photo would look like by adding or subtracting different colors, and you do so by clicking on the thumbnails at the bottom of the dialog. However, in this case, there is no color in the photo, so clicking on a swatch will actually add color (even if it says it’s decreasing it). So start by clicking once on the tiny thumbnail preview named “Decrease Blue.” As you can see from the After preview at the top of the dialog, it added in a bit of a sepia tone effect to our photo.
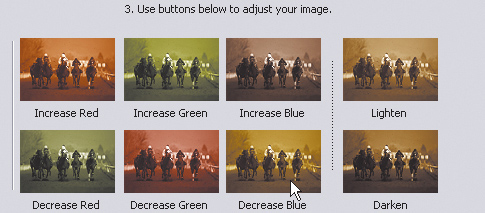
Step Four:
The rest is easy—just click on any of the thumbnail previews at the bottom of dialog that look more like a sepia tone than what you already have. Keep an eye on the preview at the top of the dialog to see how you’re doing. Click on the Lighten and/or Darken thumbnails to adjust the color. Note: If you click a swatch and it doesn’t look right, there’s an Undo button on the right side of the dialog. Just click it and it reverts your swatch clicking (known as “swatch-clickination” in some circles).
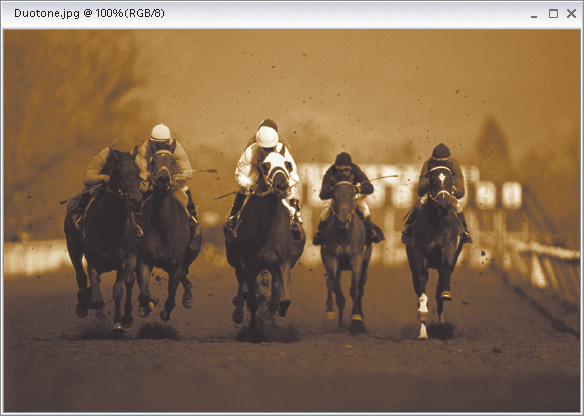
Step Five:
Click OK and the sepia tone effect is applied to your photo.

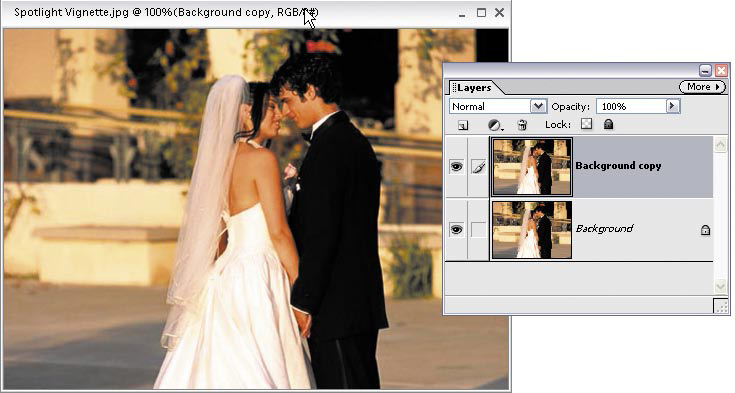
Creating a Photo Backdrop
This is a quick technique for creating a traditional photographic background (a muslin, a backdrop, etc.) that you can composite portraits into. This technique is pretty handy if you need to take a snapshot of a person and make it look like a studio shot.
Step One:
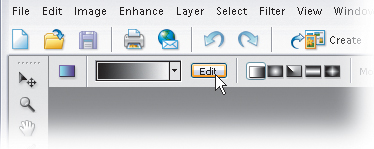
Start by creating a custom gradient that will form the basis of the back-drop. Press the G key to switch to the Gradient tool, then in the Options Bar click on the Edit button.
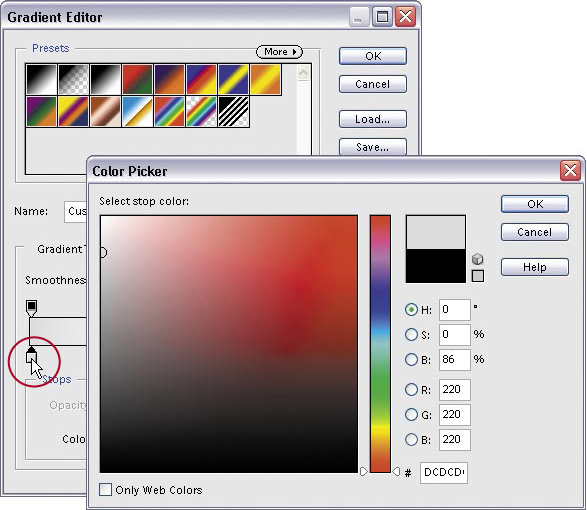
Step Two:
When the Gradient Editor appears, you’re going to create a simple custom gradient that goes from light gray to dark gray. Here’s how: Double-click on the bottom far-left color stop underneath the gradient ramp to bring up the Color Picker. When the Color Picker appears, to create a light gray color, enter these figures: R=220, G=220, and B=220, and then click OK to assign that gray color for the left side of your gradient.
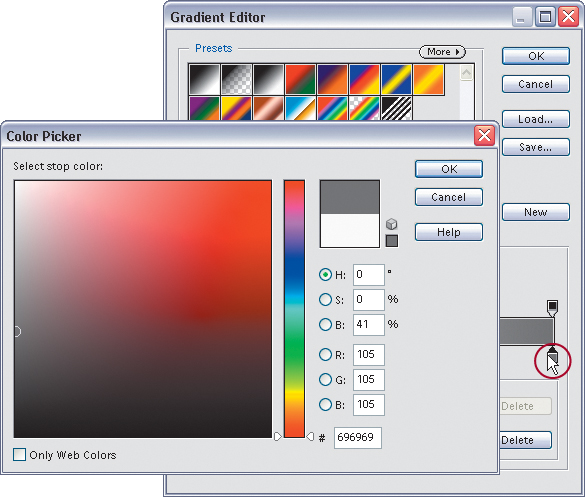
Step Three:
Now double-click the color stop on the bottom-right side of the gradient ramp, and this time you’ll want to choose a dark gray, so enter R=105, G=105, and B=105, then click OK. Save your gradient for future use by clicking on the New button in the Gradient Editor, then click OK to save this gradient.
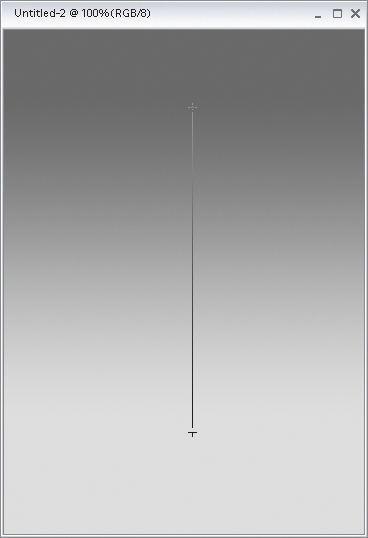
Step Four:
Create a new document (go under File, under New, and choose Blank File) in RGB mode (the one shown here is a 5×7″). Take the Gradient tool, click near the bottom of your image area and drag upward. Make sure the lighter gray appears at the bottom of the image. Next, press the letter D to set your Foreground color to black.
Step Five:
At the top of the Layers palette, click on the Create a New Layer icon to create a new blank layer. Then, go under the Filter menu, under Render, and choose Clouds. The effect is way too intense, so to tone it down and have it blend in with the background, lower the Opacity of this layer to 20% in the Layers palette.
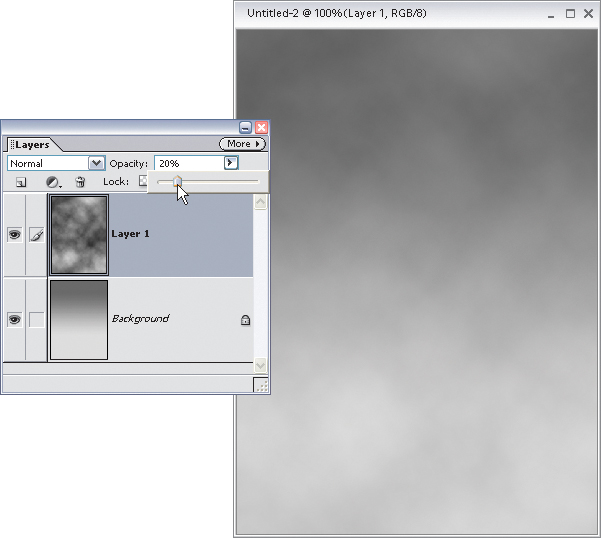
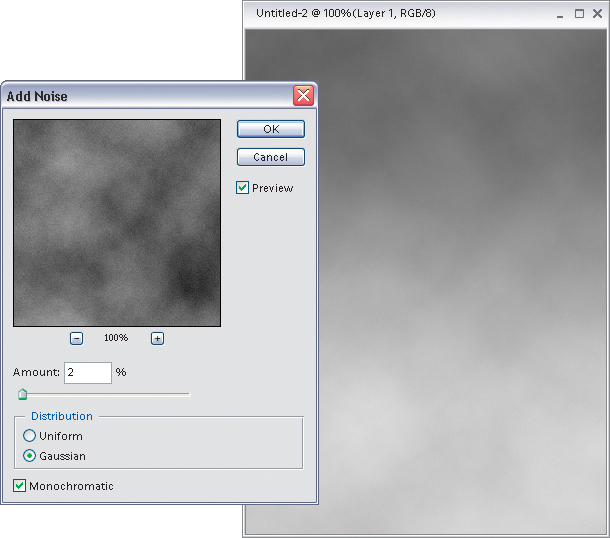
Step Six:
To keep the background from looking too synthetic, we’ll add a little “noise” to give it some grain. Go under the Filter menu, under Noise, and choose Add Noise. Lower the Amount to 2%, set the Distribution to Gaussian, and then click on the Monochromatic checkbox. Then click OK to add this slight bit of noise to the background.
Step Seven:
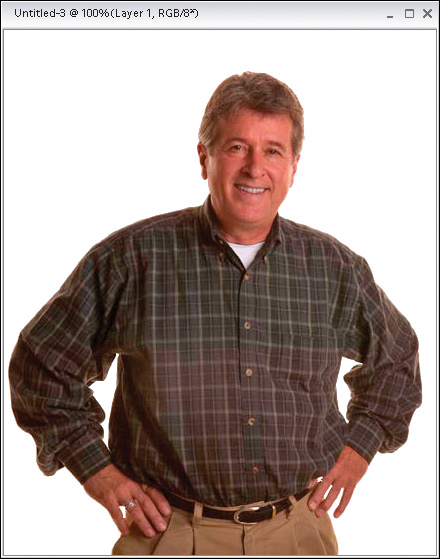
Open an image of a person (an object, etc.) that you want to put on the new background. Then use any selection tool you’d like to draw a selection around the person. (For instance, I clicked the Magic Wand tool [W] on the white background, and then I went to the Select menu and chose Inverse.)
BRAND X PICTURES
Step Eight:
Now, switch to the Move tool by pressing the V key and drag-and-drop the person from his photo onto your new background.
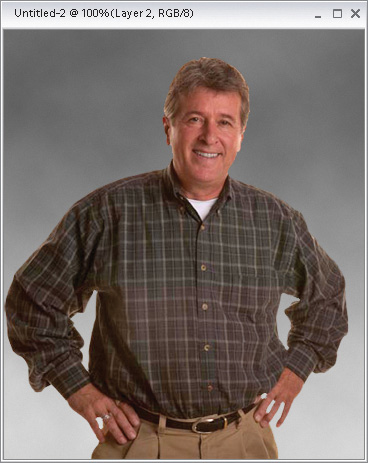
Step Nine:
In the Layers palette, Control-click on the Create a New Layer icon to create a new blank layer beneath your person’s layer. Press Shift-M until you get the Elliptical Marquee tool. Then, hold the Shift key again, and draw a circular selection around the person’s head. Press the letter X to set your Foreground color to white, then fill your selection with white by pressing Alt-Backspace.
Step Ten:
Press Control-D to deselect your circle. Go under the Filter menu, under Blur, and choose Gaussian Blur. You’re going to use this filter to soften the edges of the white circle to make it look like a spotlight aiming at the gray background. On a 72-ppi photo, choose a Radius amount of approximately 30. (On a high-resolution, 300-ppi image, try 60 or 70.) Click OK when the edges look nice and soft.
Step Eleven:
To help the spotlight blend into the background more realistically, lower the Opacity of this layer to around 70% in the Layers palette.
Step Twelve:
You can use the background as-is for a realistic looking backdrop, or you can add some color by switching back to the cloud layer in the Layers palette, going under the Enhance menu, under Adjust Color, and choosing Adjust Hue/Saturation. When the dialog appears, click the Colorize checkbox in the lower right-hand corner, then move the Hue slider to the color you’d like. If the intensity of the color isn’t right, drag the Saturation slider until it looks good to you. Click OK to apply a color to the background.
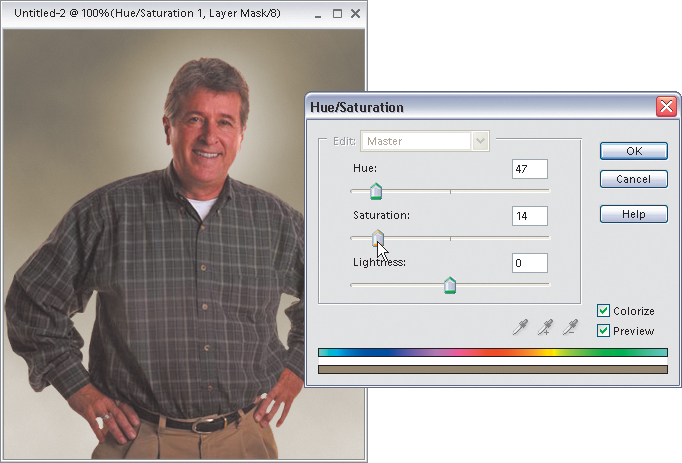
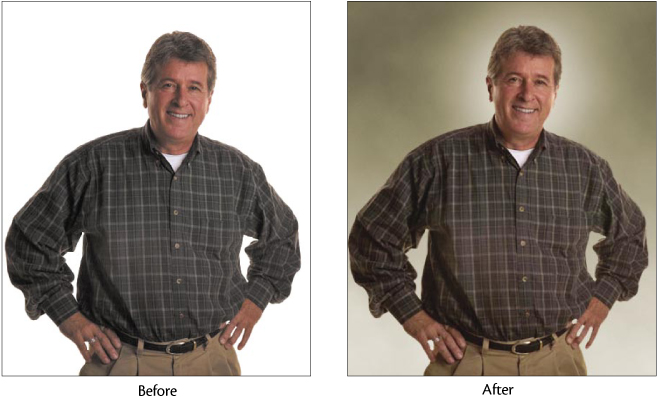
Photo to Sketch in 60 Seconds Flat
I learned this technique from Rich Harris, the former creative guru over at Wacom Technologies. He sent me a bunch of PDFs with some special effects he had come up with, and this one just blew me away, so I asked Rich if I could include it in the book. It does the best job I’ve seen yet of converting a photo into a color pencil sketch.
Step One:
Open the photo you want to convert into a color sketch. Duplicate the Background layer by going to the Layer menu, under New, and choosing Layer via Copy (or by pressing Control-J). Hide this duplicate layer (Layer 1) by going to the Layers palette and clicking on the Eye icon to the left of this layer. Now click on the Background layer.
BRAND X PICTURES
Step Two:
Press Shift-Control-U to remove the color from the Background layer (technically, this is called “desaturating,” but in Enhance it’s the Remove Color command, which is found under the Enhance menu’s Adjust Color submenu). Then press Control-J to duplicate the Background layer (this copied layer is titled “Background copy”).
Step Three:
Press Control-I to invert the photo (giving you a photo negative look).
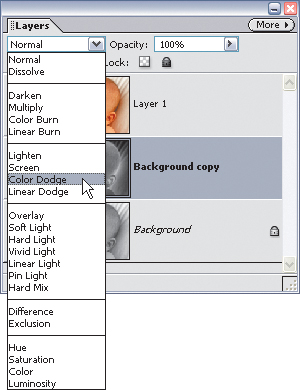
Step Four:
Go to the Layers palette and change the layer blend mode for this layer to Color Dodge. This turns your photo white (it looks like a blank document, but in the next step, you’ll bring back the photo).
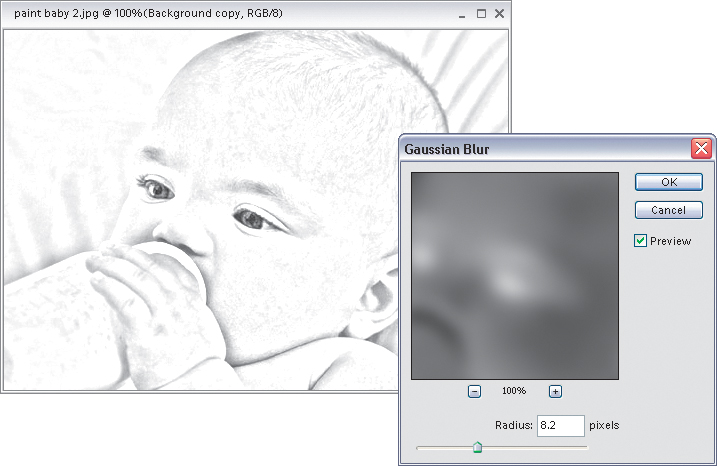
Step Five:
Go under the Filter menu, under Blur, and choose Gaussian Blur. When the dialog appears, drag the Radius slider all the way to the left, and then slowly drag it back to the right, and as you do your sketch will begin to appear. Click OK when the lines look dark, and the photo doesn’t look too blurry.
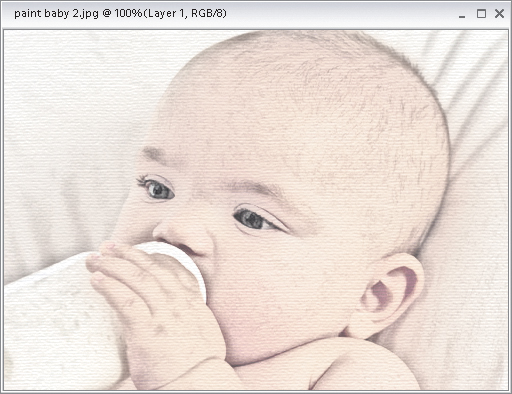
Step Six:
Go to the Layers palette and make the top layer (the color layer) visible again by clicking in the empty box where the Eye icon used to be. Now lower the Opacity of this layer to 20% to bring back a hint of the original color of the photo.

Step Seven:
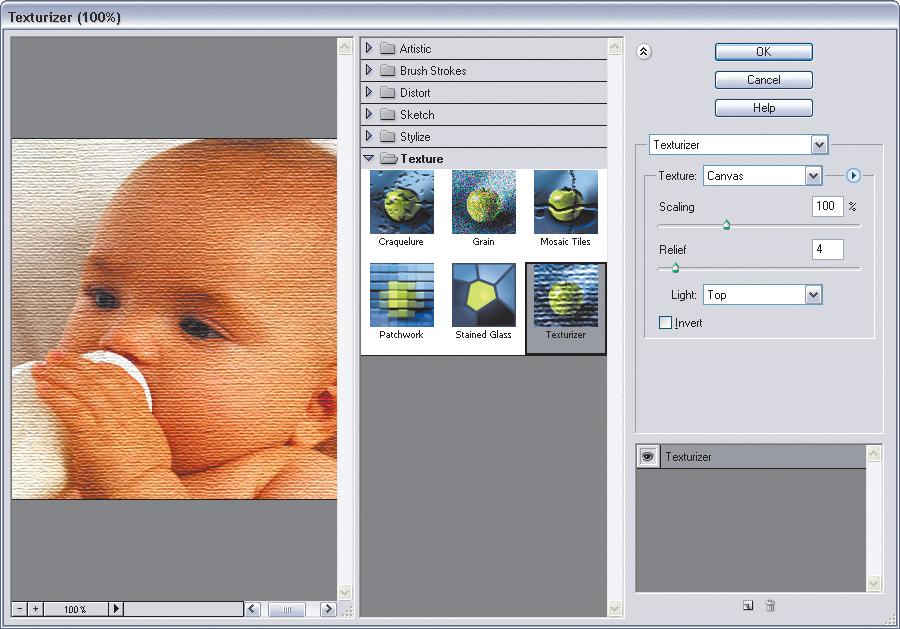
To add some texture to your sketch, go under the Filter menu, under Texture, and choose Texturizer. When the Texturizer dialog appears, you’ll use the default settings (which are: Texture pop-up menu set to Canvas, Scaling set at 100%, Relief at 4, and Light set to Top). Click OK to apply your canvas texture. Now press Control-F to apply the filter again to make the effect a little more intense.

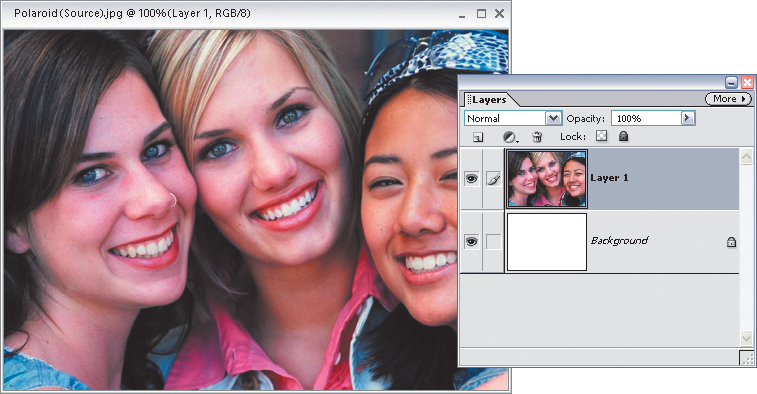
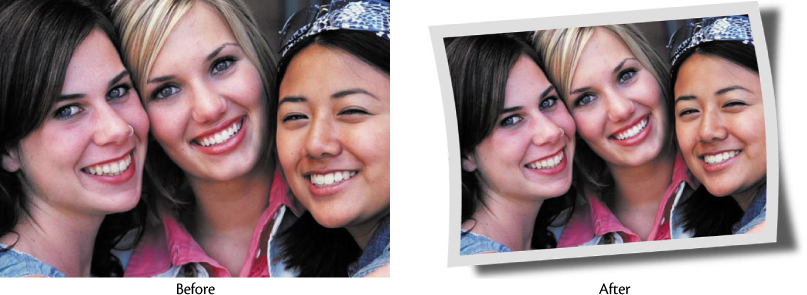
Getting the Polaroid™ Look
This is a quick technique that lets you turn any photo into what looks like a Polaroid™ snapshot. This is an ideal effect to apply when you really want that “scrapbook” feel, or you’re looking for that spontaneous “my-family-on-vacation” feel. Give this one a try—it’s much, much easier than it looks.
Step One:
Open the photo you want to turn into a Polaroid. Press Control-A to put a selection around the entire image. Go under the Layer menu, under New, and choose Layer via Cut to remove the photo from the Background layer and put it on a separate layer (Layer 1) above the background. Now press D to set your colors to the default black and white.
BRAND X PICTURES
Step Two:
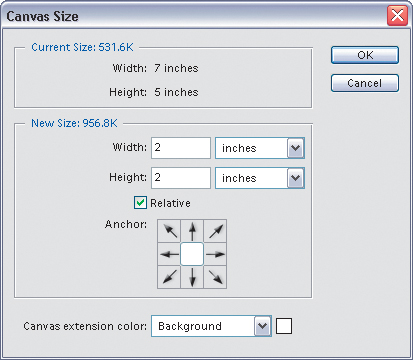
To create this effect, you’ll need a little more working room around your photo, so go under the Image menu, under Resize, and choose Canvas Size. When the Canvas Size dialog appears, click the Relative checkbox, then add at least 2 inches of space to both the Width and Height. Choose Background in the Canvas Extension Color pop-up menu, and click OK.
Step Three:
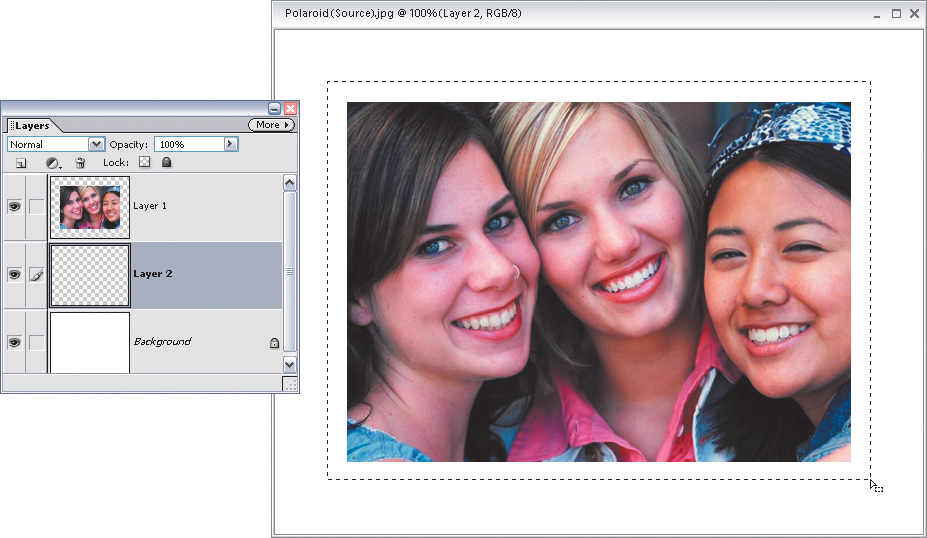
Create a new blank layer directly beneath your current layer by Control-clicking on the Create a New Layer icon at the top of the Layers palette (the new layer will be titled “Layer 2”). Press the M key to switch to the Rectangular Marquee tool, and on this layer draw a selection that’s about a ½-inch larger than your photo on all sides. This will act as the border for your Polaroid image.
Step Four:
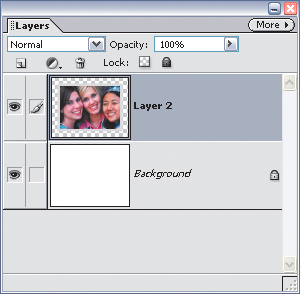
Click on the Foreground color swatch in the Toolbox, choose a very light gray in the Color Picker (I used R=232, G=232, B=232), and then fill your selection with this light gray by pressing Alt-Backspace. Now you can deselect by pressing Control-D. In the Layers palette, click on your top layer (your photo layer) and press Control-E to combine (merge) your photo with the gray rectangle layer below it, creating just one layer.
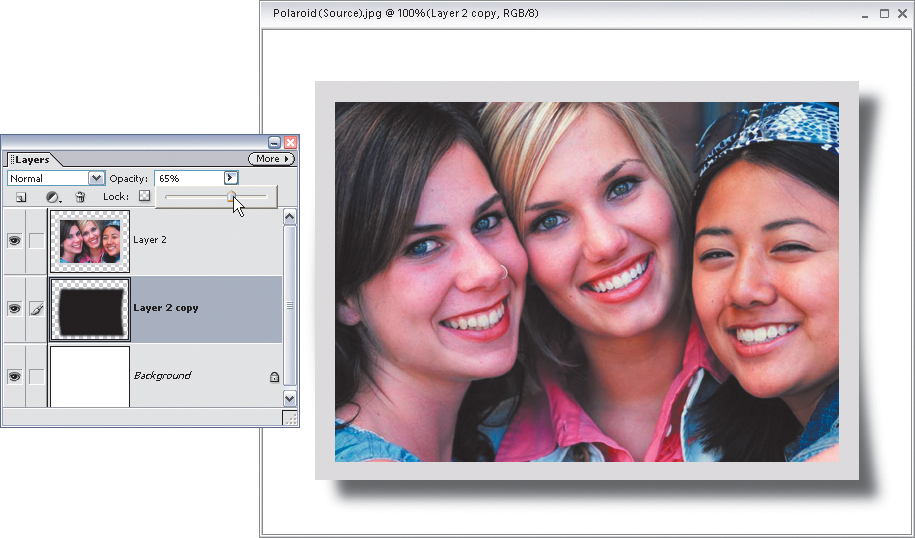
Step Five:
Make a duplicate of this merged layer by dragging it to the Create a New Layer icon at the top of the Layers palette (this copied layer will be titled “Layer 2 copy”). Press the D key to set your Foreground color to black. Then, press Shift-Alt-Backspace to fill your copied layer with black. Now, in the Layers palette, drag the black layer directly beneath your photo layer. You’re going to “bend” this black-filled layer and use it as the shadow for the Polaroid.
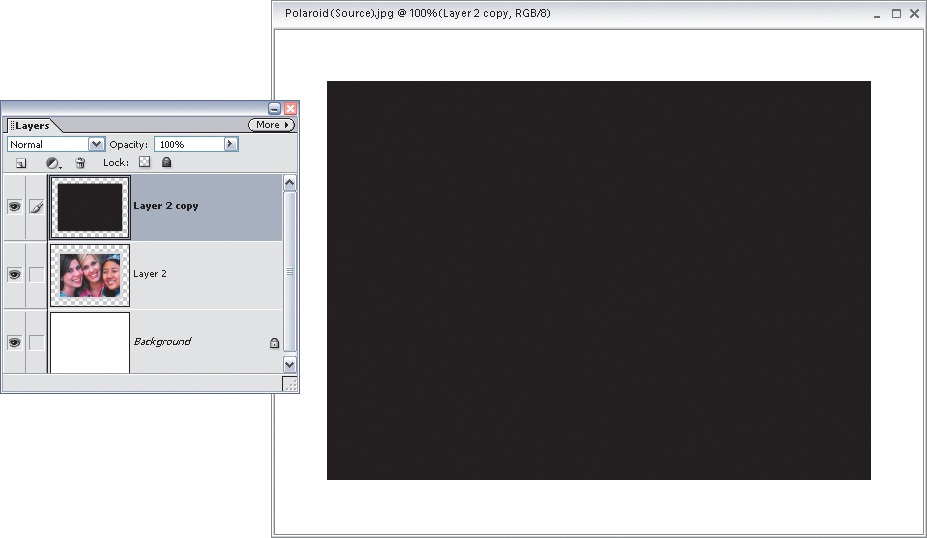
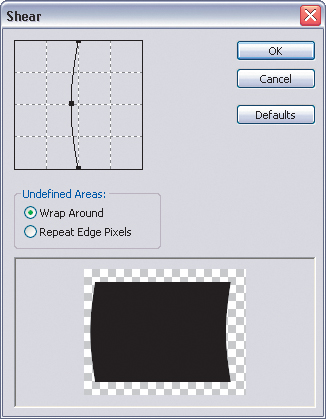
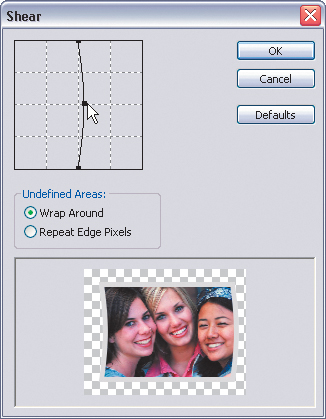
Step Six:
Go under the Filter menu, under Distort, and choose Shear. When the Shear dialog appears, click on the center of the line that appears at the center of the grid. This adds a center point to the line. Click-and-drag this point to the left. The bottom of the dialog shows a preview of how your shear will look. When it looks good to you, click OK.
Step Seven:
With the “shadow” layer still active in the Layers palette, press the V key to switch to the Move tool. Then drag this black, sheared layer directly to the right until the corners are peering out, giving the impression that the Polaroid’s shadow is bent.
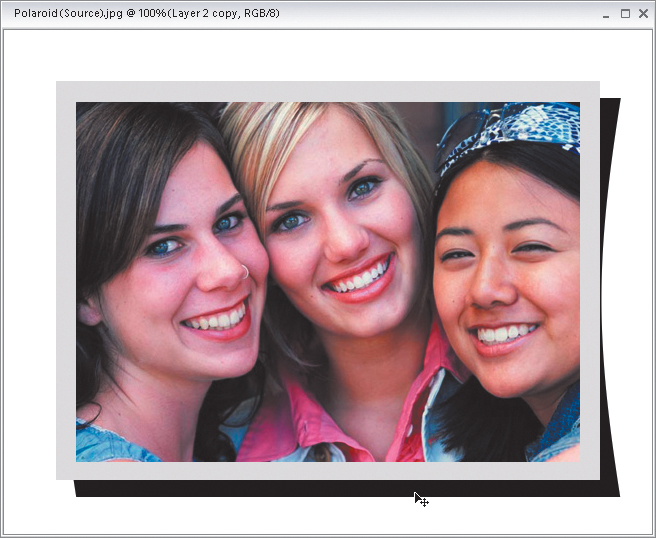
Step Eight:
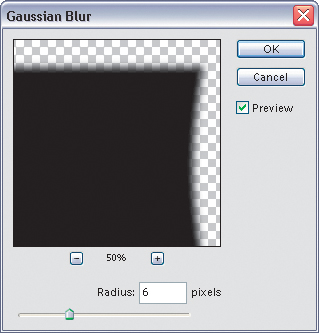
To soften the edges of your shadow (and make them look, well...shadow-like), go under the Filter menu, under Blur, and choose Gaussian Blur. Enter a Radius of 6 and click OK (enter a Radius of 14 for high-res, 300-ppi images).
Step Nine:
Now that the shadow is soft, you’ll need to lower its opacity to make it appear more subtle. Go to the Layers palette and lower the Opacity setting to around 65%. (You can go lower if you like—it’s up to you.) Now that your shadow is finished, to make the effect look more realistic, you’ll have to bend the edges of the photo itself.
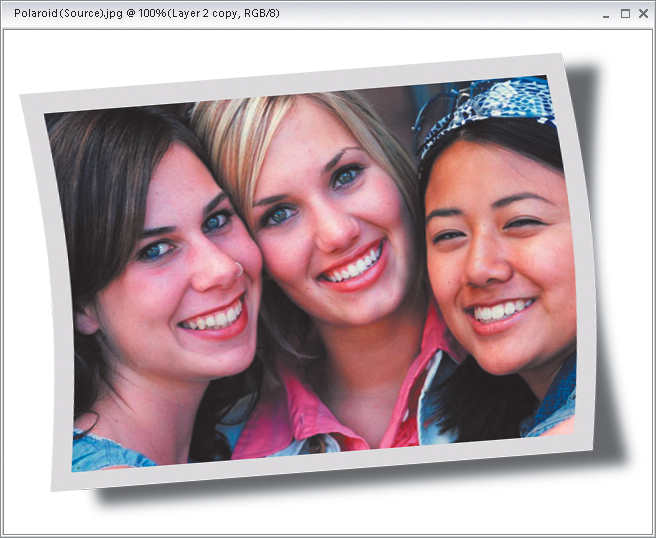
Step Ten:
In the Layers palette, click on your photo layer (Layer 2) to make it active. Then, go under the Filter menu, under Distort, and choose Shear. When the Shear dialog appears, it will still have the last settings you applied in the grid. Click-and-drag the center point on the line to the right to bend your photo in the opposite direction of the shadow. When it looks good to you, click OK.
Step Eleven:
Merge the shadow layer and the photo layer into one layer by pressing Control-E. Then, press Control-T to bring up the Free Transform bounding box. Move your cursor outside the bounding box to the right, then click-and-drag upward to rotate the Polaroid. Press Enter to lock in your transformation, giving you the final effect.
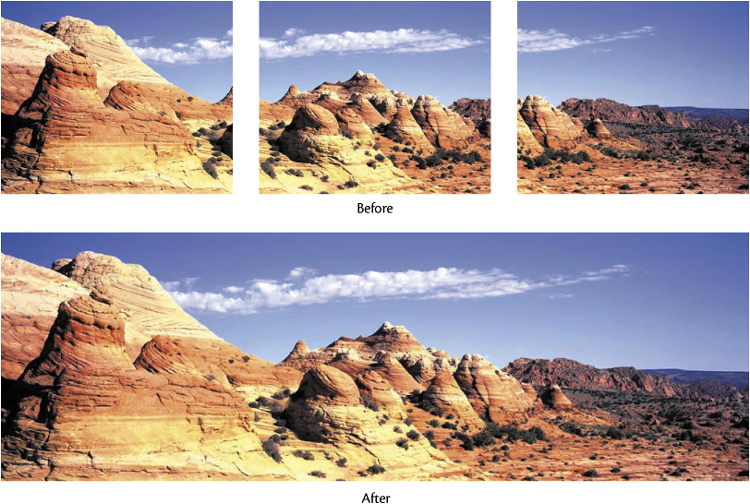
Automated Pano Stitching with Photomerge
If you’ve taken the time to get your pano set up right during the shoot (in other words, you used a tripod and overlapped the shots by about 15 to 20% each), then you can have Elements 3’s Photomerge feature automatically stitch your panorama images together. If you handheld your pano shoot, you can still use Photomerge: It’s just going to be much more manual with you doing most of the work rather than Elements doing it for you.
Step One:
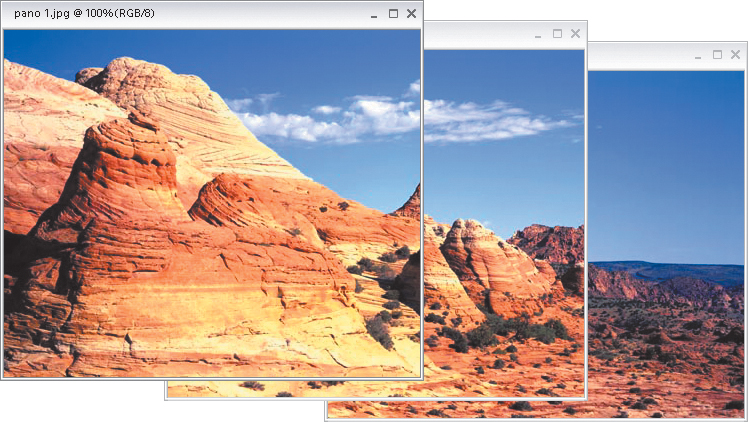
Open the photos that you want Photomerge to stitch together as one panoramic image (you can also open individual images or a folder of images directly from within the Photomerge dialog if you like). In the example shown here, I had three shots already open in Elements.
BRAND X PICTURES
Step Two:
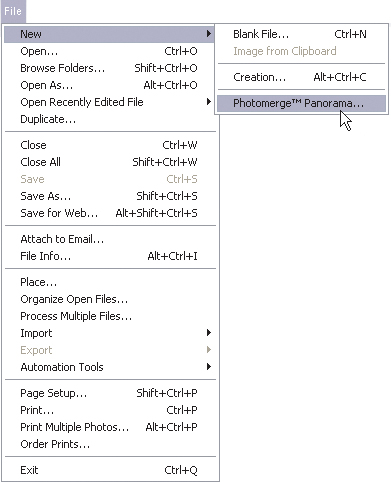
Go under the File menu, under New, and choose Photomerge Panorama.
Step Three:
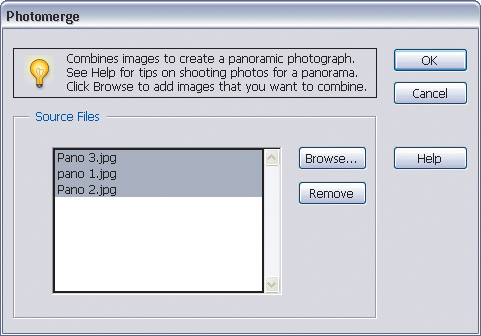
When you choose Photomerge, a dialog appears asking which files you want to combine into a panorama. Any files you have open will appear in the window, or you can click the Browse button and navigate to the photos you need to open. Control-click to select individual files in the Open dialog or if the files are contiguous, click on the first file, press-and-hold the Shift key, then click on the last file. Now click Open and then click OK in the Photomerge dialog.
Step Four:
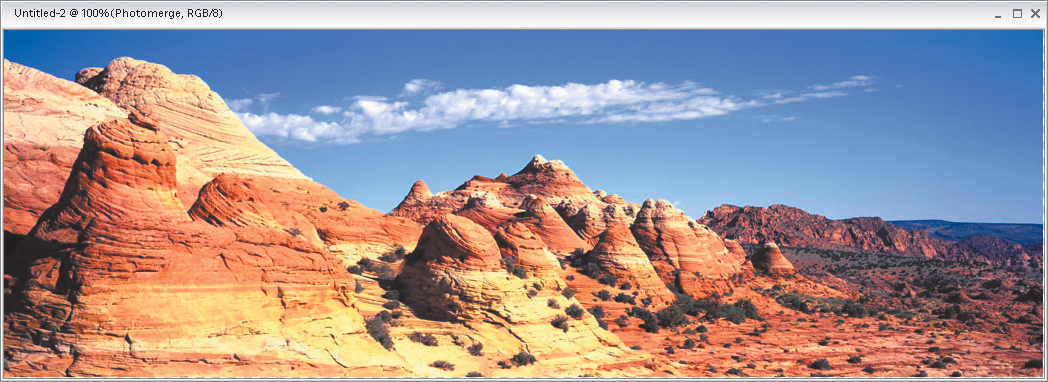
If your pano images were shot correctly (as I mentioned in the introduction of this technique), Photomerge will generally stitch them together seamlessly. Note: By default, Photomerge creates a flattened image, but if you want a layered file instead (great for creating panoramic video effects) turn on the Keep as Layers checkbox on the right-hand side of the dialog.

Step Five:
Click OK and your final panorama will appear as one image. This is what we call the “best-case scenario,” when you’ve shot the panos on a tripod and overlapped them just like you should so Photomerge had no problems and did its thing right away. It was perfect the first time. But you know, and I know, life just isn’t like that.
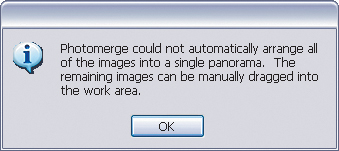
Step Six:
More likely what you’ll get (especially if you handheld your camera or didn’t allow enough overlap) is this warning dialog that lets you know that Photomerge “ain’t gonna do it for you” (that’s a technical phrase coined by Adobe’s Alabama tech office). In other words—it’s up to you.
Step Seven:
Once you click OK in that warning dialog, Photomerge will at least try to merge as many segments together as possible. The segments it couldn’t merge will appear in the “Lightbox” (that horizontal row across the top). Although Photomerge didn’t do all the work for you, it still can help—just make sure the Snap to Image checkbox on the right-hand side is turned on.
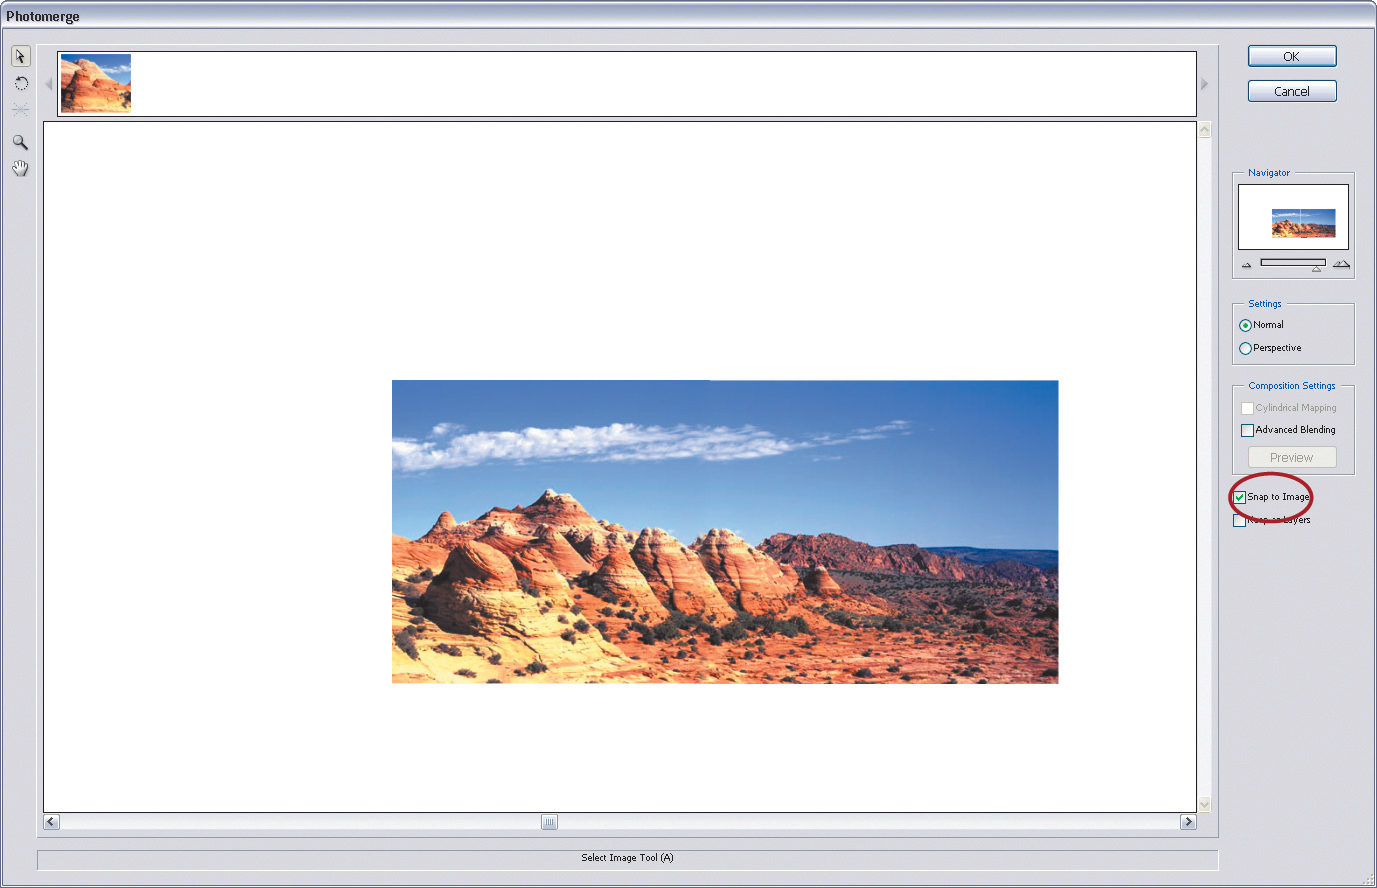
Step Eight:
Get the Select Image tool (it looks like the Move tool) from the Toolbox on the left of the dialog and drag the image’s thumbnail from the Lightbox down to your work area near the first image. Slightly overlap the image above the other merged images, release your mouse button, and if Photomerge detects a common overlapping area, it will snap them together, blending any visible edges. It actually works surprisingly well. If you need to rotate a segment to get it lined up, click on it with the Select Image tool first, then switch to the Rotate tool and click-and-drag within the segment to rotate. See, it’s not that bad (especially using the Snap to Image option).