I've been a long time coming, and I'll be a long time gone. You've got your whole life to do something, and that's not very long. | ||
| --Ani Difranco (American singer, songwriter, and guitarist) | ||
The timeline is After Effects' killer application. It is the reason above all others that After Effects is equally effective for motion graphics or visual effects work. Node-based compositors make it easy to see render order, but they can make coordinating the timing of events more difficult.
With the timeline, you always know how layers and their keyframes relate in time. Some would argue that render order is more significant than timing for visual effects work. Of course, both are significant, but once you get the hang of managing the timeline well, render order is no longer such a problem.
Note
The timeline actually makes render order explicit; the layers render starting with the lowest first and ending with the top last (assuming they are all 2D). If you twirl down the properties of each layer, you see the order in which they will render, top to bottom. Chapter 4, “Optimizing the Pipeline,” further explores the render pipeline.
The Timeline window is also a relatively user-friendly part of the application, albeit one packed with hidden powers. By unlocking those powers and mastering them, you can streamline your workflow a great deal, setting the stage for more advanced work.
One major source of hidden powers is the timeline's set of shortcuts: A lot of what you can accomplish in the timeline can be accomplished more efficiently and effectively with keyboard shortcuts and context menus. My feeling is that these are not extras to be learned once you're a veteran, but small productivity enhancers that you can learn gradually all the time, enhancers that collectively give you a lot of extra momentum and confidence as an After Effects artist.
Customization is what the timeline is all about; as you work with it, you constantly change not only its contents but your view of it. Thus a good number of the tips offered in this chapter are workflow improvements (views and shortcuts) designed to speed you on your way.
The Timeline window's top-level customizable views are its columns. Right-clicking on any column heading shows a menu list containing all of the possible views; you would never work with all of them revealed, because it's pointless; there are much better organized ways to keep these displayed to get you quickly to what you need to edit.
Context-click on any of the column headings and you can reveal or conceal all the different types of columns available in After Effects. Don't bother revealing them all—several are only occasionally useful, and After Effects provides you with a better way of finding them in context.
Figure 2.1 shows a typical minimal column setup that still gives you instant access to all of the columns, from which you can toggle in one step to each of the columns that don't currently display. From there, you have several options:
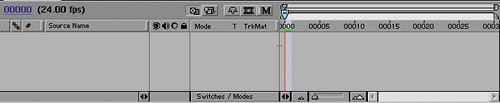
Figure 2.1. You don't need to vary your view much from the default to have it about as streamlined as you can get. Here, the Parent column is hidden but all columns other than Parent and Comment are available in a single left-click or via a shortcut.
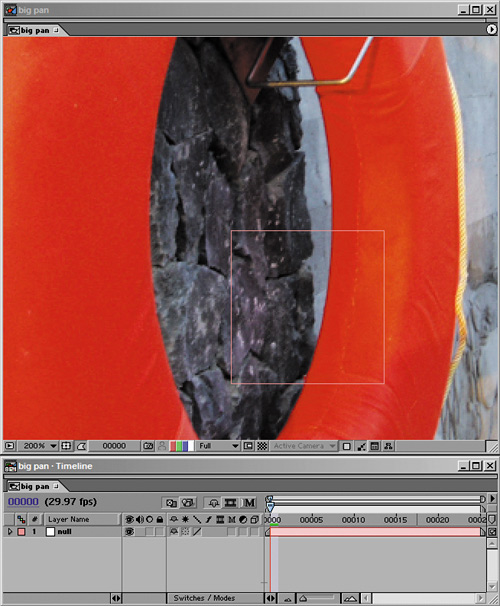
Switches/Modes: If only Switches or Modes (not both) is displayed, the label Switches/Modes appears at the bottom of that column (Figure 2.2). You can click on that to toggle from one to the other (or use the F4 function key). I tend to find that I get the switches the way I want them (more about that later) and then remain in Modes view so that I can easily see where I have used track mattes and transfer modes. You can alternatively keep both columns visible, but it's a space hog. If you temporarily want neither column to display, click the little double-sided arrow at the bottom-right corner of the Source/Layer Name column.
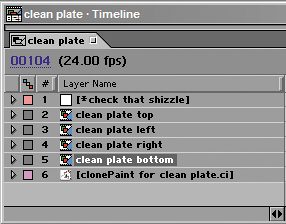
Layer/Source: Another toggle awaits you at the top of the Layer Name column. This is the one column that is grayed out in the context menu because hiding it would be utterly confusing, but if you left-click on its column heading, you can toggle from Layer Name to Source Name. Source Name is the name of the file (in the Project window), but Layer Name can be any name you want to assign to that layer (by selecting it, pressing the Enter/Return key on your keyboard—don't press Enter on the numeric keypad—and typing in a name). Many users are more careful about layer names than about source names, for example using the same source repeatedly and naming each individual instance (Figure 2.3).
AV Features/Keys: There is no reason ever to choose Keys from the context menu, as long as you have the Switches column open. Keys appear below AV Features for a given layer when you twirl down the Keys arrow.
Time Stretch: Similarly, there is no reason ever to choose In, Out, Duration, or Stretch from the context menu, because you can reveal all of them with the little double-sided arrow at the bottom right of the columns. You will rarely (if ever) use any of these anyhow; the only useful edit to perform here is to time-reverse a layer, giving it a stripy appearance (discussed later, in the “Playing with Time Itself” section); any other changes to timing should be done with Time Remapping (detailed later in this chapter).
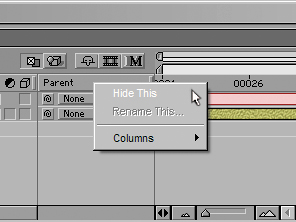
Parent: The Parent column is often left on in the many compositions that use no parenting, which wastes horizontal space. Context-click on it, and choose Hide This at the top of the column if you're not using it (Figure 2.4).
Minimalism: If you really want the minimal UI experience, you can even hide AV Features and access those features by context-clicking layers instead, but I don't recommend it; that column takes up very little horizontal space, doubles as a holder for Keys, and is just plain useful as it is. The same goes for the Label and # columns.
With unused columns hidden, you'll have more space for the columns you need most.
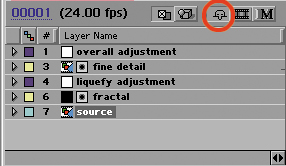
Ever try to make sense of someone else's project? Chaos, right? Make it easy on your coworkers: Color code your layers and use plenty of comments. Choosing a distinct color for each layer can provide intuitive visual clues. It can even help you as you work. How you handle colors is really up to you; Figure 2.5 shows an example of a timeline with several layers that are color coded by type.
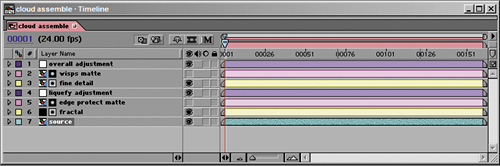
Figure 2.5. A unique color has been assigned to each type of layer (and to the composition itself), making it easy to quickly distinguish between them.
The Comments column is probably the most neglected, yet it enables you to say a few words about the purpose and use of a layer, which is especially useful when creating templates. But even better than enabling the Comments column is to add a layer marker. Press the * key on your numeric keypad, then double-click the layer marker, and enter text in the comment field. Unlike the Comments column, which requires quite a bit of that precious horizontal space and might quickly get turned off, layer marker text is written right over the layer bar itself, so you have as much horizontal space as the layer has.
Three toggles on the A/V and Switches columns pertain to how layers are edited and viewed as you work, and because I've seen users who should know better miss or forget them, I'm including a quick refresher.
The small circular icon in the A/V Features (Figure 2.6) column is the Solo switch. After Effects decided not to copy Photoshop this time around, so Alt/Option-clicking on the layer eyeball does not solo it—this switch does. The reason for doing it this way is that too many of your layer visibility options in After Effects are permanent in nature to have them inadvertently toggling on and off. Solo a layer and you see only it; send a comp with a layer toggled solo, and the Solo Switches menu in Render Settings determines whether it renders that way.
Figure 2.6. You probably already use the Solo switch, engaged here for the bottom layer; remember that leaving a layer solo in a subcomposition will display it that way in the main comp, a common gotcha.
The Lock toggle is really great in situations where you are certain you no longer want to inadvertently edit a layer (or you want to signal to other users of the project not to edit it). You can't even select a layer that is locked.
Shy is trickier to new users; toggle a layer to shy and nothing happens until you also activate the Shy toggle for the whole composition (Figure 2.7). Then suddenly, the shy layers disappear from view in the timeline, although they will still be visible in the comp itself, if they were previously. This is a way to temporarily reduce clutter in your timeline, but beware—if you're left scratching your head as to where that layer went, when you can plainly see it's still there, take a close look at the Index numbers: If they are no longer in sequential order, then the missing number belongs to a layer that is now shy.
More than any other window in After Effects, the Timeline window is the place where keyboard shortcuts—lots of them—come into play. There's a heck of a lot you can do in the timeline via either a single keyboard shortcut or a single click of the mouse, where a beginner would use several clicks of the mouse.
Most users learn time navigation shortcuts right away, while others are content simply to drag the time needle around all of the time, a policy I oppose on the grounds that it quickly becomes tedious. Here are a few handy navigation shortcuts:
The Home, End, Page Up, and Page Down keys correspond to moving to the first frame, the last frame, one frame backward, and one frame forward. Shift+Page Up and Shift+Page Down skip ten frames backward or forward, respectively. Press Shift+Home or Shift+End, and you are taken to the In and Out points of the work area.
Click on the blue time status at the upper left of the timeline to open the Go To Time dialog (press Ctrl+G/Cmd+G). Here, you can enter a new time. There's no need to add punctuation, so 1000 is ten seconds in Seconds mode or frame 1000 in Frames mode.
To navigate an arbitrary but precise number of frames or seconds (say, 48 frames after the current time), in the Go To Time dialog, replace the current time with your increment, in the format +48, click OK, and After Effects calculates the increment for you.
But here's a gotcha: If you need to navigate backward in time 48 frames, you can't simply enter –48 in the Go To Time dialog. If you do, you're transported to negative 48 (frames or seconds, either of which probably moves the time needle right off the timeline). Instead, you must use the format +–48; that's right, you're adding a negative number, not subtracting. It's weird, but it works (Figure 2.8).
Figure 2.8. Setting this value to –48 would set the current time to that negative frame value, probably not what you want. But entering +–48 adds an offset of –48 frames, which might very well be useful.
Note
The add-a-negative method for offsetting values works in many number fields in the program. For example, you can subtract 30 degrees to Rotation by entering +–30, and you can multiply or divide as well, using the * and / symbols, respectively. This won't work, however, in certain number fields outside the timeline, such as those in the Composition Settings dialog, where it would occasionally be quite useful.
The timeline becomes a liability for effects work when layers inadvertently pop on or off because they started at a frame other than zero or are pre-comps that are too short for the master comp. This one burned me on The Day After Tomorrow, where a bit of haze added to a window at 3% opacity—too low to see clearly when previewing on my monitor—abruptly shut off two-thirds of the way through a film-out of the shot. For this reason, some users prefer to make all of their comps longer (in duration) than they ever expect to need, and manage them with the Work Area.
To add a layer to a composition, you have many options for dragging and dropping. The one I like best for an existing comp is to drag the source to the layer position where you want it. For a new comp, drag it to the Create a New Composition icon. The keyboard shortcut Ctrl+/ (Cmd+/) drops the footage into the top layer of the active composition.
If you skipped Chapter 1, “The Effects Toolset,” you missed a major tip for making layers behave for visual effects work—editing your Preferences file itself so that all layers that are added to the timeline come in at frame zero on the timeline. Here are some other useful tips and shortcuts:
Set the current frame to be the beginning or end of the Work Area by pressing J or K, respectively.
Navigate to the beginning or end frame of the Work Area by pressing Shift+Home or Shift+End, respectively.
To reset the Work Area to the length of the composition, double-click its center hash marks; to set it to the exact length of the currently active layer, press Ctrl+Alt+B/Cmd+Option+B.
Note

That all saves quite a bit of unnecessary clicking and dragging, but what about the annoying fact that the Work Area controls which frames are rendered to RAM preview and, by default, which frames render? The Work Area's dual influence is another good reason to use a project template (as advised in Chapter 1). If you have a final “Render Me” composition that contains all of the settings for the final render, including the correct framing of pixel aspect and time, you never have to worry about managing these settings to get a clean render every time.
Select a layer by clicking on it (the old-fashioned way), or enter the layer's index number with the numeric keypad (the cool way).
To select an adjacent layer without touching the mouse, use Ctrl+Up Arrow (Cmd+Up Arrow) to select the next layer up, and Down Arrow the next layer down.
Add the Alt (Option) key and you can move the layer up or down in the stack, which you can also do with Ctrl+] and Ctrl+[. Ctrl+Shift+] moves a layer to the top of the stack and Ctrl+Shift+[ moves it to the bottom.
Every once in a great while you will need to invert the layers you have selected: Context-click on a layer, and choose Invert Selection. Locked layers will not be selected by this method, but shy layers will.
Duplicate any layer using Ctrl+D (Cmd+D). If you duplicate a layer and its track matte, they retain proper orientation in the copy.
If you need a layer to straddle another layer in the stack or you need an effect that you can't disable to end at a certain frame, you can split the layer (Ctrl+Shift+D/Cmd+Shift+D). Plus you can set a preference for whether split layers are created above or below the original layer (for example, Preferences > General > Create Split Layers Above Original Layer).
To move a layer's In point to the current time, use the [ key, or press ] to move the Out point. Add the Alt (Option) key, and you're trimming the layer to the current time.
If you click and drag over a trimmed layer's white space, you see a double-ended arrow cursor between two lines that indicates you are “slipping and sliding” the layer, changing the In and Out points of the source footage while leaving them the same in the timeline.
Often, you may add elements to your composition that are a different size or pixel aspect, yet which are meant to fill the frame (or fill it on the vertical or horizontal axis). No need to break open the Scale controls and guess. We come now to one of my favorite sets of shortcuts in After Effects: the “fit to fill” shortcuts.
The standard fit to fill, Ctrl+Alt+F (Cmd+Option+F) is dangerous in that it will not lock the aspect ratio of your layer, stretching the X and Y scale individually so that each is identical to that of the comp itself.
More useful, and just plain cooler, are the shortcuts for fit to fill on a single axis, X or Y, because they do lock the aspect ratio of the nondominant axis. For fit to fill on X only, the shortcut is Ctrl+Alt+Shift+H (Cmd+Option+Shift+H), and for the Y axis twist your fingers around Ctrl+Alt+Shift+G (Cmd+Option+Shift+G).
These choices of letters might seem a little obtuse until you note that they are adjacent to F on the keyboard; your visual memory picks up that they are close cousins to the regular F fit to fill command.
Now that I've barraged you with useful shortcuts, what about interacting with the view of the timeline itself? I'll assume you're familiar with the process of setting keyframes and move right on to some controls for zooming in and out of keyframe data:
The ; key toggles between a view that's fully zoomed in on the current frame and the whole timeline view.
The slider at the bottom of the timeline is handy for zooming in and out more selectively (Figure 2.9).
If you have a mouse with a scroll wheel, there's a cooler option: Not only can you scroll up and down the layer stack, and Shift-scroll left and right in a zoomed in timeline view, but Alt-scrolling (Option-scrolling) dynamically zooms you in and out of time. All of these operate simply by having the cursor positioned over the Timeline window.
Your time needle is actually capable of going where your Timeline window cannot: to time frames that are below the first frame of the composition or beyond the last frame. This needle disappearing act typically happens after you navigate the timeline in the Layer window and then return to the Composition or Timeline window. Have no fear, clicking where you want the time needle to be or using any of the time shortcuts will save you.
Note
The scroll wheel also zooms in and out of footage view windows when the cursor is placed over them.
You can, of course, view the timeline without seeing the associated Composition window; it's just tricky to unlink the two because making it easy would be confusing to beginning users. If you Alt/Option-click on the box to close the Composition tab, you close the Composition view while the Timeline tab stays active. This “headless” timeline is useful for making adjustments in one timeline while seeingthe results in another comp (Figure 2.10). I'll cover this more in Chapter 4. If you need to bring back the Composition view for your timeline, click the Comp button at the right edge of the timeline (Figure 2.11).
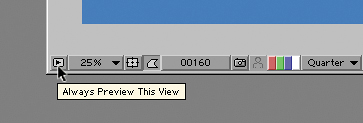
Figure 2.10. There's an easier way to preview one comp while continuing to adjust another related one, or several others. Activate the Always Preview This View toggle in the lower left corner of the Composition window. Now, whenever you set RAM Preview, that's the view that will load and play.
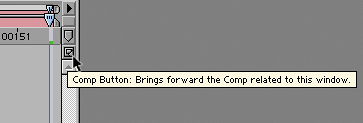
Figure 2.11. Clicking the Comp button reveals the Composition window for the current timeline; this is helpful if you have closed the comp view while leaving the timeline open.
Just above the Comp button is the comp marker bin, where you can click and drag out a marker to a point on your timeline. Markers are numbered sequentially, and you can also add whichever number you like at any time (even when a RAM preview is up) by pressing Shift and one of the numbers at the top of your keyboard (not the numeric keypad this time). These aren't quite as cool as layer markers (which you can add at any time with the asterisk key) because you can't label them, but they're sometimes useful anyhow. Holding down the Shift key as you drag the time needle snaps the needle to any comp or layer markers that are present.
Sometimes you need to replace the source of a layer with an alternate take or a different element in the Project window. You can easily do this by highlighting the layer to be replaced in the timeline and holding down the Alt (Option) key while dragging the new source to the timeline. An even easier method is to select both the existing layer and the new source and then press Ctrl+Alt+/ (Cmd+Option+/).
All of the settings from the previous layer, along with any applied effects, translate to the new layer automatically. Beware if you are replacing with source of a different size or aspect, as the mask and transform values may only be appropriate to the predecessor.
Note
If your replaced layer has a time that mismatches with the previous source and there's no simple fix such as extending the end point, see the section called “Playing with Time Itself” later in this chapter.
While we're on the subject, what do you do to neutralize a layer that is taking up a disproportionate amount of render time? I recommend that you not replace it in this manner; Chapter 4 covers some much more elegant methods for assigning proxies and pre-rendering embedded compositions.
Twirl down any layer in the timeline, and you find the Transform controls. On a typical layer, transforms are spatial data related to Position and its cousins Anchor Point, Scale, Rotation, and, um, Opacity. Opacity isn't really spatial transform data, but Adobe decided to sort of grandfather it in here as an essential layer property; transforms has a snappier ring to it, evidently.
The keyboard shortcuts to reveal individual transforms are the first letter of each type: P, A, S, R, and, um, T—Opacity is the oddball again, because O is already in use as the Out point of the Work Area (mentioned above).
To reveal additional properties, hold down Shift when typing the letter shortcut.
A property in After Effects is a data channel that you can find under a twirled-down layer. Typically the channel can be animated and has a stopwatch icon beside it which, when clicked, sets the first keyframe at the current time.
That's simple enough. But there are, in fact, many different ways to animate a property in After Effects. How many can you think of? As an example, if you wanted to move a layer 200 pixels along the X axis over 24 frames, after setting the first keyframe and moving the time needle forward 24 frames, you could
Drag the layer to the new position in the Composition window (with the Shift key held down to constrain it to one axis)
Shift+Right Arrow 20 times to move the layer exactly 200 pixels
Enter the new value by highlighting the X Position numerical value and typing in the new number
Use rub text to drag on the X Position numerical value, dragging to the right until it was 200 pixels higher (and to move faster, holding down Shift to increment it by ten pixels)
Enter a numerical offset by highlighting the X Position numerical value and typing +200
Copy the new Position keyframe from another layer or another point in time (if there were a keyframe with the needed Position value) and paste it to this layer at this time
And that's just an example of some of the things you could do with an added Position keyframe. There are options for causing the animation without setting a new Position value. You could also get that layer to transform 200 pixels over 24 frames by
Offsetting the anchor point in the opposite direction (negative 200 pixel X value) and keyframe that over 24 frames
Enabling 3D for the layer, adding a 50mm camera, and animating it moving 200 pixels, again in the negative X direction
Parenting the layer to another layer that has the transform
Replacing the layer with a composition that contains the layer and transform
Assigning an expression to the Position channel that performs the animation without keyframes
If that's not crazy enough, you could even
Apply the Transform effect to the layer and animate the effect's Position value
Animate in real time via the cursor using Motion Sketch (I did say crazy)
Paste in a path (from a Mask or a Path from Photoshop or Illustrator) to the Position channel, adjusting timing as needed (this method defaults to creating a two-second animation)—again, crazy, but possible
The last two sets of options, in particular, are obviously designed for situations more complicated than the one I set up. Parenting is useful when several layers should all transform in the same manner, and expressions let you link just a single property or create one from scratch. The Transform effect exists for one reason only: to allow you to change the order in which Transforms occur. Normally, they occur before all effects, but this plug-in lets them occur after an effect is applied as well, without the need to pre-compose.
Note
My point is not that you need to be able to rattle off this list to qualify for a job in a production situation. The point is that there are many approaches to a given problem in a program like After Effects, and the more of them you know, the more prepared you'll be for whatever comes your way.
Note that there are even many ways to enter values while animating: You can click and drag using the Selection tool (shortcut: V), the Pan Behind tool to move the anchor point (shortcut: Y), or the Rotate tool (shortcut: W, which the official documentation even points out is for “wotate”). But you can also work directly with the values found in the timeline, and you can do so by entering values or using the rub text feature.
The After Effects keyframe interface is fairly highly evolved, meaning you can create quite complex animations in After Effects. I mastered keyframes in After Effects by matchmoving shots in After Effects 2.0, before there was any tracker. If you feel like you need a refresher of the basics of keyframes, they are well detailed in the documentation. Press F1 to launch After Effects Help in a Web browser and choose Animating Layers for solid, basic information on transforms and keyframes. If you want to know all the nuances of the various types of keyframes available, choose Fine-tuning Animation. In this chapter, I will focus only on the issues that come up all the time for effects compositors.
Note
When using rub text in either the Timeline or Effect Controls window, holding down Shift while dragging increments at ten times the normal amount, while holding down Ctrl+Alt (Cmd+Option) increments at one tenth the normal amount. The “normal amount” is often, but not always, 1 for any given property; it depends on the slider range, which you can edit by context-clicking on the value and choosing Edit Value.
The most common way that keyframes are used in an effects situation is to say, about a given value, “I want it to be this value at this point in the shot, and this value here.” By default, After Effects sets linear temporal transitions; in other words, you travel from keyframe A to keyframe B at a steady rate, then from keyframe B to keyframe C at a separate but still steady rate.
Many basic animations are greatly aided by adding eases. Experienced animators and anthropologists alike will tell you how rare it is that anything in nature proceeds in a linear fashion; nature is full of arcs and curves. A classic example of this is a camera push: In most cases, with a real camera operator, a push would start and stop gently, moving at a steady rate only at the middle of the transition.
Flips and Flops
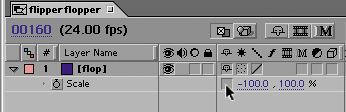
That's all very well, but how do I flop a shot? Unlike many other compositing and editing applications, After Effects has little in the way of dedicated transform effects, so searching in the Effects palette for flop is not going to help you. For those unfamiliar with the term, to flop a shot is to invert it horizontally, on its Y axis (as opposed to flipping a shot upside down on its X axis). To flop, you toggle Constrain Proportions off and set the X value to–100 (Figure 2.12).
A quick way to deal with easing is to apply the Easy Ease keyframe assistants. To apply them, context-click on a keyframe. Now, look under the Keyframe Assistant submenu, or use the keyboard shortcuts. Clicking F9 applies Bezier interpolation, creating eases in and out of a keyframe, while Shift+F9 creates an ease into the keyframe only, and Ctrl+Shift+F9 (Cmd+Shift+F9) creates an ease out. For the camera push example, you would ease out of the first frame and ease in to the final frame, and you would add an ease in both directions if there were any keyframes in the middle (for example, if the speed of the push changed at some point).
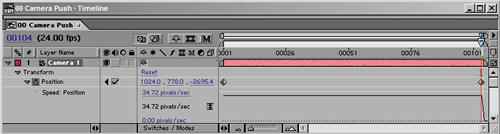
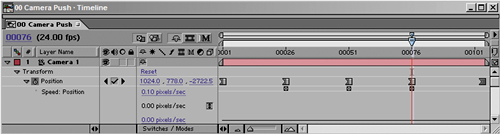
To see the result, twirl down the property to which the eases were applied. Figures 2.13a and b show the difference between a default linear camera push and one to which eases have been applied. The keyframes have changed from linear to Bezier type, and rate of motion is described by a curve instead of a straight line.
You must set Hold keyframes deliberately, by context-clicking on the keyframe and choosing Toggle Hold Keyframe from the menu or by using the shortcut Ctrl+Alt+H (Cmd+Shift+H). A Hold keyframe's value does not to interpolate to the next keyframe, which is indicated by the square appearance of the right side of the keyframe.
If you need a layer to reposition over time with no transitions (no keyframe in-betweening whatsoever) begin by setting the first frame as a Hold keyframe; all keyframes that follow it in time will be Hold keyframes, signaled by their completely square appearance (Figure 2.14).

Figure 2.14. A series of Bezier keyframes have been converted to Hold keyframes, evident by the square shape at the right of each keyframe and the speed of 0.0.
Keep holds in mind as a problem solver any time you see unwanted in-between information creep into an animation, which can particularly happen with Position animations.
Effects compositors are rarely, if ever, called upon to perform complex animations, but eventually your project may require it, and the keyframe interface of After Effects has long been one of its strengths. Rather than teach you to be a great animator in After Effects, though, I prefer to keep it simple and focus on what you need to know to keyframe effectively and to avoid common pitfalls.
When keyframing Position (or Anchor Point) data, there are in fact two ways you can adjust keyframes: temporally (on the timeline) and spatially (in the Composition window). To illustrate this, I'm going to use the most classic bare bones animation the world has ever known: the bouncing ball (Figures 2.15 to 2.18). This example will show you (rather than just tell you) what you need to know about adjusting spatial keyframes.
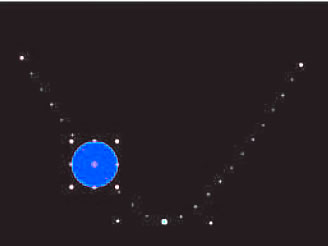
Figure 2.15. Under Preferences > General (Ctrl+Alt+; or Cmd+Option+;) the option Default Spatial Interpolation to Linear is off by default, producing this result when you create three or more position keys. After Effects also applies an automatic Bezier shape to any point that falls between two other points—the opposite of what you want for a bouncing ball.
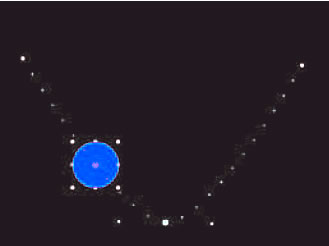
Figure 2.16. Click the check box for Default Spatial Interpolation to Linear, restart After Effects, and you get this result: three keyframes that are linear in both time and position. Often this is they way you want moves to go, but it does not create the realistic arcs of a bouncing ball.
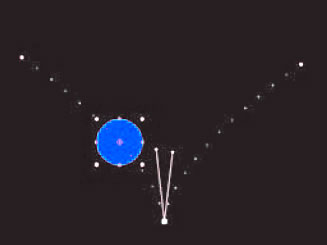
Figure 2.17. Hold down the Ctrl/Cmd key while clicking the middle keyframe to activate its Bezier handles, then Ctrl/Cmd-click on one of the handles to “break” them, enabling you to form the V-shape shown here, which naturally causes curved arcs to and from the bounce point.
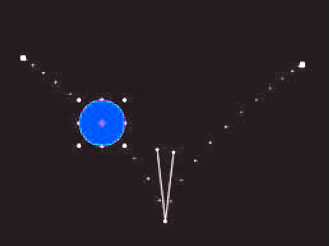
Figure 2.18. Finally, temporal eases create a more realistic variation in motion speed. Selecting the first and last frame and pressing F9 causes eases to those frames and an effective acceleration in and out of the keyframe in between them. Look closely. The dots are spaced further apart (traveling faster) at the bottom and closer together at the top, where the eases are.
You'll probably never have to bounce a ball to create a realistic effect, so what can you possibly learn from the example? Let's recap:
If your keyframes aren't cornering sharply at transition points, check Preferences > General and, if necessary, turn on Default Spatial Interpolation to Linear. For the most part, this setting is more intuitive and useful in the work you'll do, but do watch out for the opposite problem: transition points that are too abrupt.
Either way, you can take control of the shape of your motion path in the Composition window, using the same shortcuts for adjusting Beziers as with the Pen tool (described in detail in the next chapter).
Realistic motion often requires a combination of shaping the motion path Beziers and adding eases to keyframes; you can perform the two actions independently on any given keyframe.
So, even though there is an infinite variety of position animations available to you in After Effects, they will all be done with the basic constraints covered here. True, it can get a little trickier in 3D, but mostly it's just trickier to see what you are doing; the basic rules and constraints remain the same, with each Position keyframe having three basic transition types: Linear, Automatic Bezier, and Custom Bezier Shapes.
There's a bit of a gotcha possible when copying and pasting keyframe data. The key is to recognize which item is active when you copy and which is active when you paste.
By default, After Effects does its best to help you work this out. If you copy keyframes from a particular property, then simply paste them to another layer, After Effects pastes them to that layer's corresponding property. If that property doesn't exist, because it comes from an effect that isn't applied on the target layer, After Effects adds the effect containing the property to the target layer, but with only the property that you copied.
However, you can also apply keyframes from one property to another similar property. For example, if you want to apply a 2D Position keyframe to the position of an effect, such as the Flare Center position of a Lens Flare effect, you can do so, but only by selecting the Flare Center property in the timeline before pasting.
That's still pretty logical. Where people get screwed up is by not noticing, for example, that an effect in the Effect Controls window is active and forward when they attempt to copy and paste a whole layer. Figure 2.19 shows a classic example, where a layer does not have its properties twirled down, and so it's easy to miss that the Effect Controls window is forward and has an effect highlighted, so that's what gets copied, instead of the whole layer.
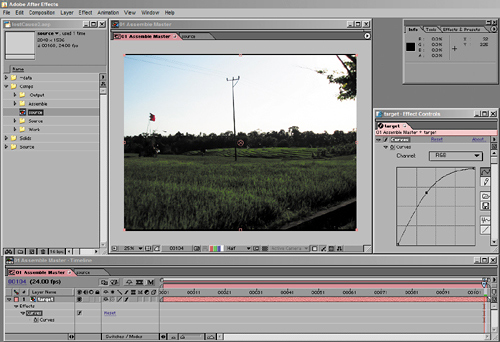
Figure 2.19. A classic example where you can get tricked: Five separate items are highlighted: the source comp in the Project window, the target layer, the Curves effect (in both the Timeline and Effect Controls windows), and the layer itself in the Composition window. If I click Delete, which item disappears? Hint: Check which menu bar is not grayed out. Further hint: The Effect Controls window.
Bottom line: If strange things happen when you copy and paste, immediately undo and try the copy operation again, selecting exactly the thing you want to copy and copying it with no intervening steps. Because even if the logic of how copy and paste works seems obvious, you can still get tripped if you don't pay attention. When something stops making sense in After Effects, there is almost always a good reason traceable to something you've just done (and can undo). This is more than you can say for much graphics software.
Twirl down properties that have keyframes with numerical values, and you'll reveal graphs that are useful for fine-tuning transitions, going beyond what is possible with just keyframe assistants, such as Easy Ease. You only have to understand what these graphs are trying to show you.
Figures 2.20a, b, and c show the timeline of the bouncing ball example, this time with linear keyframes, with automated eases (courtesy Easy Ease, F9), and with eases accentuated manually, the result of adjusting the curve handles. You will mostly use the Velocity graph to fine-tune eases. The easiest way to do this, especially if you're not yet at home with this graph, is to start with an Easy Ease adjustment. Draw the handles out further from the keyframe to extend the ease, or move them in closer to shorten it.

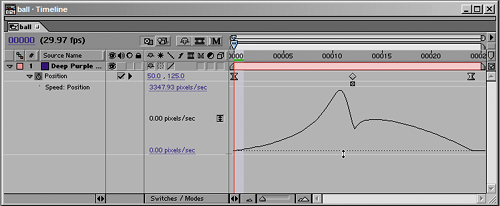
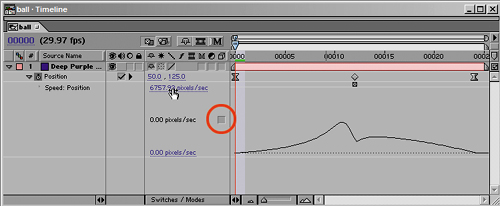
Figure 2.20a, b, and c. These three timelines show a progression, from a default linear animation (2.20a), to adding eases to all keyframes (2.20b), and finally to toggling the middle keyframe back to a linear keyframe by Ctrl/Cmd-clicking on it and hand-adjusting the other eases, to accentuate the first and moderate the second (2.20c). Do not feel the need to follow these as a “recipe for a bouncing ball.” Rather, they exemplify a progression of how you can use curves to refine an animation, and what that looks like.
Note
Take care not to extend handles so far that they overlap; this can cause curves to spike and buckle, leading to sudden jumps in the animation. If you see something strange while previewing, look for a sudden sharp jolt in the graph and back the handles off to smooth it.
The main thing to understand about the Velocity graph is that it is shows you the rate of change in keyframe values; the Value graph shows the change of the values themselves. The other important thing to understand, which applies to both of these graphs, is that they show relative values; 200% velocity makes a steep slope if the surrounding values are smaller, but is dwarfed by an added 600% velocity change.
You can drag the lower boundary of the graph view to enlarge it and adjust the viewable range by editing the upper and lower values, in blue. Checking the box next to the current rate resets the graph view.
Roving Keyframes
Say you need an animation to follow an exact path, hitting precise points, but you want the animation to progress steadily, with no variation in the rate of travel. This is the situation for which Roving keyframes were devised. Figure 2.21 shows a before and after view of roving keyframes being applied to the finished bouncing ball animation; the path of the animation is identical, but the keyframes are now evenly spaced. This won't come up often, but if it does, Roving keyframes will be very useful.
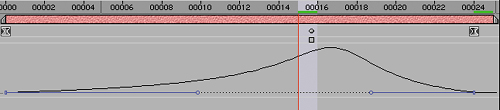
Figure 2.21. The middle keyframe was set to rove (by turning off the tiny toggle below the keyframe) and is now positioned in between frames 15 and 16; the keyframe's interpolation setting is no longer taken into account, and it moves to keep the curve created by the other keyframes smooth and steady.
With a wink at Friedrich Nietzsche, who theorized the übermensch (the overman or superman) and no doubt would be proud, I'll now focus in on the shortcuts that will make you a rapid-fire animator in the Timeline window. This section is not only about the überkey, possibly the most useful timeline shortcut of all, but about taking control of keyframe data in general with useful shortcuts and tips.
The überkey comes in two delicious flavors: U and UU. Highlight a layer that contains keyframe data but has no keyframes revealed, and press U on your keyboard. All of the properties with keyframes are revealed. Press U again, and they are all concealed.
But wait, there's more. Now highlight a layer with no keyframes whatsoever and press UU on your keyboard (two Us in quick succession). All of the properties that are set at any value other than their default, including those with keyframes, are revealed (Figure 2.22).
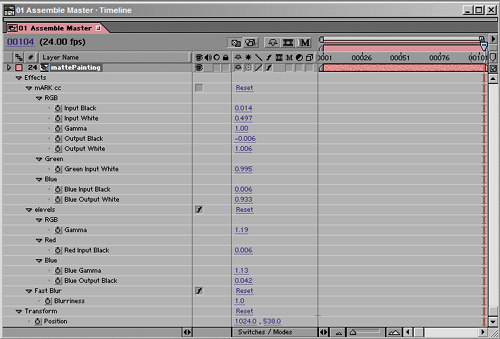
Figure 2.22. Sometimes a layer will have a lot of values adjusted to transforms and effects but no keyframes whatsoever. Pressing UU with the layer highlighted reveals everything that is not set at the default value for a given layer. It's very handy.
The utility of the U shortcut is obvious: It's a quick way to get at keyframes to edit them or to find an animation that you suspect is hiding somewhere. But UU—now that is a full-on problem solving tool. It allows you to quickly investigate what has been edited on a given layer, helpful when troubleshooting your own layer settings, and priceless when investigating someone else's. Highlight all of the layers in your comp, press UU, and you have before you all of the edits that have been made to all of the layer properties. Fabulous.
Note
To reveal only the applied effects on a layer, use the E key. Or, if the überkey reveals effects and transforms and you want the transforms only, use Shift+E to toggle the revealed effects.
Suppose you've been handed someone else's project and have to make sense of it; two tools will help you more than any others.
For a broad overview of the project setup, you can enable the Project Flowchart view; look under the Window menu or use the shortcut Ctrl+F11/Cmd+F11. This is it—the node interface option in After Effects (Figure 2.23), similar but far less interactive than the process trees at the heart of competing applications such as Apple's Shake, Eyeon's Digital Fusion, and Digital Domain's Nuke.

Figure 2.23. What node-based compositing application is this? Why, the decidedly non-nodal After Effects. You cannot interact with this view much, but along with being an occasionally handy way to dissect an unfamiliar project, this view shows that all compositing applications are nodal, when you get right down to it.
This view allows you to see how the objects in your project have been used and how they interrelate. The toggles at the lower left of the window show layers and effects, but these muddy the waters somewhat on a project of any complexity; for a project overview, toggle them off. The most intuitive view that fits well on a monitor seems to be Left to Right, which you can choose via the pull-down menu at the lower left of the menu. Whether you choose straight or angled lines is up to you, but you can clean up the view by choosing one of them with the Alt/Option key pressed.
Click on the plus signs at the left of each comp, and you can see the component source files. This is step one in dissecting the project: Understand what is used where.
Step two is to open the individual comp; you can double-click to open it directly from the flowchart. Turn off the Shy toggle at the top if it's on, highlight all of the layers, and press UU to reveal all properties that have been altered on all layers. Now preview the composition, stopping at any frame where you have questions and investigating which settings and animations apply to that point in time. If there is a nested composition, you can open it and investigate that in the same manner.
The most effective way to do this is to start with the top-level compositions, the ones that are not contained in other compositions, and work your way backward. While I wouldn't call this process speedy, if you approach it in this logical manner, it will diminish the sense of “Where am I?” that can come over users who come to After Effects used to a more node-based approach. It also opens new comps on tabs that array to the right of the currently open comp, helping keep the tabs in visual order.
Although every other shortcut pales in comparison with the überkey, there are several other highly useful shortcuts for dealing with keyframe:
Navigate backward and forward, respectively, through all visible keyframes (and layer markers, and Work Area boundaries) with the J and K keys. These shortcuts include all revealed keyframes, so if you want to navigate from keyframe to keyframe in one channel only, you might choose instead to click the arrows that appear under A/V Features (also known as the Keys column). Or you can reveal only those keyframes; hidden keyframes are skipped by this shortcut.
Select all of the keyframes for a property by clicking on that property's name.
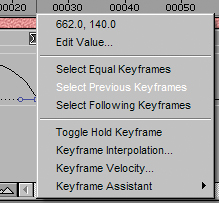
Select all previous or all following keyframes by context-clicking on the keyframe in the timeline and choosing the respective option from the menu (Figure 2.24). The context menu even offers an option for selecting equal keyframes, those with an identical value.
Don't use Ctrl/Cmd to multiselect nonadjacent keyframes, although this works everywhere else in the application. Ctrl/Cmd-clicking on keyframes converts them to Auto Bezier mode. Shift-clicking accomplishes what you're after. You can, of course, drag a box around a subset of keyframes to select them or Shift-drag to deselect them.
Use Alt/Option+Shift+the shortcut corresponding to the property (P, A, S, R, or T) to set a keyframe for a Transform property. This is a more obscure one, but it will save you at least one click each time you use it.
Set a keyframe at the current frame for an effect from the Effect Controls window by clicking on its stopwatch there, instead of revealing it in the timeline.
Keep these tips in mind, and your keyframe edits should be rapid and painless.
To offset the values of multiple keyframes by the same amount, use rub text. If instead you edit one of the values, all of the keyframes will be set to that value—not what you want. Here are a few more tips for working with multiple keyframes:
Nudge selected keyframes (one or many) forward or backward in time using Alt+Right/Left Arrow (Option+Right/Left Arrow), respectively.
Deselect keyframes only using Shift+F2. Select all visible keyframes (without selecting their layers) using Ctrl+Alt+A (Cmd+Option+A); this is useful for deleting a bunch of keyframes but leaving the layers.
Delete a bunch of keyframes, and the value of the first keyframe remains; turn off the stopwatch to clear them, and the current value remains.
Scale the timing of a set of keyframes by selecting the keyframes to be scaled in time and Alt/Option-clicking and dragging on a keyframe at either end of the selected set, stretching it out to whatever time you need. This method can cause intermediate keyframes to fall in between frames, but After Effects is still able to work with them and maintains the proportionality between the keyframes perfectly.
There is no easy way to scale an animation spatially, but I can offer a method if you ever really need to do it:
Copy a set of Position keyframes, and paste it into the Mask Shape property of an existing or new mask.
Scale the mask.
Copy the Mask Shape, and paste the data into an empty Position channel.
The new animation automatically will be two seconds long with roving keyframes, making the cases in which this is useful even rarer.
But what the heck, maybe you can impress someone at a party with this trick—that is, if you invite other After Effects nerds to your parties.
The two most common ways to offset a transform animation—to have a layer change its position, rotation, and scale from a point other than its center—are intuitive, easy to use, and well documented. In an individual layer, move the anchor point from the center to a specific point in the frame, typically using the Pan Behind tool (keyboard shortcut: Y). Details on that are in the “Editing the Anchor Point” section.
You can center several layers around a single layer by parenting them to that layer. The children take on all of the transforms of the parent layer (not Opacity, which, remember, isn't a real transform) plus whatever offsets they already have.
The number one piece of advice when setting an anchor point or a parent-child relationship is to do so before animating, if at all possible, because the only places where this gets tricky have to do with editing the anchor point or the parent-child relationship when Transform keyframes are already in place. The problem is that these settings work as offsets, and can change the current Position frame, messing up the animation as a whole.
The development team is consistent in their design of extra animation features: You can activate the features without changing what is already set up in the composition. So when you change an anchor point position, for example, After Effects performs an offset to the position of the layer in the exact opposite direction so that the layer maintains the same apparent position. And when you parent a layer to another layer, you are setting the default relationship between the parent and child at the frame where you parent; nothing changes in the Composition window on that frame.
Note
After Effects has a “prime directive” with animation settings: At the default, setting them should not change the appearance of the current frame. This holds when toggling layers between 2D and 3D, adding or removing parenting, moving the anchor point with the Pan Behind tool, and applying most effects.
That's nice and clear. But reset an offset anchor point in the middle of a Position animation, and the Position keyframe where you reset it changes. Or undo parenting at a frame other than the one where you set it, and its Position value changes, but it appears to remain in the same place. Weird.
You can override this default behavior, moving the anchor point or undoing parenting without changing the Position value in either case, by holding down the Alt (Option) key as you make the change.
There are a bunch of ways to edit the anchor point position, and the effect on existing Position data varies with each method.
The most straightforward method is to edit the anchor point with the Pan Behind tool (Y) right in the Composition window; doing so causes Position to offset to maintain its current appearance. For a similar result, if you edit the anchor point numbers in the timeline, it is like holding down the Alt (Option) key using the above methods: The Position data does not change.
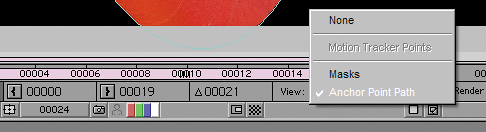
If you want to edit animated anchor point data, you may have a difficult time in the Composition window. Activate the Layer window, and under the View pull-down, change the default of Masks to Anchor Point Path (Figure 2.25).
When setting up (or, if necessary, dismantling) a parent-child relationship, you have a choice of methods. You can choose the target parent layer from the pull-down menu in the Parent column of the timeline. Or, you can use the pickwhip control next to the pull-down menu, clicking and dragging from the pickwhip icon of the child layer to the target parent layer. If you have several layers selected and want to parent them all to a single layer, either method will set them all to the same parent.
Parenting does an effective job of sticking even when you change layer order or you duplicate or rename the parent. You can select all of the children of a parent layer by choosing Select Children from the bottom of the context menu. You can remove parenting from all selected layers by choosing None from the pull-down menu.
Keep parenting in mind whenever you are trying to solve a problem that involves individualizing transforms. A prime example is the lack of separate transform channels in After Effects.
Position, Anchor Point, and Scale properties share a single keyframe for all three channels. Animators who are used to being able to keyframe these as separate channels sometimes find this a bit of a drag. There is a way to solve this problem with expressions sliders, but I'll leave that aside in favor of one that's easier to set up: a null axis hierarchy.
Null objects are quite useful, invisible, nonrendering layers that occupy only a single point in space, although they are based on layers with dimensions that show up in the Composition window (Figure 2.26). You can create a null by context-clicking an empty space in the Timeline window and choosing New > Null Object (you can choose it from the Layer menu, as well).
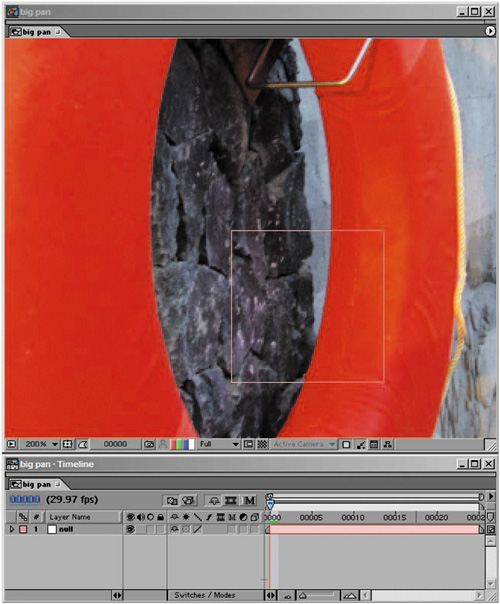
Figure 2.26. A null object in After Effects looks like the outline of a 100-by-100-pixel layer, but cannot show up in renders. The reason for showing the outline is to give you something to easily recognize and grab.
Consider an example of creating a hierarchy for 2D Position. This addresses a concern some animators have with After Effects: that it does not provide the ability to keyframe transforms on separate axes individually.
Figure 2.27 shows the basic setup, in which two nulls are created, one called X and the other Y; the layer is parented to Y, which is then parented to X. Ideally there would be a way to now lock the second (Y) Position value in X, and the first (X) value in Y, but there's not, so you must remember to adjust only the X Position value in X and the Y Position value in Y. If it's important to you to stagger keyframes between the two values, however, this is an effective-workaround.
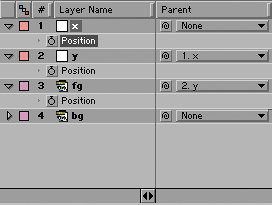
Figure 2.27. You may never need to animate a layer on separate axes, but it's a good example of how a parent hierarchy can help you out. The foreground (fg) layer is parented to the Y control, which is in turn parented to the X control. The idea is to animate only the X Position value of X and only the Y Position value of Y, so that the timing of each channel can vary (which it cannot with standard keyframes).
Except for one thing: After Effects 6.5 has no curve editor, nowhere to see the animation data from two distinct channels together. So visually coordinating this edit may turn out to be a hassle. As a matter of full disclosure, I will add that I have rarely ever needed to set things up this way; I tend either to anticipate the problem by animating in a certain order to avoid it, or to use expressions to tie each animation channel to a slider (described in Chapter 10, “Expressions”).
Motion blur plays into many of the more advanced illusions you can create with After Effects, but it is fundamentally quite simple. If a layer animates at a sufficiently high velocity, and the Motion Blur toggle is enabled, for it and for the composition containing it, then for free you get this great illusion that the elements blur to match the apparent motion of the scene.
Motion blur is an artifact of motion occurring while a camera shutter is open. It is not something that you encounter with your naked eye, yet it looks very natural when you see it on film or video. It is a complement to your eye's persistence of vision that helps your eye to accept the low frame rate of film (or video). It also looks quite pretty even in still photos, which is part of the reason that efforts to eliminate motion blur from a sampled image have tended to fall flat.
The thing that some users don't realize is that After Effects gives you control over how long and when the camera shutter is open via the Composition Settings dialog's Advanced tab (Figure 2.28). Or, more typically, users encounter these settings without really understanding them.
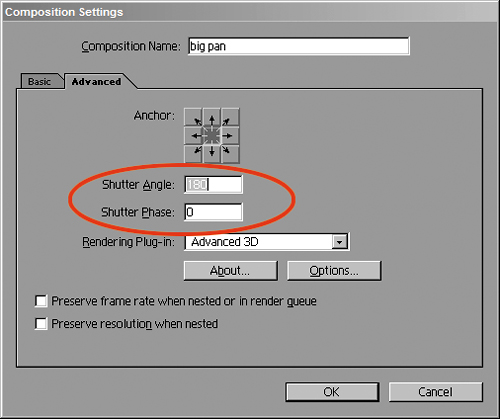
Figure 2.28. The Shutter Angle and Shutter Phase settings on the Advanced tab of the Composition Settings dialog control the appearance of motion blur.
The Shutter Angle setting controls how long the shutter is open; a higher number means more blur. The Shutter Phase controls when, during a given frame, the shutter opens; at the default of 0, the shutter opens at the moment in time when the frame begins. See the section “What the Settings Mean” for an explanation of why you'd ever want it any other way.
A physical film camera typically has an angled shutter that can open in a circular fashion anywhere between a few degrees and a full 360 degrees (an electronic shutter does not behave the same, but never mind about that in this context). Theoretically, 360 degrees would provide the maximum amount of blur a shot could have.
The Virtual Camera Shutter
With a real, physical camera, there is a good reason for how long the shutter is open: Along with the aperture setting, it controls how much light is passed on to the film or video pickup. Low-lit scenes tend to be blurrier as a result of the shutter remaining open longer to gather more light. Other scenes may deliberately be shot with a slow shutter (and the aperture closed down to compensate) just to get some nice, streaky blur.
After Effects is unconcerned with light gathering and does not emulate the differing amount of light that would pass through a lens with a high or low shutter angle setting (nor when adjusting the Aperture setting on a 3D camera, discussed in Chapter 9, “Virtual Cinematography”). Therefore, you only get the desirable part—the blur itself.
After Effects, however, cheats by offering you double the blur overhead of a fully open shutter. The maximum setting for Shutter Angle in the Composition Settings dialog is 720, an impossibility in the real world (because a fully open shutter only has 360 degrees, or a full circle, to reveal).
A camera report may help you adjust this setting, although it's often good enough to carefully eyeball it by zooming in on an area where your background and foreground element both have blur and matching them (Figures 2.29a and b). If you do have a camera report and it gives you the shutter speed, you can calculate the Shutter Angle setting with the following formula:
shutter speed = 1 / frame rate * (360 / shutter angle)
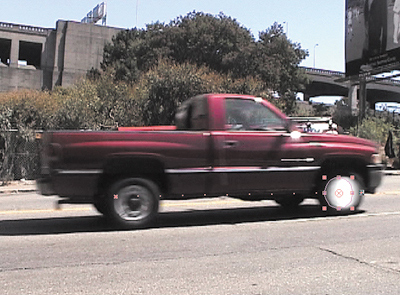

Figure 2.29a and b. In 2.29a, the default Shutter Angle setting of 180 degrees is too heavy for this white solid masked over the front hubcap, which has been tracked to match the shot motion. In 2.29b, Shutter Angle was cut down by 50% to 90 degrees. In this case, there was no camera report to guide the decisions; they are based on blur that can be observed on the rest of the moving truck.
This isn't as gnarly as it looks, but if you hate looking at formulas, try thinking about the relationship this way: If your camera shoots at 24 frames per second, but Shutter Angle is set at 180 degrees, then the camera is exposing half the total time of each frame (180/360 = ½), or 1/48 of a second. If your camera report tells you that the exposure was 1/96 of a second, the Shutter Angle setting should be 90 degrees.
When Blur Is Needed Where None Exists
Motion blur is cool and automatic, if you animated the layer to receive the blur in After Effects. However, if the element comes in already animated but without sufficient blur—as can happen with 3D elements or when a scene is retimed to be faster—you need a different solution, because After Effects has no motion to sample to generate blur.
The painful way to deal with this is to apply directional blur to the elements in question. The problem is that that natural motion blur is rarely unidirectional.
In such cases, and when there's no possibility of reshooting or re-rendering, it's worth considering an investment in Real Smart Motion Blur by RE: Vision Effects (www.revisionfx.com). This plug-in can sample motion from other layers and enhance the amount of blur created by that motion. It's render intensive and can require some tweaking, but it can be just the thing for such situations. A demo version is available on the book's CD-ROM.
The Shutter Phase setting determines when the shutter opens; in other words, the blur doesn't have to start at the beginning of the frame, the shutter could open between frames. Here's the trick: the Shutter Phase is meaningful as a fraction of the Shutter Angle.
In other words, a setting of 0 means the motion blur starts at the beginning of the given current frame. A –90 setting with a 180 Shutter Angle equates the blur starting –0.5 frames before the frame or in between this frame and the previous one. This setting is often used with motion tracking, where you are matching the middle of a motion-blurred target (not one end of it).
Consider a Shutter Phase setting of –50% of the Shutter Angle when working with motion-tracked plate (background) footage; otherwise, leave it at 0. The amount of blur won't change, only the timing of it.
Ricochet
One place a –50% Shutter Phase setting is used is when tracking in an object that ricochets, such as a bouncing ball, so that you can see the motion in both directions at the frame of impact. The thing is that this effect doesn't work by default in After Effects 6.5, because it averages the surround frames (Figure 2.30a). You have to trick it into making the V-shape of the ricochet by adding a very slight rotation to the ricochet layer. This forces After Effects into sampling all of the frames necessary to create the ricochet (Figure 2.30b).
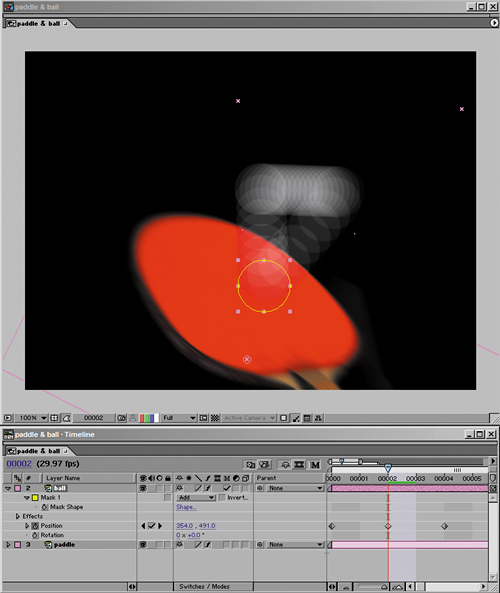
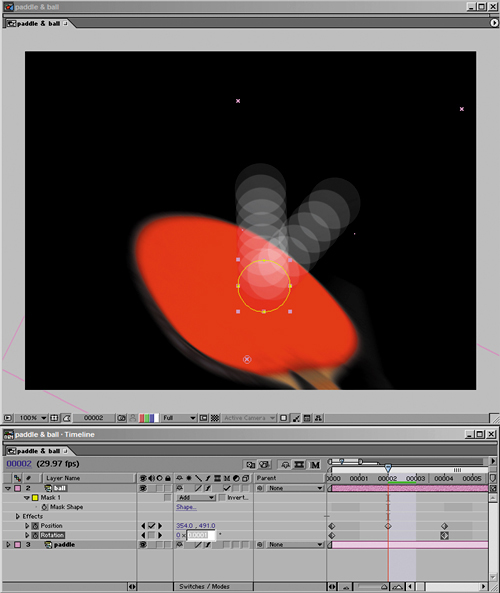
Figure 2.30a and b. These two images should look the same, but you have to force After Effects into getting the result in 2.30b by adding a slight bit of rotation. The other key is setting the Shutter Phase to –50% of the Shutter Angle, which causes the motion blur to be sampled right at the middle of the motion.
After Effects has the advantage of being quite flexible when working with time. Ordinary video applications are quite rigid about locking you down to a single frame rate, and they're rather stilted about how they let you retime footage or mix and match speeds and timing.
After Effects offers quite a few options; it's mostly a question of choosing the right approach for the given situation. Because it's not always obvious how to handle situations in which source footage needs retiming, it's worth looking at the overall approach to time in After Effects and the ways in which timing can be edited, highlighting which are useful and for what situations.
The thing to understand about how After Effects thinks about time is that, internally, it thinks in absolute terms, in seconds (not in frames that change in absolute time according to how many of them there are per second). If it were instead calculating time as number of frames total, or frames per second, it would have difficulty if you were to change the frame rate, but actually, at the deepest level, it doesn't care what the frame rate is; After Effects lets you worry about that, while it continues to think in terms of total time measured in seconds.
What does that mean? In real terms, it means that you can change the frame rate of any comp on the fly and the keyframes and other timing information will stay the same in seconds: The timing will not change even though the frames play back at a faster (or slower) rate. The keyframes won't even be nudged to the nearest frame; they will rest between frames, if necessary, to hold the same position in seconds. You can't place them between frames manually, mind you; it only occurs in service to absolute time (Figure 2.31).
Figure 2.31. This composition was changed from 29.97 fps to 24 fps. All frames following the first one now fall in between whole frames, and After Effects averages the data accordingly.
The same goes for footage (or a composition) that comes into a composition with an alternate frame rate; After Effects simply looks for the current frame in absolute time, whether it started at the same exact moment in time or not.
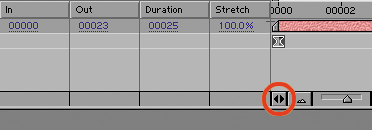
Sometimes you need to change the duration and speed of an incoming clip or subcomp; perhaps you need it longer and slower to cover the duration of the shot, or maybe it must be shorter and run faster to complete sooner. Your solution in both situations is the Time Stretch feature, provided you don't need the frame rate to change in the course of the shot (in which case only Time Remapping will do).
There are several ways to activate stretch, depending on how you want to set it up. Click on that little double-sided arrow along the bottom, between the columns and the Zoom slider (Figure 2.32). This reveals four columns that show the four basic ways you can set Time Stretch for a layer. You can stretch by
Setting a different In or Out point: Ctrl+Shift+comma (Cmd+Shift+comma) stretches the In point to the current frame, Ctrl+Alt+comma (Cmd+Option+comma) stretches the Out point to the current time
Changing the duration of the layer
Changing the stretch value from 100% to an alternate value
Click on the Duration or Stretch value to bring up the Time Stretch dialog (Figure 2.33).
Figure 2.33. You can set an alternate Duration or Stretch Factor in the Time Stretch dialog. Here you can also specify the pivot point for the stretch by choosing whether the In point, Out point, or current time is held in place.
Note that stretching a layer does not cause any keyframes applied to that layer to stretch as well; you can highlight a set of keyframes and Alt/Option-drag on the keyframe at one end of the set to stretch keyframes as needed, or you can pre-compose the clip prior to time stretching, guaranteeing that all of the animation stays lined up.
There is, of course, a downside to lengthening a source clip (and to a lesser extent, to shortening it); frames repeat or skip, and unless the stretch value is an even multiplication or a division of 100% (say, 50% or 200%), the repeating or skipping occurs in irregular increments, potentially causing a herky-jerky motion.
When Frame Blending Won't Do
When it's critical to retain as much detail and accuracy in your footage as possible but frame blending is causing its trademark blurriness, you may want to consider another plug-in: Twixtor from RE: Vision Effects.
This plug-in transcends frame blending, sampling adjacent frames to realistically synthesize new ones by warping and extrapolating frames from the original sequence. Rather than simply blending adjacent frames, Twixtor tracks and calculates motion for each individual pixel. For a demo version, go to www.revisionfx.com.
Enable Frame Blending for the layer and the composition, and After Effects averages the frames together. This works not only on layers with time stretching but with any footage that comes in at a frame rate other than that of the composition.
There's only one problem: To say that After Effects “averages” adjoining frames to create the Frame Blending effect is really too generous; it actually just overlays them, making them appear blurrier than at 100%. Although, at Best quality, After Effects averages as many as five adjacent frames in each direction, it's not enough to prevent a disconcerting variation between blurry and sharp images at irregular frame rates.
So, use this feature only in cases where it doesn't count for much; where the element itself will help conceal the trick. For example, use it for something already soft in appearance, such as smoke or clouds.
You can reverse the timing of a layer with a simple shortcut: Highlight the layer, and press Ctrl+Alt+R (Cmd+Option+R) to set the Stretch value to –100%. The layer takes on a stripy appearance to remind you that its time has been set in reverse motion (Figure 2.34).
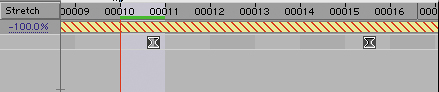
Figure 2.34. The candy-striping is a clear indication that the Stretch value is negative. Keyframes no longer align with the beginning of the frame, a potential gotcha if you're adding animation.
There are some bizarre side effects of doing this, however, which may lead you to prefer using Time Remapping to achieve this effect (more on this soon) or to drop the time-reversed clip into a composition of its own. The first thing you notice is that the layer jumps in time, so that the layer now begins where the last frame had been. Moreover, everything to do with that layer is reversed: the In and Out shortcuts are inverted, keyframes appear at the end of each frame, making them look offset from the time needle, and moving forward in time in the Layer window moves you backward in the composition.
If you apply Time Stretch (or Time Remapping) to a composition, After Effects, by default, goes back to that composition's animation and recalculates its frame rate, slicing any keyframe animations to fit the new rate instead of adhering to the old one.
Be aware, therefore, that the frame values on any given frame will be different unless the underlying time values match. After Effects does not round off to the nearest whole frame; again, it looks at where the animation is in absolute time, even if that means it's between frames in the subcomposition.
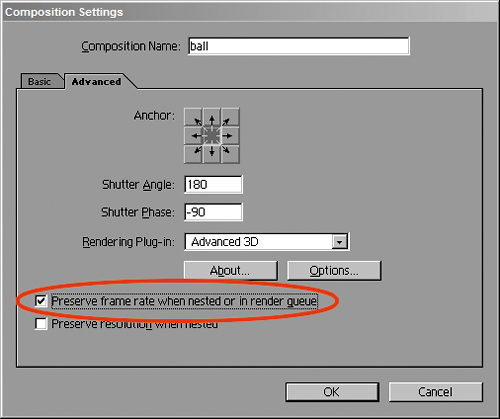
You can override this behavior and force After Effects to round off, however. On the Advanced tab of the Composition Settings window of the nested comp, toggle on Preserve Frame Rate When Nested or in Render Queue (Figure 2.35) to force After Effects to look at only whole frame increments in the underlying composition. This would be a way to show footage at a film frame rate (24 fps) in a composition designed for NTSC television (29.97 fps). You may never need this feature, but knowing it's there and how After Effects otherwise handles pre-composed animations is helpful.
You can do away with the Time Stretch feature set altogether if you are comfortable working with Time Remapping instead. This feature may require a bit of work to wrap your head around, but once you understand it, it has fewer pitfalls than with Time Stretch.
The philosophy behind Time Remapping is elusively simple: Time has a value, just like any other property, which means you can keyframe it, ease in and out of it, loop and ping-pong it, and do all of the other things you can do with any other keyframe data.
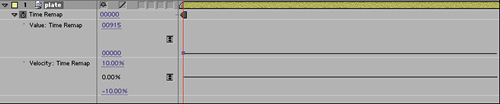
Figures 2.36a, b, and c show sample timelines that contain typical uses for Time Remapping in an effects situation. The presumption is that you're not going completely nuts rolling footage back and forth, ramping the frame rate up and down, although you can; I'm just considering the deep exploration of this ability to be off-limits for realistic effects work.
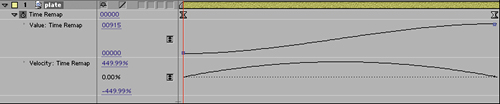
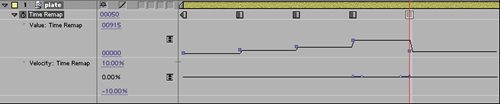

Figure 2.36a, b, and c. Simple, everyday things you can do with Time Remapping: speed up the source with eases (shown in 2.36a as Value and Velocity curves), progress through a series of stills selected from the moving clip using Hold keyframes (2.36b), and loop the source using a simple expression (2.36c).
Note
Beware that if you apply Time Remapping to a source layer that is longer than the composition in which you're applying it, there are two keyframes assigned every time you activate this feature, and the second one hides somewhere off the end of the timeline. Set a new keyframe at the (visible) end of the composition, click the Time Remap property title to highlight all three keyframes, Shift-click the first two to deselect them, and then press Delete to get rid of that hidden final one.
You can set Time Remapping by selecting it under the Layer menu or using the shortcut (Ctrl+Alt+T/Cmd+Option+T). This sets and reveals two keyframes at the beginning and end of the layer (not the In and Out points, if they've been edited).
If you've set different In or Out points from the default to the layer being time remapped, then a logical first step is to set Time Remapping keyframes at the In and Out points, then delete the default ones.
Time remapped layers have a potentially infinite duration. When you apply time remapping to a layer whose duration is shorter than that of the composition, the layer automatically becomes the duration of the comp, filling the extra frames by holding on the final time remapped keyframe value.
Believe it or not, the simplest way to create a still in After Effects from a moving image clip is to set Time Remapping to that clip with just a single keyframe (Figure 2.37). The value of that keyframe is the time at which the desired frame appears in the source clip. It doesn't even matter where on the timeline the one keyframe appears, as long as it is the only one applied.
To reverse a clip using Time Remapping, highlight all keyframes by clicking on the Time Remap property name. Next, context-click one of the highlighted keyframes, and select Keyframe Assistant > Time-Reverse Keyframes.
Time remapping can take awhile to get used to in complex situations, but because this book is concerned more with simulating realism than with stylized artistry, I'll use Time Remapping mostly for eases, holds, loops (discussed in Chapter 10), and the occasional time reversal. If you find yourself in deeper, the same principles apply; you just have to track them more closely.
This chapter aimed to unlock some of the elegance and logic behind the After Effects timeline. Not everything is straightforward to the first-time user, but lots of shortcuts can help you around what might initially seem to be tedious or exacting edits.
If the information seems overwhelming, remember that most of the advice is tied to specific situations in which it may come in handy. Don't try to memorize every shortcut or tip, but do keep the working scenarios in mind. You then can refer back to the related advice as needed, when those circumstances present themselves.