Hour 12 Managing Disk Quotas

There’s an old joke in the system administration world that there are two different types of sysadmins: those that are happy when their users are happy, and those that are happy when they don’t have any users. Without going into this too much, it’s worth pointing out that happy users lead directly to an environment where you’re successful and have the ability to plan and organize, rather than reactively fight fires everyday.
In that sense, we’re going to look at disk quotas and managing disk usage on a per-user basis in this hour. We have already looked at disk usage in Hour 3, ″Disk Usage,″ but that was focused on df and du, which are useful tools, but relatively primitive compared to the find power tool we’ll explore this hour.
In this hour you learn
• How to implement disk quotas
• Quota nuances on other Unixes
• How to create your own quota system with find
Implementing a Disk-Quota Policy
Earlier we talked about how disk space is so cheap that it’s probably easier to get an additional disk and hook it into your system, rather than complaining to users that they’re consuming too much disk space. You could even charge them a disk overuse tax and let them buy their own disks.
However, that’s not realistic and it’s very helpful to learn about tools that are built-in to the Unix system for managing and limiting disk usage. Even better, by having it integrated into the user environment, you free yourself from having to send nastygrams, e-mail messages to users that say they’re in trouble. (Rarely are they received with a positive glow!)
Disks can fill up, too, even big disks. Don’t believe me? Go look at how large movie trailer files are on sites such as www.sonypictures.com. If you have a user eagerly storing them on disk, you’ve got a problem brewing, and it could be a problem that pops up overnight without you even realizing anything is wrong! Not good.
To address these issues, there’s a disk-quota system built-in to just about every flavor of Unix. Essentially, the exact same disk-quota tools are available on Red Hat Linux, Mac OS X, and Solaris 8. This means that we’ll be able to explore one in depth, and have it apply to all three of these operating systems.
![]()
It turns out that enabling disk quotas on Mac OS X is quite a bit more tricky. We’ll talk about that in a little while.
Task 12.1: Implementing Quotas
The key commands for managing a disk-quota policy are edquota to define user (or group) quotas; quotacheck to ensure everything is configured properly; quotaon to enable quotas; and finally the user-level quota command to see how much space users have left in their quota allocation.
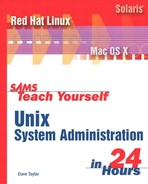
Let’s get started looking at Red Hat Linux 7.2. Our first stop is the /etc/fstab file used by mount.
1. Disk quotas need to be enabled on each physical disk or partition you want to manage. To do this you need to make a change in the /etc/fstab file and create two empty admin files at the topmost level of the disk for the system to track quota usage.
First off, to enable quotas by user, you’ll need to add usrquota to the list of mount options in the /etc/fstab file. For group-based quotas (that is, a configuration where all members of a group cannot collectively exceed a specific disk allocation) use grpquota, and, yes, you can specify both if you would like.
I have modified the mount entry for /disk2 because my intent is for this disk to be used for storing large media files like movies, MP3 music collections, tarballs, and so forth. Everyone will get a large quota, but I want to ensure that every user gets a fair shake at the disk space.
![]()
As a reminder, a tarball is a cute name for an archive of files, usually a program and its supplemental docs, stored in compressed tar format. See Hour 7, ″Large File Management and Backups,″ for more about this.
Note the addition of usrquota to the very last entry.
2. The next step is to create the two files: aquota.user and aquota.group.
![]()
Different versions of Unix differ on the name of these two files. Newer Unixes use aquota.*, whereas other flavors use quota.*. Check the man page for the final verdict on your installation.
These two files have to go at the root of the disk in question, so we’ll want to create them before we unmount and remount the disk.

3. Because /disk2 is already mounted to the system, I’ll need to either unmount it and mount it again, or reboot. I’ll try the former first because obviously it’s considerably less disruptive!
% umount /disk
umount: /disk2: device is busy
Ugh! This is one of those errors that sysadmins don’t like very much. It means that there’s a process running that has a file or directory open on this disk.
If you encounter this, you can immediately step to rebooting, but there’s one more trick we can try first: wall. The wall command (think write-all) enables you to send a quick message to everyone who is logged in. I’ll use this to ask everyone to pull off of /disk2 for a few minutes.
# wall
I′m trying to reconfigure /disk2 so if you are using this disk,
please back away and go back to your home directory for five.
Thanks. If this doesn′t work, I′ll need to reboot! :-)
#
To end my input, I used Ctrl+D. Here’s what users see on their screens:
Broadcast message from root (pts/2) Fri Feb 22 10:14:18 2002…
I′m trying to reconfigure /disk2 so if you are using this disk,
please back away and go back to your home directory for five.
Thanks. If this doesn′t work, I′ll need to reboot! :-)
Sixty seconds later we try the umount command again and succeed! (If that hadn’t succeeded, fuser can be a real blessing—it shows what files are open by what processes on a given file system. Check the man page for details.)
Ah, users can be nice folk sometimes!
# umount /disk2
# mount /disk2
#
4. The next step is to run quotacheck to ensure that everything is configured properly. You can specify a disk, but it’s easier to just use the -a flag to have quotacheck check all the disk quotas at once:
# quotacheck -a
quotacheck: WARNING - Quotafile /disk2/aquota.user was probably truncated.
Can′t save quota settings…
#
This isn’t as dire as it seems; all it’s saying is that we need to add at least one user quota. This is done with edquota, and to start, let’s give user taylor a quota.
# edquota -u taylor
If you get an immediate error message that there are no disk systems with quotas, your best bet is to double-check that you modified /etc/fstab appropriately, then reboot. Once everything is settled, the system pops up a vi editor with the following information within:
![]()
You can see that this user has no disk quota, though he’s using 1578 blocks of disk space and consuming two inodes. You can also see that you can specify quota by disk blocks (1K each) or by the number of inodes (essentially, the number of files) the user can create. Usually, you’ll specify both.
![]()
There are two types of quotas available. Users that exceed their soft limit have warnings generated by the file system as they proceed, but they can continue to work. The hard limit, however, often stops them in their tracks, rejecting any attempts to write to the disk. Always set your soft limit significantly lower than your hard limit to avoid frustrated users.
User taylor isn’t too bad a disk hog, so we’ll give him relatively generous disk quotas by editing the values shown:
![]()
Quit the editor and the quota values are saved.
If you want to copy one user’s quota limits to another user, specify the -p proto-type-user flag to the edquota command. To copy taylor’s quota to user sangeeth, for example, you’d use edquota -p taylor sangeeth. Or, of course, you can automate the whole shebang with a quick shell script.
5. One more step: We need to enable the quota system with quotaon. For this, I prefer to use -a, -g, -u, and -v, which are all quotas turned on, verbose output, group and user quotas checked, respectively. To do this once, we can simply type it in:
# quotaon -aguv
/dev/hdb [/disk2]: user quotas turned on
5. Now when user taylor types quota, he’ll see

On systems with quotas in place, it’s often a good idea to add the quota command to the user’s .login or .bash_profile files.
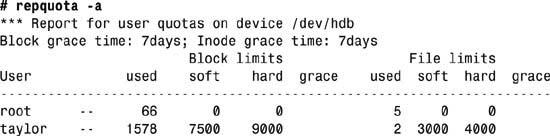
6. From an administrative point of view, you can use repquota to generate an attractive output report:
7. The only issue we haven’t touched on is how to automatically turn on quotas at boot-time, so you don’t have to remember quotaon each time you restart the system.
We’re jumping ahead of ourselves a little bit (the sequence of files read during bootup is covered in the next few hours) but in a nutshell, if the quota enabling code isn’t already therein, you’ll want to append the following lines to your /etc/rc.local file:
echo ″Checking quotas. This may take a moment or two…″
/sbin/quotacheck -aguv
if [ $? -eq 0 ] ; then
echo ″Turning on disk quotas.″
/sbin/quotaon -aguv
else
echo ″*** Did not turn on disk quotas due to quotacheck errors.″
fi
This checks the quota files for a valid format, then, if all is well (the return code, tested as $?, is equal to zero) turns on the quota-management system. Otherwise, an error is output.
Many Unix system administrators eschew disk quotas, preferring either to ignore the problem or assume that users will manage their own disk space properly. This might be true in some environments, but setting big disk quotas once and forgetting them can be a much more graceful solution. If no one ever emerges as a disk hog, you’ll forget the disk quotas are even there. But, if someone starts expanding their file system usage the system will automatically flag it and help avoid bigger problems.
Quota Nuances on Other Unixes
Although the basics of turning on disk quotas are the same in just about all modern Unix operating systems, there are nuances with Solaris 8 that are worth examining briefly.
![]()
Setting up disk quotas from the Unix level of Mac OS X is quite tricky—too tricky to explore in this book. The basic challenge is that disks other than root are mounted by autodiskmounter, so enabling quotas is quite difficult. After you do that, the standard quota commands are available, as man -k will confirm. Hopefully, as OS X matures it’ll become easier to enable quotas, too. If you really want to pursue this, start by reading the quotaon man page.
Task 12.2: Quotas on Other Systems
The best way to learn about the nuances of implementing quotas on your particular version of Unix is, of course, to read the man pages for the quota commands.
1. Let’s start there, on a Solaris system:
# man -k quota
edquota edquota (1m) - edit user quotas for ufs file system
quota quota (1m) - display a user′s ufs file system disk quota
![]() and usage
and usage
quotacheck quotacheck (1m) - ufs file system quota consistency checker
quotactl quotactl (7i) - manipulate disk quotas
quotaoff quotaon (1m) - turn ufs file system quotas on and off
quotaon quotaon (1m) - turn ufs file system quotas on and off
repquota repquota (1m) - summarize quotas for a ufs file system
rquotad rquotad (1m) - remote quota server
The commands certainly look familiar, don’t they?
![]()
Actually, one command shown here and worth knowing is rquotad, which enables you to use quotas on a shared NFS (network file system) disk.
The Solaris version of quota only reports disks where the users are over their soft limit, so they should probably get into the habit of using the -v flag, which reports their status on all disks with quotas enabled, over limit or not. Alternatively, you could make it a system-wide shell alias.
2. The first change we need to make is to edit /etc/vfstab (notice that it’s not fstab, but vfstab) to add rq to the list of mount-time options. Then, instead of creating quota.user and quota.group, simply create a single file quotas:
# cd /export/home
# touch quotas ; chmod 600 quotas
Now, unmount the disk and remount it; then use edquota to set up a quota for a user. The edquota command is essentially the same, even though the actual layout of the information presented in the editor is slightly different.
3. Next, ensure all is set up properly with quotacheck. The Solaris version of quotacheck differs in what flags it understands. To get the equivalent of the -aguv set in Linux, use -pva, which has the added benefit of checking quotas in parallel, which can be considerably faster!
# quotacheck -pva
*** Checking quotas for /dev/rdsk/c0d0s7 (/export/home)
#
The repquota reports the status of users on a device with quotas enabled:

4. Here’s what user taylor would see on a Solaris box by using quota:
$ /usr/sbin/quota
$
Remember, without the -v flag it only reports systems where the user is over quota. One more try:

Many system administration books counsel you not to bother with disk quotas because they’re obsolete or no one really uses them. I disagree. If you have a multiuser system, it’s in everyone’s best interest to set high, but meaningful, disk quotas to ensure that the resources are shared fairly. If you set this up prior to assigning accounts, you’ll never have to argue with sore users afterward either!
Creating Your Own Quota System with find
Before we leave the topic of disk quotas, let’s look at how you can use the powerful find command to build your own simple disk quota system.
The basic idea is that you want to automatically scan all disks on your system for files owned by the specified user, sum up their sizes, and then compare the total size of all files against a set limit that you’ve defined.
Rather than have this as a set of daemons, however, we’ll just create a shell script, fquota, to do the work for us.
Task 12.3: Disk Quotas with find
There are a small number of commands that I find myself using over and over again as a system administrator, and find definitely makes the short list. Whether you’re looking to ensure that there are no setuid root programs, trying to find where RPM stores its package data files, or even just helping a user find that long-lost letter to Aunt Hernia, find offers lots of power and capabilities. Indeed, spending 30 minutes reading the man page and trying out different find options is time very well spent!
![]()
setuid root programs are programs that run as if they were root. These are very dangerous security holes, and therefore, you should always be aware of what programs on your system are setuid root. You can check by looking for a file permission s in an ls -l output, coupled with an ownership of root. We’ll talk about this again in Hour 21, ″Shell Scripting: The Administrator’s Swiss Army Knife.″
1. Here’s a typical use of find, to output the equivalent ls string for each regular file owned by user taylor below the specified point on the file tree:
# find /disk2 -user taylor -type f -ls
12 789 -rw-r--r-- 1 taylor root 802068 Feb 22 10:53 /disk2/
![]() vmlinuz
vmlinuz
15 789 -rw-r--r-- 1 taylor root 802068 Feb 22 10:53 /disk2/
![]() vmlinuz-2.4.7-10
vmlinuz-2.4.7-10
#
Only two files match these criteria on /disk2.
2. I’ll cast my net wider by looking across the entire file system, but because I know there are going to be lots of files, I’ll just count lines the first time through:
# find / -user taylor -type f -ls | wc -l
686
To sum up the sizes of all files is a good job for awk or perl: I’ll opt for awk because it’s available on older Unix systems, too. The task we want is to have a script that extracts the seventh field of each line, then sums them all up and outputs the result. This can be done in awk with the succinct program
{sum += $7} END { print sum }
(the END tag denotes a block of instructions that is only run after all the lines have been read in).
# find / -user taylor -type f -ls |
awk ′{ sum += $7 } END { print sum }′
27869349
Let’s see; that’s in bytes, so dividing by 1024×1024 will reveal that this is 26 megabytes. Not too much disk space at all, even though the number certainly looks huge!
Of course, awk can do this math, too:
# find / -user taylor -type f -ls |
awk ′{ sum += $7 } END { print sum / (1024*1024) }′
26.5783
3. This suggests our simple disk-quota script—for each user account, sum up their disk usage and report if it’s greater than MAXDISKUSAGE, a variable we’ll set in the script. For the first version, however, let’s just figure out everyone’s disk usage:
#!/bin/sh
# FQUOTA - Disk quota analysis tool for Unix.
# Assumes that all user accounts are >= UID 100.
MAXDISKUSAGE=20 # 20MB is our soft quota
for name in ′cut -d: -f1,3 /etc/passwd | awk -F: ′$2 > 99 {print $1 }′′
do
echo -n ″User $name exceeds disk quota. Disk usage is: ″
find / /usr /var /home -user $name -xdev -type f -ls |
awk ′{ sum += $7 } END { print sum / (1024*1024) ″ Mbytes″ }′
done
exit 0
There are a couple of things worth mentioning about the script here. First off, the for loop is being fed a list of usernames whose UIDs are 100 or greater, to screen out system accounts. This is done with a more sophisticated expression to awk, as you can see. Then, the find we’re constraining to the file systems we’re interested in checking, and using -xdev to ensure that it doesn’t check uninteresting systems.
The output of this version of fquota is
# fquota
User mthorne exceeds disk quota. Disk usage is: 0.0558786 Mbytes
User mdella exceeds disk quota. Disk usage is: 0.700355 Mbytes
User taylor exceeds disk quota. Disk usage is: 26.5783 Mbytes
User testdude exceeds disk quota. Disk usage is: 0.554475 Mbytes
4. Adding the final step of only listing those users whose disk usage exceeds the MAXDISKUSAGE quota is accomplished by wrapping the entire for loop in subshell parentheses, then feeding the output, again, to awk for filtering:
#!/bin/sh
# FQUOTA - Disk quota analysis tool for Unix.
# Assumes that all user accounts are >= UID 100.
MAXDISKUSAGE=20
( for name in ′cut -d: -f1,3 /etc/passwd | awk -F: ′$2 > 99 { print $1 }′′
do
echo -n ″User $name exceeds disk quota. Disk usage is: ″
find / /usr /var /home -user $name -xdev -type f -ls |
awk ′{ sum += $7 } END { print sum / (1024*1024) ″ Mbytes″ }′
done ) | awk ″$9 > $MAXDISKUSAGE { print $0 }″
exit 0
When this version of the program is run, it correctly reports which users are over the allocated disk quota, across the entire file system:
# fquota
User taylor exceeds disk quota. Disk usage is: 26.5783 Mbytes
A little bit more work and this could automatically e-mail the user with a gentle reminder to compress or delete some files, and free up the disk space for others to use.
5. Now what about getting this Linux script to work on Mac OS X? Surprisingly little has to change. We just need to omit -xdev, which isn’t understood by the Apple version of find. Of course, there are a few more files to consider:
# find / -user taylor -ls | wc -l
87308
The main wrinkle is that users need to be extracted from the NetInfo database, not /etc/passwd, so we’ll need to use nireport, as discussed extensively back in Hour 5, ″Working with User Accounts.″
Put all this together, and the modified script looks like this:
#!/bin/sh
# FQUOTA - Disk quota analysis tool for Unix.
# Assumes that all user accounts are >= UID 100.
MAXDISKUSAGE=20
( for name in ′nireport . /users name uid | awk ′$2 > 99 { print $1 }′′
do
echo -n ″User $name exceeds disk quota. Disk usage is: ″
find / -user $name -xdev -type f -ls |
awk ′{ sum += $7 } END { print sum / (1024*1024) ″ Mbytes″ }′
done ) | awk ″$9 > $MAXDISKUSAGE { print $0 }″
exit 0
The output is fun:
# fquota
User taylor exceeds disk quota. Disk usage is: 17162.5 Mbytes
That taylor guy is using a ton of disk space!! I’ll have to talk with him!
It’s not particularly difficult to write a simple quota-management system in Unix. After all, with hundreds of different utilities ready to pull into action, there’s not much you can’t cobble together, frankly!
However, if your system has a built-in quota system, there are advantages to having the file system itself enforce quota limits, particularly if you have any concern about runaway users who might go bananas over a weekend downloading MP3s and filling up a disk completely.
Summary
This hour has explored the concept of disk quotas and the difference between using built-in tools, and using system tools that are part of the file system. There are pluses and minuses for each of the solutions, and there are, of course, potential problems lurking if you ignore disk quotas and run out of disk space. As with many administrative issues, there are no simple answers.
Q&A
Q Aren’t quotas a bad thing? I mean, didn’t the U.S. Supreme Court vote that quotas were in violation of the U.S. Constitution?
A Um, you might well have too much time on your hands, even with this accelerated 24-hour format. The U.S. Supreme Court did overrule quotas, most notably in Regents of the University of California v. Bakke, back in 1978, but, really, is this relevant?
Q Why are so many system admins against quotas?
A Somewhat tied to the previous question, and certainly related to the anarchistic strain of the hacker community, many sysadmins do speak out strongly against quotas or any other artificially imposed constraints on usage. However, even with disk space a dime a megabyte, it simply cannot be that everyone can use as much space as they want. There must be some constraints, and if that’s the case, quotas are a reasonably elegant, and certainly an egalitarian solution.
Q Are disk quota systems used on Windows?
A Yes. You can get disk quota management systems for just about any flavor of Windows available. Shareware repository Download.com has nine, including Northern.Net’s slick Quota Server (but beware, it’s $900).
Workshop
Quiz
1. What’s the difference between a hard and soft quota limit?
2. What is the first step before enabling a disk quota?
3. A major limitation of quotas that are built-in to the system is….
4. What’s the purpose of the wall command?
5. Where is a recommended location for adding a call to the quota command?
Answers
1. A soft limit is the maximum amount of disk space users can consume without any warnings. When they exceed their soft limit, the system complains but lets them continue. A hard limit is an inviolable constraint and the system will reject user attempts to add new files or even enlarge files.
2. The first step is to edit the /etc/fstab (or vfstab on Solaris) to enable quotas at mount time.
3. A major limitation is that the quota system doesn’t span multiple file systems, so although it’s possible to limit users to a specific amount of space per device, there’s no built-in mechanism to limit overall disk usage.
4. The wall command lets you send an instant message to every user logged in at that moment.
5. If you enable quotas, adding a call to quota (or quota -v, as necessary) in every user’s .login or .bash_profile is a very smart move.
In the next hour, we’ll switch gears and start looking at process and system controls. We’ll focus on starting up and shutting down Unix systems, including an extensive discussion of run levels and init states. It’s required reading for any system administrator!